How To Automate Login Page Using Selenium WebDriver
Faisal Khatri
Posted On: February 2, 2024
![]() 630524 Views
630524 Views
![]() 26 Min Read
26 Min Read
One of the crucial elements while creating a website is the login page. As a critical component, the login feature is pivotal in ensuring user security and overall website performance. Any glitches or problems with the login process can potentially compromise the user experience and the overall reliability of the entire website. Therefore, it is crucial to thoroughly test the login functionality to identify and address any potential issues.
While there are various methods available for testing, leveraging test automation frameworks like Selenium emerges as the optimal choice due to its ability to provide a robust and efficient way to automate the testing of login processes. By using Selenium, web developers can enhance the reliability and security of their website’s login feature.
In this Selenium Java tutorial, we will explore various mechanisms to automate login pages. Additionally, we will delve into the specifics to automate login pages with Selenium WebDriver on cloud-based platforms like LambdaTest to enhance the scope of Selenium automation testing further.
So, let’s get started!
TABLE OF CONTENTS
What is Selenium WebDriver?
Selenium WebDriver is an open-source suite of APIs for testing web applications by automating browser actions on different platforms. Its primary function is to ensure the proper functioning of web applications under various scenarios.
It helps testers write test automation scripts in multiple languages such as Java, JavaScript, Python, C#, and more, enhancing flexibility and integration with various testing frameworks.
Selenium WebDriver comprises three main components: Language Bindings, WebDriver API, and WebDriver Implementation. Featuring a user-friendly API, Selenium WebDriver enables browser management through code, ensuring ease of use. Its compatibility with different programming languages makes it adaptable to various testing frameworks and setups.
As a potent tool, Selenium WebDriver facilitates efficient testing across diverse browsers. It provides a programming interface for creating and executing test scripts, allowing testers to simulate user interactions with WebElements.
With the release of Selenium 4, Selenium WebDriver has undergone many enhancements, including the support for W3C protocol. To learn about WebDriver hierarchy, follow this blog on Selenium 4 WebDriver hierarchy. This guide provides an insightful view of the Selenium 4 WebDriver internal architecture and its different methods and interfaces.
In the next section of this tutorial on how to automate login pages using Selenium WebDriver, we will delve into the different authentication aspects that must be considered when conducting automation testing of a login page using Selenium.
Top Authentication Mechanisms
There are different mechanisms used for login purposes. Some of them are mentioned below:
- Password-based authentication
- Multi-factor authentication
- Token-based authentication
- Certificate-based authentication
The implementation of the login feature varies based on the type of authentication, with high-security websites often requiring diverse methods to ensure user identity. A notable addition to these methods is OAuth 2.0, designed to enable login pages or applications to access resources hosted by another application on behalf of a user.
Testing web applications encompasses various scenarios, one of the most critical being how to automate login page scenarios. Effective testing strategies for the login page are essential, as they directly impact the usability and security aspects of the entire website or application.
Properly assessing these aspects through comprehensive automation of login pages is crucial for ensuring the overall quality and reliability of the web application.
For automating login features with password authentication, specific requirements must be fulfilled before creating the test case, including a valid URL for the web application. Different steps are involved in handling various authentication methods.
- For password-based authentication, a combination of username and password has to be passed in the test script.
- For multi-factor authentication, different steps for handling the authentication. Once the user has entered the credentials in some web pages, it will prompt to respond to the push notification sent to the mobile. In such cases, we have to automate the notification handling steps.
- In OAuth authentication, we must provide various parameters like client ID, secret client ID, etc. Here, tests must be designed based on the authentication mechanism used in the web application.
Below are the key scenarios to cover while automating login pages using Selenium WebDriver.
- Test with different data combinations like upper case, special character, maximum and minimum length, and verify the error message in case of incorrect usage.
- Mask the password in the password field and verify the password by clicking the Show Password button.
- Verify if the password is stored in an encrypted form.
- Verify if the user can copy and paste the password.
- Verify two-way authentication (or 2FA) through email and mobile on highly secured websites.
- Verify if a logged-in user lands on the login page when the same URL is copied & pasted in a new browser window.
We have seen some high-level scenarios to be tested on the login page. In the next section of this tutorial on how to automate login pages using Selenium WebDriver, let us see how to implement and test the login functionality.
Automate login page using Selenium WebDriver over 3000+ environments. Try LambdaTest Now!
In the next section of this tutorial on how to automate login pages using Selenium WebDriver, we will delve into various test scenarios to validate and verify the login functionality.
Automating the Login page
To begin with, automating the login mechanisms, we first need to specify the driver’s path and then instantiate the appropriate browser for that driver. Then, depending on our browser choice, we can instantiate the drivers.
With Selenium’s 4.11.0 and above, we don’t need to set the driver executable path in the code as it is internally handled by Selenium Manager. Selenium Manager searches, downloads, and installs the required driver executable as per the browser installed. Hence, we need to add the following line of code to start the different browsers.
Chrome:
|
1 |
WebDriver driver = new ChromeDriver(); |
Firefox:
|
1 |
WebDriver driver = new FirefoxDriver(); |
Edge:
|
1 |
WebDriver driver = new EdgeDriver(); |
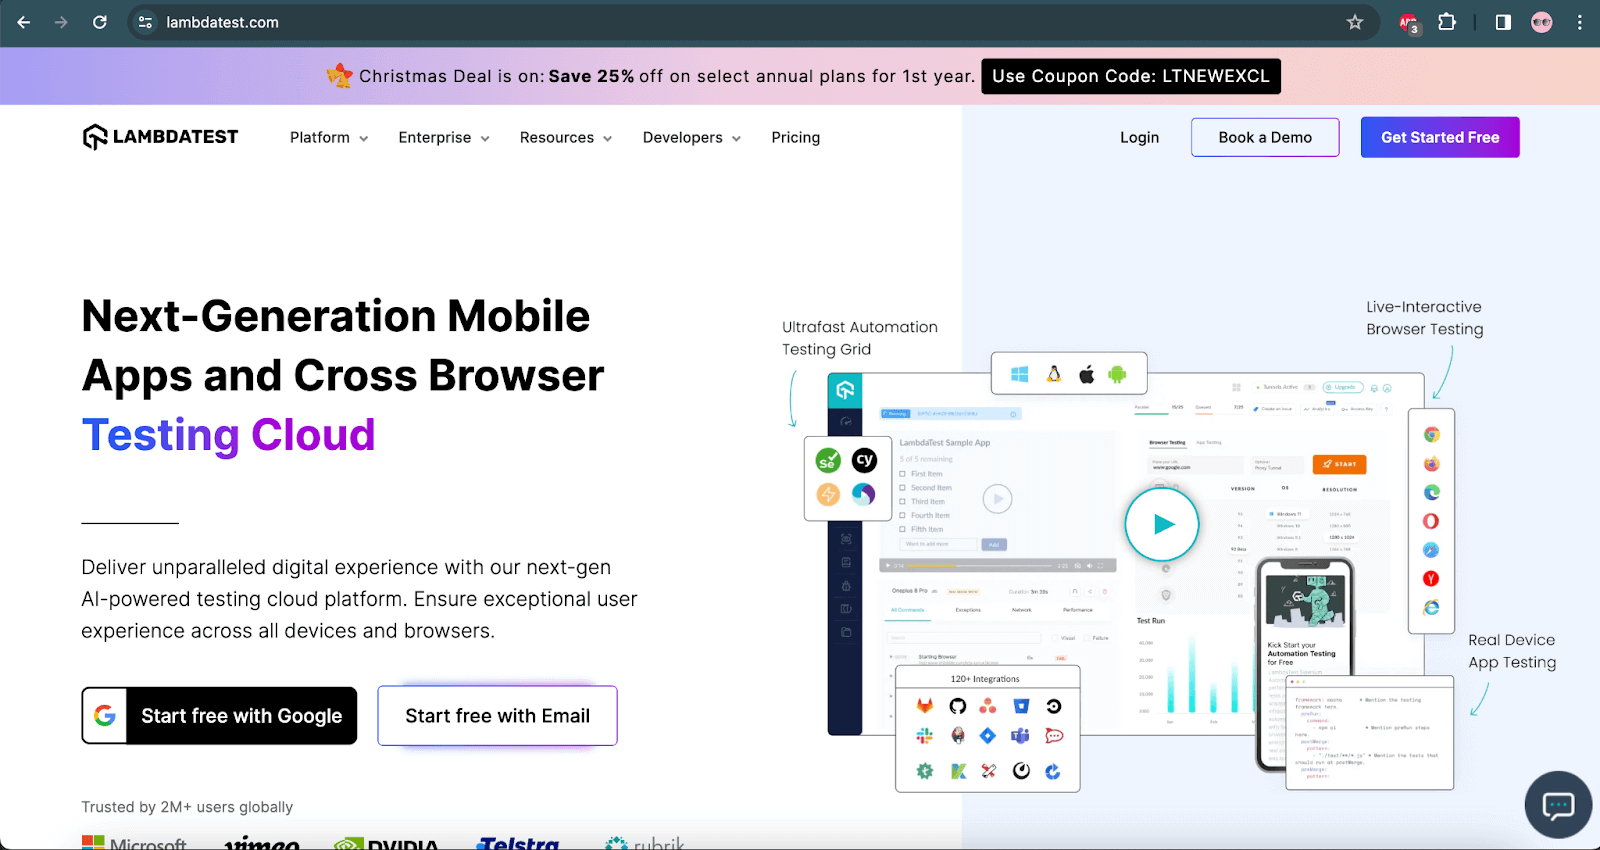
Consider the below scenario to automate the login functionality of the LambdaTest website.
Test Scenario:
|
To implement the test scenario, we must first identify WebElements for all the web browser activities.
- We must identify the WebElement for the Login link.
- We must identify the WebElement for email.
- We must identify the WebElement for the password.
- We must identify the WebElement for the LOGIN button.
Element Identification:
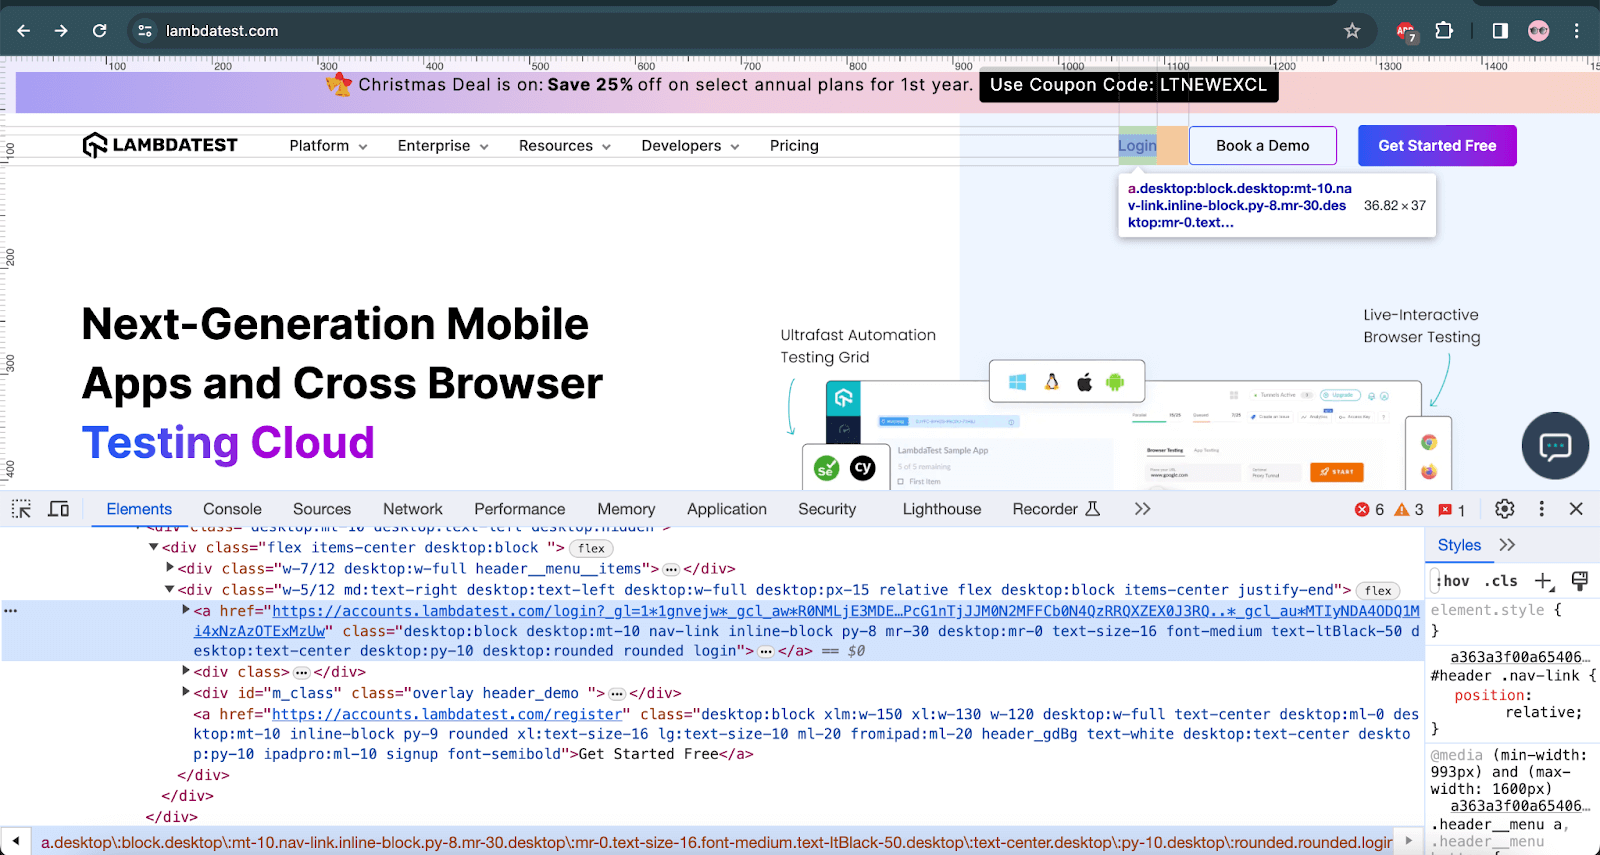
Step 1: Visit the LambdaTest website.
Step 2: To identify the first element from the list above, right-click on the element and select Inspect.
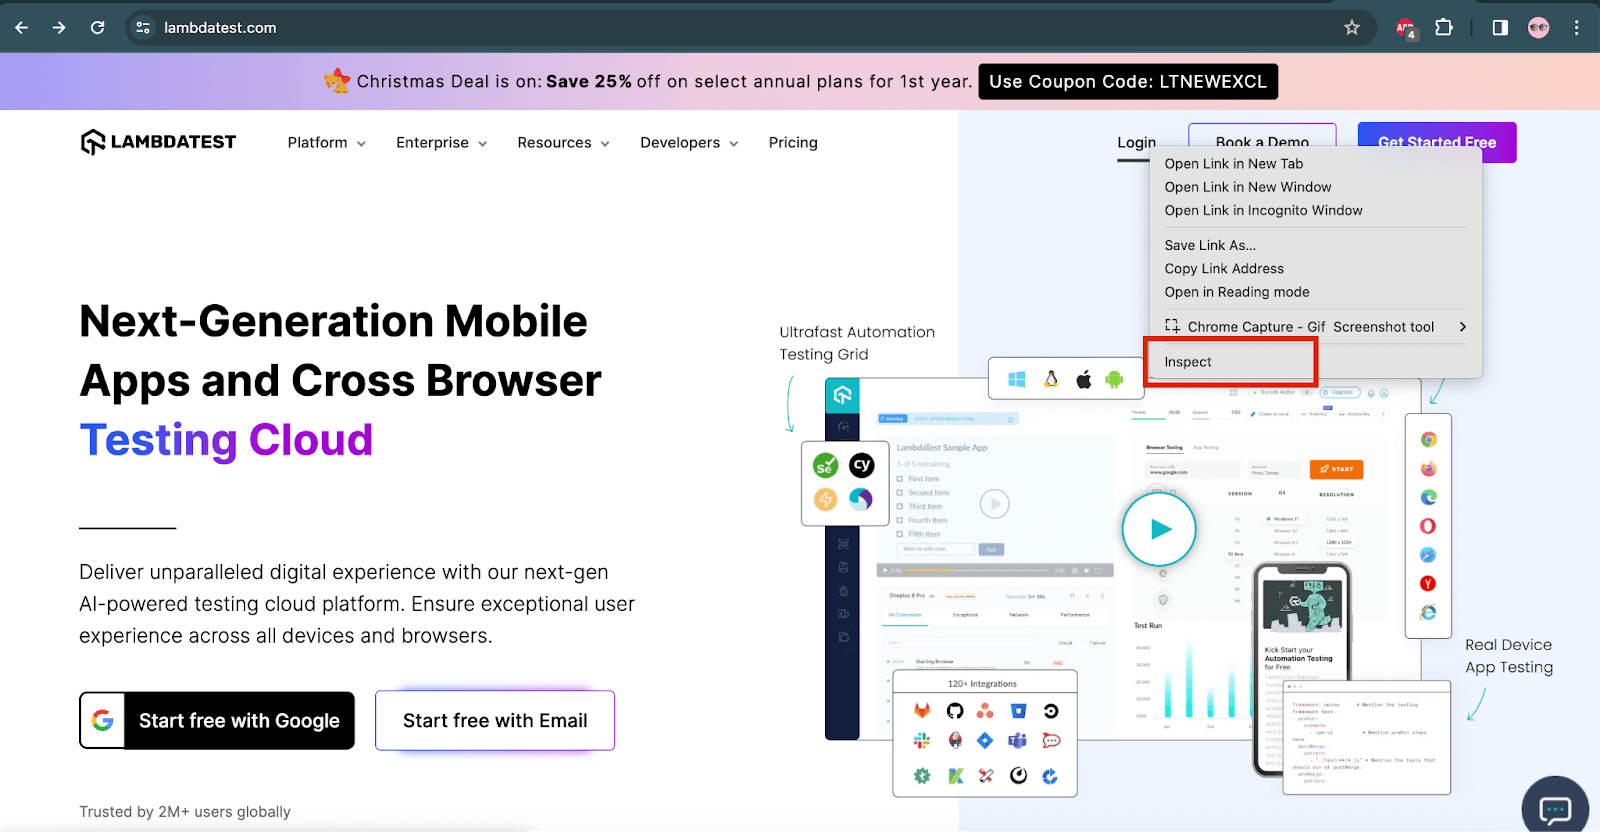
Step 3: Upon clicking Inspect, you can see the attributes displayed for the WebElement in the Elements tab.
Eight locator strategies can be used to locate the elements while working with Selenium WebDriver. They are.
To gain a more in-depth understanding of various locators used in Selenium, refer to this Selenium locators cheat sheet offering detailed insights into the various locators and their usage in Selenium.
Step 4: To locate the login link on the webpage, utilize the LinkText locator and execute a click() action on that element.
|
1 2 |
WebElement login = driver.findElement(By.LinkText(“Login”); login.click(); |
Step 5: Users must enter valid credentials in the Email and Password text boxes after navigating to the login page.
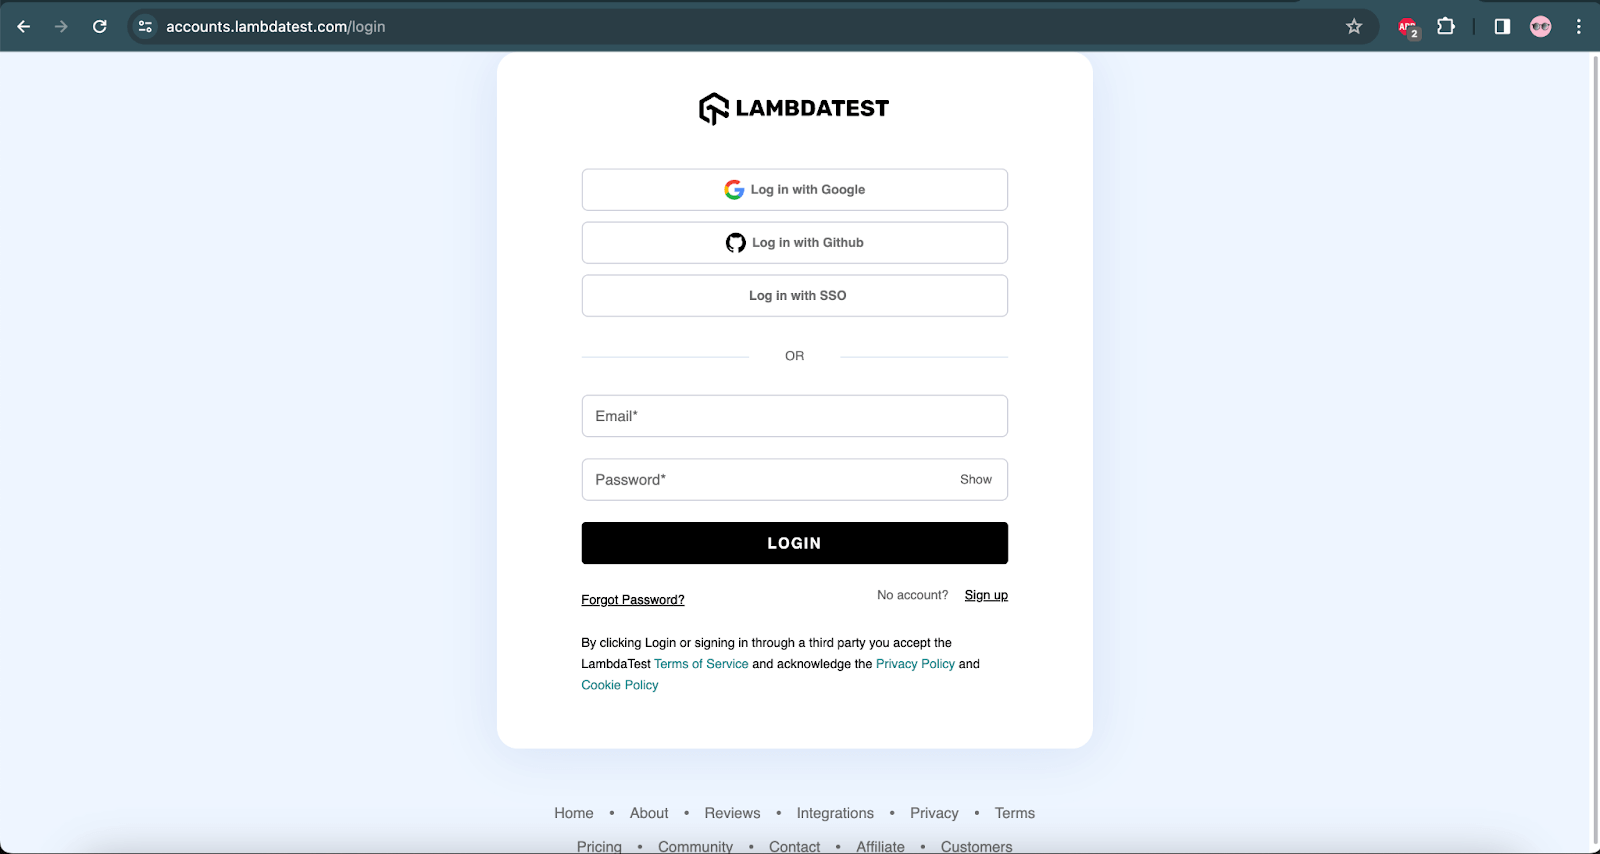
Step 6: Other login options are available on this webpage, such as Log in with Google and Log in with GitHub. However, in this tutorial, we will focus on Log in with Google.
Step 7: Upon clicking this, you will be asked to log in through your Gmail account.
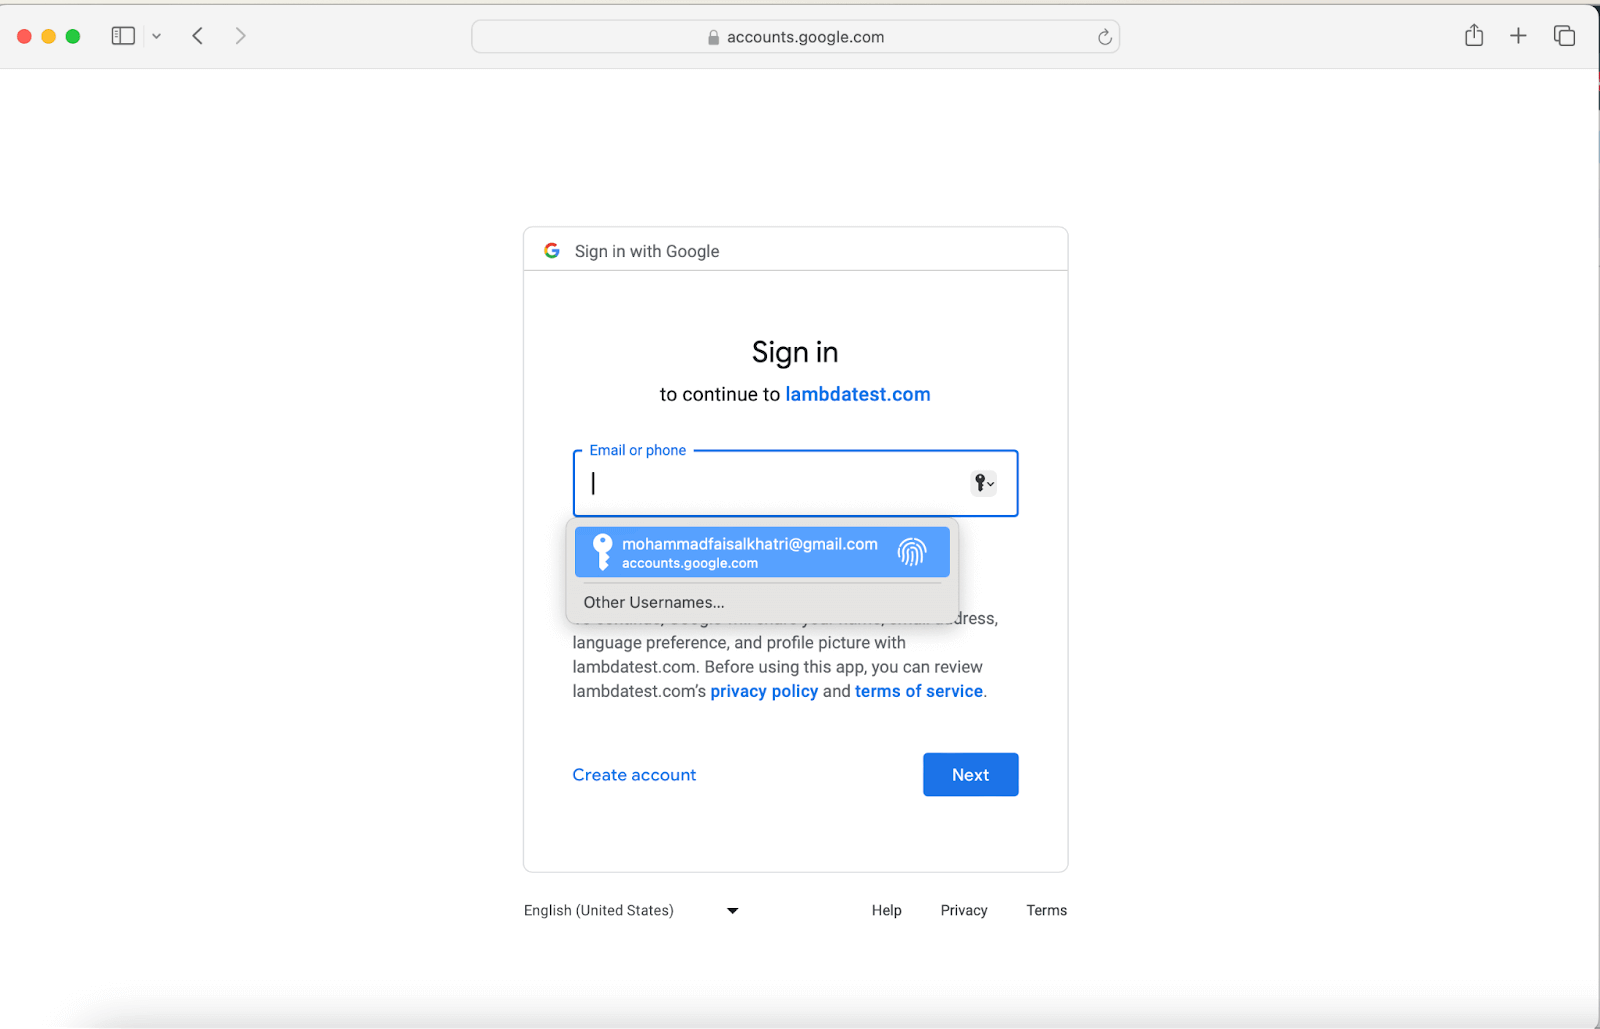
You must provide your email and password if you don’t have an existing account. A notification will then be sent to your mobile device since it’s the first time you’re signing in through this device. Let’s proceed with the standard login using your email and password.
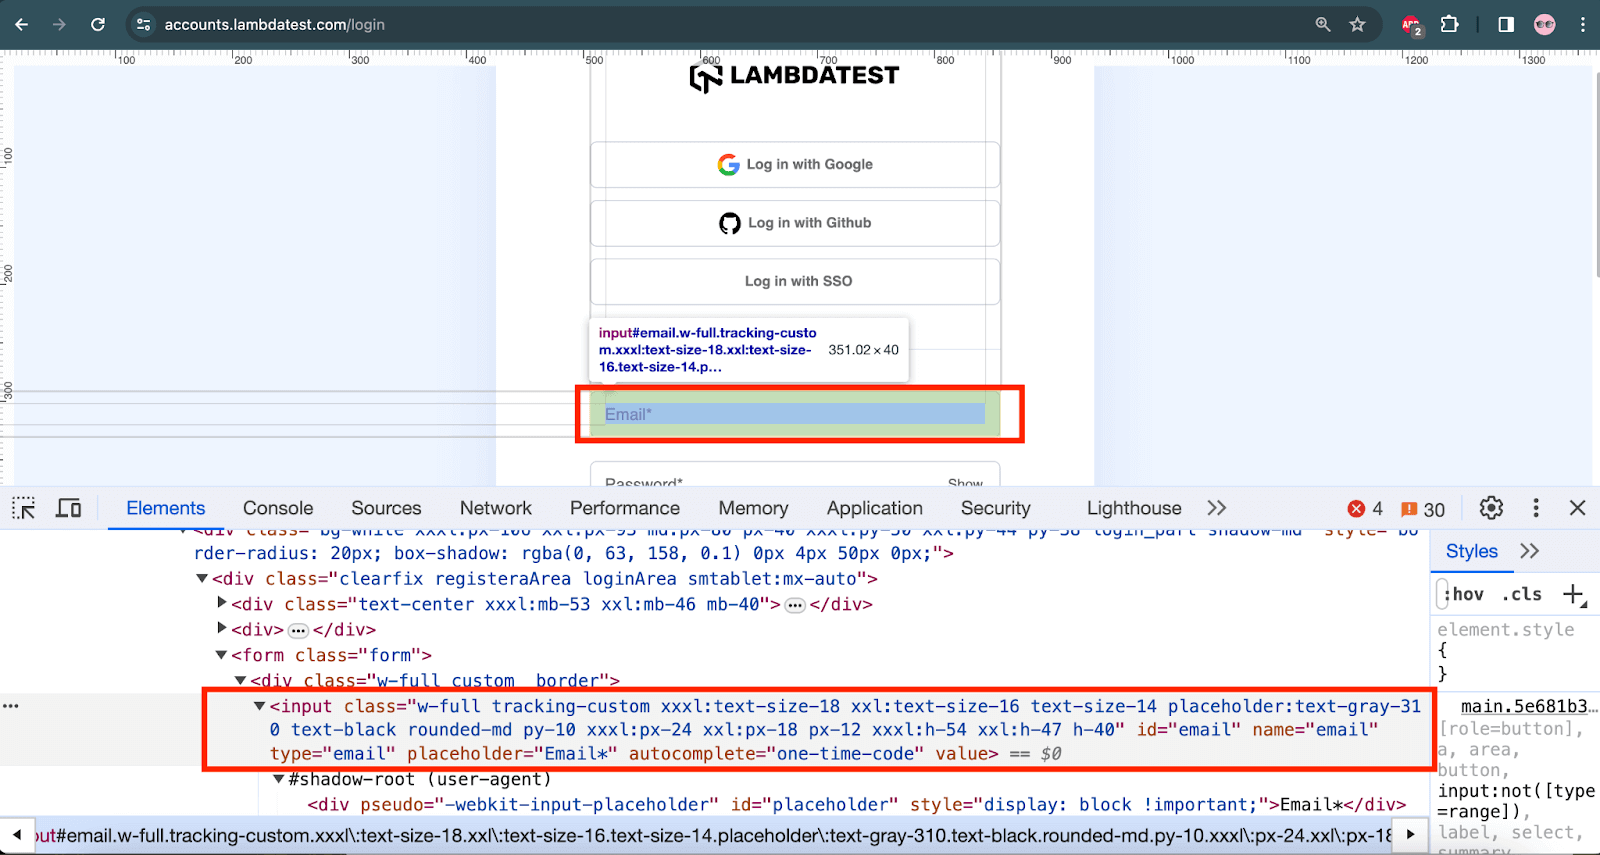
Step 8: To identify the WebElement for the Email text box, right-click on the Email text box and choose Inspect. You can use attributes like ID, Name, ClassName, or XPath.
Here are various locator strategies you can use to identify the same WebElement in different ways:
ID:
|
1 |
driver.findElement(By.id(“email”)); |
Name:
|
1 |
driver.findElement(By.name(“email”)); |
className:
|
1 |
driver.findElement(By.className(“(//input[@class=’form-control’])[1])”); |
XPath:
|
1 |
driver.findElement(By.xpath(//@id=”email”)); |
After identifying the WebElements, use the sendKeys() method to type the email address into the Email text box. As a best practice in Selenium test automation, use the clear() method before entering values to ensure the text fields are empty and ready for new input.
Below is the illustration of the code snippet using sendKeys() and clear().
|
1 2 3 |
WebElement email = driver.findElement(By.name(“email”)); email.clear(); email.sendKeys(“your_email”); |
Step 9: Right-click the Password text box to identify the WebElement and choose Inspect. You can use attributes like ID, Name, ClassName, or XPath.
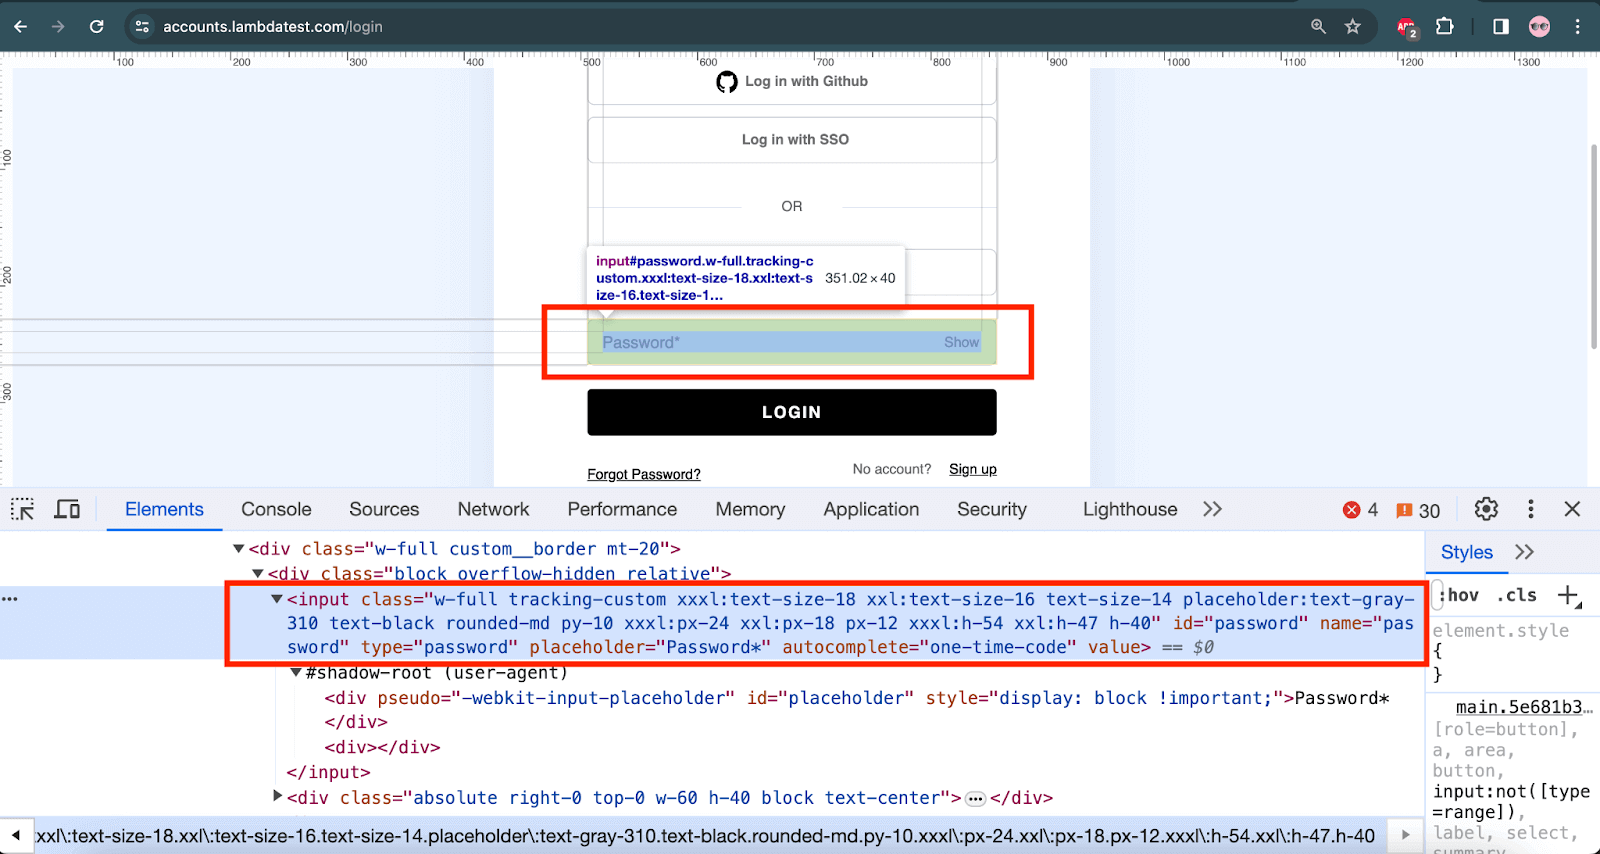
Utilize the sendKeys() method to input the password into the password text box. Before sending the text, use clear() to empty the text field, maintaining a clean state before entering the password.
Below is the illustration of the code snippet using sendKeys() and clear().
|
1 2 3 |
WebElement password = driver.findElement(By.id(“password”)); password.clear(); password.sendKeys(“your_password”)); |
Step 10: Once the credentials are entered, click the LOGIN button. To achieve this, inspect the LOGIN button to identify the corresponding WebElement and then use the click() method to perform the click action.

Below is the illustration of the code snippet using click() on the LOGIN button.
|
1 2 |
WebElement loginButton = driver.findElement(By.id(“login-button”)); loginButton.click(); |
Having identified all the necessary WebElements and methods, the next step is to automate the login page using Selenium WebDriver in the web application.
After entering credentials and clicking the LOGIN button, the final task involves obtaining the web page’s title. This ensures a successful login and confirms that the user has been securely logged into the web page, enabling further actions to be performed.
Step 11: To retrieve the title of the current web page, the getTitle() method in Selenium can be used. This method provides a straightforward way to obtain the title, allowing for further validation and verification in the automation process.
Below is the illustration of the code snippet using getTitle() to fetch the web page’s title.
|
1 2 3 |
String actualTitle = driver.getTitle(); System.out.println(“The title of the web page is “ +actualTitle); String expectedTitle = “Welcome – LambdaTest”; |
Step 12: We can compare the results obtained after successfully logging into the webpage for verification and validation purposes. To perform this comparison, the assertions class proves useful.
|
1 |
Assert.assertEquals(actualTitle, expectedTitle, "The actual and expected title don’t match");`. |
In cases where the titles differ, this approach enables effective handling by triggering an error message: “The actual and expected titles don’t match.”
To learn more about how to use assertions when using the TestNG framework, refer to this blog on TestNG assertion and get valuable insights.
Finally, upon completion of the test execution, it is crucial to close the browsers running the tests.
Step 13: Close the browser using two different Selenium WebDriver commands.
- close(): This command closes the current browser window.
- quit(): This command terminates all instantiated browser instances, comprehensively closing the WebDriver sessions.
Below is the illustration of the code snippet using close() and quit() to fetch the web page’s title.
|
1 2 |
driver.close(); //it closes the single browser window accessed by the WebDriver instance driver.quit(); //it closes all the open browser windows instances |
Learn how to interact with various WebElement. Watch this video below and get valuable insights.
In the next section of this tutorial on how to automate login pages using Selenium WebDriver, we will present the complete code and the output for enhanced clarity and better understanding.
Code Implementation:
The provided code facilitates the execution of login tests on the LambdaTest login screen through Selenium WebDriver. This test is designed to run on the latest version of the Chrome browser. It involves the login process by entering a valid email and password values in the corresponding fields and clicking the LOGIN button.
Upon successful login, the code will verify the presence of the text “Welcome – LambdaTest” in the screen title. If the assertion fails, the message “Page title does not match” will be displayed.
The WebDriver session will be gracefully closed to conclude the automation process.
|
1 2 3 4 5 6 7 8 9 10 11 12 13 14 15 16 17 18 19 20 21 22 23 24 25 26 27 28 29 30 31 32 33 34 35 36 37 38 39 40 41 42 43 44 45 46 47 48 49 50 51 52 53 54 55 56 57 |
import org.openqa.selenium.By; import org.openqa.selenium.WebDriver; import org.openqa.selenium.WebElement; import org.openqa.selenium.chrome.ChromeDriver; import org.testng.Assert; import java.util.concurrent.TimeUnit; public class LoginTest { public static void main(String[] args) { WebDriver driver = new ChromeDriver(); String url = "https://www.lambdatest.com/"; driver.get(url); driver.manage().window().maximize(); driver.manage().timeouts().pageLoadTimeout(10, TimeUnit.SECONDS); WebElement login = driver.findElement(By.linkText("Login")); System.out.println("Clicking on the login element in the main page"); login.click(); driver.manage().timeouts().pageLoadTimeout(10,TimeUnit.SECONDS); WebElement email = driver.findElement(By.id("email")); WebElement password = driver.findElement(By.id("password")); WebElement loginButton = driver.findElement(By.id("login-button")); email.clear(); System.out.println("Entering the email"); email.sendKeys("your_email"); password.clear(); System.out.println("entering the password"); password.sendKeys("your_password"); System.out.println("Clicking login button"); loginButton.click(); String title = "Welcome - LambdaTest"; String actualTitle = driver.getTitle(); System.out.println("Verifying the page title has started"); Assert.assertEquals(actualTitle,title,"Page title doesn't match"); System.out.println("The page title has been successfully verified"); System.out.println("User logged in successfully"); driver.quit(); } } |
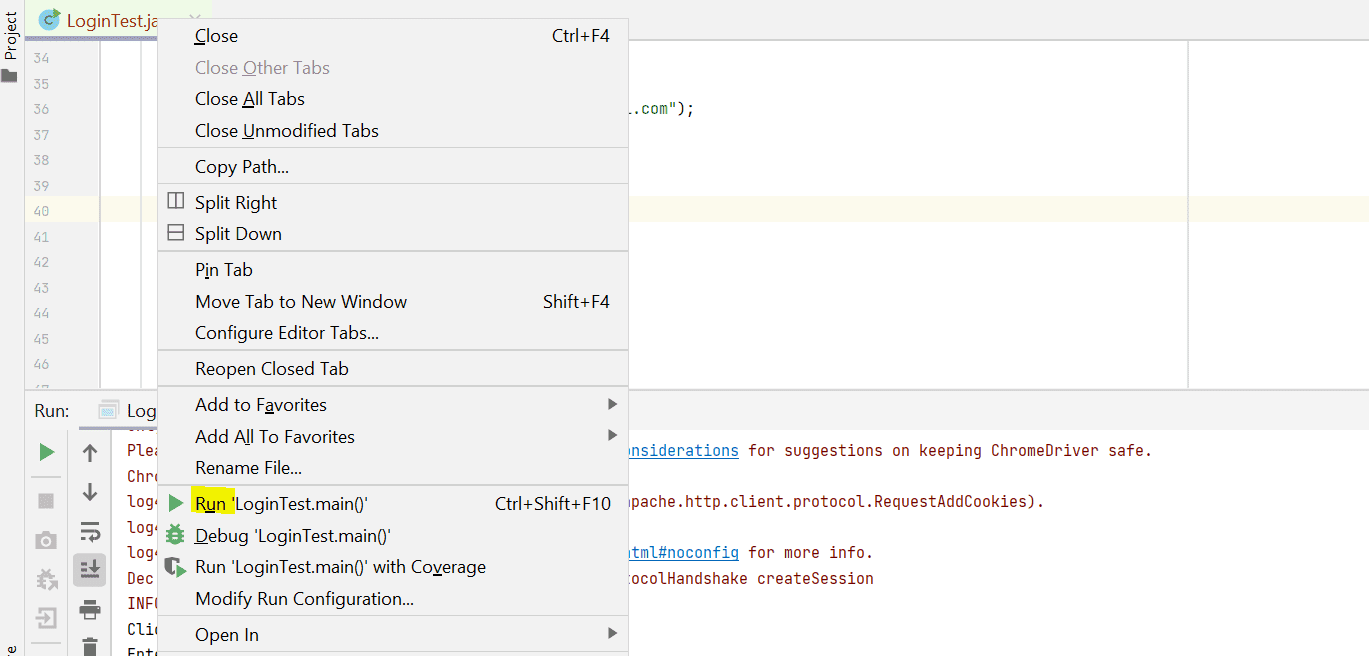
To execute the tests locally, right-click on your class name and select the Run option. This initiates the test execution process, allowing you to observe the outcomes of the login page automation.
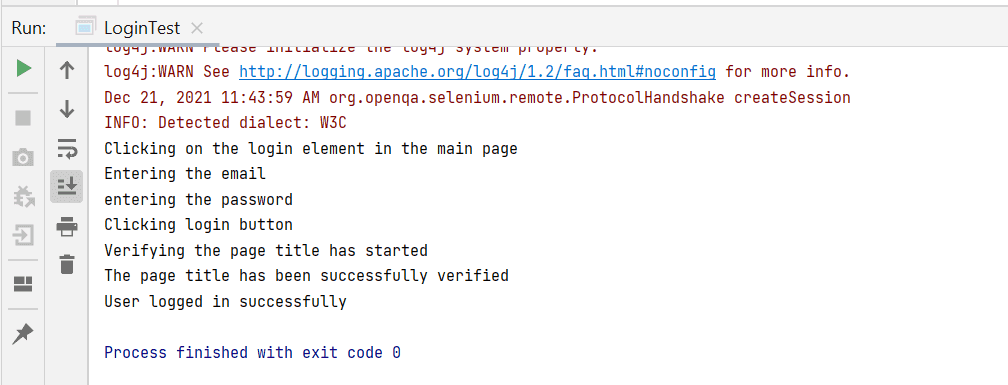
Output:
Watch this video to learn how to automate a registration page using Selenium 4.
To gain in-depth insights into various operations performed during web application testing using Selenium, subscribe to the LambdaTest YouTube Channel and access tutorials on Selenium testing, Cypress testing, Playwright testing, and more.
In the next section of this tutorial on automating login pages using Selenium, we will delve into the practical implementation of login operations on an eCommerce website. We will learn to interact with WebElements to enter user credentials and submit the form.
How to automate the Login page for an eCommerce website?
Automating the login page for an eCommerce website streamlines user authentication, enhancing efficiency and reliability in online transactions.
To demonstrate how to automate login page for the eCommerce website, we will refer to the LambdaTest eCommerce Playground website.
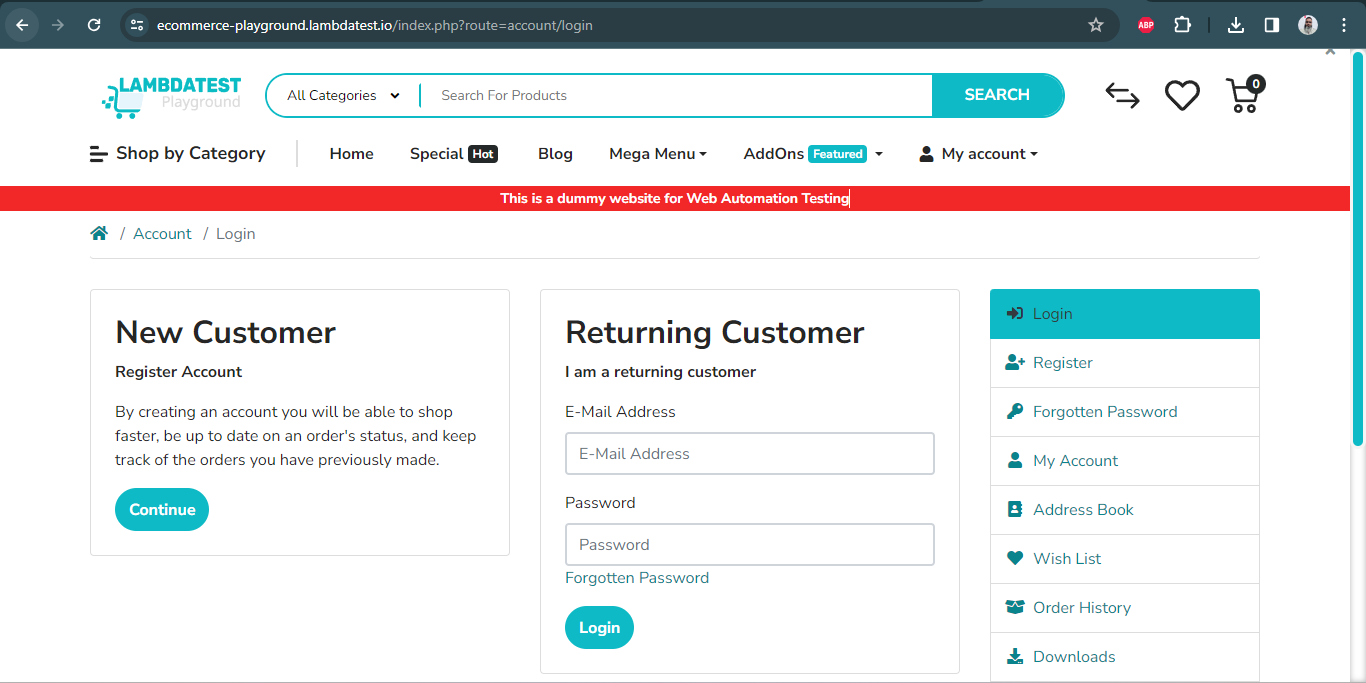
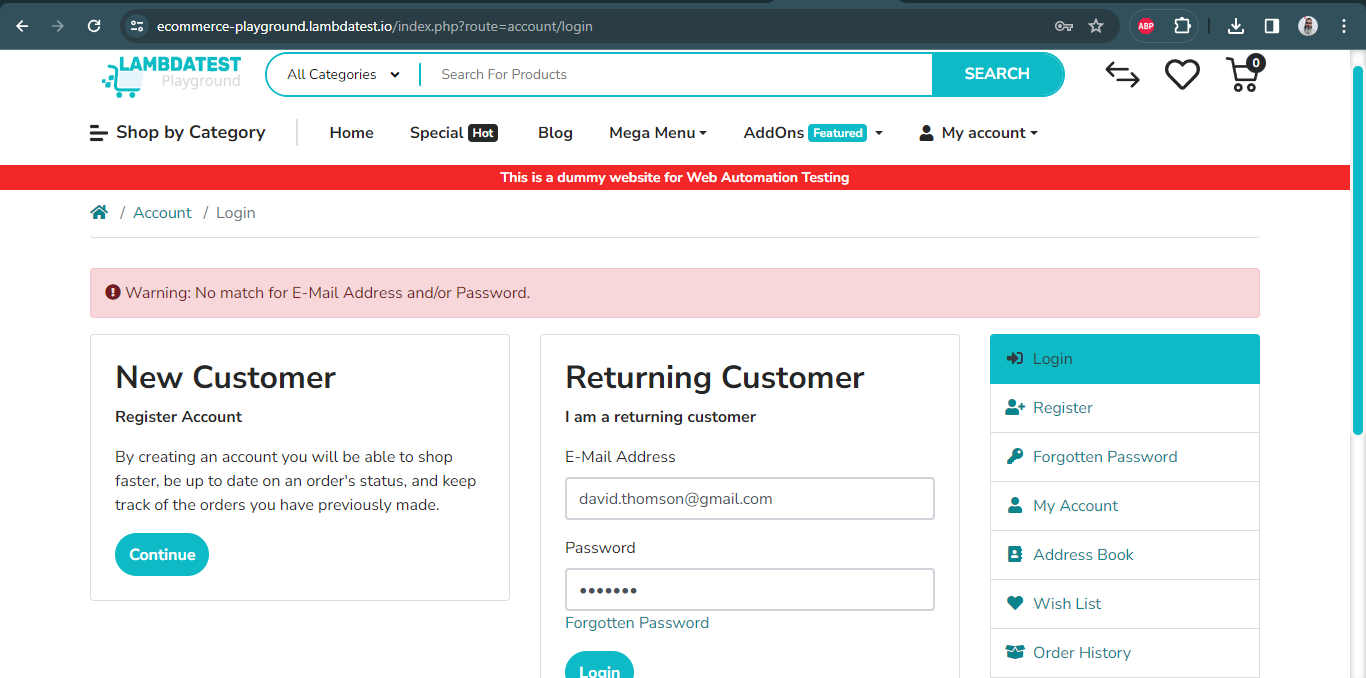
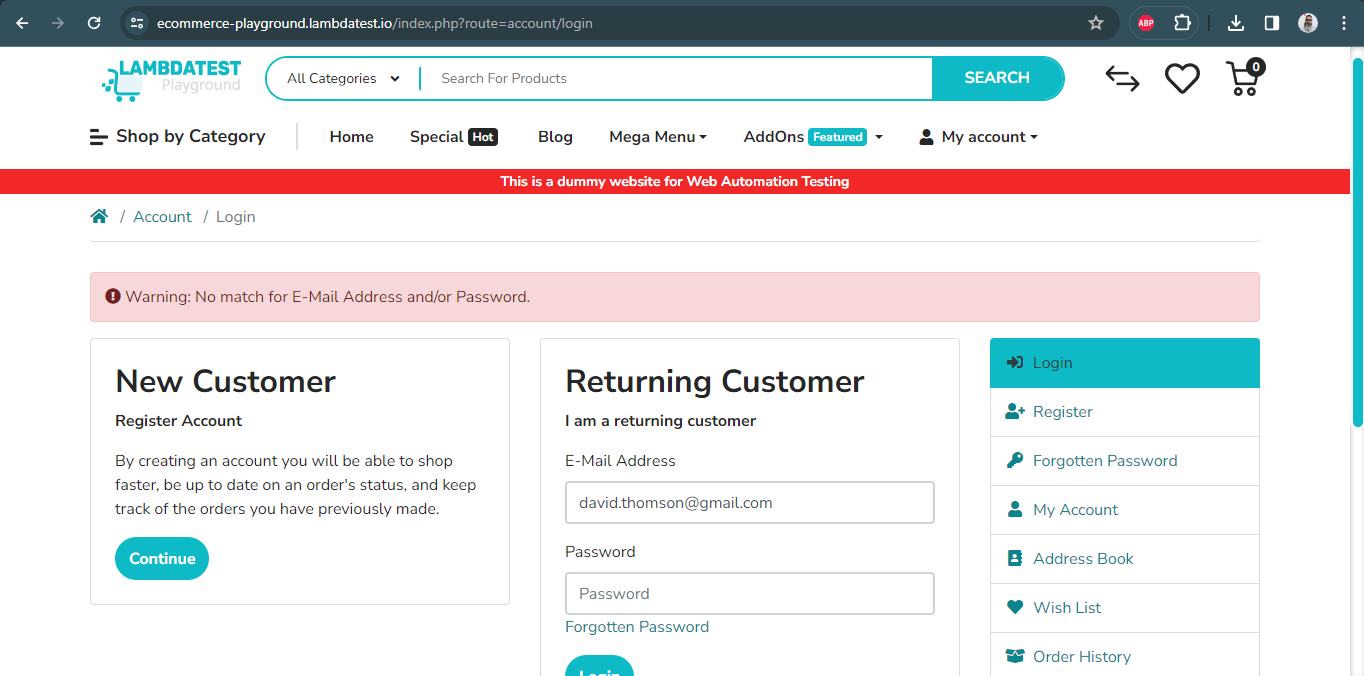
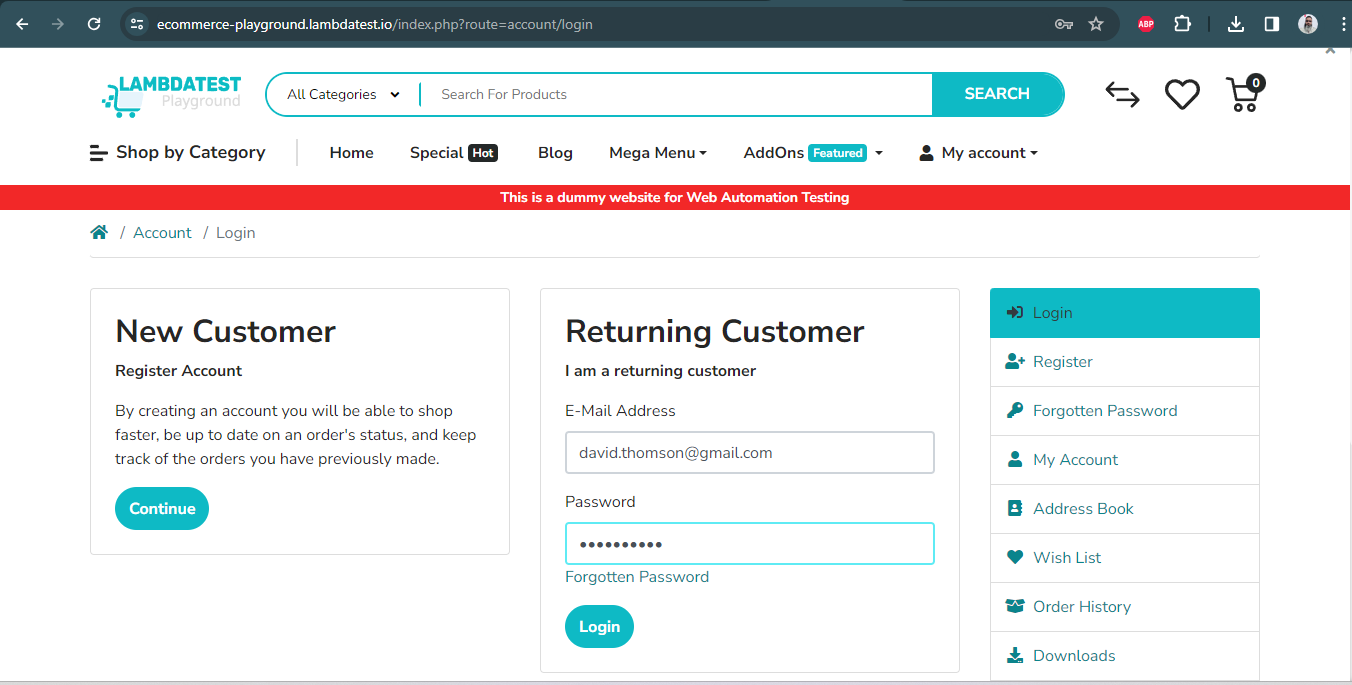
The login page comprises fields for E-Mail Address, Password, and a Login button, requiring interaction for a successful login. This login page automation will encompass positive and negative scenarios, automating various login conditions for comprehensive testing.
Test Scenario 1:
|
Test Scenario 2:
|
Test Scenario 3:
|
Code Implementation:
Below is the code implementation for the mentioned test scenarios. To initiate, create a Maven project, and subsequently update the Selenium WebDriver and TestNG dependencies in the pom.xml file.
Now, let’s proceed with Selenium’s driver implementation using the Page Object Model (POM) for enhanced maintenance and code readability. The project configuration is considered complete once the dependencies are updated in the pom.xml file.
Next, let’s commence with the WebDriver implementation. This demo will execute the tests on the LambdaTest cloud grid. Therefore, we must implement the RemoteWebDriver and pass the required capabilities.
These capabilities can be obtained using the LambdaTest Capabilities Generator, a helpful tool created by LambdaTest that provides actively used capabilities for running tests on the LambdaTest cloud grid.
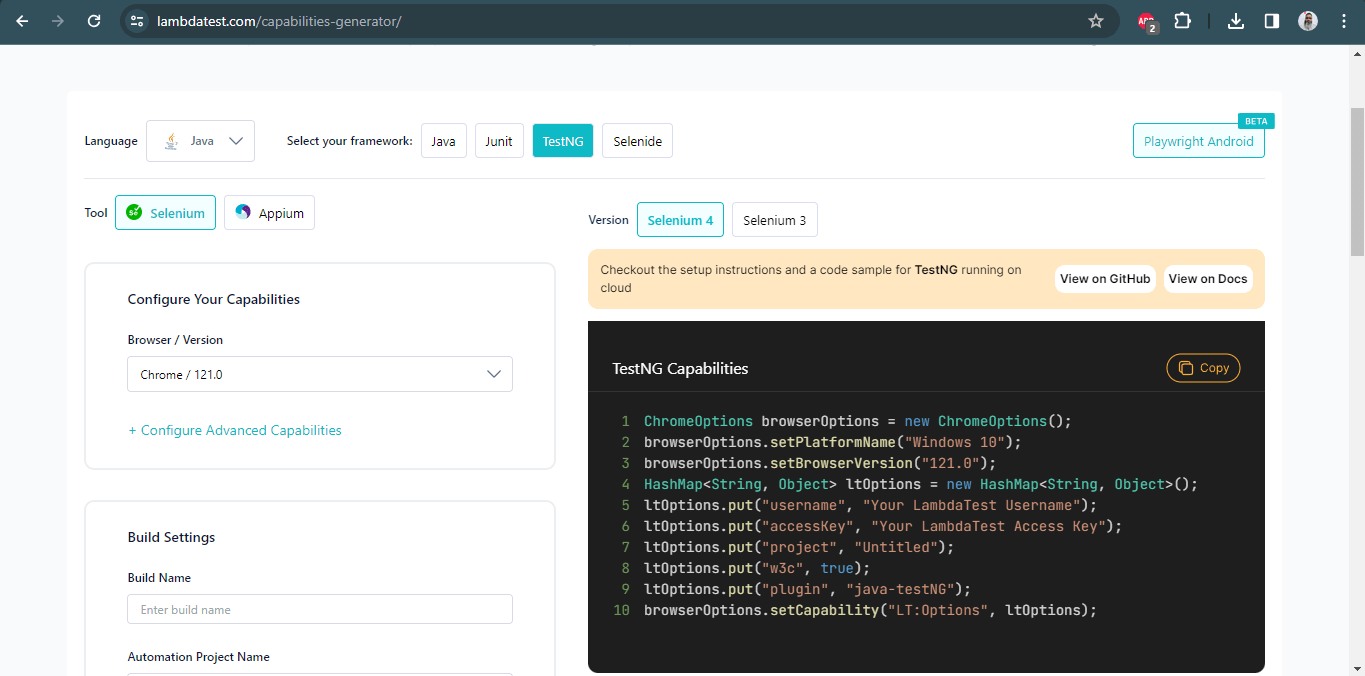
The setupChromeInLambdaTest() method in the DriverManager class contains the code enabling the execution of the Chrome browser on the Windows 10 platform on the LambdaTest cloud grid, utilizing Selenium’s RemoteWebDriver() method.
Below is the illustration of the code snippet of class setupChromeInLambdaTest() consisting of the various browserOptions and using RemoteWebDriver().
|
1 2 3 4 5 6 7 8 9 10 11 12 |
private void setupChromeInLambdaTest() { final var browserOptions = new ChromeOptions(); browserOptions.setPlatformName("Windows 10"); browserOptions.setCapability("LT:Options", ltOptions()); try { setDriver( new RemoteWebDriver(new URL(format("https://{0}:{1}{2}", LT_USERNAME, LT_ACCESS_KEY, GRID_URL)), browserOptions)); } catch (final MalformedURLException e) { throw new Error("Error setting up cloud browser in LambdaTest", e); } } |
The LambdaTest capabilities are configured using another method, namely ltOptions(), which returns a HashMap of < String, Object >.
Below is a code snippet illustrating the use of the ltOptions() method. This ltOptions() includes relevant capabilities such as username, access key, Selenium version, and other capability options, returning the values using a HashMap of < String, Object >.
|
1 2 3 4 5 6 7 8 9 10 11 12 13 |
private HashMap<String, Object> ltOptions() { final var ltOptions = new HashMap<String, Object>(); ltOptions.put("username", LT_USERNAME); ltOptions.put("accessKey", LT_ACCESS_KEY); ltOptions.put("resolution", "2560x1440"); ltOptions.put("selenium_version", "4.0.0"); ltOptions.put("build", "LambdaTest Scale Demo"); ltOptions.put("name", "LambdaTest tests at scale"); ltOptions.put("acceptInsecureCerts", true); ltOptions.put("w3c", true); ltOptions.put("plugin", "java-testNG"); return ltOptions; } |
The LambdaTest username and access key will be supplied at runtime, as these values are retrieved using the System.getProperty() method in Java.
Below is the illustration of the code snippet using private access modifiers to store the username and access key value using the System.getProperty() method.
|
1 2 |
private static final String LT_ACCESS_KEY = System.getProperty("LT_ACCESS_KEY"); private static final String LT_USERNAME = System.getProperty("LT_USERNAME"); |
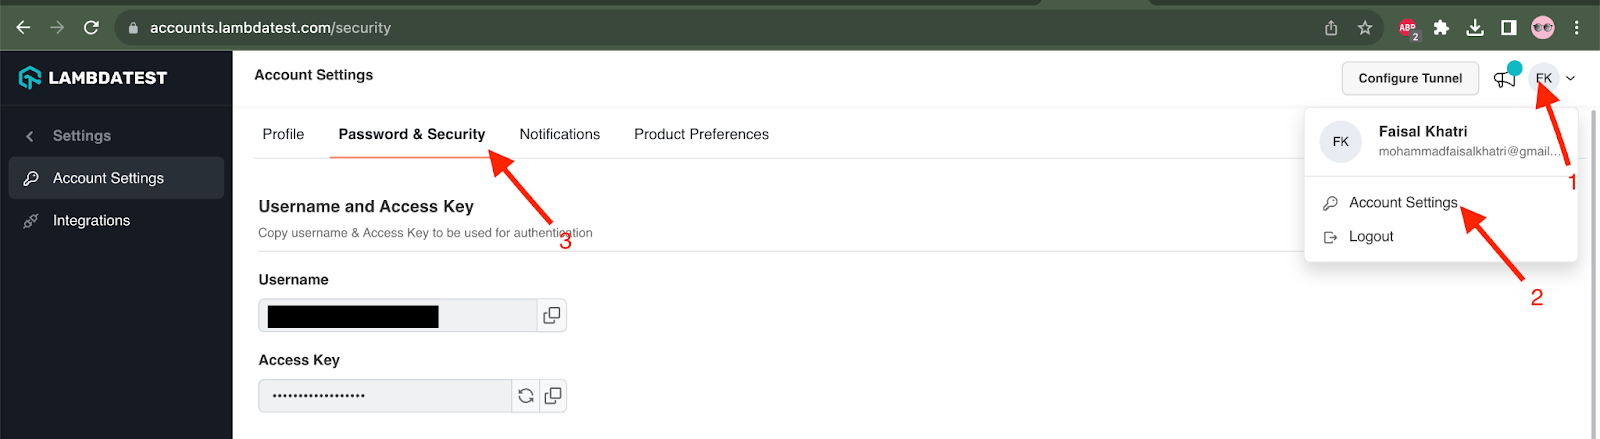
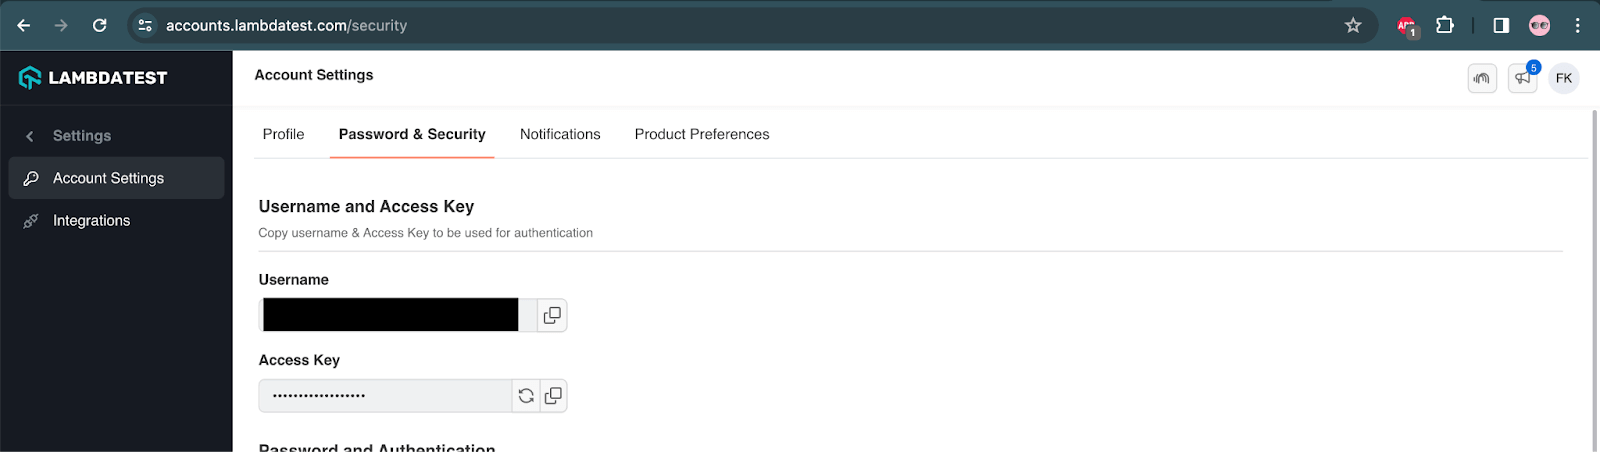
The LambdaTest Username and Access Key can be obtained from the Profile > Account Settings > Password & Security screen after logging in to the LambdaTest website.
The setupBrowserTimeouts() method implements the implicit wait and is called after the WebDriver session is instantiated.
Below is a code snippet illustrating the setupBrowserTimeouts() method using the implicitWait() method. This method will wait 20 seconds or until all the WebElements are loaded.
|
1 2 3 4 5 |
private void setupBrowserTimeouts() { getDriver().manage() .timeouts() .implicitlyWait(Duration.ofSeconds(20)); } |
Finally, the createDriver() method is implemented to start the required browser based on the browser name supplied in the test.
Below is the code snippet illustrating the createDriver() method. This method includes the browser you intend to use, and you can add other browsers in the code section. The function is responsible for invoking the appropriate drivers.
|
1 2 3 4 5 6 7 8 |
public void createDriver(final Browsers browser) { switch (browser) { case FIREFOX -> setupFirefoxInLocal(); case CHROME_CLOUD -> setupChromeInLambdaTest(); default -> setupChromeInLocal(); } setupBrowserTimeouts(); } |
Using an enum for storing and managing browser names is a good practice. Enums provide a clean and type-safe way to represent a fixed set of constants.
Once the capabilities are set and the WebDriver implementation is complete, the next step involves locating the WebElements on the login page. These WebElements are essential for performing actions on the login page.
As mentioned earlier, we’ll be using the Page Object Model. The LoginPage class will handle all the page objects on the login Page.
Before we jump to the result let us try to understand what the code is trying to perform in a step-by-step process.
Code Walkthrough:
Below is the code walkthrough for the above code implementation.
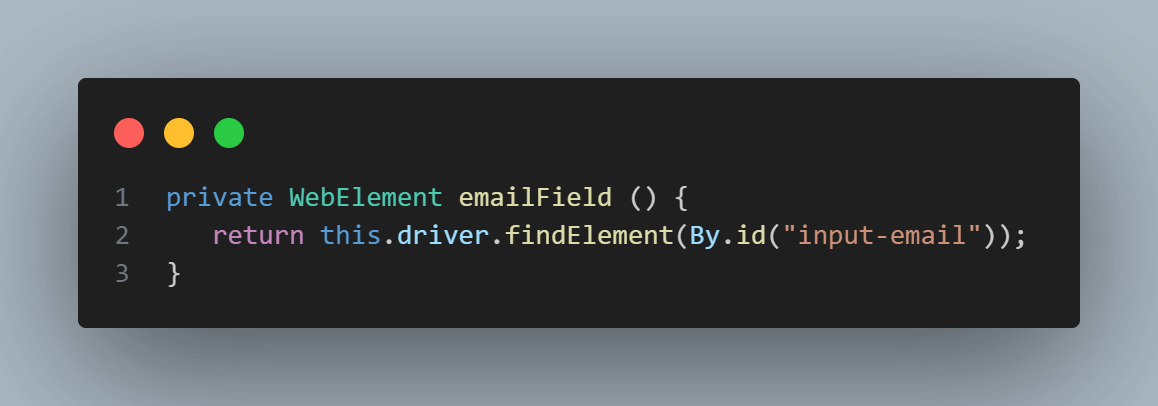
The emailField() method returns the WebElement for the Email field. This field is located using the ID locator “input-email.”
The following screenshot shows that the Email address field has the ID locator “input-email” attached.

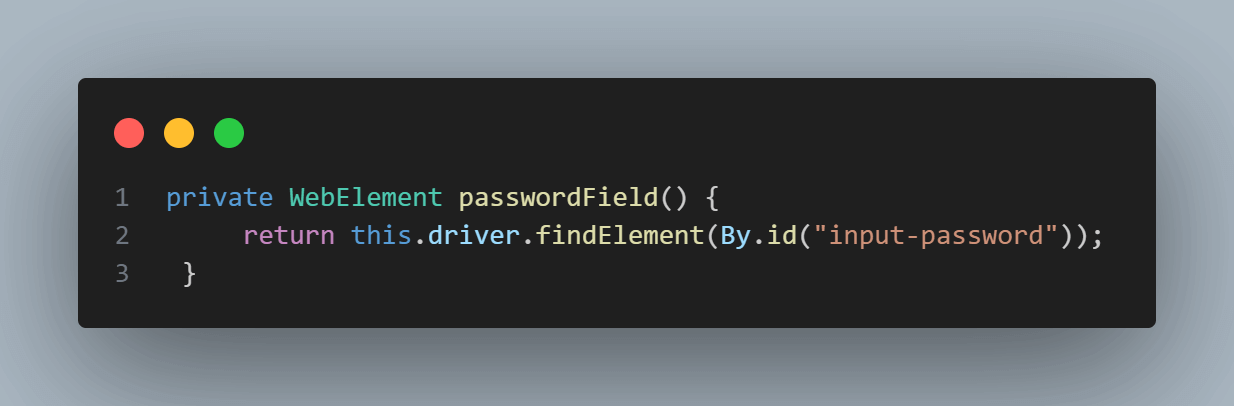
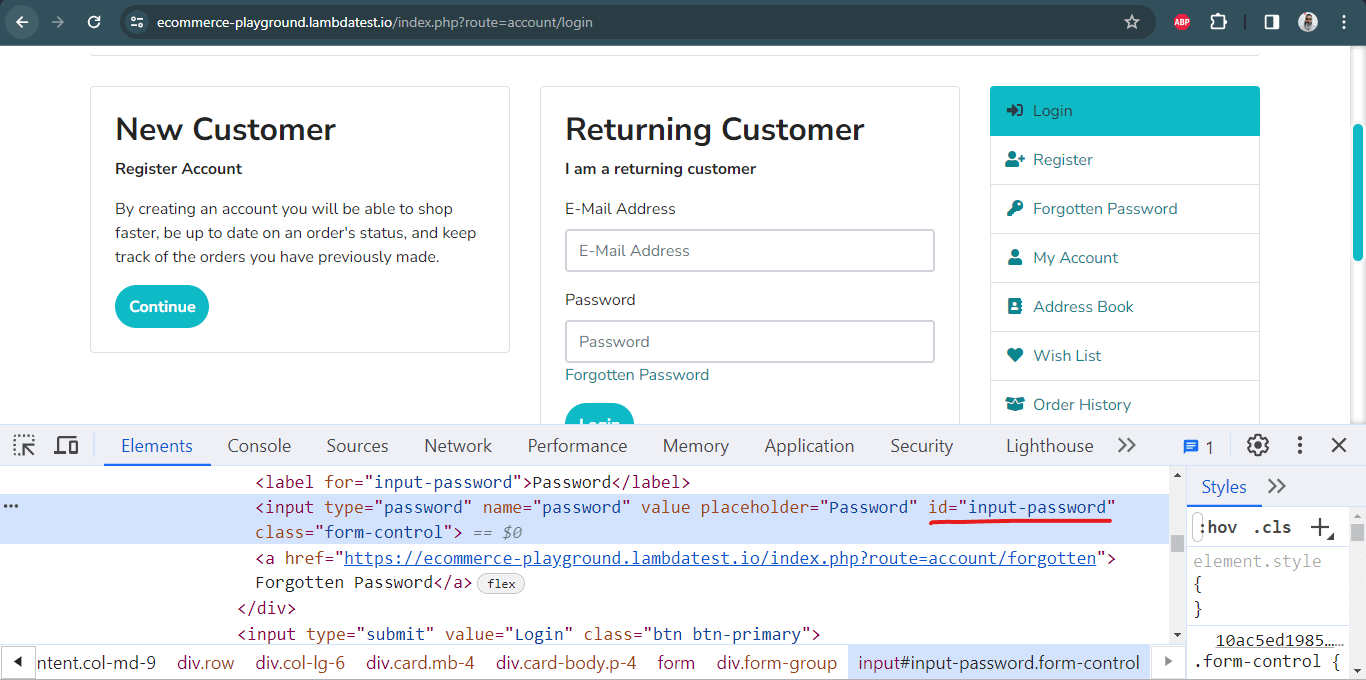
Similarly, the passwordField() method locates the password field using the ID locator “input-password”.
The following screenshot shows that the Password field has the ID locator “input-password” attached.
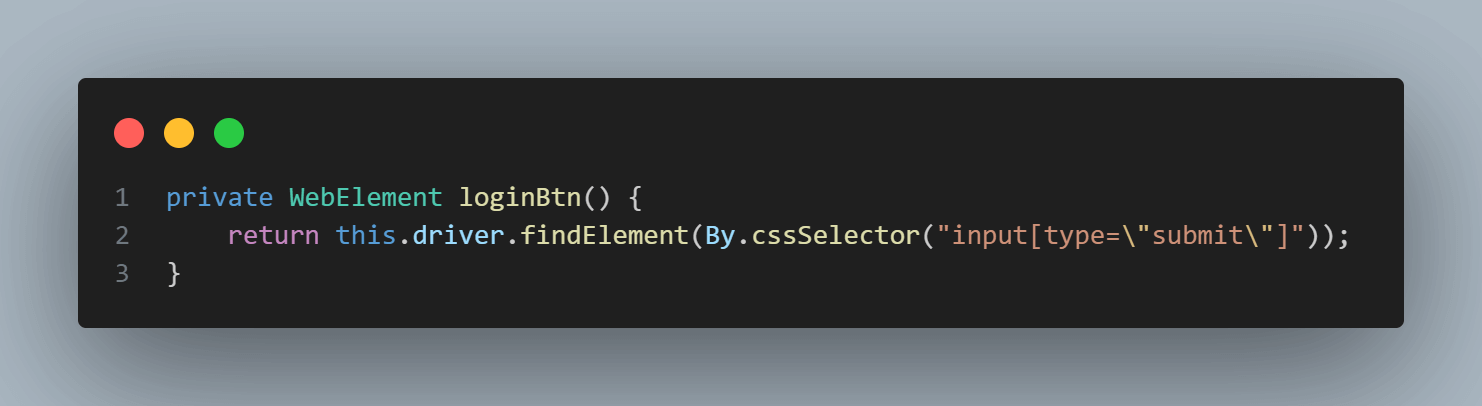
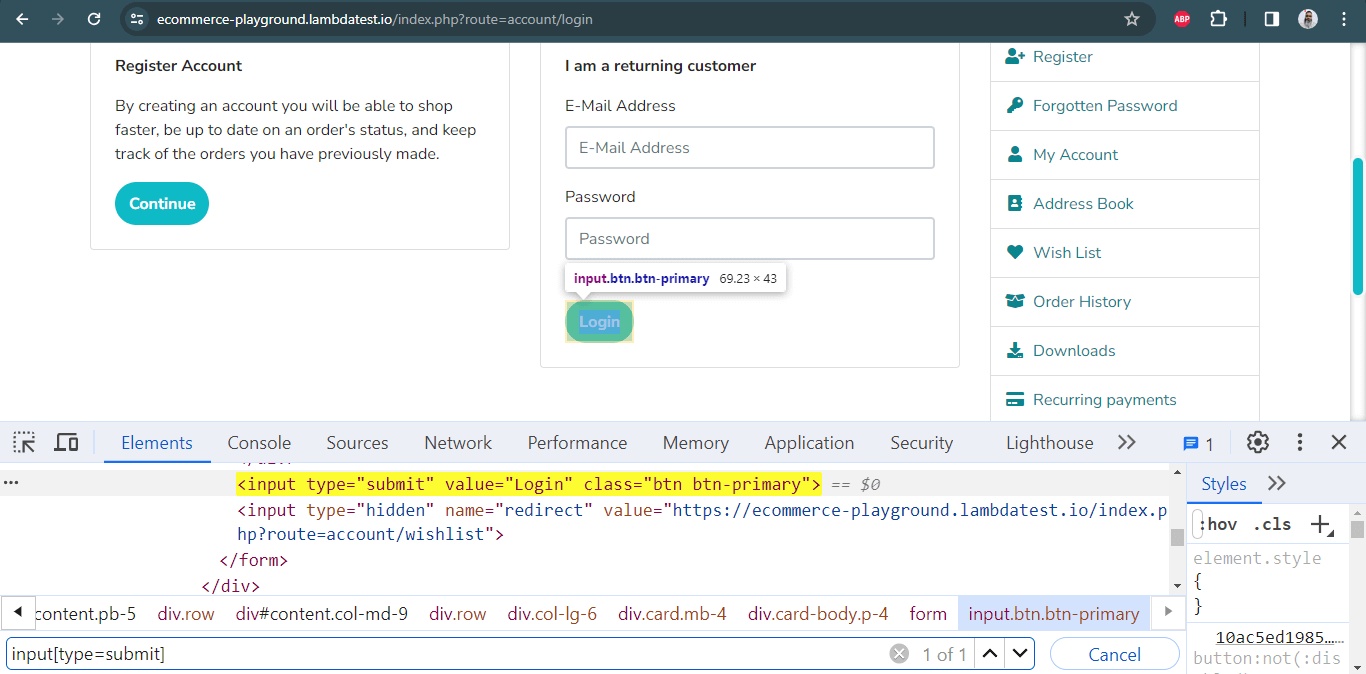
Next, the loginBtn() method locates the Login button on the screen using the CSS Selector “”input[type=\”submit\”]”
The following screenshot shows how the CSS Selector was chosen as a locator strategy for the LOGIN button.
Once all three fields, namely Email, Password, and LOGIN button, are located, the respective WebElement methods of these fields are invoked in the performLogin() method to interact with these fields and execute the login action.
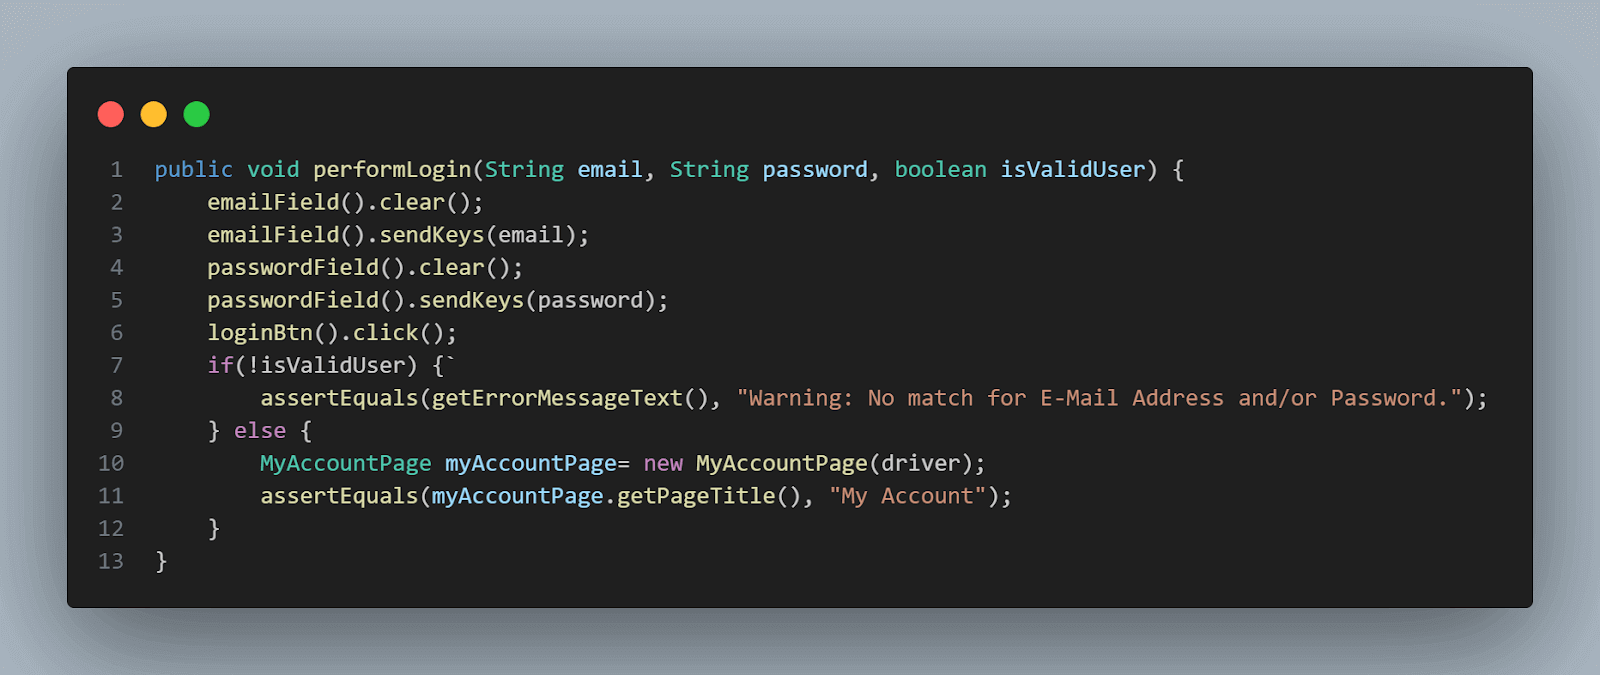
The performLogin() method takes in three parameters: the user’s email address and password; the third value is to determine whether the login credentials supplied for login are valid or invalid.
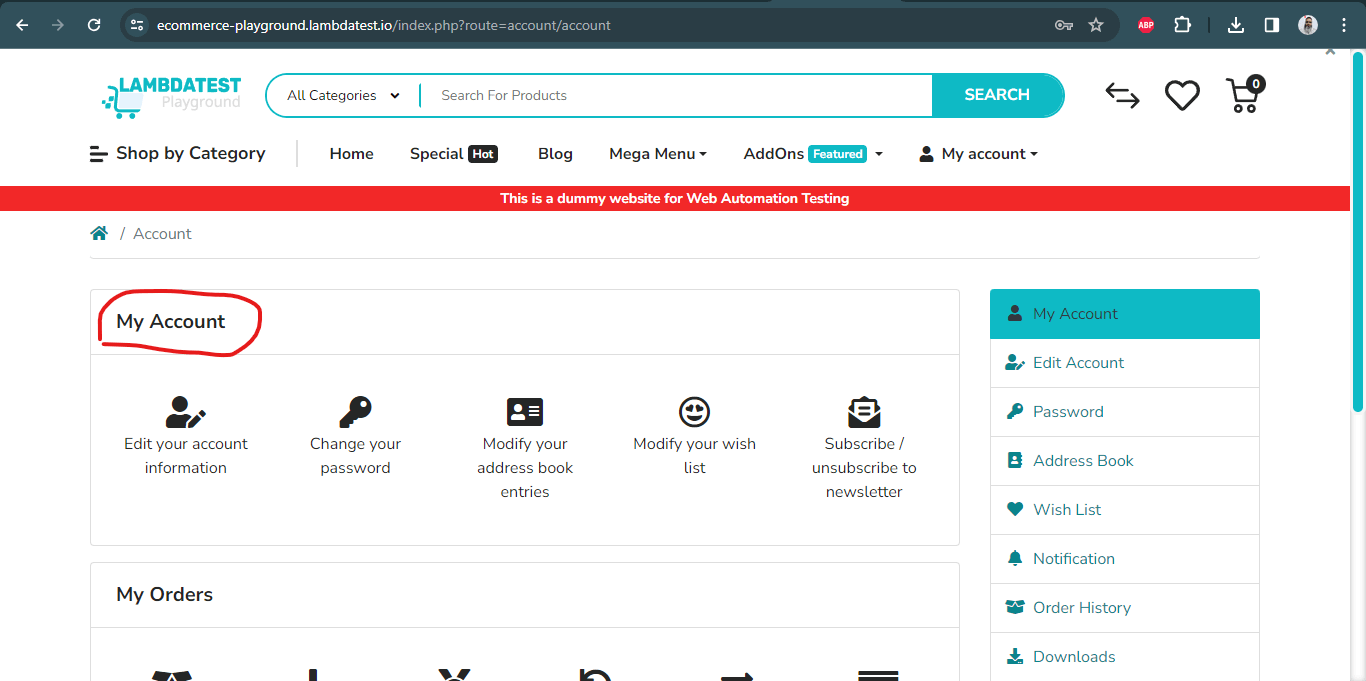
A condition is associated with the third parameter, which is a boolean. If the user logging in is valid, then the MyAccountPage class is instantiated. Using its object, the getPageTitle() method inside the MyAccountPage class is called to verify that the page title displayed after successful login is My Account.
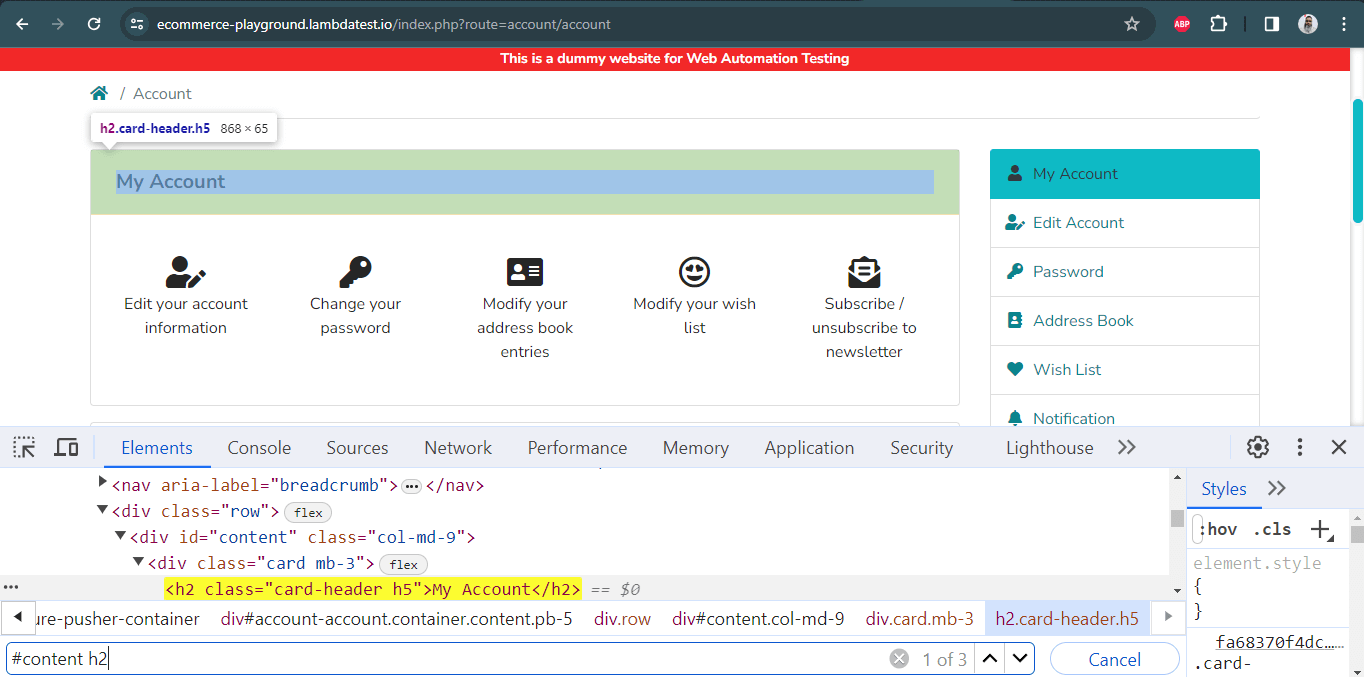
The getPageTitle() method in the MyAccountPage class returns the WebElement for the Page title. The title is located using the CSS Selector – “#content h2”. The identification and location of the page title are achieved through this CSS Selector, as shown in the following screenshot.
Setting up the BaseTest
The initial step in creating the tests is to develop the BaseTest class, which includes the setup() method. This method facilitates initiating a new WebDriver session with a specified browser value, passed through the @Parameters annotation in TestNG from the testng.xml file.
The BaseTest class also has the quitDriver() method that will help in gracefully closing the WebDriver session.
Writing the Automation Test
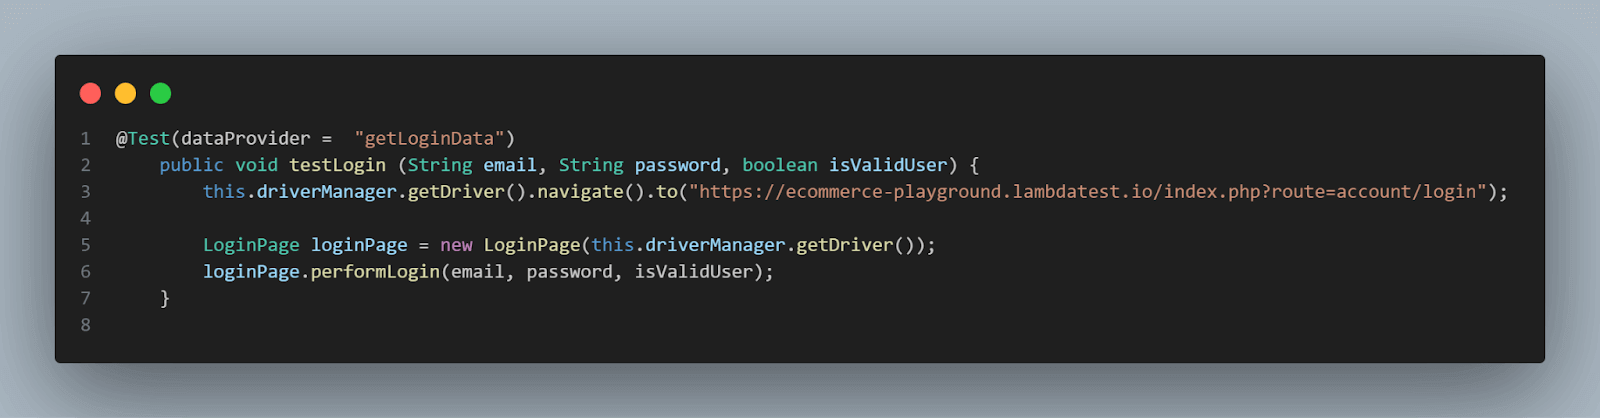
Finally, the test automation scripts for the discussed login scenarios are implemented in the LambdaTestECommerceTests class. This class contains the login tests.
|
1 2 3 4 5 6 7 8 9 10 11 12 13 14 15 16 17 18 19 20 21 22 23 24 25 26 |
public class LambdaTestECommerceTests extends BaseTest{ @DataProvider public Iterator<Object[]> getLoginData() { List<Object[]> loginData = new ArrayList<>(); loginData.add(new Object[] {"david.thomson@gmail.com","Password",false}); loginData.add(new Object[] {"david.thomson@gmail.com","",false}); loginData.add(new Object[] {"david.thomson@gmail.com","Secret@123",true}); return loginData.iterator(); } @Test(dataProvider = "getLoginData") public void testLogin (String email, String password, boolean isValidUser) { this.driverManager.getDriver().navigate().to("https://ecommerce-playground.lambdatest.io/index.php?route=account/login"); LoginPage loginPage = new LoginPage(this.driverManager.getDriver()); loginPage.performLogin(email, password, isValidUser); } } |
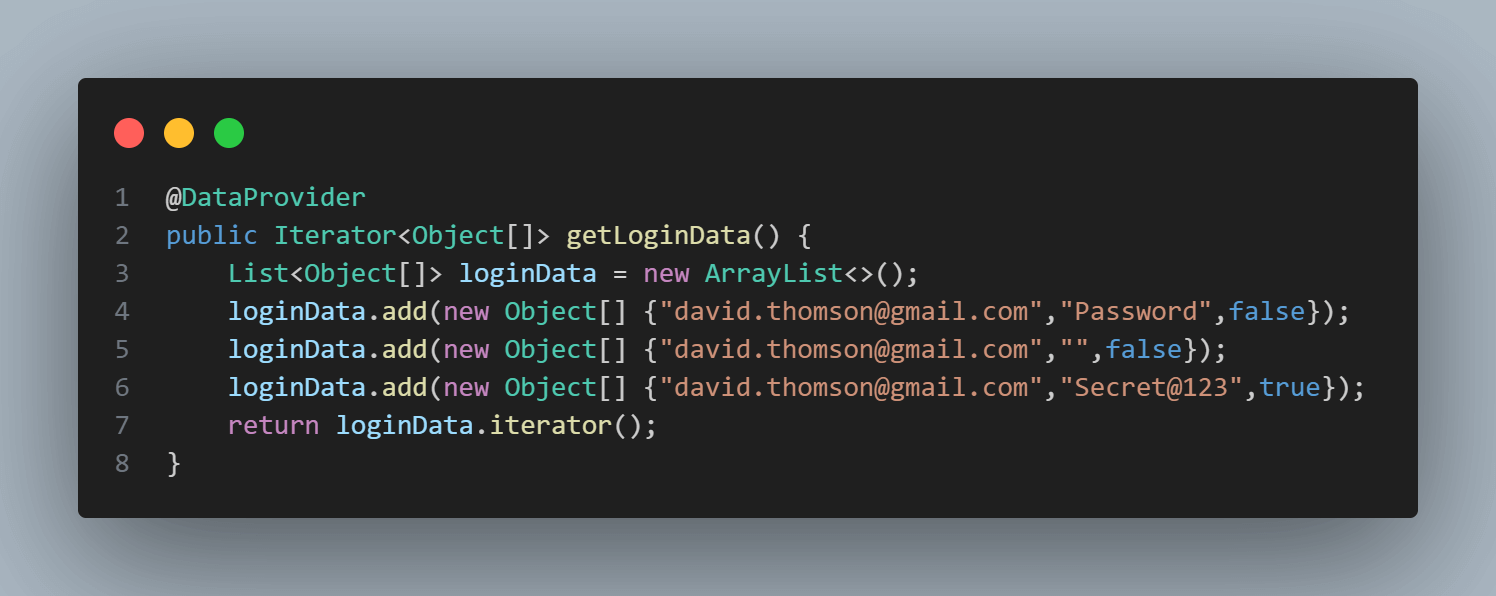
In the above class, we have a single test method, testLogin(), which invokes the getLoginData() method. This method is annotated with @DataProvider from TestNG and is responsible for providing the necessary data for login tests.
The getLoginData() method returns an Iterator with Object Arrays, providing email, password, and isValid boolean test data.
The first test data set includes a valid email and an invalid password, identifiable as a false boolean value by the third parameter set.
The second test data set consists of a valid email with a blank password. The third parameter is set to false, indicating another invalid login credential.
For the invalid credentials, the test will verify the warning message and assert its text.
Finally, the third test data set offers a valid email and password. The boolean parameter is set to true, indicating that it is a valid set of data and should allow the user to log in successfully to the website.
The data provided by the getLoginData() method will be passed on to the testLogin() method with the three parameters: email, password, and isValidUser().
This test data set facilitates the execution of all three test scenarios – two negative ones validating the error message and one happy path scenario checking for a successful login.
Test Execution using TestNG
To execute the tests using the testng.xml file on the LambdaTest cloud grid with the Chrome browser, you would typically configure the testng.xml file with the necessary parameters. The testng.xml file should be placed in the root folder of the project.
To run the tests on the LambdaTest Cloud grid in IntelliJ, add the LambdaTest Username and AccessKey in the Run Configuration. This can be done as follows:
-DLT_USERNAME=< LambdaTest Username > -DLT_ACCESSKEY=< LambdaTest AccessKey >
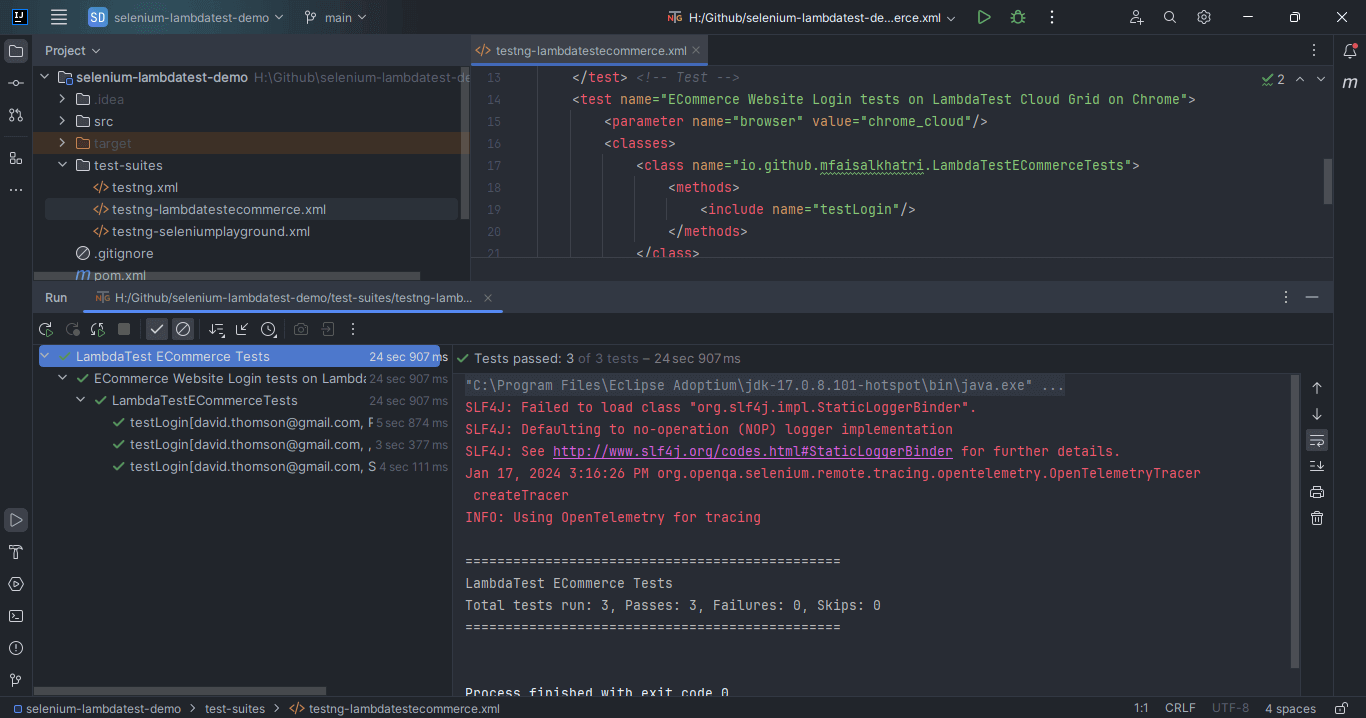
Then, right-click on the testng-lambdatestecommerce.xml file and select the option “Run ../ testng-lambdatestecommerce.xml” to execute the test.
The successful test execution on IntelliJ should look similar to the screenshot provided.
Output:
In the next section of this automating login page tutorial, we will explore the process of running your login functionality tests on a cloud grid. We will be using a cloud-based Selenium Grid to execute the tests efficiently.
How to automate the Login page on the cloud?
Using a cloud-based platform that allows you to enhance the capabilities of Selenium by enabling you to perform over a cloud grid can be beneficial. One such platform is LambdaTest.
LambdaTest is an AI-powered test orchestration and execution platform that lets you perform manual and automated testing at scale using Selenium with Java on over 3000+ real devices, browsers, and OS combinations.
This platform enables you to expedite Java automation testing with parallel test execution by harnessing an online Selenium Grid. This feature significantly improves test execution efficiency and speed by concurrently running tests across multiple instances.
The basic setup for running the tests over the LambdaTest platform is below.
Step 1. Create a LambdaTest account
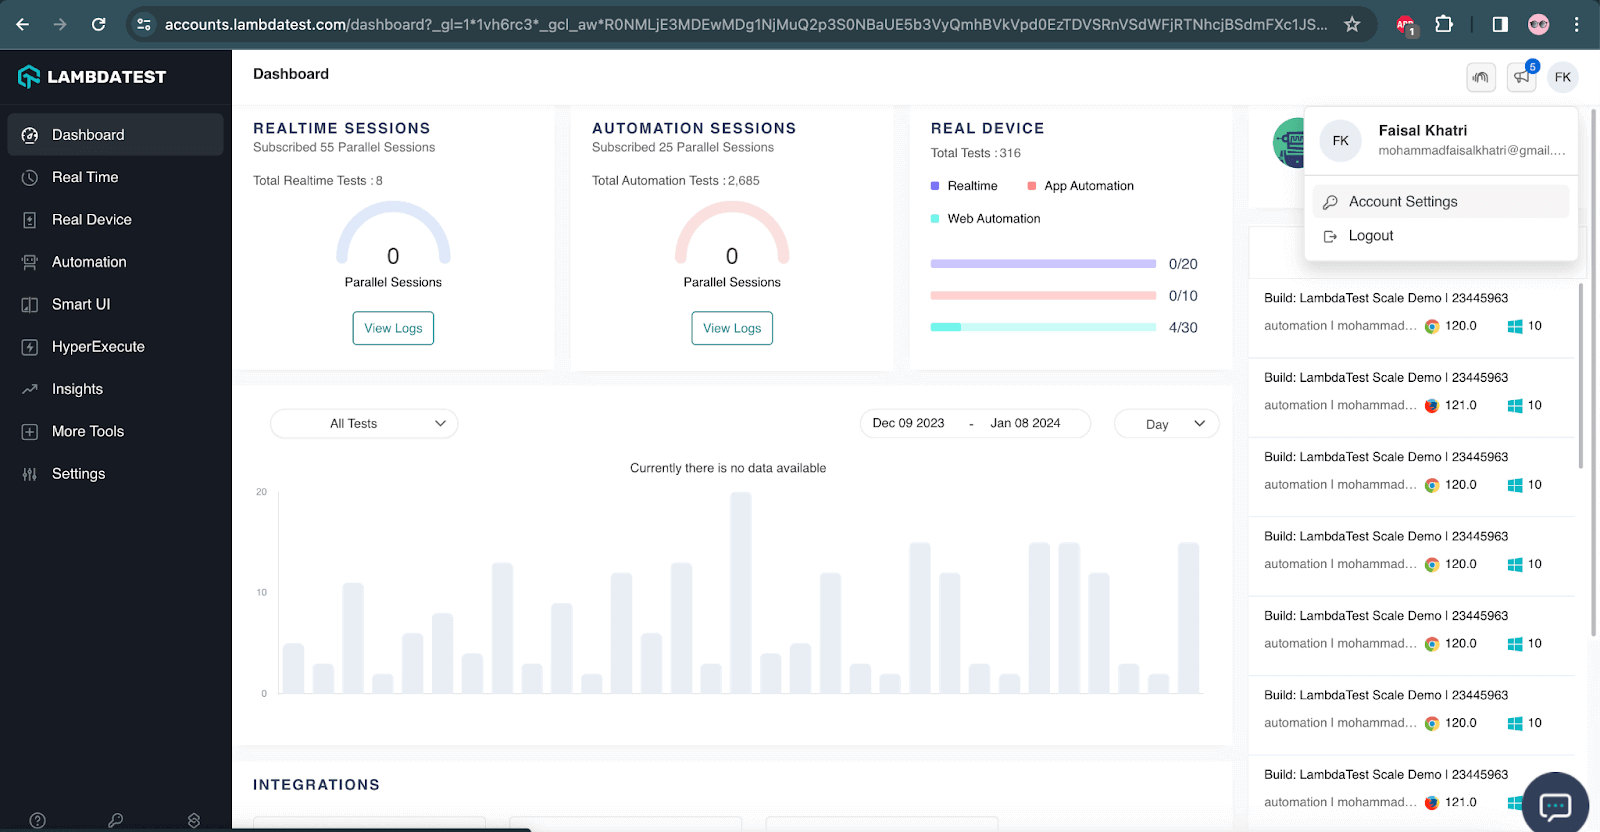
First, you need to create a LambdaTest account. Upon successful account creation, you can sign in to your account and navigate to the LambdaTest Dashboard. Next, click on Profile > Account Settings.
From the Password & Security tab, you can find your Username and Access Key as shown in the screenshot below:
Step 2. Setting up Desired Capabilities
To run the tests in different browsers and operating systems, we must define the Desired Capabilities.
|
1 2 3 4 5 6 |
DesiredCapabilities capabilities = new DesiredCapabilities(); capabilities.setCapability("browserName", browserName); capabilities.setCapability("version", browser_version); capabilities.setCapability("platform", platform_name); capabilities.setCapability("build", buildName); capabilities.setCapability("name", testName); |
In tests, we have mentioned the desired capabilities for running the tests in a Chrome browser with version 93 in the Windows 10 operating system.
|
1 2 3 |
capabilities.setCapability("browserName", "chrome"); capabilities.setCapability("version", "120.0"); capabilities.setCapability("platform", "win10"); |
Similarly, you can define the desired capabilities for other browsers and operating systems. If you’re unsure about writing your desired capabilities, LambdaTest assists. You can generate the desired capabilities for different browser and OS combinations using the LambdaTest Desired Capabilities Generator.

Code Implementation:
As discussed earlier in this tutorial on how to automate login pages using Selenium WebDriver, the following code will launch the LambdaTest website, locate the LOGIN button, and click on it. Subsequently, it will find the E-Mail Address and Password fields, entering the respective email and password values. Afterward, it will click on the Login button.
It will verify the text “Welcome – LambdaTest” upon successful login. This test will be executed on the LambdaTest cloud grid.
Code Implementation:
Below is the code implementation for successful login on the LambdaTest page.
|
1 2 3 4 5 6 7 8 9 10 11 12 13 14 15 16 17 18 19 20 21 22 23 24 25 26 27 28 29 30 31 32 33 34 35 36 37 38 39 40 41 42 43 44 45 46 47 48 49 50 51 52 53 54 55 56 57 58 59 60 61 62 63 64 65 66 67 68 69 70 71 72 73 74 75 76 77 78 79 80 81 82 83 84 85 |
import org.openqa.selenium.By; import org.openqa.selenium.WebElement; import org.openqa.selenium.remote.DesiredCapabilities; import org.openqa.selenium.remote.RemoteWebDriver; import org.testng.Assert; import org.testng.annotations.AfterClass; import org.testng.annotations.BeforeClass; import org.testng.annotations.Test; import java.net.MalformedURLException; import java.net.URL; import java.util.concurrent.TimeUnit; public class LoginTest { public String username = "YOUR_USERNAME"; public String accesskey = "YOUR_ACCESSKEY"; public static RemoteWebDriver driver = null; public String gridURL = "@hub.lambdatest.com/wd/hub"; @BeforeClass public void setUp() throws Exception { DesiredCapabilities capabilities = new DesiredCapabilities(); capabilities.setCapability("browserName", "chrome"); capabilities.setCapability("version", "120.0"); capabilities.setCapability("platform", "win10"); // If this cap isn't specified, it will just get the any available one capabilities.setCapability("build", "LoginTest"); capabilities.setCapability("name", "LoginTestInChrome"); try { driver = new RemoteWebDriver(new URL("https://" + username + ":" + accesskey + gridURL), capabilities); } catch (MalformedURLException e) { System.out.println("Invalid grid URL"); } catch (Exception e) { System.out.println(e.getMessage()); } } @Test() public void test_1() { String url = "https://www.lambdatest.com/"; driver.get(url); driver.manage().window().maximize(); driver.manage().timeouts().pageLoadTimeout(10, TimeUnit.SECONDS); WebElement login = driver.findElement(By.linkText("Login")); System.out.println("Clicking on the login element in the main page"); login.click(); driver.manage().timeouts().pageLoadTimeout(10,TimeUnit.SECONDS); WebElement email = driver.findElement(By.id("email")); WebElement password = driver.findElement(By.id("password")); WebElement loginButton = driver.findElement(By.id("login-button")); email.clear(); System.out.println("Entering the email"); email.sendKeys("your_email"); password.clear(); System.out.println("entering the password"); password.sendKeys("your_password"); System.out.println("Clicking login button"); loginButton.click(); String title = "Welcome - LambdaTest"; String actualTitle = driver.getTitle(); System.out.println("Verifying the page title has started"); Assert.assertEquals(actualTitle,title,"Page title doesn't match"); System.out.println("The page title has been successfully verified"); System.out.println("User logged in successfully"); } @AfterClass public void closeBrowser() { driver.close(); } } |

The following testng.xml file has been created and updated with the test class name that will execute the tests defined in the LoginTest class. Placed within the project’s root folder, this testng.xml file facilitates running the tests, leveraging TestNG as the test runner framework.
TestNG.xml
|
1 2 3 4 5 6 7 8 9 10 11 |
<?xml version="1.0" encoding="UTF-8"?> <!DOCTYPE suite SYSTEM "http://testng.org/testng-1.0.dtd"> <suite name="LoginSuite"> <test name="LoginTest" > <classes> <class name="com.MyTests.LoginTest"> </class> </classes> </test> </suite> |
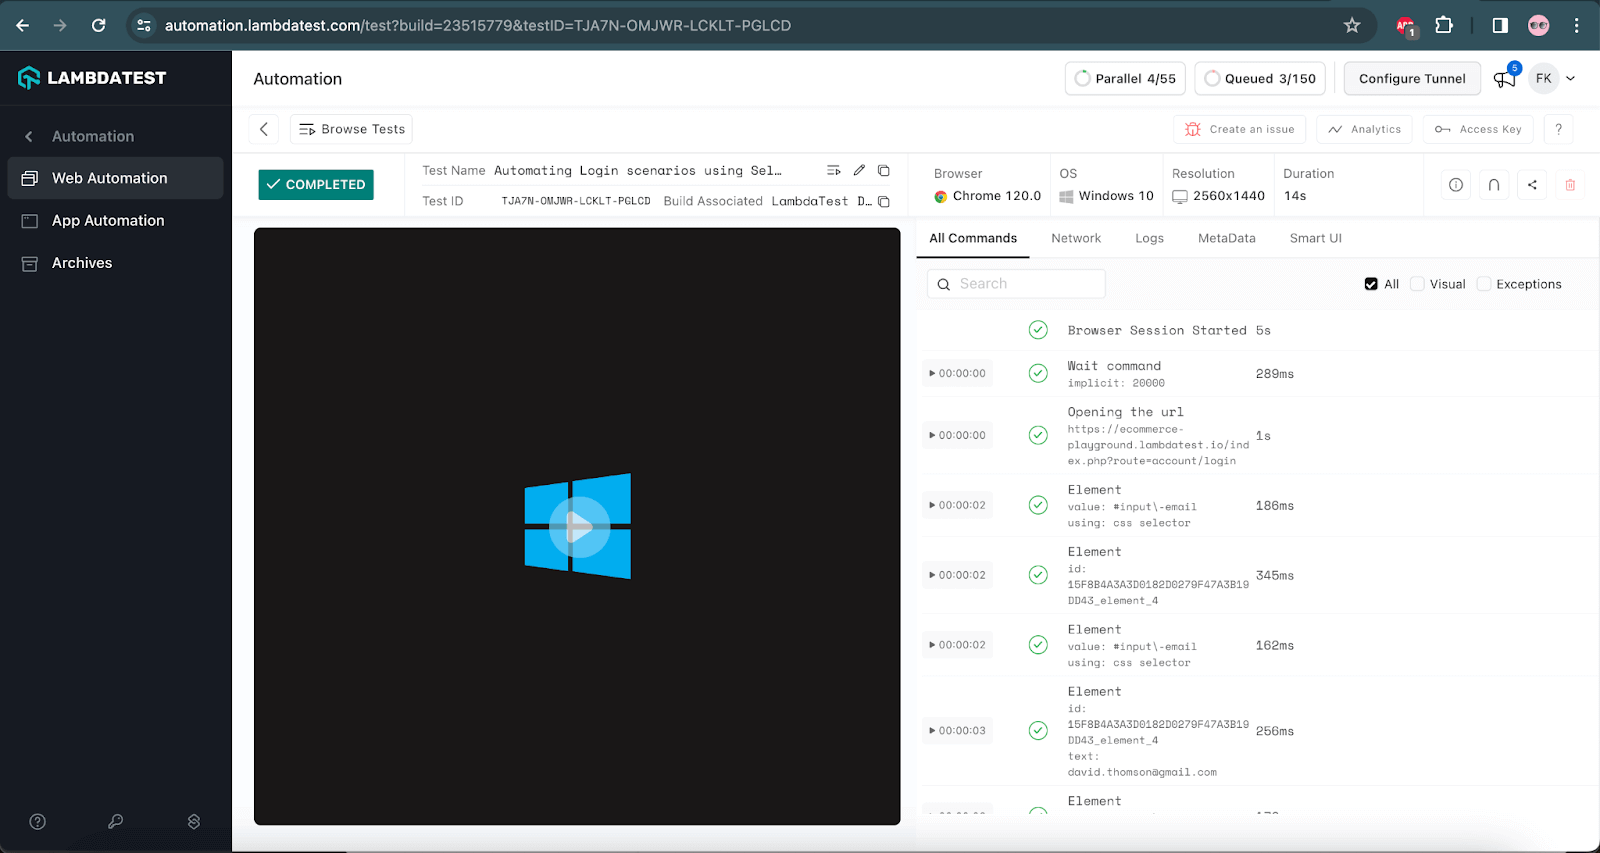
In the LambdaTest dashboard, you can review the executed test and its results.
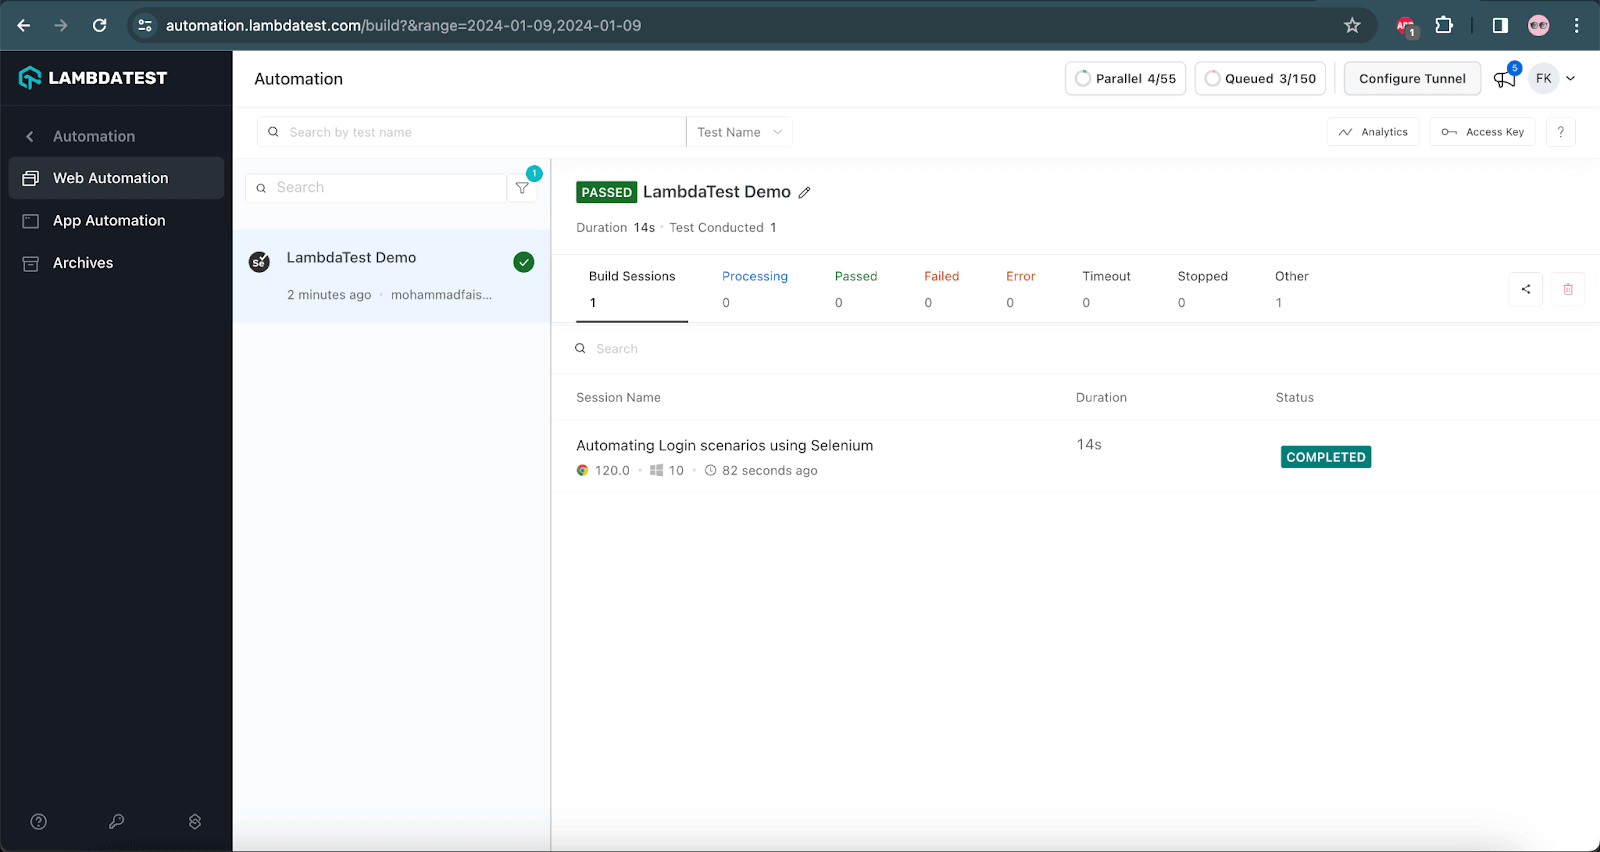
Upon further navigation, you can explore the browser and operating system details on which the test was executed. Additionally, a video recording of the test execution is provided for debugging purposes.
In the next section of this tutorial on how to automate login pages using Selenium WebDriver, we will delve into executing the login functionality test in parallel across various browsers and operating systems.
How to automate the Login page in parallel?
The login functionality must work consistently across various browsers and operating systems. Running tests on different platforms ensures users have a consistent experience with the feature regardless of the platform used. LambdaTest facilitates parallel testing, ensuring consistency across various environments and providing a seamless and enhanced user experience.
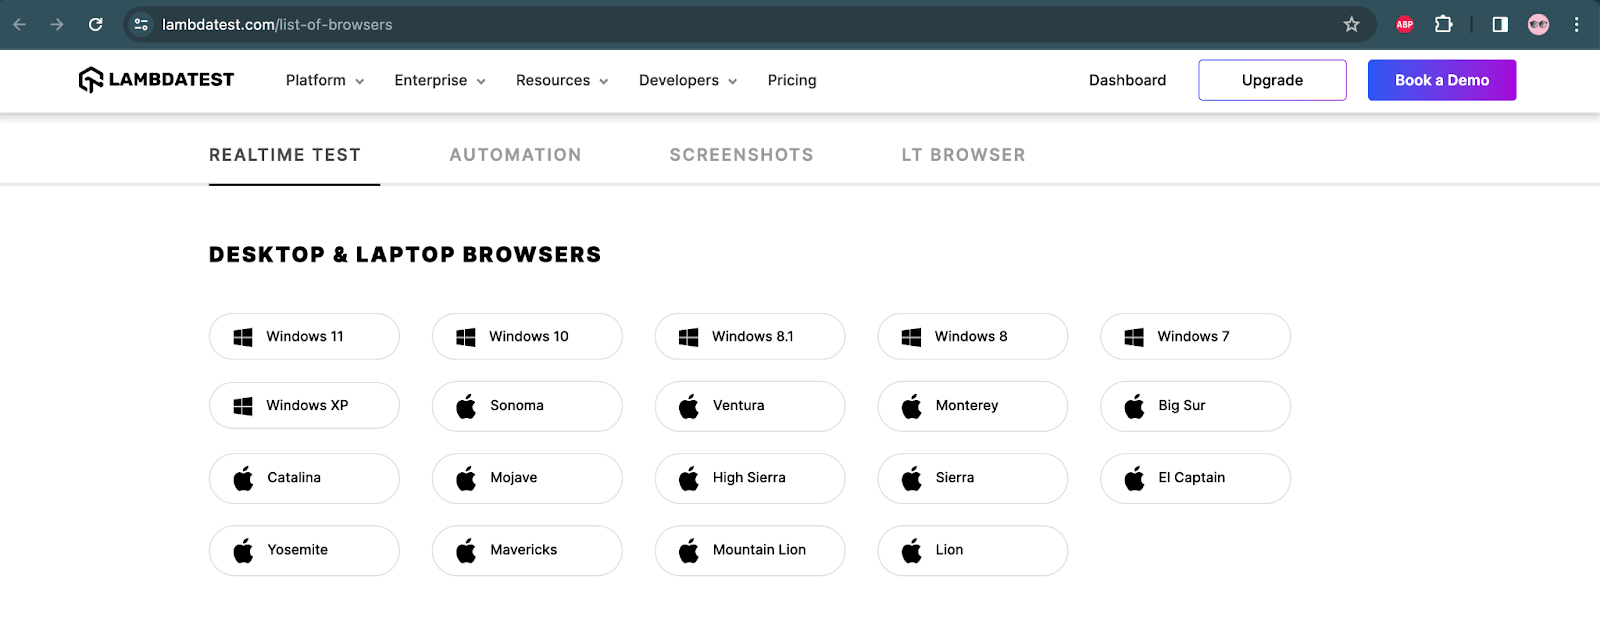
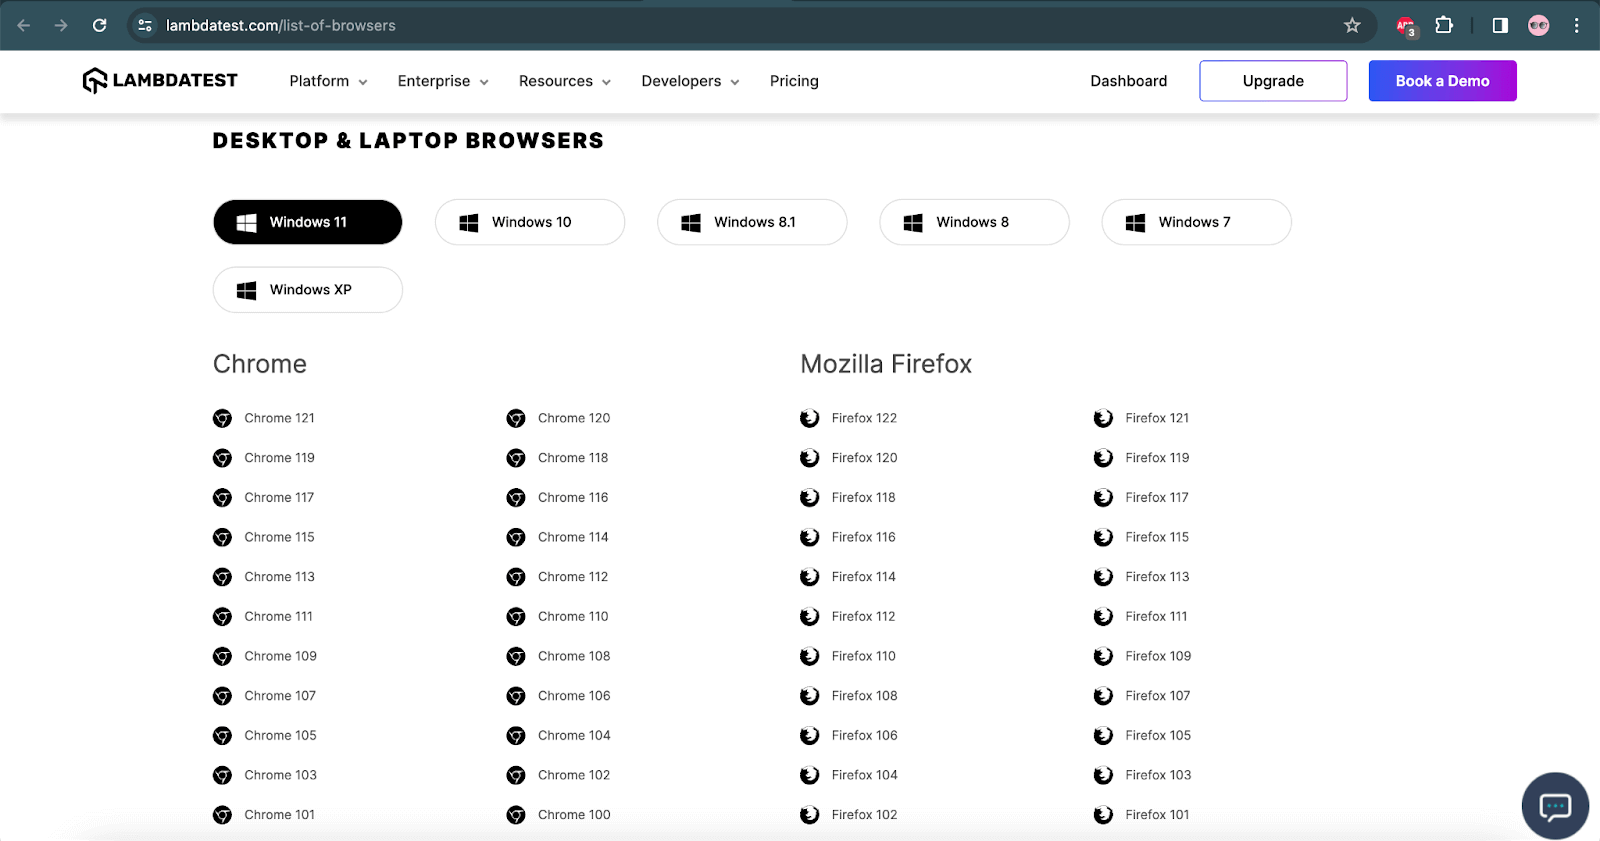
Below are screenshots illustrating the lists of browsers supported by LambdaTest, providing the capability to run tests on diverse browser and OS combinations.
Additionally, running tests in parallel on different platforms proves highly effective in significantly reducing Selenium test execution time.
To grasp how LambdaTest enables parallel execution, let’s attempt running login tests concurrently in two different browsers – Chrome and Firefox.
Code Implementation:
The provided code will automate the login page on the LambdaTest cloud grid, running in parallel on both Chrome and Firefox browsers.
|
1 2 3 4 5 6 7 8 9 10 11 12 13 14 15 16 17 18 19 20 21 22 23 24 25 26 27 28 29 30 31 32 33 34 35 36 37 38 39 40 41 42 43 44 45 46 47 48 49 50 51 52 53 54 55 56 57 58 59 60 61 62 63 64 65 66 67 68 69 70 71 72 73 74 75 76 77 78 79 80 81 82 83 84 85 86 87 88 89 90 91 92 93 94 95 96 97 98 99 100 101 |
import org.openqa.selenium.By; import org.openqa.selenium.WebElement; import org.openqa.selenium.remote.DesiredCapabilities; import org.openqa.selenium.remote.RemoteWebDriver; import org.testng.Assert; import org.testng.annotations.AfterClass; import org.testng.annotations.BeforeClass; import org.testng.annotations.Parameters; import org.testng.annotations.Test; import java.net.MalformedURLException; import java.net.URL; import java.util.concurrent.TimeUnit; public class LoginTest { public String username = "YOUR_USERNAME"; public String accesskey = "YOUR_ACCESSKEY"; public static RemoteWebDriver driver = null; public String gridURL = "@hub.lambdatest.com/wd/hub"; @BeforeClass @Parameters("browser") public void setUp(String browser) throws Exception { DesiredCapabilities capabilities = new DesiredCapabilities(); if (browser.equalsIgnoreCase("Chrome")) { capabilities.setCapability("browserName", "chrome"); capabilities.setCapability("version", "120.0"); capabilities.setCapability("platform", "win10"); // If this cap isn't specified, it will just get the any available one capabilities.setCapability("build", "LoginTest"); capabilities.setCapability("name", "LoginTestInChrome"); } else if (browser.equalsIgnoreCase("Firefox")) { capabilities.setCapability("browserName", "Firefox"); //To specify the browser capabilities.setCapability("version", "120.0"); //To specify the browser version capabilities.setCapability("platform", "win10"); // To specify the OS capabilities.setCapability("build", "LoginTest"); //To identify the test capabilities.setCapability("name", "LoginTestInFirefox"); } try { driver = new RemoteWebDriver(new URL("https://" + username + ":" + accesskey + gridURL), capabilities); } catch (MalformedURLException e) { System.out.println("Invalid grid URL"); } catch (Exception e) { System.out.println(e.getMessage()); } } @Test() public void test_1() { String url = "https://www.lambdatest.com/"; driver.get(url); driver.manage().window().maximize(); driver.manage().timeouts().pageLoadTimeout(10, TimeUnit.SECONDS); WebElement login = driver.findElement(By.linkText("Login")); System.out.println("Clicking on the login element in the main page"); login.click(); driver.manage().timeouts().pageLoadTimeout(10,TimeUnit.SECONDS); WebElement email = driver.findElement(By.id("email")); WebElement password = driver.findElement(By.id("password")); WebElement loginButton = driver.findElement(By.id("login-button")); email.clear(); System.out.println("Entering the email"); email.sendKeys("your_email”); password.clear(); System.out.println("entering the password"); password.sendKeys("your_password"); System.out.println("Clicking login button"); loginButton.click(); String title = "Welcome - LambdaTest"; String actualTitle = driver.getTitle(); System.out.println("Verifying the page title has started"); Assert.assertEquals(actualTitle,title,"Page title doesn't match"); System.out.println("The page title has been successfully verified"); System.out.println("User logged in successfully"); } @AfterClass public void closeBrowser() { driver.close(); } } |
In the TestNG.xml file, we specified the browser names to execute our tests in different browsers.
Output:
In the output console, you can see that the tests are executed in two different browsers.

In the LambdaTest dashboard, you can view the tests and the corresponding browser configurations in which they were executed.

LambdaTest provides users with a comprehensive view of their application’s performance and quality. You can monitor the health of your automated test cases by navigating to LambdaTest Analytics under the Automation tab. This page lets you identify failed tests and download a detailed report for your records.
Conclusion
The login feature holds the utmost significance in any web application, constituting a crucial aspect of user interaction. Managing this feature is typically straightforward, yet its testing involves positive and negative scenarios.
In this comprehensive tutorial on how to automate login pages, we have chosen the LambdaTest webpage to demonstrate the automation of the login functionality. This tutorial walks you through automating login pages, showcasing how to effectively handle both favorable and negative cases.
We have also explored leveraging cloud testing solutions to execute login tests parallely across different browsers, ensuring robust cross-browser compatibility. This approach enhances the coverage of the login automation, addressing diverse user environments.
We hope this tutorial on how to automate login pages using Selenium WebDriver has been valuable in seamlessly implementing login functionality.
Happy testing!
Frequently Asked Questions (FAQs)
How does Selenium Webdriver verify successful login?
- Create an instance for Selenium WebDriver.
- Configure the browser if needed.
- Navigate to the web page.
- Locate the desired WebElement.
- Perform some actions on the WebElement.
- Verify and validate the action.
How do I login to multiple users in Selenium?
- Create a 2D array list of multiple user IDs and passwords.
- Add process commands within 2 loops.
- Login.
- Submit something
- Logout the user through some command.


Author’s Profile
Faisal Khatri
Faisal is a Software Testing Professional having 14+ years of experience in automation as well as manual testing. He is a QA, freelancer, blogger and open source contributor. He loves learning new tools and technologies and sharing his experience by writing blogs.
Blogs: 23
Got Questions? Drop them on LambdaTest Community. Visit now