The Ultimate CSS Selectors Cheat Sheet You Must Know
Harish Rajora
Posted On: May 4, 2021
![]() 80452 Views
80452 Views
![]() 30 Min Read
30 Min Read
As a front-end developer, there are many times when you say, “What’s that property that takes child elements and applies CSS?” or something on the same thoughts. CSS is endless when you start to learn it.
Selectors are among the first things you’ll need to know when you start using CSS. Once you dig deep into the CSS selectors, you’ll discover a lot more to CSS selectors than you initially assumed. Whether you’re an experienced web developer or just a novice, the CSS selectors cheat sheet will always come in handy to create cross browser compatible websites.
With the ultimate CSS selectors cheat sheet, you’ll learn sophisticated highly functional CSS selectors that will save your significant amount of manual coding by allowing you to control and manipulate multiple elements based on their properties.
What are CSS Selectors?
CSS selectors are a part of the CSS rule set that selects the element we want to style. They are used in the CSS file or inside the “style” tag while declaring the CSS. CSS selectors play an essential role in applying the style to multiple elements at once. We can use the inline CSS using the “style” attribute.
But what if we want to apply the same CSS to 15 elements, we have to do that 15 times. What if something needs to be changed? We have to do that edition again 15 times. A smart choice is to use the selector, group elements using the identifier and apply CSS in a single place. An example of a selector is given below.
|
1 2 3 4 5 6 |
p, h1, #my_id { font-weight: bold; text-decoration: underline; } |
CSS selectors are not a unique subject to learn. They are just an enhancement to regular simple CSS styling, allowing us to select multiple elements at once. From this point onwards, we will start with the basic selectors and move our way upwards toward more complex ones.
Read How Pro-Testers Use CSS Selectors In Selenium Automation Scripts?
In this post, we will look at CSS selectors cheat sheet that will guide you in your web designing career and improve the methods you already use for selecting elements.
Let’s begin with our CSS Selectors list!
TABLE OF CONTENT
CSS Simple Selectors
The first in our list of CSS selectors cheat sheet is the Simple selectors. Simple selectors in CSS do not include any hierarchical wraps or too much logic in the CSS. CSS simple selectors just locate the element through the identifier and implement the style.
CSS Tag Selector
The easiest CSS selector to apply is to catch the “tag” from the HTML and implement the styling on it. “Tags” are the predefined HTML tags, and with CSS selectors, you can catch them all with just a single line. In the following example, we selected the tag “H1” from the HTML code and fixed its text color as red and font size as 50px.
|
1 2 3 4 5 6 7 |
<style> h1 { color: red; font-size: 50px; } </style> |
As a web developer, you would find using the CSS simple selectors a lot of the time because the team sometimes settles on a few things such as the style of all the headings or how the paragraph looks. CSS simple selectors can catch all of them and help you stylize them in no time.
CSS ID Selector
This one is the most popular CSS selector in our CSS selectors cheat sheet which is used in styling the web page. The “id” selector determines the “id” of the element which helps in the styling. IDs are a great way to tag along with various elements and then use CSS selectors or JavaScript to select those elements and perform a few operations. For example, if you want a different color for a section or page, you can use the same id for all the elements and implement the functions.
CSS Selector used with IDs starts with the symbol “#” followed by the styling:
|
1 2 3 4 5 6 7 8 |
<style> #my_id { color: red; font-size: 50px; } </style> <p id = "my_id">CSS Selector</p> |
The above code will change the color and font size of all the elements tagged with the id name “my_id”.
CSS Class Selector
Similar to the CSS ID selector, the CSS class selector selects all the elements with a particular class name. If there is at least one element with the defined class name, the styling is applied. Similar to the IDs, class names are also a great way to select multiple elements by giving them the same class.
In addition, while using some framework such as Bootstrap, we get pre-defined classes for specific elements such as “large buttons”. We can just apply CSS via class selector, and all the large buttons will be changed to the defined setting. In such cases, the CSS class selector becomes faster than the CSS ID selectors.
|
1 2 3 4 5 6 7 8 |
<style> .my_class { color: red; font-size: 50px; } </style> <p class = "my_class">CSS Class Selector</p> |
As shown in the above example of our CSS selectors cheat sheet, the “.” symbol represents a class name in CSS. In the above code, the class “my_class” is used to select the elements.
Grouping the CSS Selectors
A lot of the time, multiple elements will have the same styling configurations on a web page. So, instead of copy-pasting the same configuration multiple times for different IDs or classes, we can group them and let the web page know that these elements will share some common styling.
In the following example in our CSS selectors cheat sheet, my_id and p are combined to color them red.
|
1 2 3 4 5 6 7 8 9 10 11 12 13 14 15 16 17 18 |
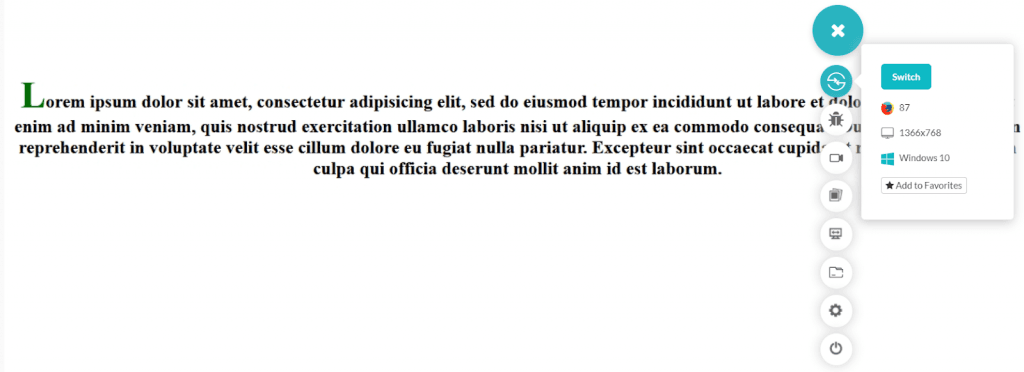
<html lang="en" dir="ltr"> <head> <meta charset="utf-8"> <title>Web Template</title> <style> #my_id, p { color: red; } </style> </head> <body> <center> <h1 id = "my_id">I am a heading</h1> <p>I am a paragraph</p> </center> </body> </html> |
Output

To group multiple selectors, just separate them with a comma as shown in the above code. The output above is taken out with the help of the LambdaTest a cloud testing platform that has 3000+ browsers and browser versions which helps you perform browser compatibility testing at scale, without worrying about the local infrastructure,
CSS Universal Selector
A website becomes unique by its unique features and signature style. An important part of establishing a signature, as an example, is the font type. Websites use unique and different font types as users often remember the website with these small features. When they see the same font anywhere else, that reminds them of your website. Hence, mission accomplished!
Such ambitious thinking involves changing the font type (or any other property) of the complete website. We cannot implement the property everywhere on the web page. Anyways, we try to reduce the repetitive behaviour with CSS Selector and not increase them. Therefore, CSS developers have thought about a wonderful property called universal selector that selects everything on the web page, i.e. it is universal. This has made its place in our CSS selectors cheat sheet.
|
1 2 3 4 5 6 7 8 |
<style> * { color: red; } </style> <h1 id = "my_id">I am a heading</h1> <p>I am a paragraph</p> |
The above selector in our CSS selectors cheat sheet selects every element and colors it red on the web page.
CSS Specific Class Selector
The CSS class selector has a specific selector property to satisfy the use case requirement when the developer needs to select only a particular element rather than all with the same class. For example, I just want my “p” tag to be coloured red, but I have other elements too with the same class name and tag name defined. In such situations, we can use a specific class selector that uses specific elements of the same class.
In the following example, all the elements are tagged with the class name “my_class”, but only the H1 will be coloured red.
|
1 2 3 4 5 6 7 8 |
<style> h1.my_class { color: red; } </style> <h1 class = "my_class">I am a heading</h1> <p class = "my_class">I am a paragraph</p> |
Run the above code to observe the output on your browser screen.
This brings us to the end of simple CSS selectors in our CSS selectors cheat sheet. The next section is dedicated to techniques that enable us to use a mix of different elements to target specific elements only.
CSS Combinator Selectors
The next type of selectors in our CSS selectors cheat sheet is CSS combinator selectors. As the name suggests, the CSS combinator selectors are a combination of more than one selector or, in general, more than one simple selector that is described in the above section. With the CSS combinator selectors, we can define relationships between two simple selectors and select only the elements that satisfy the relationship.
CSS Descendant Selector
The first one in this CSS selectors list is CSS descendant selector works on the descendants of the specified element. The descendant selector is written by separating two elements with space where the second element is required to be the descendant of the first element. The relationship “descendant” symbolises that the element should be inside another element (before the first element tag has been closed). When such a relationship is found, the defined style is applied to the descendant element.
|
1 2 3 4 5 6 7 8 9 10 |
<style> div p { color: red; } </style> <div> <h1>I am a heading</h1> <p>I am a paragraph</p> </div> |
Here, only the content inside the “p” tag will turn red since it is a descendant of the “div” tag.
CSS Child Selector
The CSS child selector is another selector in our CSS selectors cheat sheet which is a little bit similar to the CSS descendant selector but with this selector to work, the second element should be a child of the first element. The child selector is defined with the “>” symbol which symbolizes that the second element is the child of the first element. So, what is the difference between being a descendant and being a child? The following example in our CSS selectors list will help you understand both the concept:
|
1 2 3 4 5 6 7 8 9 10 11 12 13 14 15 16 17 18 19 20 21 22 23 24 |
<!DOCTYPE html> <html lang="en" dir="ltr"> <head> <meta charset="utf-8"> <title>Web Template</title> <style> div > h3 { color: red; } </style> </head> <body> <br><br> <center> <div> <h3>I am a child</h3> <h3>I am a child</h3> <span><h3>I am a descendant</h3></span> <h3>I am a child</h3> </div> </center> </body> </html> |
Output
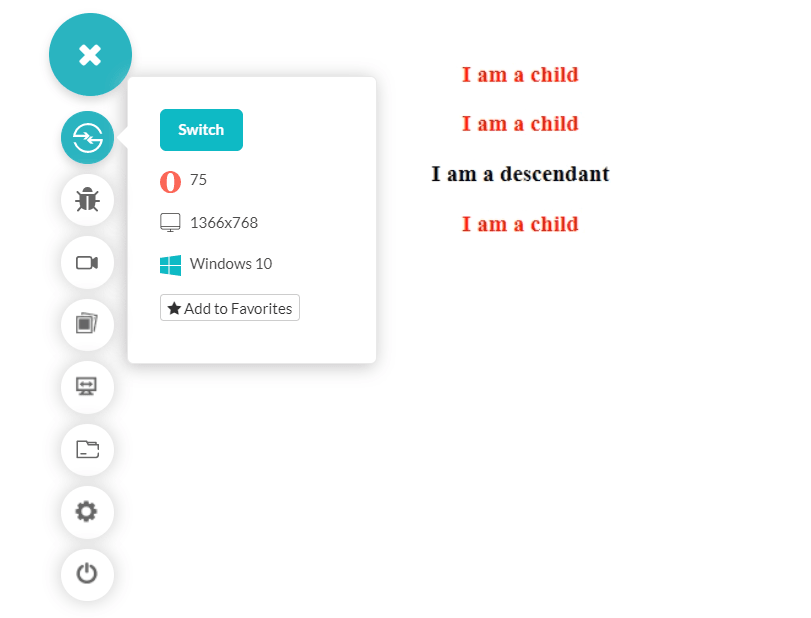
The third “p” tag is inside the “div” tag but not directly (as it is inside the span tag). Therefore, the third “p” is not a child of the “div” tag, whereas it is a child of the span tag. Hence the third “p” tag does not get the red colour.
CSS Adjacent Sibling Selector
The next selector in our CSS selectors list is the CSS adjacent sibling selector. The CSS adjacent sibling selector selects the element, which is directly followed by the first element. All the other elements sequences are ignored, and only the directly followed element is considered. Note that the element has to be “followed” and not be “inside” the element. The CSS adjacent sibling selector is symbolized by the symbol “+”. In the following example, we check for the adjacent “h3” tag inside the “div” tag.
|
1 2 3 4 5 6 7 8 9 10 |
<style> div + h3 { color: red; } </style> <div> <h3>I am not adjacent</h3> <h3>Me neither</h3> </div> <h3>I am adjacent</h3> |
Run the above code and observe which one of the H3 content gets red in the browser.
CSS General Sibling Selector
The CSS general sibling selector selects all the siblings, i.e. whenever the element is followed instead of the first sibling which happens in the CSS adjacent sibling selector. The CSS general sibling selector is just the generalised form of the adjacent sibling selector in CSS. The following code uses the same snippet as above, tweaking its selector.
|
1 2 3 4 5 6 7 8 9 10 11 12 13 14 15 16 17 18 19 20 21 22 23 |
<html lang="en" dir="ltr"> <head> <meta charset="utf-8"> <title>Web Template</title> <style> div ~ h3 { color: red; } </style> </head> <body> <br><br> <center> <div> <h3>I Am Not Adjacent</h3> <h3>Me Neither</h3> </div> <h3>I am adjacent</h3> <h3>Me Too</h3> </center> </body> </html> |
Output
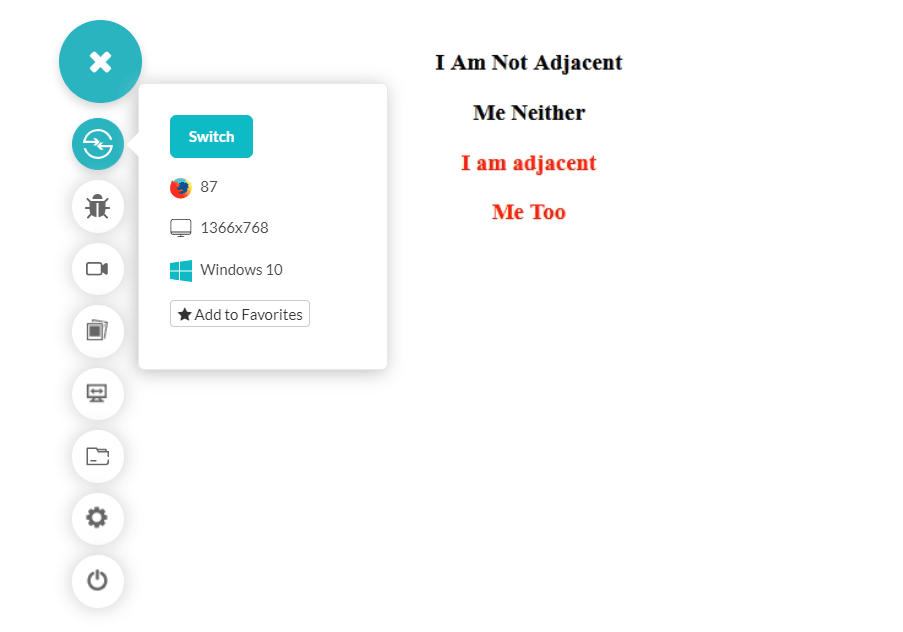
As seen in the above image, all the siblings of the “div” tag named “p” are colored red. Note that sibling, children and descendant here references the document object model of the webpage.
CSS Pseudo-Class Selectors
CSS pseudo-class selectors are popular ones in our CSS selectors cheat sheet used while styling the components with conditions. Pseudo-classes get hold of the elements on particular states rather than without any condition as done by the CSS simple selectors. For example, the pseudo-class hover selects the elements only when the mouse is moved over to the element. Pseudo-classes give us more control and enable us to style elements quickly without taking any help from JavaScript.
CSS Link Pseudo Class Selector
The first pseudo-class in our CSS pseudo-class selector list is the link selector. The link selector applies the styling to the unvisited link of the element we attach this class to. To use the link pseudo-class selector, the “link” keyword is used along with the pseudo-class symbol “:”. The following example uses the link pseudo-class selector on the anchor tag.
|
1 2 3 4 5 6 7 |
<style> a:link { color: red; } </style> <a href = "www.google.com">This is an unvisited link</a> |
The above link will appear red until visited. Note that the “href” attribute plays a vital role in the link pseudo-class. Even though the anchor tag is used for the link will not be recognized without the “href” tag. Hence, the pseudo-class selector will not work.
CSS Visited Pseudo Class Selector
The link pseudo-class selector works on the unvisited links. When we click the same link, the visited flag is turned on with respect to that link so the user can know that he has already visited it. The visited pseudo-class selector applies the styling to the visited links. The keyword used here is “visited”, along with the “:” symbol for pseudo-class.
|
1 2 3 4 5 6 7 |
<style> a:visited { color: red; } </style> <a href = "https://www.google.com" target="_blank">This is a link</a> |
The link will turn red after the user has clicked it.
CSS Hover Pseudo Class Selector
The hover pseudo-class selector works when the mouse is hovered over to the element to which the selector is attached. CSS hover pseudo-class brings out some unique styling elements such as changing the background colour etc. The hover pseudo-class is identified by the keyword “hover” and the “:” symbol for pseudo-class.
|
1 2 3 4 5 6 7 8 9 10 11 12 13 14 15 16 17 18 19 20 21 22 23 24 |
<!DOCTYPE html> <html lang="en" dir="ltr"> <head> <meta charset="utf-8"> <title>Web Template</title> <style> .my_div { background-color: blue; width: 300px; height: 300px; } .my_div:hover { background-color: red; } </style> </head> <body> <br><br> <center> <div class="my_div"></div> </center> </body> </html> |
Output
As you can see in the above example of our CSS selectors cheat sheet, the div box uses the hover tag to change its background from blue to red on a mouse hover.
CSS Active Pseudo-Class Selector
Next in our CSS selectors list is the CSS active pseudo-class selector. The active pseudo-class selector selects the element when selecting the element with the mouse (the mouse-click). The active pseudo-class selector is identified with the “active” keyword along with the pseudo-class symbol “:”.
|
1 2 3 4 5 6 7 8 9 10 11 |
<style> .my_div { background-color: blue; width: 300px; height: 300px; } .my_div:active { background-color: red; } </style> <div class="my_div"></div> |
Run the above-tweaked code to notice the difference between the hover and active pseudo-classes.
CSS Checked Pseudo-Class Selector
Another pseudo-class selector in the CSS selectors cheat sheet is the CSS checked selector. The checked selector selects the element when it is in the “checked” state. Since a “checked” state is required, it works on the checkbox and radio buttons only. The keyword used is “checked” along with the “:” symbol. The following code changes the colour of the text when the checkbox is checked.
|
1 2 3 4 5 6 7 |
<style> input[type = checkbox]:checked + label{ color: red; } </style> <input type="checkbox" class="my_button" value="Radio Button"> <label for = "check_button">Radio Button</label> |
Note: The above code uses the CSS attribute selector, which will be discussed in the next section.
The code changes the text colour from black to red. A popular use case of using the CSS checked selector is for building up the image gallery with thumbnails that can be viewed only when the user checks the thumbnail. Such examples can be seen on e-Commerce websites.
CSS First-Child Pseudo-Class
The first-child CSS class selector selects the first child among all the occurrences of the element. The first-child pseudo-class is identified by the term “first-child” along with the “:” symbol. In the following example of our CSS selectors cheat sheet, notice how the first “p” child gets selected on the web page with the following code:
|
1 2 3 4 5 6 7 8 |
<style> p:first-child{ color: red; } </style> <p>This is the first child</p> <p>This isn't</p> |
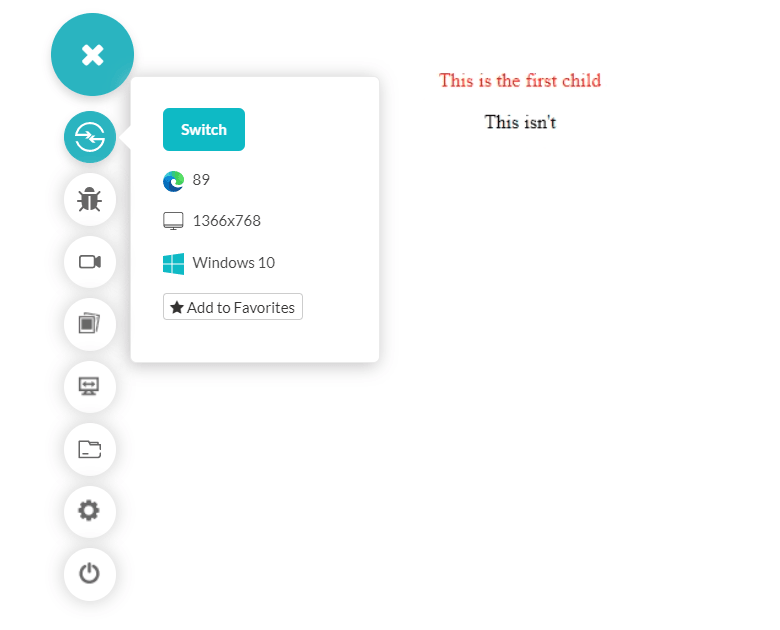
The first child is selected and turned red in the above example. A more clearer picture can be drawn by looking at the following example that uses CSS selector groups and the first-child pseudo-class together:
|
1 2 3 4 5 6 7 8 9 10 11 12 13 14 15 16 17 18 19 20 21 22 23 24 25 26 27 |
<!DOCTYPE html> <html lang="en" dir="ltr"> <head> <meta charset="utf-8"> <title>Web Template</title> <style> ul li:first-child{ color: red; } </style> </head> <body> <br><br> <ul> <li>I am the first-child</li> <li>Am I?</li> <li>Am I?</li> <li> <ul> <li>I am the first-child</li> <li>Am I?</li> <li>Am I?</li> </ul> </li> </ul> </body> </html> |
Output
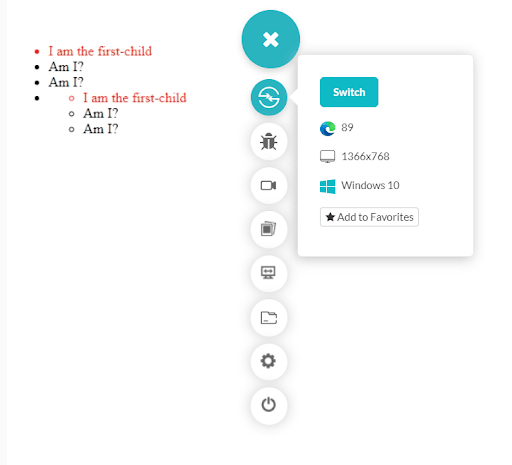
Notice how two “li” tags get the red colour as they both are the first “li” after a “ul” tag. Hence, they both are first-child. These operations are good for heading related purposes and scenarios where the first element denotes what is being followed.
Other Popular CSS Pseudo Classes
The following table denotes some of the more common pseudo-classes in our CSS selectors list. You can try them and mix them to make colourful and logical web pages.
Input: disabled |
||
h1:empty |
||
input:enabled |
||
input:focus |
||
p:last-child |
||
p:nth-child(4) |
||
p:nth-child(4) |
||
p:only-child |
||
input:read-only |
Combining Pseudo-Classes with CSS Classes
In addition to our list of pseudo-classes and ultimately our CSS selectors list, we can combine them with the CSS classes to narrow down our selections and make our selectors work less in finding the elements. We can select the specific classes tagged along with the HTML tags and use pseudo-class selectors on them with this combination. In the example below, I have assigned a class to one of the div tags to select later using the selectors.
|
1 2 3 4 5 6 7 8 9 10 11 12 13 14 15 16 17 18 19 20 21 22 23 24 25 26 |
<!DOCTYPE html> <html lang="en" dir="ltr"> <head> <meta charset="utf-8"> <title>Web Template</title> <style> div { background-color: blue; width: 300px; height: 300px; } div.my_div:hover{ background-color: red; } </style> </head> <body> <br><br> <center> <div></div> <br><br> <div class="my_div"></div> </center> </body> </html> |
Output
It’s easier and convenient than applying multiple classes and multiple selectors to achieve our objectives.
CSS Pseudo Element Selectors
Similar to the pseudo-classes, our CSS selectors list contains another similar property called pseudo-element selectors. With pseudo-classes, we select the complete element and apply the styling to it. In pseudo-elements, instead of the complete element, we grab a specific part of the element and apply the styling on only those parts. They are accommodating in certain situations, such as inserting some element before a particular tag etc.
Pseudo element selectors are identified by double colon instead of one as we used in pseudo-class. This notation was introduced in the CSS specification Level 3 to distinguish pseudo-elements from pseudo-classes. Before CSS 3, both of them used single colon notification. Let’s see some important pseudo-elements used in CSS selectors.
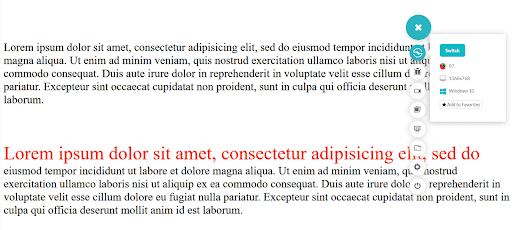
CSS First-Line Pseudo-Element Selector
The first and one of the most commonly used pseudo-element selector in our CSS selectors list is the “first-line” selector. There is no science involved in decoding what this selector does. When we need to style the first line of the element, we use the “first-line” selector. The keyword used is “first-line” along with the “::” symbol of pseudo-element.
|
1 2 3 4 5 6 |
<style> h2::first-line{ color: green; } </style> <h2>Your Text</h2> |
The above code will turn the first line’s colour into green. Note that the “first-line” pseudo-element is applicable only on the block-level elements on the web page. As a developer, you can make use of the following HTML or CSS properties while working with the “first-line”:
- font properties
- color properties
- background properties
- word-spacing
- letter-spacing
- text-decoration
- vertical-align
- text-transform
- line-height
- clear
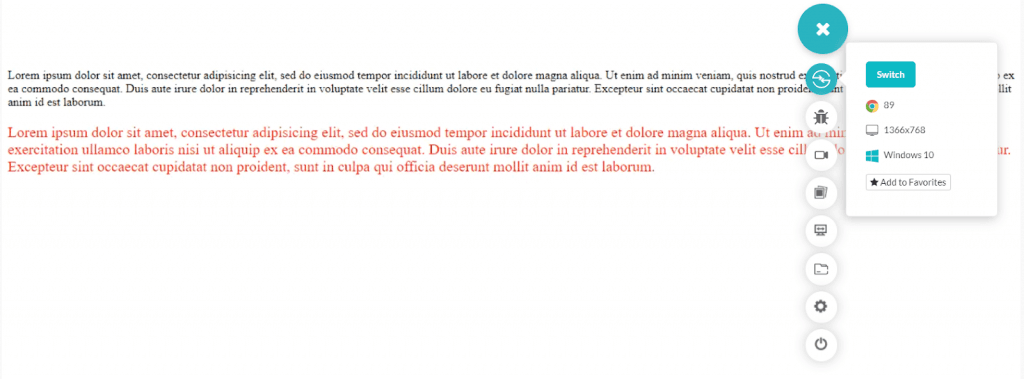
CSS First-Letter Pseudo-Element Selector
Next in our CSS selectors cheat sheet is The “first-letter” pseudo-element CSS selector which selects the first letter of the element we tag it to. The first-letter element then applies the defined styling to that letter. The “first-letter” pseudo-selector is very common in article writing. We often see the first letter being bigger and bolder with a different colour or any other such styling. This can be achieved through the keyword “first-letter” along with the pseudo-element symbol “::”.
|
1 2 3 4 5 6 7 8 9 10 11 12 13 14 15 16 17 18 19 20 |
<html lang="en" dir="ltr"> <head> <meta charset="utf-8"> <title>Web Template</title> <style> h2::first-letter{ color: green; font-size: 50px; } </style> </head> <body> <br><br> <center> <div></div> <br><br> <h2>Text</h2> </center> </body> </html> |
Output
The above code magnifies the first element and changes its colour.
Like the “first-line” pseudo-element, the “first-letter” element can also be applied only to the block-level elements. As a web developer, the following properties can be used along with the “first-letter” pseudo-element:
- font properties
- color properties
- background properties
- margin properties
- padding properties
- border properties
- text-decoration
- vertical-align (only if “float” is “none”)
- text-transform
- line-height
- float
- clear
CSS Before Pseudo Element Selector
The CSS, “before” pseudo-element selector, adds up the content before the target element. The content can be as per the UI styling approved by the team. An example can be to use the inverted commas before starting the heading in HTML. A similar thing can be noticed with the below example in our CSS selectors cheat sheet:
|
1 2 3 4 5 6 |
<style> p::before{ content: "««"; font-size: 25px; } </style> |
The above code will insert «« before the start of every paragraph.
CSS After Pseudo Element Selector
As the CSS “before” element works placing the content before the target element, the CSS after pseudo-element places the content after the target element. The following code demonstrates the before and after pseudo-element used in a paragraph.
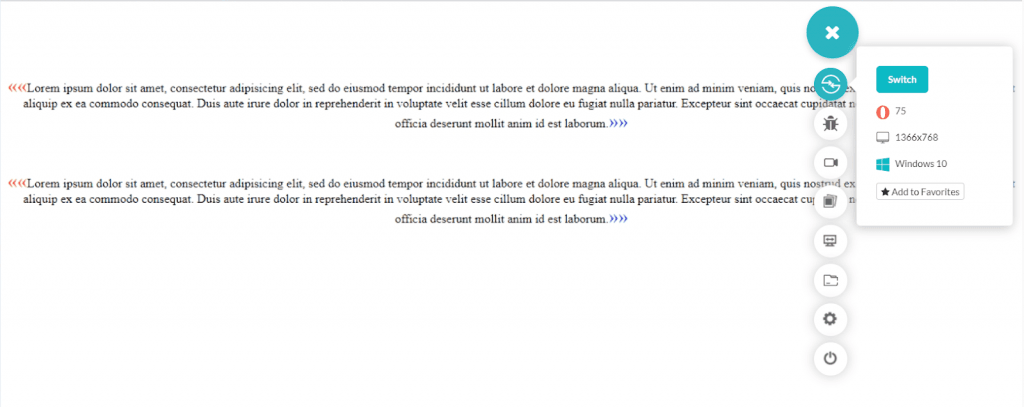
The above code uses some styling elements for a start and the end of a paragraph. CSS “before” and “after” pseudo-elements are very common and very subtle in their usage. Often, you will see the elements but won’t notice anything special because it’s used too commonly today.
Adding an image before the start of an element or some design elements or even applying inverted commas all work great with the after and before CSS pseudo-element. There are hundreds of use cases for the “before” and “after” pseudo-elements in CSS. If you have used something unique, we call for such designs in the comment section that are unique and help other people think creatively.
CSS Marker Pseudo Element Selector
Next in our CSS selectors cheat sheet is the CSS marker pseudo-element that selects the marker element from the web page and applies the defined styling onto it. The marker elements are the bullet points, numbered points or any other “li” element. The following code will mark the markers into the red colour:
|
1 2 3 4 5 6 7 8 9 10 |
<style> ul li::marker{ color: red; } </style> <ul> <li>The first element</li> <li>The second element</li> <li>The third element</li> </ul> |
The above code will turn the bullet points into a red colour. Since we are constrained to use the marker only on a selected few elements, we are also constrained to the things we can do with the marker elements. The below-given list will enlighten you with the properties that can be used with the marker CSS pseudo-element.
- The font-properties.
- The color properties.
- Direction, unicode-bidi and text-combine-upright properties.
- The white-space property.
- The content property.
- All animation and transition properties.
The marker property was also introduced in the CSS level 3 specification. If you are working with CSS level 1 or 2 (which is not recommended), this property might give you a bit of trouble.
CSS Selection Pseudo-Element Selector
The CSS selection pseudo-element selector applies the styling to that part of the target element that has been selected by the user. They are a good candidate when there is too much content to let the user focus on a few words while reading. Thus making it an important addition to our CSS selectors cheat sheet list. The following code will colour the selected text improving the text readability.
|
1 2 3 4 5 6 7 8 9 10 11 12 13 14 15 16 17 18 19 20 21 |
<!DOCTYPE html> <html lang="en" dir="ltr"> <head> <meta charset="utf-8"> <title>Web Template</title> <style> p{ font-size: 30px; } p::selection{ color: red; font-size: 50px; } </style> </head> <body> <br><br> <br><br> <p>Your Text</p> </body> </html> |
Output
The above code turns the selected text to red. As you can see, the selection CSS pseudo-element selector works with the text; there are very few properties that can support this selector. The properties that can be used with the selection CSS pseudo-element are as follows:
- text-decoration property.
- text-shadow property.
- All the color properties including background-color.
- stroke-color, fill-color and stroke-width.
- cursor properties.
- outline properties.
While working with the colours in the selection pseudo-element, keep in mind the accessibility and W3C guidelines on contrasts. Since many devices are associated with the internet, browser compatibility testing and maintaining a well-constructed page is an add-on.
Combining Pseudo-Elements with CSS classes
Pseudo-elements in CSS can also be combined with the CSS classes similar to the pseudo-classes discussed above. This gives more control to the developers on the element and a little more flexibility. With this combination, you can go all creative and bring out a unique design on the web page.
The following code combines a pseudo-element with the CSS class:
|
1 2 3 4 5 6 7 8 9 10 11 12 13 14 15 16 17 18 19 20 21 22 |
<html lang="en" dir="ltr"> <head> <meta charset="utf-8"> <title>Web Template</title> <style> p{ font-size: 30px; } p.my_class::first-line{ color: red; font-size: 50px; } </style> </head> <body> <br><br> <br><br> <p>Your Text</p> <br><br> <p class="my_class">Your Text</p> </body> </html> |
Output
Only the “p” tag with the defined class is selected and coloured red in the above code.
Note that you can also use multiple pseudo-elements targets to the same element like first-letter and first-line etc. Multiple elements work with pseudo-elements.
CSS Attribute Selectors
Next is the CSS Attribute Selectors in our CSS selectors cheat sheet. Web developers are quite familiar with the attributes used during the construction of a web page. Attributes help us provide specific instructions to the web elements and mould their working accordingly.
Attributes also give us more options to play with the element and more control to handle these elements through JavaScript or CSS. CSS developers have thought about the similar composition and included the attributes in their selector library. These selectors that work with the attributes are called CSS attribute selectors, and in this section, we shall see a few of them with examples and demonstrations.
The general syntax of using the CSS attribute selectors is as follows:
|
1 2 3 |
element [attribute] { //styling } |
CSS [attribute] Selector
The first in our CSS selectors list of attribute selectors is the CSS [attribute] selector. This is the simplest of all the selectors and requires just the attribute name in the parameters. All the elements in the web page that contains this attribute name will be selected to apply the styling.
The following code performs CSS styling on the “p” elements that have the “lang” attribute:
|
1 2 3 4 5 6 |
p[lang]{ color: red; font-size: 20px; } <p lang = “en”>Your Text</p> <p>Your Text</p> |
Run the above code in any browser to see the difference in styling in both “p” tags.
CSS [Attribute = Value] Selector
The developer can also target an attribute with a specific value to narrow down their selection of elements. Rest everything remains the same as CSS [attribute] selector. The syntax for the same is as follows:
|
1 2 3 4 |
element [attribute = “value”] { //styling } |
We can tweak the above code to target only the paragraphs written in the “en” language.
|
1 2 3 4 5 6 7 8 9 10 11 12 13 14 15 16 17 18 |
<html lang="en" dir="ltr"> <head> <meta charset="utf-8"> <title>Web Template</title> <style> p[lang = "hi"]{ color: red; font-size: 20px; } </style> </head> <body> <br><br> <br><br> <p lang="en">Your Text</p> <p lang = "hi">Your Text</p> </body> </html> |
Output
As expected, only the attribute “lang” with a value “hi” is selected, and the specified styling is applied to it.
CSS [Attribute ~= “Value”] Selector
Next one in our CSS selectors cheat sheet is the CSS [Attribute ~= “value”] is an enhancement to the CSS [Attribute = “Value”] with a small added capability. The CSS [Attribute ~= “value”] can select the element if it includes the word “value” in the attribute specified. For example, the following code looks for the value “shirt” in the attribute “title”.
|
1 2 3 4 5 6 7 8 9 |
<style> p[title ~= "shirt"]{ color: red; font-size: 20px; } </style> <p title="blue shirt">Your Text</p> <p title="red shirt">Your Text</p> <p title="hoodie">Your Text</p> |
The above code selects the first two paragraphs since they have a shirt in their title, which is the target attribute.
CSS [attribute |= “value”] Selector
The CSS[attribute |= “value”] selector selects all those attribute values that start with the word “value”. The following code demonstrates the selector:
|
1 2 3 4 5 6 7 8 9 |
<style> p[title |= "shirt"]{ color: red; font-size: 20px; } </style> <p title="shirt-blue">Your Text</p> <p title = "shirt-red">Your Text</p> <p title = "hoodie">Your Text</p> |
The above code colours the first two paragraphs into red colour. Note that CSS[attribute |= “value”] selector works only when the value is either a single word in the attribute such as only “shirt” or is hyphenated as “shirt-blue”. White space in between will not be selected by the CSS for styling. The value has to be one word. For example, the following code will only select the middle paragraph:
|
1 2 3 |
<p title="shirt blue">Your Text</p> <p title = "shirt-red">Your Text</p> <p title = "hoodie">Your Text</p> |
Be cautious before using this CSS selector in your CSS sheet.
CSS [attribute ^= “value”] Selector
The shortcoming of CSS[attribute |= “value”] is fulfilled by the CSS[attribute ^= “value”] selector. With this selector, the attribute value need not be a whole word (single or hyphenated). Any value that starts with the word “value” will be selected for styling. The following code demonstrates the working of the CSS [attribute ^= “value”] selector:
|
1 2 3 4 5 6 7 8 9 10 11 12 13 14 15 16 17 18 19 20 |
<!DOCTYPE html> <html lang="en" dir="ltr"> <head> <meta charset="utf-8"> <title>Web Template</title> <style> p[title ^= "shirt"]{ color: red; font-size: 20px; } </style> </head> <body> <br><br> <br><br> <p title="shirt-blue">Your Text.</p> <p title = "shirt red">Your Text.</p> <p title = "hoodie">Your Text.</p> </body> </html> |
Output
As seen in the above screenshot, the first two paragraphs are coloured red even though one of the attribute values is a two word but starts from the word “shirt”.
CSS [attribute $= “value”] Selector
The CSS[attribute $= “value”] selector works just opposite to the CSS[attribute ^= “value”] selector. While the ^ attribute selector finds the beginning with the word “value”, the $ attribute selector finds the ending with the word “value”. The following code demonstrates the working of CSS [attribute $= “value”] selector:
|
1 2 3 4 5 6 7 8 9 |
<style> p[title $= "shirt"]{ color: red; font-size: 20px; } </style> <p title="blue shirt">Your Text</p> <p title = "shirt red">Your Text</p> <p title = "hoodie">Your Text</p> |
The above code colours the first paragraph into red colour. Note that the CSS [attribute $= “value”] selector does not ask for a single or hyphenated word (one word). The attribute values with multiple attributes are selected until they end with the word “value”.
CSS [attribute *= “value”] Selector
The CSS [attribute *= “value”] selector works like the regular expression checker which selects every element with the target attribute having value composed of “value”. The value need not be a whole word. The selector works even if the “value” is a part of the attribute value.
|
1 2 3 4 5 6 7 8 9 |
<style> p[title *= "rt"]{ color: red; font-size: 20px; } </style> <p title="blue shirt">Your Text.</p> <p title = "shirt red">Your Text</p> <p title = "hoodie">Your Text</p> |
The above code selects the first two paragraphs and color them red.
CSS attribute selectors are vital components of our CSS selectors cheat sheet as they provide an easy way for developers to to target a lot of elements (generally input elements) and style them according to the attributes. Another important use case in CSS attribute selectors is while using the forms and other input-based elements. They can also be combined using the class, ID or selector as demonstrated in pseudo-elements and pseudo-classes. This one can be a good exercise for you.
Conclusion
The CSS selectors are an essential part of the specification that gets many new additions with every release. Not only does it bring down the redundant code from the HTML file, but it also improves efficiency and helps us stylize the web page more freely.
While all the advanced CSS Selectors offer high cross-browser compatibility, a developer always needs to perform browser compatibility testing to ensure no browser compatibility issues occur. LambdaTest can be a go-to option while testing CSS Selectors implementation. You can perform browser compatibility testing of your websites and web apps once across 3000+ browsers and OS combinations.
I hope this CSS selectors cheat sheet helps you ahead in your professional career and if there are any suggestions, feel free to comment them down to help us refine the post for good.

Frequently Asked Questions (FAQs)
What is a CSS selector cheat sheet?
A CSS selector cheat sheet is a reference guide that provides a quick overview of different CSS selectors and their syntax. It helps web developers and designers easily understand and select HTML elements using CSS selectors.
Why is a CSS selector cheat sheet useful?
A CSS selector cheat sheet is useful because it saves time and effort when writing CSS code. It allows developers to quickly find and use the appropriate CSS selector for styling specific HTML elements. It serves as a handy reference tool for both beginners and experienced developers, ensuring accurate and efficient CSS selection.
What information can I find on a CSS selector cheat sheet?
A CSS selector cheat sheet typically includes a comprehensive list of CSS selectors along with their descriptions and examples. It may cover various selector types, such as element selectors, class selectors, ID selectors, attribute selectors, pseudo-classes, and pseudo-elements. The cheat sheet may also provide tips and tricks for using selectors effectively.
Where can I find a CSS selector cheat sheet?
There are numerous online resources where you can find CSS selector cheat sheets. Many web development websites, blogs, and forums offer downloadable or printable cheat sheets for free. Additionally, CSS documentation or tutorials often include selector references. A simple web search for “CSS selector cheat sheet” will yield multiple options to choose from.
How to use the CSS selector in Selenium?
To use CSS selectors in Selenium, identify elements on a web page using CSS selector syntax. CSS selectors provide a concise and powerful way to locate elements based on their attributes, classes, or hierarchy. Selenium’s findElement() or findElements() methods can be used with CSS selectors to interact with the desired elements during automated web testing.
How to find elements by CSS selector in Selenium?
To find elements by CSS selector in Selenium, you can use the findElement() or findElements() methods provided by the WebDriver interface. CSS selectors offer a powerful way to locate elements based on their attributes, classes, or hierarchical relationships. Selenium provides a convenient and efficient mechanism to interact with web elements using CSS selectors, allowing you to automate web testing and manipulation seamlessly.
How to write a CSS selector which contains text in Selenium?
To write a CSS selector which contains text in Selenium, you can use the “:contains()” pseudo-class. It allows you to select elements that contain specific text within their content. This selector is useful when you want to locate elements based on partial or full text matches.
Which is better XPath or CSS selector?
Both XPath and CSS selectors have their advantages and best use cases. CSS selectors are generally more intuitive and widely supported, making them the preferred choice for selecting elements based on their attributes, classes, or IDs. However, XPath offers more flexibility and power when dealing with complex document structures or navigating through the DOM. Ultimately, the choice between XPath and CSS selector depends on the specific requirements and context of the project.


Author’s Profile
Harish Rajora
I am a computer science engineer. I love to keep growing as the technological world grows. I feel there is no powerful tool than a computer to change the world in any way. Apart from my field of study, I like reading books a lot and write sometimes on https://www.themeaninglesslife.com .
Blogs: 88
Got Questions? Drop them on LambdaTest Community. Visit now