How To Use Annotations In Cucumber Framework [Tutorial]
Gunjan Kaushik
Posted On: August 10, 2021
![]() 236251 Views
236251 Views
![]() 13 Min Read
13 Min Read
This article is a part of our Content Hub. For more in-depth resources, check out our content hub on Selenium Cucumber Tutorial.
Cucumber is one of the most popular open-source BDD frameworks that facilitates Selenium test automation. It offers a set of tools that helps us to manage the various scenarios available in multiple feature files. We have already seen how to configure Cucumber and write a basic Cucumber test using a feature file in our earlier blog on automated testing with Selenium and Cucumber. However, it doesn’t suffice when you are working on complex projects involving multiple feature files.
To handle multiple feature files and the multiple scenarios in each of the files, there is an inherent need for functionality to manage the execution of these scenarios. This is where Cucumber provides us a handful of utilities to ease the maintenance of our framework.

This Cucumber tutorial will help you learn about Cucumber annotations ranging from tags, Cucumber hooks, and more. However, you can refer to this guide for configuring the Cucumber setup In Eclipse and IntelliJ if you haven’t configured it in your machine yet. If you’re looking to improve your Cucumber interview skills, check out our curated list of Cucumber interview questions and answers.
Let’s look into following Cucumber annotations individually and explore more in this Cucumber tutorial.
How To Use Cucumber Tags
Automation frameworks today offer several APIs to cover various situations. But you can’t really mock everything! It’s cumbersome to mock every scenario in a new file, and it’s not a good deal to leave them in the existing file. So instead, we can use cucumber tags to separate the multiple scenarios in a single file and execute only one of them.
If you are familiar with TestNG, you would know how to specify the test method to be included or excluded in the XML file (refer to our TestNG tutorial for more).
While performing automation testing with Cucumber, you may use Tags in the feature file. Tags are nothing but a meaningful name you may give to your test scenario in the feature file. The ideal way to use tags is by using ‘@.’
For example; To mark a scenario as a regression test case in your framework, you may tag it as ‘@RegressionTest’ right above the scenario in the feature file.
Once you define the tags for your scenario, you may specify which scenario you would like to execute in your runner file. You may either tag the scenario or the entire feature file that the Scenario, Outline, etc., will then automatically inherit.
Below is an example of running multiple selective tests or a single feature file using the Cucumber annotation- Tags.

Read – Cucumber Best Practices For Selenium Automation
Execution of Selective Scenarios using Tags
Let us consider an example where multiple scenarios are present in a feature file with different tags, as shown below:
|
1 2 3 4 5 6 7 8 9 10 11 12 13 14 15 16 17 18 19 20 21 22 23 24 25 |
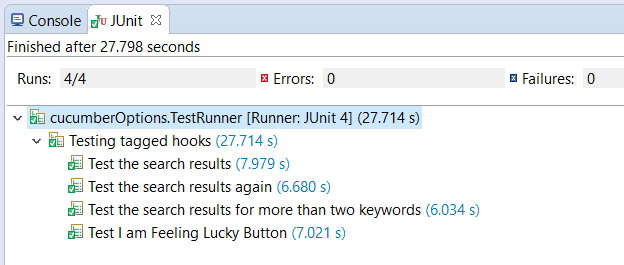
@Test Feature: Testing tagged hooks @Regression Scenario: Test the search results Given Google is open in the browser When User searches for Lambda Test Then Results are displayed @Sanity Scenario: Test the search results again Given Google is open in the browser When User searches for Selenium cross browser testing Then Results are displayed @E2E Scenario: Test the search results for more than two keywords Given Google is open in the browser When User enters more than two keywords Then Results are displayed @Sanity @Regression Scenario: Test I am Feeling Lucky Button Given Google is open in the browser When User clicks on I am Feeling Lucky button Then Results are displayed |
Now, let us try to execute only the tests with the tag as ‘@Sanity’ using the Runner class as shown below:
On executing the above file, you will see that only two tests are executed, tagged as @Sanity.
Here is one more example where we will execute the entire Feature File using its tag.
Execution of Feature File using Tags
The updated test runner file would look like below:
|
1 2 3 4 5 6 7 8 9 10 |
package cucumberOptions; import org.junit.runner.RunWith; import io.cucumber.junit.Cucumber; import io.cucumber.junit.CucumberOptions; @RunWith(Cucumber.class) @CucumberOptions(features="src/test/java/features/single.feature", glue="stepDefinitions", tags="@Tests") public class TestRunner { } |
On executing this file, we will notice all the scenarios under the feature file are executed.
So far in this Cucumber tutorial, we have seen execution through a single tag. Let us now explore the scenarios under which more than one tag is executed. To implement, we may use the logical operators either AND or OR. Let us see examples of each.
Execution of Scenarios using Tags with Logical Operators
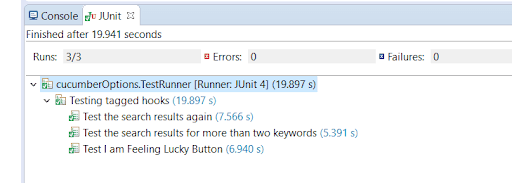
To execute scenarios that are using either @Sanity or @E2E tag, we will use the OR keyword as shown in the code below:
|
1 2 3 4 5 6 7 8 |
package cucumberOptions; import org.junit.runner.RunWith; import io.cucumber.junit.Cucumber; import io.cucumber.junit.CucumberOptions; @RunWith(Cucumber.class) @CucumberOptions(features="src/test/java/features/single.feature", glue="stepDefinitions", tags="@Sanity or @E2E") public class TestRunner { } |
You will see that three tests are executed that have either the @Sanity or @E2ETest tag.
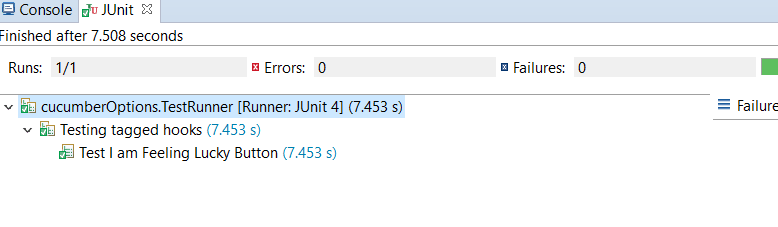
Similarly, we will use the AND operator to execute scenarios with both @Sanity and @Regression tags. The below code has been updated to run the same scenario.
|
1 2 3 4 5 6 7 8 9 10 11 |
package cucumberOptions; import org.junit.runner.RunWith; import io.cucumber.junit.Cucumber; import io.cucumber.junit.CucumberOptions; @RunWith(Cucumber.class) @CucumberOptions(features="src/test/java/features/single.feature", glue="stepDefinitions", tags="@Sanity and @Regression") public class TestRunner { } |
And here you go! You will see just one test is tagged while both the tags are getting executed.
Now here comes another use case! What if you want to execute all the tests but ignore a few? How do we do that?
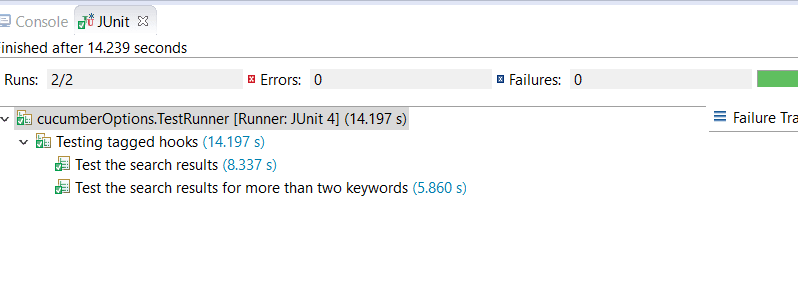
Well, you can use the same tags but with a ‘not’ preceding the tag. If you add ‘not’ before the tag name in the runner class, you will notice that the scenarios under the tag get skipped, as shown in the below example:
|
1 2 3 4 5 6 7 8 9 10 11 |
package cucumberOptions; import org.junit.runner.RunWith; import io.cucumber.junit.Cucumber; import io.cucumber.junit.CucumberOptions; @RunWith(Cucumber.class) @CucumberOptions(features="src/test/java/features/single.feature", glue="stepDefinitions", tags="not @Sanity") public class TestRunner { } |
The execution would happen for all the scenarios except the ones tagged with @Sanity.
Next in this Cucumber tutorial, we will learn about Cucumber Hooks, which like other Cucumber annotations, are code blocks that can be executed either before or after scenarios.
How To Work With Cucumber Hooks
You may know that multiple prerequisites are required at the start of test execution. Right from setting up the web driver, browser settings to cookies, navigating to the specific URL, etc.
Similarly, some steps must be performed after executing the test scenarios, like killing the web driver connection, clearing browser cookies, generating reports, etc. Such cases can be easily handled using one particular type of Cucumber annotations, namely Cucumber Hooks.
You might have worked across different TestNG annotations, like BeforeTest, BeforeMethod, BeforeSuite, AfterTest, AfterMethod, AfterSuite, etc. Unlike TestNG, Cucumber provides only two hooks, i.e., before and after. We will now see how we can implement these Cucumber hooks in our tests.
Implementing Cucumber Hooks
In this section of the Cucumber tutorial, we will now see how Cucumber hooks can be implemented for basic scenarios. We will cover examples where we have a single scenario and one with multiple scenarios.
Below is an example of a feature file with a single feature.
|
1 2 3 4 5 6 |
@SingleFeature Feature: Testing hooks from a single feature file Scenario: Test the search results Given Google is open in the browser When User searches for Lambda Test Then Results are displayed |
Next, let us create a simple step definition file for the feature file we just created.
Further, we will create the Java class for the Cucumber hooks to implement in our framework. This class is created under the stepDefinitions package, as shown in the below code:
Note that I am using simple text inside hooks methods, and you may use more logical steps and their corresponding code for your Selenium test automation.
We need to create the step definitions for the specific feature by calling the @SingleFeature tag we used for our feature file in the runner class, as shown in the below code snippet:
|
1 2 3 4 5 6 7 8 9 10 11 12 |
package cucumberOptions; import org.junit.runner.RunWith; import io.cucumber.junit.Cucumber; import io.cucumber.junit.CucumberOptions; @RunWith(Cucumber.class) @CucumberOptions(features="src/test/java/features", glue="stepDefinitions", tags="@SingleFeature") public class TestRunner { } |
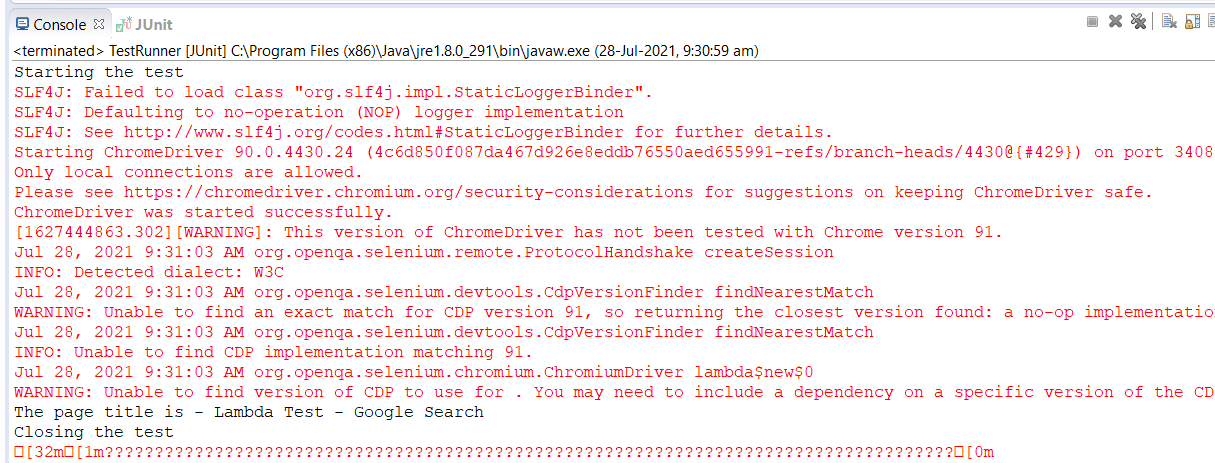
On executing the above code, you will see that the execution of the @Before and @After hook provides the following result:
Now that we have covered an example with a single feature let’s take the example with multiple feature files. We will add one more feature to the project and execute these scenarios in parallel using the Maven Surefire Plugin.
Feature File 1
|
1 2 3 4 5 6 7 8 9 10 |
Feature: Testing hooks from a single feature file Scenario: Test the search results Given Google is open in the browser When User searches for Lambda Test Then Results are displayed Scenario: Test the search results again Given Google is open in the browser When User searches for Selenium cross browser testing Then Results are displayed |
Feature File 2:
|
1 2 3 4 5 |
Feature: Testing the hooks in parallel Scenario: Test sign up on Lambda Test Given LambdaTest is open in browser When User enters an email in the email address text box Then User lands on registration page |
Let’s have a look at the step definition files for these features.
Step Definition File 1:
Step Definition File 2:
Next, in this Cucumber tutorial, we will configure the maven surefire plugin in our pom.xml with the parallel attribute for methods.
Plugin configuration in pom.xml:
|
1 2 3 4 5 6 7 8 9 10 11 12 13 |
<build> <plugins> <plugin> <groupId>org.apache.maven.plugins</groupId> <artifactId>maven-surefire-plugin</artifactId> <version>2.22.0</version> <configuration> <parallel>methods</parallel> <useUnlimitedThreads>true</useUnlimitedThreads> </configuration> </plugin> </plugins> </build> |
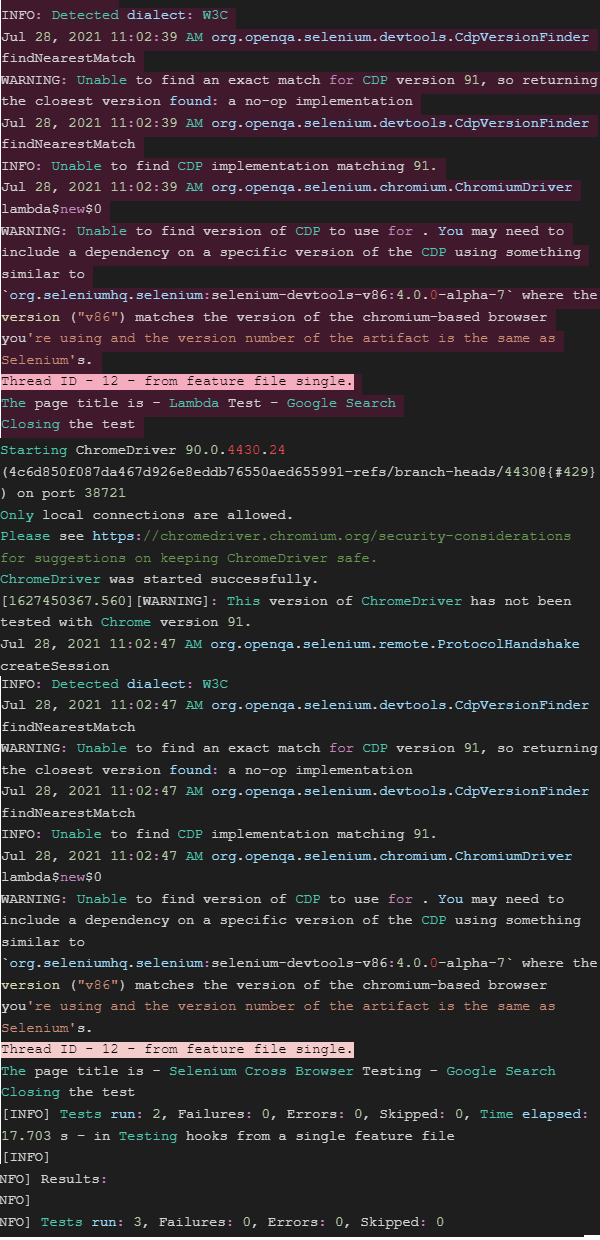
Once you execute the pom.xml using maven install or any other relevant command, you will notice that the execution results clearly show different thread numbers (refer to the three lines highlighted in pink in the logs below) for the two feature files. This indicates that our feature files were executed in parallel.
Integrating parallel test execution for Selenium test automation to the Cucumber framework saves a considerable amount of time. However, for effective parallel execution, you might face challenges in terms of resources and time. As not every user might be using the same browser with the latest version or the same resolution and operating system.
Leveraging cloud platforms like LambdaTest, which offers cross browser testing on cloud, helps you achieve maximum test coverage at a pace. LambdaTest supports an online selenium grid of 2000+ browsers, browser versions, and operating systems to accelerate automation testing with the ability to perform parallel testing at scale.
Now that we have learned about Cucumber hooks let’s explore tagged hooks in Cucumber annotations in depth.
Read: Cucumber.js Tutorial with Examples For Selenium JavaScript
You can take this certification as proof of expertise in the field of test automation with JavaScript to empower yourself and boost your career.
Here’s a short glimpse of the Selenium JavaScript 101 certification from LambdaTest:
Tagged Hooks In Cucumber
Tagged Hooks are basically the problem solvers when you need to perform different Before and After actions for different scenarios. To explain in a more simple way, think you have ten different tags like Sanity, Regression, etc., which need to be tested with different URLs. This is where Tagged hooks help you achieve that.
Let us create a simple feature file with three different scenarios to understand the concept:
|
1 2 3 4 5 6 7 8 9 10 11 |
Feature: Testing tagged hooks @CaseOne Scenario: Test the search results Given Google is open in the browser When User searches for Lambda Test Then Results are displayed @CaseTwo Scenario: Test the search results again Given Google is open in the browser When User searches for Selenium cross browser testing Then Results are displayed |
Next, we will create the step definition file for the feature.
|
1 2 3 4 5 6 7 8 9 10 11 12 13 14 15 16 17 18 19 20 21 22 23 24 25 26 27 28 29 30 31 32 33 34 35 36 37 38 39 40 41 42 43 44 |
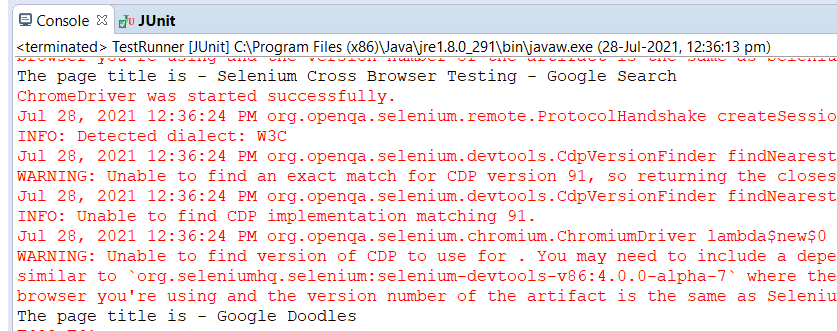
package stepDefinitions; import org.openqa.selenium.By; import org.openqa.selenium.WebDriver; import org.openqa.selenium.chrome.ChromeDriver; import io.cucumber.java.en.Given; import io.cucumber.java.en.Then; import io.cucumber.java.en.When; public class SingleOne { WebDriver driver; @Given("Google is open in the browser") public void google_is_open_in_the_browser() { System.setProperty("webdriver.chrome.driver", "D:\\Gunjan\\Selenium\\chromedriver.exe"); driver = new ChromeDriver(); driver.get("https://www.google.com/"); driver.manage().window().maximize(); } @When("User searches for Lambda Test") public void user_searches_for_lambda_test() { driver.findElement(By.xpath("//input[@name='q']")).sendKeys("Lambda Test"); driver.findElement(By.xpath("//div[@class='FPdoLc lJ9FBc']//input[@name='btnK']")).click(); } @When("User searches for Selenium cross browser testing") public void user_searches_for_Selenium_cross_browser_testing(){ driver.findElement(By.xpath("//input[@name='q']")).sendKeys("Selenium Cross Browser Testing"); driver.findElement(By.xpath("//div[@class='FPdoLc lJ9FBc']//input[@name='btnK']")).click(); } @Then("Results are displayed") public void results_are_displayed() { System.out.println("The page title is - " +driver.getTitle()); driver.quit(); } } |
Now we will create the hooks file and define the tagged hooks in it. This can be done using the @Before or the @After hook followed by the tag name of the scenario as shown in the code below:
|
1 2 3 4 5 6 7 8 9 10 11 12 13 14 15 16 17 18 19 20 21 22 23 24 25 26 27 28 29 30 31 32 33 34 35 36 37 38 39 40 41 |
package stepDefinitions; import org.openqa.selenium.WebDriver; import org.openqa.selenium.chrome.ChromeDriver; import io.cucumber.java.After; import io.cucumber.java.Before; public class Hooks { @Before public void setUp(){ System.out.println("Execution before every scenario"); } @After public void burnDown(){ System.out.println("Execution after every scenario"); } @Before("@CaseOne") public void beforeOne(){ System.out.println("This will be executed before case one"); } @After("@CaseOne") public void afterOne(){ System.out.println("This will be executed after case one"); } @Before("@CaseTwo") public void beforeTwo(){ System.out.println("This will be executed before case two"); } @After("@CaseTwo") public void afterTwo(){ System.out.println("This will be executed after case two"); } } |
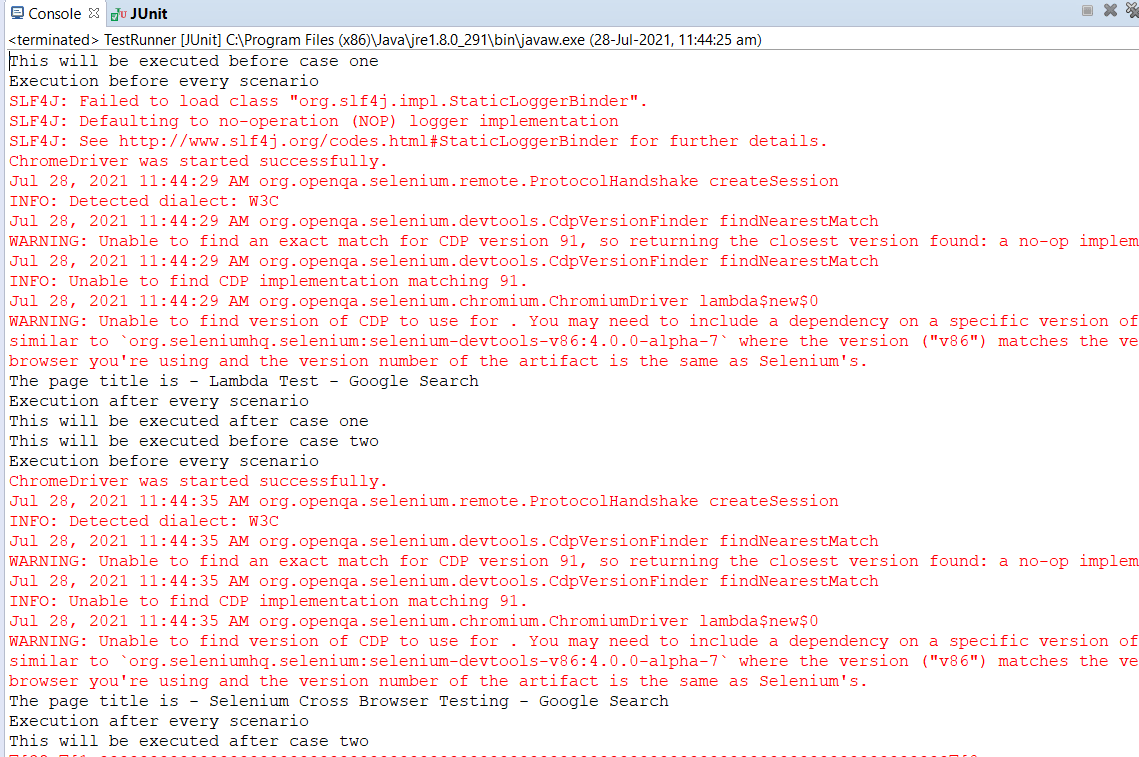
Note that I have added Before and After hooks for scenario one and scenario two outlined in the feature file with tags @CaseOne and @CaseTwo, respectively.
Also, I have used a @Before and @After hook to be executed before and after each scenario. Let us run the same test runner file as used earlier and see the results:
This way, we can write unique prerequisite actions and post-execution actions for each scenario.
Let’s learn how the same tagged hooks can be used for multiple scenarios as we move forward. All you have to do is simply append the tag name for the scenarios in the hooks file using the ‘or’ keyword, as shown below.
I am adding @CaseTwo with the @CaseOne tag name in the file we just used and removing the @Case tagged hook.
|
1 2 3 4 5 6 7 8 9 10 11 12 13 14 15 16 17 18 19 20 21 22 23 24 25 26 27 28 |
package stepDefinitions; import io.cucumber.java.After; import io.cucumber.java.Before; public class Hooks { @Before public void setUp(){ System.out.println("Execution before every scenario"); } @After public void burnDown(){ System.out.println("Execution after every scenario"); } @Before("@CaseOne or @CaseTwo") public void before(){ System.out.println("This will be executed before case one and two"); } @After("@CaseOne or @CaseTwo") public void after(){ System.out.println("This will be executed after case one and two"); } } |
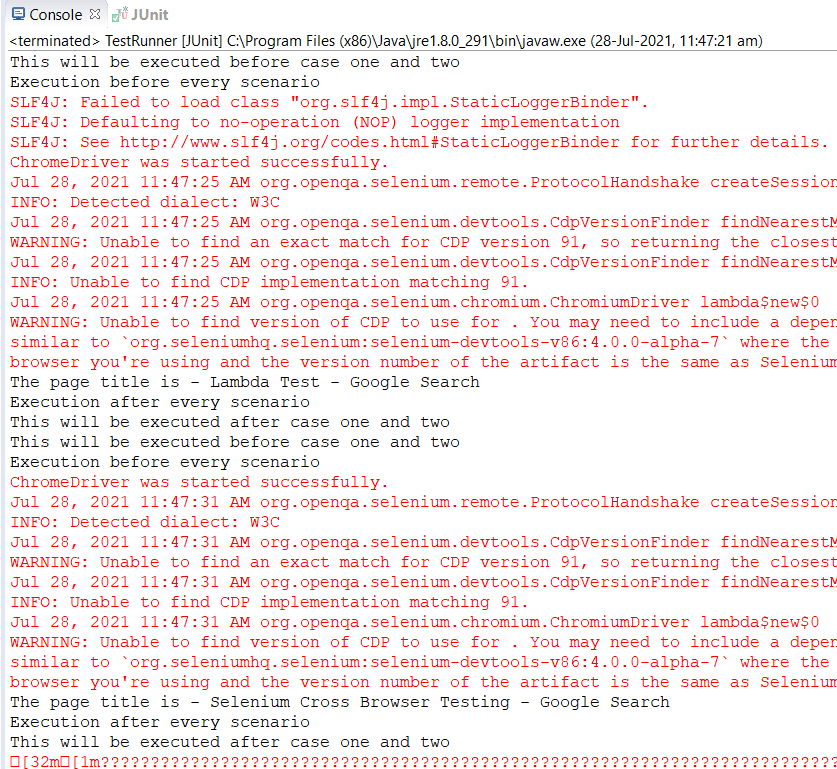
On executing the test, you may see the results in which the same @Before and @After hooks are executed for scenarios with tags @CaseOne and @CaseTwo.
Setting Order or Priority of Cucumber Hooks
If you have worked on TestNG, you must be familiar with the priority of tests and execution order. Similarly, Cucumber hooks can also be executed as per order.
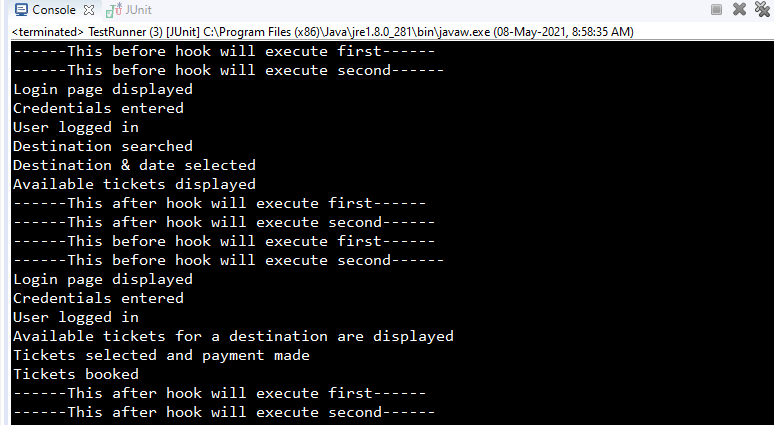
Let us consider an example with a hooks file consisting of two @After hooks and two @Before hooks. We will set the order of the hooks as per our requirement by simply specifying the order as in the hooks file code below:
|
1 2 3 4 5 6 7 8 9 10 11 12 13 14 15 16 17 18 19 20 21 22 23 24 25 26 27 |
package stepDefinitions; import io.cucumber.java.After; import io.cucumber.java.Before; public class Hooks { @Before(order=0) public void setUp() { System.out.println("This will execute first--Before"); } @After(order=1) public void tearDown() { System.out.println("This will execute first--After"); } @Before(order=1) public void setUpTwo() { System.out.println("This will execute second--Before"); } @After(order=0) public void afterOne() { System.out.println("This will execute second--After"); } } |
As we execute the code, you will see that hook execution is similar to what we have defined.
Now, you may set the order of execution of hooks as per your requirement.
Understanding The ‘Background Keyword’ In Cucumber
So now that we have learned about the different Cucumber annotations that can be used, we will understand another important keyword in Cucumber called the Background Keyword.
We have multiple scenarios that require the same prerequisites, like logging in or navigating to a URL in real-time. Now you may say that we can use the Cucumber hooks to trigger such scenarios. But what if all the scenarios in a feature need this prerequisite, and we are working with multiple features!
To make the code more efficient and manageable, Cucumber provides the Background Keyword, which contains a series of steps executed before each scenario of the feature file. This Background keyword, along with the steps, is placed in the feature file.
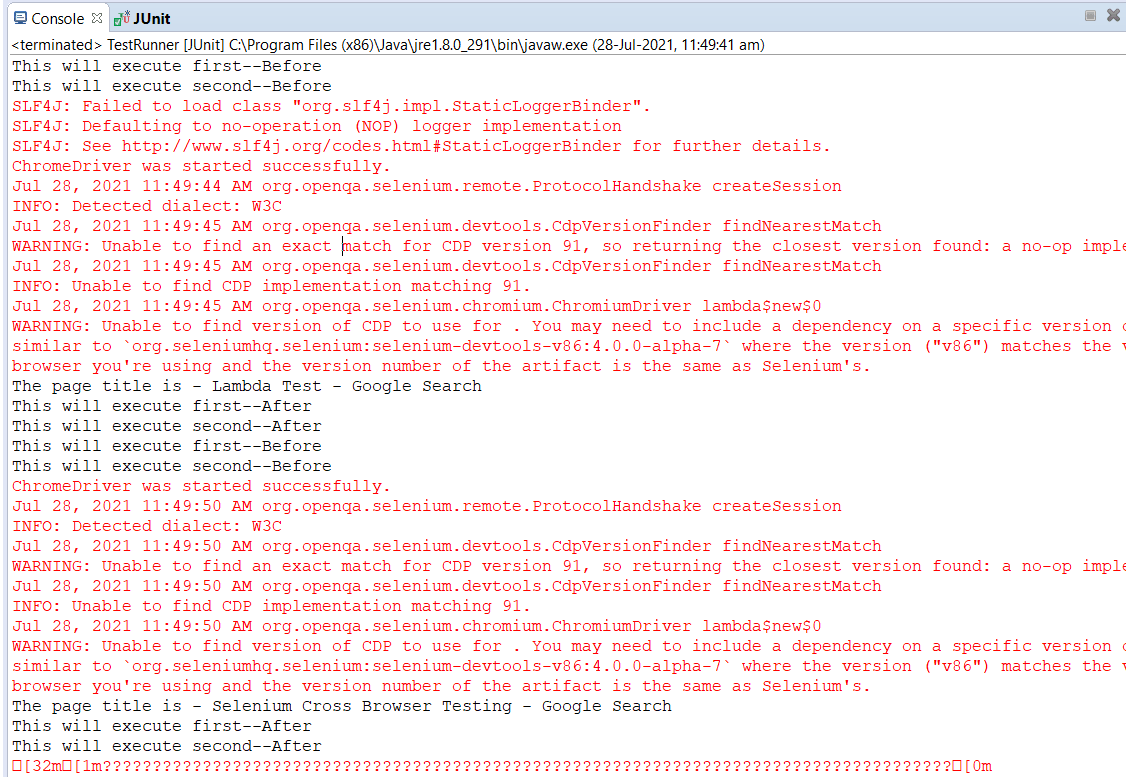
Let us see how it works by using an example. Consider a ticket booking application. To search for tickets or to book a ticket, you will have to login to the website. We will use the Background keyword to define the login functionality which each scenario can reuse.
The feature file for our example would look like below:
|
1 2 3 4 5 6 7 8 9 10 11 12 13 14 15 16 17 |
Feature: Testing the background keyword Background: Logging In of User Given Login page is displayed When credentials are entered Then user is logged in Scenario: Search tickets for a destination Given Search for destination A When Destination A is selected and date is selected Then Tickets available are displayed Scenario: Book tickets for a destination Given Available tickets for a destination are displayed When The number of tickets is selected and payment done Then the tickets are booked |
Since logging in is required in both the scenarios above, we keep the Login functionality under Background. Now, we will create the step definition class.
Note that this is all a dummy representation, and you may use logical code that would trigger the functionality of your application.
|
1 2 3 4 5 6 7 8 9 10 11 12 13 14 15 16 17 18 19 20 21 22 23 24 25 26 27 28 29 30 31 32 33 34 35 36 37 38 39 40 41 42 43 44 45 46 47 48 49 50 51 |
package StepDefinitions; import io.cucumber.java.en.Given; import io.cucumber.java.en.Then; import io.cucumber.java.en.When; public class BackgroundTest { @Given("Login page is displayed") public void login_page_is_displayed() { System.out.println("Login page displayed"); } @When("credentials are entered") public void credentials_are_entered() { System.out.println("Credentials entered"); } @Then("user is logged in") public void user_is_logged_in() { System.out.println("User logged in"); } @Given("Search for destination A") public void search_for_destination_a() { System.out.println("Destination searched"); } @When("Destination A is selected and date is selected") public void destination_a_is_selected_and_date_is_selected() { System.out.println("Destination & date selected"); } @Then("Tickets available are displayed") public void tickets_available_are_displayed() { System.out.println("Available tickets displayed"); } @Given("Available tickets for a destination are displayed") public void available_tickets_for_a_destination_are_displayed() { System.out.println("Available tickets for a destination are displayed"); } @When("The number of tickets is selected and payment done") public void the_number_of_tickets_is_selected_and_payment_done() { System.out.println("Tickets selected and payment made"); } @Then("the tickets are booked") public void the_tickets_are_booked() { System.out.println("Tickets booked"); } } |
Let us now run this feature using the test runner file.
|
1 2 3 4 5 6 7 8 |
package cucumberOptions; import org.junit.runner.RunWith; import io.cucumber.junit.Cucumber; import io.cucumber.junit.CucumberOptions; @RunWith(Cucumber.class) @CucumberOptions(features="src/test/java/features/background.feature", glue= {"stepDefinitions"} ) public class TestRunner { } |
As you can see, the steps under the Background Keyword were executed before both scenarios.
We did not use any of the Cucumber hooks, but the Background Keyword solved our problem of executing a series of steps before each scenario in a feature file.
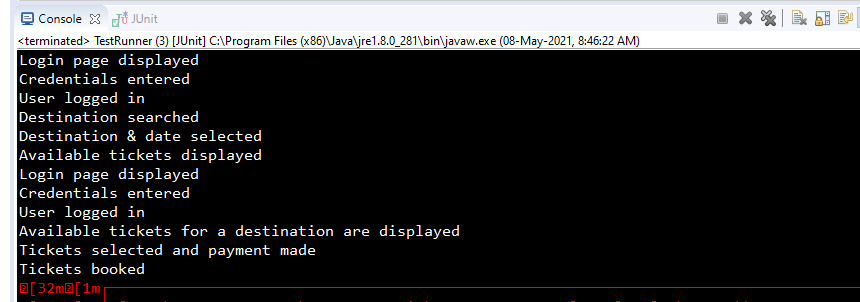
Now you must be wondering what if we use hooks along with the Background Keyword. Since Cucumber hooks execute before the execution, Background would execute only after @Before hook. We will use the below hooks file for our demonstration-
|
1 2 3 4 5 6 7 8 9 10 11 12 13 14 15 16 17 18 19 20 21 22 23 24 25 26 |
package StepDefinitions; import io.cucumber.java.After; import io.cucumber.java.Before; public class Hooks { @Before(order=0) public void setUp() { System.out.println("------This before hook will execute first------"); } @After(order=1) public void tearDown() { System.out.println("------This after hook will execute first------"); } @Before(order=1) public void setUpTwo() { System.out.println("------This before hook will execute second------"); } @After(order=0) public void afterOne() { System.out.println("------This after hook will execute second------"); } } |
The execution results would look like this:
And here you go! You have successfully implemented Cucumber hooks along with Background Keywords.
Wrapping Up!
Like TestNG, Cucumber provides us with various functionalities that can be used as annotations to enhance our test scripts.
- Tags are used to identify scenarios in feature files uniquely. Thus, we can efficiently execute particular scenarios using tags and exclude specific scenarios using the same.
- Hooks let us define prerequisites to be executed before the scenarios. We may use tags along with hooks so that specific pre-steps are executed before specific scenarios. Additionally, you may define the order of execution tags using the order parameter.
- Background keyword comes as an enhancement when we need to run specific steps before each scenario in a feature file. A single background can serve the purpose of that pre-requirement for any feature file.
You can leverage these Cucumber annotations individually or as a combination of multiple annotations to attain maximum benefits for your Selenium test automation. In addition, you may use Cucumber hooks along with Background or tagged hooks as per the requirements of your project.
Happy testing!
Frequently Asked Questions
What Are The Annotations In Cucumber?
Cucumber Annotations are predefined text, which holds a specific meaning. It allows the compiler/interpreter to know what should be done upon execution.


Author’s Profile
Gunjan Kaushik
Automation Test Engineer with more than 8 years of experience. Over the years I have worked on multiple automation tools in different domains. Apart from being a techie, I love traveling and am an adrenaline junkie.
Blogs: 2
Got Questions? Drop them on LambdaTest Community. Visit now