How To Generate Extent Reports In Selenium
Shalini Baskaran
Posted On: May 19, 2022
![]() 257962 Views
257962 Views
![]() 24 Min Read
24 Min Read
Selenium is a great tool when it comes to reporting, as it provides inbuilt reports using various frameworks like TestNG and JUnit. Though a few built-in reports are available, they do not provide information on the steps executed as part of the test suite. Therefore, custom reporting needs to be implemented to make it convenient for all major project stakeholders.
With the advent of custom report functionality that can be used to create reports for additional test-case information, it is even more important for the testers to configure those reports to be helpful for the entire project team.
For someone who is new to the concept of Extent Reports, the idea of generating them may seem strange at first. This step-by-step guide will make it a little easier to understand how to generate Extent Reports in Selenium WebDriver with example codes.
Let’s get started!
TABLE OF CONTENTS
- What are test reports in automation?
- Introduction to Extent Reports
- How to generate and customize the Extent Reports?
- How to generate Extent Reports in Selenium using a cloud grid?
- How to execute parallel tests and generate Extent Reports in Selenium?
- How to generate Extent Reports in Selenium using Jenkins?
- Frequently Asked Questions (FAQs)
What are test reports in automation?
Creating a report for a task makes the task 100% complete. The report not only provides a summary but also helps the person to visualize and summarize the results of the task. A report plays a vital role in test automation as well. A test automation report helps the testers and the other stakeholders understand the stability of the tests executed before the product goes live. This helps the stakeholders to understand the stability of the application and also provides confidence for going live.
An automation test report should be designed in such a way that it depicts the results of the tests to the end-user. A good test report should hold various test statistics like the total number of automation test cases, the total number of test cases passed, the total number of failed test cases, the percentage of passed and failed cases, classification of the tests based on certain criteria, etc.
In recent years, various reporting tools like TestNG Reports, JUnit Reports, Allure Reports, etc., are available for generating the test automation report. Out of those, Extent Reports is one of the best reporting tools for Selenium that is being widely used in various organizations. It has gained immense popularity because of its unique features like report customization, integration with different test frameworks, amazing data visualization, etc. In this blog on Extent Reports in Selenium, we shall be looking at the most popularly used test report – the Extent Reports.
Introduction to Extent Reports
Extent Report is an open-source library used for generating test reports in automation testing. It has been more widely used for report generation than the inbuilt reports in various test frameworks because of its enhanced features and customization. It is a simple yet powerful reporting library that can be integrated with the automation framework for generating the automation test report.
Extent Reports can also be integrated with other popular test automation frameworks like JUnit and TestNG. It provides a detailed outlook on the automated test cases in a graphical way. It is very easy to integrate Extent Reports with the automation framework.
Watch this video to know more about how to generate Extent Reports in Selenium, a popular testing framework for web applications. Also, learn different ways to configure Extent Reports to capture your test results and more.
Advantages of Extent Reports
Let us pen down the advantages of using Extent Reports in Selenium for automation testing.
- It is an open-source library.
- It provides a pictorial representation of the test results.
- It can be customized as required.
- It allows the users to attach screenshots and logs in the test report for a detailed summary of the tests.
- It can be easily integrated with other frameworks like JUnit, TestNG, NUnit, etc.
- It can be easily configured with Jenkins, Bamboo, etc.
Prerequisites to generate Extent Reports
In this blog on how to generate Extent Reports in Selenium, we shall set up and generate our first Extent Report in Selenium for our automation tests implemented with Selenium Java. For more information about Selenium Java, please read our Selenium Java Tutorial. To set up and generate Extent Reports in Selenium upon test execution, let us see the prerequisites to be done.
- Java: Download and install Java in the system.
- Selenium: For framing our automation test cases, we need to install Selenium by adding a maven dependency in the pom.xml file.
- Extent Reports: To integrate our automation framework, we need the Extent Report dependency either as a maven dependency or a jar file. In the case of a maven project, add maven dependency in the pom.xml file.

You can also download the jar file and add the jar to the build path. You can refer to the mvn repository for adding the Extent Report dependency. - TestNG: To design and execute the tests, we shall use TestNG by adding the TestNG dependency.


Now we have set up for automating a web application and generating the Extent Reports in Selenium.
In the next section of this article on Extent Reports in Selenium, let us understand the terminologies in Extent Report in detail before adding our tests.

How to generate and customize the Extent Reports?
There are three classes that are used for generating and customizing the Extent Reports in Selenium. They are:
- ExtentHtmlReporter
- ExtentReports
- ExtentTest
The ExtentHtmlReporter is used for creating an HTML file, and it accepts a file path as a parameter. The file path represents the path in which our extent report would be generated.
|
1 2 3 |
ExtentHtmlReporter htmlReporter = new ExtentHtmlReporter(System.getProperty("user.dir")+"/Reports/extentReport.html"); |
In the above line, we have used ExtentHtmlReporter and specified the file path where the Extent Report in Selenium has to be generated.
In Java, the getProperty(String key) method returns the system property specified by the key, which is passed as the argument. Here we have specified “user.dir” as the key, and System.getProperty(“user.dir”) returns our current working directory. So instead of specifying the full path, we can use this to fetch the value of our directory and add the path where we want our Extent Report in Selenium to be saved.
ExtentHtmlReporter is also used to customize the extent reports. It allows many configurations to be made through the config() method. Some of the configurations that can be made are described below.
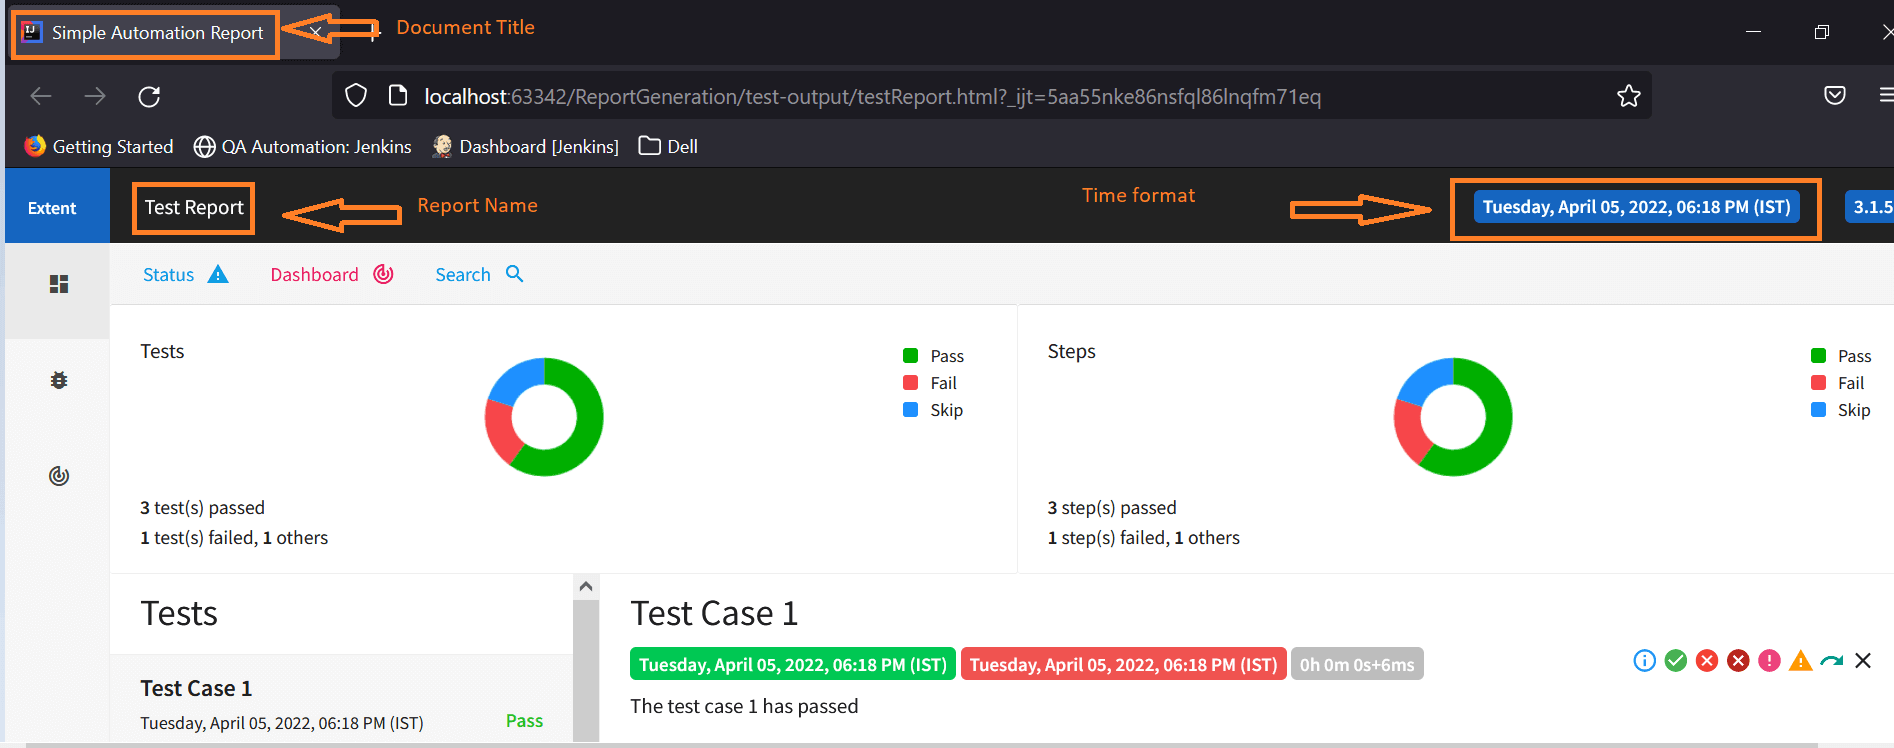
- To set the title of the extent report, we can use setDocumentTitle(“YOUR_TITLE”).
- To set the report name, we can use setReportName(“YOUR_REPORT_NAME”).
- We can also specify the time format in our extent report by using the setTimeStampFormat() method.
|
1 |
htmlReporter.config().setDocumentTitle("Automation Report"); |
|
1 |
htmlReporter.config().setReportName("report"); |
|
1 |
htmlReporter.config().setTimeStampFormat("EEEE, MMMM dd, yyyy, hh:mm a '('zzz')'"); |
Now, once the Extent Report in Selenium gets generated, we can visualize all the above changes in the report.
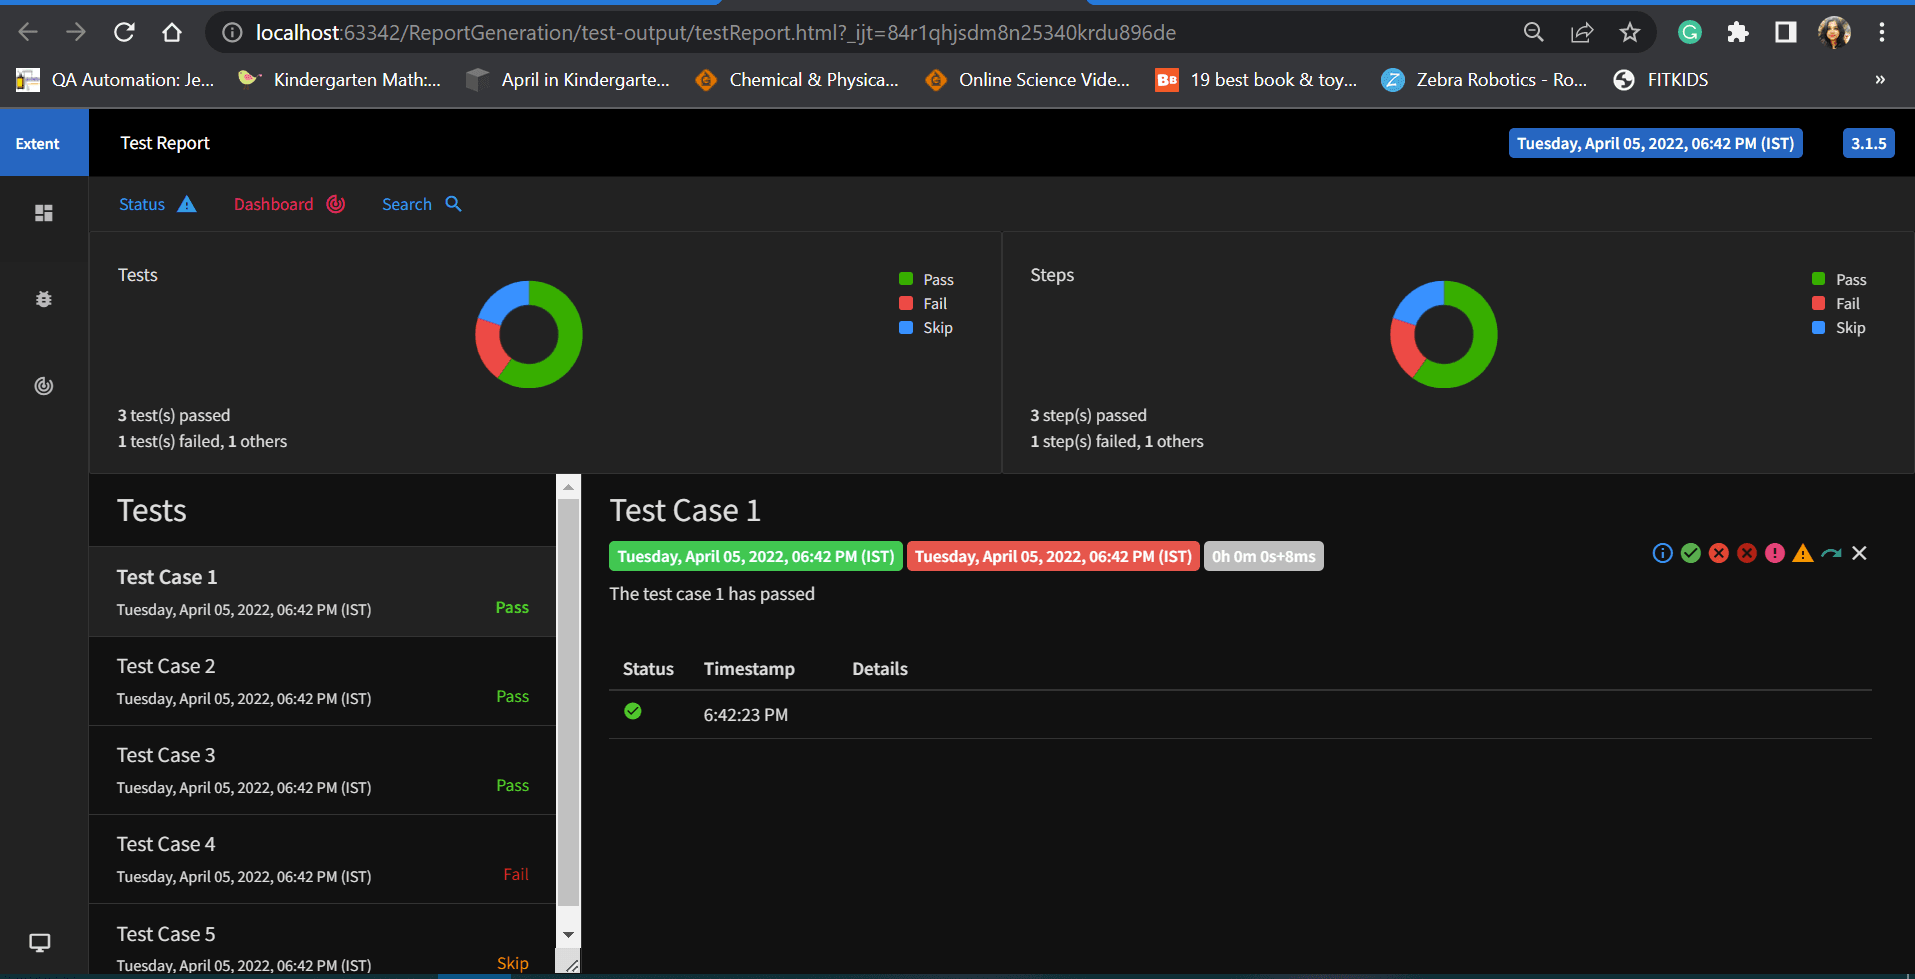
In addition to these changes, if you are a great fan of dark themes, then Extent Reports in Selenium can also be customized with dark themes using the setTheme() method.
We have two themes – STANDARD and DARK for customizing the look and feel of our extent reports.

- For Light Theme, we can set the Theme as STANDARD.
- For the Dark theme, we can set the theme as DARK.
|
1 |
htmlReporter.config().setTheme(Theme.STANDARD); |
Below is the screenshot of the extent report with STANDARD THEME

|
1 |
htmlReporter.config().setTheme(Theme.DARK); |
In a nutshell,
- The ExtentHtmlReporter class is used for creating the HTML reports.
- The ExtentReports class is used for creating the tests.
- The ExtentTest class is used for generating the logs in the Extent Report.
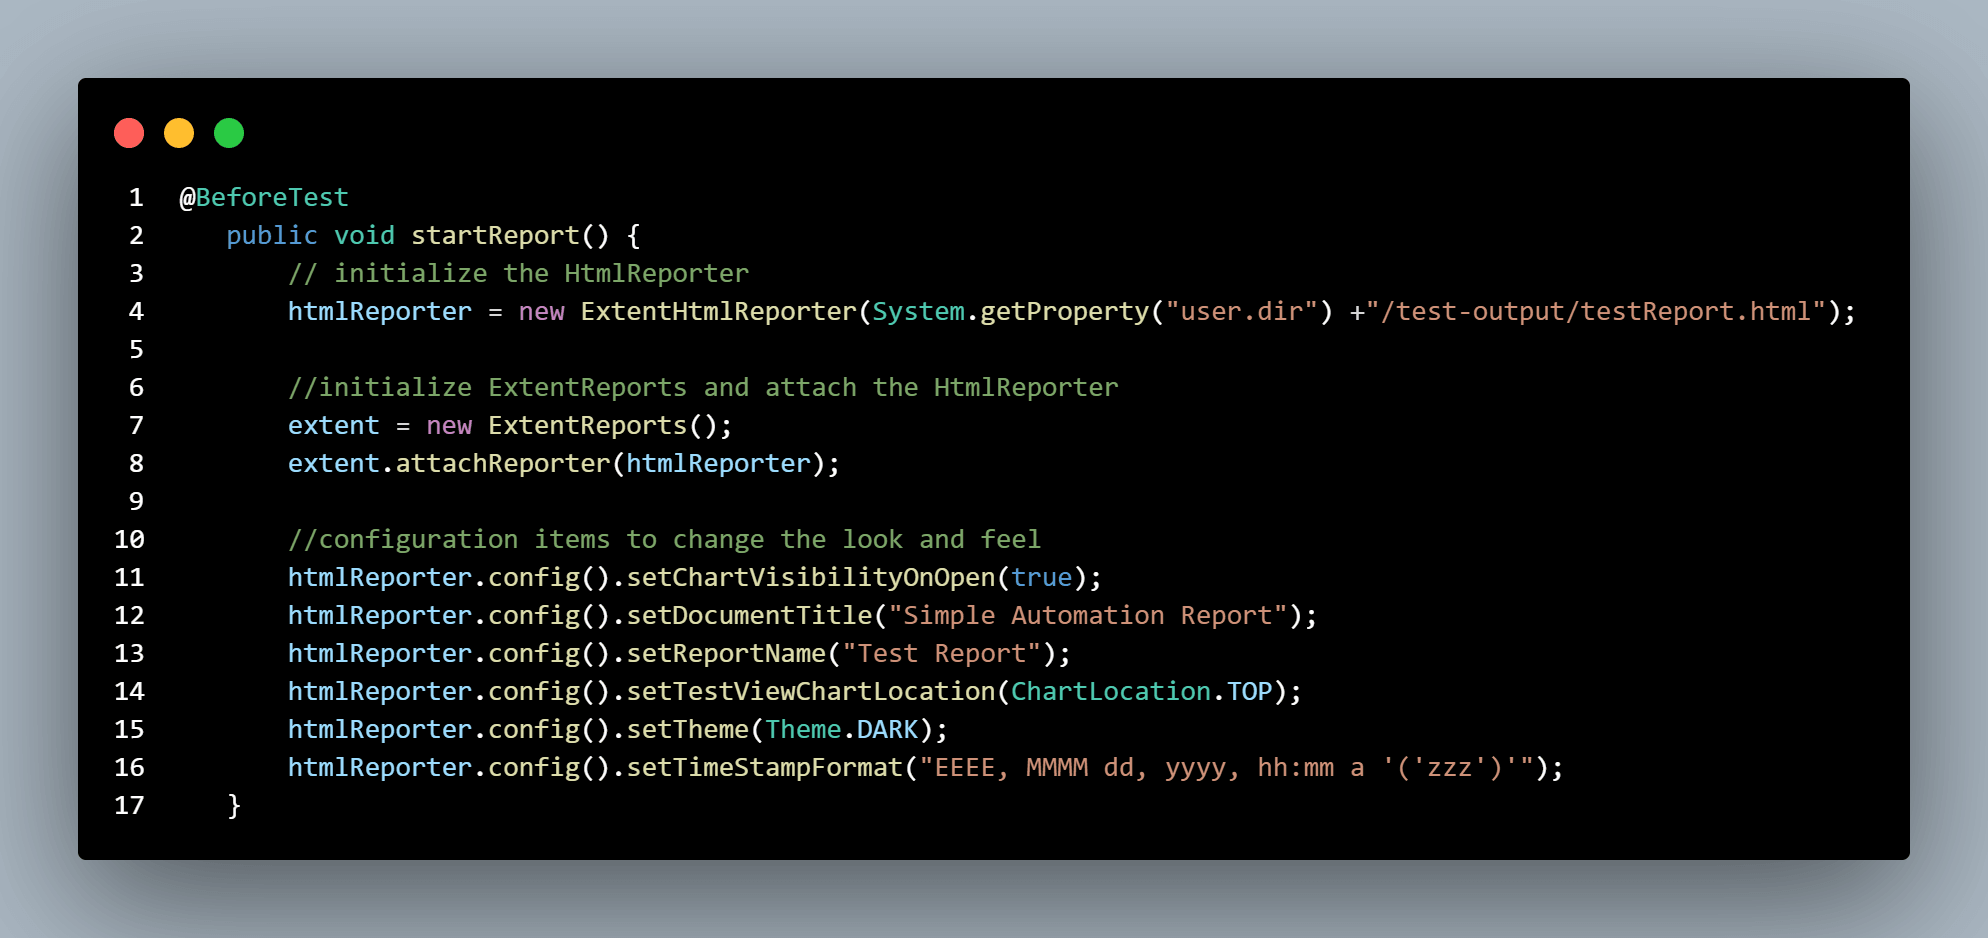
So now, we have gone through various configurations that can be made to customize the look of the Extent Reports in Selenium. We can initialize the ExtentHtmlReporter and add the required configurations in the @BeforeTest TestNG annotation.
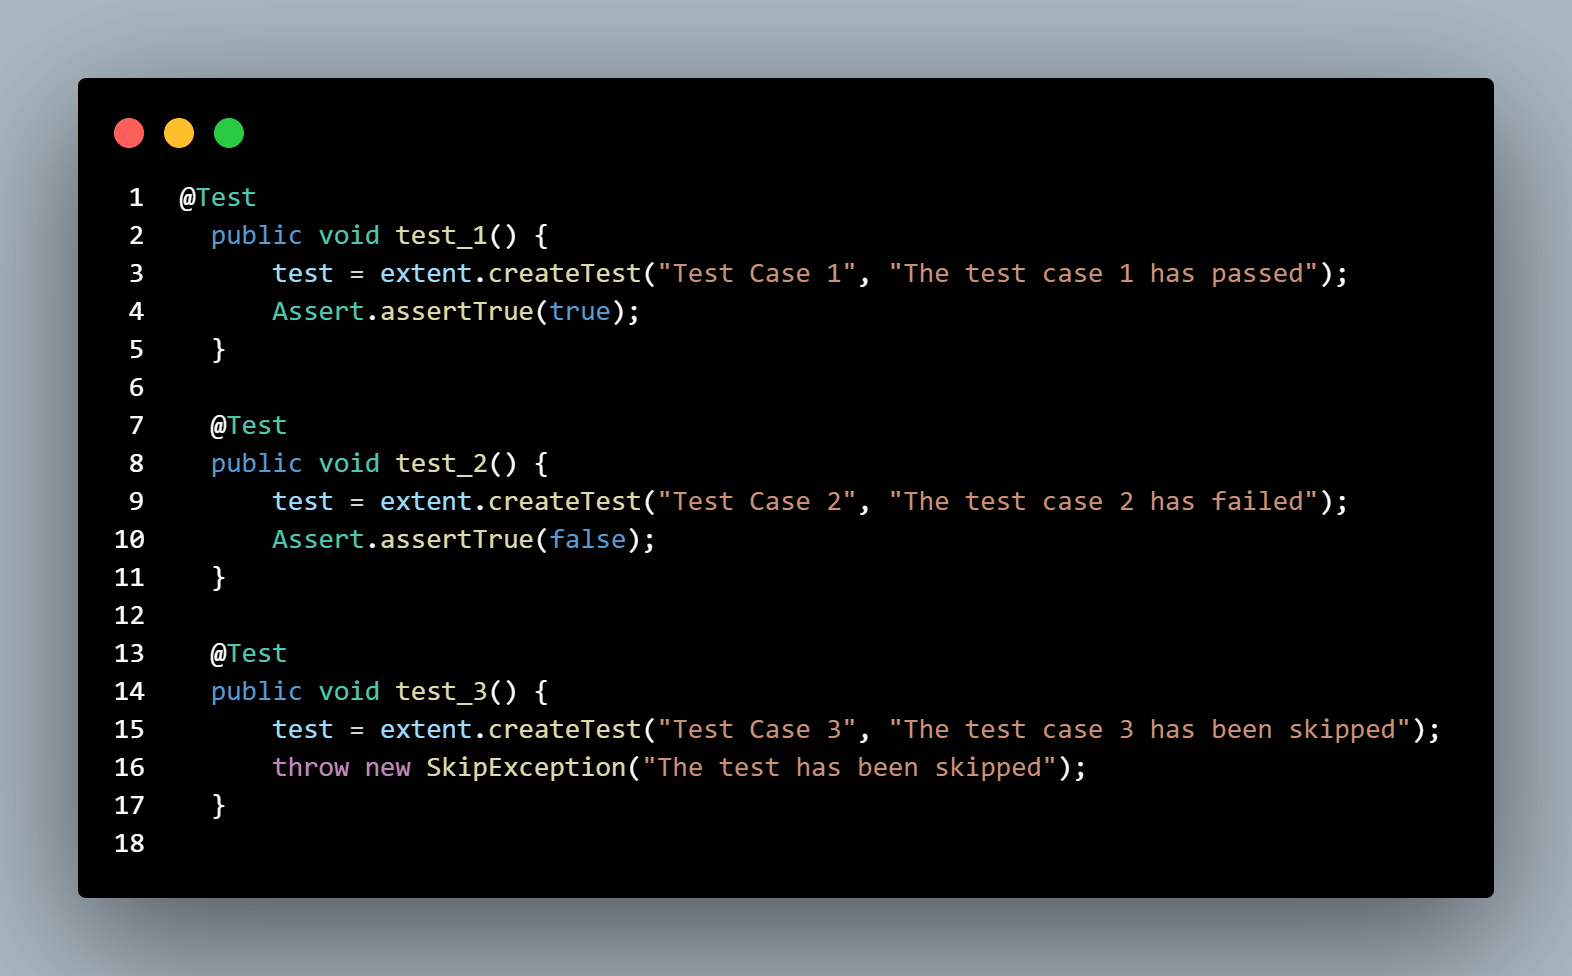
Now let us see how to write simple test cases and generate our first Extent Report in Selenium. We shall create test cases that end in three different statuses like Pass, Fail and Skip.
To create a test, we can use createTest(test_name,test_description) using ExtentReports class.
- We have created a simple test test_1 which ends up in PASS by asserting the condition as true.
- We have created test_2, which would fail as we have passed False in the assetTrue condition.
- We have created test_3, which would be skipped.
To get the status of our tests and publish it in our report, we can use the log() method from ExtentTest class.
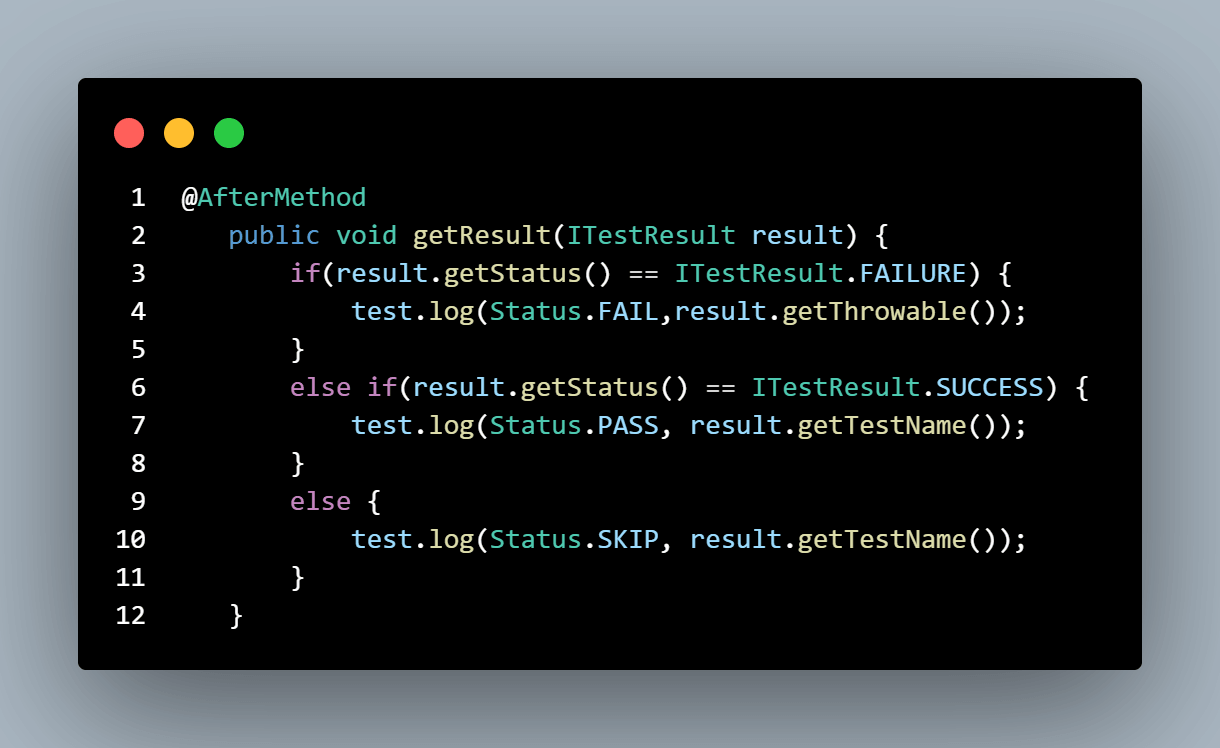
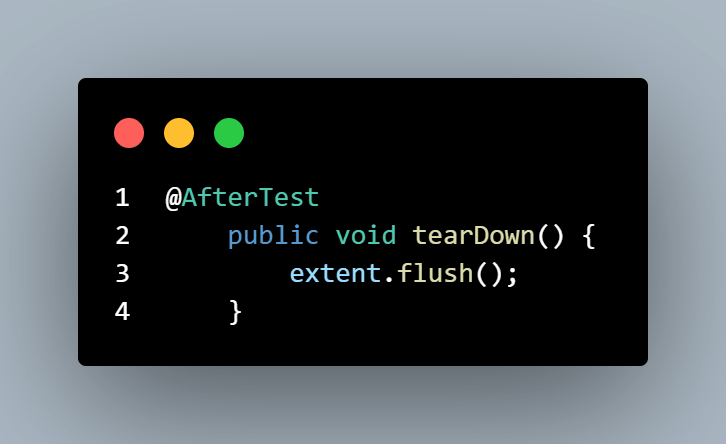
In the end, we can use the flush()method, which is used for removing any previous data and creating a new Extent Report in Selenium.
Code snippet for creating simple tests and generating our first extent report:
|
1 2 3 4 5 6 7 8 9 10 11 12 13 14 15 16 17 18 19 20 21 22 23 24 25 26 27 28 29 30 31 32 33 34 35 36 37 38 39 40 41 42 43 44 45 46 47 48 49 50 51 52 53 54 55 56 57 58 59 60 61 62 63 64 65 66 67 68 69 70 71 72 73 74 75 76 77 78 79 80 81 82 |
package testCases; import com.aventstack.extentreports.ExtentReports; import com.aventstack.extentreports.ExtentTest; import com.aventstack.extentreports.Status; import com.aventstack.extentreports.reporter.ExtentHtmlReporter; import com.aventstack.extentreports.reporter.configuration.ChartLocation; import com.aventstack.extentreports.reporter.configuration.Theme; import org.testng.Assert; import org.testng.ITestResult; import org.testng.SkipException; import org.testng.annotations.AfterMethod; import org.testng.annotations.AfterTest; import org.testng.annotations.BeforeTest; import org.testng.annotations.Test; public class DemoTest { ExtentHtmlReporter htmlReporter; ExtentReports extent; //helps to generate the logs in the test report. ExtentTest test; @BeforeTest public void startReport() { // initialize the HtmlReporter htmlReporter = new ExtentHtmlReporter(System.getProperty("user.dir") +"/test-output/testReport.html"); //initialize ExtentReports and attach the HtmlReporter extent = new ExtentReports(); extent.attachReporter(htmlReporter); //configuration items to change the look and feel //add content, manage tests etc htmlReporter.config().setChartVisibilityOnOpen(true); htmlReporter.config().setDocumentTitle("Simple Automation Report"); htmlReporter.config().setReportName("Test Report"); htmlReporter.config().setTestViewChartLocation(ChartLocation.TOP); htmlReporter.config().setTheme(Theme.STANDARD); htmlReporter.config().setTimeStampFormat("EEEE, MMMM dd, yyyy, hh:mm a '('zzz')'"); } @Test public void test_1() { test = extent.createTest("Test Case 1", "The test case 1 has passed"); Assert.assertTrue(true); } @Test public void test_2() { test = extent.createTest("Test Case 2", "The test case 2 has failed"); Assert.assertTrue(false); } @Test public void test_3() { test = extent.createTest("Test Case 3", "The test case 3 has been skipped"); throw new SkipException("The test has been skipped"); } @AfterMethod public void getResult(ITestResult result) { if(result.getStatus() == ITestResult.FAILURE) { test.log(Status.FAIL,result.getThrowable()); } else if(result.getStatus() == ITestResult.SUCCESS) { test.log(Status.PASS, result.getTestName()); } else { test.log(Status.SKIP, result.getTestName()); } } @AfterTest public void tearDown() { //to write or update test information to reporter extent.flush(); } } |
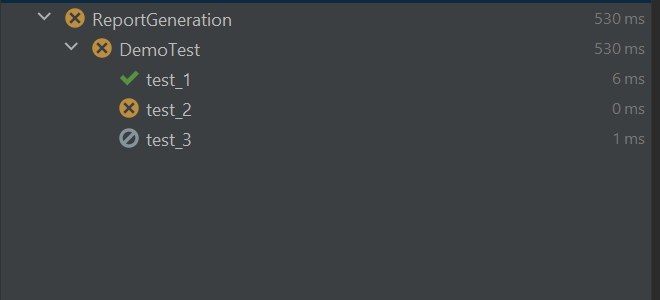
Test Execution:
Upon running the tests, our output console would look similar to the screenshot below.
Now the Extent Report in Selenium would be generated and saved in the path provided initially.
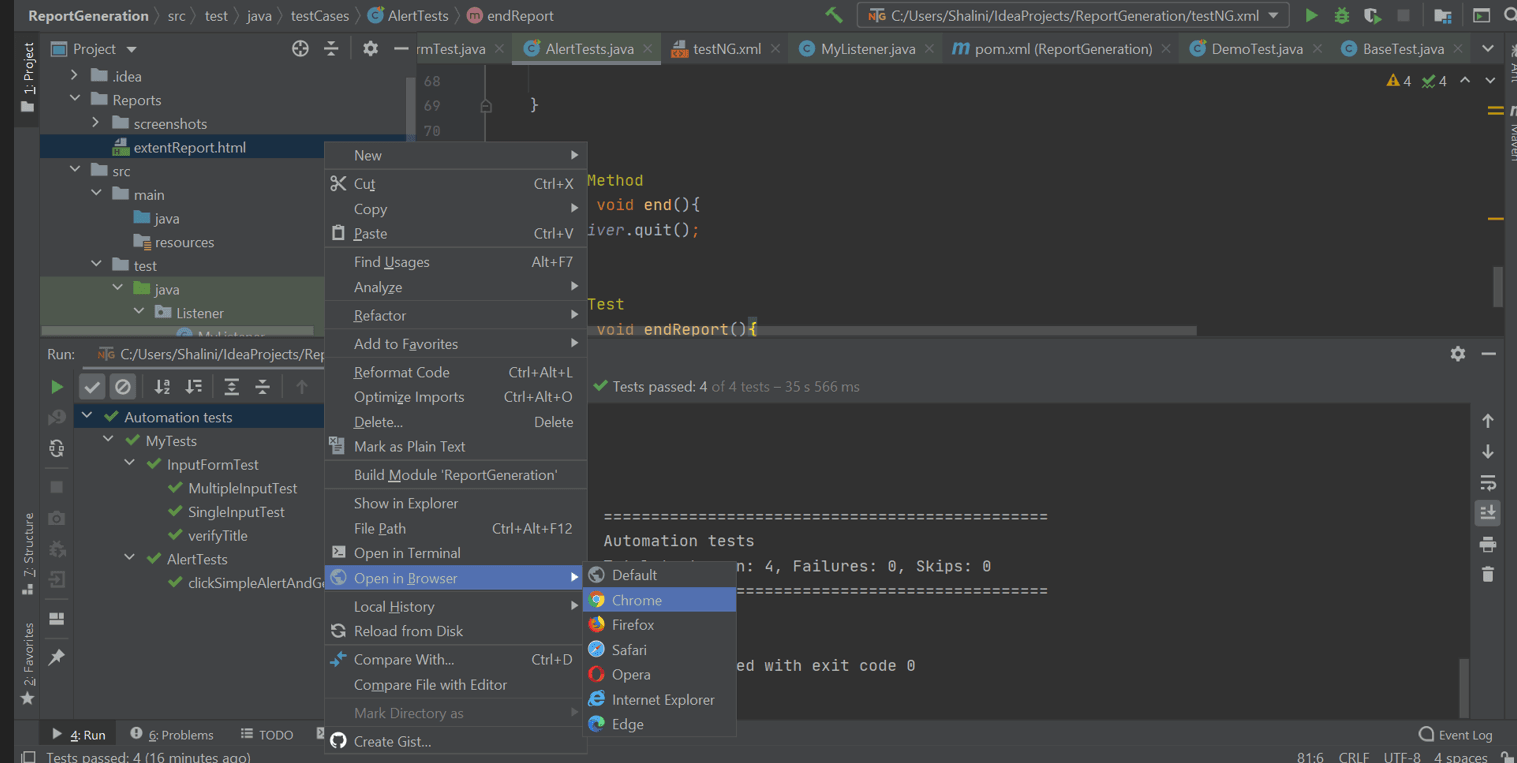
Right-click on the Extent Report 🡪 Open in Browser 🡪 Chrome (Browser of your choice).
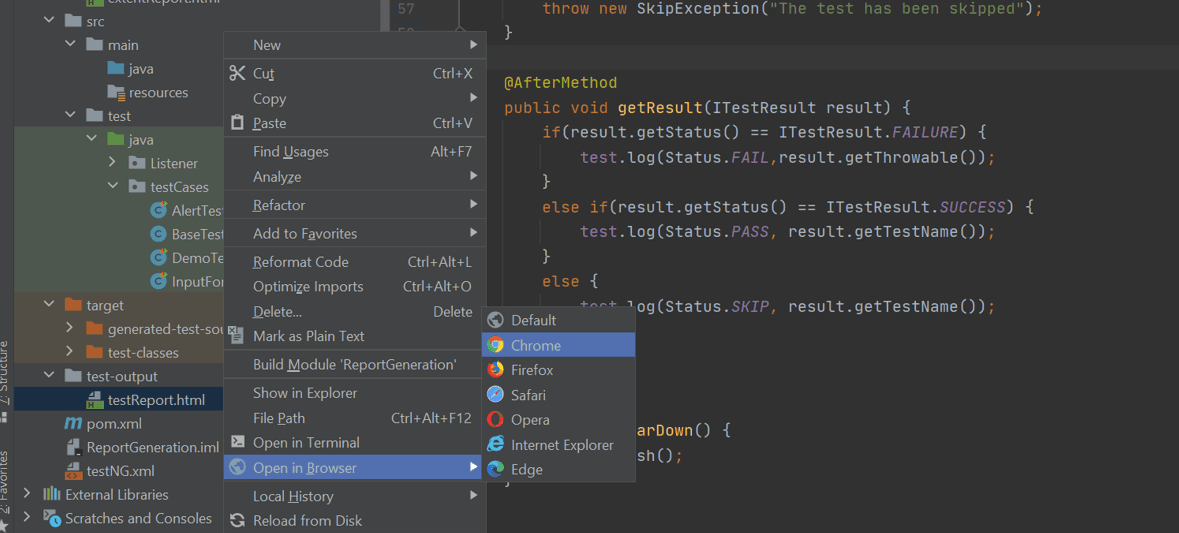
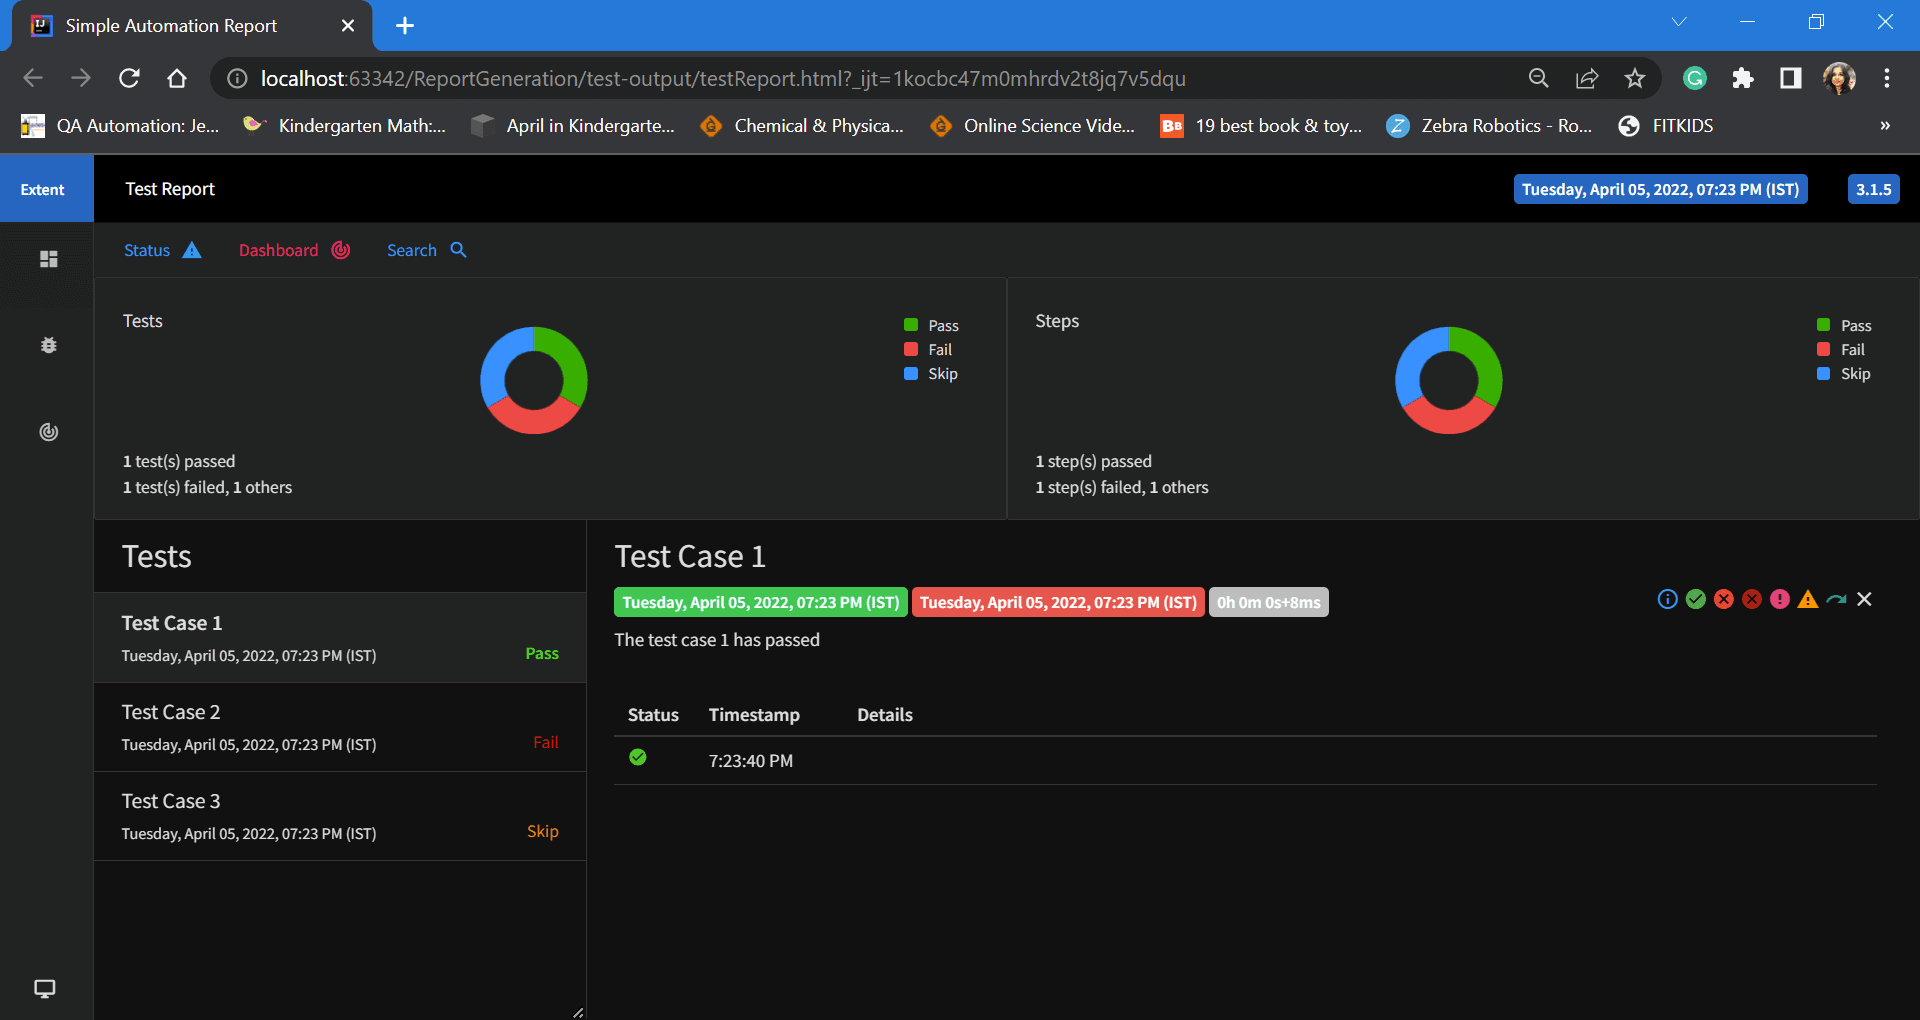
We have successfully generated our first Extent Report in Selenium..!!!
Here you can see the tests that have been marked with different statuses.
If you’re a Java developer, the following certification from LambdaTest can help you improve your skills.
This Selenium Java 101 certification is for anyone who wants to upskill their knowledge of the Java programming language and learn more about the Selenium automation testing.
How to generate Extent Reports in Selenium using a cloud grid?
So far, we have written simple test cases to understand the basics of Extent Reports in Selenium. Now let us automate some test cases using Selenium and generate our real automation report. We shall use our cloud Selenium Grid like LambdaTest to execute our tests.
LambdaTest is a cloud-based cross browser testing platform that supports Selenium Grid, which can be leveraged for running our tests in the grid. Test automation platforms like LambdaTest offer an online browser farm of 3000+ online browsers to perform Selenium automation testing effortlessly.
Here’s a glimpse of LambdaTest cloud Selenium Grid:
You can also Subscribe to the LambdaTest YouTube Channel and stay updated with the latest tutorials around automated browser testing, Cypress UI automation, CI/CD, and more.
Let us create two classes for our tests, execute them in Cloud Selenium Grid and then finally generate Extent Reports in Selenium for automation.
Generate your Extent Reports using Cloud Selenium Grid. Try LambdaTest Now!
Scenarios:
We shall be using the LambdaTest playground for all our tests, which opens the gate to explore various pages to learn automation.
Test case 1: To verify the title of the webpage
Step 1: Launch https://www.lambdatest.com/selenium-playground/.
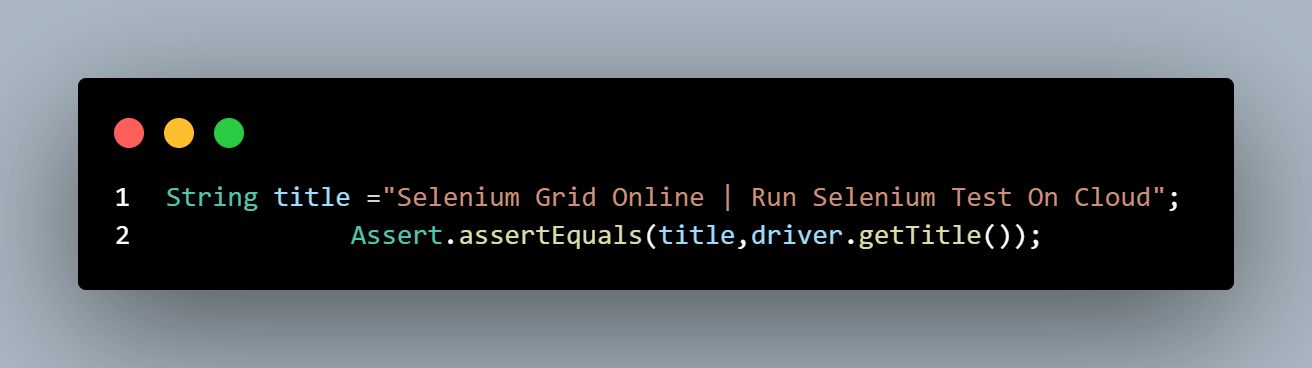
Step 2: Get the title of the web page and verify it.
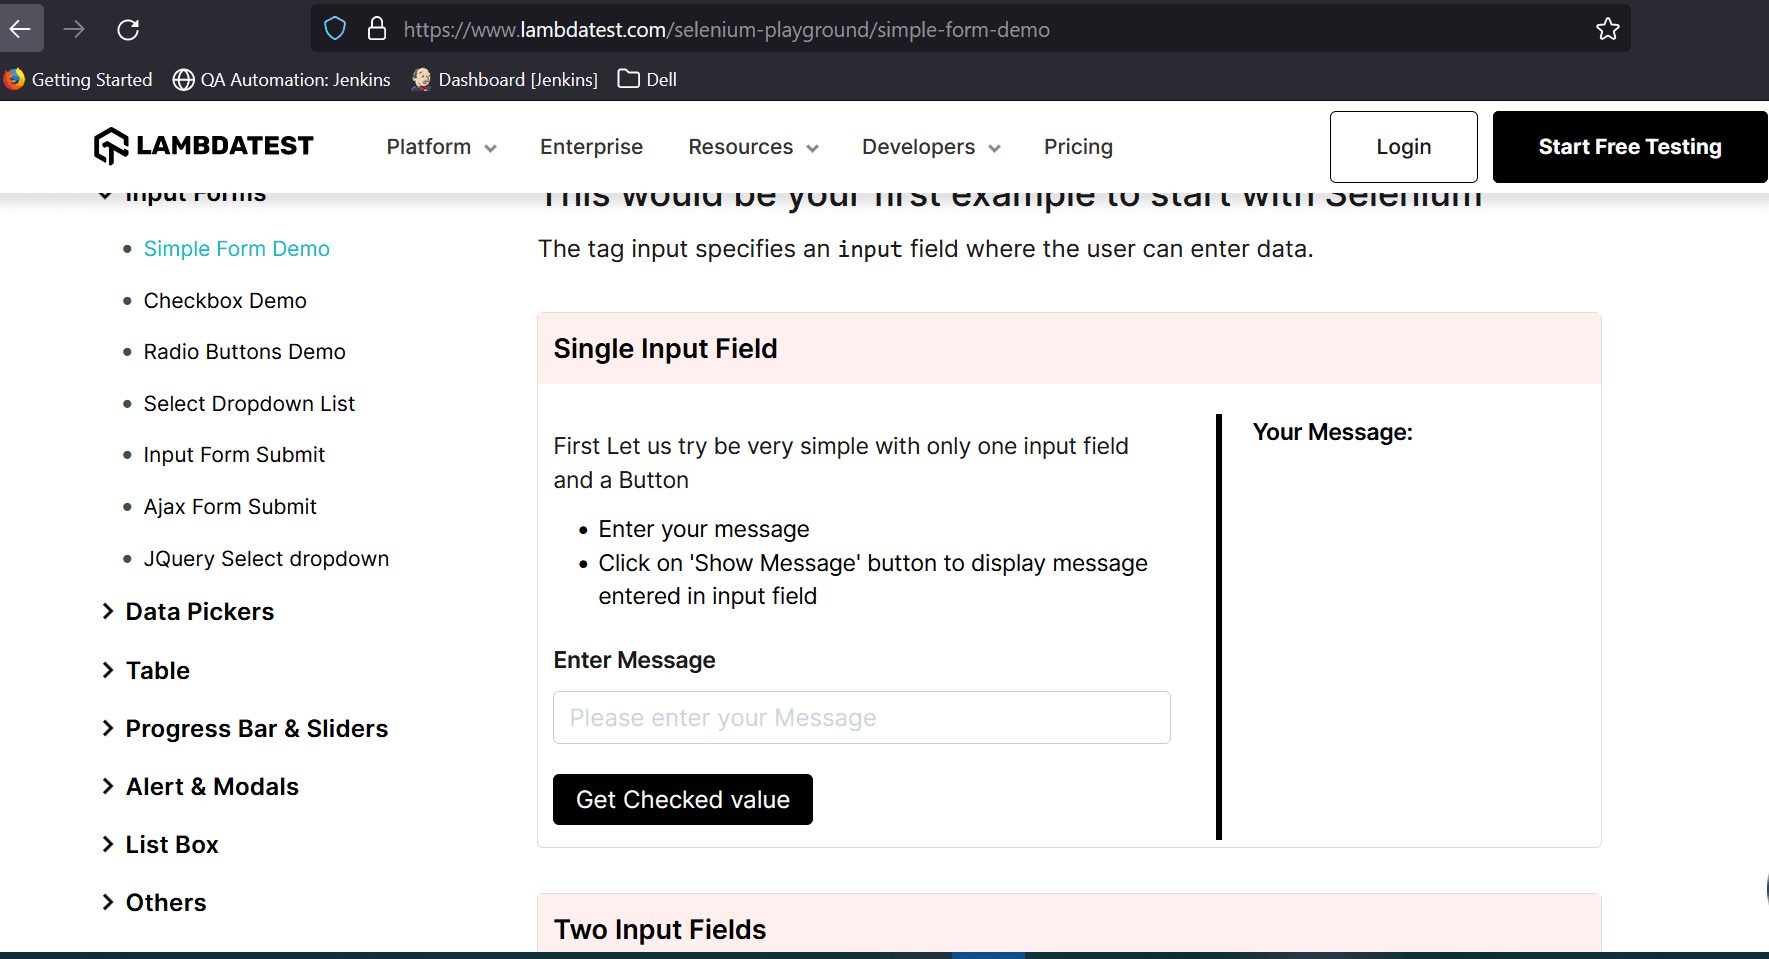
Test case 2: To enter single input and verify the message displayed
Step 1: Launch https://www.lambdatest.com/selenium-playground/.
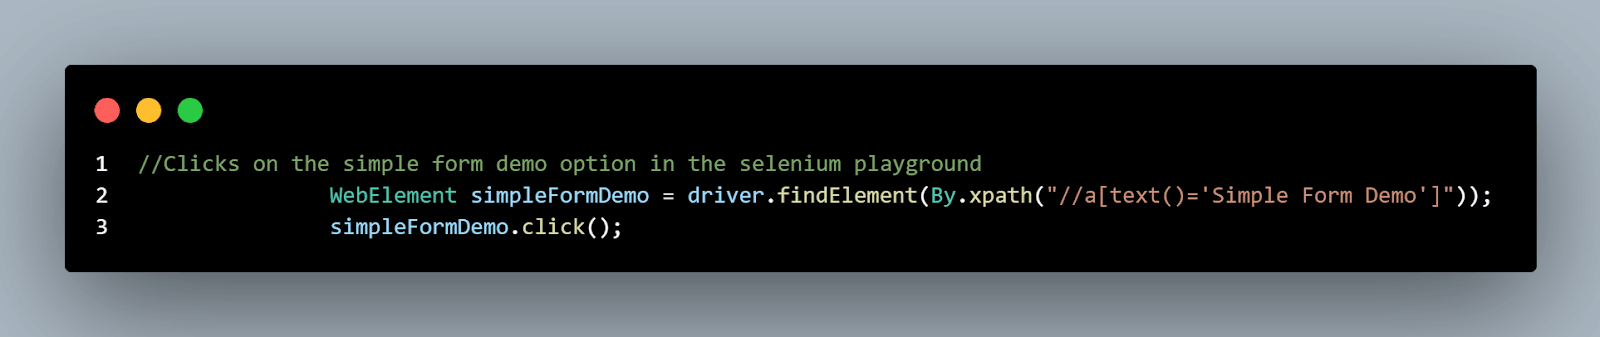
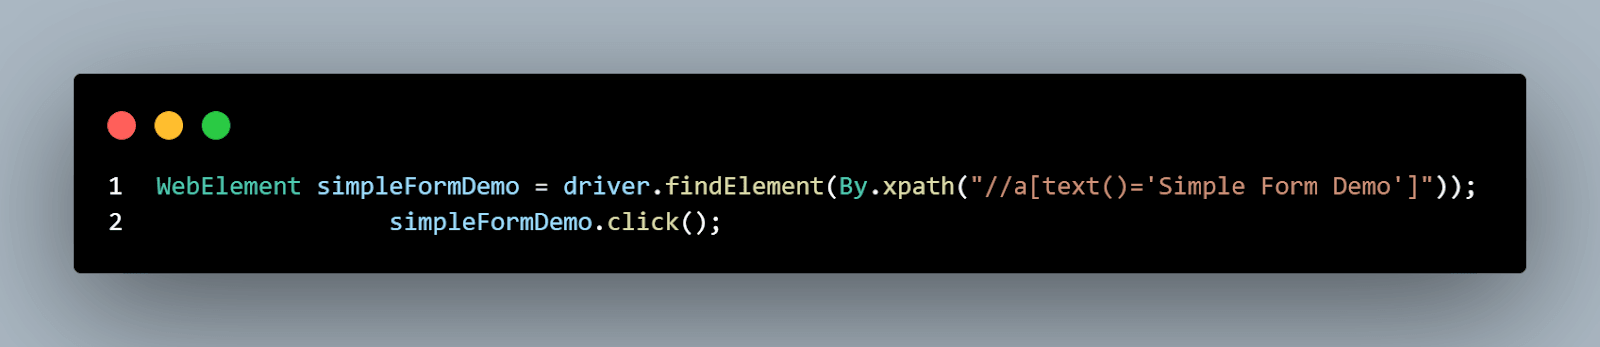
Step 2: Click Simple Form Demo under the Input Forms Section.
Step 3: Enter the message in the Enter Message text box.
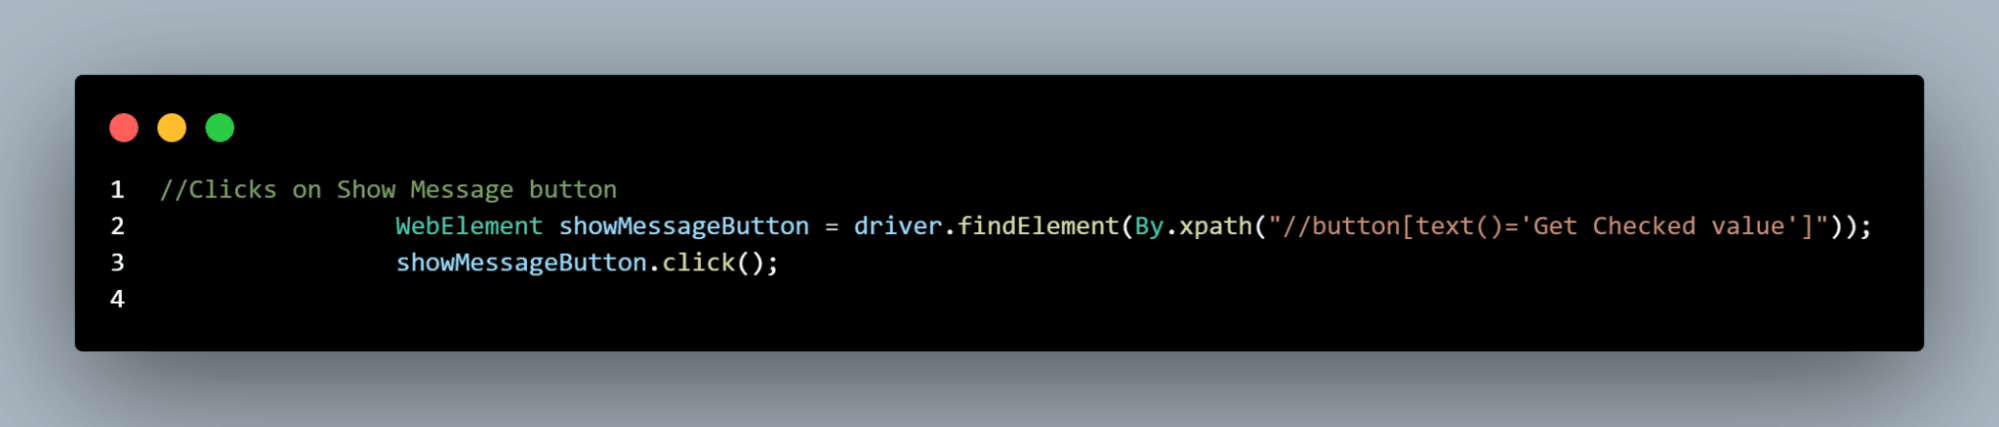
Step 4: Click the Get Checked Value button.
Step 5: Verify the message displayed in the Your Message section.
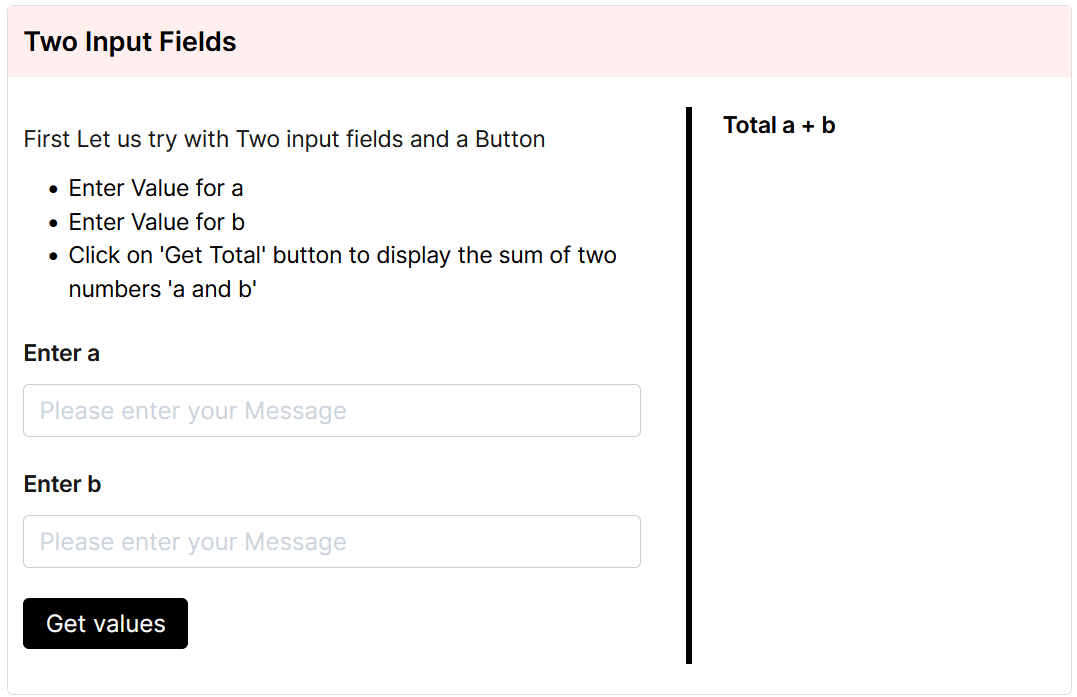
Test case 3: To enter multiple inputs and verify the value displayed
Step 1: Launch https://www.lambdatest.com/selenium-playground/.
Step 2: Click Simple Form Demo under the Input Forms Section.
Step 3: In the two input Fields section, enter the value of a and b.
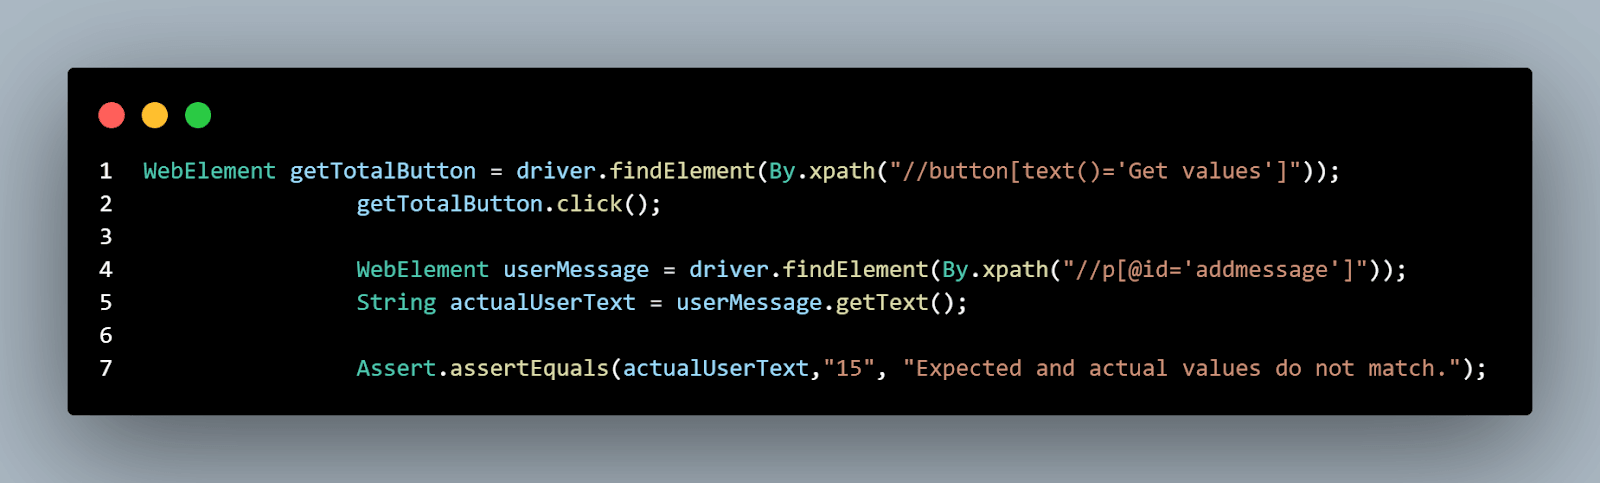
Step 4: Click the Get Values button.
Step 5: Verify the value displayed in the Total a+b section.
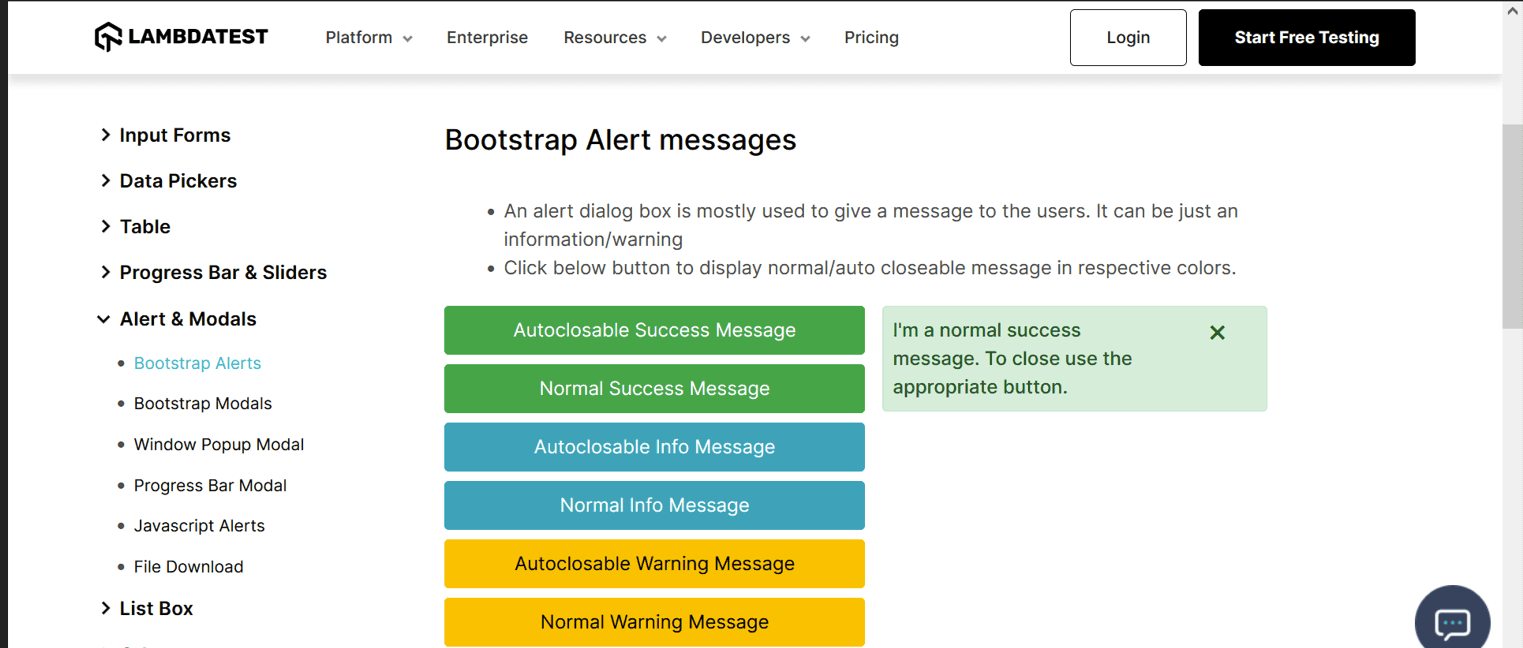
Test case 4: Verify the alert message on the web page
Step 1: Launch https://www.lambdatest.com/selenium-playground/.
Step 2: Click Bootstrap Alerts under the Alerts & Modals section.
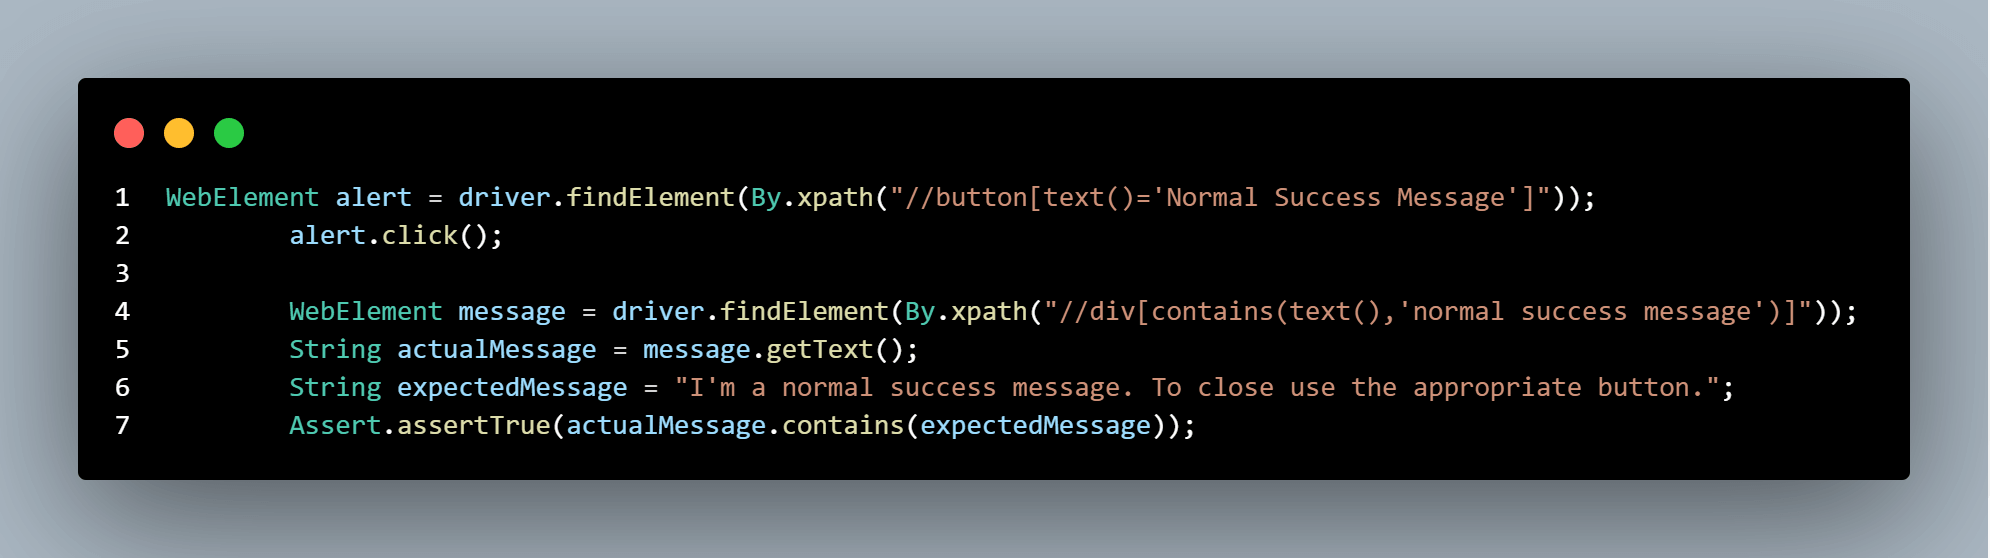
Step 3: Click Normal Success Message and verify the message displayed.
We understood the scenarios to be automated. Let us split them into two different classes – InputFormTest having the first three scenarios and AlertTests having the last test case.
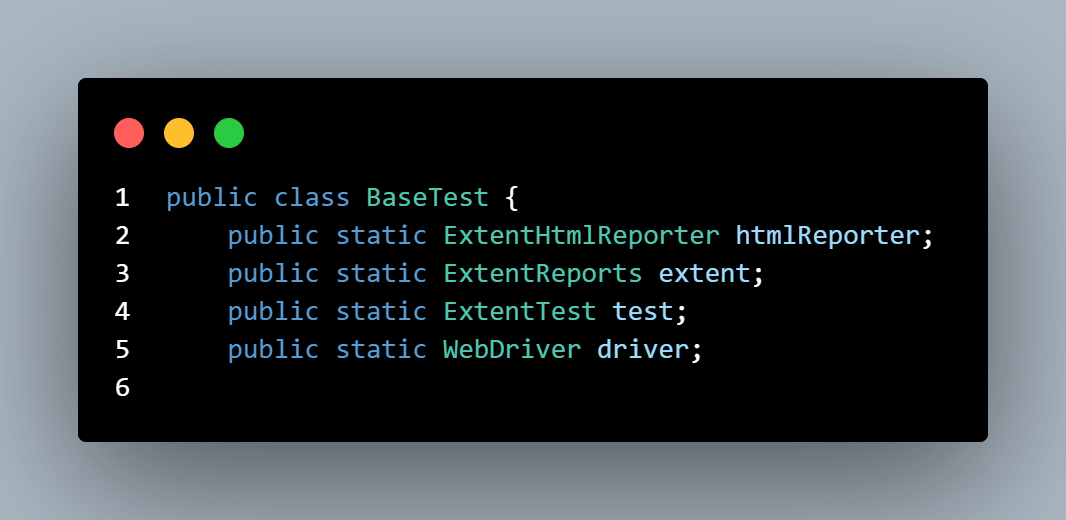
Before we implement the test cases, let us frame a BaseTest class, which will have the common methods used for initializing and generating Extent Reports in Selenium.
|
1 2 3 4 5 6 7 8 9 10 11 12 13 14 15 16 17 18 19 20 21 22 23 24 25 26 27 28 29 30 31 32 33 34 35 36 37 38 39 40 41 42 43 44 |
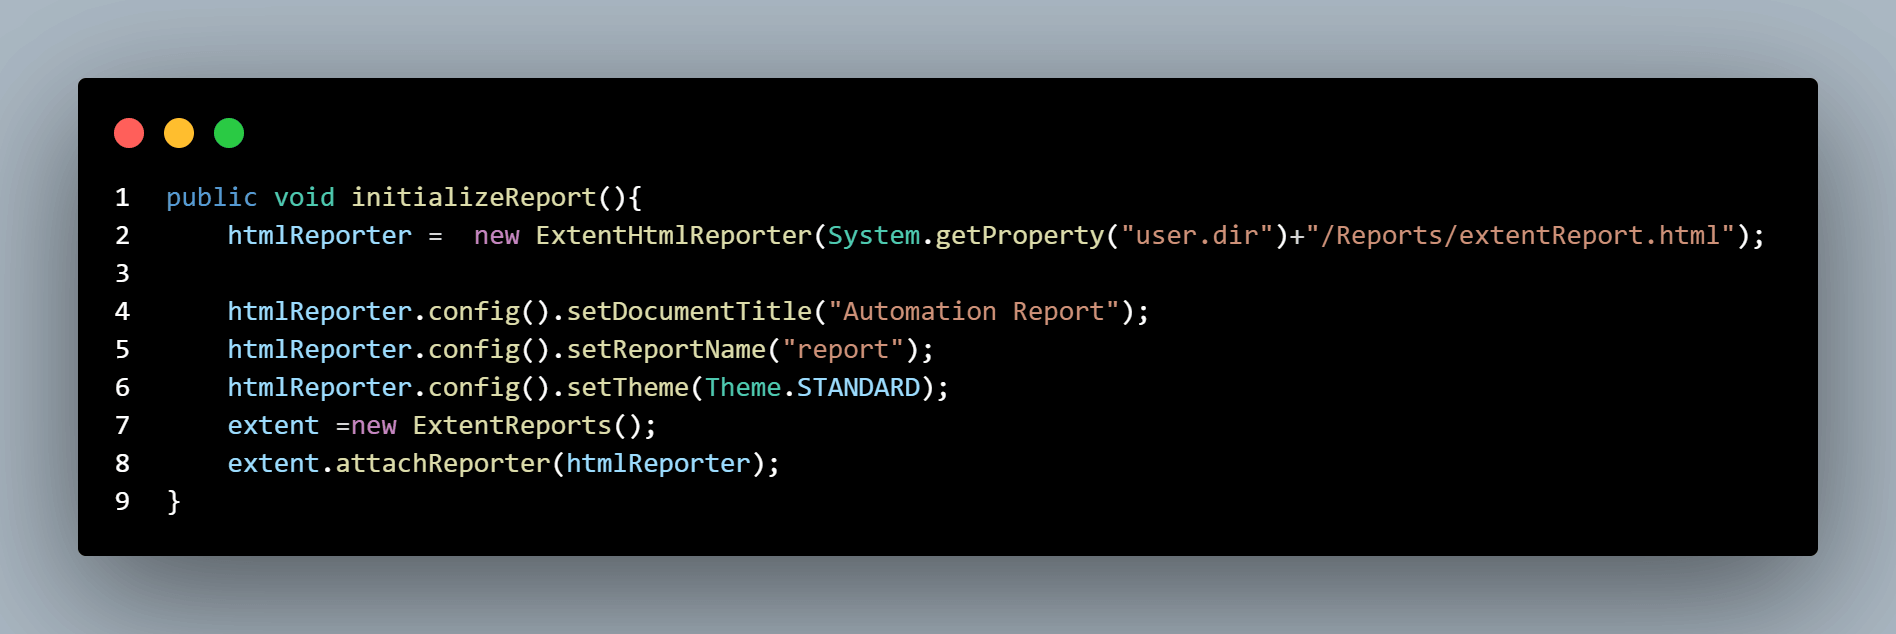
package testCases; import com.aventstack.extentreports.ExtentReports; import com.aventstack.extentreports.ExtentTest; import com.aventstack.extentreports.reporter.ExtentHtmlReporter; import com.aventstack.extentreports.reporter.configuration.Theme; import org.apache.commons.io.FileUtils; import org.openqa.selenium.OutputType; import org.openqa.selenium.TakesScreenshot; import org.openqa.selenium.WebDriver; import java.io.File; import java.io.IOException; public class BaseTest { public static ExtentHtmlReporter htmlReporter; public static ExtentReports extent; public static ExtentTest test; public static WebDriver driver; public void initializeReport(){ htmlReporter = new ExtentHtmlReporter(System.getProperty("user.dir")+"/Reports/extentReport.html"); htmlReporter.config().setDocumentTitle("Automation Report"); htmlReporter.config().setReportName("report"); htmlReporter.config().setTheme(Theme.STANDARD); extent =new ExtentReports(); extent.attachReporter(htmlReporter); } public static String CaptureScreenshot(WebDriver driver) throws IOException { String FileSeparator = System.getProperty("file.separator"); String Extent_report_path = "."+FileSeparator+"Reports"; String ScreenshotPath = Extent_report_path+FileSeparator+"screenshots"; File src = ((TakesScreenshot)driver).getScreenshotAs(OutputType.FILE); String screenshotName = "screenshot"+Math.random()+".png"; String screenshotpath = ScreenshotPath+FileSeparator+screenshotName; FileUtils.copyFile(src,new File(screenshotpath)); return "."+FileSeparator+"screenshots"+FileSeparator+screenshotName; } } |
Code Walkthrough
- Initialize the global variables
In the BaseClass, let us initialize the global variables. - Initialize the extent report
We have created a method initializeReport(), which has the steps to initialize and configure Extent Reports in Selenium. - Include common methods
In the BaseTest class we can add commonly used methods like capturing screenshots which can be used across various tests.
Let us frame the automation test cases.
|
1 2 3 4 5 6 7 8 9 10 11 12 13 14 15 16 17 18 19 20 21 22 23 24 25 26 27 28 29 30 31 32 33 34 35 36 37 38 39 40 41 42 43 44 45 46 47 48 49 50 51 52 53 54 55 56 57 58 59 60 61 62 63 64 65 66 67 68 69 70 71 72 73 74 75 76 77 78 79 80 81 82 83 84 85 86 87 88 89 90 91 92 93 94 95 96 97 98 99 100 101 102 103 104 105 106 107 108 109 110 111 112 113 114 115 116 117 118 119 120 121 122 123 124 125 126 127 128 129 130 131 132 133 134 135 136 137 138 139 140 141 142 143 144 |
package testCases; import com.aventstack.extentreports.Status; import org.openqa.selenium.*; import org.openqa.selenium.remote.DesiredCapabilities; import org.openqa.selenium.remote.RemoteWebDriver; import org.testng.Assert; import org.testng.annotations.*; import java.net.MalformedURLException; import java.net.URL; import java.util.concurrent.TimeUnit; public class InputFormTest extends BaseTest { public String username = "YOUR_USERNAME"; public String accesskey = "YOUR_ACCESSKEY"; public static RemoteWebDriver driver = null; public String gridURL = "@hub.lambdatest.com/wd/hub"; @BeforeTest public void startReport(){ initializeReport(); } @BeforeMethod public void setUp(){ DesiredCapabilities capabilities = new DesiredCapabilities(); capabilities.setCapability("browserName", "chrome"); capabilities.setCapability("version", "96.0"); capabilities.setCapability("platform", "win10"); // If this cap isn't specified, it will just get the any available one capabilities.setCapability("build", "ExtentReportGeneration"); capabilities.setCapability("name", "ExtentReportGenerationTest"); try { driver = new RemoteWebDriver(new URL("https://" + username + ":" + accesskey + gridURL), capabilities); } catch (MalformedURLException e) { System.out.println("Invalid grid URL"); } catch (Exception e) { System.out.println(e.getMessage()); } } @Test public void verifyTitle(){ String methodName = new Exception().getStackTrace()[0].getMethodName(); test = extent.createTest(methodName,"verify_Page_Title"); test.log(Status.INFO,"starting"); test.assignCategory("P0"); driver.get("https://www.lambdatest.com/selenium-playground/"); driver.manage().window().maximize(); driver.manage().timeouts().pageLoadTimeout(10, TimeUnit.SECONDS); String title ="Selenium Grid Online | Run Selenium Test On Cloud"; Assert.assertEquals(title,driver.getTitle()); } @Test public void SingleInputTest() { try { String nameofCurrMethod = new Throwable() .getStackTrace()[0] .getMethodName(); test = extent.createTest(nameofCurrMethod, "TestCase_singleInputTest"); test.log(Status.INFO,"Starting the tests : "+test.getStatus()); test.assignCategory("P1"); driver.get("https://www.lambdatest.com/selenium-playground/"); driver.manage().window().maximize(); driver.manage().timeouts().pageLoadTimeout(10, TimeUnit.SECONDS); //Clicks on the simple form demo option in the selenium playground WebElement simpleFormDemo = driver.findElement(By.xpath("//a[text()='Simple Form Demo']")); simpleFormDemo.click(); //Enters the message in the enter message input box WebElement messageInputBox = driver.findElement(By.xpath("//input[@id='user-message']")); messageInputBox.sendKeys("Hello World"); //Clicks on Show Message button WebElement showMessageButton = driver.findElement(By.xpath("//button[text()='Get Checked value']")); showMessageButton.click(); //Retrieves the entered user message WebElement userMessage = driver.findElement(By.xpath("//label[text()='Your Message: ']//..//p")); String actualUserText = userMessage.getText(); Assert.assertEquals(actualUserText,"Hello World", "Expected and actual texts do not match."); } catch (Exception e) { } } @Test public void MultipleInputTest() { try { String methodName = new Exception().getStackTrace()[0].getMethodName(); test = extent.createTest(methodName, "TestCase_MultipleInputTest"); test.log(Status.INFO,"Starting the tests :"); test.assignCategory("P0"); driver.get("https://www.lambdatest.com/selenium-playground/"); driver.manage().window().maximize(); driver.manage().timeouts().pageLoadTimeout(10, TimeUnit.SECONDS); WebElement simpleFormDemo = driver.findElement(By.xpath("//a[text()='Simple Form Demo']")); simpleFormDemo.click(); WebElement firstInputBox = driver.findElement(By.xpath("//input[@id='sum1']")); firstInputBox.sendKeys("5"); WebElement secondInputBox = driver.findElement(By.xpath("//input[@id='sum2']")); secondInputBox.sendKeys("10"); WebElement getTotalButton = driver.findElement(By.xpath("//button[text()='Get values']")); getTotalButton.click(); WebElement userMessage = driver.findElement(By.xpath("//p[@id='addmessage']")); String actualUserText = userMessage.getText(); Assert.assertEquals(actualUserText,"15", "Expected and actual values do not match."); } catch (Exception e) { System.out.println(e); } } @AfterMethod public void end(){ driver.quit(); } @AfterTest public void endReport(){ extent.flush(); } } |
Code Walkthrough
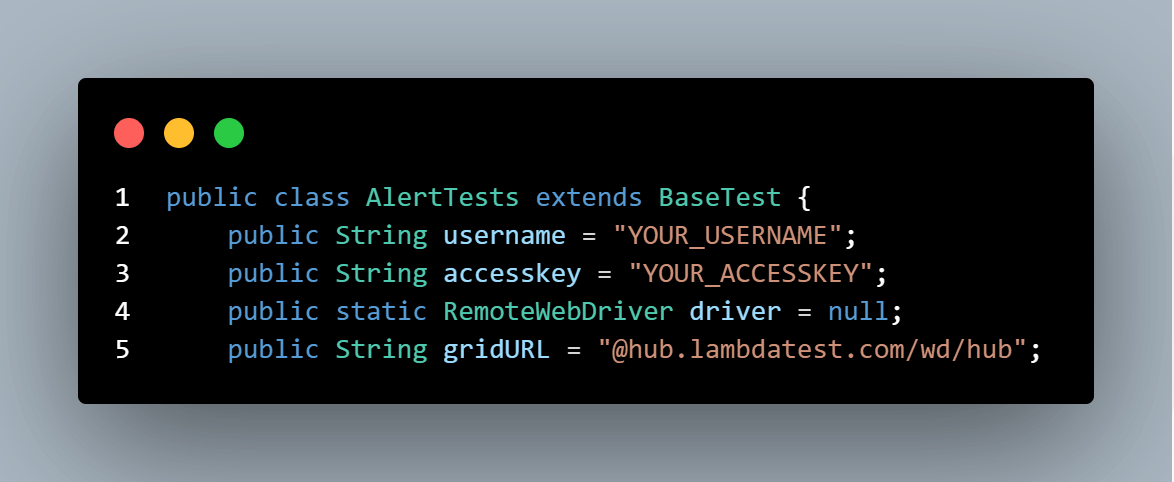
- Extend BaseTest.
- Initialize the global variables like username and access key for running the tests in cloud Selenium Grid.
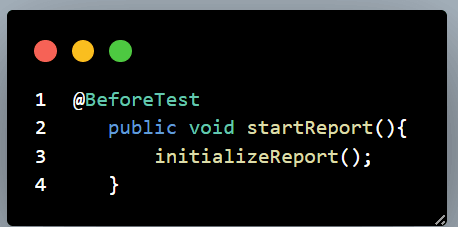
- @BeforeTest
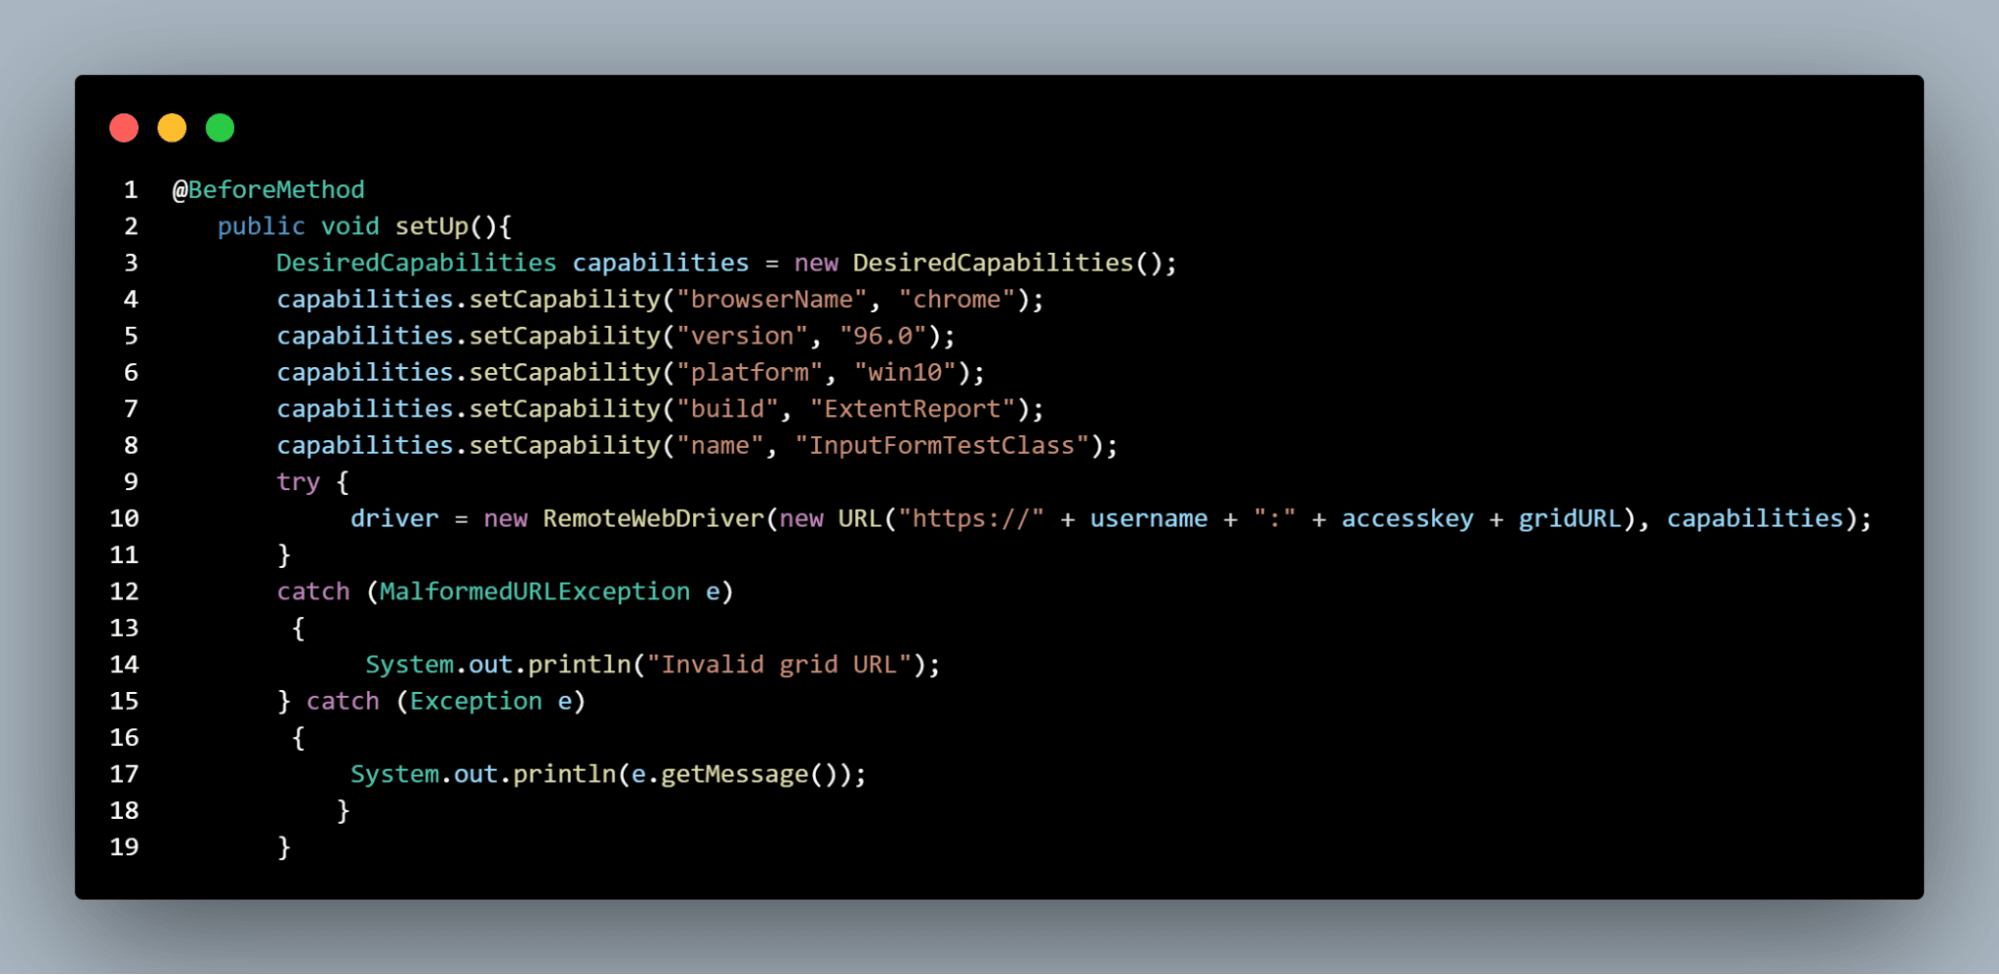
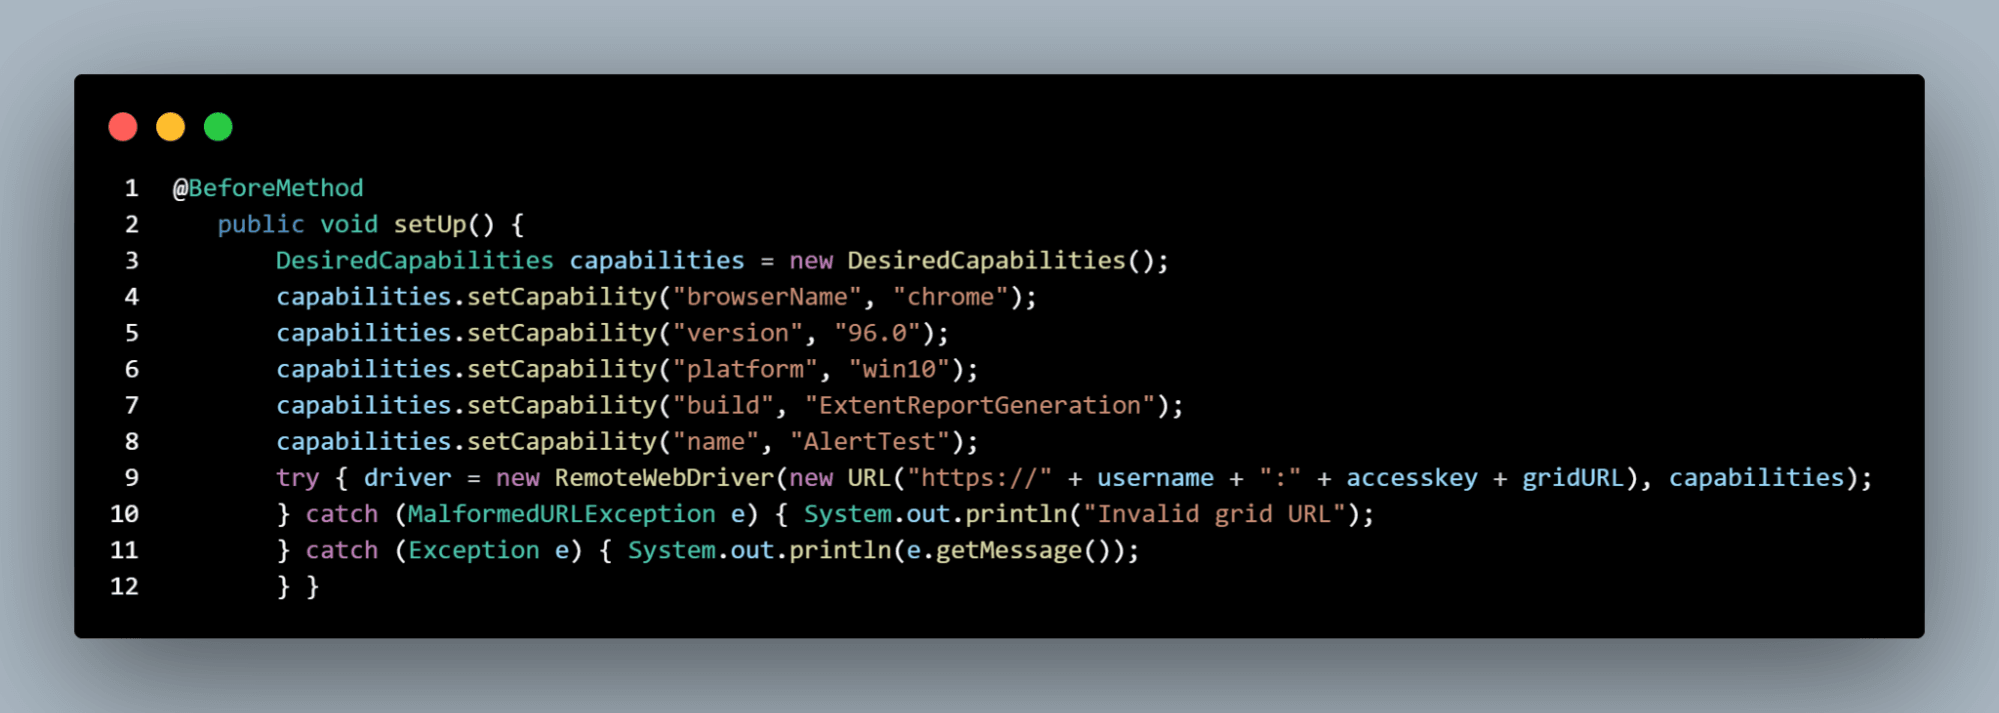
Use the initializeReport() method from BaseTest class for initializing the Extent Report set up. - @BeforeMethod
Define the desired capabilities like browser, browser version, operating system and its version, build and test name for running our tests in cloud Selenium Grid like LambdaTest. In addition to this, we need to specify the grid URL for the tests to be executed. - @Test
Test annotations must be defined at the start of every test method. If the @Test annotation is not found on a given test method, then the method will not be executed as a part of the test code. - @AfterMethod
Here we will add a step to quit the browser - @AfterTest
Here we shall flush the report
Let us implement our test cases.
Test case 1: To verify the title of the webpage
|
1 2 3 4 5 6 7 8 9 10 11 12 13 14 |
@Test public void verifyTitle(){ String methodName = new Exception().getStackTrace()[0].getMethodName(); test = extent.createTest(methodName,"verify_Page_Title"); test.log(Status.INFO,"starting"); test.assignCategory("P0"); driver.get("https://www.lambdatest.com/selenium-playground/"); driver.manage().window().maximize(); driver.manage().timeouts().pageLoadTimeout(10, TimeUnit.SECONDS); String title ="Selenium Grid Online | Run Selenium Test On Cloud"; Assert.assertEquals(title,driver.getTitle()); } |
To get the title of the web page, we can use driver.getTitle(). Then we can use TestNG assertions to compare the actual and expected title on the web page.
The ExtentTest class provides a method to segregate our tests into various categories.
|
1 |
test.assignCategory(category_name); |
Let us assign this test case as P0 category.

Test 2: SingleInputTest – This is to verify the form submission and verification of the message in the form
Upon launching the browser and navigating to the website, we have to click the Simple Input Form. For this, we have first to inspect the Simple Form Demo link and then perform a click.
We will be directed to the form page, where we have to provide some value in the input form. We shall inspect the text box web element and enter the value by using the sendkeys(your_message) method. You can go through this article on sendKeys in Selenium to know more about sendKeys.
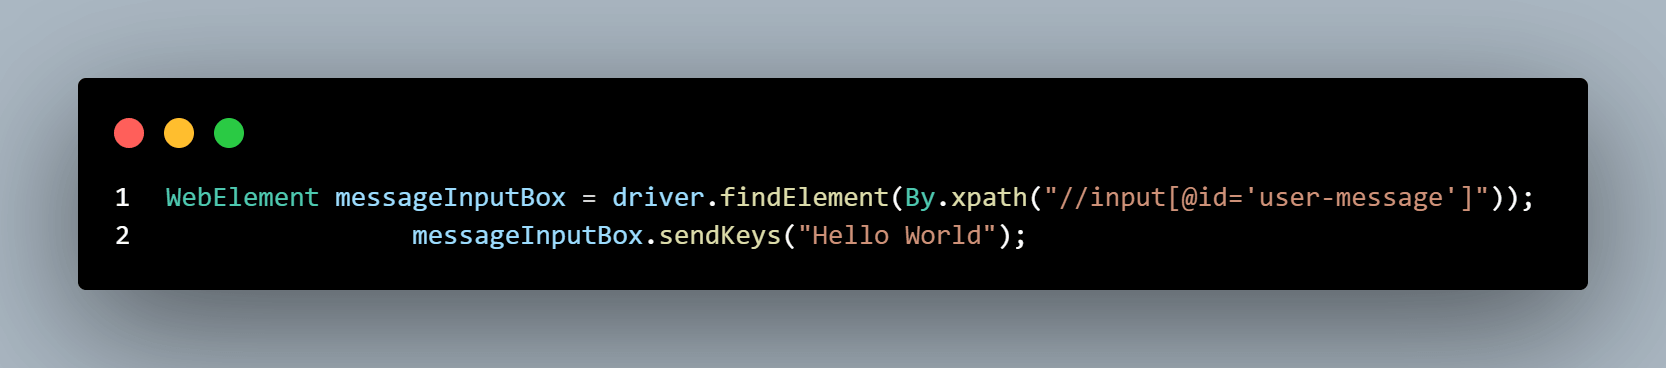
After entering the value in the form, we have to click the ‘Get Checked value’ button to display our message, which was entered in the form.
Now we have to fetch the message displayed.

Using assertions let us verify if the actual and expected messages are the same.

|
1 2 3 4 5 6 7 8 9 10 11 12 13 14 15 16 17 18 19 20 21 22 23 24 25 26 27 28 29 30 31 32 33 34 35 36 37 |
@Test public void SingleInputTest() { try { String nameofCurrMethod = new Throwable().getStackTrace()[0].getMethodName(); test = extent.createTest(nameofCurrMethod, "TestCase_singleInputTest"); test.log(Status.INFO,"Starting the tests : "+test.getStatus()); test.assignCategory("P1"); driver.get("https://www.lambdatest.com/selenium-playground/"); driver.manage().window().maximize(); driver.manage().timeouts().pageLoadTimeout(10, TimeUnit.SECONDS); //Clicks on the simple form demo option in the selenium playground W,ebElement simpleFormDemo = driver.findElement(By.xpath("//a[text()='Simple Form Demo']")); simpleFormDemo.click(); //Enters the message in the enter message input box WebElement messageInputBox = driver.findElement(By.xpath("//input[@id='user-message']")); messageInputBox.sendKeys("Hello World"); //Clicks on Show Message button WebElement showMessageButton = driver.findElement(By.xpath("//button[text()='Get Checked value']")); showMessageButton.click(); //Retrieves the entered user message WebElement userMessage = driver.findElement(By.xpath("//label[text()='Your Message: ']//..//p")); String actualUserText = userMessage.getText(); Assert.assertEquals(actualUserText,"Hello World", "Expected and actual texts do not match."); } catch (Exception e) { System.out.println(e); } } |
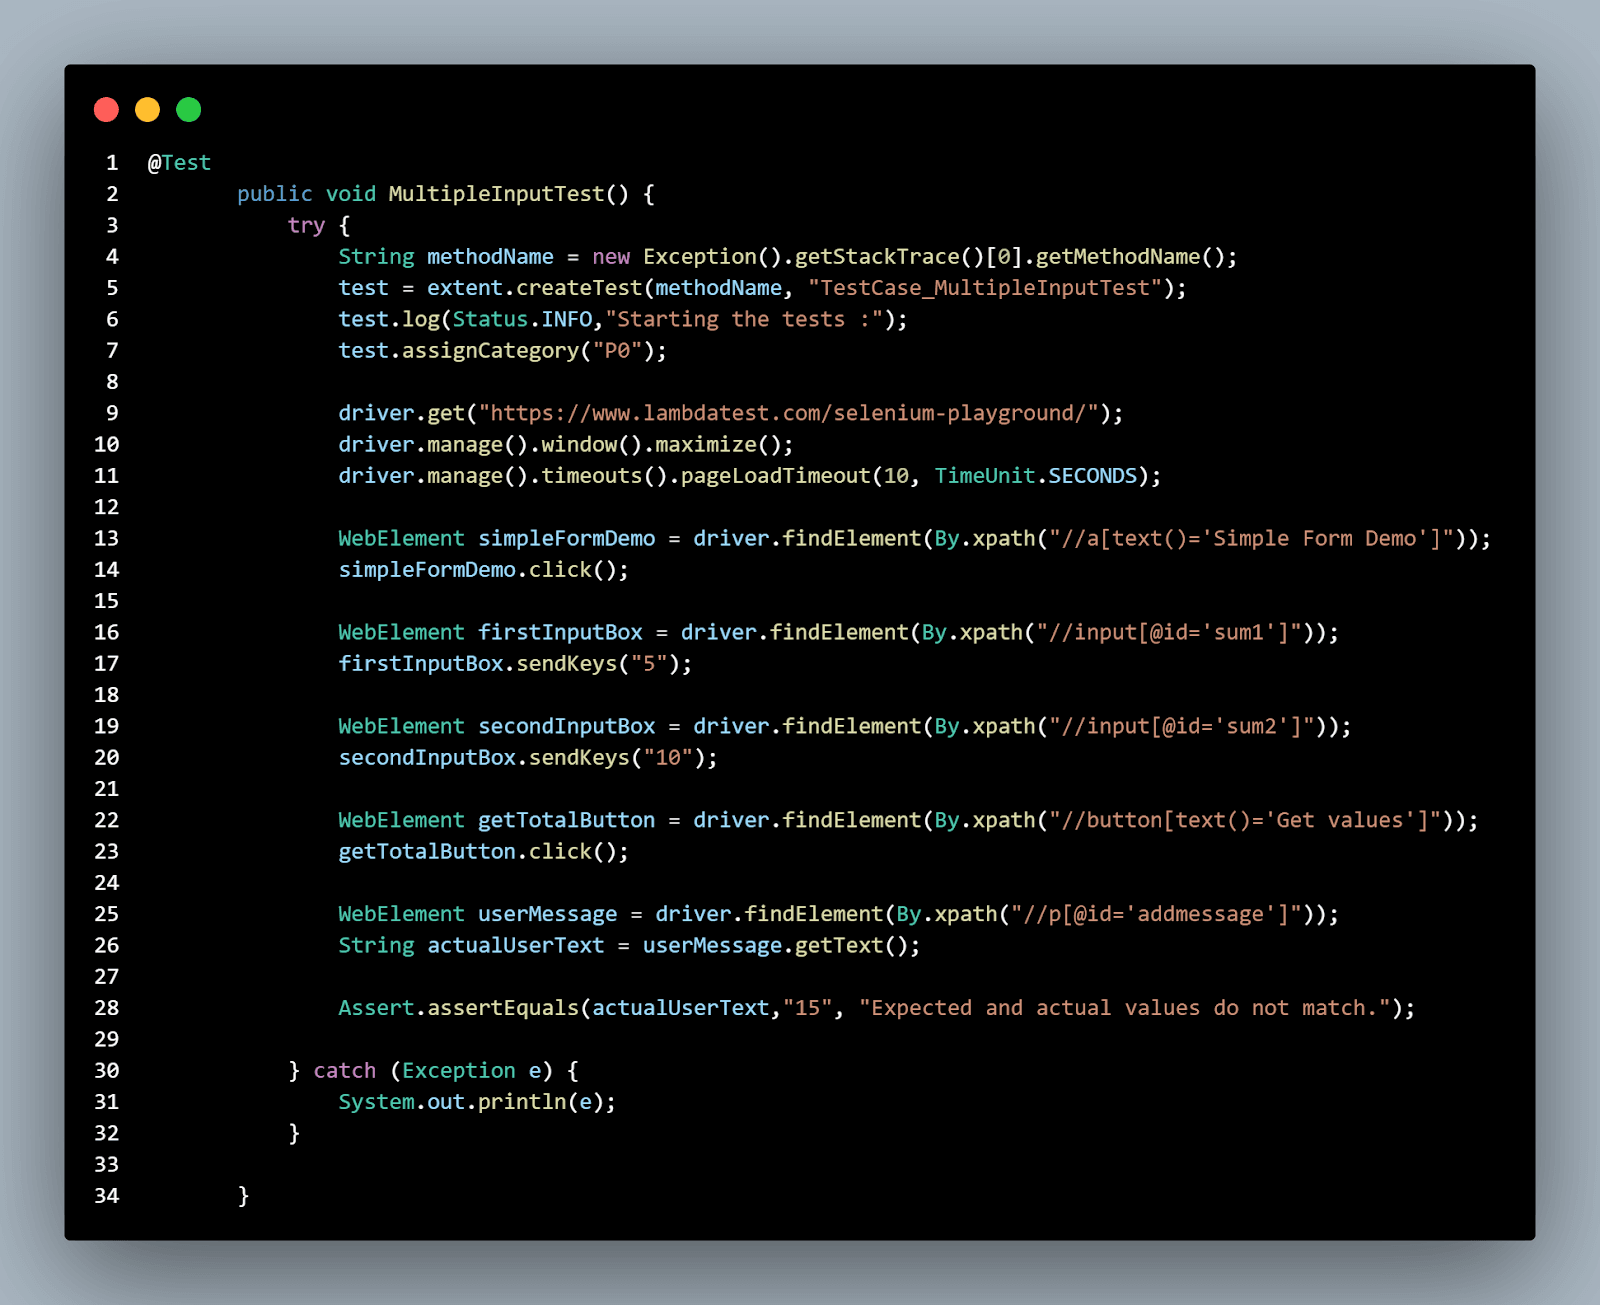
Test 3: MultipleInputTest – This test is to verify if the user is able to enter two input fields in the form.
First we need to click the Simple Form Demo option.
This navigates us to the form page and here we have to enter two values in the form for which first we have to identify the web elements.
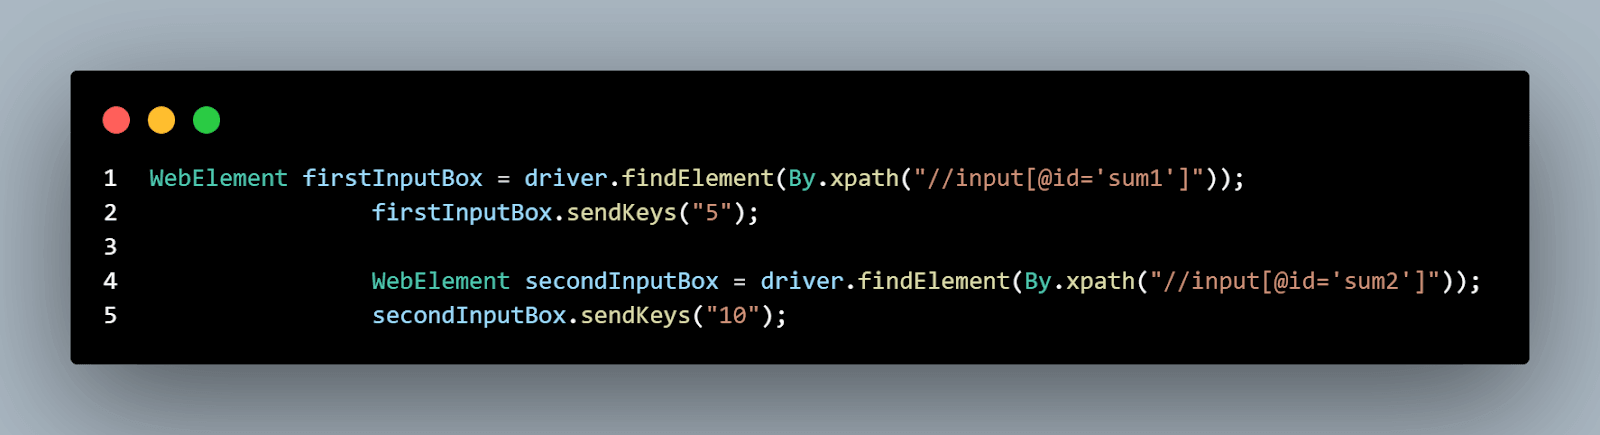
Upon submitting the form, the sum of the values would be displayed and we have to verify the displayed value.


Next, we will see AlertTests, where we have added one test which verifies the alert message displayed on the page.
|
1 2 3 4 5 6 7 8 9 10 11 12 13 14 15 16 17 18 19 20 21 22 23 24 25 26 27 28 29 30 31 32 33 34 35 36 37 38 39 40 41 42 43 44 45 46 47 48 49 50 51 52 53 54 55 56 57 58 59 60 61 62 63 64 65 66 67 68 69 70 71 72 73 74 75 76 77 78 79 80 81 |
package testCases; import com.aventstack.extentreports.Status; import org.openqa.selenium.By; import org.openqa.selenium.WebDriver; import org.openqa.selenium.WebElement; import org.openqa.selenium.chrome.ChromeDriver; import org.openqa.selenium.remote.DesiredCapabilities; import org.openqa.selenium.remote.RemoteWebDriver; import org.testng.Assert; import org.testng.annotations.*; import java.net.MalformedURLException; import java.net.URL; import java.util.concurrent.TimeUnit; public class AlertTests extends BaseTest { public String username = "YOUR_USERNAME"; public String accesskey = "YOUR_ACCESSKEY"; public static RemoteWebDriver driver = null; public String gridURL = "@hub.lambdatest.com/wd/hub"; @BeforeTest public void startReport() { initializeReport(); } @BeforeMethod public void setUp() { DesiredCapabilities capabilities = new DesiredCapabilities(); capabilities.setCapability("browserName", "chrome"); capabilities.setCapability("version", "96.0"); capabilities.setCapability("platform", "win10"); // If this cap isn't specified, it will just get the any available one capabilities.setCapability("build", "ExtentReportGeneration"); capabilities.setCapability("name", "ExtentReportGenerationTest"); try { driver = new RemoteWebDriver(new URL("https://" + username + ":" + accesskey + gridURL), capabilities); } catch (MalformedURLException e) { System.out.println("Invalid grid URL"); } catch (Exception e) { System.out.println(e.getMessage()); } } @Test public void clickSimpleAlertAndGetMessage() { String methodName = new Exception().getStackTrace()[0].getMethodName(); String className = new Exception().getStackTrace()[0].getClassName(); test = extent.createTest(methodName, "Click alert and verify the text"); test.log(Status.INFO, "starting"); test.assignCategory("P0"); driver.get("https://www.lambdatest.com/selenium-playground/"); driver.manage().window().maximize(); driver.manage().timeouts().pageLoadTimeout(10, TimeUnit.SECONDS); WebElement alertMenu = driver.findElement(By.linkText("Bootstrap Alerts")); alertMenu.click(); driver.manage().timeouts().pageLoadTimeout(10, TimeUnit.SECONDS); WebElement alert = driver.findElement(By.xpath("//button[text()='Normal Success Message']")); alert.click(); WebElement message = driver.findElement(By.xpath("//div[contains(text(),'normal success message')]")); String actualMessage = message.getText(); String expectedMessage = "I'm a normal success message. To close use the appropriate button."; Assert.assertTrue(actualMessage.contains(expectedMessage)); } @AfterMethod public void end(){ driver.quit(); } @AfterTest public void endReport(){ extent.flush(); } } |
Code Walkthrough
- Extend BaseTest.
- Initialize the global variables like username and access key for running the tests in cloud Selenium Grid.
- @BeforeTest
Use the initializeReport() method from BaseTest class for initializing the Extent Report set up. - @BeforeMethod
Define the desired capabilities like browser, browser version, operating system, and its version, build and test name for running our tests in cloud Selenium Grid like LambdaTest. In addition to this, we need to specify the grid URL for the tests to be executed. - @Test
Test annotations must be defined at the start of every test method. If the @Test annotation is not found on a given test method, then the method will not be executed as a part of the test code.


Let us implement our test case.
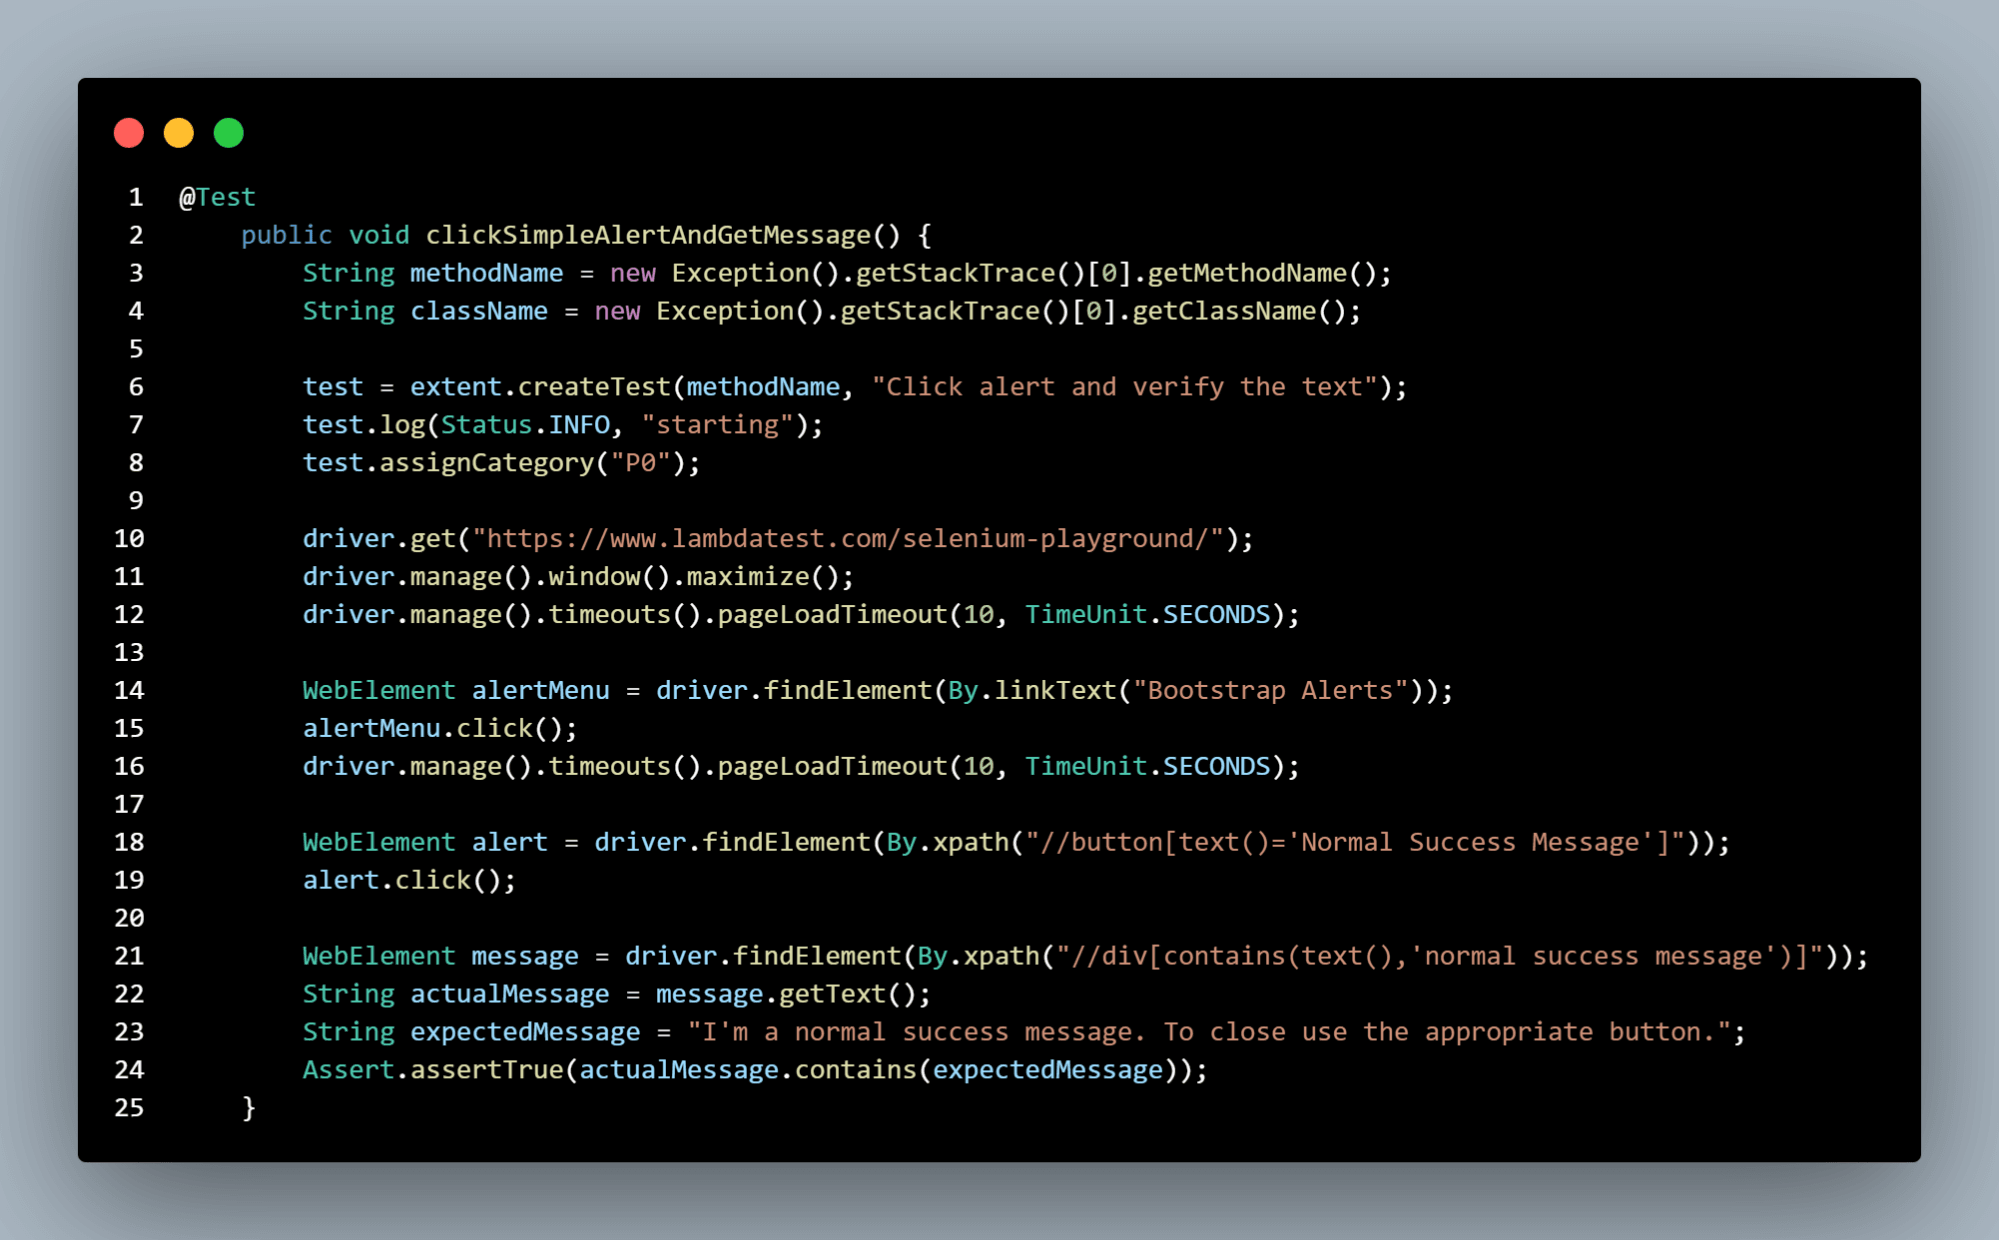
Once the website has been launched, the Bootstrap Alert webElement has to be identified and clicked.
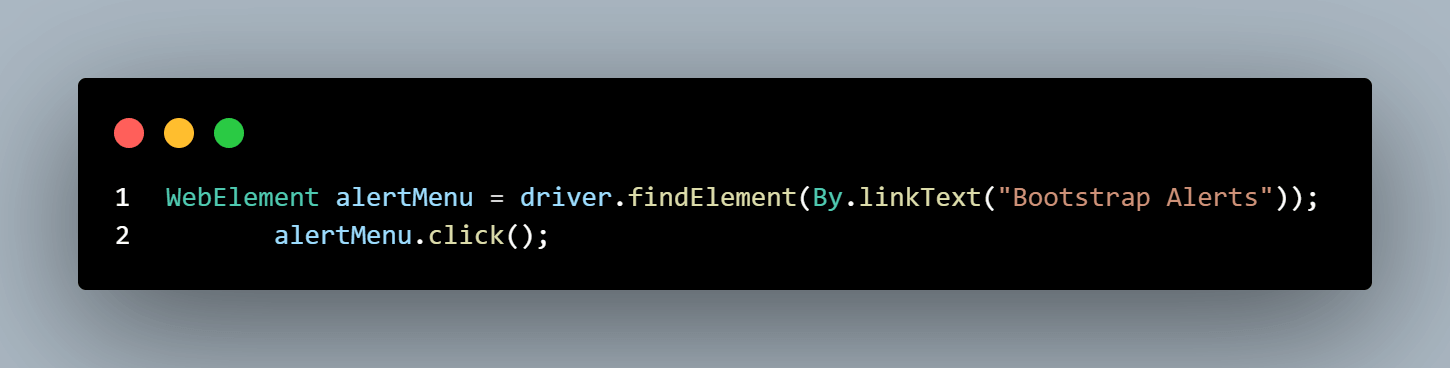
This directs us to the alerts page where we should verify the alert message popped up upon clicking the Normal Success Message.
Listener class
TestNG provides the @Listeners annotation, which listens to every event that occurs in a Selenium code. TestNG Listeners are activated either before the test or after the test case. It is an interface that modifies the TestNG behavior. If any event matches an event for which we want the listener to listen then it executes the code, which ultimately results in modifying the default behavior of TestNG.
If you want to know more about Event Listeners In Selenium WebDriver watch this video to learn how the Listeners “listen” to the event defined in the Selenium script and behave accordingly.
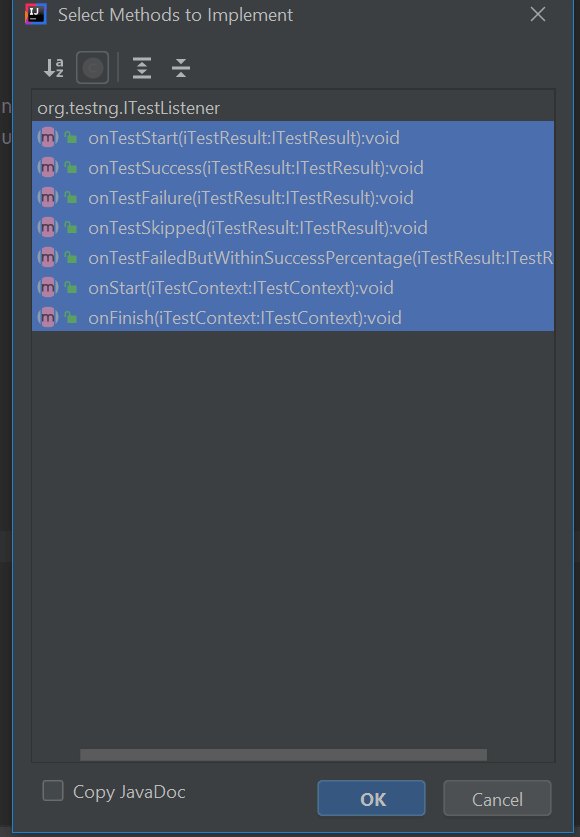
There are various types of TestNG listeners out of which we shall be using ITestListener in our tests. The ITestListener is an interface which has unimplemented methods by default and we can add lines of code within each method. So whenever a specific event occurs, the code written within that method will be executed. onTestFailure is a method in which this listener will be invoked whenever the test fails.
Within this method we shall add our code to capture screenshots whenever the test case fails on execution.
|
1 2 3 4 5 6 7 8 9 10 11 12 13 14 15 16 17 18 19 20 21 22 23 24 25 26 27 28 29 30 31 32 33 34 35 36 37 38 39 40 41 42 43 44 45 46 47 48 49 50 51 52 53 54 55 56 57 |
package Listener; import com.aventstack.extentreports.Status; import com.aventstack.extentreports.markuputils.ExtentColor; import com.aventstack.extentreports.markuputils.MarkupHelper; import org.testng.ITestContext; import org.testng.ITestListener; import org.testng.ITestResult; import sun.misc.BASE64Decoder; import testCases.BaseTest; import java.io.IOException; import static testCases.BaseTest.CaptureScreenshot; public class MyListener implements ITestListener { public void onTestStart(ITestResult iTestResult) { } public void onTestSuccess(ITestResult iTestResult) { BaseTest.test.log(Status.PASS,MarkupHelper.createLabel(iTestResult.getName().toUpperCase()+" PASS",ExtentColor.GREEN)); } public void onTestFailure(ITestResult iTestResult) { BaseTest.test.log(Status.FAIL,iTestResult.getThrowable().getMessage()); BaseTest.test.log(Status.FAIL,MarkupHelper.createLabel(iTestResult.getName().toUpperCase()+" FAIL",ExtentColor.RED)); try { BaseTest.test.addScreenCaptureFromPath(CaptureScreenshot(BaseTest.driver)); BaseTest.test.addScreencastFromPath(CaptureScreenshot(BaseTest.driver)); } catch (IOException e) { e.printStackTrace(); } } public void onTestSkipped(ITestResult iTestResult) { BaseTest.test.log(Status.SKIP,MarkupHelper.createLabel(iTestResult.getName().toUpperCase()+" SKIPPED",ExtentColor.PURPLE)); } public void onTestFailedButWithinSuccessPercentage(ITestResult iTestResult) { } public void onStart(ITestContext iTestContext) { } public void onFinish(ITestContext iTestContext) { } } |
Code Walkthrough
- Create a class and implement the ITestListener.
- Generate all the implemented methods in it.
- OnTestSuccess()
Once the test execution is complete and the test has been passed, this method will be invoked. We shall add the log included in the Extent Report to mark the test case as passed within this method. - OnTestFailure()
Once the test execution is complete and the test has failed, this method will be invoked. We shall add the log to be included in the Extent Report to mark the test case as failed within this method. Also, we add code to capture screenshots whenever the test fails.


MarkHelper is a class that is used for customizing the Extent Reports in Selenium by creating labels for the tests and adding colors to the test status by using ExtentColor enum.
Here, the tests which are passed will be updated with a label – testname with “PASS”.
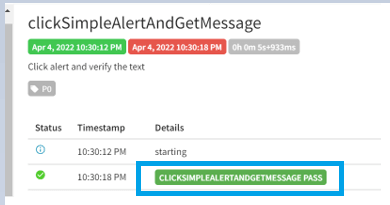
Also, the status of the status will be marked with green color as we have provided ExtentColor.GREEN.

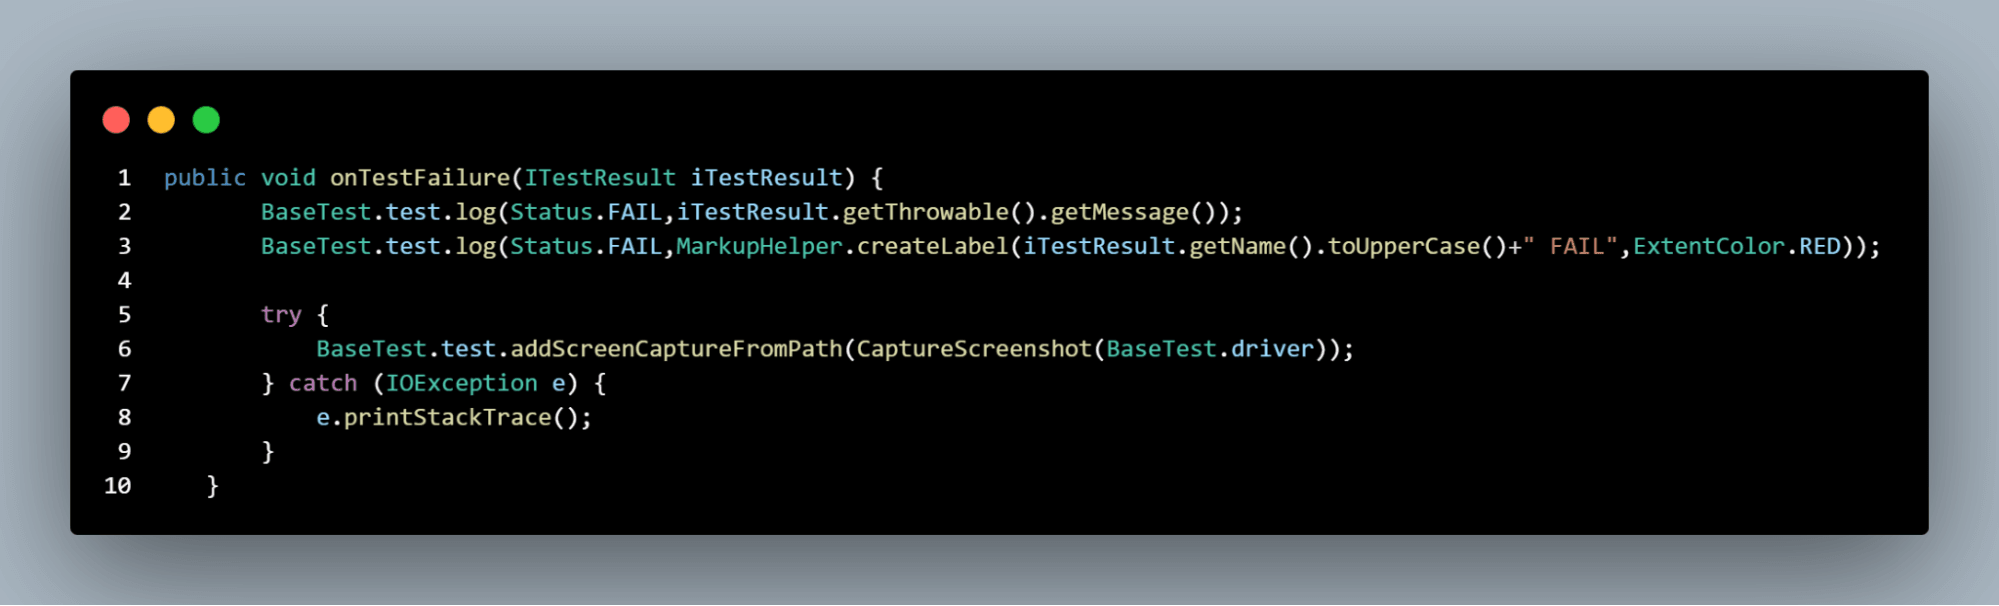
So when a test fails, logs will be captured with the exceptions and attached to the Extent Report in Selenium.
The addScreenCaptureFromPath() is a method in ExtentTest class that attaches the captured screenshot in the Extent Report.
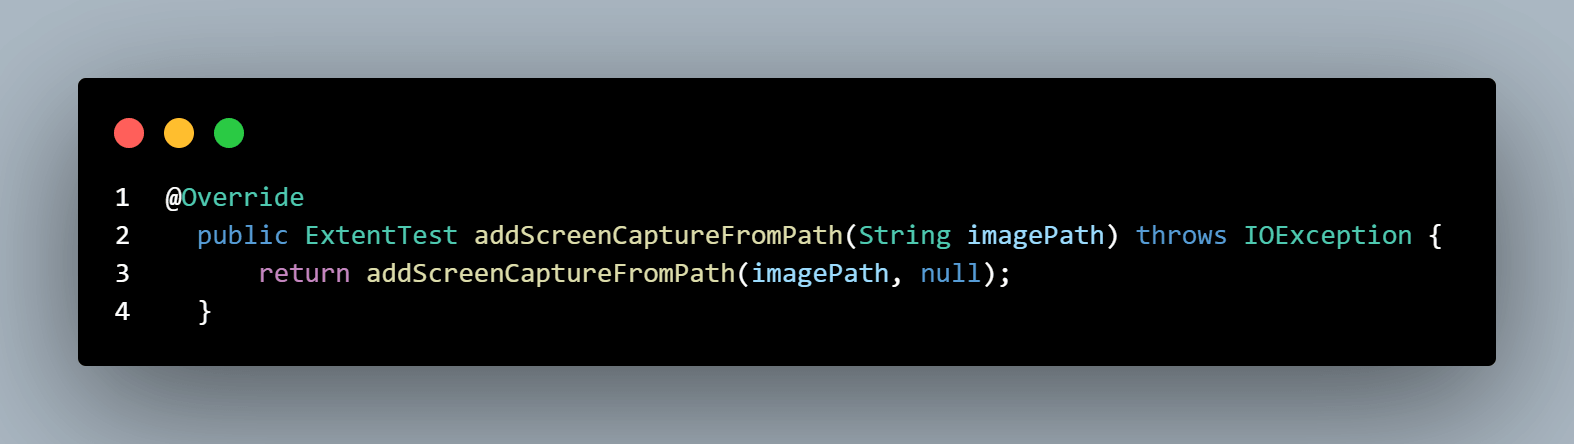
It takes the image path where the screenshot has been captured as the parameter and attaches the screenshot to the Extent Report in Selenium.
We can invoke the CaptureScreenshot() method which we have implemented in the BaseTest class.
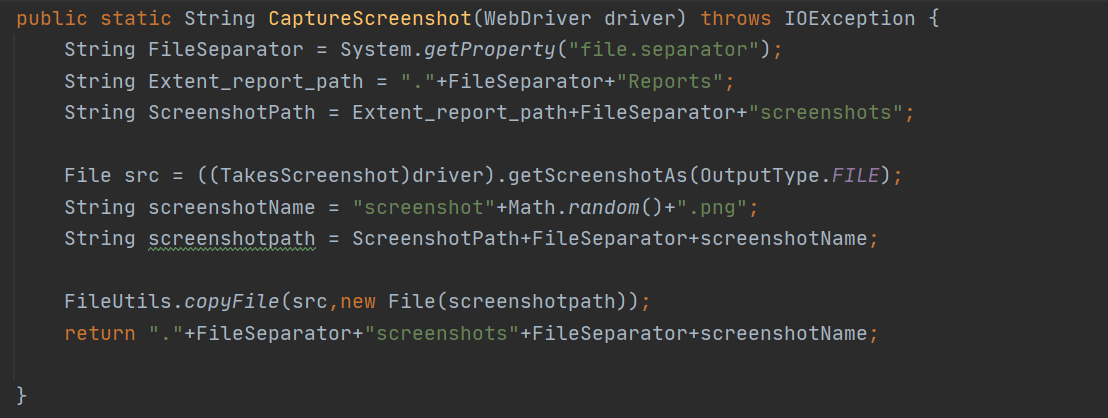
Using getScreenshotAs() method we shall capture the screenshot and save it in the path. This path will be returned to addScreenCaptureFromPath(), which will attach the screenshot in the Extent Report.
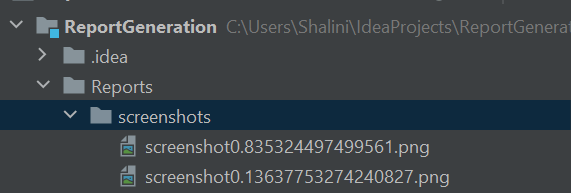
Upon test execution for the failed tests, you would see the screenshot attached to the respective tests.
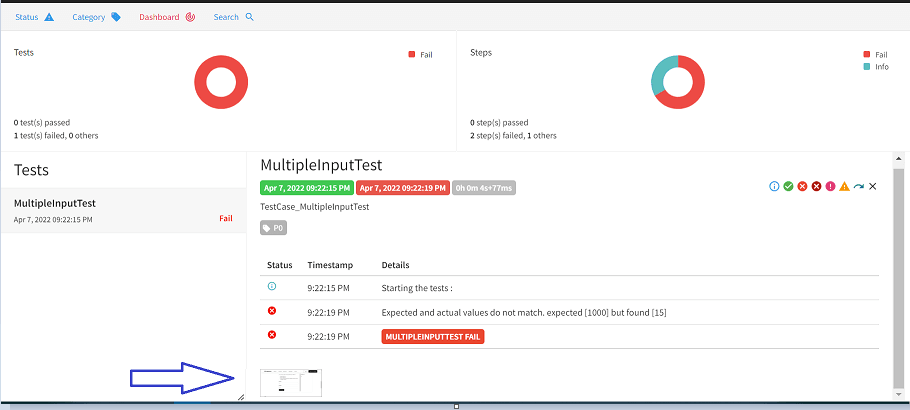
Clicking on it will show an enlarged view of the screenshot. This will help in analyzing the test failure.
TestNG.xml
In the TestNG.xml file, we shall add our classes and also the listener class.
|
1 2 3 4 5 6 7 8 9 10 11 12 13 14 15 16 17 |
<?xml version="1.0" encoding="UTF-8"?> <!DOCTYPE suite SYSTEM "http://testng.org/testng-1.0.dtd"> <suite name="Automation tests"> <listeners> <listener class-name="Listener.MyListener"></listener> </listeners> <test name="MyTests"> <classes> <class name="testCases.InputFormTest"/> <class name="testCases.AlertTests"></class> </classes> </test> <!-- Test --> </suite> <!-- Suite --> |
Output Console:
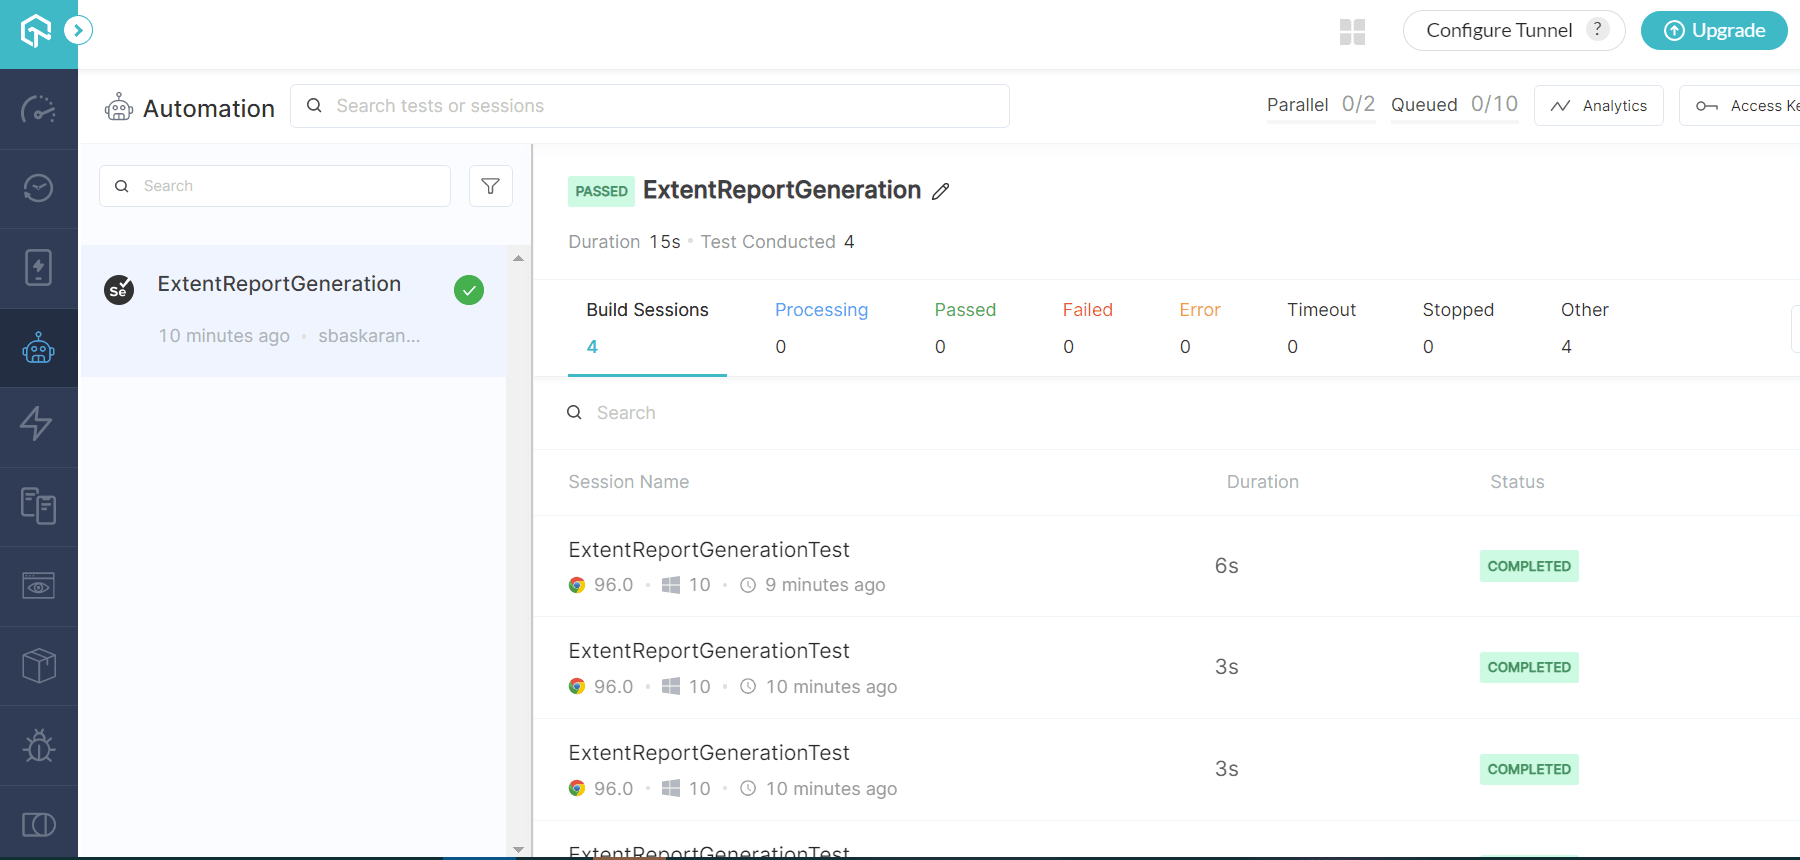
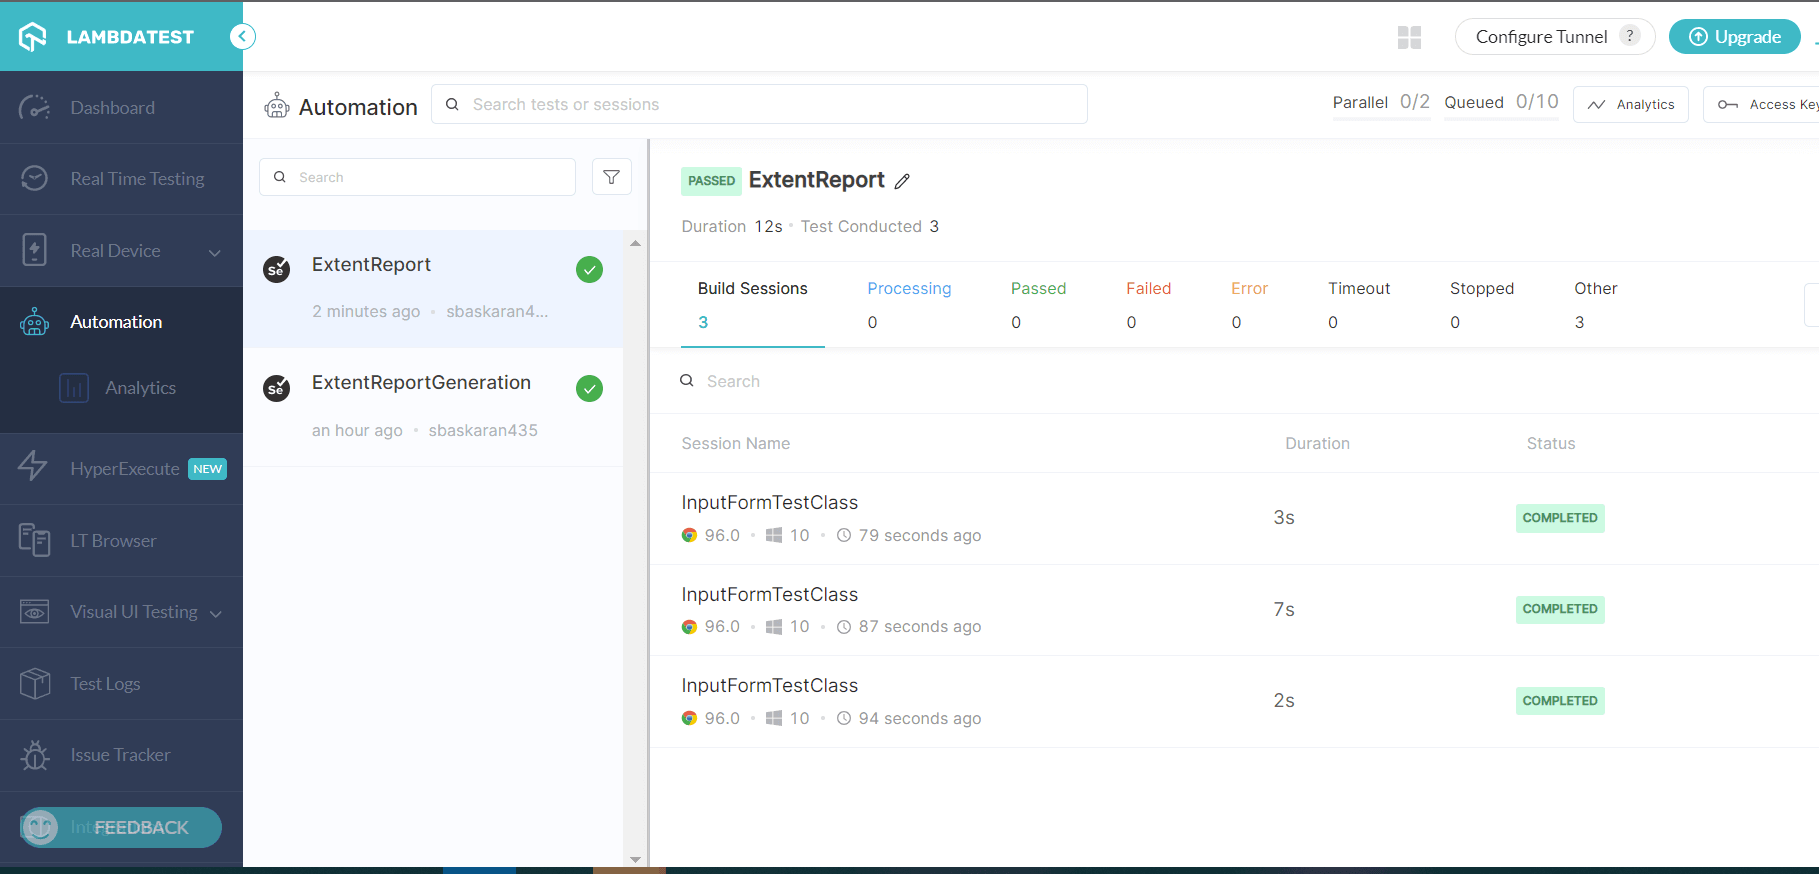
Cloud Grid Console
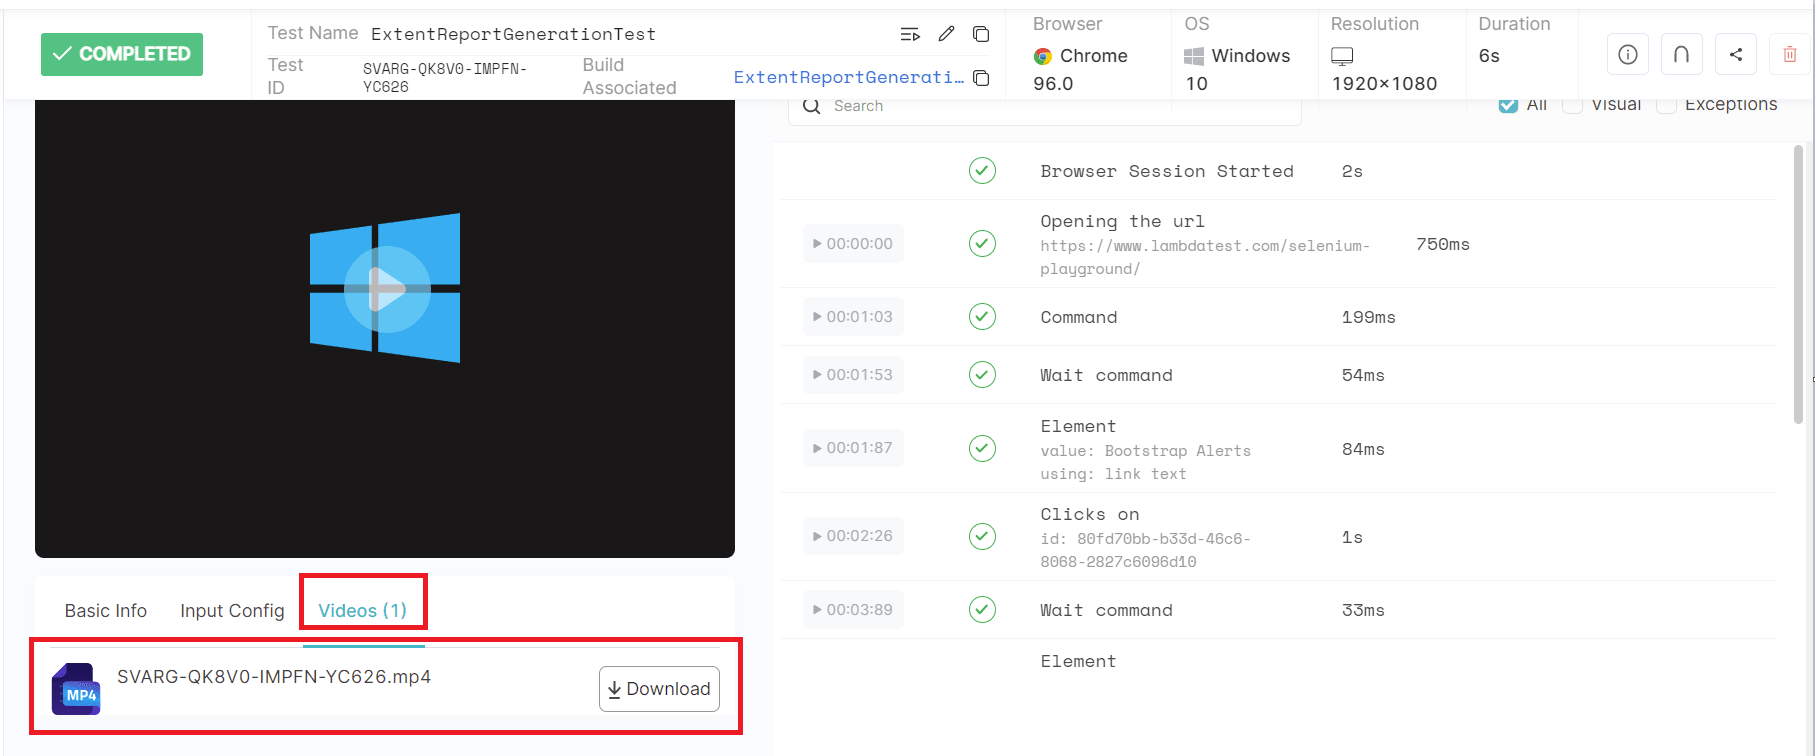
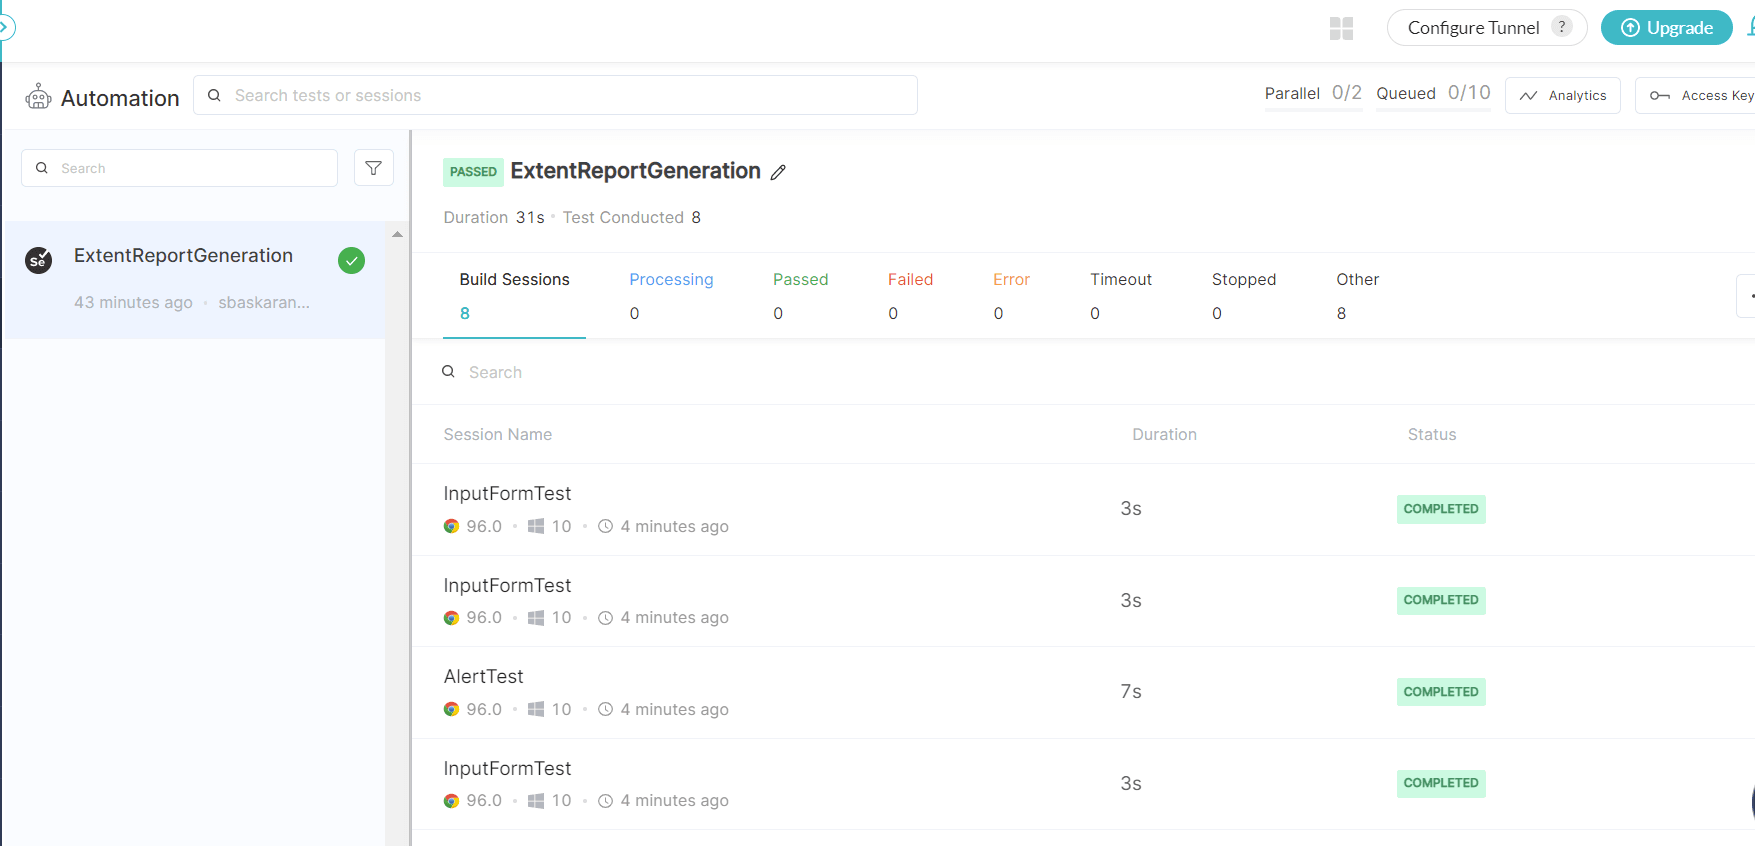
In the LambdaTest Dashboard, you can see our tests that are executed. You can see four tests that were executed and on clicking each test you can further navigate and verify the test details like the browser and its version, the platform upon which the tests were executed.
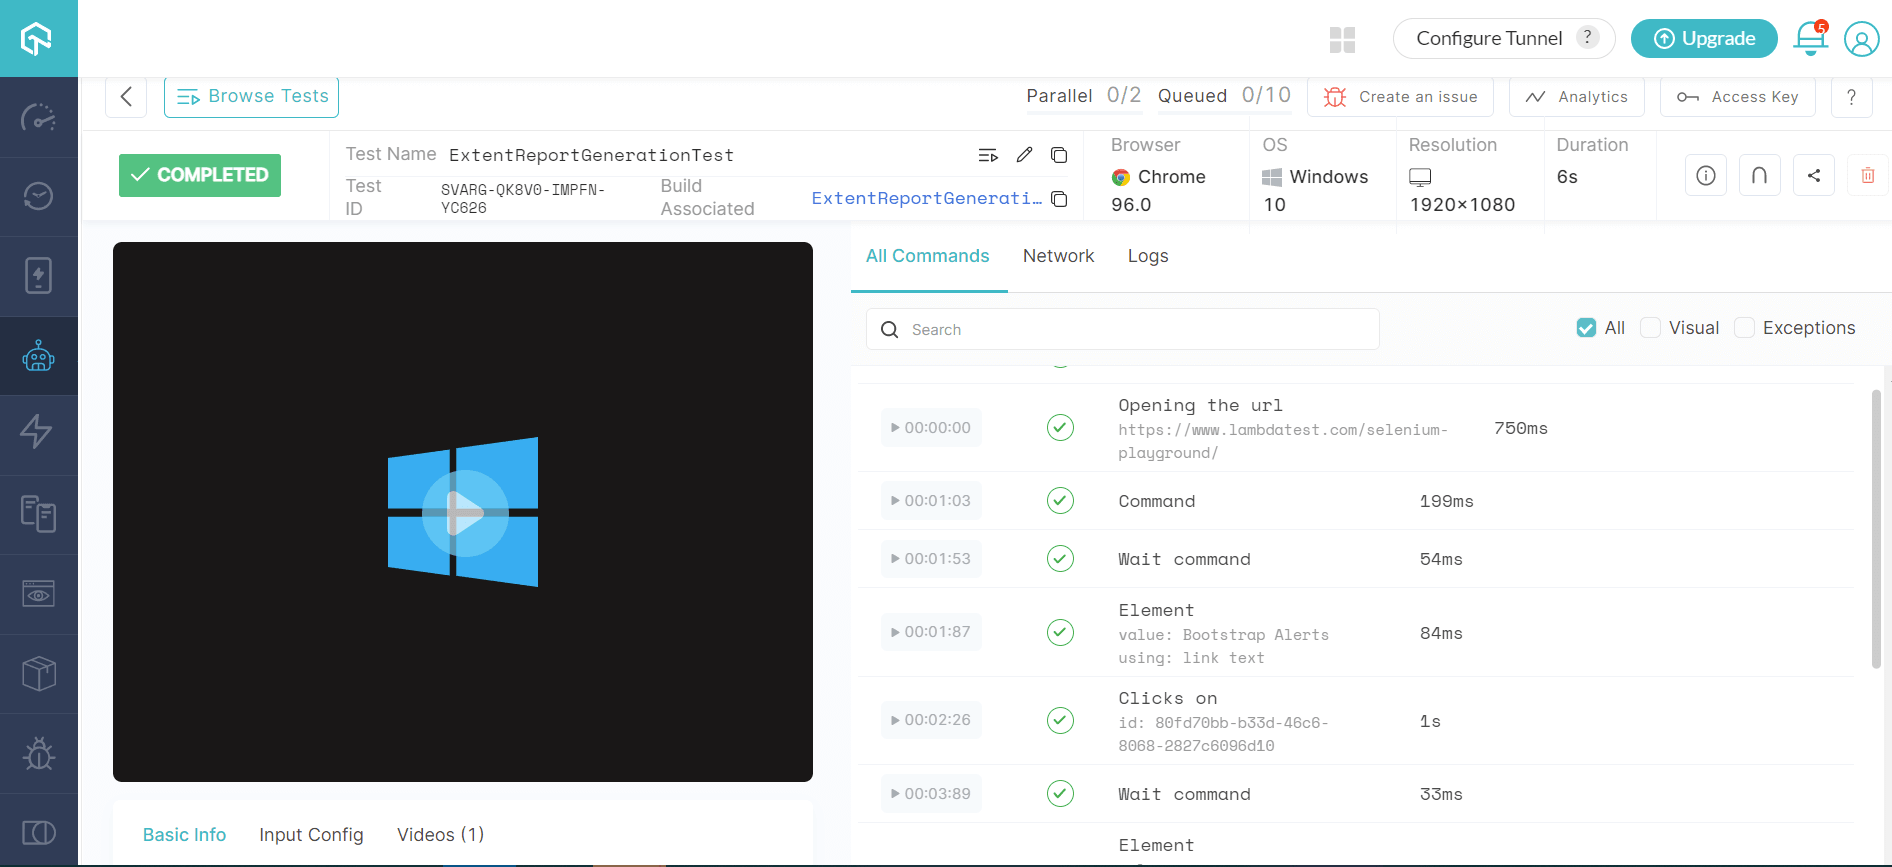
This section shows the browser and platform configurations in which the tests were executed. As mentioned in the DesiredCapabilities, the tests were run in the Chrome browser of version 96.0 and the Windows operating system.

There is also a video recording attached to the tests, which shows the end-to-end flow of our tests. This will help us to analyze when there are test failures. There is also an option to download the captured video.
Extent Reports
Now that our tests have been executed in the cloud-based Selenium Grid. Now let’s see if our extent report has been generated.
Yes, it is…! You can see the report being generated in the mentioned path.
- Right-click the report and open it in your choice of browser.
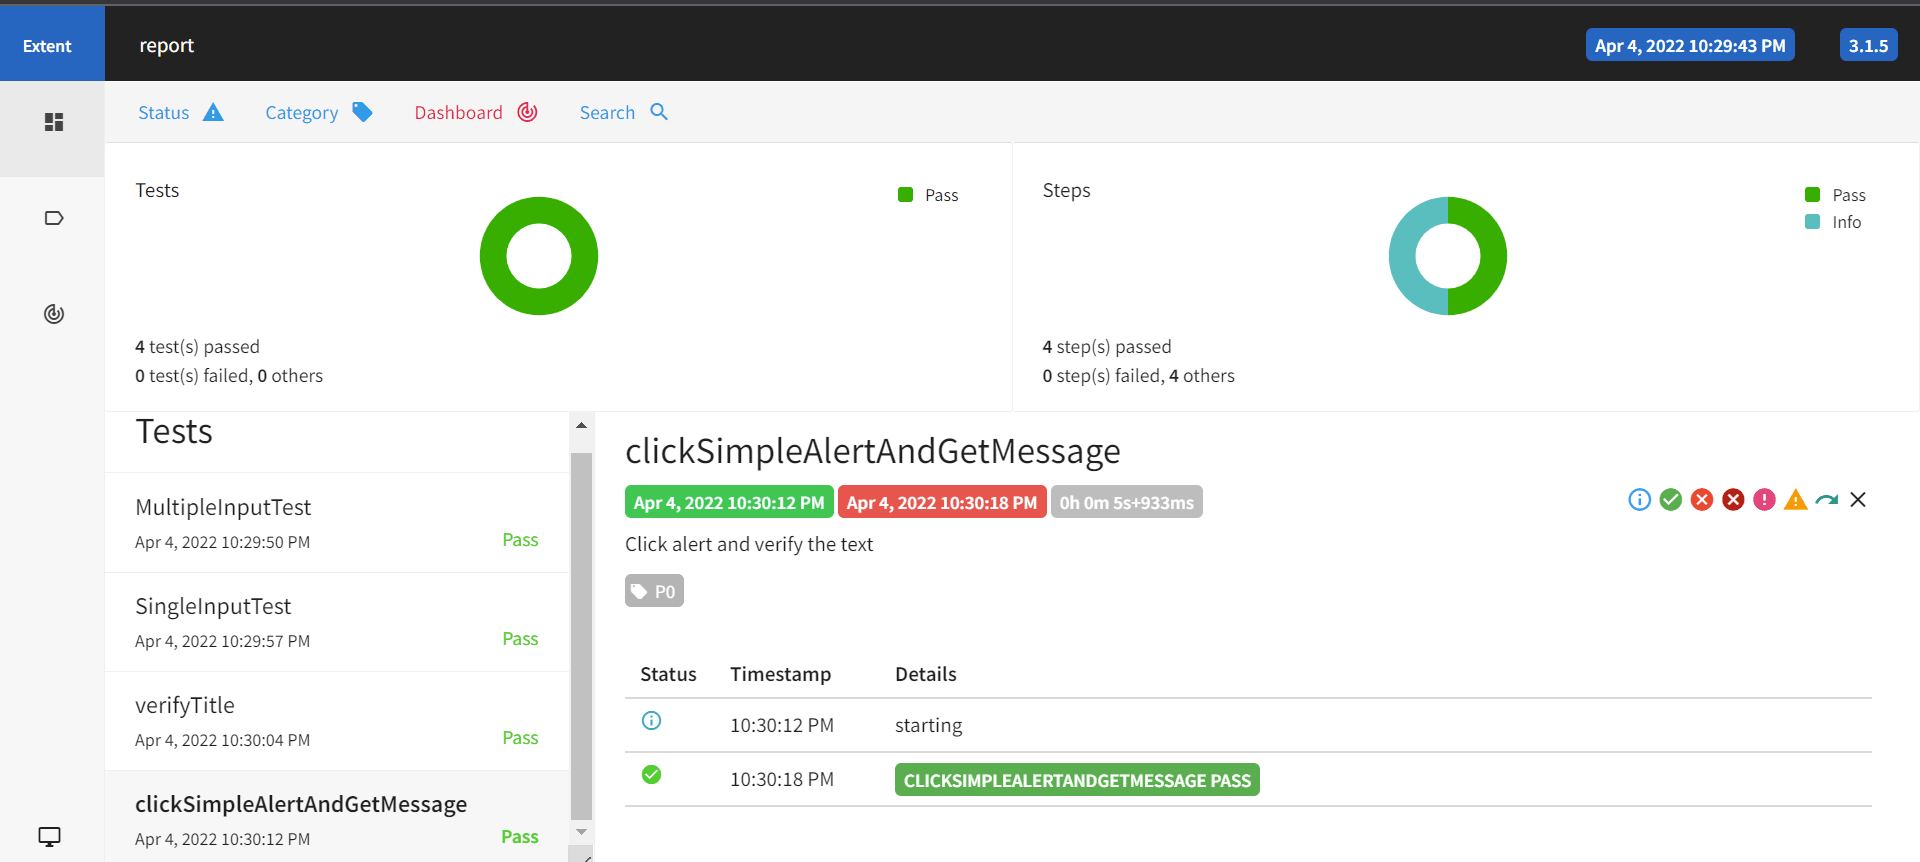
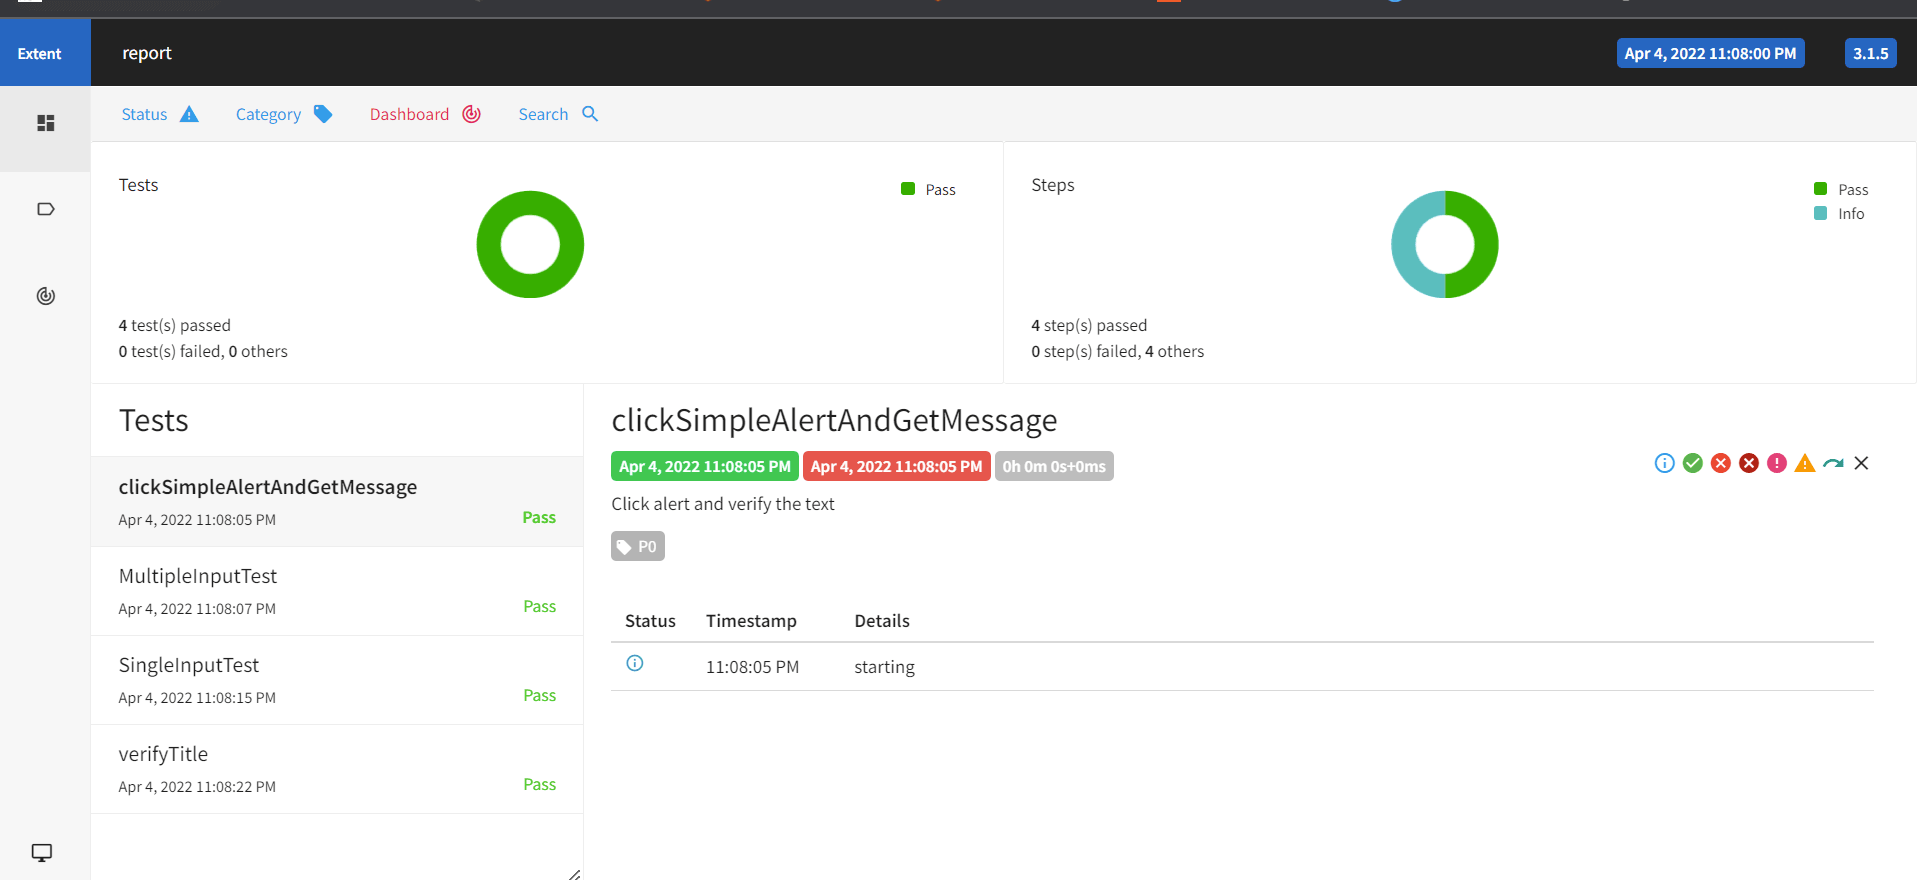
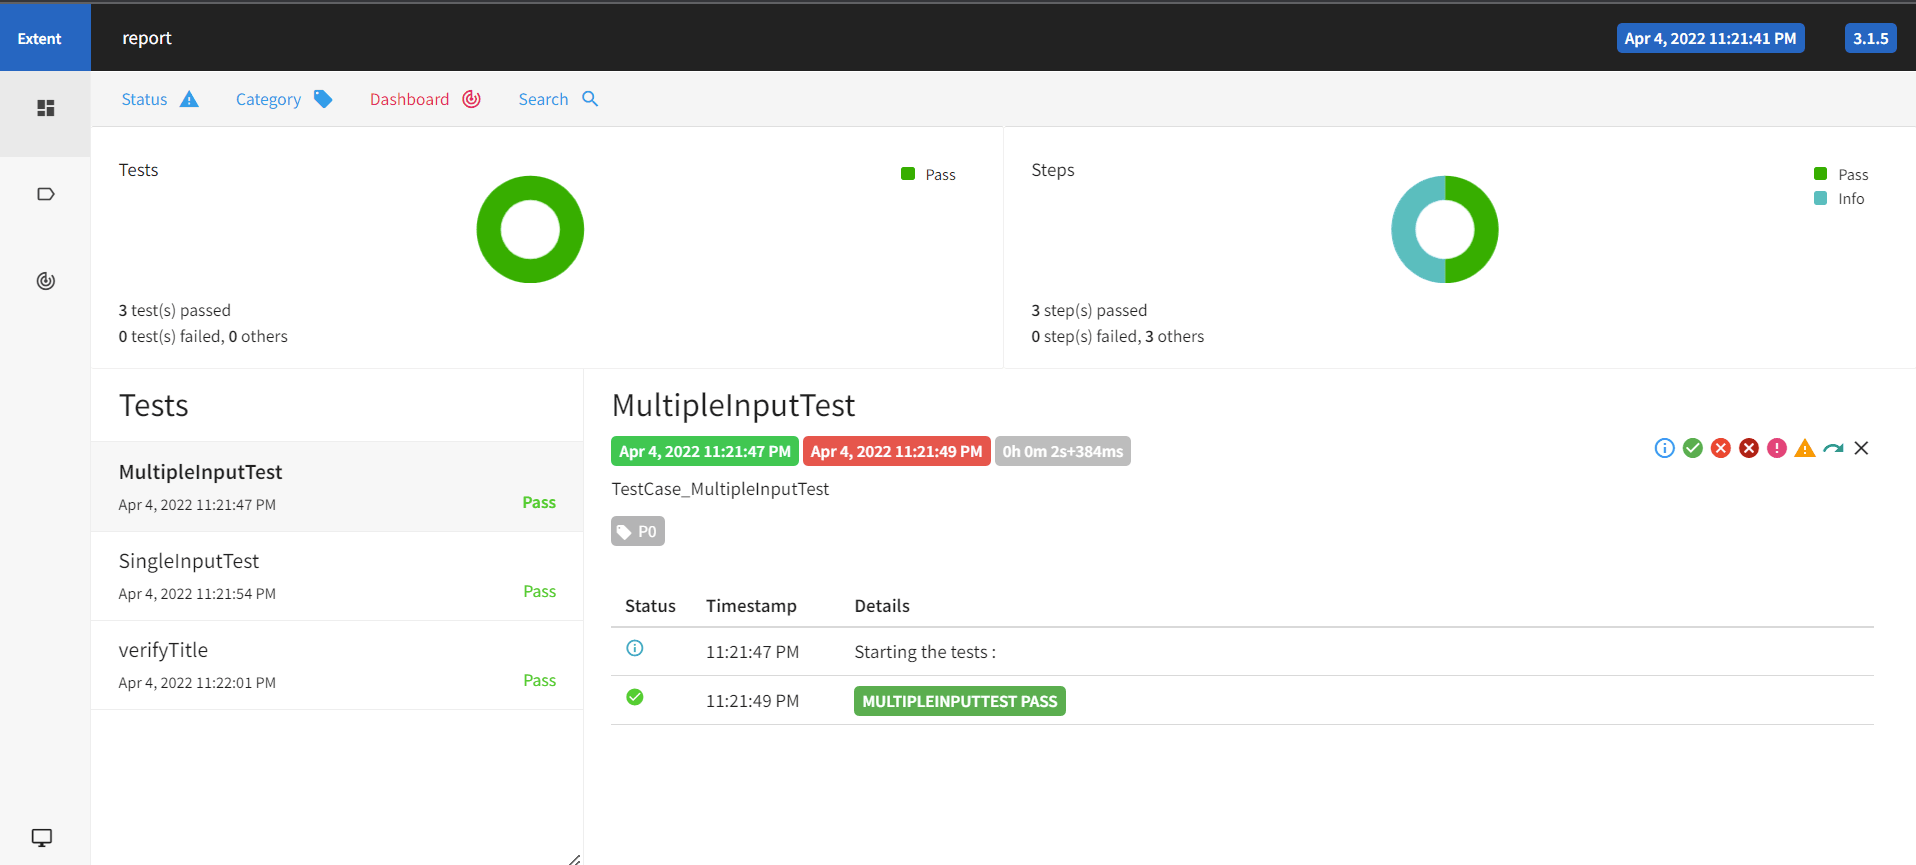
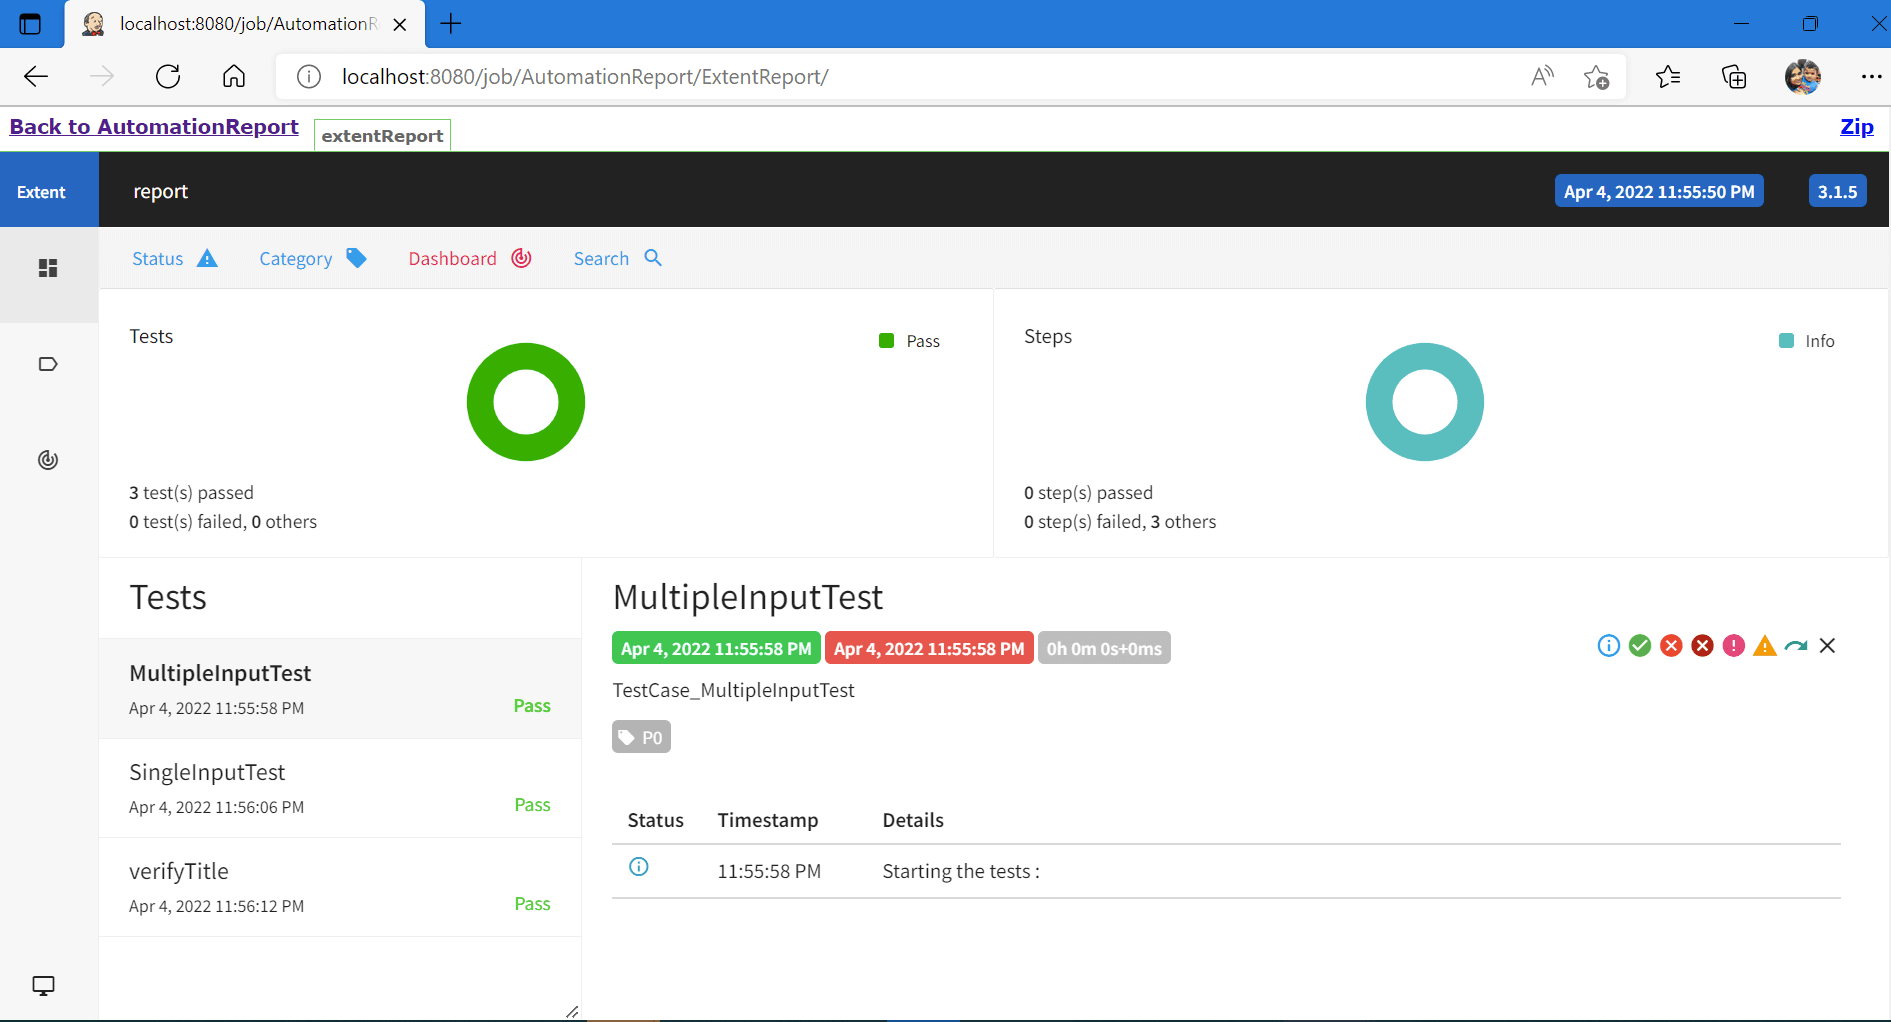
- Upon opening the Extent Report, you can see the summary of the tests executed.
- On clicking the category tab, you can see how the tests are categorized into different groups as mentioned in our tests.
We have assigned 3 tests for the P0 category and 1 test for P1 category. In the category tab, you can visualize the same. In a similar way, we can categorize our tests into Regression, Smoke, Sanity, etc. Thus, categorization will help us to get the test execution summary in a structured way. We can take a quick look at the execution of the tests based on the category by filtering out the specific category in the Extent Report.

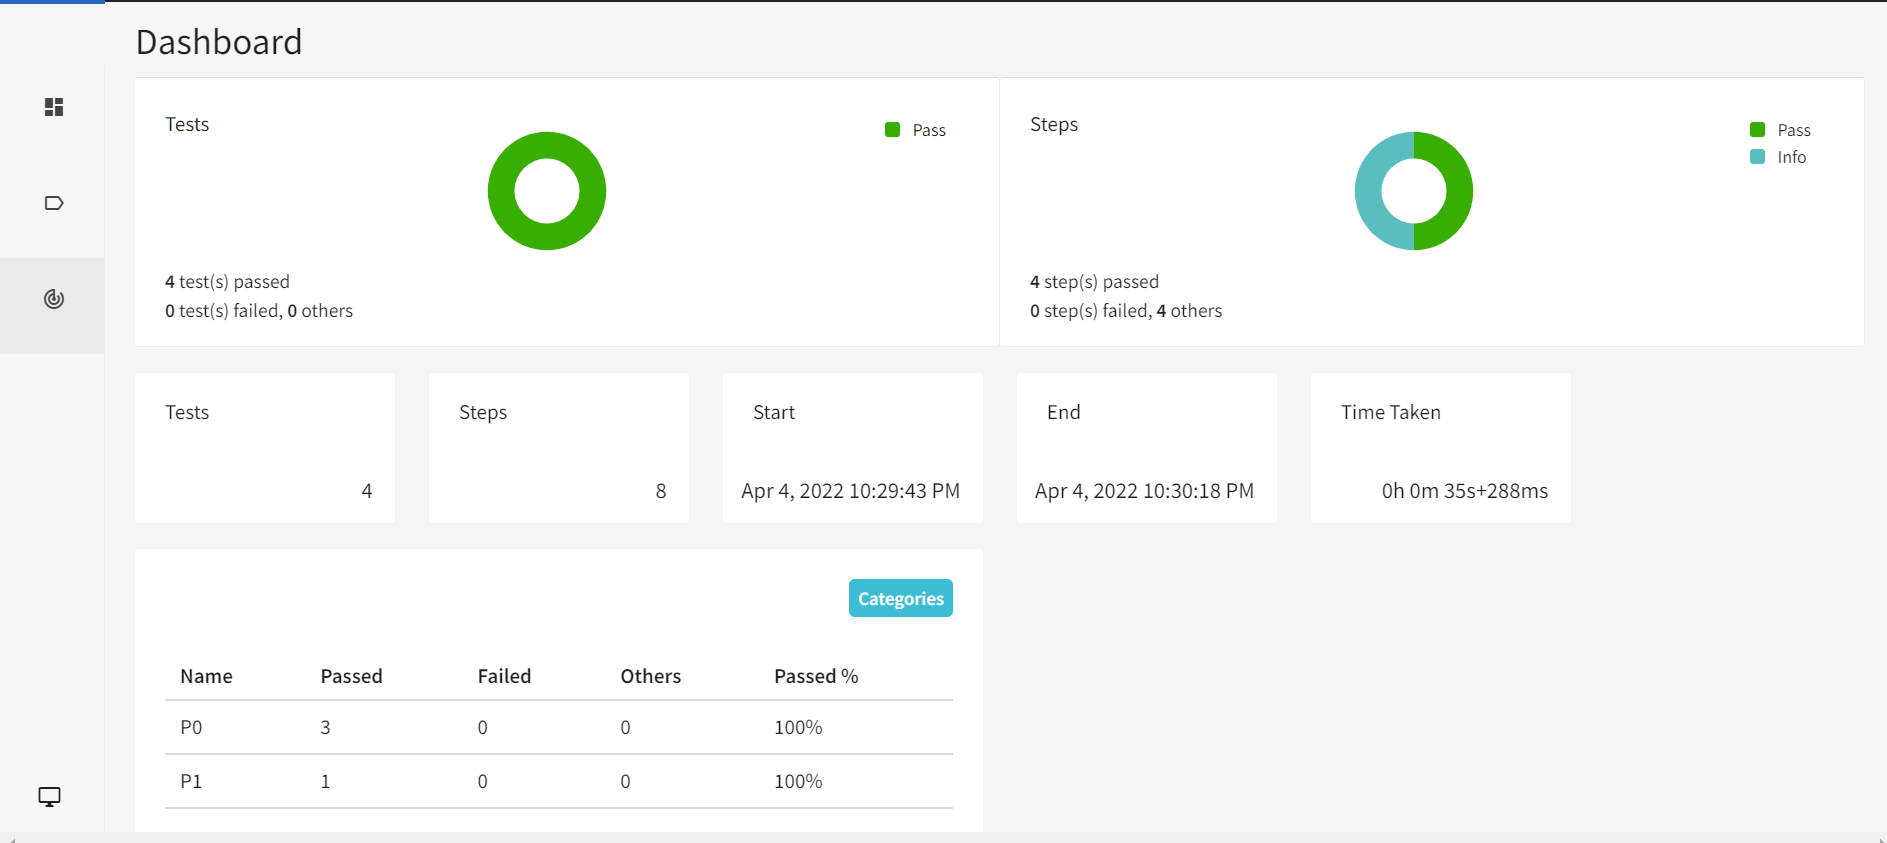
This is the view of the dashboard in the Extent Report. This page provides a complete view of the total number of the tests executed, passed tests, failed tests, the total time taken for executing the tests, and also the classification of the tests based on the category.
How to execute parallel tests and generate Extent Reports in Selenium?
As the name suggests, parallel testing is the process of running the test methods/test classes in parallel rather than in sequential order. Parallel execution in TestNG is widely preferred in automation as it reduces the time taken for test execution. We can apply parallel execution on method level, class level, test level, and instance level.
- Methods: This will run the parallel tests on all @Test methods in TestNG.
- Tests: All the test cases present inside the
tag will run with this value. - Classes: All the test cases present inside the classes that exist in the XML will run in parallel.
- Instances: This value will run all the test cases parallel inside the same instance.
Now let us execute our tests in parallel in a cloud-based Selenium Grid like LambdaTest and then generate Extent Reports in Selenium.
We shall use the two classes – InputFormTest and AlertTests to carry out our parallel execution and then generate the final Extent Report in Selenium.
Parallel execution in Class level
|
1 2 3 4 5 6 7 8 9 10 11 12 13 14 15 16 17 18 19 20 21 22 23 24 25 26 27 28 29 30 31 32 |
@BeforeTest public void startReport(){ initializeReport(); } @BeforeMethod public void setUp(){ DesiredCapabilities capabilities = new DesiredCapabilities(); capabilities.setCapability("browserName", "chrome"); capabilities.setCapability("version", "96.0"); capabilities.setCapability("platform", "win10"); capabilities.setCapability("build", "ExtentReport"); capabilities.setCapability("name", "InputFormTestClass"); try { driver = new RemoteWebDriver(new URL("https://" + username + ":" + accesskey + gridURL), capabilities); } catch (MalformedURLException e) { System.out.println("Invalid grid URL"); } catch (Exception e) { System.out.println(e.getMessage()); }} @Test public void verifyTitle(){ //same implementation as before } @Test public void SingleInputTest() { //same implementation as before } @Test public void MultipleInputTest() { //same implementation as before } @AfterMethod public void end(){ driver.quit();}; @AfterTest public void endReport(){extent.flush(); } |
|
1 2 3 4 5 6 7 8 9 10 11 12 13 14 15 16 17 18 19 20 21 22 23 24 25 26 27 28 29 30 31 32 33 34 35 36 37 38 39 40 41 42 |
package testCases; import org.openqa.selenium.remote.DesiredCapabilities; import org.openqa.selenium.remote.RemoteWebDriver; import org.testng.annotations.*; import java.net.MalformedURLException; import java.net.URL; public class AlertTests extends BaseTest { public String username = "YOUR_USERNAME"; public String accesskey = "YOUR_ACCESSKEY"; public static RemoteWebDriver driver = null; public String gridURL = "@hub.lambdatest.com/wd/hub"; @BeforeTest public void startReport() { initializeReport(); } @BeforeMethod public void setUp() { DesiredCapabilities capabilities = new DesiredCapabilities(); capabilities.setCapability("browserName", "chrome"); capabilities.setCapability("version", "96.0"); capabilities.setCapability("platform", "win10"); capabilities.setCapability("build", "ExtentReportGeneration"); capabilities.setCapability("name", "AlertTest"); try { driver = new RemoteWebDriver(new URL("https://" + username + ":" + accesskey + gridURL), capabilities); } catch (MalformedURLException e) { System.out.println("Invalid grid URL"); } catch (Exception e) { System.out.println(e.getMessage()); } } @Test public void clickSimpleAlertAndGetMessage() { // same implementation as before } @AfterMethod public void end(){ driver.quit(); } @AfterTest public void endReport(){ extent.flush(); } } |
TestNG.xml
To run classes in parallel, we have mentioned parallel attribute with classes value and thread-count with a specific value. Here I have mentioned thread-count as 3 which means the classes mentioned in TestNG.xml will be executed in parallel in 3 threads.
|
1 2 3 4 5 6 7 8 9 10 11 12 13 14 15 16 17 |
<?xml version="1.0" encoding="UTF-8"?> <!DOCTYPE suite SYSTEM "http://testng.org/testng-1.0.dtd"> <suite name="Automation tests"> <listeners> <listener class-name="Listener.MyListener"></listener> </listeners> <test name = "Parallel Tests" parallel = "classes" thread-count="3"> <classes> <class name="testCases.InputFormTest"/> <class name="testCases.AlertTests"></class> </classes> </test> <!-- Test --> </suite> <!-- Suite --> |
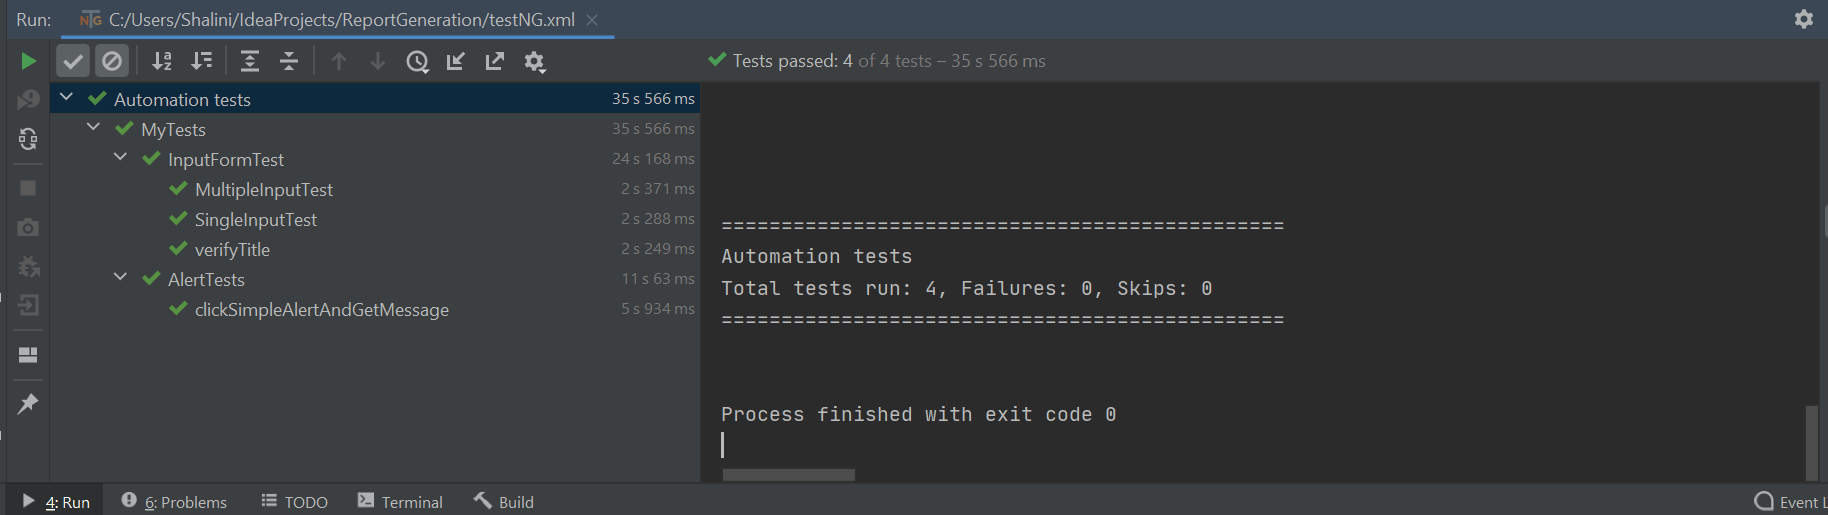
Output Console
Here you can see the classes being executed in parallel.
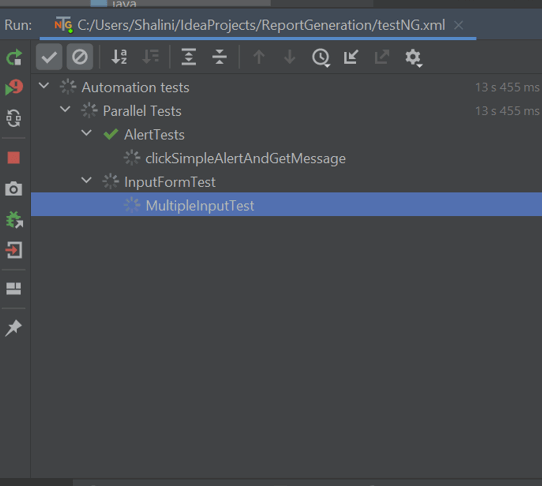
Finally, the extent report has been generated for the tests executed in parallel.
In the cloud Selenium Grid, we can visualize the tests executed.
Parallel execution in method level
We shall use the InputFormTest class which has three test methods. Let us run them in parallel.
The implementation of the tests remains the same as used before.
|
1 2 3 4 5 6 7 8 9 10 11 12 13 14 15 16 17 18 19 20 21 22 23 24 25 26 27 28 29 30 31 32 33 34 35 36 37 38 39 40 41 42 43 44 45 46 47 48 49 50 51 52 53 54 |
package testCases; import com.aventstack.extentreports.Status; import org.openqa.selenium.*; import org.openqa.selenium.remote.DesiredCapabilities; import org.openqa.selenium.remote.RemoteWebDriver; import org.testng.Assert; import org.testng.annotations.*; import java.net.MalformedURLException; import java.net.URL; import java.util.concurrent.TimeUnit; public class InputFormTest extends BaseTest { public String username = "YOUR_USERNAME"; public String accesskey = "YOUR_ACCESSKEY"; public static RemoteWebDriver driver = null; public String gridURL = "@hub.lambdatest.com/wd/hub"; @BeforeTest public void startReport(){ initializeReport(); } @BeforeMethod public void setUp(){ DesiredCapabilities capabilities = new DesiredCapabilities(); capabilities.setCapability("browserName", "chrome"); capabilities.setCapability("version", "96.0"); capabilities.setCapability("platform", "win10"); capabilities.setCapability("build", "ExtentReport"); capabilities.setCapability("name", "InputFormTestClass"); try { driver = new RemoteWebDriver(new URL("https://" + username + ":" + accesskey + gridURL), capabilities); } catch (MalformedURLException e) { System.out.println("Invalid grid URL"); } catch (Exception e) { System.out.println(e.getMessage()); }} @Test public void verifyTitle(){ //same implementation as before } @Test public void SingleInputTest() { //same implementation as before } @Test public void MultipleInputTest() { //same implementation as before } @AfterMethod public void end(){ driver.quit();}; @AfterTest public void endReport(){extent.flush(); } } |
TestNG.xml
To execute the methods in parallel , we use a parallel attribute with methods value and shall define the thread-count as 3. This will execute the methods in the class in parallel in 3 different threads.
|
1 2 3 4 5 6 7 8 9 10 11 12 13 14 15 16 |
<?xml version="1.0" encoding="UTF-8"?> <!DOCTYPE suite SYSTEM "http://testng.org/testng-1.0.dtd"> <suite name="Automation tests"> <listeners> <listener class-name="Listener.MyListener"></listener> </listeners> <test name = "Parallel Tests" parallel = "methods" thread-count="3"> <classes> <class name="testCases.InputFormTest"/> </classes> </test> <!-- Test --> </suite> <!-- Suite --> |
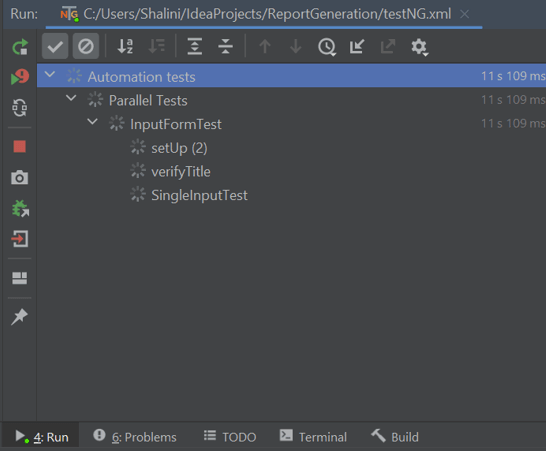
Test Execution
When the tests are executed, we shall see the methods running in parallel in three threads.
Extent Report
Once the execution is complete, the Extent Report will be generated.
Cloud Selenium Grid Dashboard
Test in parallel and cut down test execution time by over 10x. Try LambdaTest now!
How to generate Extent Reports in Selenium using Jenkins?
Jenkins is an open-source DevOps tool that has been popularly used for continuous integration and continuous delivery processes. It is a Java-based application and platform-independent. It is a build tool used for running builds from the source code repository, running unit tests, and sending the build reports to the respective member or team.
To get a detailed understanding of Jenkins setup and creating various projects, please go through our blog on continuous integration with Jenkins.
Steps to generate Extent Reports in Selenium using Jenkins
To generate Extent Reports in Selenium using Jenkins, please follow the below-mentioned steps:
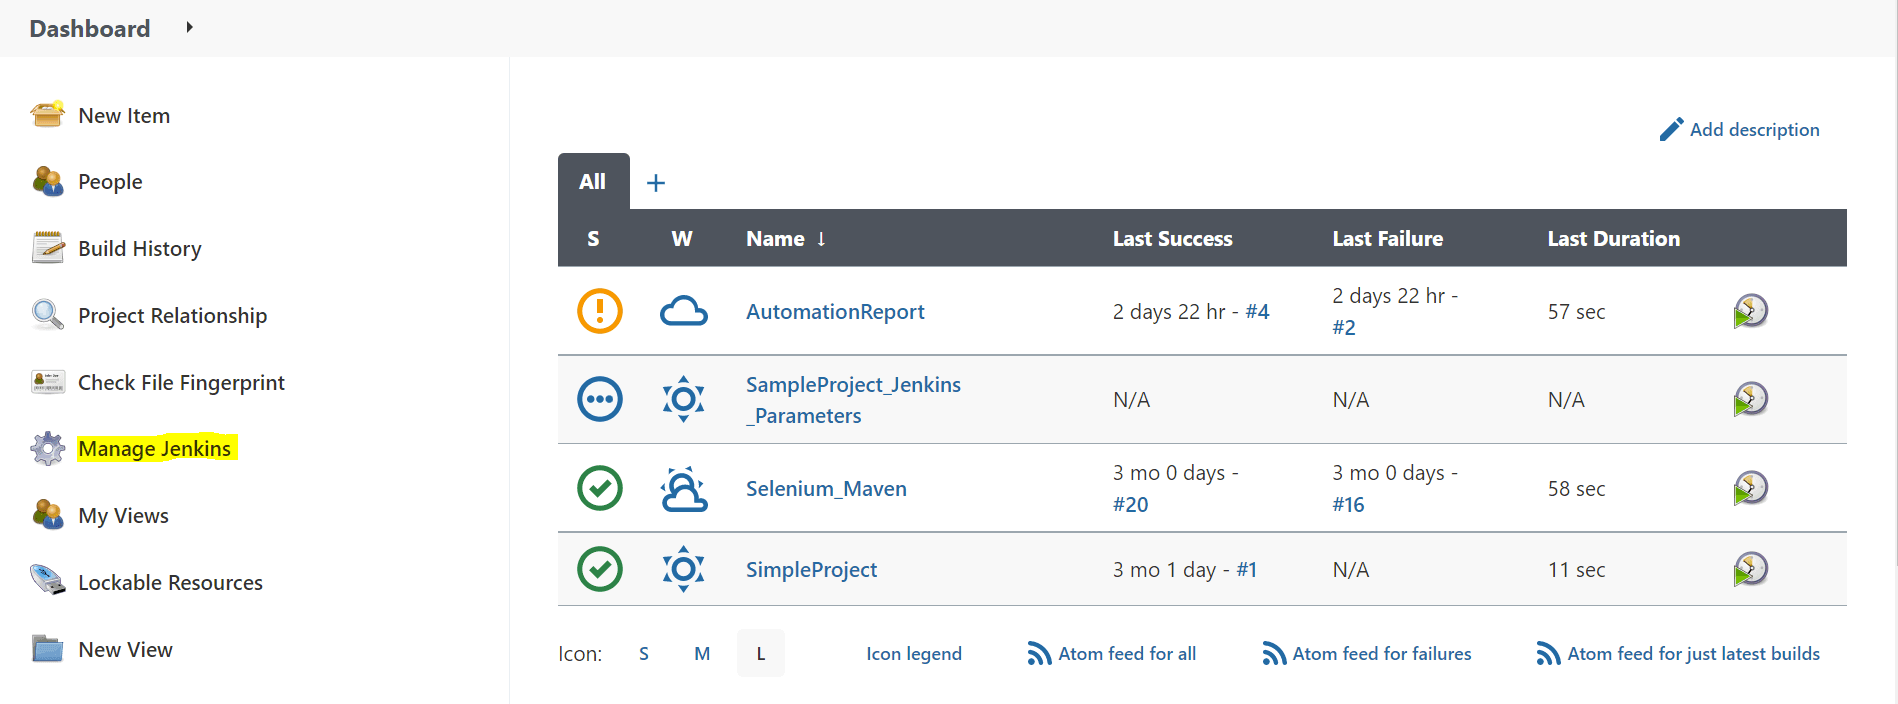
- Login into Jenkins and click Manage Jenkins.
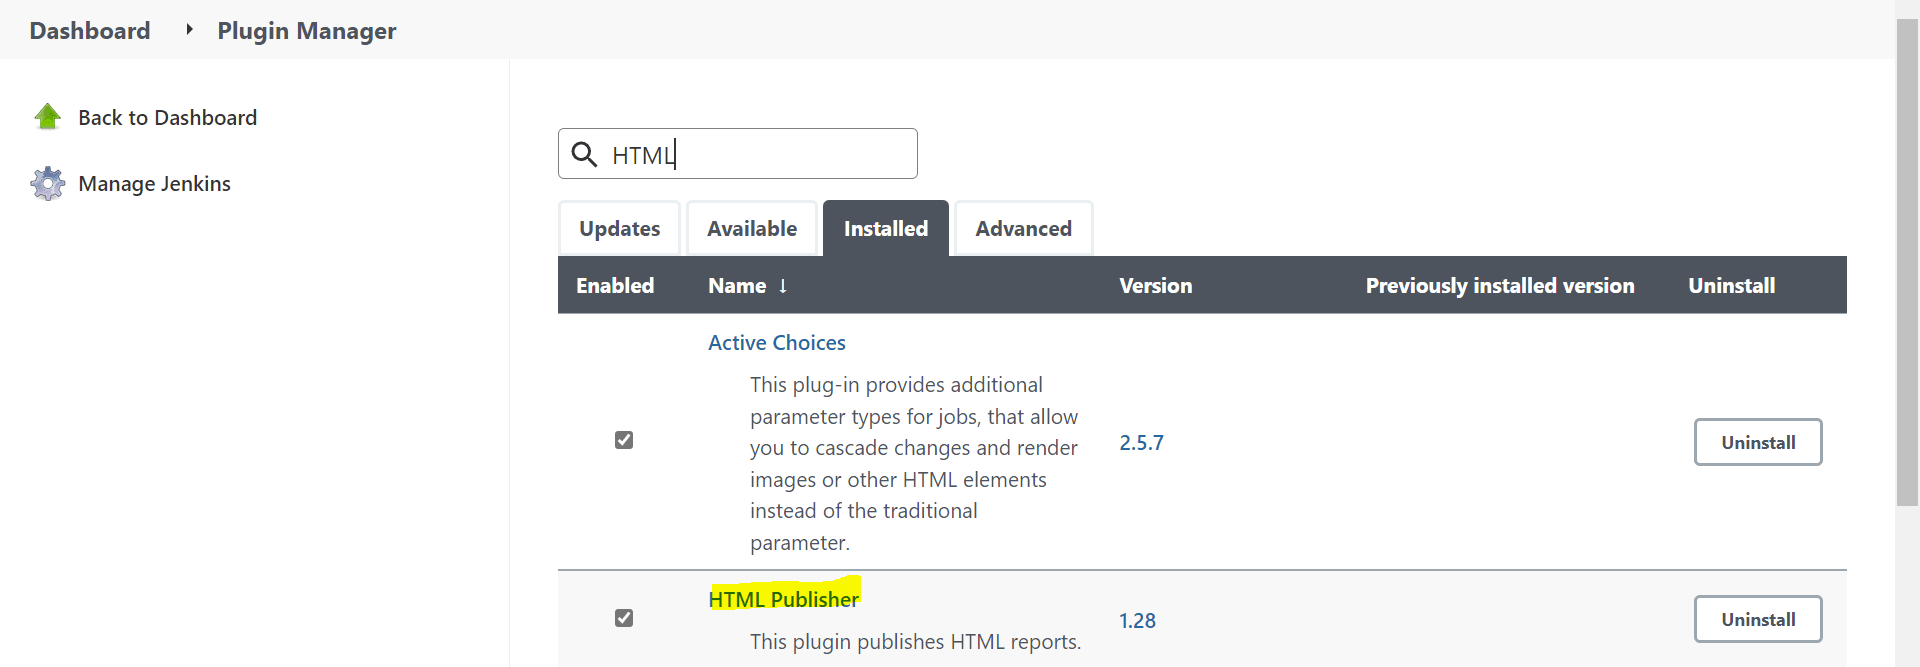
- Install the HTML Publisher plugin.
- Once installed, you will see the HTML Publisher plugin in the Installed tab.
- After installing the plugin, make sure that you restart the Jenkins.
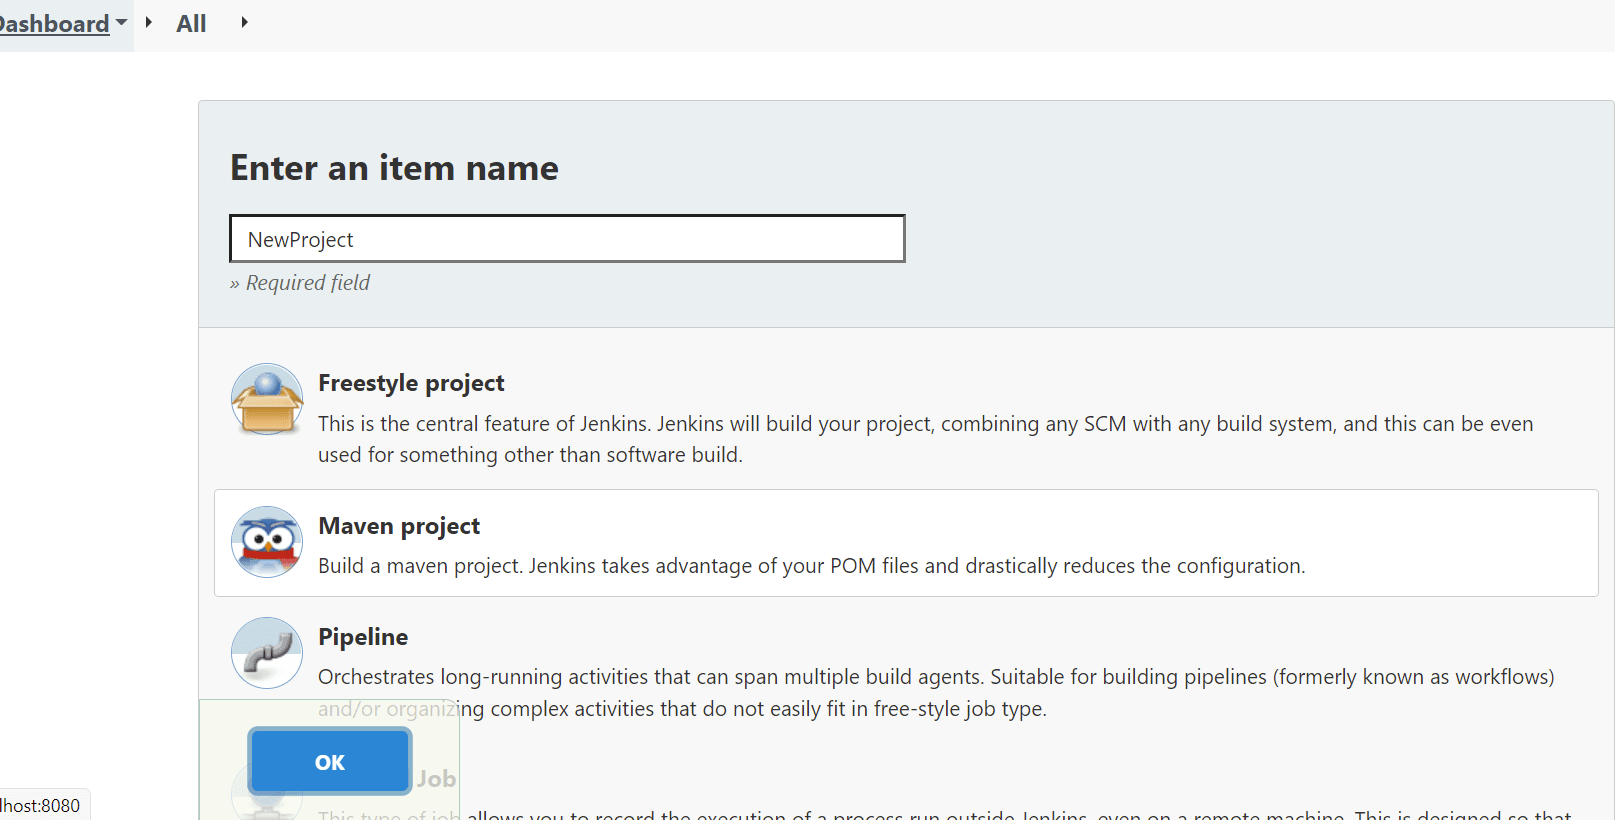
- Now click New Item and create a Project.
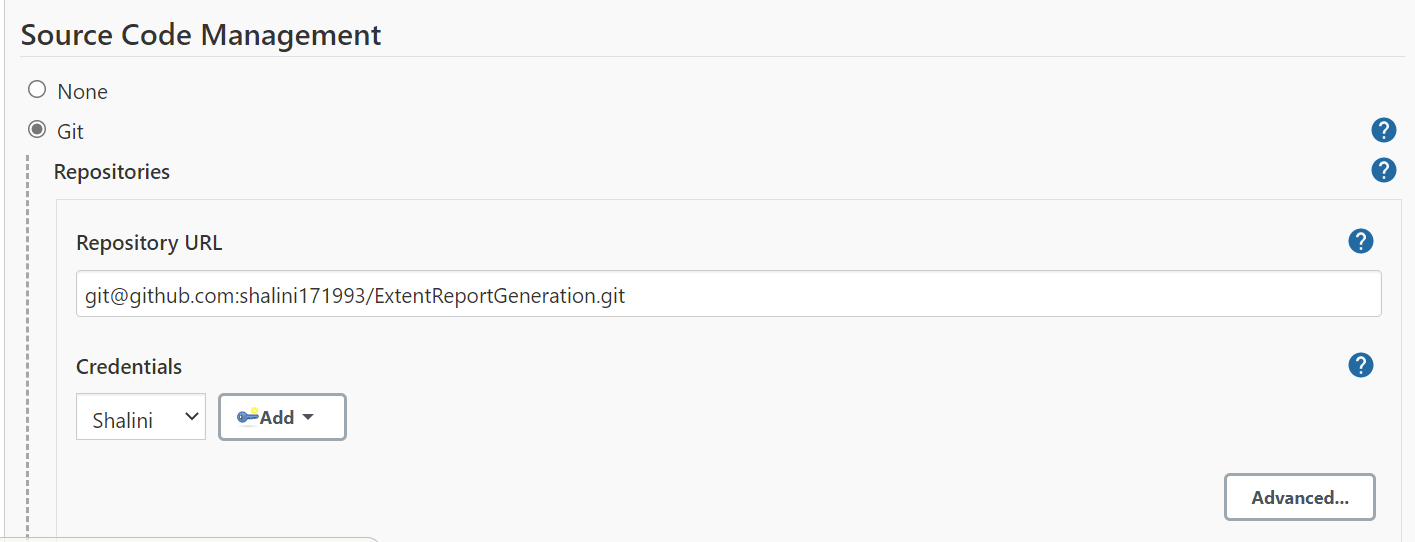
- Integrate your GitHub account in the source code management section. This helps us to pull the code from the GitHub account and run the tests in Jenkins.
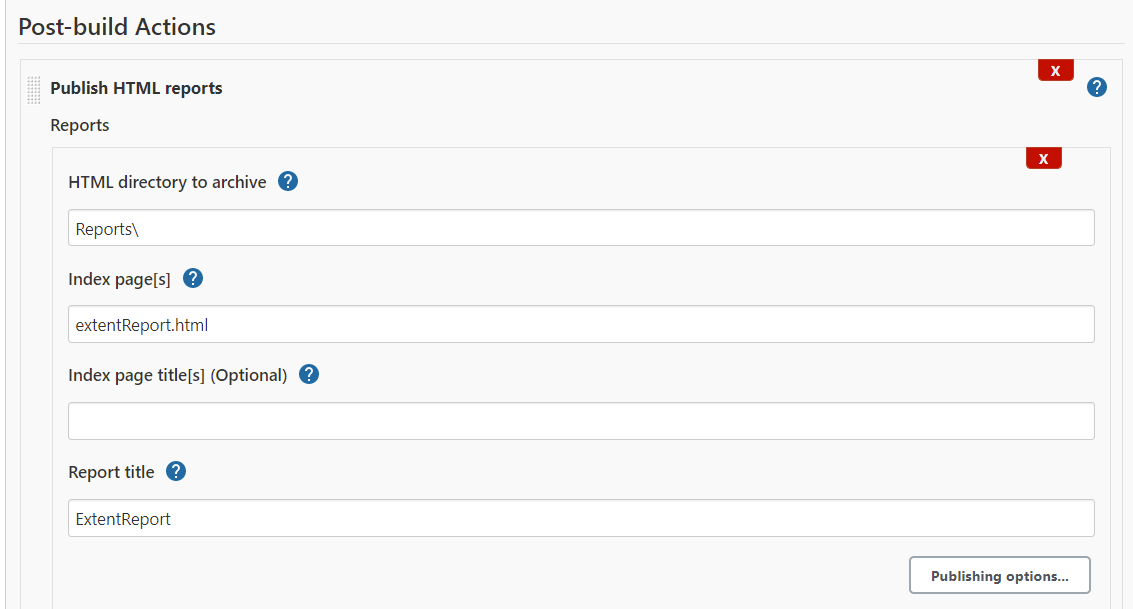
- In the Post-Build Actions section, select Publish HTML Reports option under Add Post-Build action.
- In this section, provide the folder name where your report would be generated, the name of the Extent Report, and the title of the Extent Report.
- Save the changes.
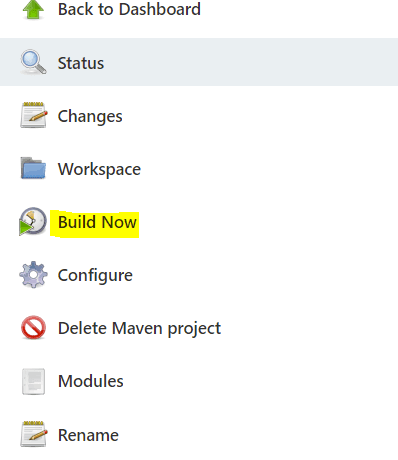
- Click Build Now.
- You shall see a job being triggered within the project.
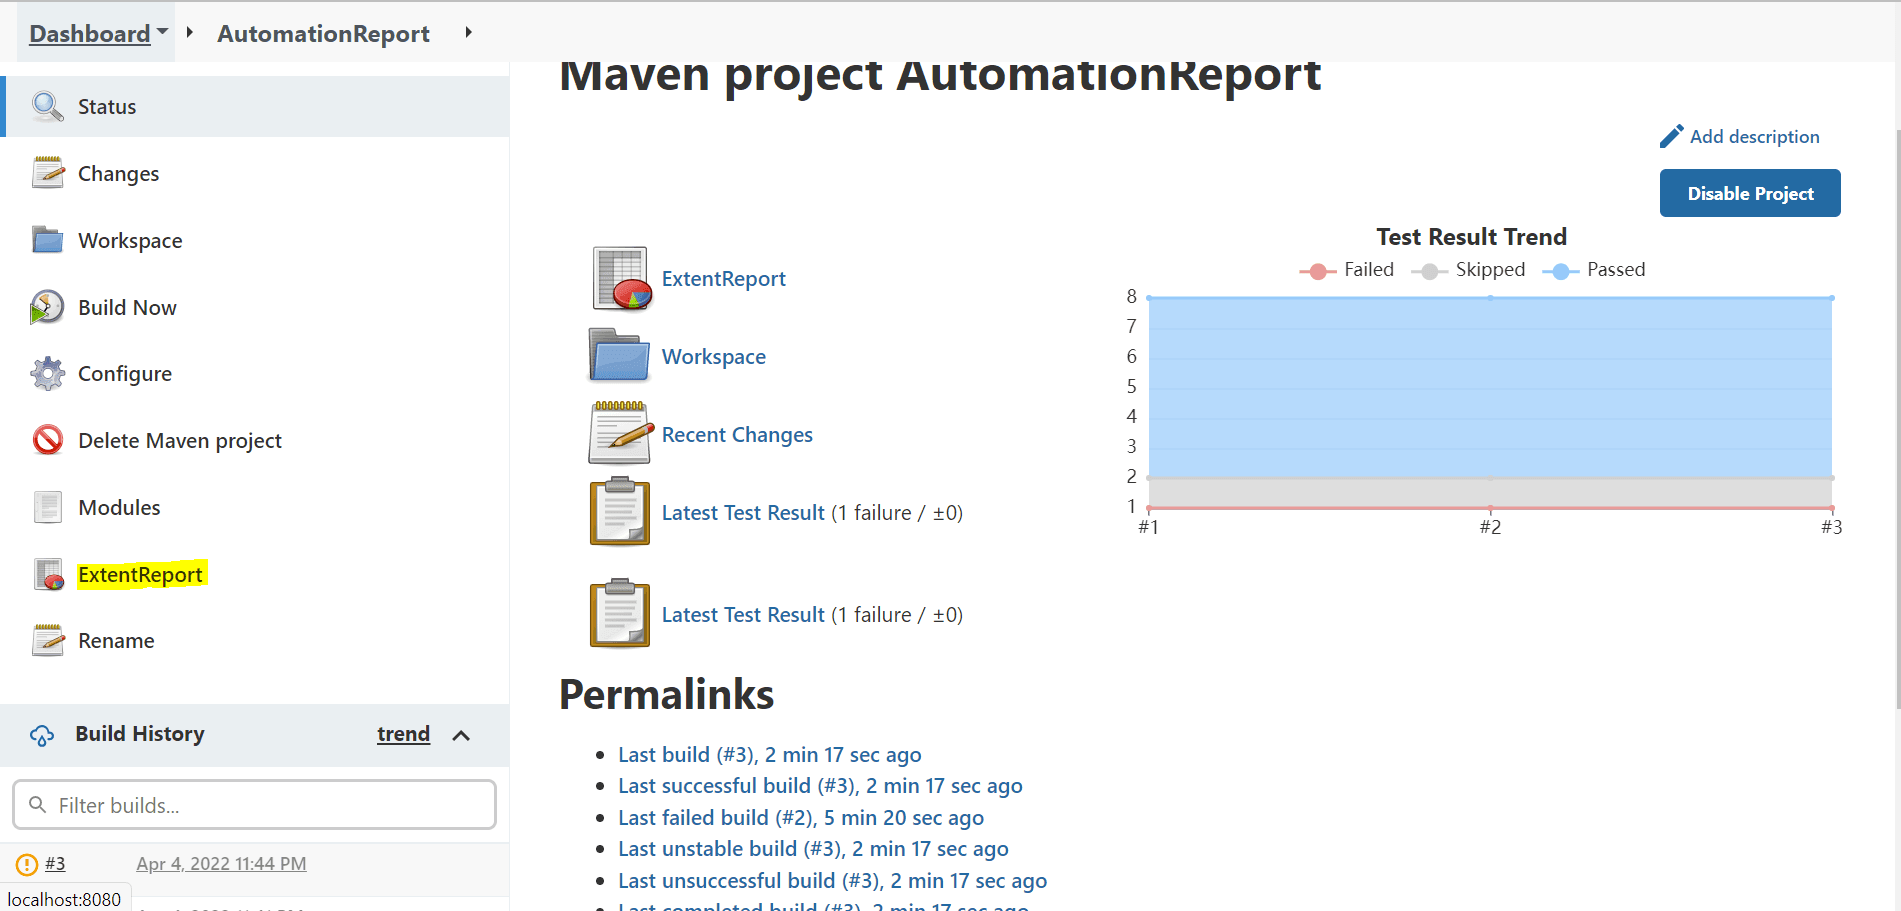
- Once the build has been completed, you shall see ExtentReport in the project, as highlighted in the below screenshot.
- Click on the ExtentReport.
- Now the generated Extent Report will be displayed. You can access the Extent Report to analyze the test execution.

Wrapping up..!
In this article on generating Extent Reports in Selenium, we have explored a new topic on integrating a reporting library with our automation framework. Extent Reports have been widely used by the automation testers for generating the test report and sharing it with the stakeholders in the organization.
As test reports play an important role in automation, it is always better to have a good report that captures the entire test execution summary with graphical representation. Extent Reports not only provide a detailed summary of the executed tests but also provide pie charts depicting the test summary in visual form.
Moreover, it is very easy to replace any existing reporting tool with Extent Reports in an automation framework. The Extent Report is very simple yet provides extraordinary test reports. I hope this article has been informative and will help you in integrating the reporting tool into your automation framework without any hurdles. Try your hands on these Extent Reports in Selenium, and let me know your feedback on this article. Keep exploring..!
Happy Testing…!
Frequently Asked Questions (FAQs)
What is the use of extent reports?
Extent Reports is a very easy-to-use library that lets you create custom reports not only during the test runs but in any project you are working on.
Is extent report part of TestNG?
An Extent report is a customized HTML-based report integrated with Selenium using the TestNG framework. It enables customers to create a wide variety of data-driven reports. It allows them to generate documents and XML feeds that execute complex actions and make complex decisions.


Author’s Profile
Shalini Baskaran
Shalini works as a Technical Writer at LambdaTest. She loves to explore recent trends in test automation. Other than test automation, Shalini is always up for travel & adventure.
Blogs: 18
Got Questions? Drop them on LambdaTest Community. Visit now