
How To Handle WebElements In Selenium Python
Eugene Kwaka
Posted On: March 31, 2023
![]() 182364 Views
182364 Views
![]() 27 Min Read
27 Min Read

Selenium automation testing is the common term used to describe a test run using Selenium. When it comes to automation testing, Selenium is a popular open-source testing tool used to automate different web browsers, such as Chrome, Firefox, Microsoft Edge, and Safari, among others, across multiple platforms. The Selenium WebDriver allows you to execute test scripts in various programming languages such as Java, Python, C#, JavaScript, PHP, and Ruby.
In Selenium, a WebElement represents an HTML element of a web page. WebElements are the building blocks of the web page. For example, anything on a web page, like a text box, button, links, dropdown buttons, etc., comes under WebElements.
Selenium WebDriver takes every single element and encapsulates it as an object of the WebElement. It provides an API to locate the web page elements and take a specific action like entering text into text boxes, clicking the buttons, etc. Using the Selenium framework, you can easily locate and interact with WebElements while performing Selenium Python testing.
Handling WebElements is important when automating web application testing. In this blog, we will look at how to handle WebElements in Selenium Python. If you are preparing for an interview you can learn more through Selenium interview questions.
TABLE OF CONTENTS
What are WebElements in Selenium?
WebElements in Selenium are HTML elements that make up the web page’s content. Each HTML document consists of several HTML elements. An HTML element comprises a start tag and an end tag determining its position in the document. Between those HTML tags lies the content of the document.
Syntax:
|
1 2 |
content comes here </end tag> |
The WebElement interface in Selenium allows you to interact with both visible and invisible elements on a web page. In Selenium, all the methods return a value or no value (null/void). Similarly, the WebElement command returns either null/void or the element being searched for.
Shown below is the command of a WebElement in Selenium:
|
1 |
WebElement element = driver.findElement(By.id(“UserName“)); |
Subscribe to the LambdaTest YouTube Channel and get the latest tutorials around automation testing, Selenium testing, Playwright, Appium, and more.
Handling WebElements in Selenium Python
Selenium makes it simple for developers to automate web testing and help you handle WebElements in Selenium Python when performing Python automation testing. Here are some of the best approaches to handling WebElements in Selenium Python.
Alert Pop-Ups
Alerts and pop-ups are notification messages that alert a user about information or request authorization to carry out certain tasks. The appearance of an alert while performing Python web automation hinders the Selenium WebDriver from interacting with the webpage’s elements until the alert is dismissed. This leads to tests stalling or failing if the alerts or pop-ups are not handled.
When an alert is prompted, the alert pop-up window is displayed on the current webpage. Since the Selenium WebDriver’s context is on the current page, we need to switch the WebDriver’s focus to the new alert window.
This is done using the switch_to.alert() code command:
|
1 |
alert_object = driver.switch_to.alert |
The other alert handling methods include:
- accept()
- dismiss()
- send_keys()
- text()
The accept() method accepts the alert message that was prompted. It uses the following syntax.
|
1 2 |
alert_object = Alert(driver) alert_object.accept() |
The dismiss() method cancels the alert prompt.
|
1 2 |
alert_object = Alert(driver) alert_object.dismiss() |
The send_keys() method accepts an argument, which will be entered in the alert pop-up.
|
1 2 |
alert_object = Alert(driver) alert_object.send_keys("Okay") |
The text() method retrieves and displays the text that is in the alert pop-up.
|
1 2 |
alert_object = Alert(driver) print(alert_object.text) |
Demonstration: How to handle an Alert in Selenium Python
Let us look at an example of a prompt alert and how we can handle it in Selenium Python.
Test Case:
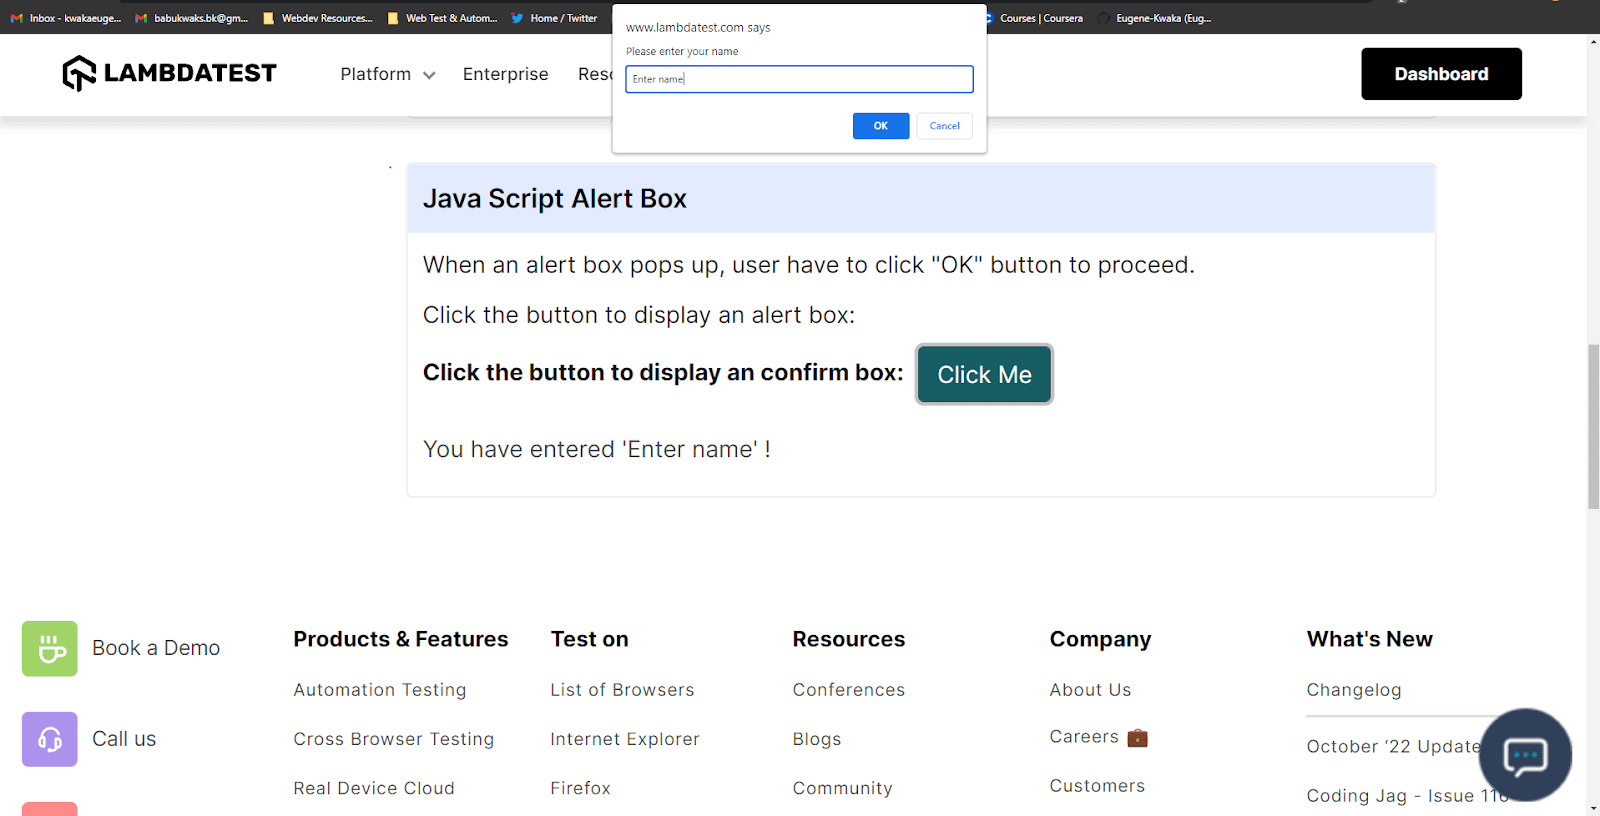
To demonstrate how to handle an alert, we will use the example of the JavaScript Alert Box Demo from the LambdaTest Selenium Playground.
- Go to the JavaScript Alert Box demo page.
- Click on the Click Me button in the last JavaScript Alert Box page
- Enter your name on the alert pop-up.
- Click on the OK button.
Implementation (Test Case on the Chrome Browser):
Let us write a test script to handle a simple alert.

Code Execution:
We then run the test script by running the following command in the terminal.
|
1 |
python -m pytest test_handling_alerts.py |
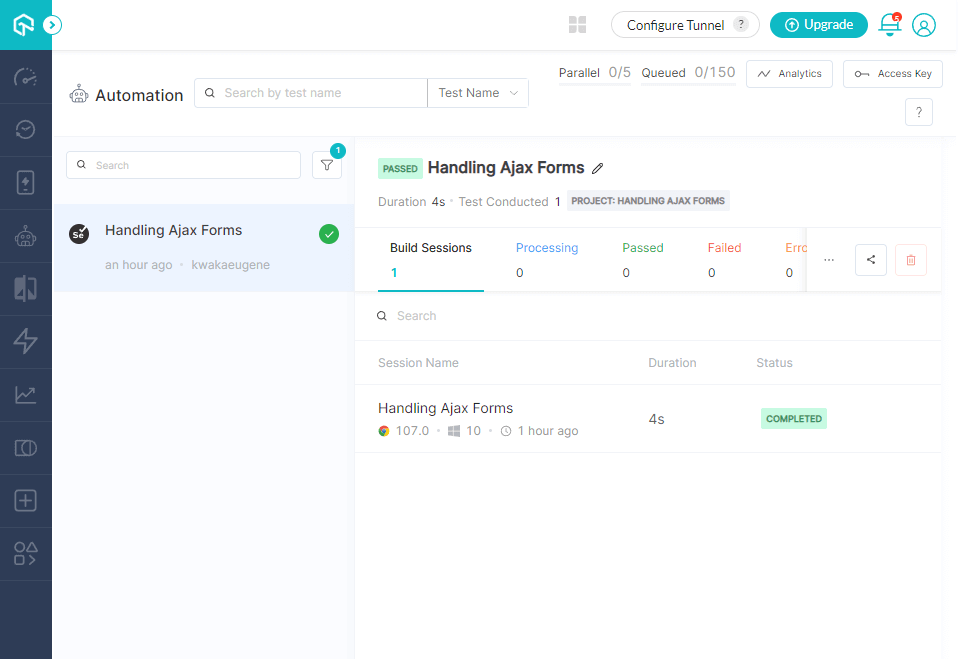
Once the test is executed, the following output is displayed to show that the Selenium automated test was successful.
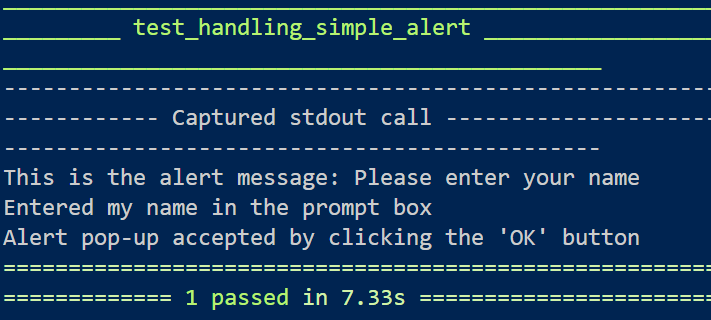
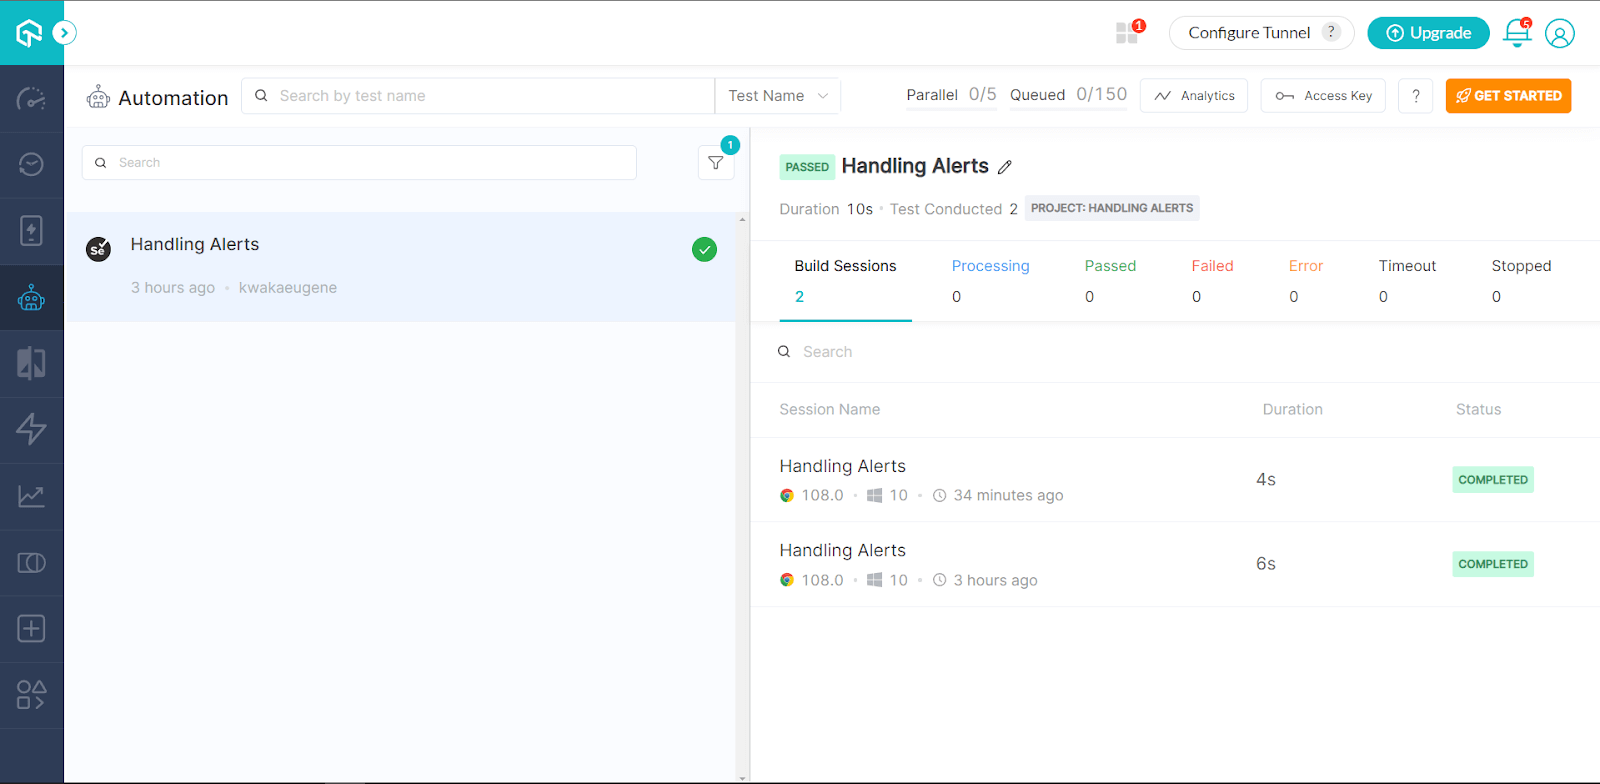
You can view the test logs in the build section from the LambdaTest Automation Dashboard.
Code Walkthrough:
Let us review the code for the test script we wrote in the section above.
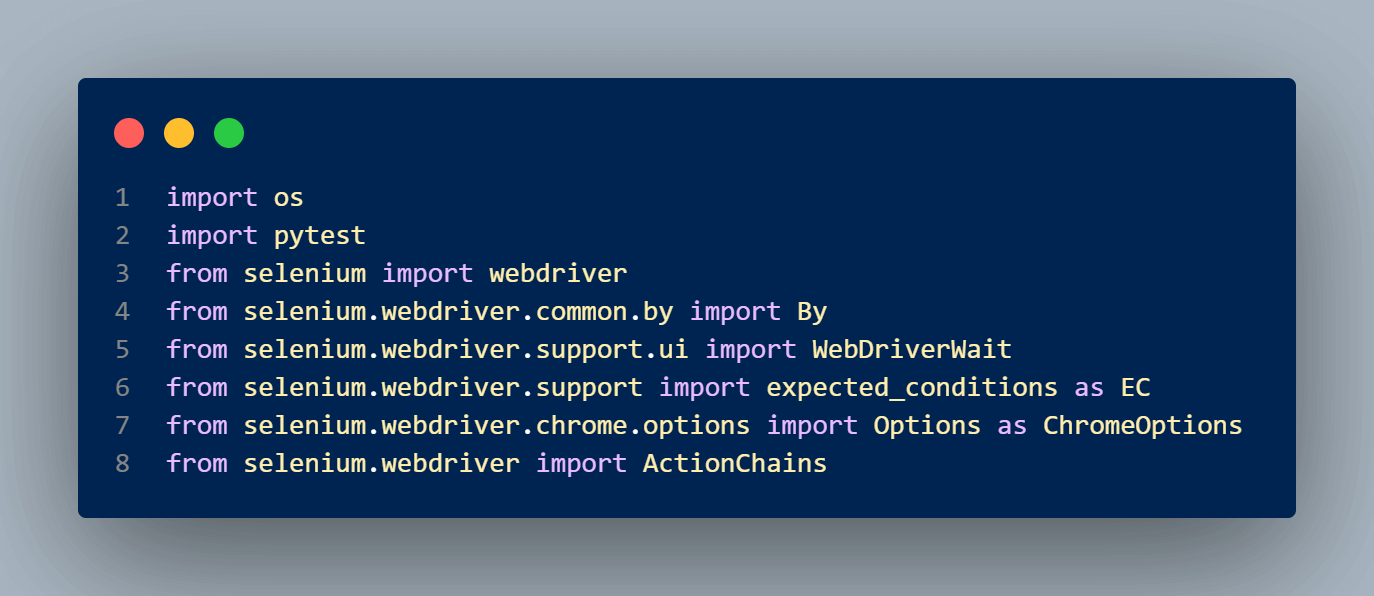
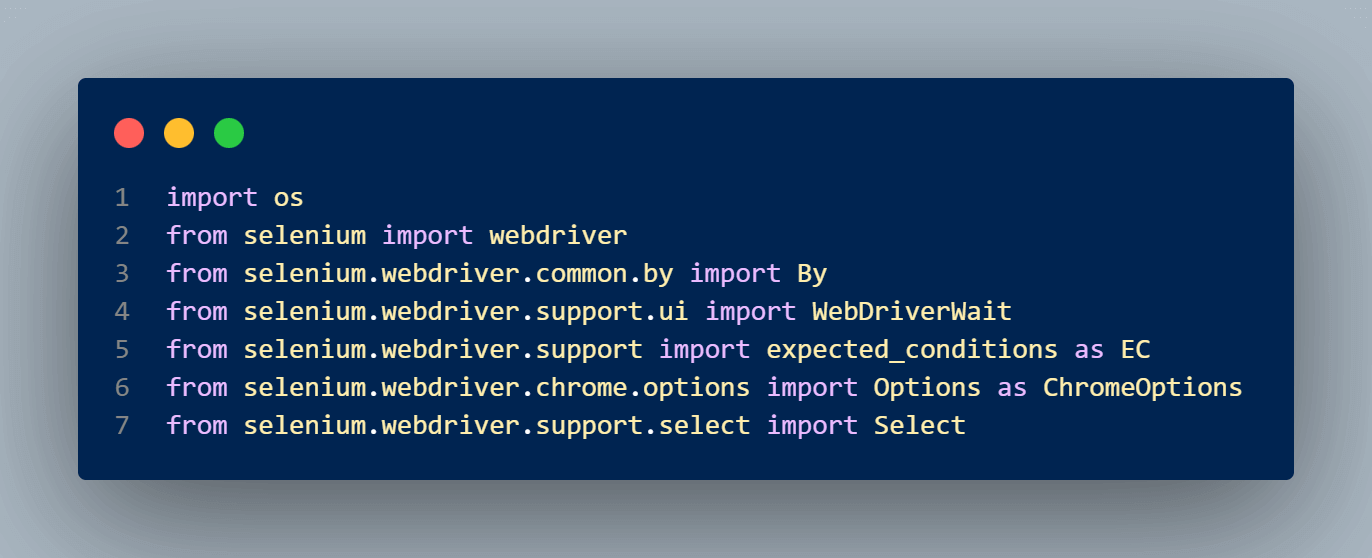
Step 1: Import the Selenium libraries needed to run the test.
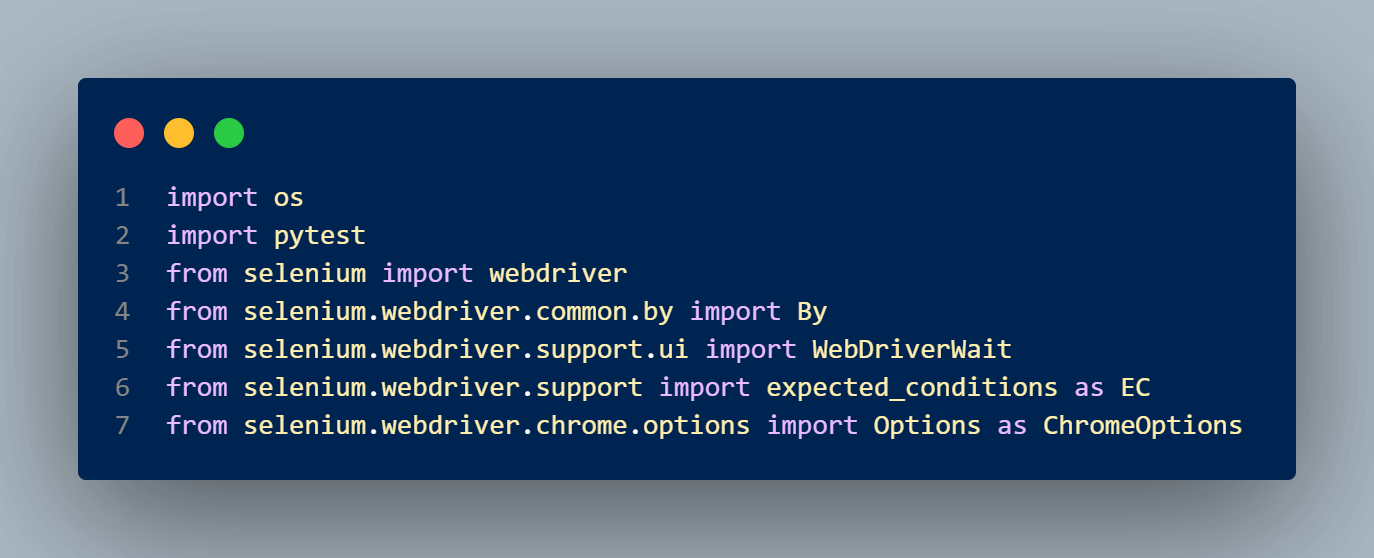
In this case, we import pytest, a testing framework for Python that enables us to write unit tests. The By query helps us locate web elements within the Document Object Model (DOM) using the find_element() method in Selenium.
The WebDriverWait class combined with expected_conditions allows us to specify the period of time the script should wait for a given condition to occur before continuing with the code. Finally, the Options (ChromeOptions) class customizes the ChromeDriver sessions and helps us perform operations like opening the Chrome browser.
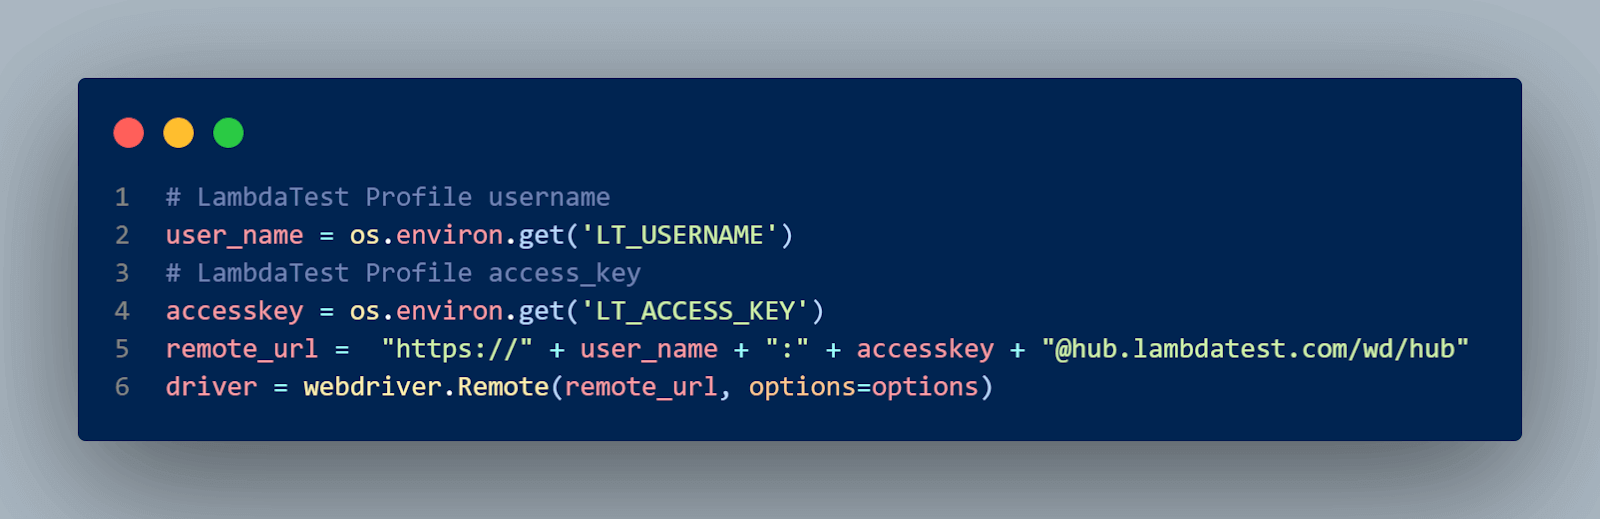
Step 2: Generate the options using the LambdaTest Capabilities Generator to run the test in the Chrome browser.
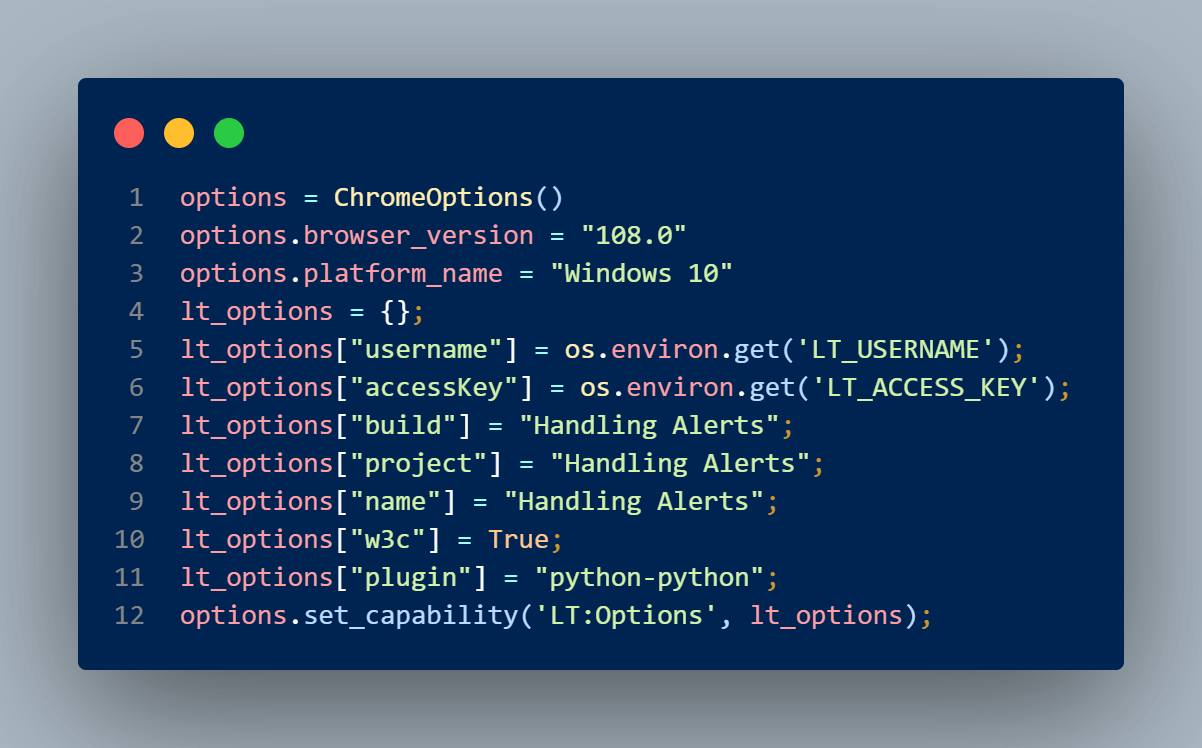
Step 3: Create a remote_url variable that connects to the Remote Selenium Grid (@hub.lambdatest.com/wd/hub) using the username and accesskey listed on the LambdaTest Profile page. We then pass the options and the remote_url to instantiate the driver constructor.
Step 4: Open the LambdaTest Playground website and locate the button that prompts the alert using its XPath Selector in the browser inspect tools, then click it to initiate the alert.


When the Click Me button is clicked, the below window will be shown with the prompt alert.
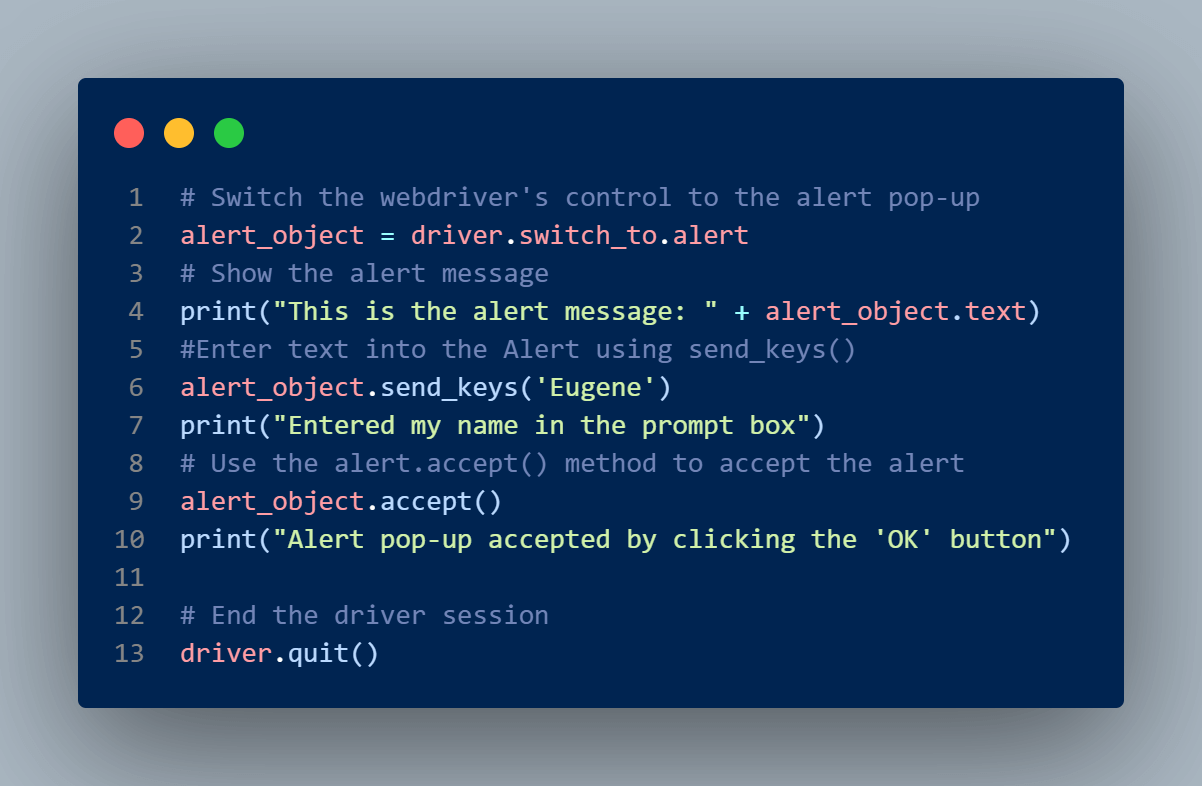
The WebDriver’s focus is then switched to the alert prompt using the switch_to.alert method. Since the alert requires an input, we use the send_keys() method in Selenium to pass a value (in this case, your name), and then we accept the alert pop-up using the accept() method. The WebDriver session is then closed using the driver.quit() method.
Run your Python test scripts in parallel. Try LambdaTest Now!
Drag and Drop Operations
The drag and drop operation in Selenium Python allows users to use a mouse to move (drag) web elements from one location to another. In test automation using Selenium Python, the drag and drop function can be difficult to automate since it necessitates several actions and interactions.
The ActionChains class in Selenium Python provides methods to simulate the mouse events required for drag-and-drop. The methods are typically used to automate actions like mouse movements, keystrokes, context menu clicks, and mouse button events. The ActionChains object implements the class as a queue and calls the perform() method, which executes the actions together to prevent the test failure.
The syntax for creating an ActionChains object is:
|
1 2 |
from selenium.webdriver import ActionChains action = ActionChains(driver) |
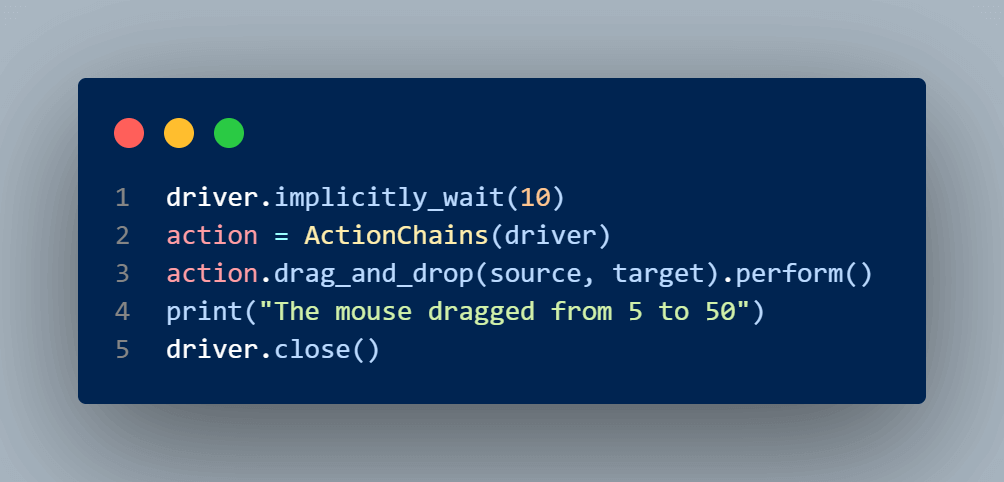
The drag_and_drop(source, target) method performs the action of holding the left mouse button on the source element and releasing the mouse button at the target element.
|
1 |
action.drag_and_drop(source, target).perform() |
Demonstration: How to perform a Drag-and-Drop Operation in Selenium Python
Let us look at how we can handle a drag-and-drop operation in Selenium using Python.
Test Case:
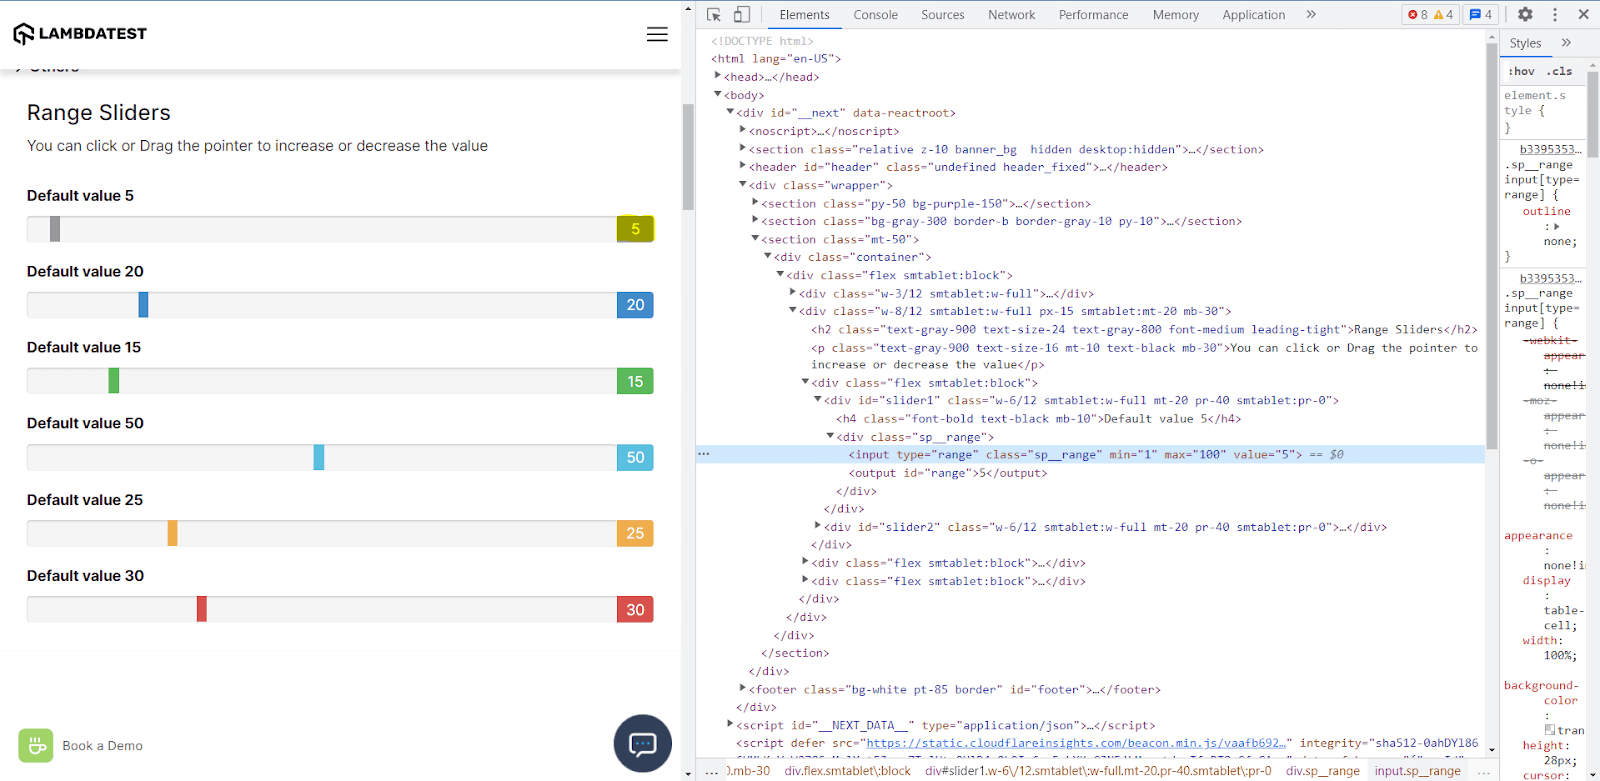
To implement drag and drop, we will use the example of Drag Drop Range Sliders from the LambdaTest Selenium Playground.
- Navigate to the Drag Drop Range Sliders demo page.
- Locate the drag pointer and drag it from 5 (source) to 50 (target)
Implementation (Test Case on the Chrome Browser):
Code Execution:
Pass the following command in the command line to execute the test script.
|
1 |
python -m pytest test_handling_drag_and_drop.py |
The test passes once it runs and displays the following output in the terminal.

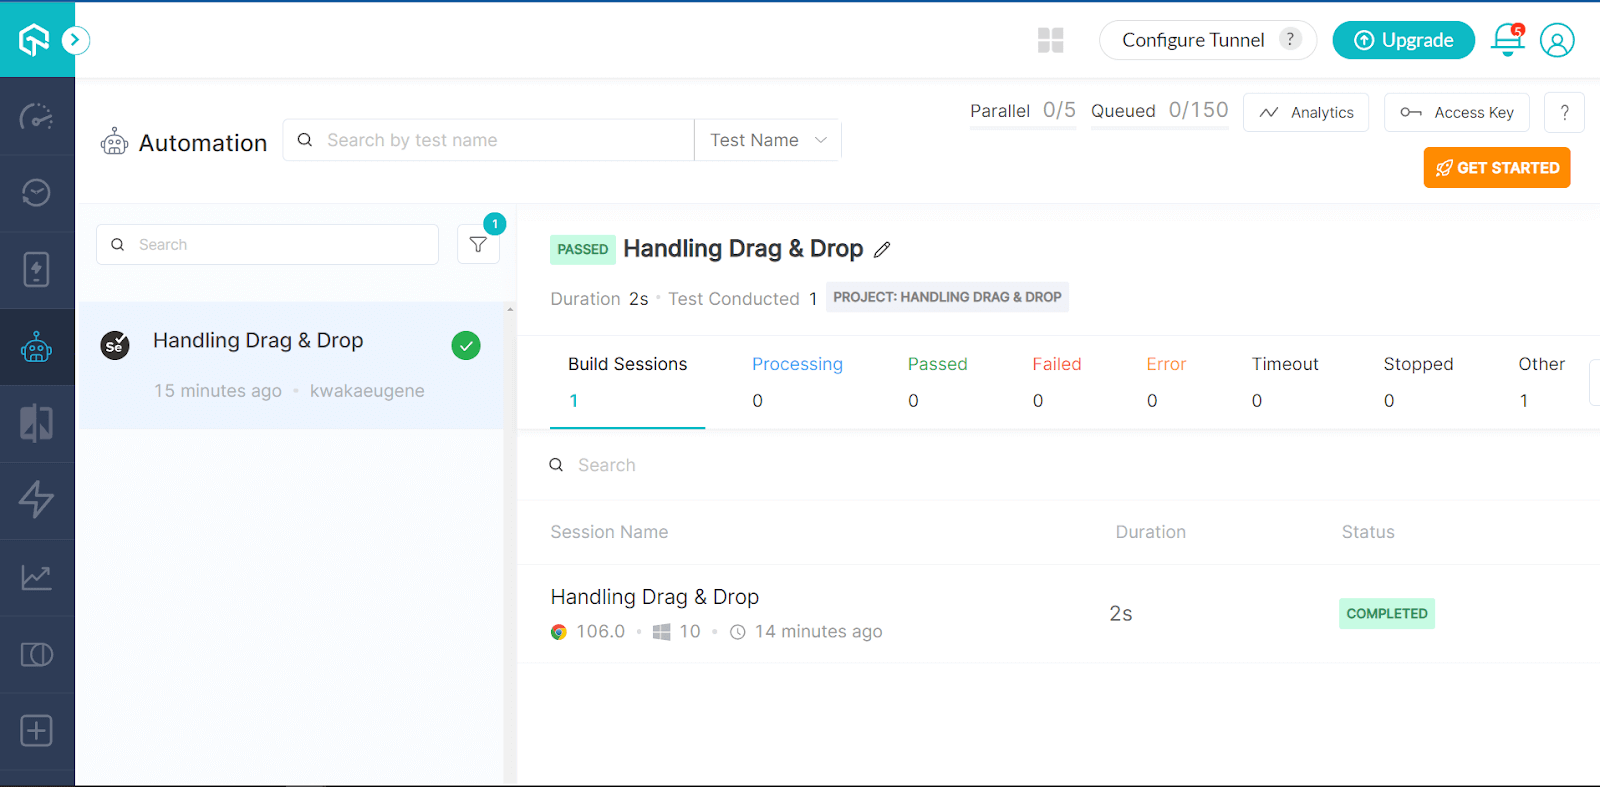
In the LambdaTest Automation Dashboard, you can see the results of the test execution. You can also see the live recordings of the test with detailed reports and logs.
Code Walkthrough:
Step 1: Import the Selenium libraries essential to the test script, including the ActionChains class that replicates mouse events for our test automation.
Step 2: Using the driver.get(url) method, we navigate to the URL where our automated test will simulate the drag and drop operation.

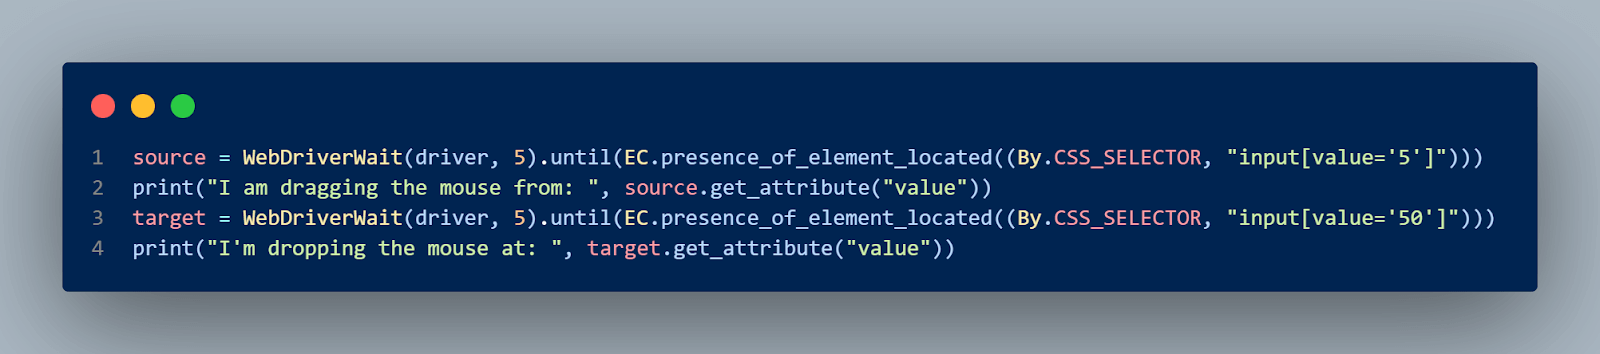
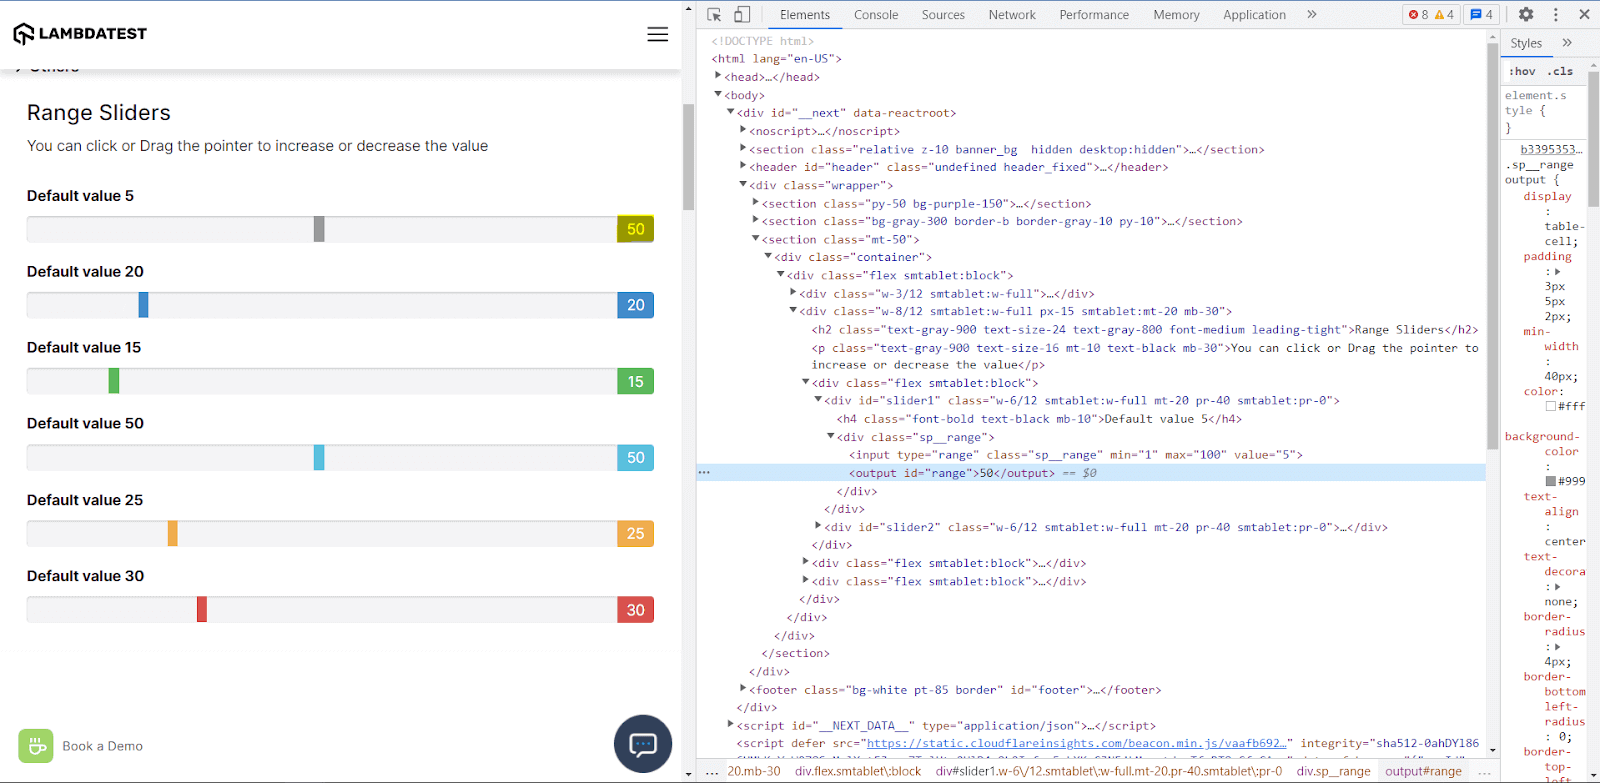
Step 3: Next, locate the source web element and the target elements the mouse will drag and drop onto. We use the elements’ CSS Selectors to locate them from the web browser’s inspect tools. The source element has an input value of 5, which will be moved to the target element, which has an input value of 50.
Locating the source element using the CSS Selector in the Browser Inspect Tools:
Locating the target element using the CSS Selector in Browser Inspect Tools:
Step 4: You then create an object of ActionChains and invoke drag_and_drop(source, target).perform() method to execute the mouse movement from 5 to 50 in the draggable slide.
Step 5: We finally close the webdriver session using the driver.close() method.
Selecting Multiple Values in Drop-Down Menus
A drop-down is a navigation element of a website that can be used in forms, search filter features and the Navbar. It allows the selection of one or more options from a list of options.
Choosing multiple values from a drop-down menu while running automated tests in Selenium Python can be a challenge for testers. Automating the selection of multiple choices is complex, as the test script needs to identify the drop-down element with its options and then search through the list of options before selecting them.
In some instances, the drop-down menu options are dynamically generated and rendered differently based on the web browser or operating system used. This can make writing robust and efficient scripts challenging.
Below are screenshots of the same drop-down menu in Chrome and Firefox browsers on a Windows OS.
Drop-down menu in a Chrome browser:
Drop-down menu in a Firefox browser:
The drop-down menu background color and font type are different in both browsers.
We use the Select class when testing with Selenium Python to address this issue. The Selenium WebDriver provides the Select class to handle single-select and multiple-select drop-downs with the < select > HTML tag. In Selenium Python, there are several methods for selecting dropdowns.
We will implement the following three methods to select multiple values in our test scenario:
- select_by_index(index)
- select_by_visible_text(text)
- select_by_value(value)
This method uses the get_attribute(“index”) of a < option > tag to determine its index and return the matching option.
|
1 2 |
multi_select = Select(dropdown) multi_select.select_by_index(0) |
This method selects the options that display text that matches the argument passed. For example, the argument “Iowa” will select an option tag with < option > Iowa < /option >.
|
1 2 |
multi_select = Select(dropdown) multi_select.select_by_visible_text("Iowa") |
This method selects the options whose value corresponds to the value argument.
For example:
< option value=”AZ”> Arizona < /option >
|
1 2 |
multi_select = Select(dropdown) multi_select.select_by_value("AZ") |
Demonstration: How to handle Multiple Values in a Drop-Down Menu using Selenium Python
Let us look at how to automate the selection of multiple values in the following test case scenario.
Test Case:
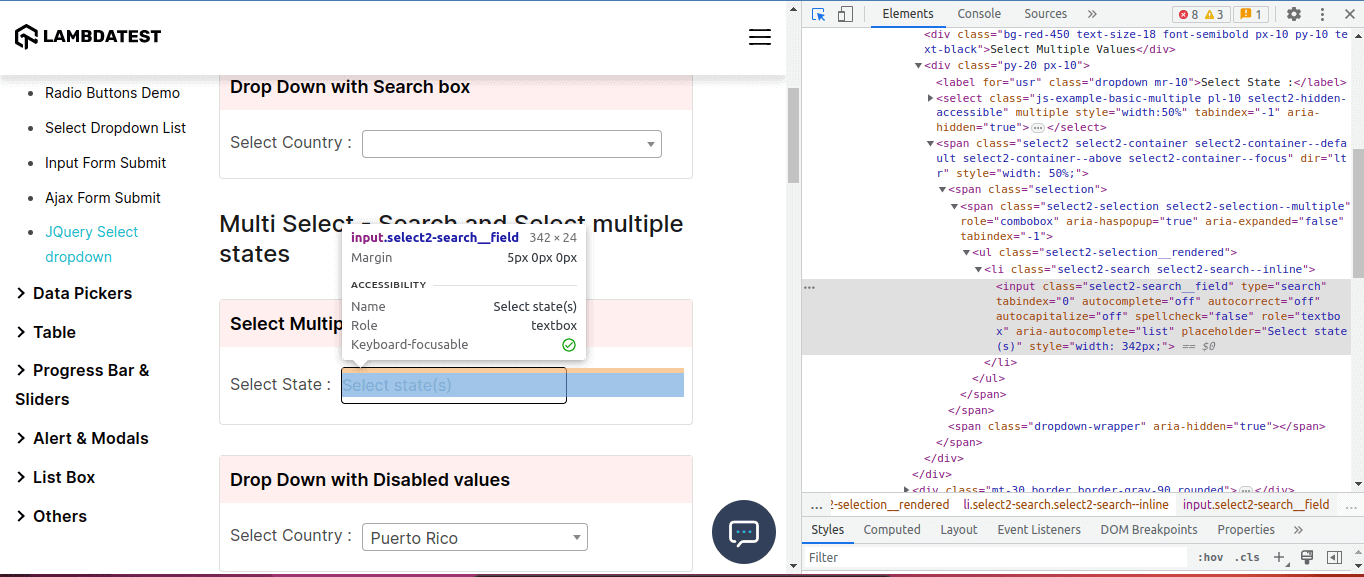
- Navigate to the jQuery Dropdown Search demo page.
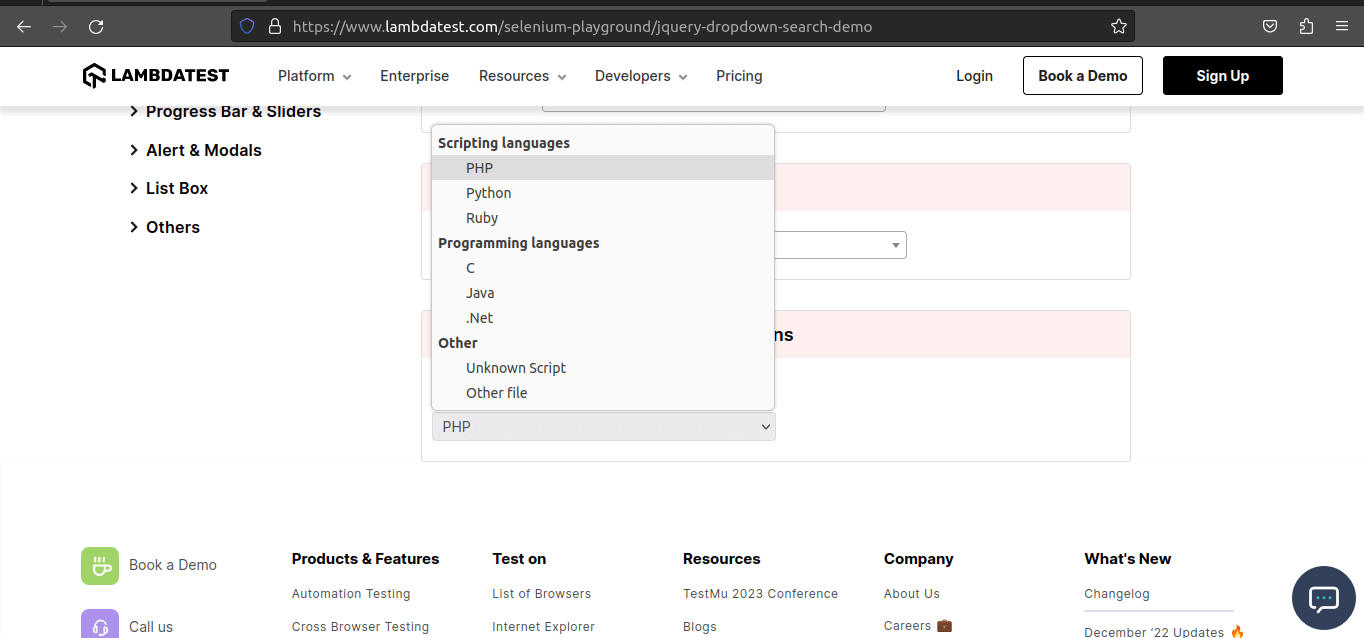
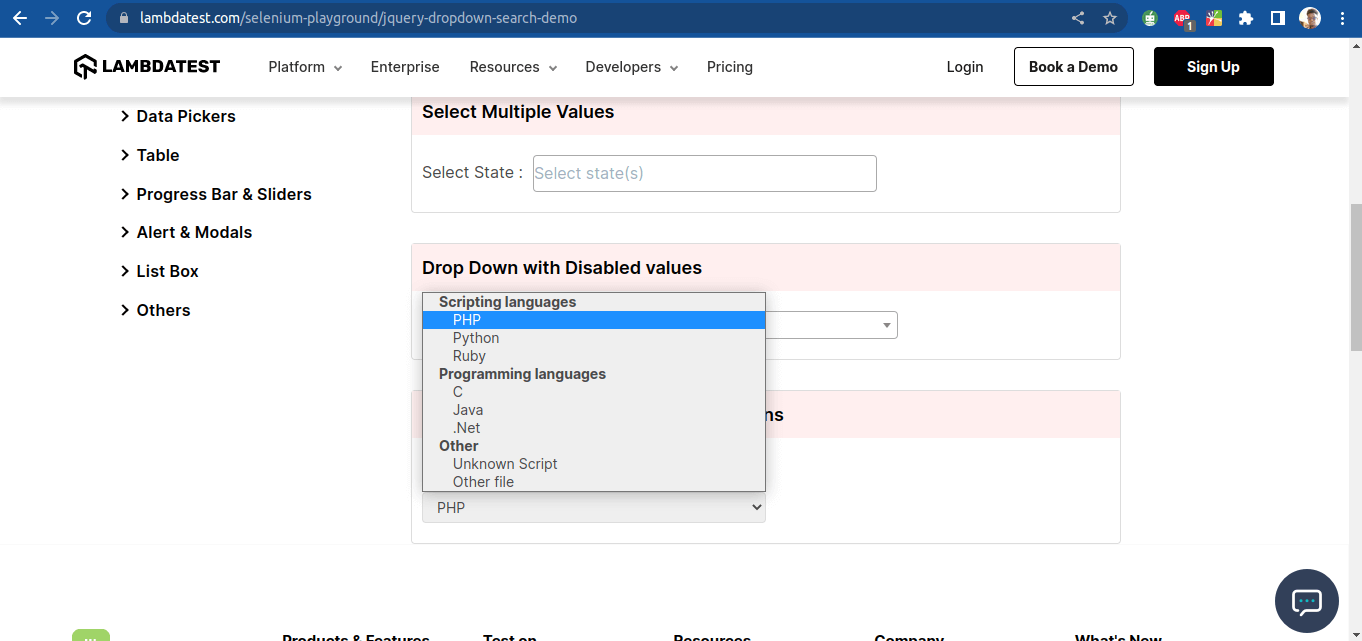
- Go to the Multi Select section on the web page to choose multiple states.
- Select 3 states from the dropdown menu.
- Print the states selected.
Implementation (Test Case on the Chrome Browser):
Code Execution:
Type the command below in the terminal to run the test script.
|
1 |
python -m pytest test_multiple_values_dropdowns.py |
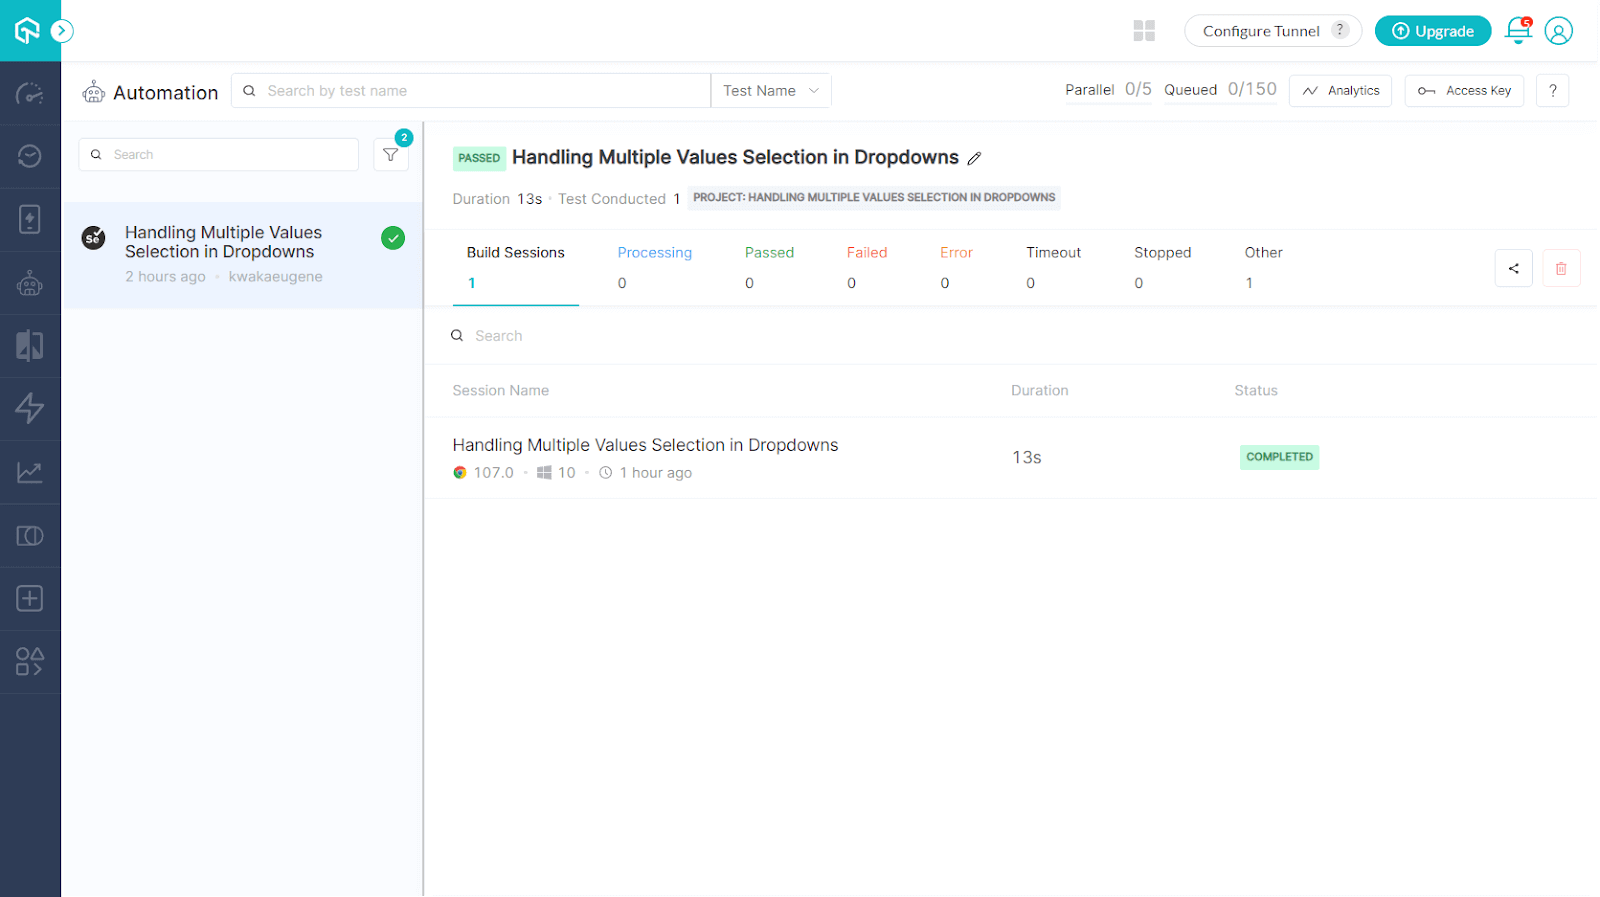
The test executes successfully and displays the three selected states as the output.

You can view the status of your successful test run on your LambdaTest Automation Dashboard.
Code Walkthrough:
Step 1: In the test script above, we import the necessary Selenium libraries required to run the script, including the Select class that will automate the selection of multiple options from a drop-down.
Step 2: Navigate to the website where we will run the test script using the driver.get() method. Using the Explicit wait with WebDriverWait, we wait for the drop-down element to appear and then locate it using XPath.

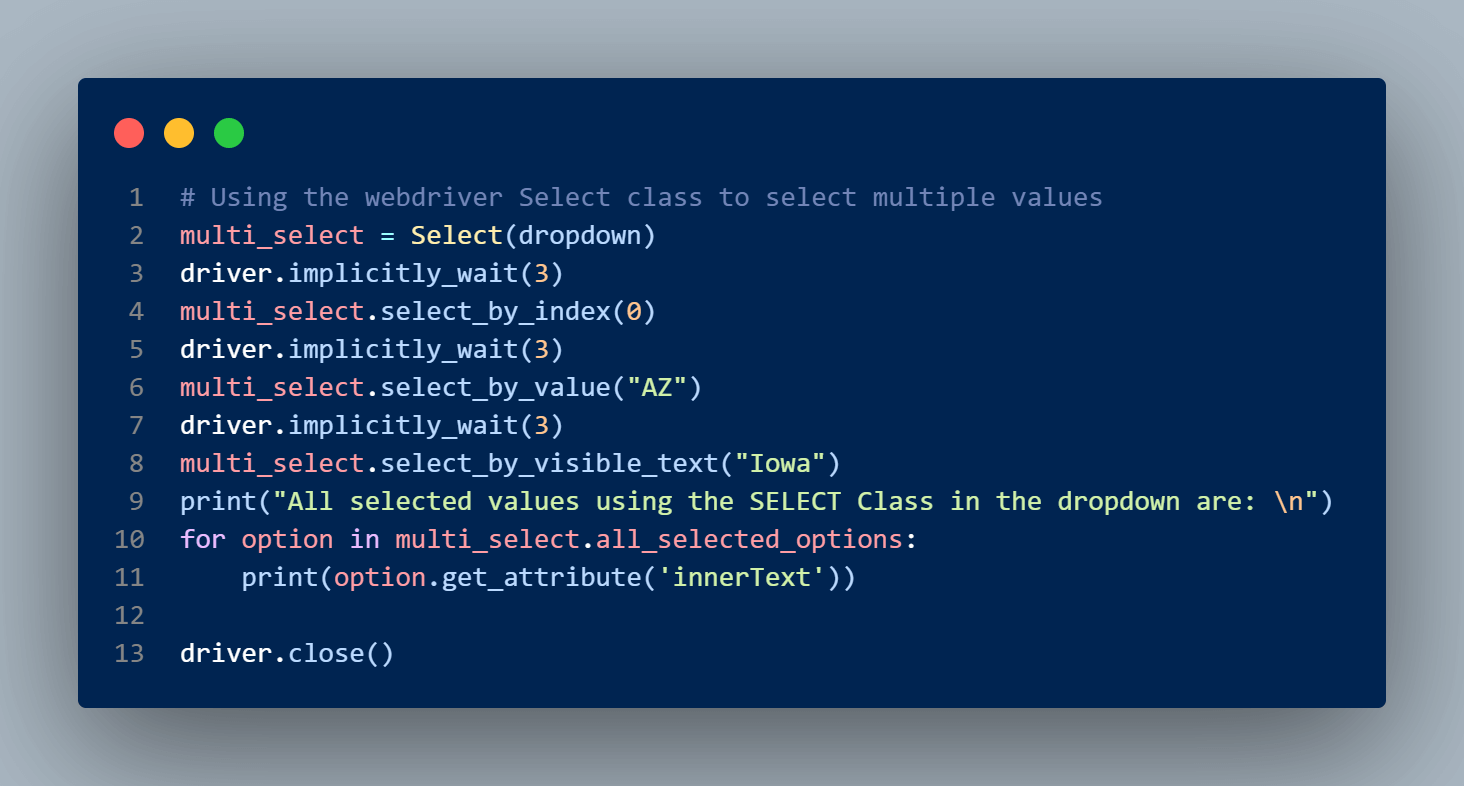
Step 3: We create an instance of the Select class using the Select() method by passing the multi_select element as its argument. We select multiple values from the drop-down menu using the select_by_index(), select_by_value(), and select_by_visible_text() methods.
Step 4: Then, use all_select_options() to iterate through the selected options and print the individual options we chose. The option tag’s text string will be printed by the get_attribute(“innerText”) function.
Step 5: Finally, calling the driver.close() ends the driver session.
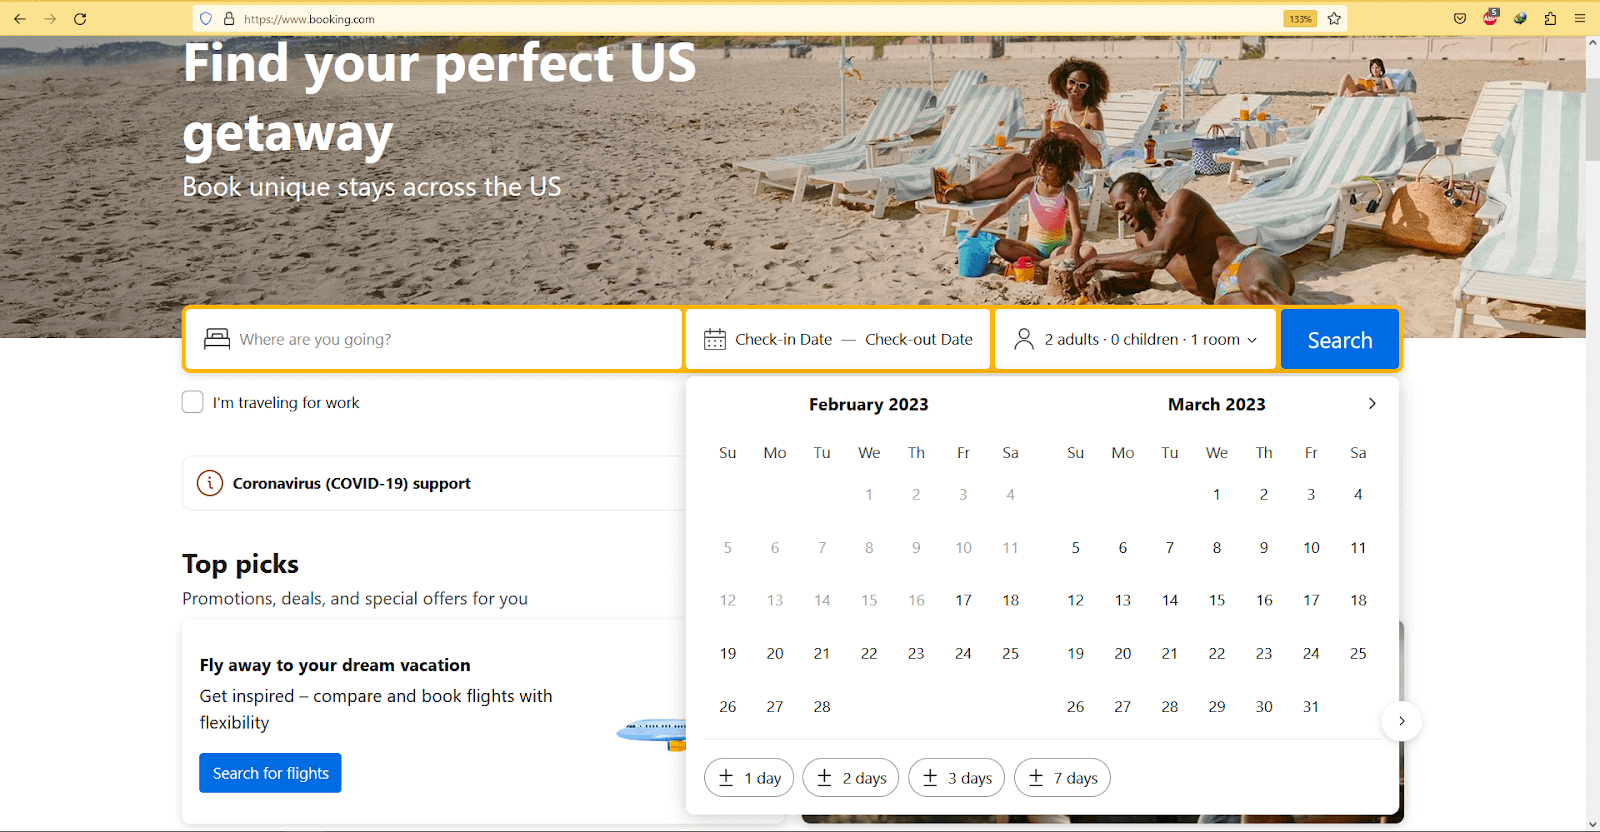
jQuery Date Pickers
When automating an airline or hotel website or filling up a form on a website, you might come across a date picker or calendar to pick dates or even time. The jQuery calendar is the most commonly used date picker control. These calendars significantly enhance the user experience by making choosing dates easier and more dynamic.
jQuery date pickers can pose a challenge when automating web applications using Selenium Python.
The date pickers could implement multiple date and time formats, making it challenging as the test implementation will need to be adjusted to match the calendar’s style and appearance. The calendar may also require navigation controls such as previous and next buttons to choose different months and years to select the dates. The calendar date pickers may also be rendered differently depending on the browser.
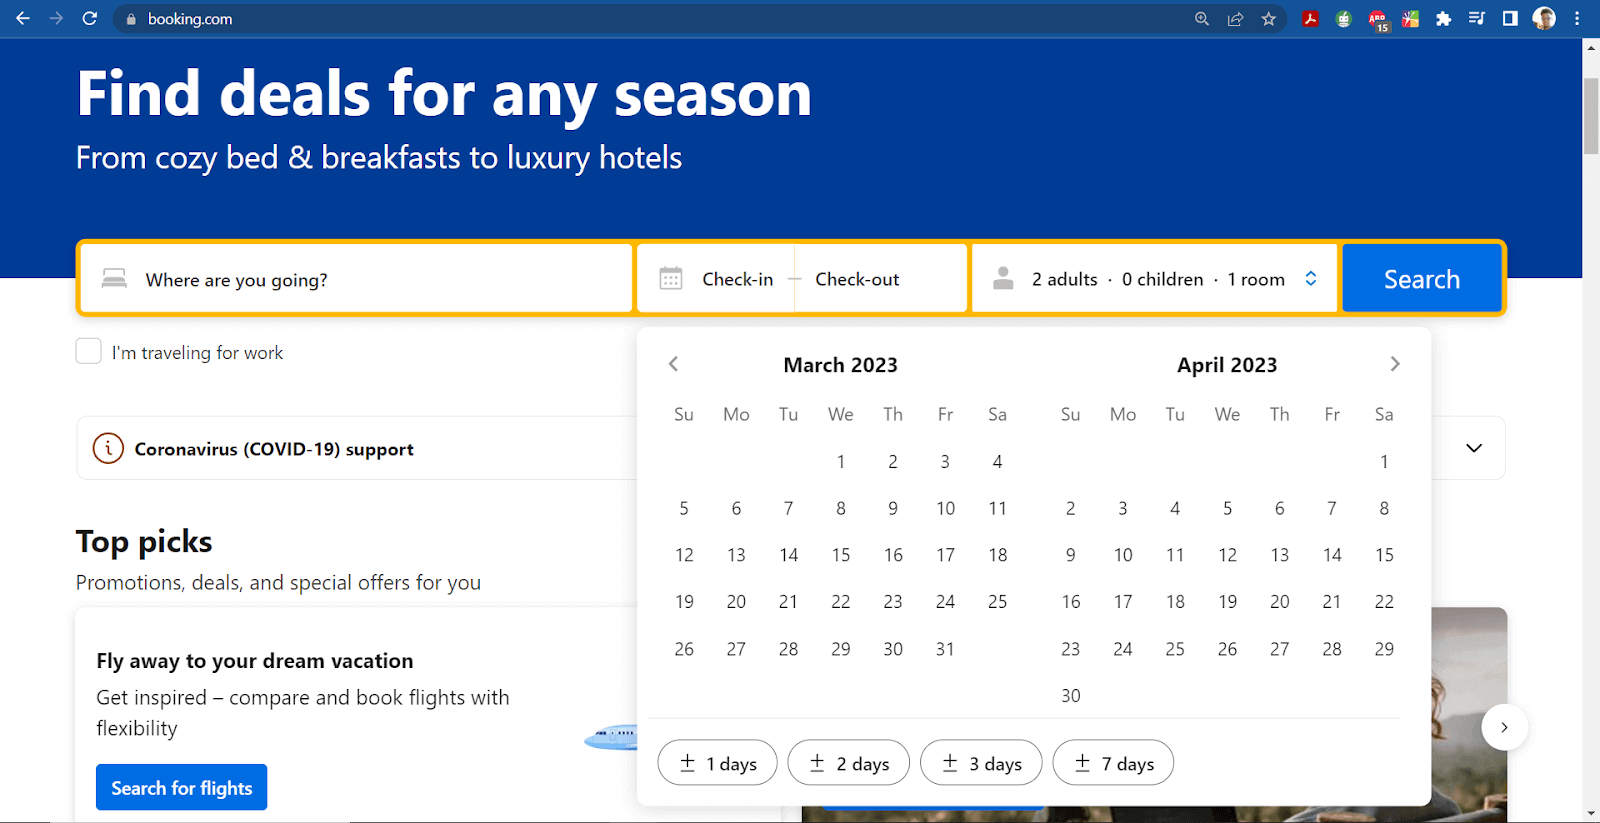
Booking.com datepicker in the Chrome browser:
Booking.com datepicker in Firefox browser:
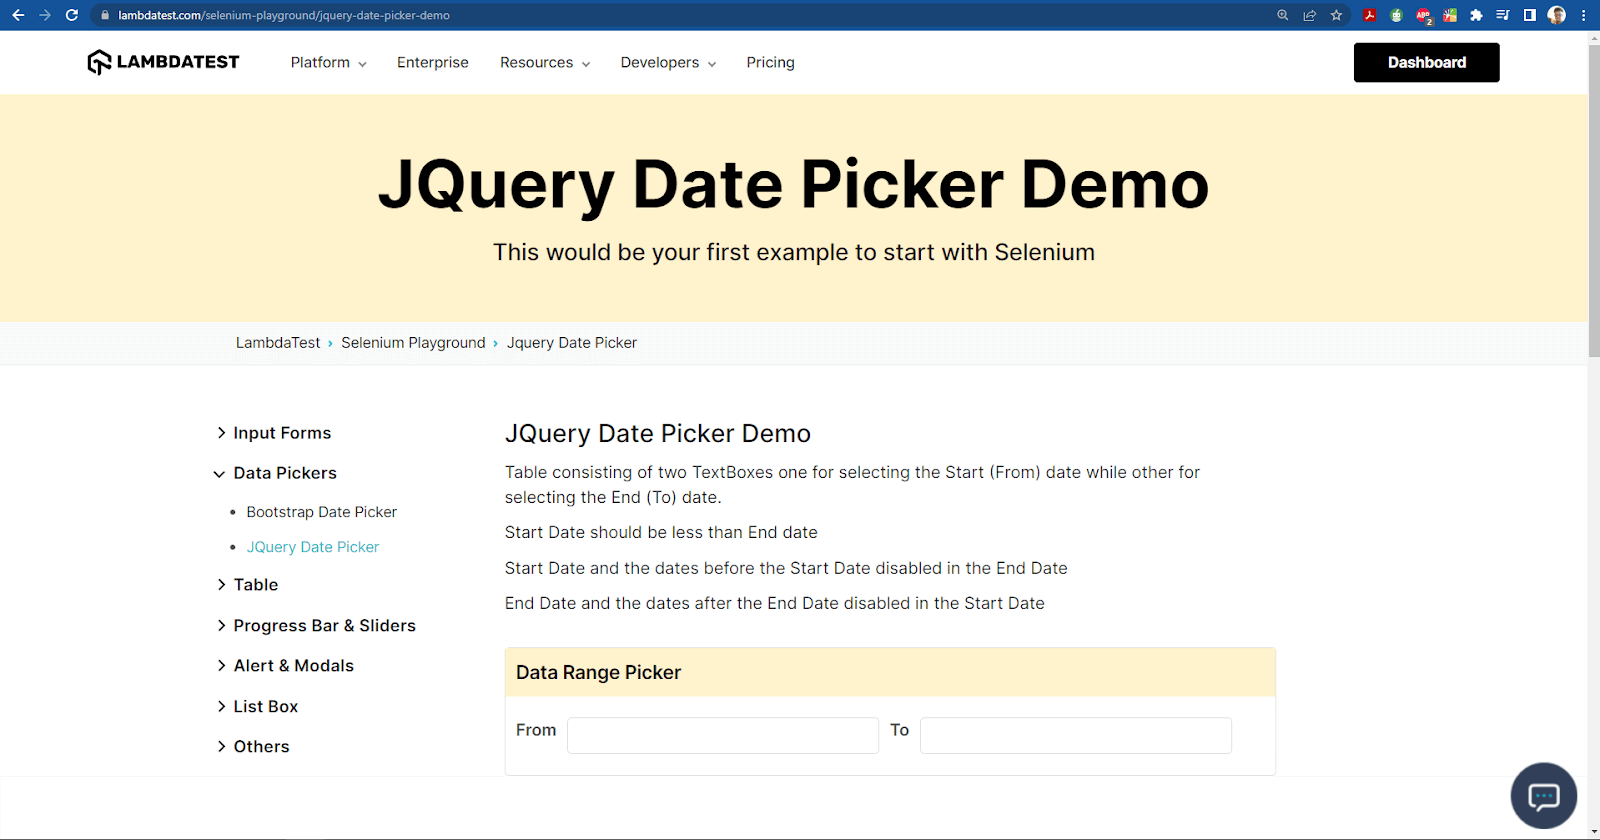
Demonstration: How to handle a jQuery Calendar in Selenium Python
Let’s look at a scenario on how to automate a jQuery calendar in Selenium Python.
Test Case:
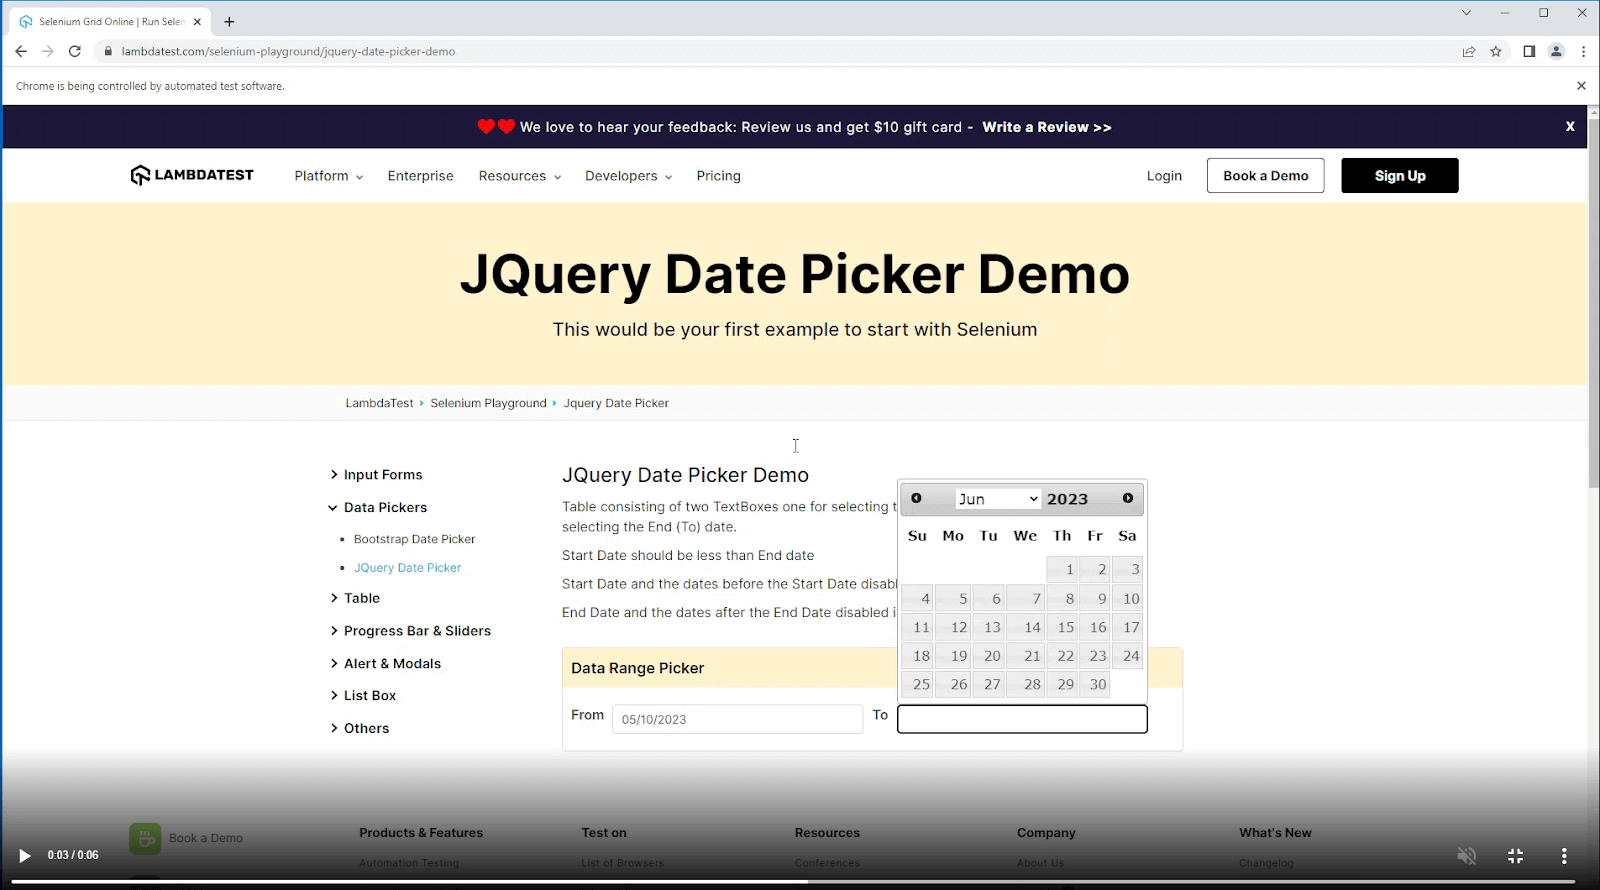
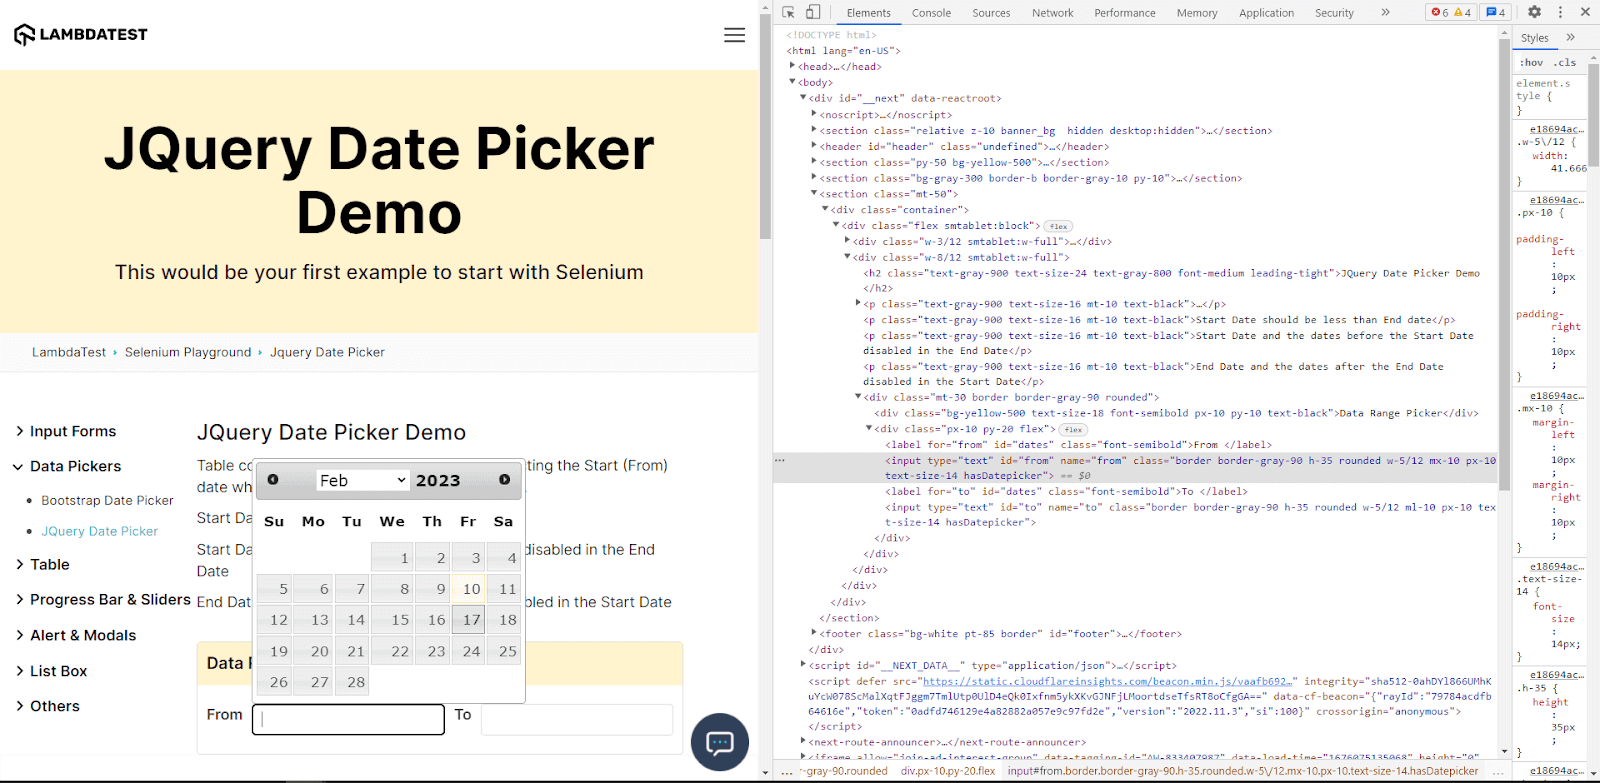
- Navigate to the jQuery Date Picker demo page.
- Go to the Date Range Picker.
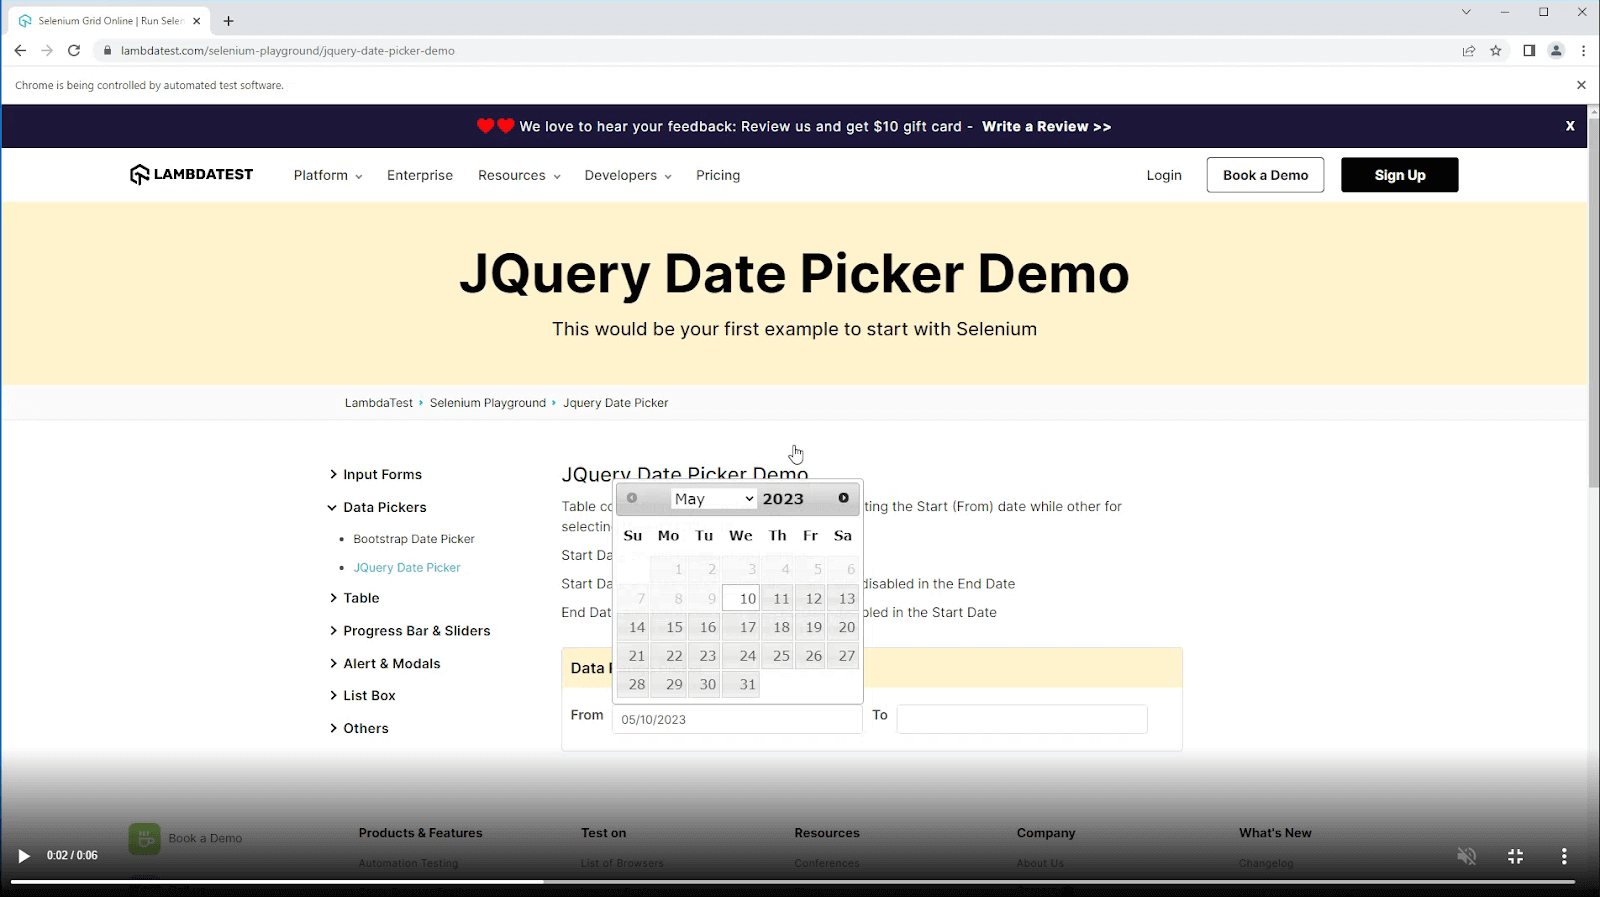
- In the From date picker field, select 05/10/2023 as the date.
- In the To date picker field, select 06/25/2023 as the date.
- Print the dates selected.
Implementation (Test Case on the Chrome Browser):
Code Execution:
To run the test script above in the terminal, run the following command:
|
1 |
python -m pytest test_handling_datepickers.py |
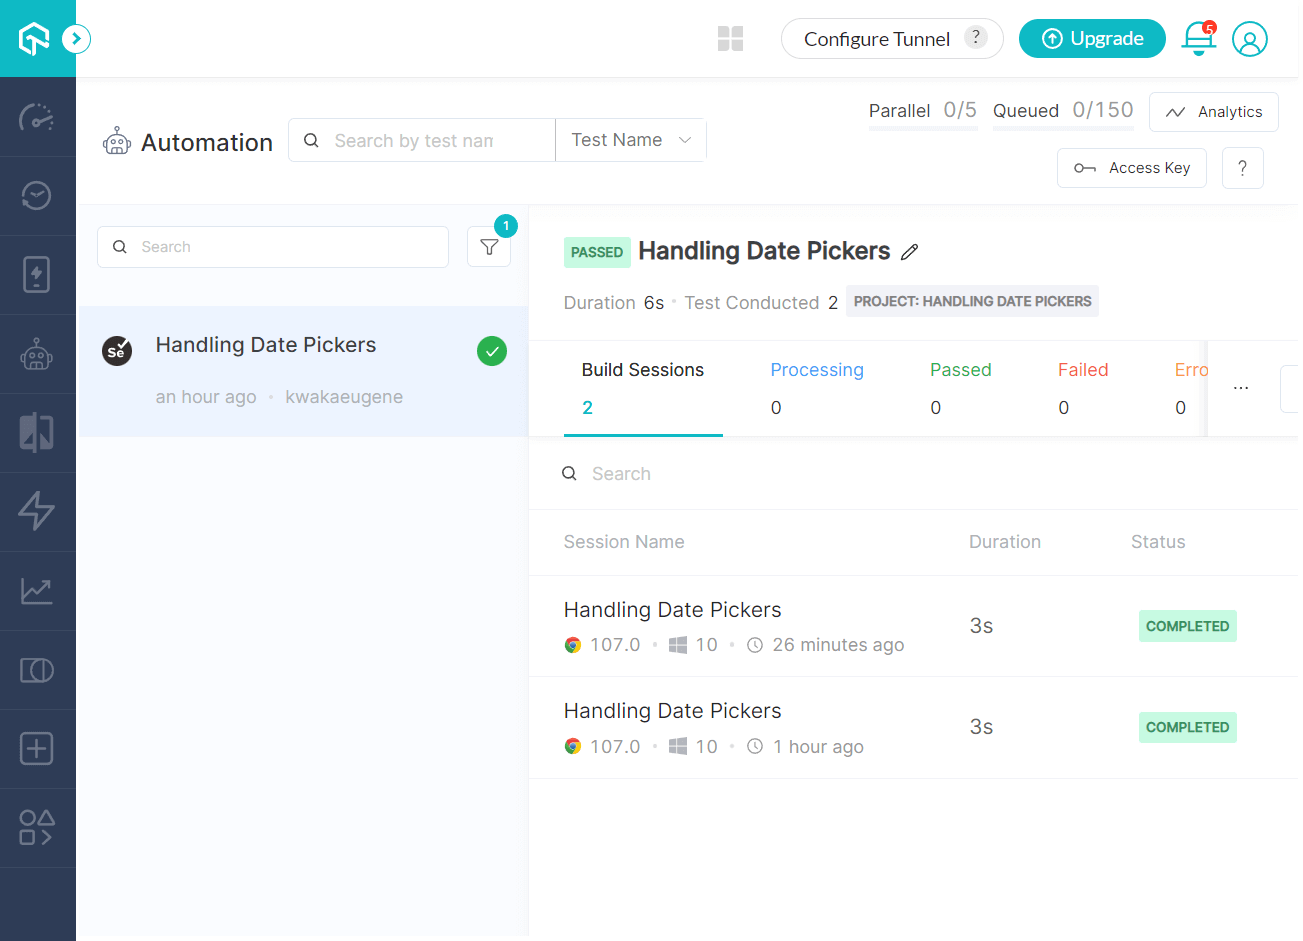
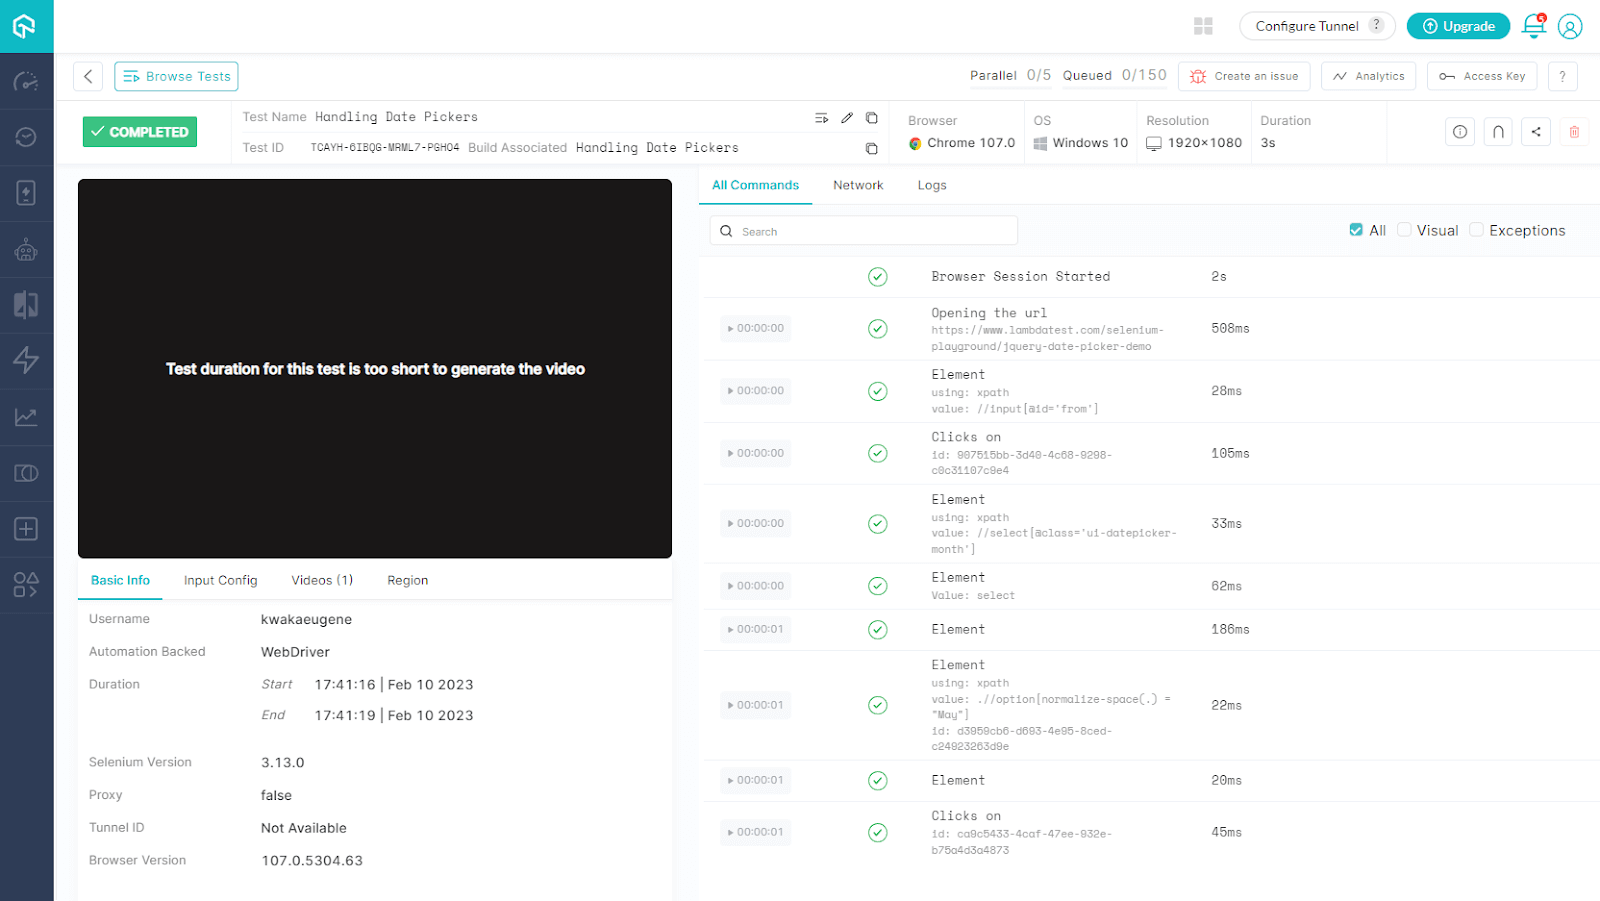
The test script executes successfully and will display the following output.

You can also view test results on the LambdaTest Dashboard.
Video recording of From date selection:
Video recording of To date selection:
Code Walkthrough:
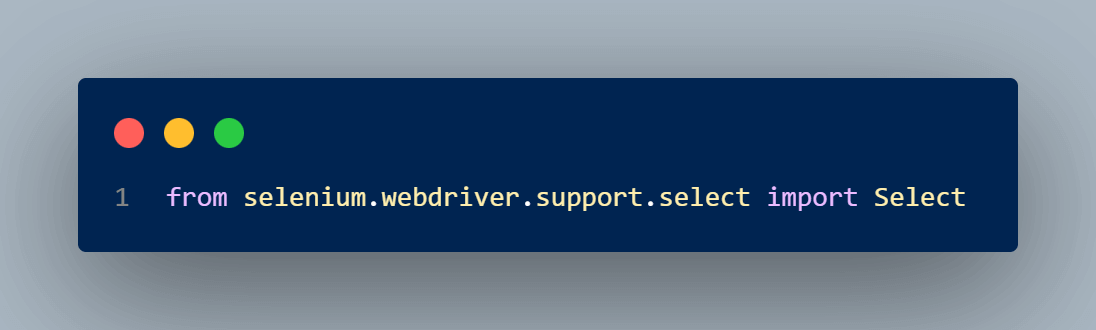
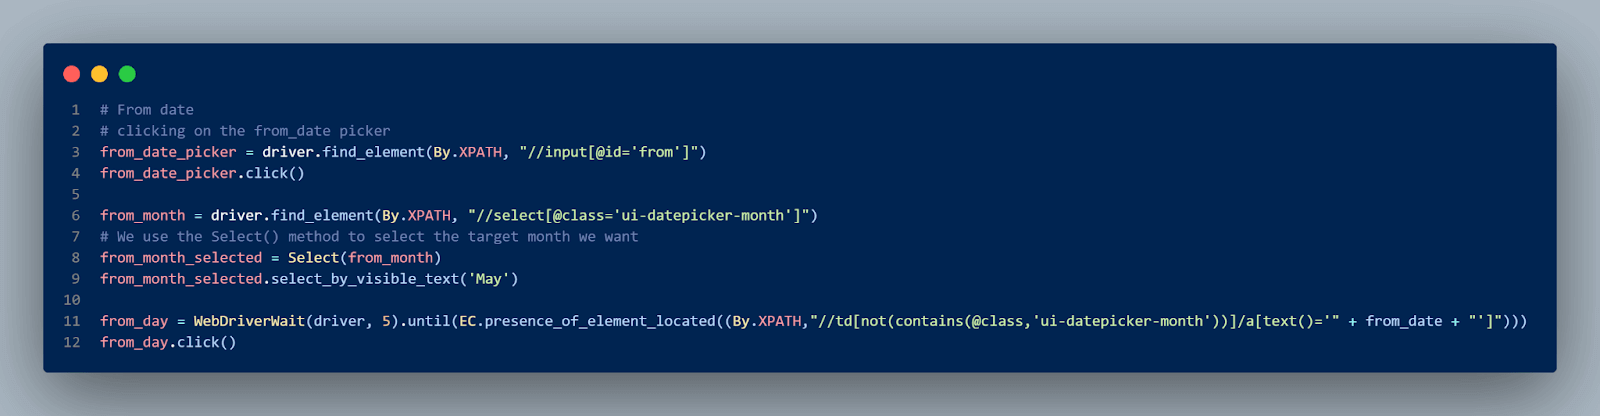
Step 1: Import the Select class from Selenium WebDriver to help us implement the < select > tag, which provides the helper methods with select and deselect options.
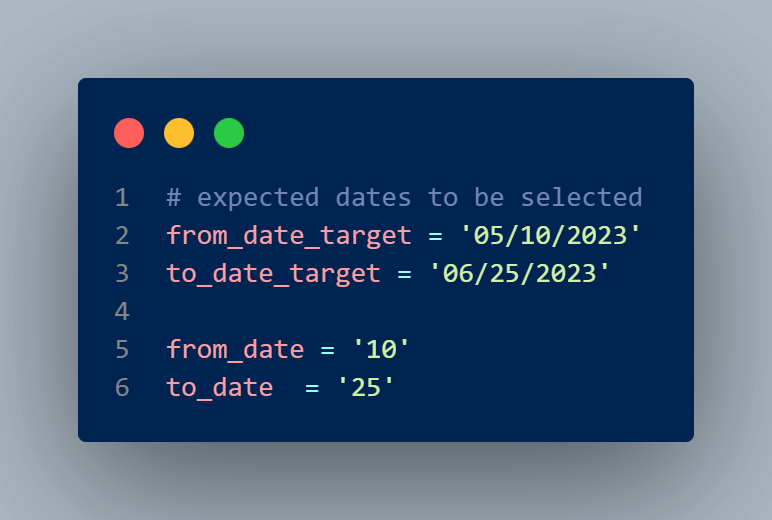
Step 2: Define the from_date target and to_date_target date targets that we want to select from the datepicker.
Step 3: The from_date_picker element is located using XPath in the Chrome Developer Tools and clicked to open the calendar.
Step 4: From the calendar, we locate from_month using XPath and select the month using the Select() method. In this instance, we select the month of May using the select_by_visible_text() method.
Step 5: Since we have specified the precise value of the from_date, the 10th day is located from the month using a dynamic XPath, and the contains() method. We then click on the day.
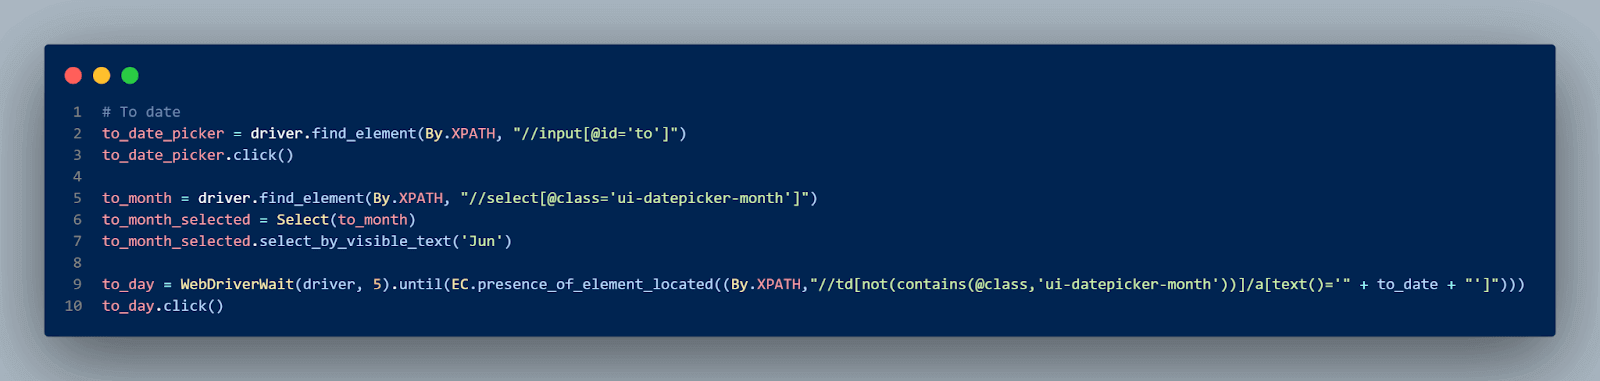
Given that the datepicker provides date range capability, the procedures implemented for the from_date are also applied to the to_date. The only difference comes from the months and locators used to locate the “from” and “to” dates. We selected June and the sixth day for the to_ date.
Step 6: Finally, we ascertain that the from_date_picker and the to_date_picker variables have the exact value we specified in the from_date_target and the to_date_target variables using the get_attribute(‘value’) method.
We store these values in the expected_from_date and expected_to_date variables and print the output.
Step 7: We then close the WebDriver session with the driver.close() method.

Mouse Hover Elements
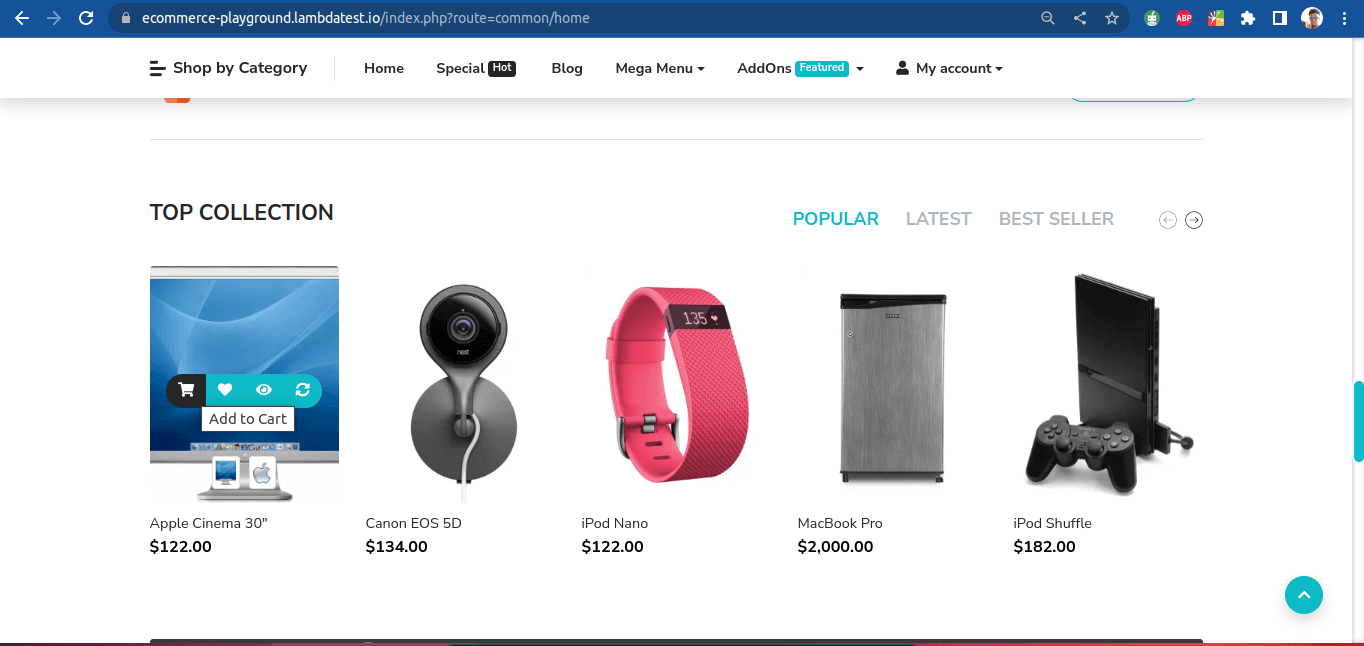
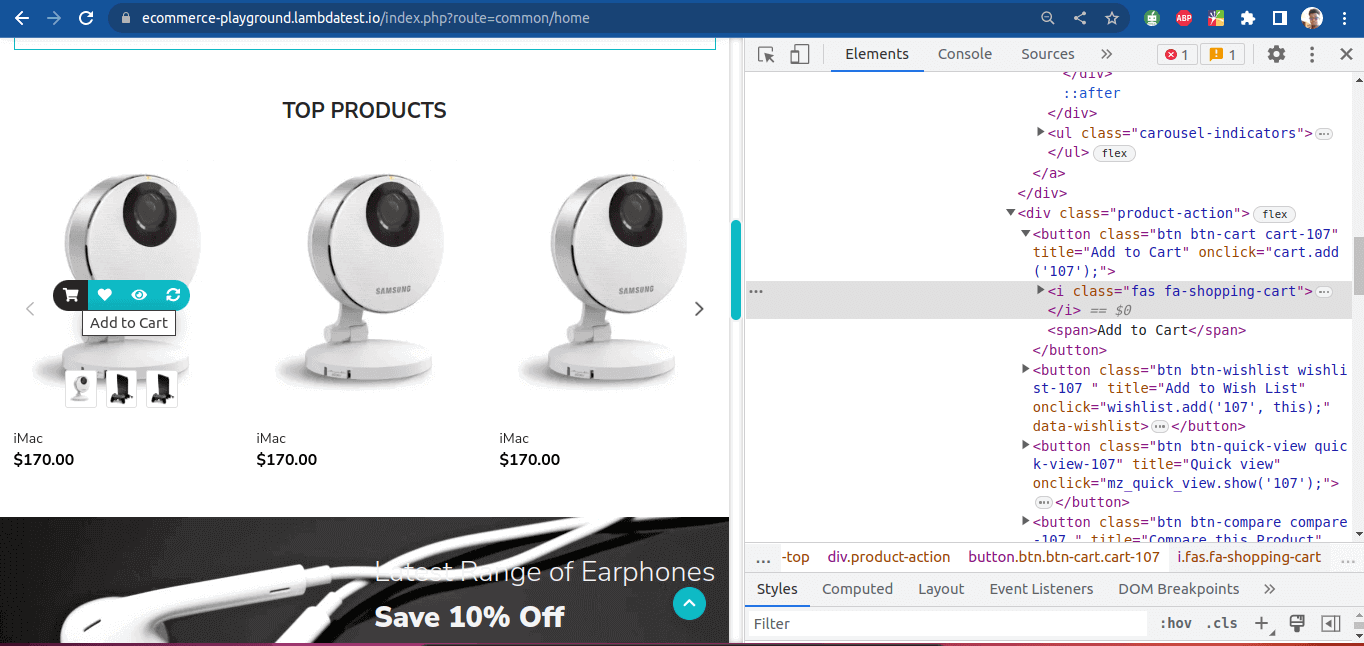
A mouse hover action is an action taken when a user moves a mouse cursor over a designated part of a webpage, and it triggers a specific event. For example, in the Selenium eCommerce Playground website, hovering over a product element will show a sub-menu of a user’s actions, such as the “Add to Cart” function.
Mouse hover can also be used on banks’ websites to show different services the bank offers, as well as on hotel websites to zoom in on a location’s picture or add the location to likes.
Mouse hover on product item showing “Add to Cart” action:
Mouse hover on the bank website showing the bank’s services:

Hover elements can pose a challenge while writing automated tests using Selenium Python. Some elements are often hidden and only become visible when the mouse hovers over some other element, making it difficult to locate them using the standard find_element() method.
Additionally, hover events can be unstable as they depend on the mouse movement speed and the timing of triggering the hover event. In the case of slow internet speeds, the mouse cursor movements might lag. This may result in the tests being flaky.
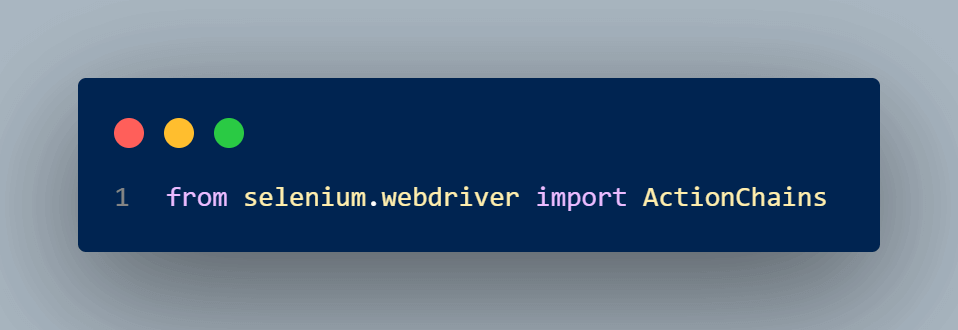
To handle mouse hover actions, we implement the methods from the ActionChains class. The class methods will simulate the mouse movement.
Demonstration: How to handle Mouse Hover Actions in Selenium Python
Let us look at a test case scenario that requires handling a mouse hover action.
Test Case:
- Navigate to the LambdaTest Selenium eCommerce Playground.
- Go to product items and hover the mouse on the item.
- Click on the Add to Cart button that hovers over the product item.
- Print that the item has been added to the cart successfully.
Implementation (Test Case on the Chrome Browser):
Code Execution:
Type the following command in the terminal to run the test script.
|
1 |
python -m pytest test_mouse_hover.py |
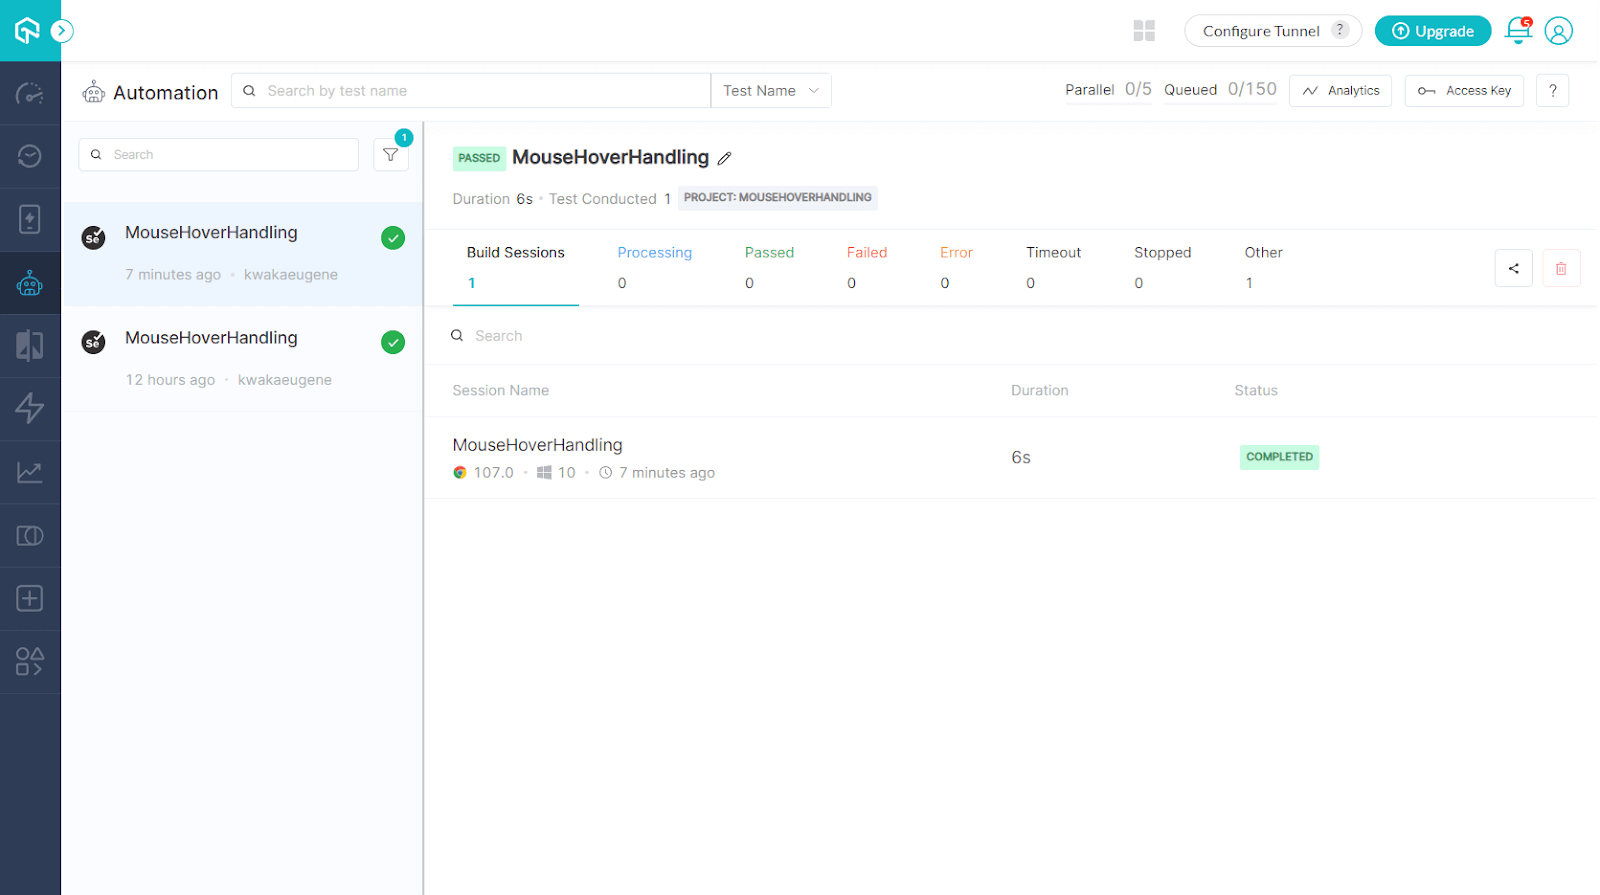
The test successfully executes on the terminal, displaying the output as shown below.

The test results can be viewed in the LambdaTest Dashboard.
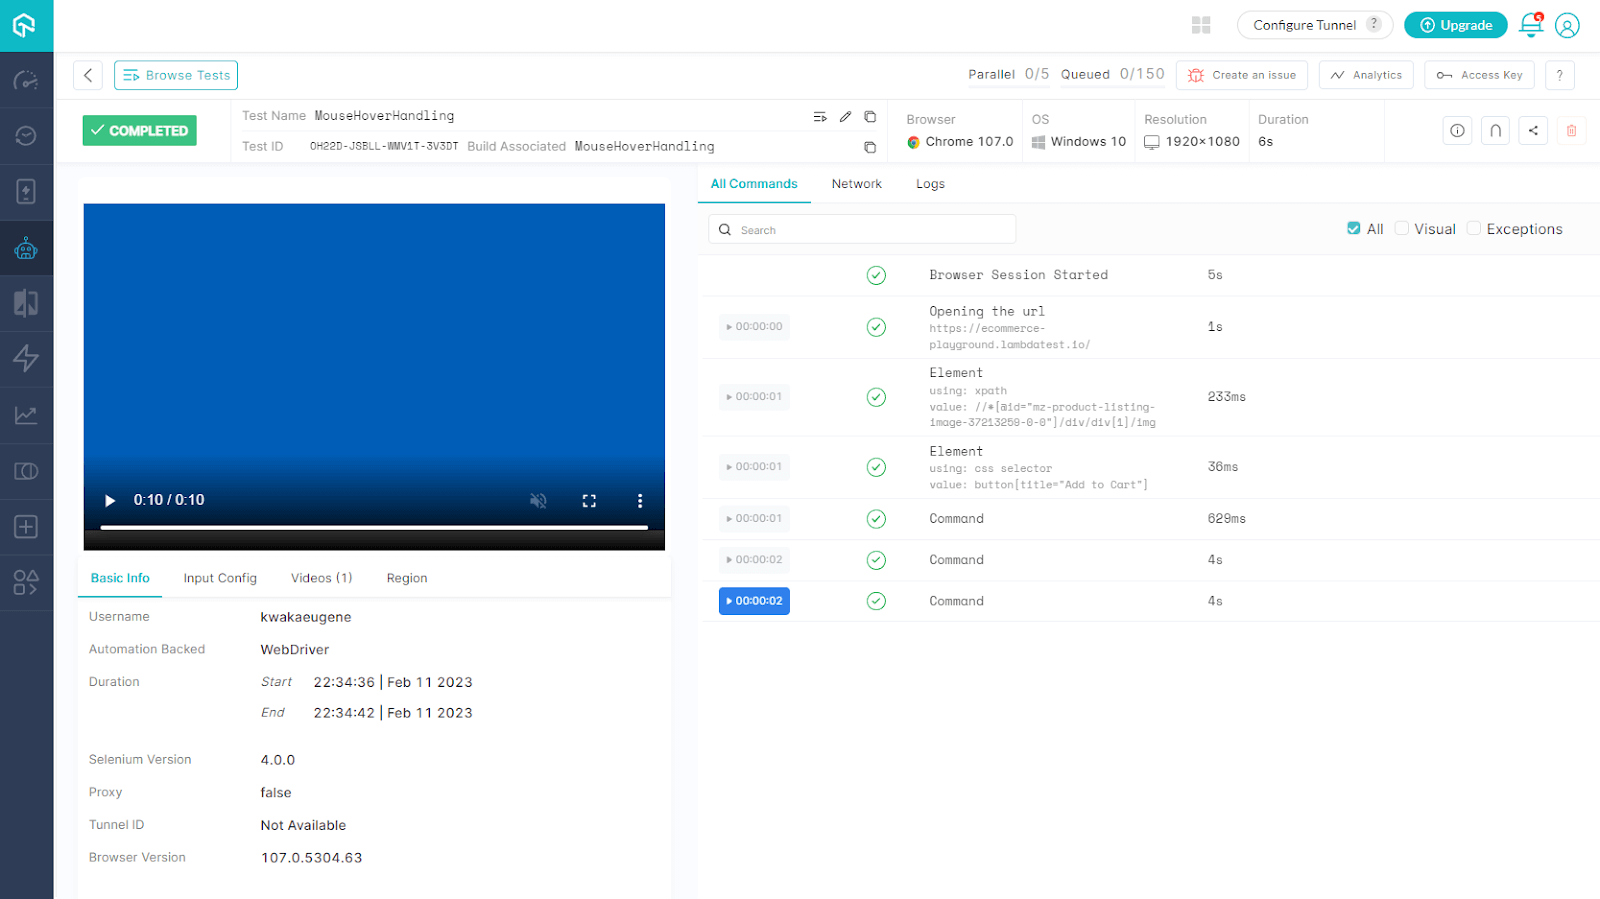
Code Walkthrough:
Step 1: Import the ActionChains class from the Selenium WebDriver, which provides a variety of APIs for keyboard and mouse actions.
Step 2: Navigate to the Selenium eCommerce Playground website using the driver.get() method. We first locate a product element in the webpage using its XPath from the Chrome Browser’s Inspect Tools to display the hover effect.
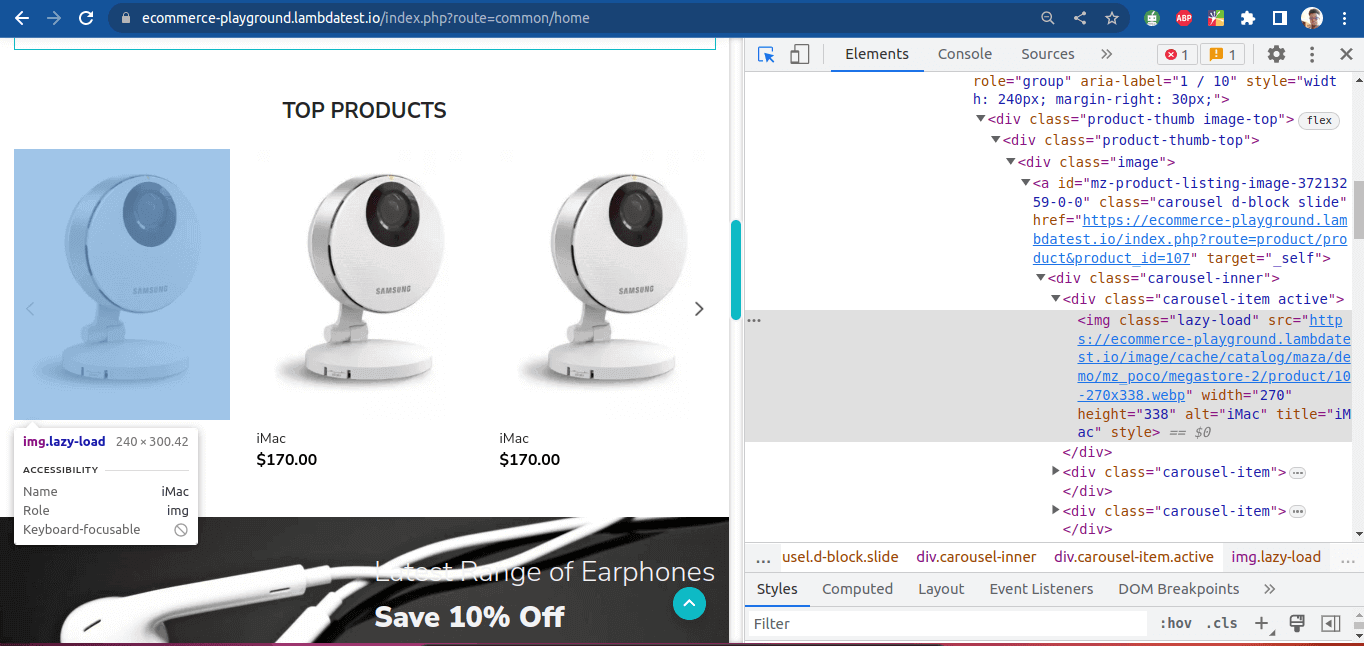
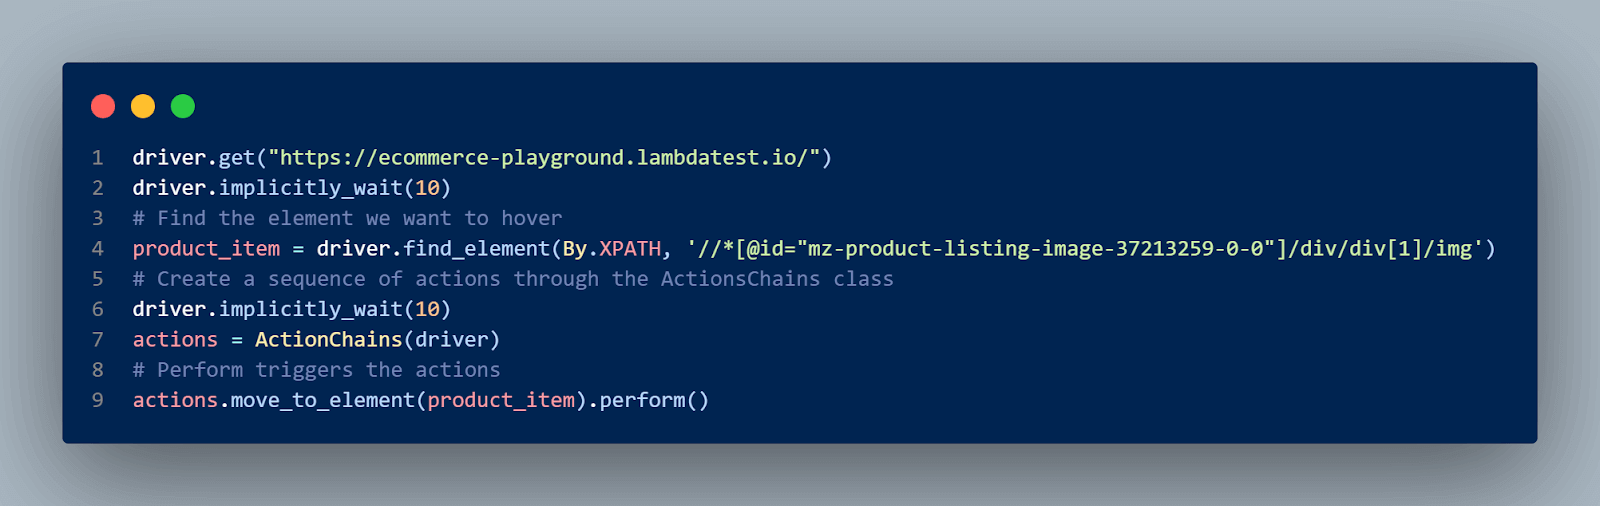
Step 3: Using the ActionChains class, we create an object of the class and use the move_to_element() method with the product_item element as its parameter. The move_to_element() method moves the mouse to the middle of the element. Then apply the perform() method to implement the mouse action.
Once the mouse cursor is on the product_item element, we locate the add_to_cart button using its CSS Selector. The add_to_cart element becomes visible when the mouse hovers over the product_item and then clicks on it using the actions class object.
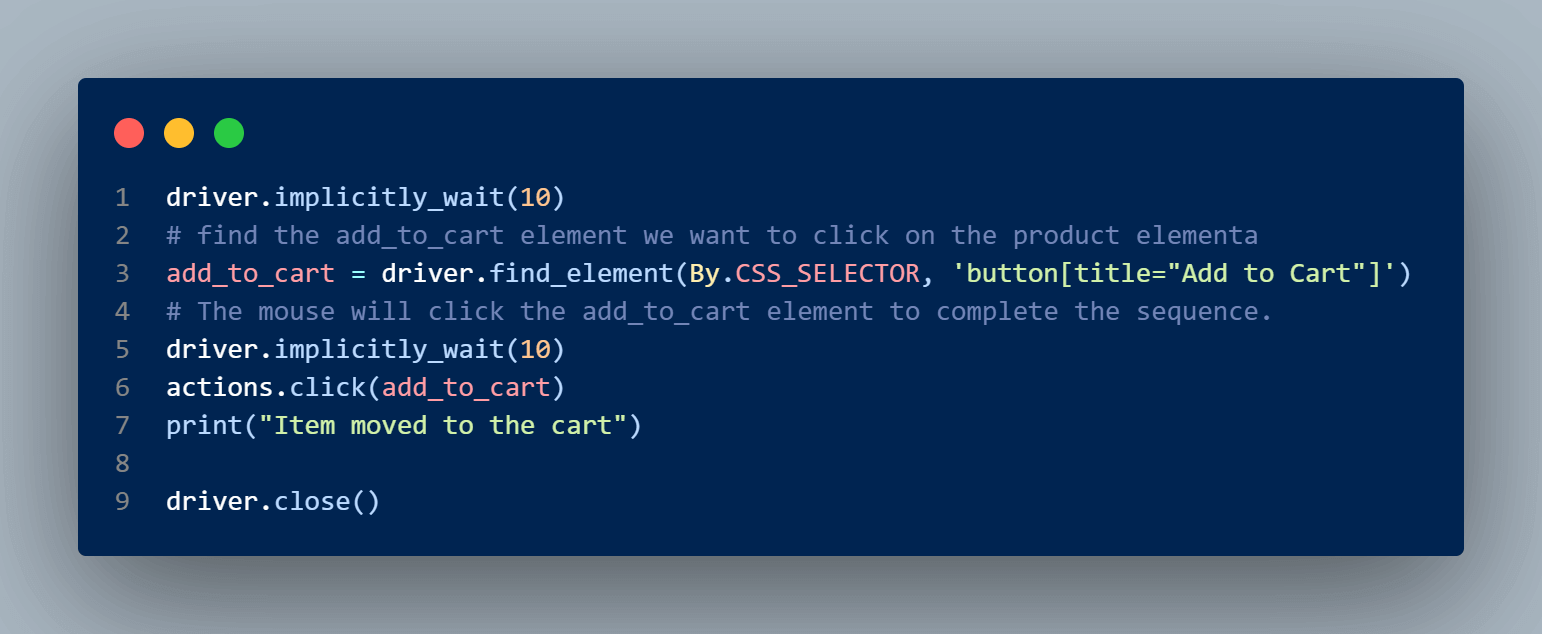
Step 4: We finally close the webdriver session using the driver.close() method.
AJAX Form Submission
AJAX forms are a challenge in automation testing using Selenium Python because of the asynchronous nature of AJAX calls. AJAX calls can be used in web apps to enable features such as autocomplete search, which displays results as you type, or infinite scrolling to fetch additional content in social media apps without reloading the page.
When you fill in and submit the traditional forms, the page reloads, and the refreshed page can be interacted with easily using Selenium. AJAX forms, on the other hand, do not require a page reload because the form data is delivered and handled asynchronously in the background. As new content is received from the server, a part of the web page’s DOM is updated rather than the entire DOM state changing. This can make it difficult to determine whether the form has completed processing and if the refreshed page content is accessible to be interacted with through Selenium.
To automate handling AJAX form submissions, we use the explicit wait functions to wait for the refreshed page to load before proceeding with the code. On the other hand, implicit waits are not recommended for handling AJAX form submissions because they do not wait for a specific form submission to complete before continuing with the test script. The test script will continue to execute without waiting for the request to complete. This causes the test to be flaky because of wait time issues.
Demonstration: How to handle AJAX Form Submission using Selenium Python
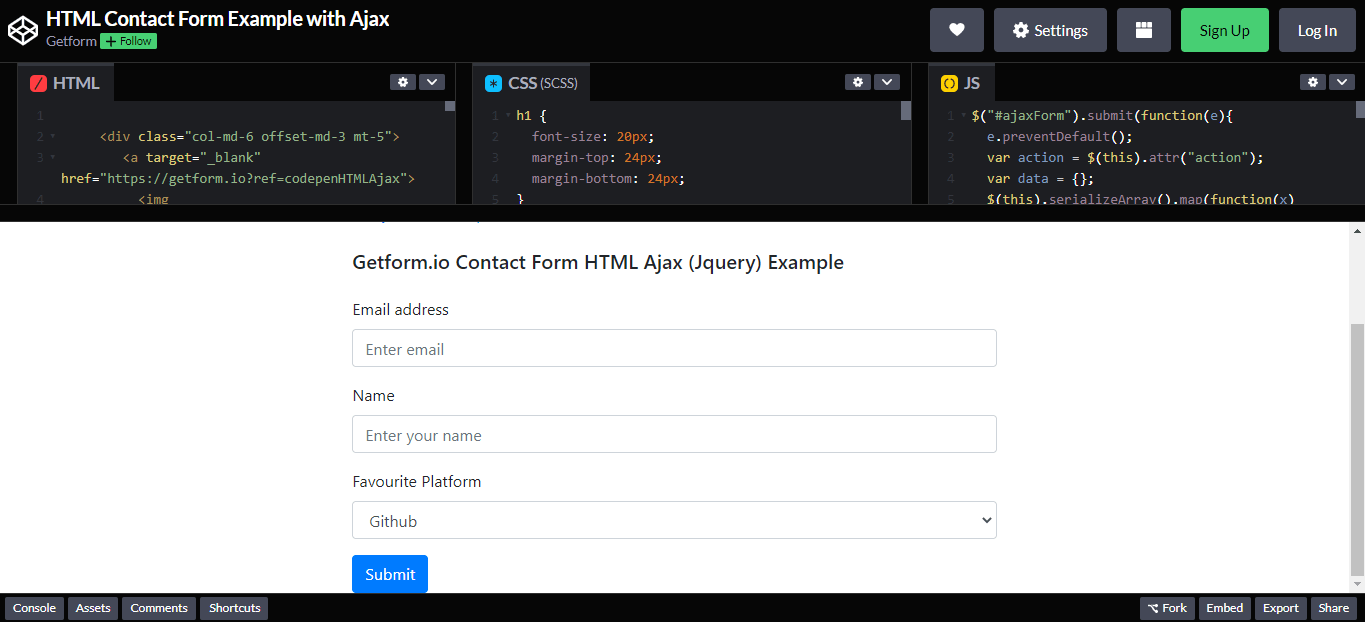
To demonstrate handling AJAX form submissions, we will use the AJAX contact form by Getform.io.
Test Case:
- Navigate to the Getform CodePen URL.
- Fill in the form details and click on the Submit button.
- Wait for the submission response and print it.
Implementation (Test Case on the Chrome Browser):
Code Execution:
Let us run the test script in the terminal using the following command:
|
1 |
python -m pytest test_handling_AJAX_forms.py |
The test executes successfully, and the terminal displays the form’s response.

We can view the test results in the LambdaTest Automation Dashboard.
Code Walkthrough:
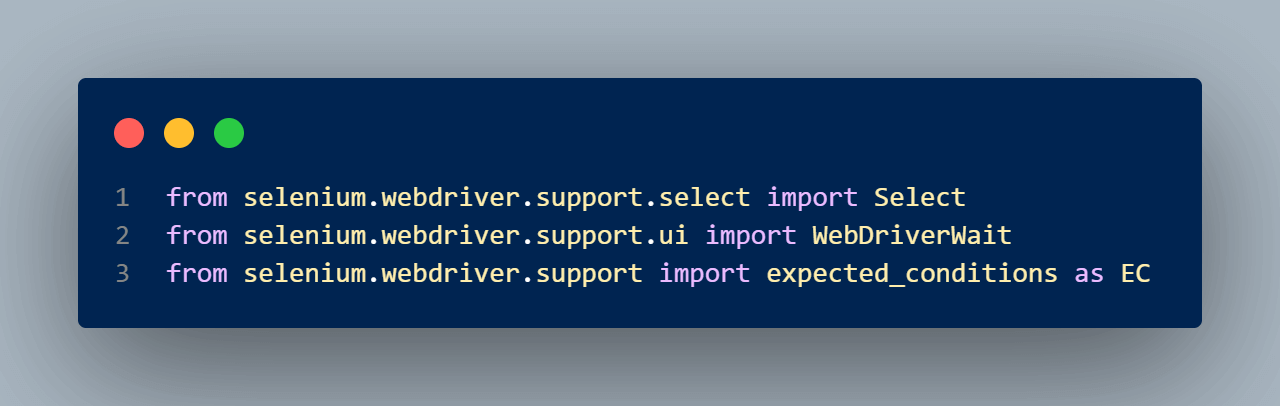
Step 1: To get started with the automated testing of an AJAX form submission test scenario in Selenium Python, we import the necessary Selenium libraries, including WebDriverWait, and the expected conditions for the explicit wait. The explicit wait will enable the WebDriver to wait until the form submission returns the response, and it becomes visible in the DOM.
Step 2: We also import the Select class to handle the drop-down input menu in the form.
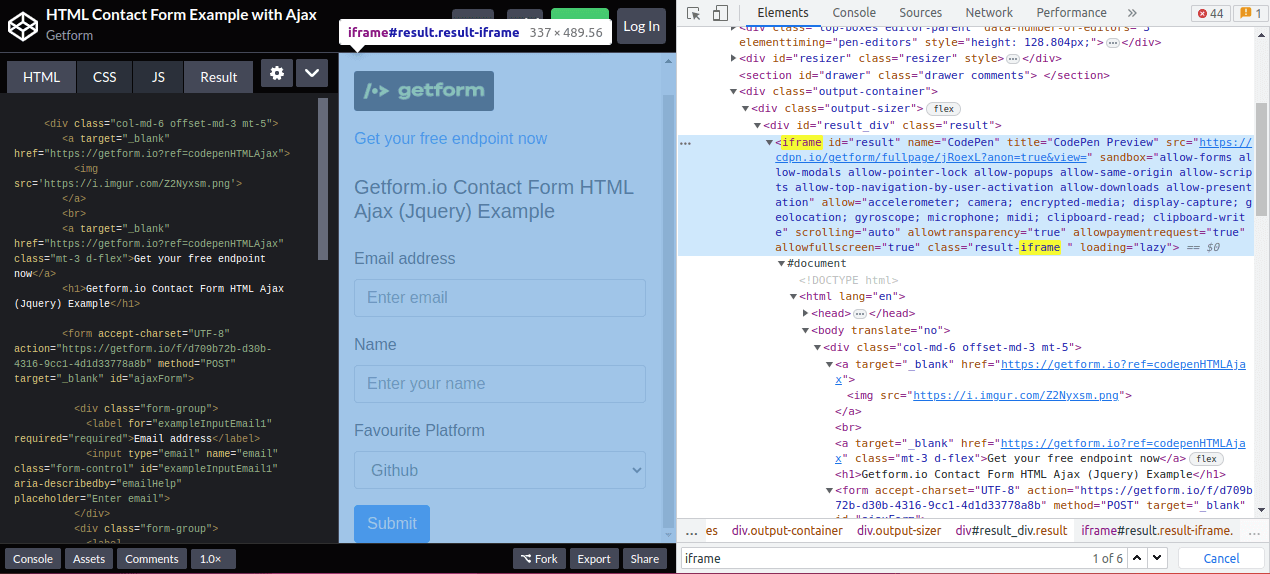
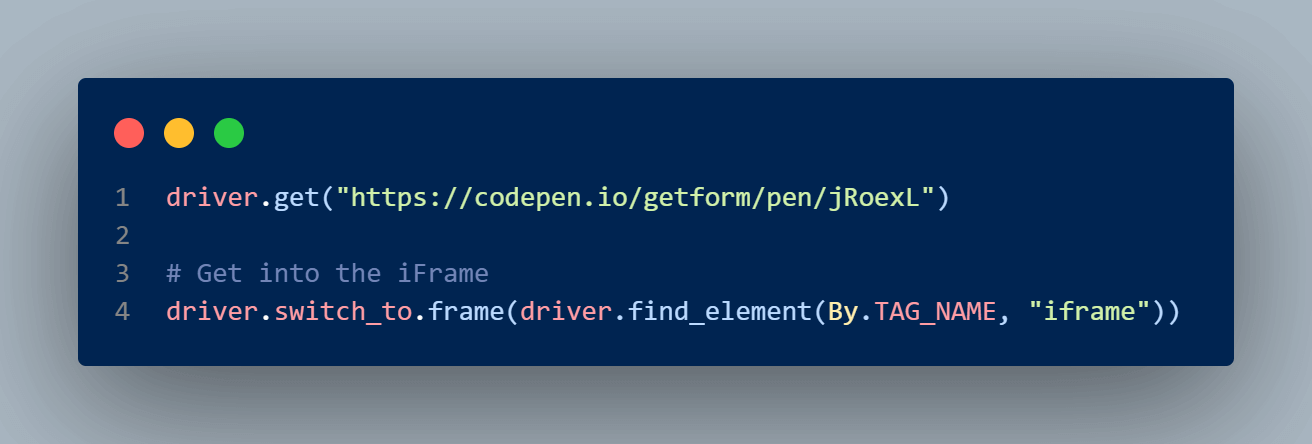
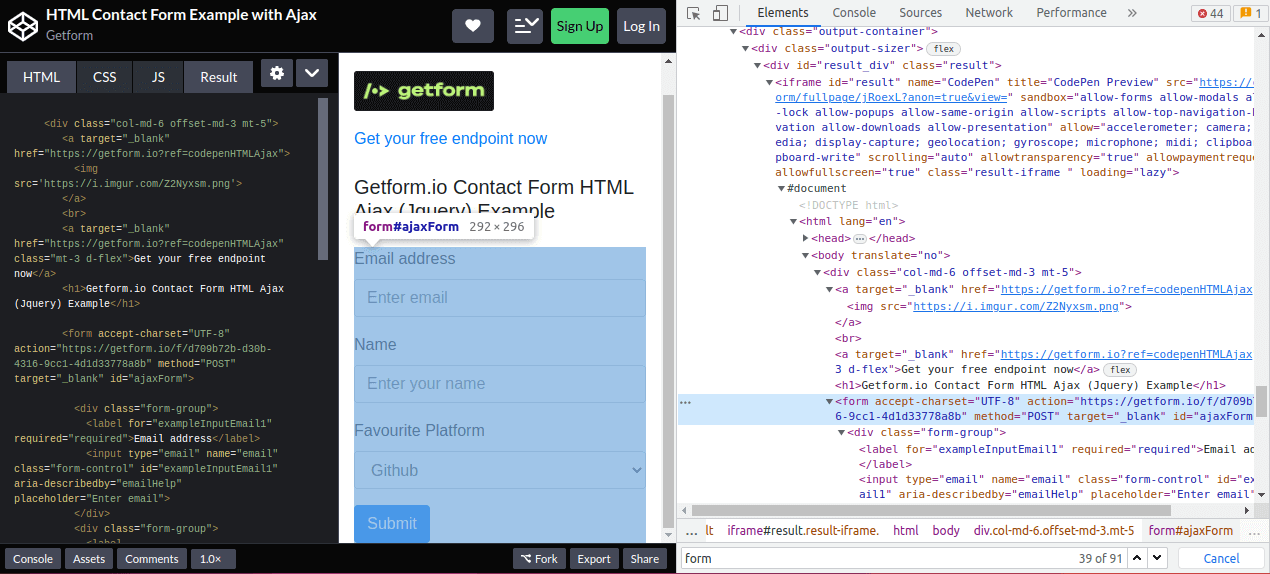
Step 3: The AJAX form is inside an iFrame, and the test script cannot continue to run until we switch the WebDriver’s context to the iFrame. In the Inspect Tool, the iFrame is identified by its TAG_NAME. We then switch to the iFrame using the driver.switch_to.frame() method with the iFrame element as its parameter.
Step 4: After switching to the iFrame, we locate the form using XPath from the Inspect Tools. After locating the email and name inputs, we use the send_keys() method to fill in the email and name details.
Step 5: The Select class we imported will select an option from the platform_element drop-down menu using the select_by_visible_text() method. Finally, click on the Submit button to submit the form details.

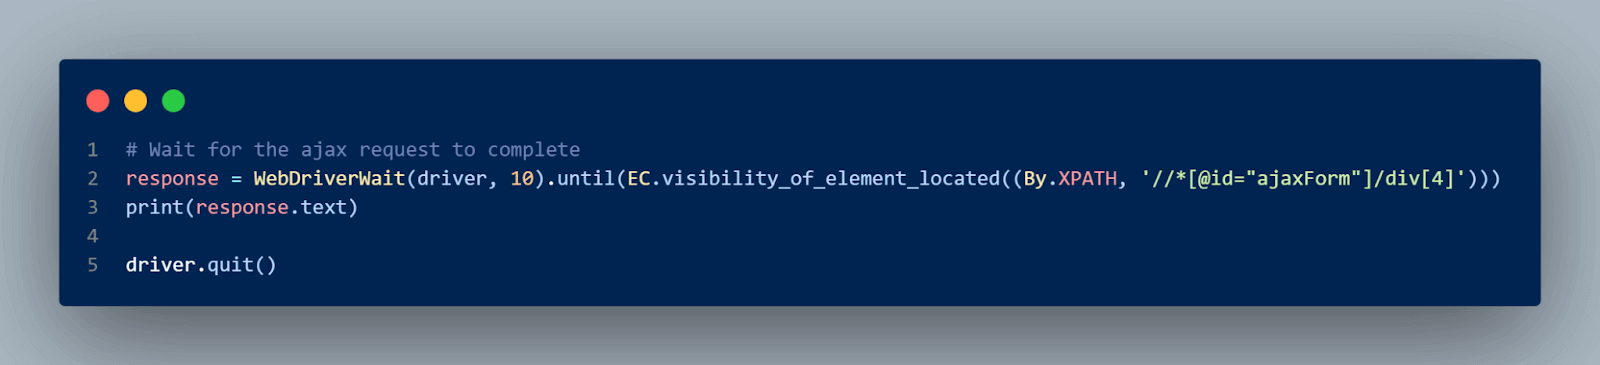
Step 6: After submitting the form, we use explicit wait to wait for the web page to load asynchronously until the response element is present in the DOM. Then print the response’s text.
Step 7: The driver.quit() closes the driver session.
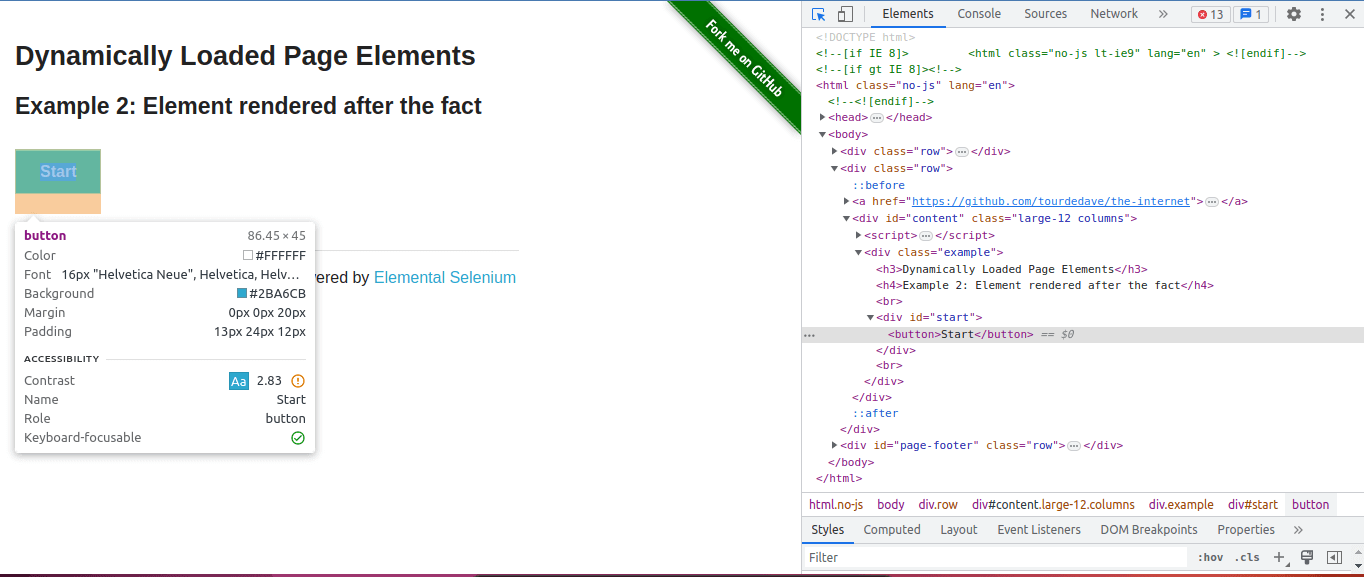
Dynamic Page Elements
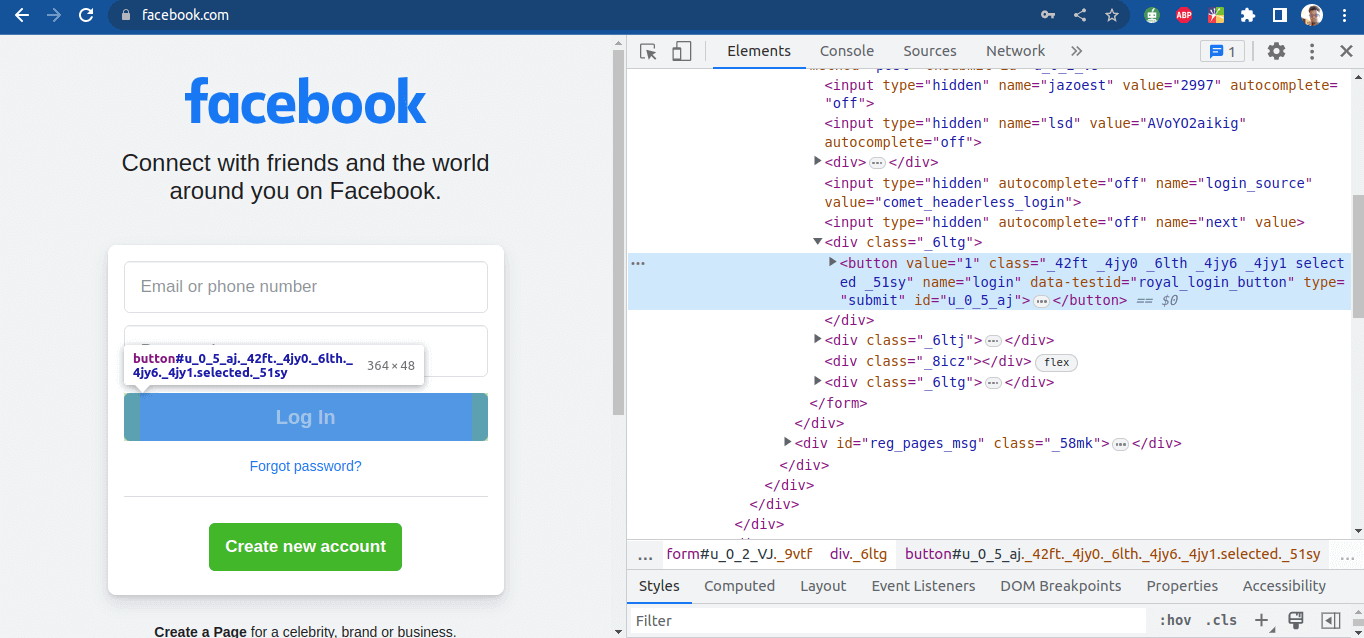
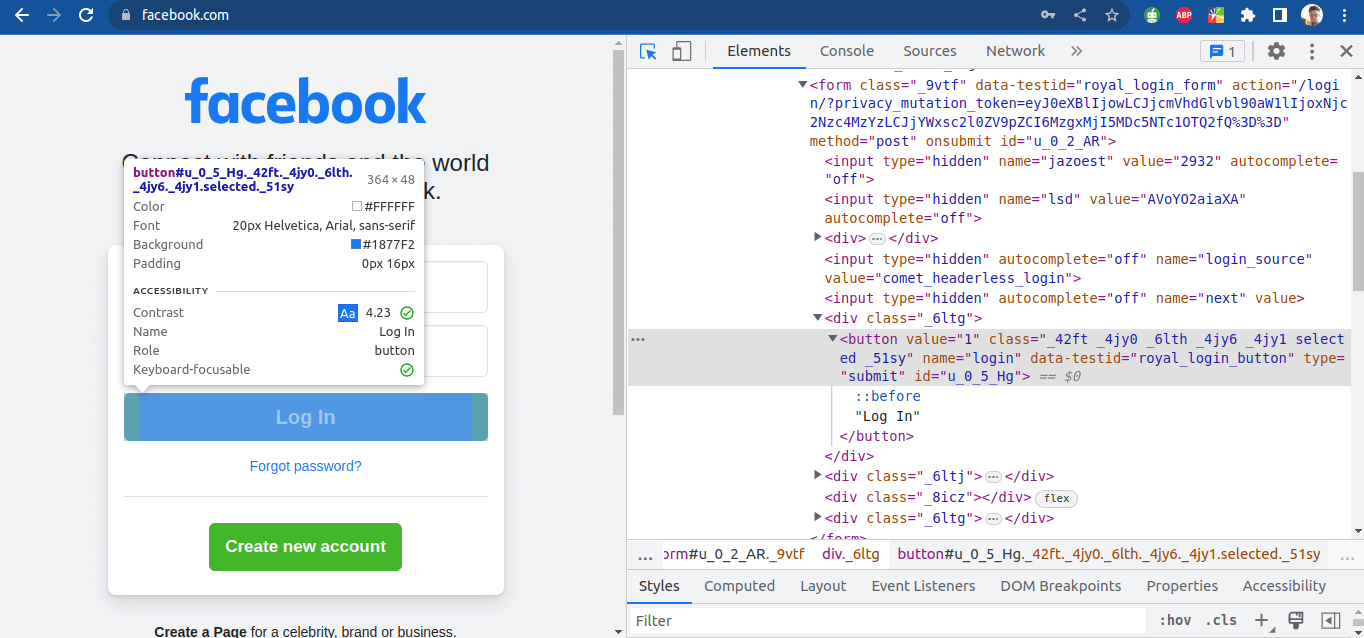
If an element in a web application has attributes such as Class, ID, or XPath that change when the web application is reloaded, such elements are known as dynamic web elements. For example, the login web element ID on the Facebook login page changes every time the page is reloaded.
In the below image, the login button ID is “u 0 5 aj.”
After the page is reloaded, the login button ID is now “u 0 5 Hg.”
Dynamic content can be challenging to automate with Selenium Python because it requires the automated test to identify and interact with the dynamic web elements. When a dynamic page element on a web page loads, not all elements are available immediately. When the WebDriver tries to interact with an element before it is present, it results in a NoSuchElementException.
Stale elements, on the other hand, are elements that are no longer attached to the web page’s DOM because the page has been reloaded or the element has been removed and replaced by another element. If the WebDriver tries to interact with a stale element, it results in a StaleElementReferenceException.
You can learn more about it through this blog on handling Errors and Exceptions in Selenium Python.
To address this challenge, automated test scripts need to implement explicit waits to wait until the page has finished loading before interacting with elements, as well as dynamic locators to locate and interact with elements that may not exist when the test is initially executed.
Demonstration: How to handle Dynamic Content with Selenium Python
Let us look at a test scenario to handle dynamic content on a website.
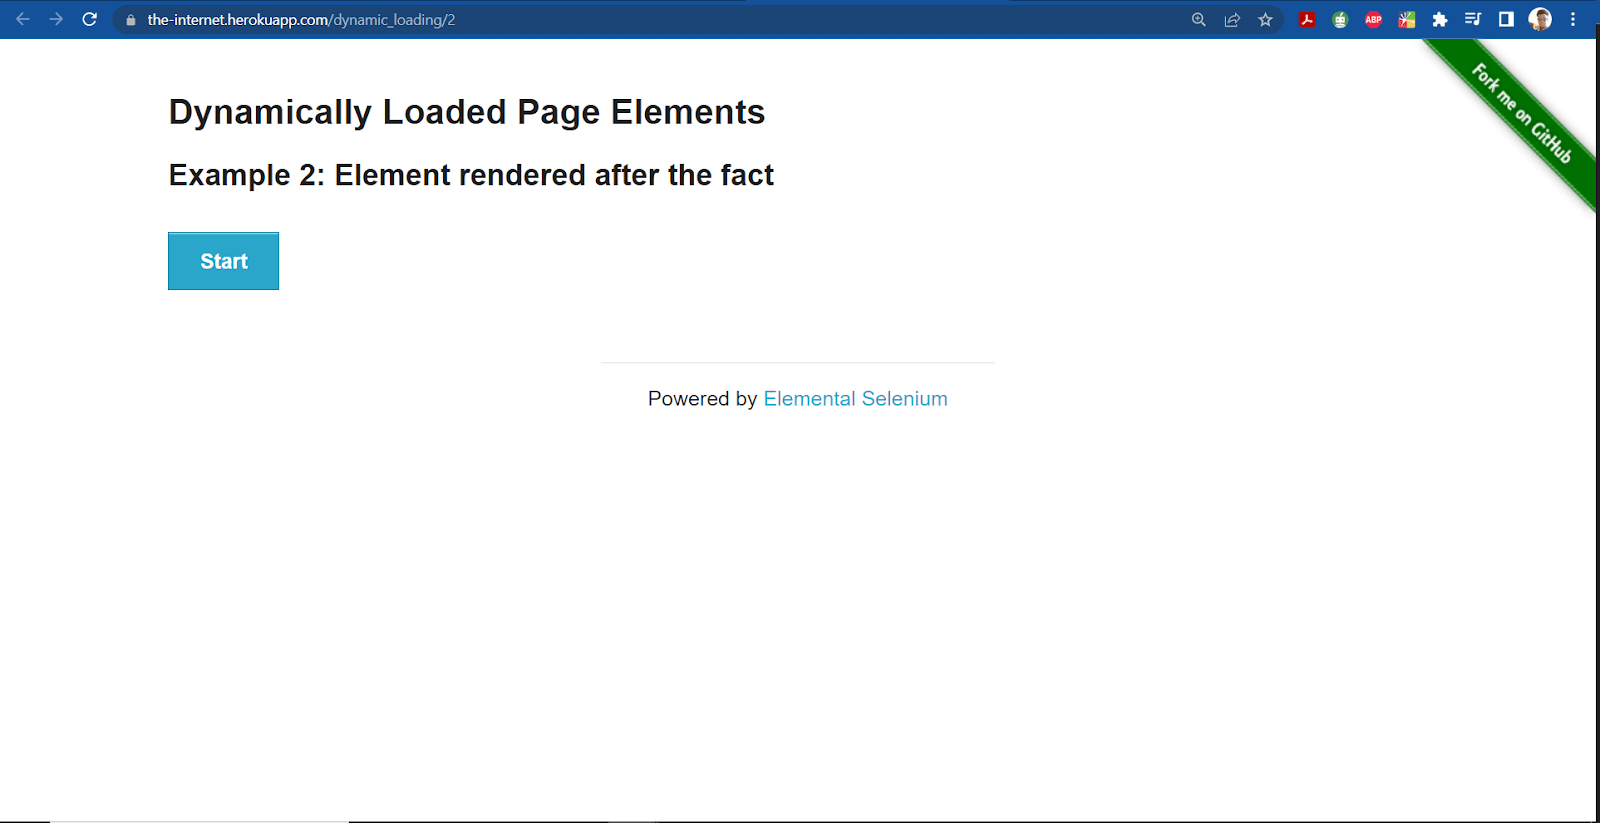
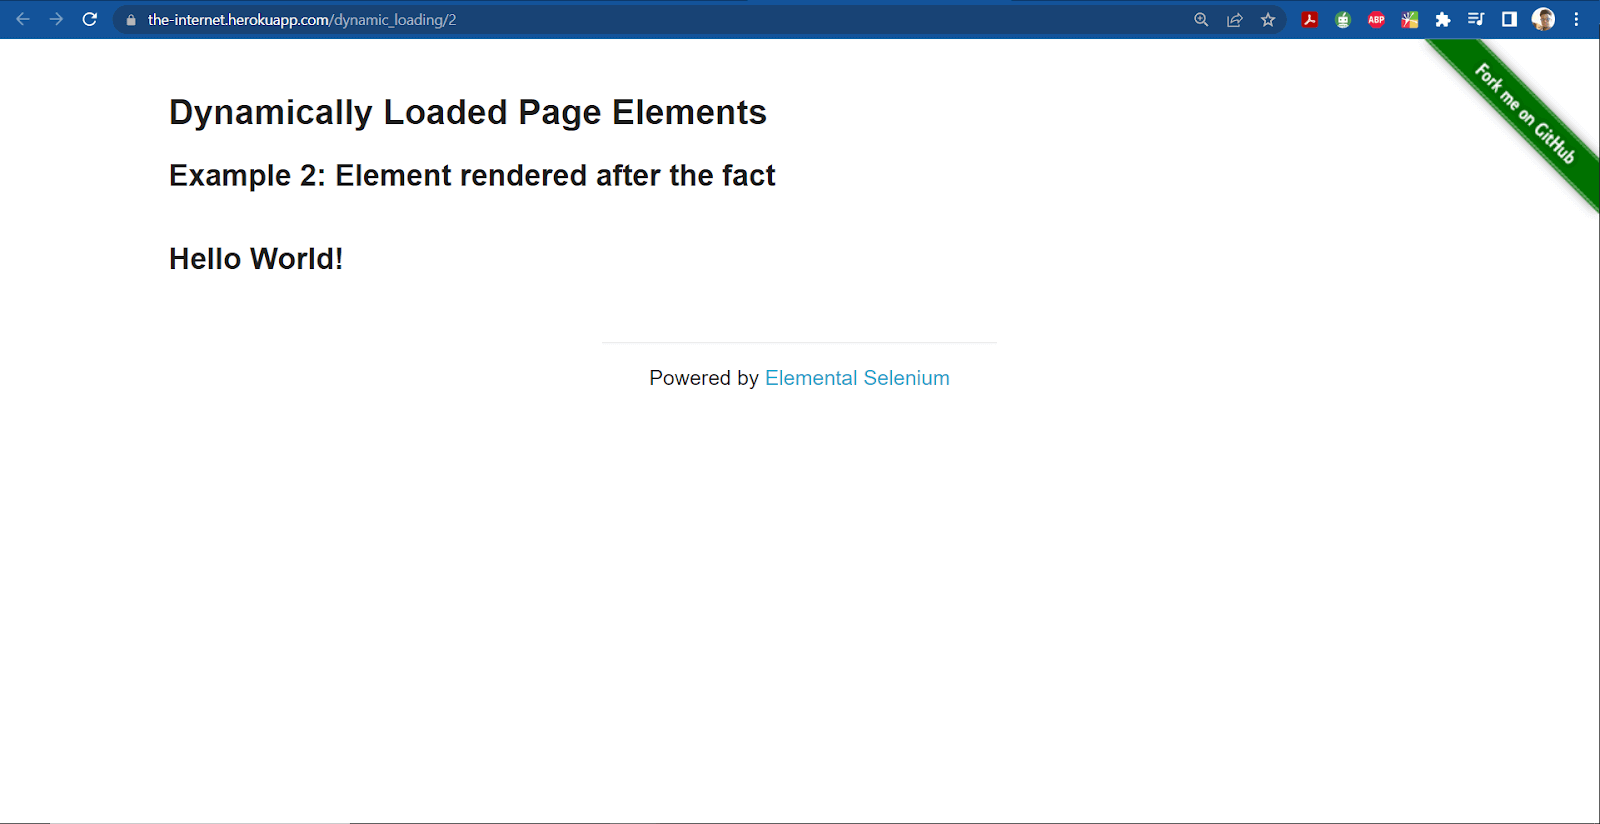
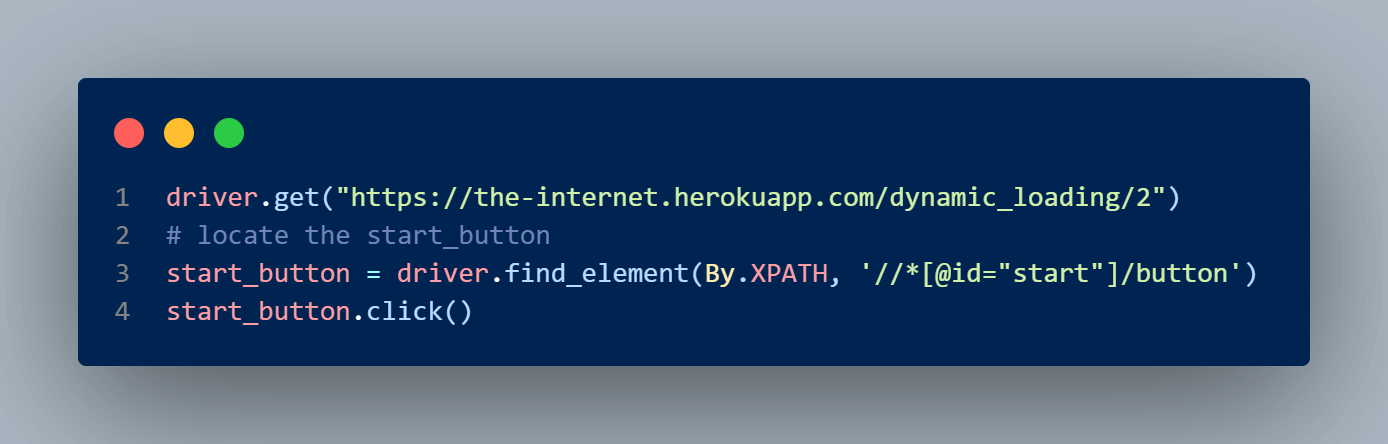
Test Case:
- Navigate to the Internet HerokuApp link.
- Click on the Start button and wait for the web page to load.
- Print the response displayed.
Implementation (Test Case on the Chrome Browser):
Code Execution:
Run the command below in the terminal to execute the test script.
|
1 |
python -m pytest test_handling_dynamic_content.py |
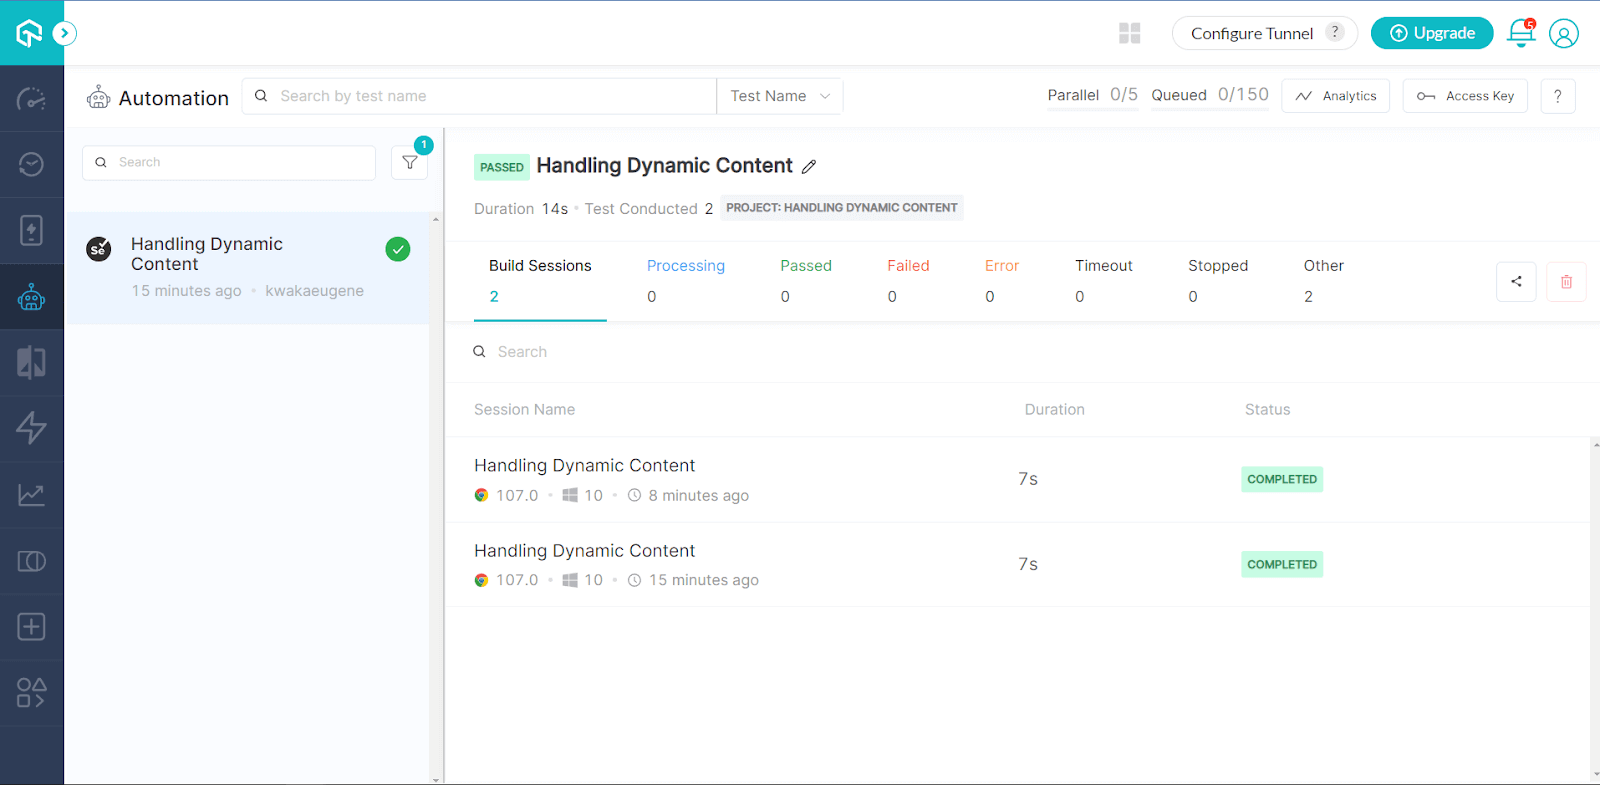
Once the test runs, the following output will be displayed in the terminal.

We can see the status of the test execution and logs in the LambdaTest Automation Dashboard.
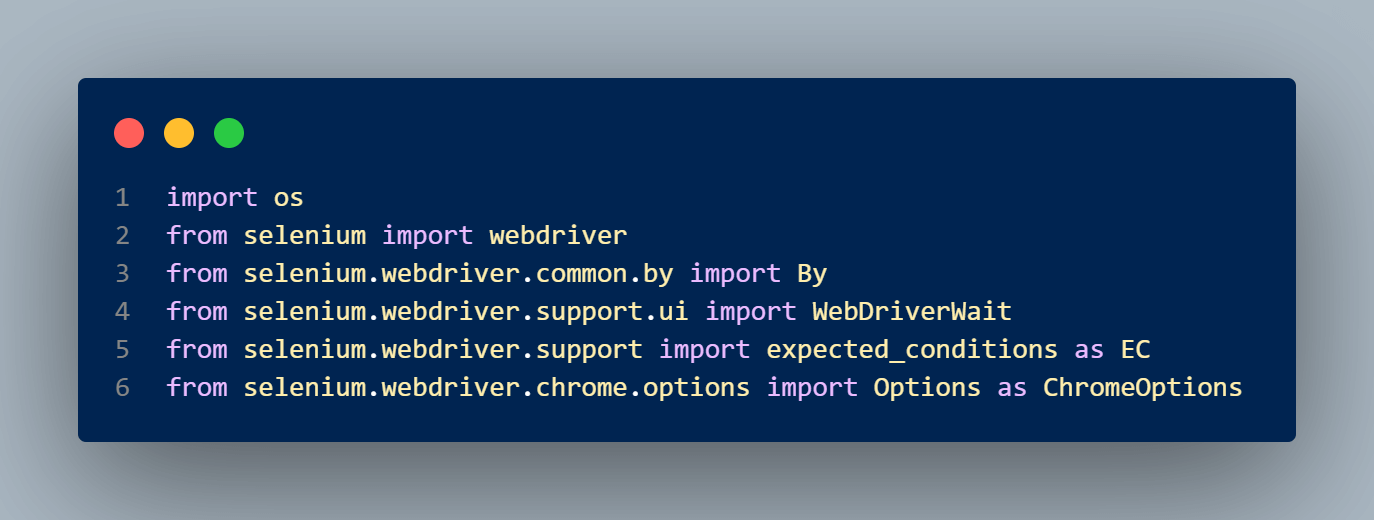
Code Walkthrough:
Step 1: Import the necessary Selenium libraries to run the test script, including the WebDriverWait class and expected_conditions that provide the explicit wait.
The WebDriver navigates to the website using the driver.get() method, locates the start_button element using its XPath in the Inspect Tools, and clicks on it.
Step 2: Using the WebDriverWait class, the WebDriver waits for the visibility of the response (finish_element) using an explicit wait. Once the element is present in the DOM, we print its text. The WebDriver will raise a TimeoutException, and the code will stop running if the finish_element is not visible in the DOM after the explicit wait period. The exception can be caught using a try-except block.
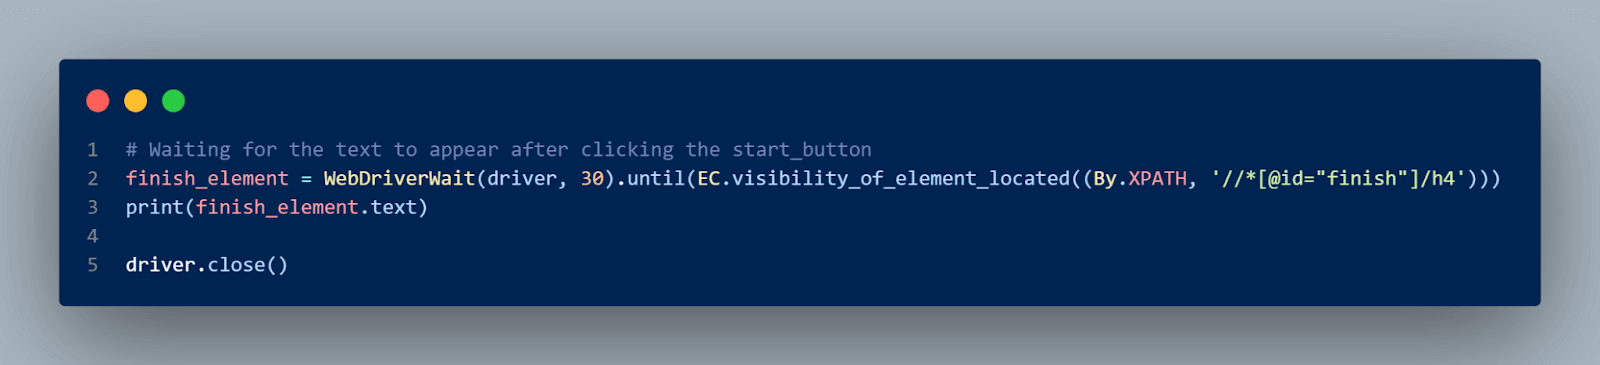
Step 3: Finally, the driver.close() method ends the WebDriver session.
Uploading Files
Uploading a file involves searching for a file at the required location or on your computer and uploading it to the website. This action can be done on specific websites, such as forms, document uploaders, and registration pages.
Uploading files can be challenging when performing automation tests with Selenium Python. The file dialog box that appears when you click the upload button is a native OS-level component and can be difficult to interact with programmatically, making it difficult to simulate the file selection process.
Additionally, different web applications might support various file formats for upload, and the same file upload element might behave differently depending on the file type. This can make writing reliable tests that function across several programs and file types difficult.
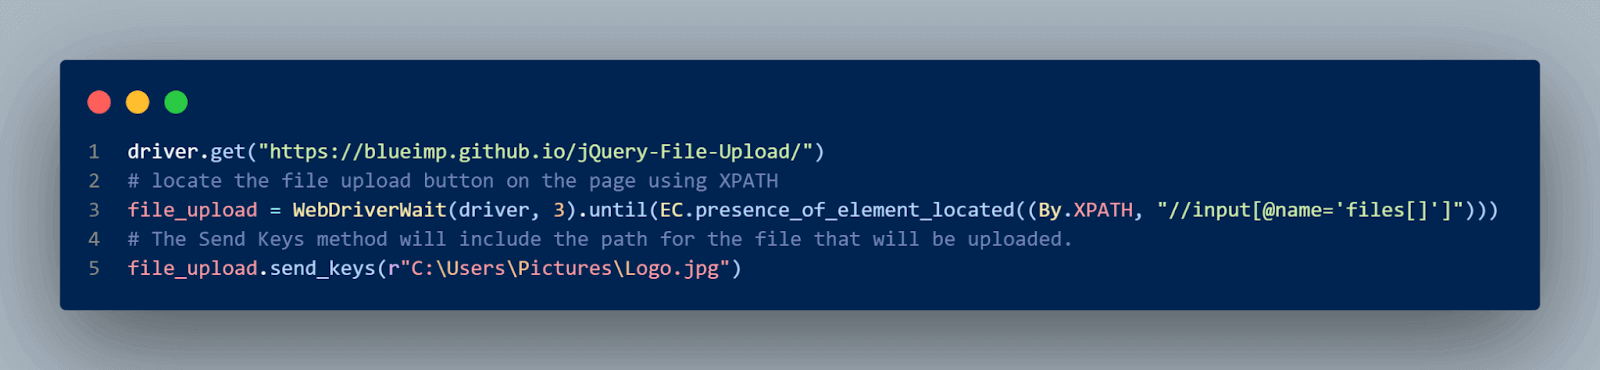
To handle this challenge, we will use the send_keys() method to upload the file. This approach is applicable to file upload elements with the tagname input and the type attribute set to the file. The send_keys() method will take the absolute path of the file as its argument and upload it to the web application we are testing.
Demonstration: How to Upload a File with Selenium Python
Let us look at a scenario for uploading a file when conducting automation testing with Selenium Python.
Test Case:
- Navigate to the jQuery File Upload Demo page.
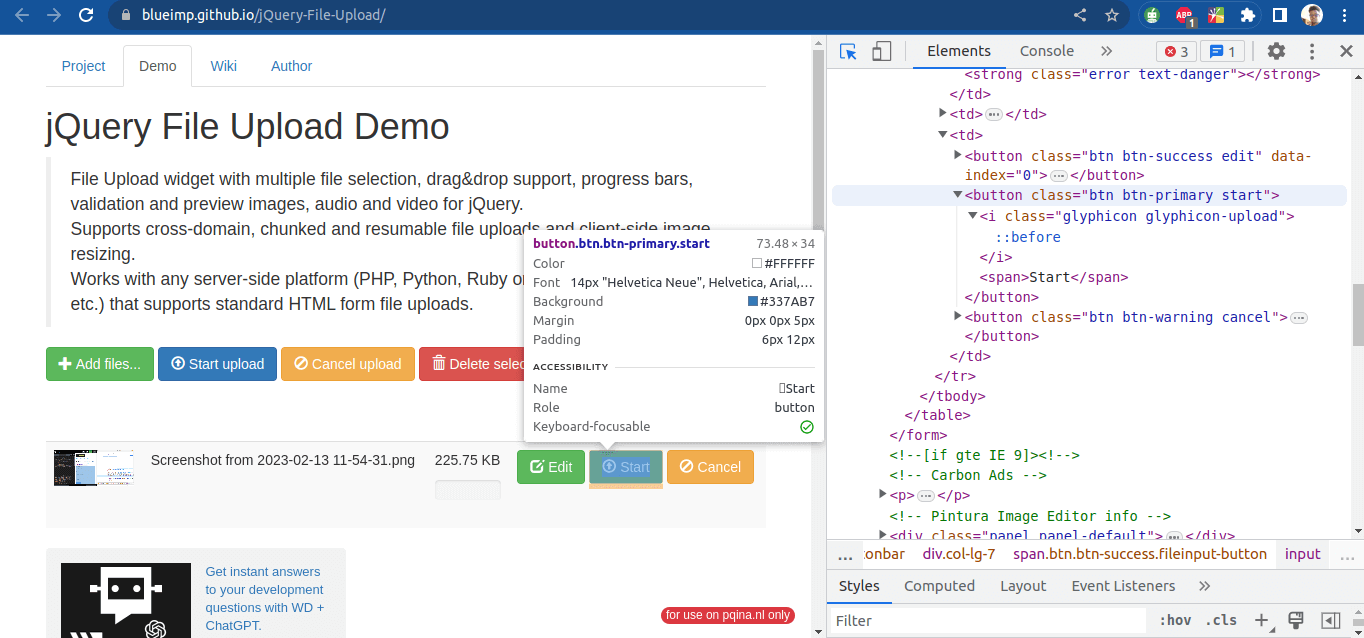
- Locate and click on the Add files button on the webpage.
- Choose a file you want to upload and click on Open.
- Click on the Start button to upload the file.
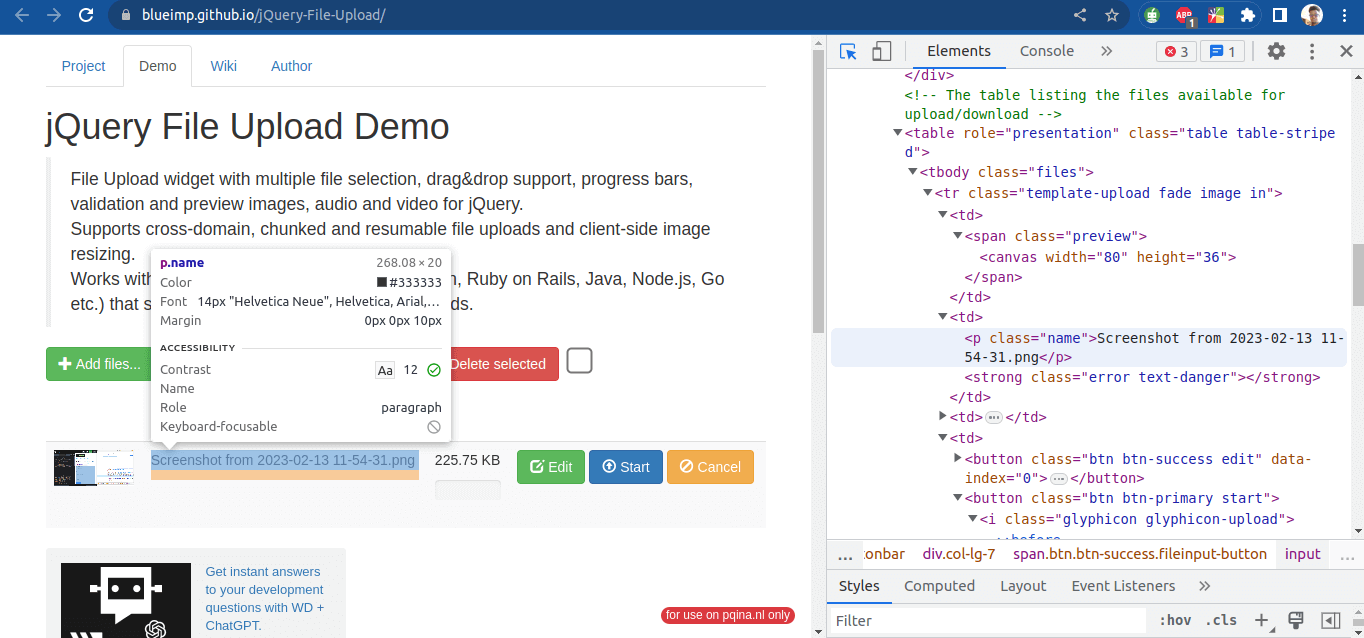
- Print that the file has been uploaded successfully.
Implementation (Test Case on a Chrome Browser):
Code Execution:
Let us run the test script in the terminal with the following command:
|
1 |
python -m pytest test_upload_files.py |
The test executes successfully and returns the following output in the terminal.

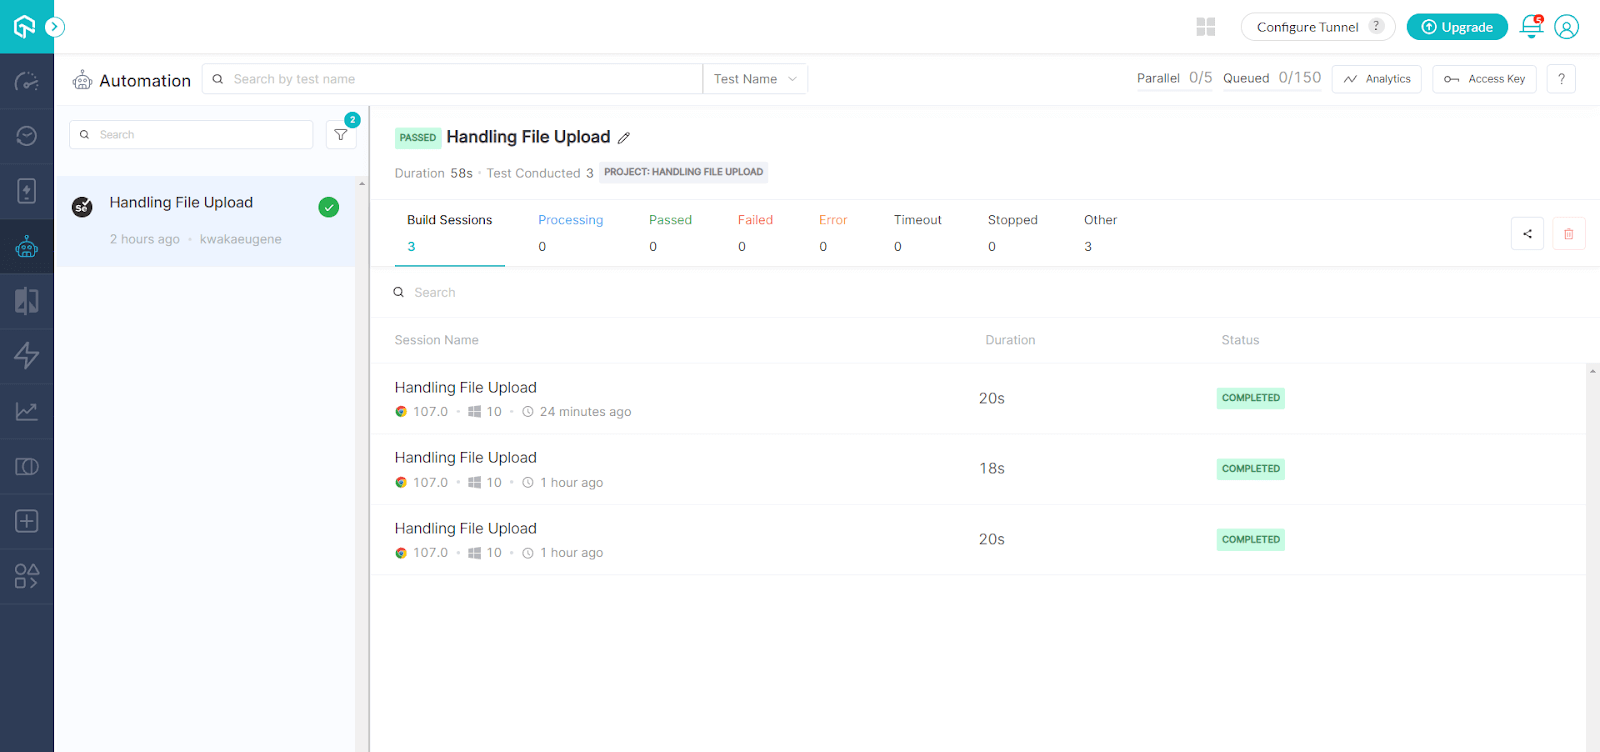
The test execution status can be viewed on the LambdaTest Automation Dashboard.
Code Walkthrough:
Step 1: After creating an instance of the WebDriver, we navigate to the URL link using the driver.get() method. The file_upload element is then located using XPath. To upload a file, the send_keys() method takes an absolute path from the operating system’s directory, where the file is stored as its argument. The file_upload element has a tagname of input and a type attribute of the file; hence, we could use the send_keys() method to upload the file.

Step 2: We locate the start_upload button element by using an explicit wait to wait for the element to appear on the DOM after the file is selected from the file upload window. Once the button appears, we click on it to upload the file to the website.

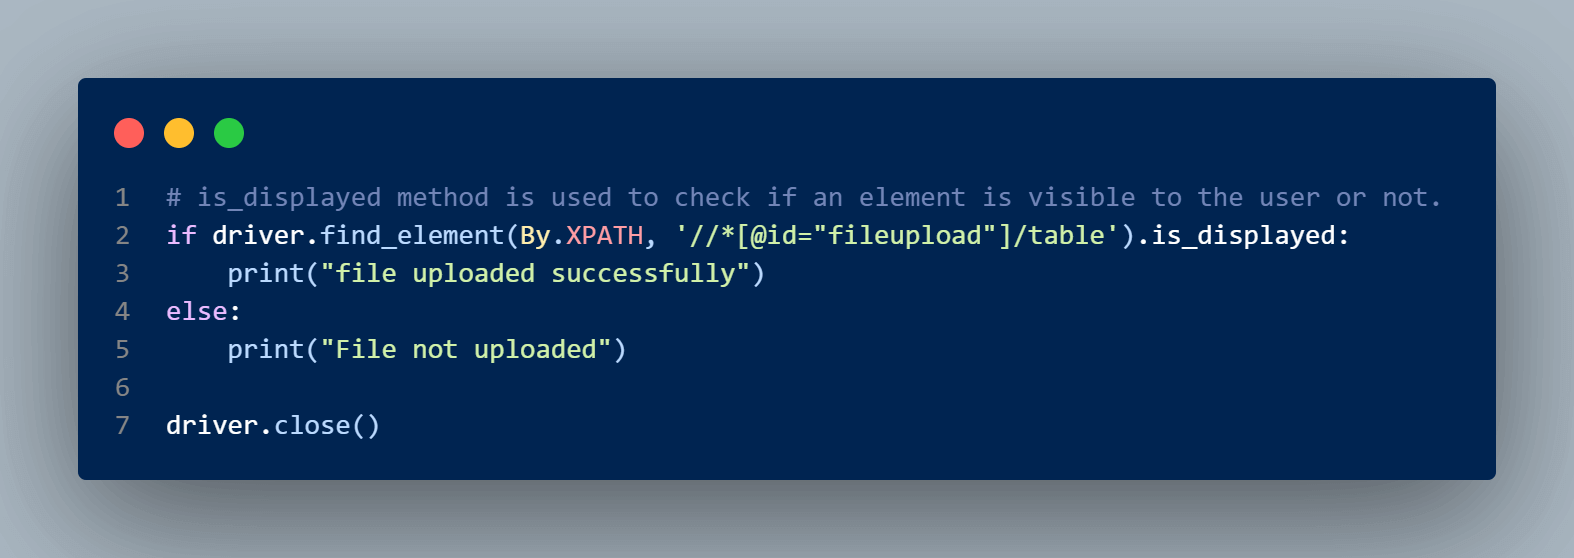
Step 3: To check if the file uploaded is in the web application’s DOM, we use the is_displayed() method. If the uploaded file is present, we print that the file has been uploaded successfully. If not, the test prints that the file has not been uploaded. Finally, the WebDriver is closed using the driver.close() method.
If you want to automate user actions on a website to verify its functionality, commands for WebElements in Selenium Python play an important role. These commands can help you automate website testing in a more detailed manner. It’s recommended to run Selenium tests on real browsers, and operating systems will help you get accurate results.
Digital experience testing platforms like LambdaTest enables developers and QA to perform automated Selenium testing using Python on an online browser farm of 3000+ real browsers and OS combinations. LambdaTest offers support for different Python testing frameworks, including pytest, Robot, Behave, and more. In addition, you can perform parallel test execution to expedite your software release cycle.
Visit our support documentation to get started with Selenium Python testing.
Run Python Test Scripts across 3000+ browsers & devices. Try LambdaTest Now!
Conclusion
In this blog on WebElements in Selenium Python, we have demonstrated different ways to handle WebElements in Selenium Python. These include handling alert pop-ups, drag-and-drop operations, jQuery datepickers, hover elements, AJAX forms, etc. We have also looked at the approaches to handle them, such as the use of explicit waits, the ActionChains class, Select, and send_keys methods.
Frequently Asked Questions (FAQs)
1. What are the WebElements in Selenium?
WebElements in Selenium are HTML elements that make up the content of the website. The WebElement interface in Selenium lets you interact with both visible and invisible elements on a web page.
2. How to get WebElements in Selenium Python?
To get WebElements in Selenium Python, you can use the find_element_by method. It allows you to get WebElement using different methods like ID, class name, name, etc.
3. How to locate WebElements in Selenium Python?
To locate WebElements in Selenium Python, you can use the following methods: find_element_by_id, find_element_by_name, find_element_by_xpath, find_element_by_css_selector, etc


Author’s Profile
Eugene Kwaka
I am a Software Developer with a background in Python(Django) and a tech enthusiast who loves writing and researching different topics on emerging trends in technology. I am keen on Software Testing, Backend Software Development, and best practices. I love tooling around and getting my hands dirty by building and learning new projects. If I’m not coding, you’ll find me traveling, listening to music, or trying different foods.
Blogs: 3
Got Questions? Drop them on LambdaTest Community. Visit now


