How to Handle Modal Dialog Box in Selenium WebDriver Java
Vipul Gupta
Posted On: March 20, 2024
![]() 317561 Views
317561 Views
![]() 22 Min Read
22 Min Read
Websites frequently implement popups, alerts, or modal dialog boxes for various use cases, such as accepting cookies, asking for permissions, entering data, and warning alerts. Most of these popups, which at times are multiple, appear on the homepage for the website under test and need to be handled/closed till the parent page is accessible to interact with and the actual test flow can begin.
If you have yet to work on these or automate them, this blog is for you. In it, we will learn how to handle modal dialog box in Selenium WebDriver Java with practical examples.
This blog will cover handling Bootstrap dialog boxes, pop-up windows/tabs, and alerts. I will start with the basics of modal dialog boxes and then demonstrate how to handle modal dialog box in Selenium WebDriver Java.
TABLE OF CONTENTS
How to Handle Modal Dialog Box in Selenium WebDriver Java?
In this Selenium Java tutorial, we will learn what is a modal dialog box and demonstrate how to handle modal dialog box in Selenium WebDriver Java.
What are Modal Dialog Boxes?
A modal dialog box (also referred to as a Bootstrap modal window) is built into the Bootstrap framework, which is why it gets displayed on top of your current page. Due to this, modal boxes need to be interacted with first before moving to the current webpage.
The Bootstrap framework is open-source and considered one of the best CSS frameworks. It is used in web development, especially for building responsive web layouts. It contains HTML, CSS, and JavaScript.
A modal dialog box written with Bootstrap is formed with three key components, namely,
- A trigger element: It triggers the modal window to be shown on the web page. It can be any link on the web page, any button, etc.
- Modal: It is like a holding area for the actual modal window code that will appear when the trigger element is interacted with.
- Modal content: It is the actual code and the content with which the window is formed and displayed according to the implementation.
So, while automating any modal window, we first fetch the modal using our WebDriver and then identify its modal content to perform actions.
Demo: Handling Modal Dialog Box in Selenium WebDriver Java
Having developed a basic understanding of the modal dialog box, it’s time to learn how to handle modal dialog box in Selenium WebDriver Java through a demo and see how it works in real-time.
Before that, you can also refer to our video to learn how to handle modal dialog box in Selenium WebDriver Java.
You can also Subscribe to the LambdaTest YouTube Channel and stay updated with the latest tutorials around Selenium testing, Selenium WebDriver, and more.
Please note that we will use this same project setup and add more test class files as we proceed. So, do the setup carefully on your machine for implementation purposes.
Step 1: Choose the IDE on which you want to do the setup. In this blog, Eclipse IDE is being used. You can follow the same steps if any other IDE has opted. If you are using IntelliJ, you can go through this blog on building and executing Selenium Projects.
Step 2: Create a Maven Project in Eclipse and name it ModalDialogBoxSeleniumJava.
Step 3: Update the pom.xml file to have Selenium (as it will be a web automation project using Selenium RemoteWebDriver) and TestNG dependencies (to create test flow and execute test cases using annotations).
Step 4: Now, inside the src package, add a package and name it as test. This will contain all the test classes created in this project.
Step 5: Inside the test package add a Java class file and name it BaseTest.java. This file will have basic driver functions like initializing the driver, quitting the driver, etc.
In this blog on how to handle modal dialog box in Selenium WebDriver Java, we will be using the TestNG framework for test execution. The reason is that it is widely supported for Selenium Java testing and provides an easy way to write and manage test automation scripts with annotations.

We have created BaseTest as the first file, which will have the code to initiate the browser session for Selenium automation, handle the code for browser setup, and close it after test completion. Our test classes will inherit this code, thus preventing redundancy and providing an abstraction of driver code from every other class user.
Inside the BaseTest, we will add two functions: one to initialize the driver and create an instance and another to close it once the test cases are executed.
We will execute the code on an online Selenium grid using an instance of Selenium RemoteWebDriver.
Along with the advantages of Selenium Grid, like executing multiple cases across various browsers and OS, a cloud grid offers speed and scalability, making executions faster and more reliable.
An example of one such online Selenium Grid is LambdaTest. LambdaTest is an AI-powered test orchestration and execution platform that lets you perform automated testing at scale with over 3000+ real devices, browsers, and OS combinations.
Code Walkthrough: BaseTest.java
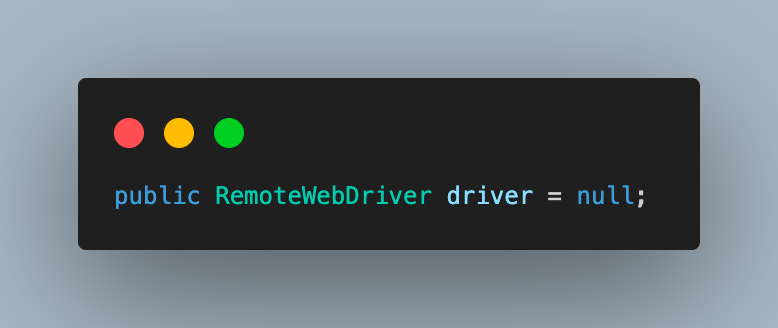
Step 1: Create an instance of RemoteWebDriver and initialize it to null.
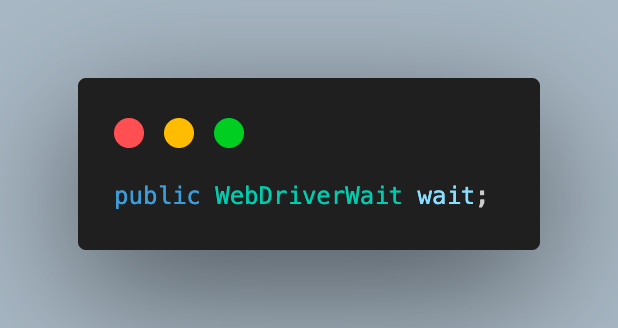
Step 2: Create an object of the WebDriverWait class. Once the driver instance is created, this object will be initialized. We will use this explicit wait object to implement necessary wait conditions in the test cases. To learn more about explicit waits, read this blog on the types of waits in Selenium.
Step 3: Next would be to add the LambdaTest Username and Access Key for your account to be used to run the script. You can find these details in your LambdaTest Profile section by navigating to Account Settings > Password & Security.

You can configure the Username and Access Key as environment variables in your system and fetch them in the automation script.
The following commands can be used to configure these.
For Windows:
|
1 2 |
set LT_USERNAME=LT_USERNAME set LT_ACCESS_KEY=LT_ACCESS_KEY |
For macOS and Linux:
|
1 2 |
export LT_USERNAME=LT_USERNAME export LT_ACCESS_KEY=LT_ACCESS_KEY |
Step 4: After that, add the first method in this file as setup(), which would be used to set initial capabilities for the browser and launch the grid with the given credentials. Annotate it with @BeforeTest annotation in TestNG to execute it before each test case for driver setup and opening the webpage.

In this function, create an object of the ChromeOptions class, which is used to define browser properties like browser version, OS version, etc.
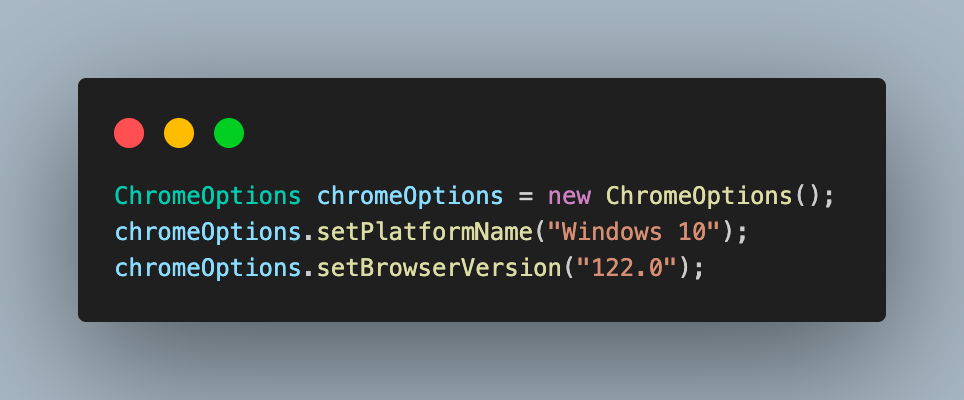
Next, define some variables for test execution on LambdaTest. These variables are used to set values like build, name, or any other browser property, which will help to identify the run on the dashboard or modify behavior. This is done with the help of a HashMap variable, which is then passed to chromeOptions.
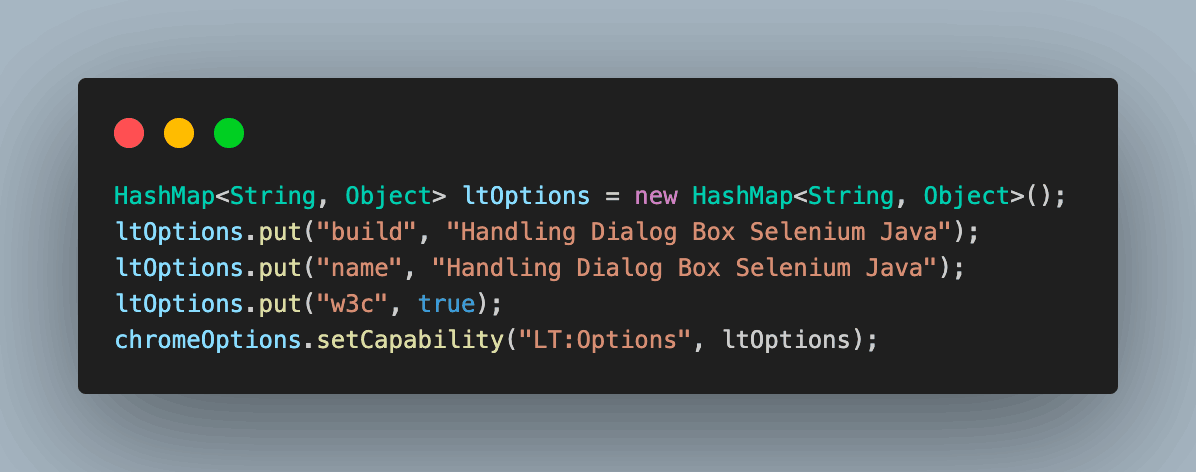
Another benefit of using LambdaTest is that all these browser properties can be easily retrieved using the Automation Capabilities Generator. You only need to select the required operating system, browser combination, and versions. The rest is done for you, and you have the code ready to use. This reduces the possibility of error and provides more valid combinations and data.

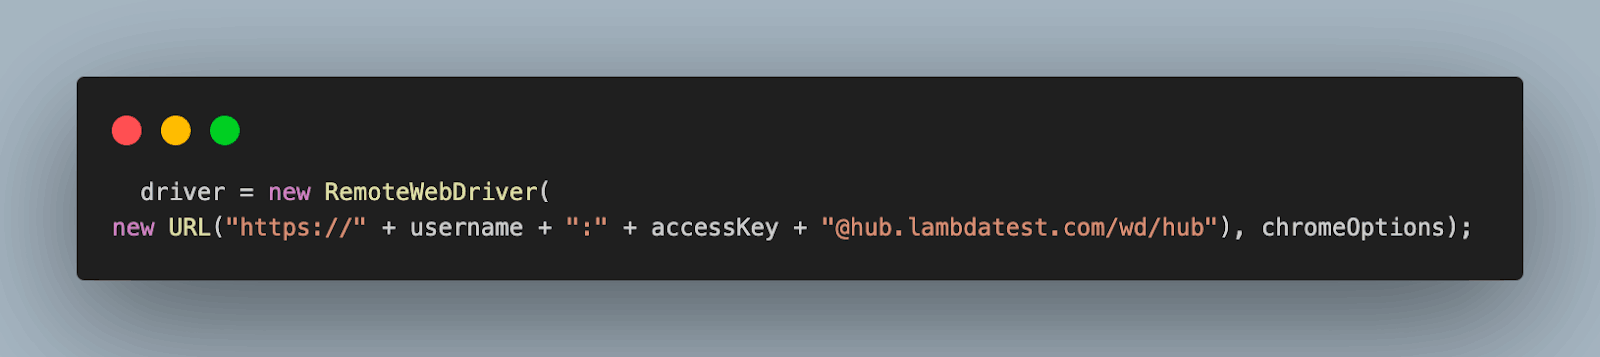
Finally, using all these properties, we create an instance of RemoteWebDriver to connect to the LambdaTest cloud grid and start execution. Your LambdaTest Username and the Access Key will be used in this step.
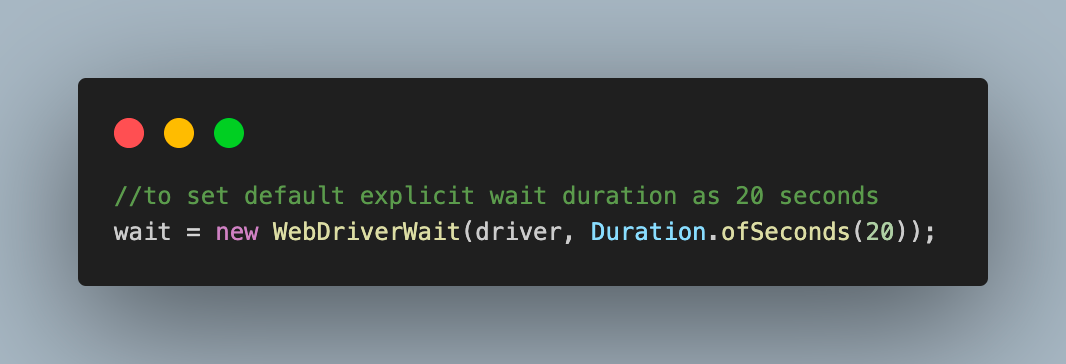
Lastly, initialize the WebDriverWait object with a default wait time of 20 seconds. It will wait for this time before throwing any exception when we use this object to wait in test cases.
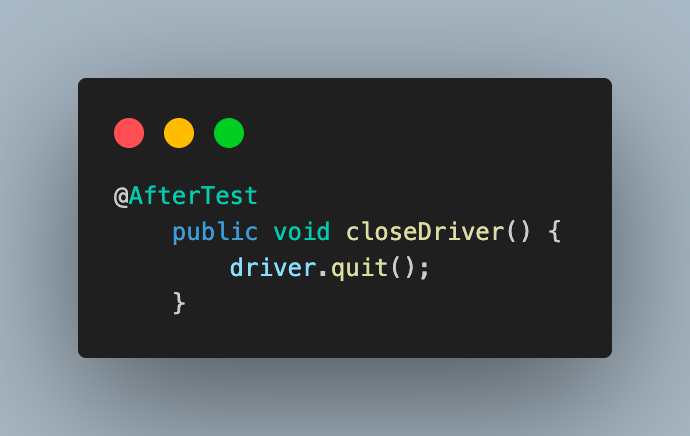
Step 5: Just like the setup() method creates the driver instance to be used for executing the script, it is a good practice to quit the current browser instance as soon as the case is completed. To implement this, add the next method as closeDriver() to quit the driver instance. This would have the @AfterTest annotation in TestNG, as the method with this annotation will be called after every test method has completed execution.
This completes the setup for our base implementation. Let’s move to the next section to implement and see how modal dialog box automation works.
Implementation: Handling Modal Dialog Box in Selenium WebDriver Java
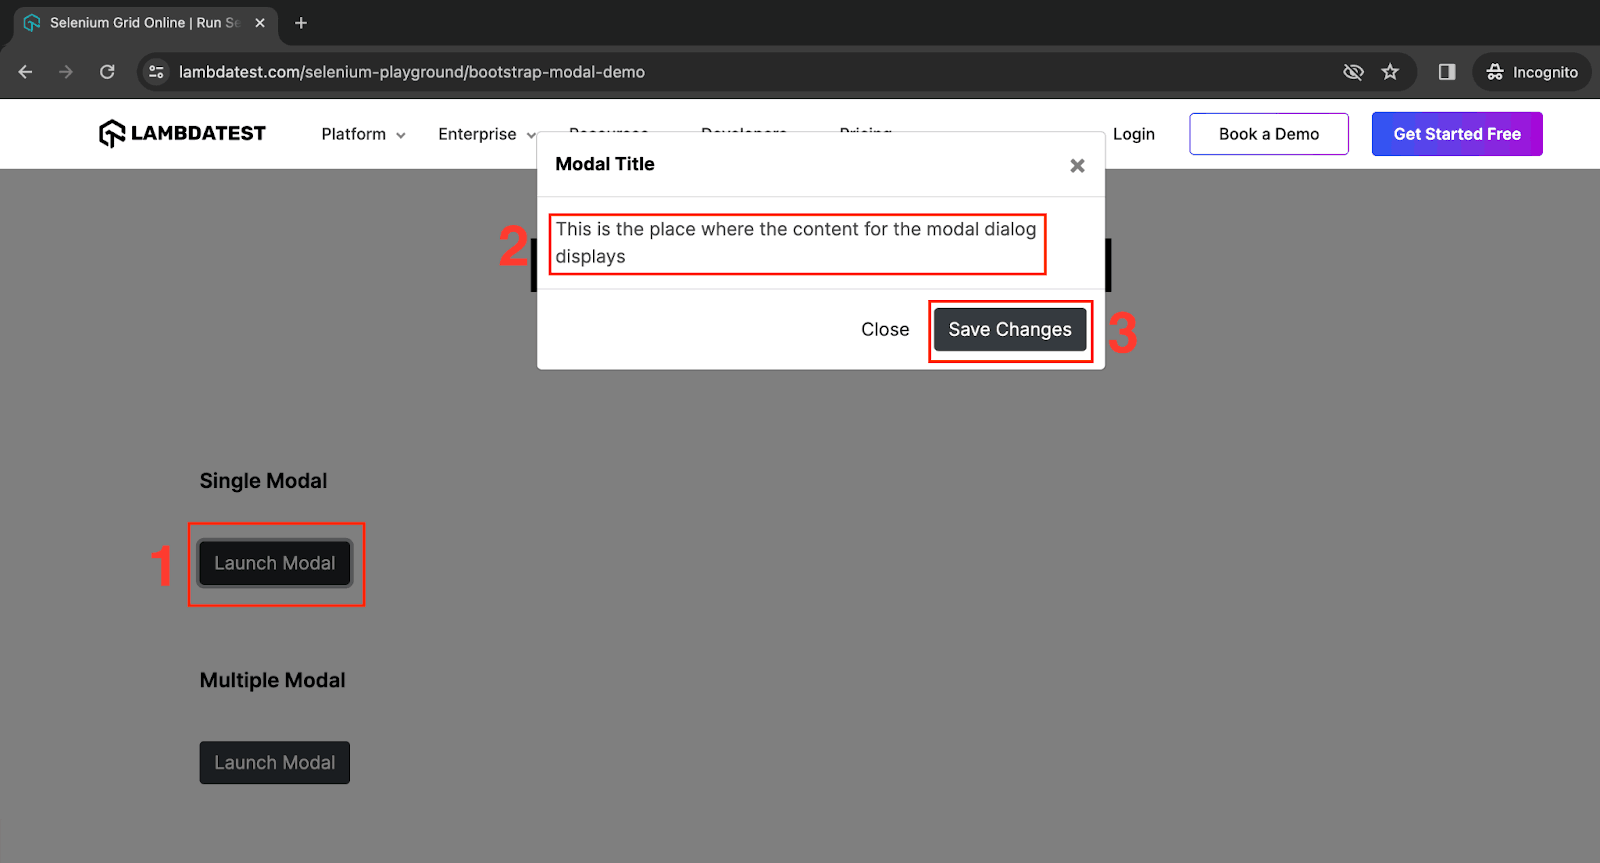
For this blog on how to handle modal dialog box in Selenium WebDriver Java, we will be automating the following flow:
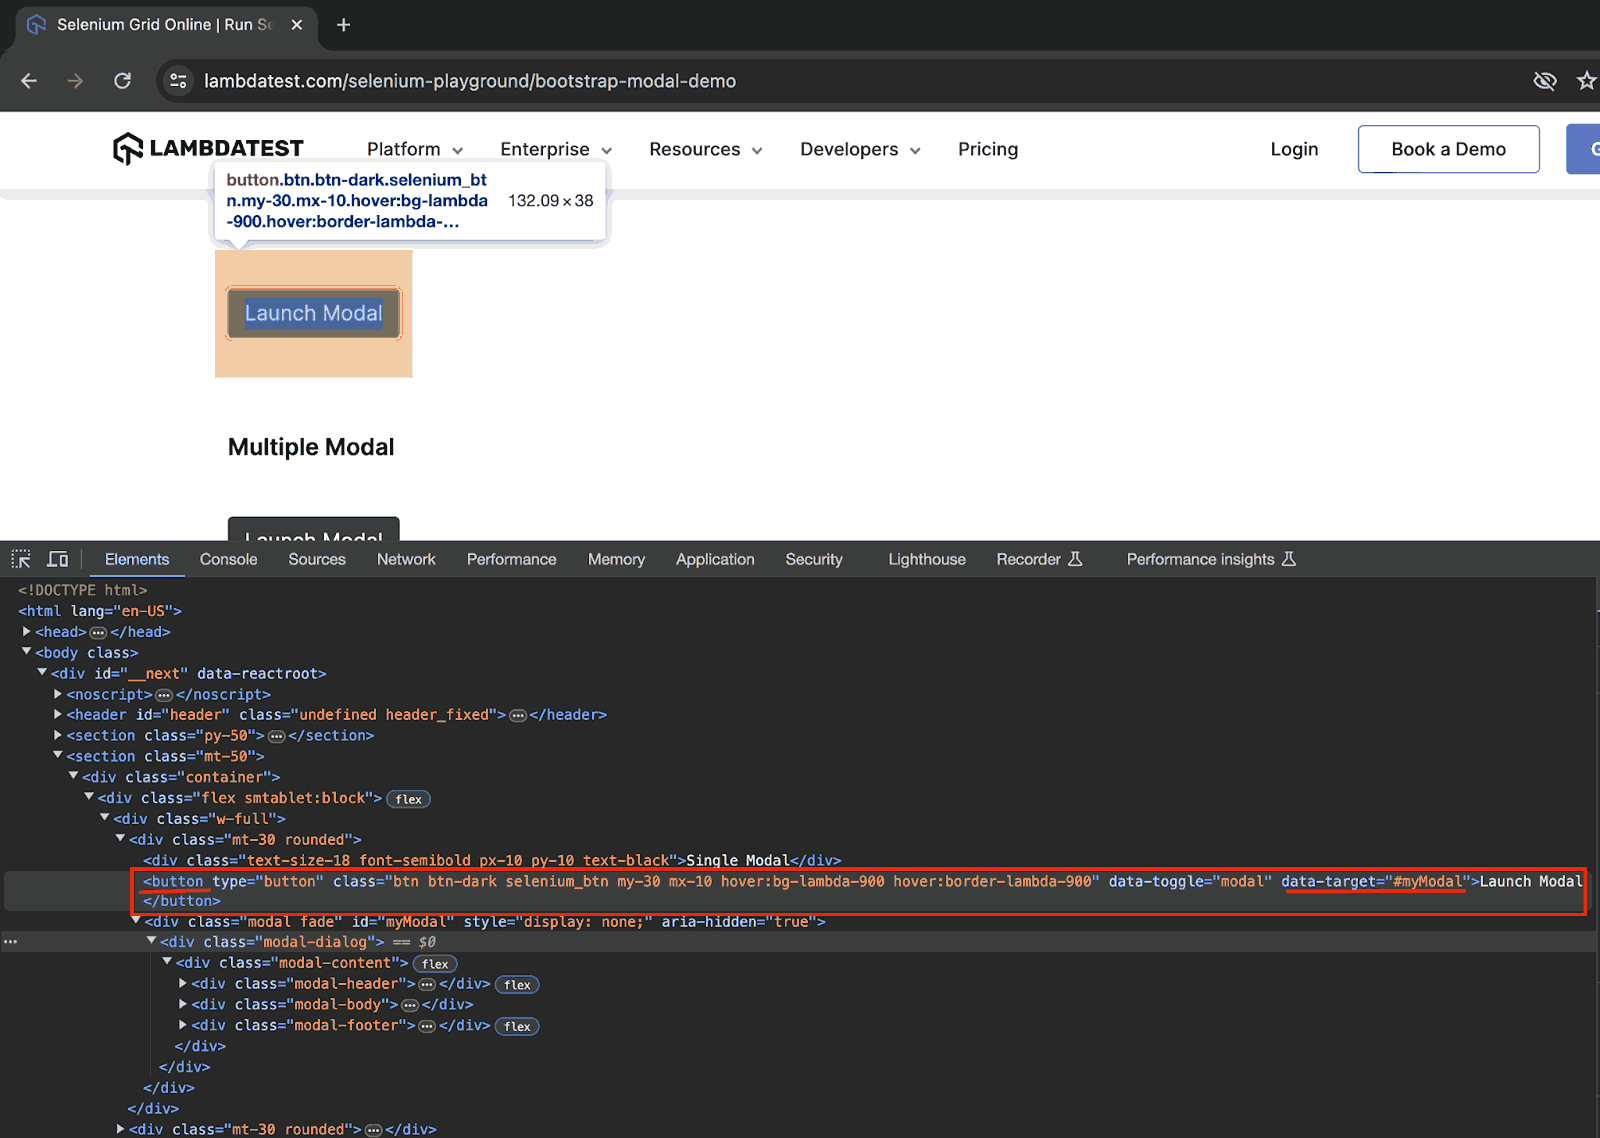
- Navigate to the Bootstrap Modal page on LambdaTest Selenium Playground.
- Click on Launch Modal under Single Modal.
- Fetch the modal container web element.
- Fetch the modal content web elements using the container element.
- Verify and interact with the modal dialog window.
Code Walkthrough: TestModalDialogBox.java
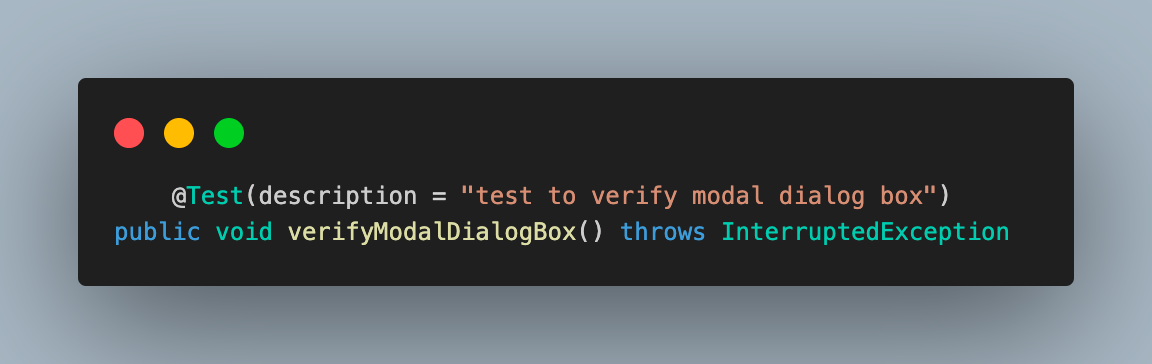
Step 1: Add the test case as verifyModalDialogBox() and annotate it with @Test annotation.
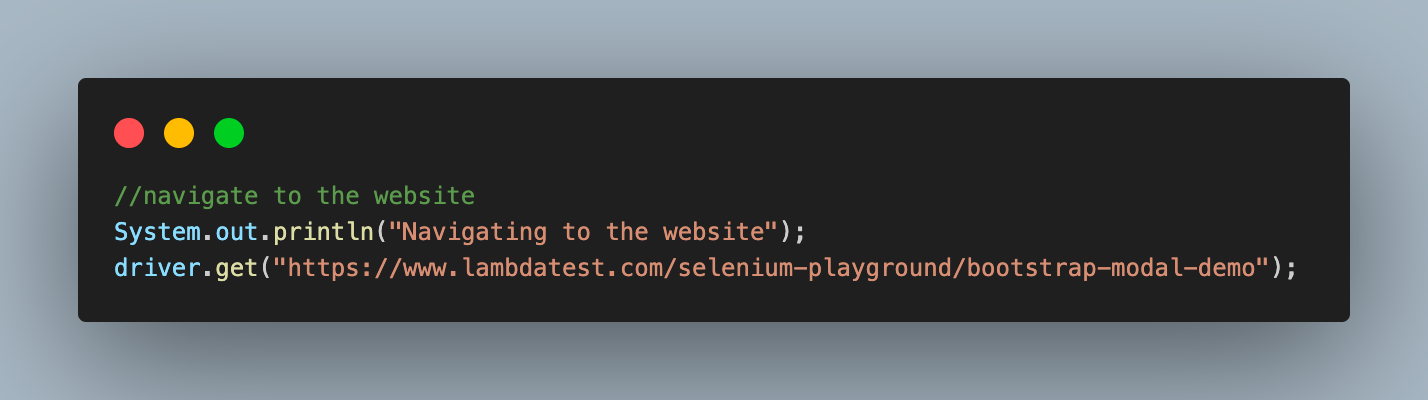
Step 2: Navigate to the URL on which we will have our modal dialog box to automate.
Step 3: Next, click on the button to launch the dialog box. As we learned, this is the trigger element that makes the dialog box appear.
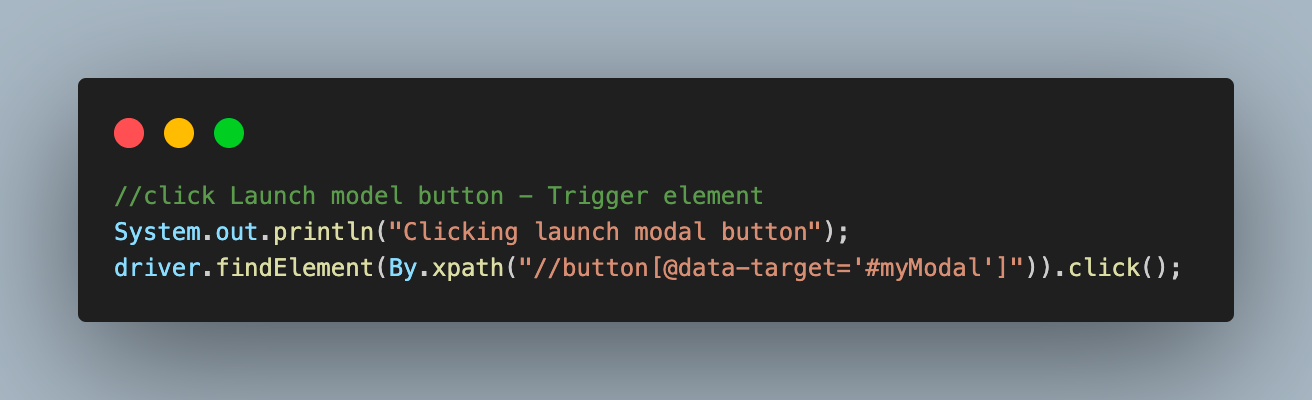
We use the XPath element locator to fetch the element using its tag and attribute key value.
Step 4: After clicking the button, wait for the modal box to be visible. For this, we have used the explicit wait object created in BaseTest.
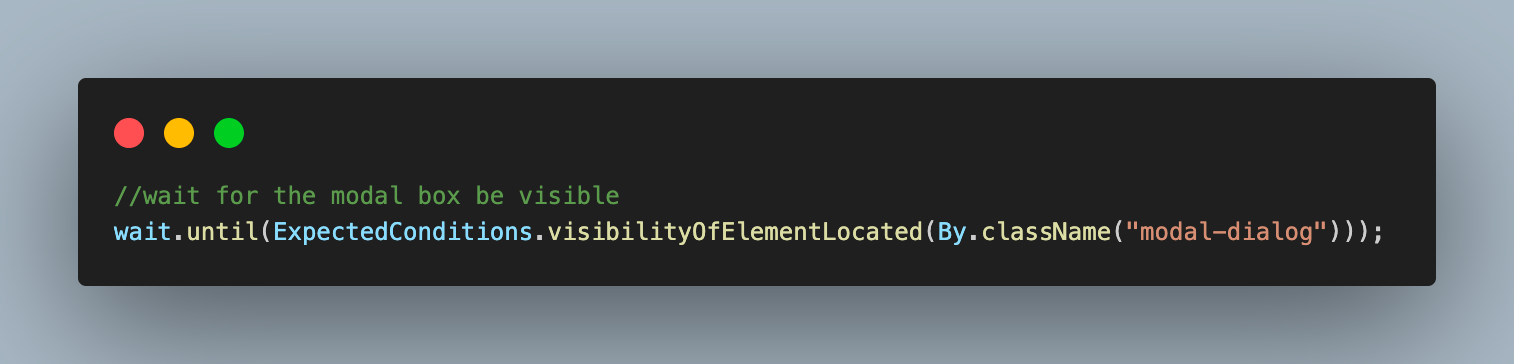
Using this wait object, we have implemented some ExpectedConditions functions to be fulfilled. Certain predefined conditions for it are in Selenium, of which we have used visibilityOfElementLocated(), which means waiting until the given WebElement is visible.
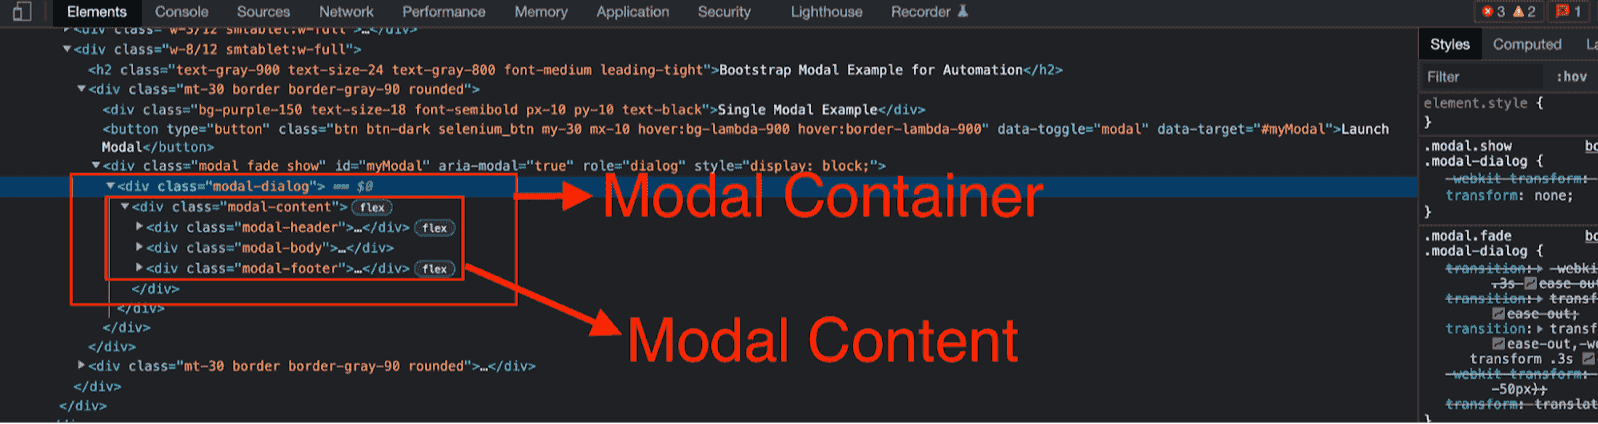
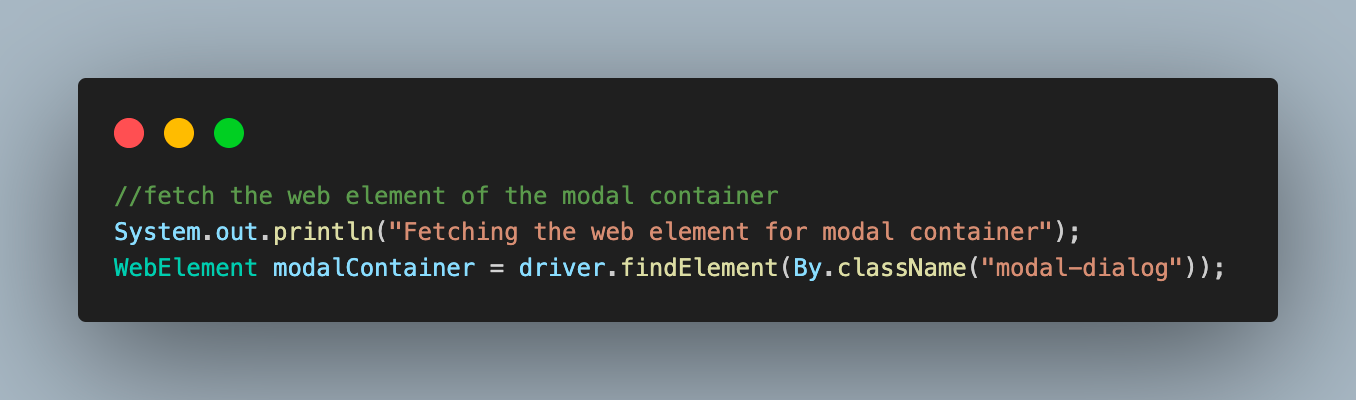
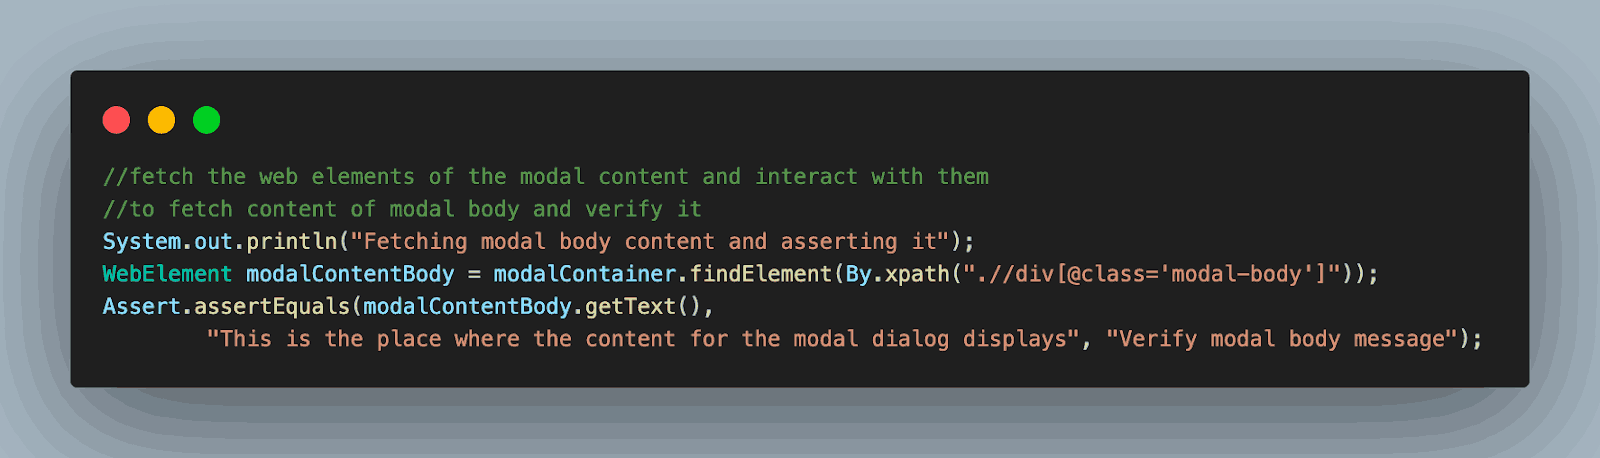
Step 5: Once the modal dialog box opens up, we fetch the WebElement of the modal container as we interact with the elements inside the modal dialog box container.
Step 6: Next, we fetch the modal dialog box WebElements to perform actions on their content. One important thing to note is how the WebElement for the model content is fetched.
For this, the WebElement identifier for the modal container is used in place of the driver, and the identifying XPath for the element starts with .//, which signifies that the corresponding element to be found is inside this element, i.e., inside the modal dialog box.
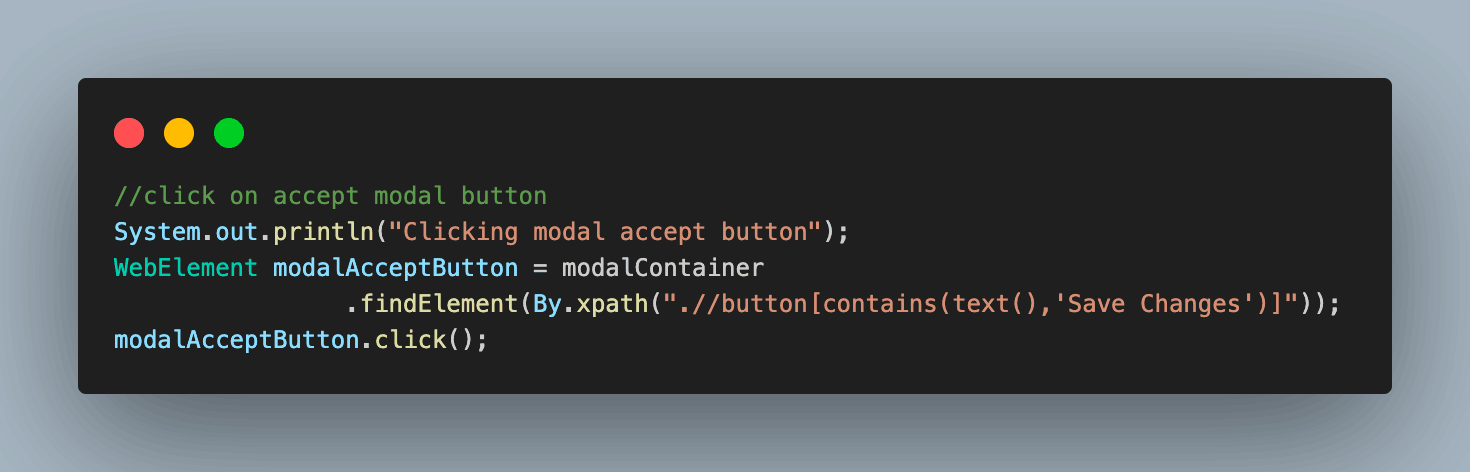
We use this approach to fetch and assert the content body of the modal dialog box.
And finally, accept it and close the modal dialog box.
To learn more about assertions, you can read our earlier blog on using assertions in TestNG or watch this video to learn what assertions are, the different types of TestNG assertions, and how you can use them while performing Selenium automation testing with TestNG.
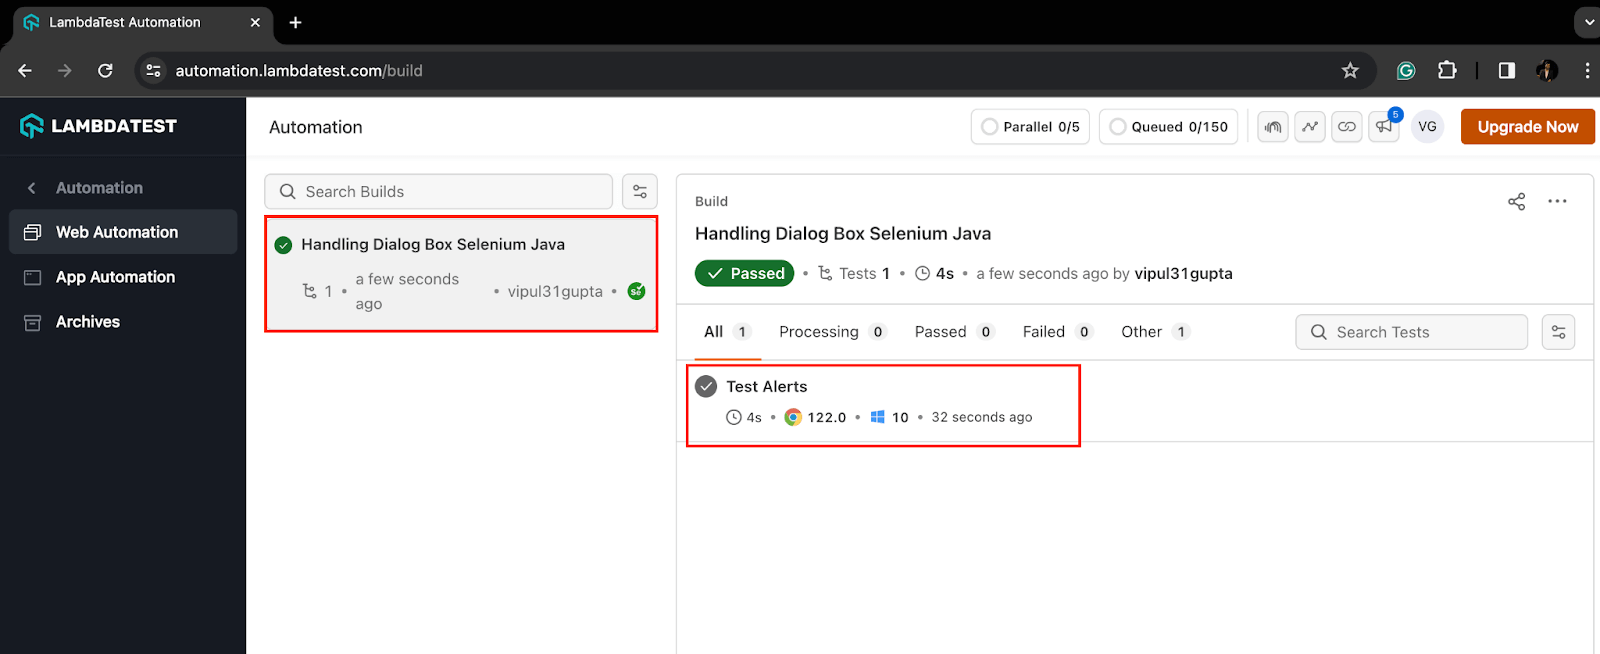
Test Execution and Result
Having understood the code implementation, let us execute the code using TestNG. Once successfully executed, you can see the following output on the IDE.

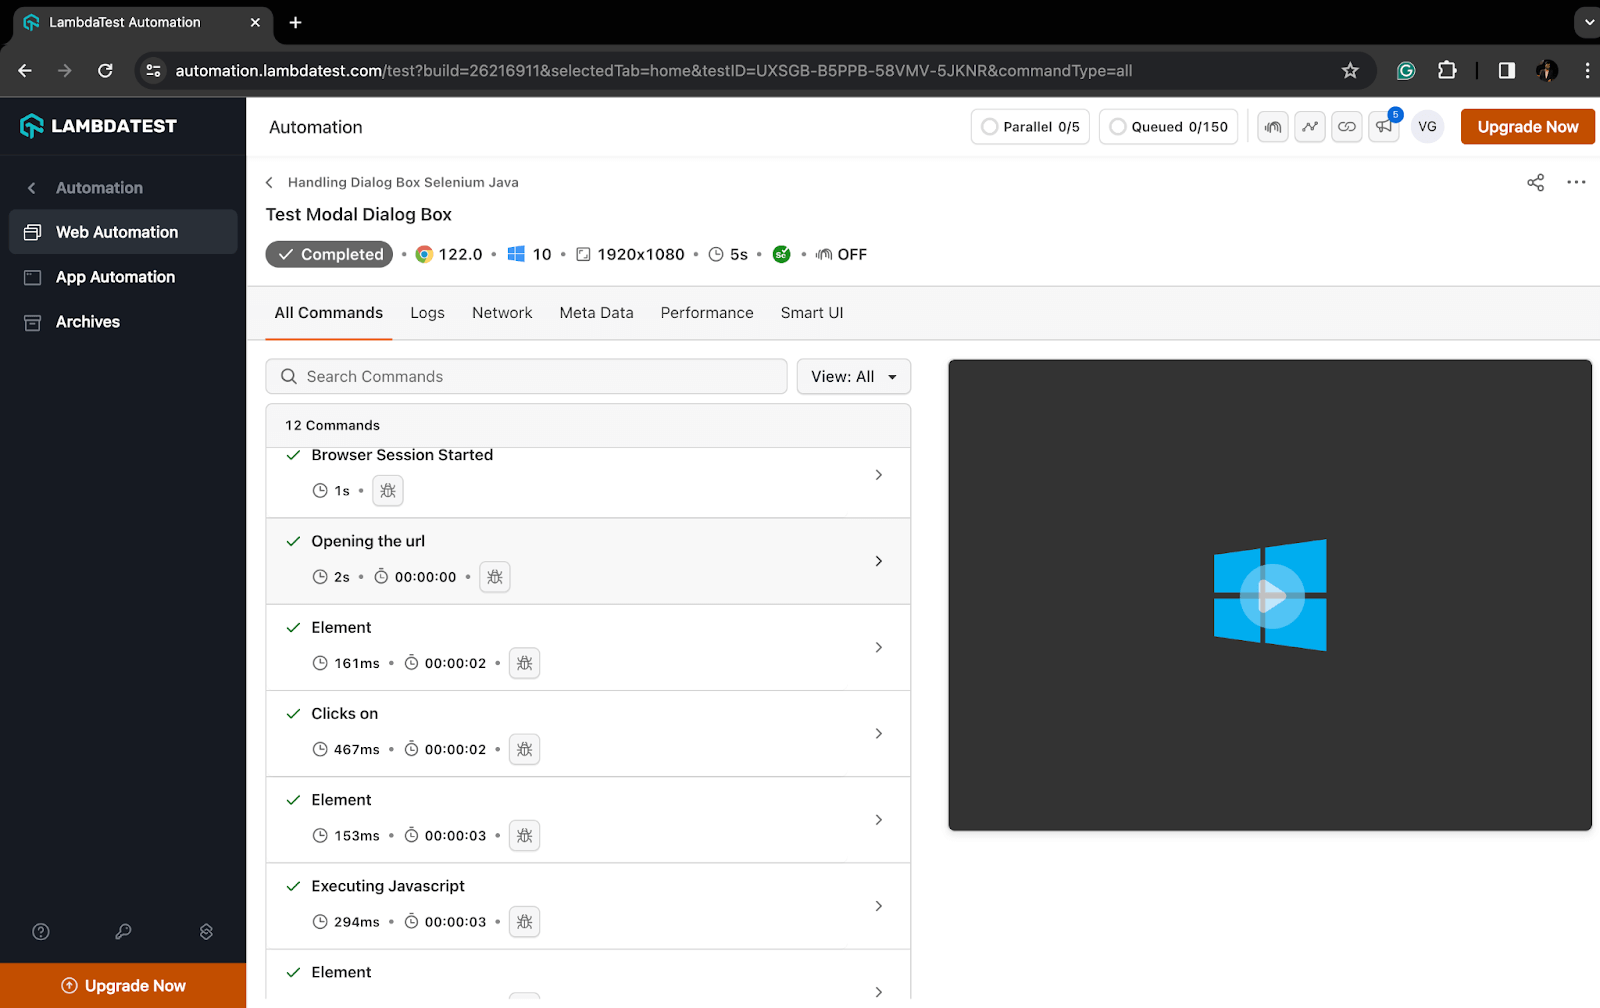
Since we executed the code on a remote grid using LambdaTest, execution logs, including video, automation script steps, and network and console logs, are also available on the LambdaTest Web Automation Dashboard.
Your executed test cases are under Automation > Web Automation on the Web Automation Dashboard.
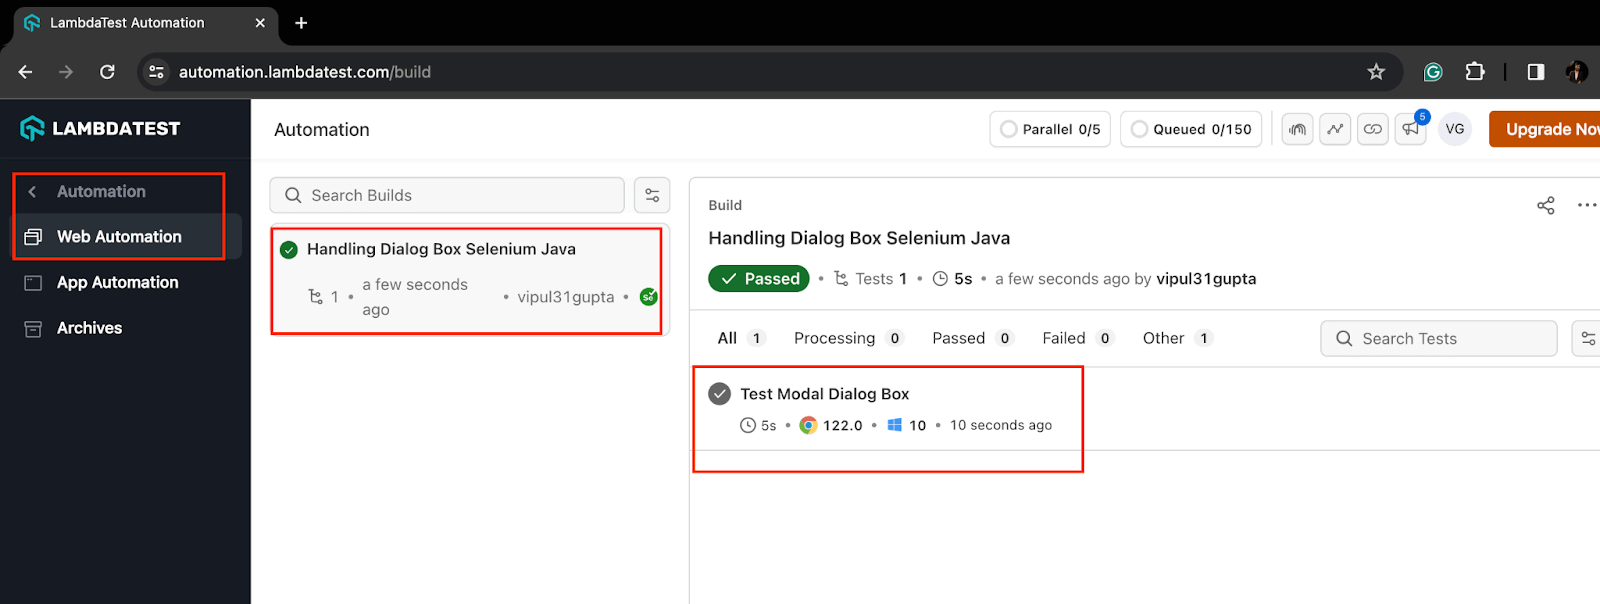
To see the detailed execution for your case, click on the test case, and you can see the details like the following:
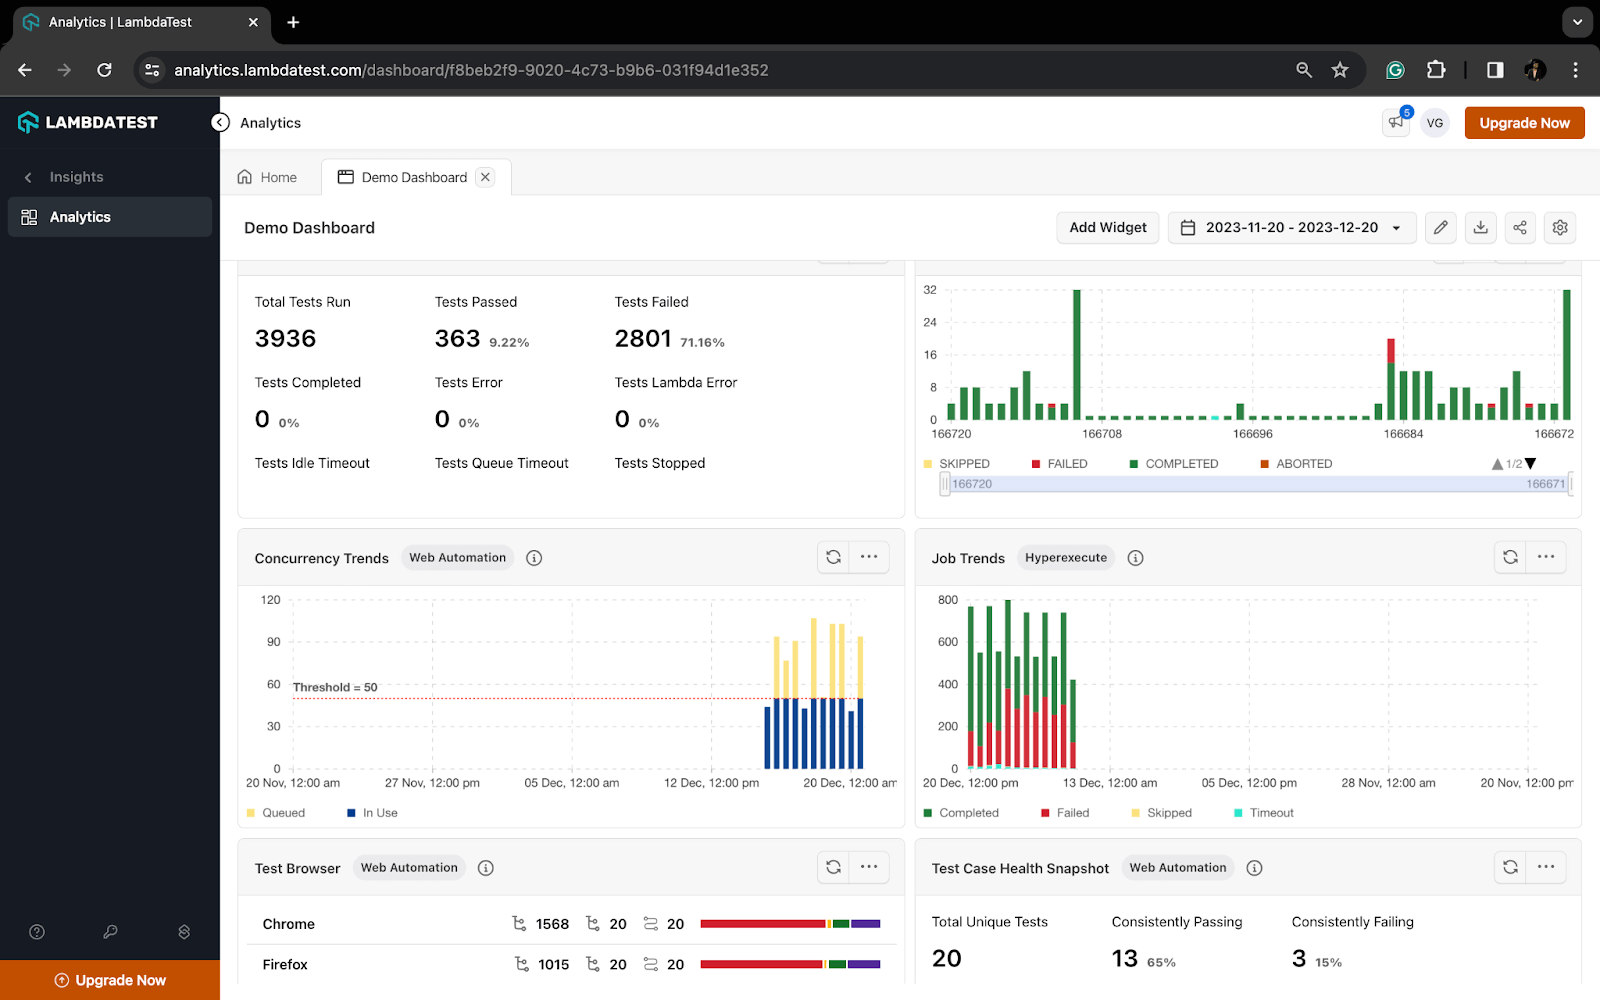
You can also navigate to the LambdaTest Analytics Dashboard to see test performance metrics. From the Insights section, go to Analytics. You will see the total number of tests passed or failed and all the related data trends, which will help you analyze the runs and compare data.
Till now, in this blog, we looked at how to handle modal dialog box in Selenium WebDriver Java. In the next sections, we will see how to handle alerts and popups using Selenium WebDriver Java. Alerts and popups play a vital role in user interfaces by providing critical information or prompting users for actions at specific moments.
How to Handle Alerts Using Selenium WebDriver Java?
In this section of the blog on how to handle modal dialog box in Selenium WebDriver Java, we will learn what alerts are and how to handle alerts using Selenium WebDriver Java.
What are Alerts?
Alerts in web development usually refer to a message or notification that lets the user know about information, namely:
- Asking for access permissions.
- Highlighting mandatory fields on a form.
- Display warning messages or help information.
Unlike modal dialog boxes, Selenium offers special functions for alerts. This is because it is a very tricky and time-consuming task for testers to automate alerts using regular methods. A few of these predefined methods are
- Click the Dismiss button to dismiss/cancel an alert box.
- Click the Accept button to accept an alert box.
- Fetch static data from the alert box.
- Send data to input fields on the alert box.
|
1 |
driver.switchTo().alert().dismiss(); |
|
1 |
driver.switchTo().alert().accept(); |
|
1 |
driver.switchTo().alert().getText(); |
|
1 |
driver.switchTo().alert().sendKeys("Text"); |
The sendKeys() in Selenium is used to enter data into the input fields on any web page in Selenium automation. It performs the same action by entering data into any input field on the alert.
Demo: Handling Alerts Using Selenium WebDriver Java
For handling alerts using Selenium WebDriver Java, we will be automating the following flow:
- Navigate to the Javascript Alert Box Demo page on LambdaTest Selenium Playground.
- Click the Click Me button beside the JavaScript Alerts.
- Retrieve and assert the alert body content.
- Click OK to accept the alert.

Code Walkthrough: TestAlerts.java
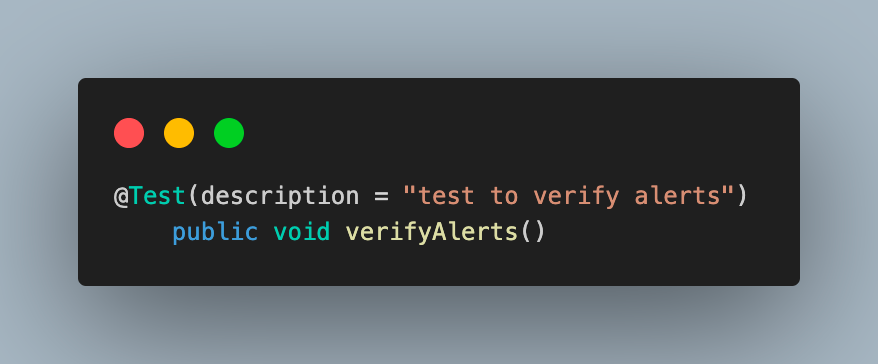
Step 1: Add the test case function as verifyAlerts() and annotate it with @Test annotation.
Step 2: Navigate to the target page, where the actual automation script will be executed.

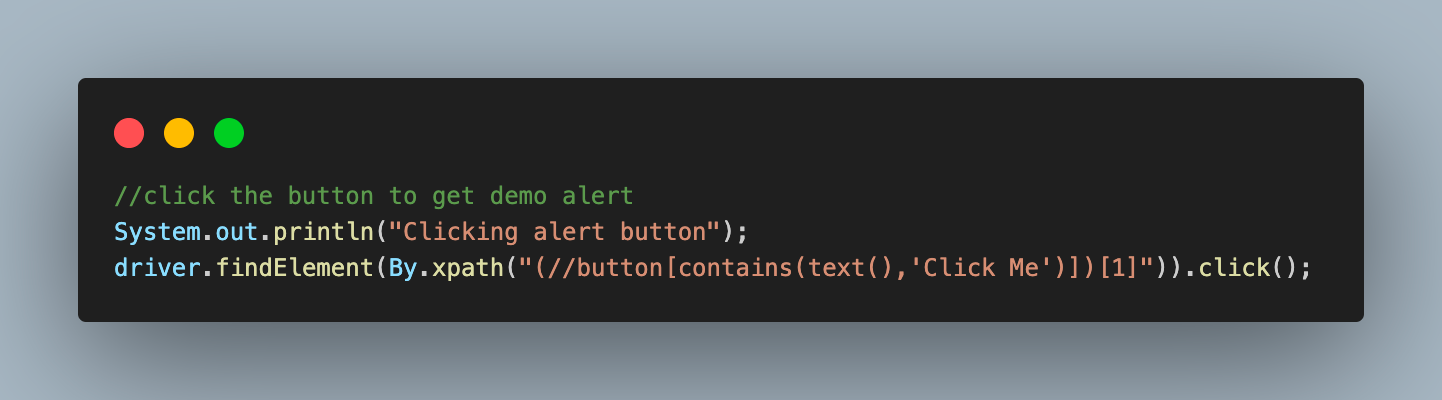
Step 3: Once the page is loaded, we click the button to get the alert on which alert functions can be implemented and verified.
Step 4: Like the modal dialog box, explicit wait is being implemented for alerts as well. Imports and object creation remain the same for this case, with the only difference being in ExpectedConditions.
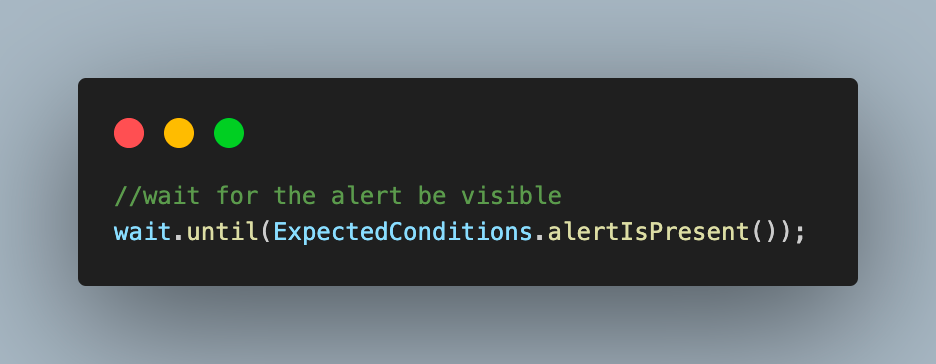
For supporting alerts, another predefined function from Selenium, alertIsPresent() is used in this case.
Step 5: After the alert is visible, we start implementing alert().getText() to fetch and assert the content on the alert and assert it.
But before doing so, we need to ensure that the driver instance focus has been switched to the alert from the main window. For this purpose, the switchTo() function is used in Selenium automation testing. This function is also used with multiple windows, such as new tabs, alerts, popups, etc.
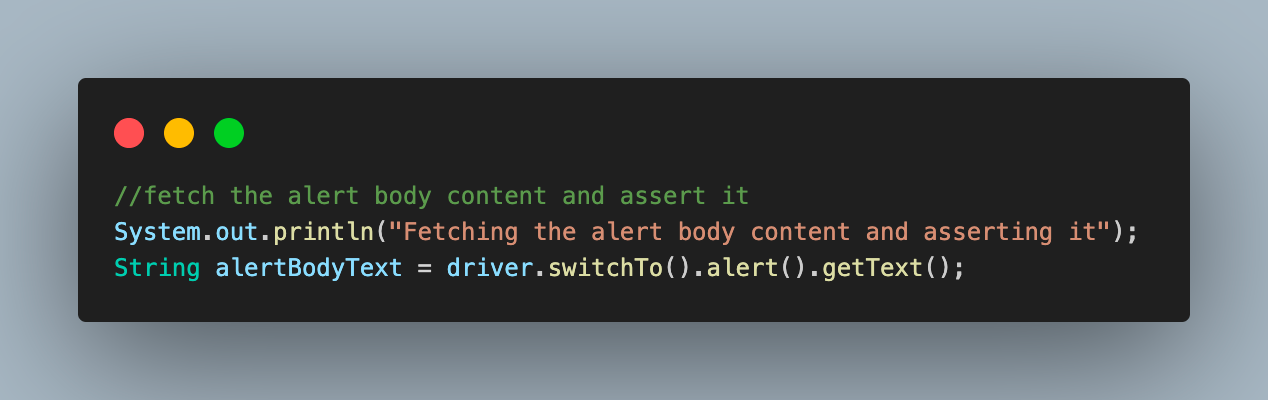
Since we need to switch to alert in this test script to interact with it, switchTo().alert() is used. We will learn more about how to switch between parent and child windows in the popups section.
Step 6: Here, we use the Assert class of TestNG to compare the content using the assertEquals() function.
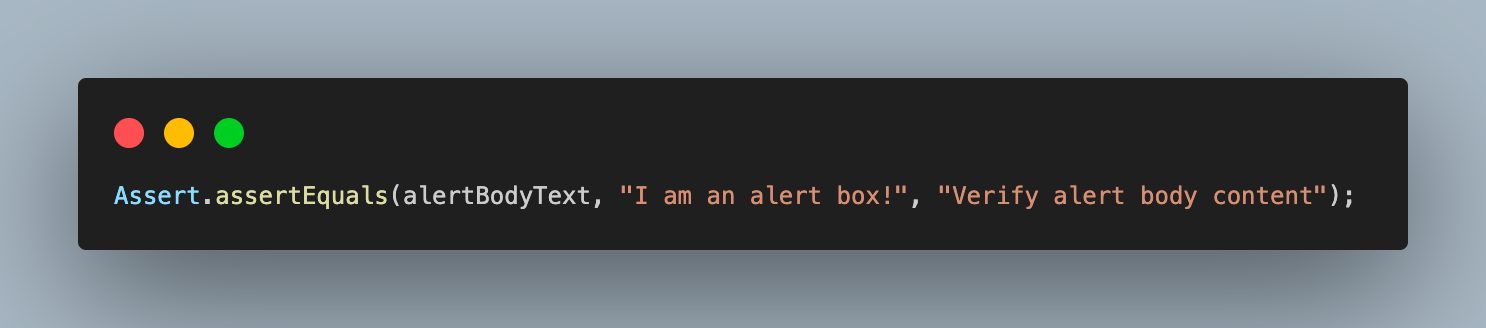
In this function, we will pass the expected content, which is the string, and the actual content, which is the body content of the alert fetched in the previous step. If both matches, assert is passed; else, it fails with an error that is expected and actual data do not equal.
Step 7: The last step of this test scenario is to accept the alert for which the predefined method that Selenium provides is being used.
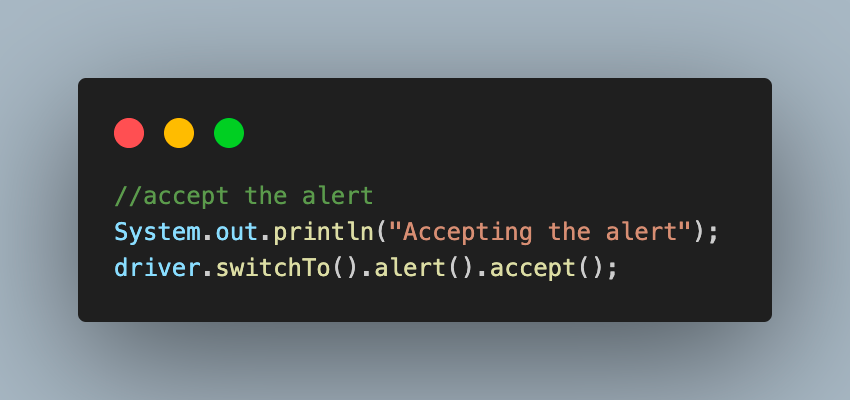
Depending upon the use case, you can also implement the function to dismiss/cancel the alert. For this following method, the Selenium method can be used.

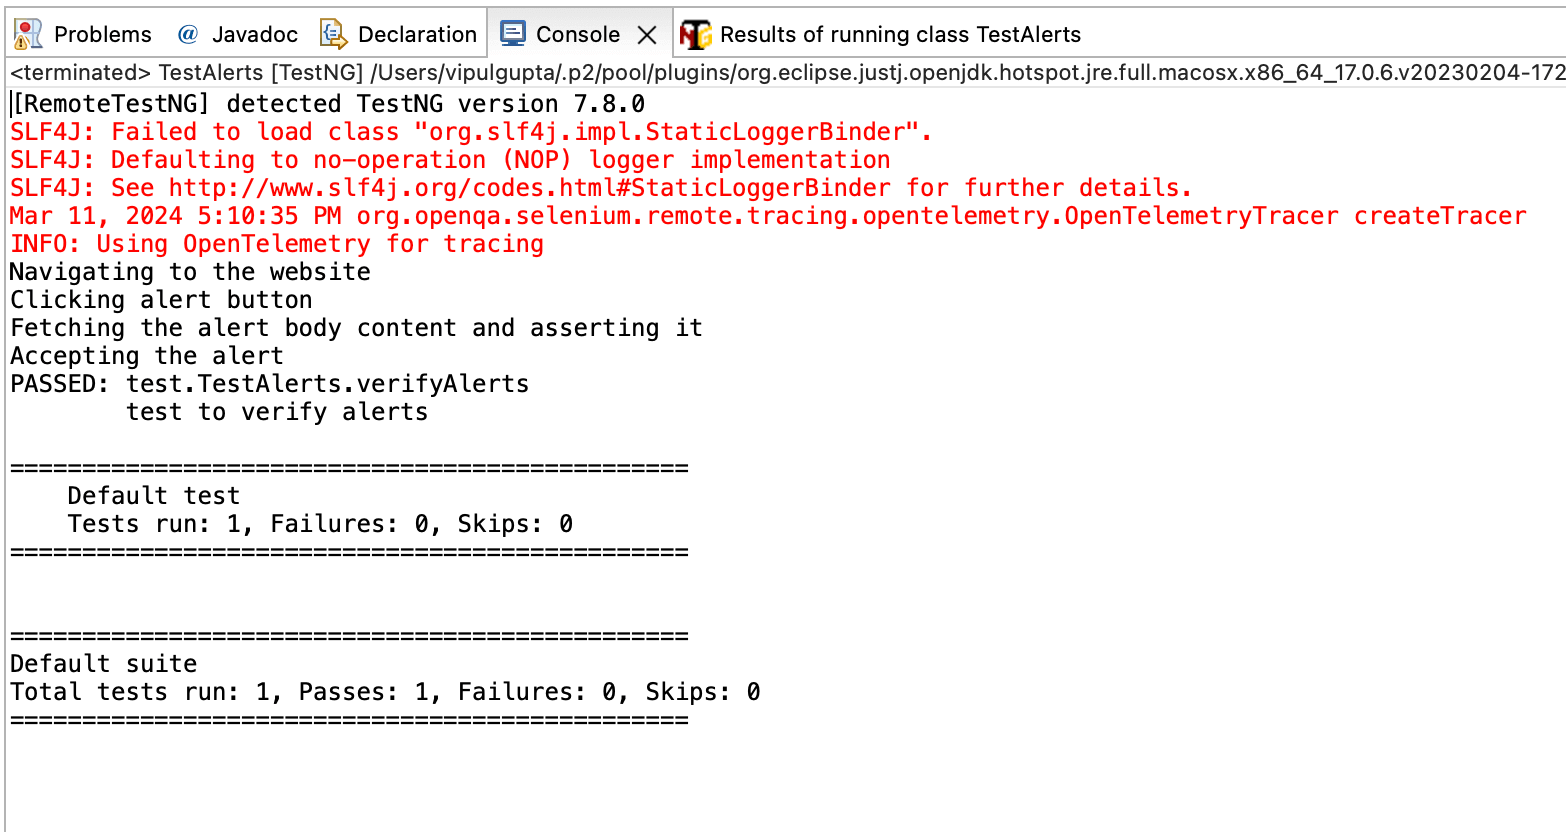
Test Execution and Result
As mentioned for the modal dialog box in the previous section, we can similarly execute the alerts test case from IDE and see the output below on successful execution on the IDE and the LambdaTest Dashboard for the automation cases.
 Note
NoteAutomate Alerts with Selenium on the Cloud. Try LambdaTest Today!
How to Handle Popups Using Selenium WebDriver Java?
In this section of the blog on how to handle modal box in Selenium WebDriver Java, we will learn what popups are and how to handle popups using Selenium Java.
What are Popups?
Popup refers to a new window or tab that pops up or gets opened due to some interaction on the webpage. It can appear under certain conditions and as per implementation.
In Selenium automation, the driver always focuses on and interacts with the currently active window. So whenever we are working with popups in Selenium, some additional methods are used to shift the driver’s focus to the newly opened window and then back to the main window.
- Get handles of all the windows that are open at that instance.
- Get the current window handle on which the driver is focused.
- Switch to the main parent window.
- Switch to any specific window using its handle.
|
1 |
driver.getWindowHandles(); |
|
1 |
driver.getWindowHandle(); |
|
1 |
driver.switchTo().defaultContent(); |
|
1 |
driver.switchTo().window(handleId); |
handleId here refers to the IDs of the window, which we can fetch using the getWindowHandle() or getWindowHandles() functions of the WebDriver.
Demo: Handling Popups Using Selenium WebDriver Java
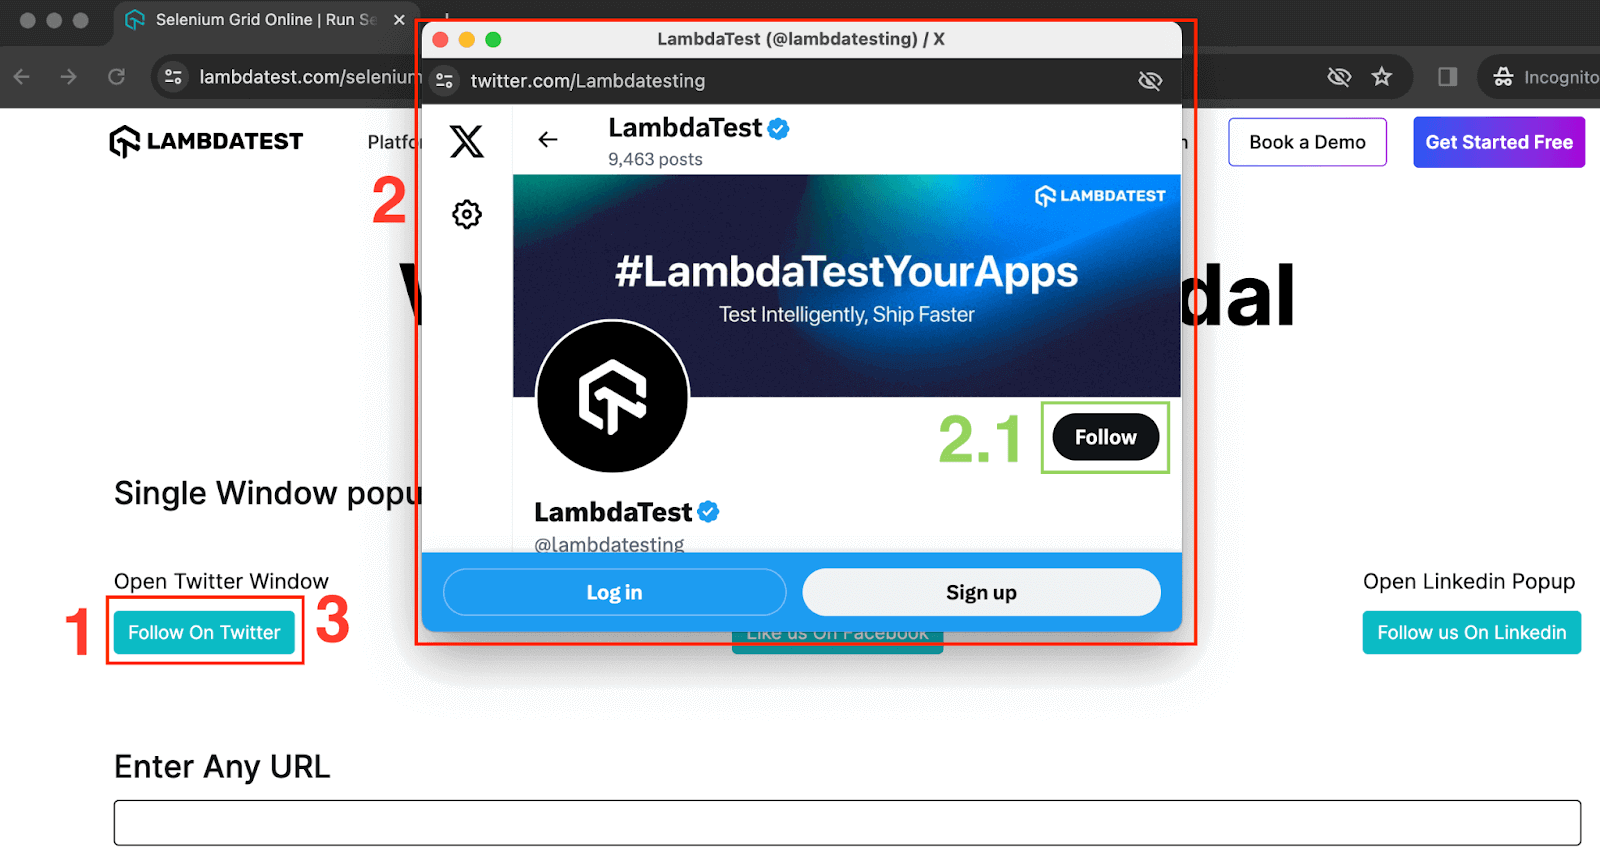
For handling popups using Selenium WebDriver Java, we will be automating the following flow:
- Navigate to the Window popup Modal page on LambdaTest Selenium Playground.
- Click on Follow On Twitter under the Single Window popup Modal.
- Switch to a new popup window.
- Assert Follow button on it is present.
- Switch back to the main window.
- Assert Follow On Twitter is displayed.
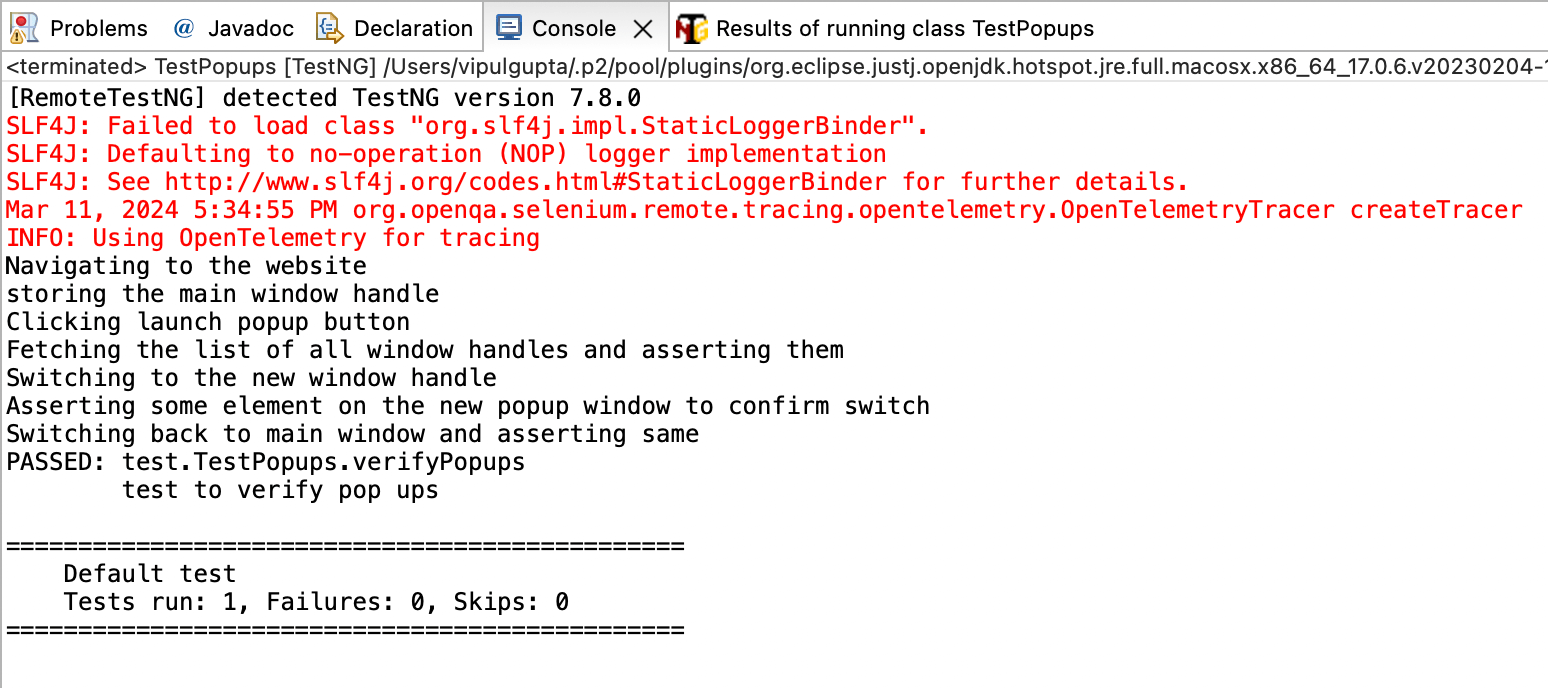
Code Walkthrough: TestPopups.java
You can find two special imports in this test class: Iterator and Set.
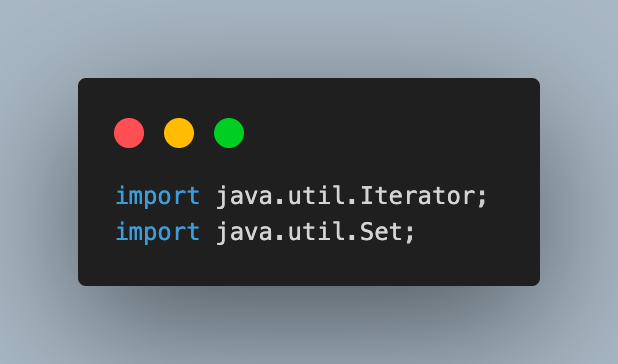
These are done to support the use of Set type data structure and Iterator, which is the function to traverse through the Set. More details about these are with the corresponding code where these are used.
Step 1: Add the new test case and navigate to the test demo page for popups.

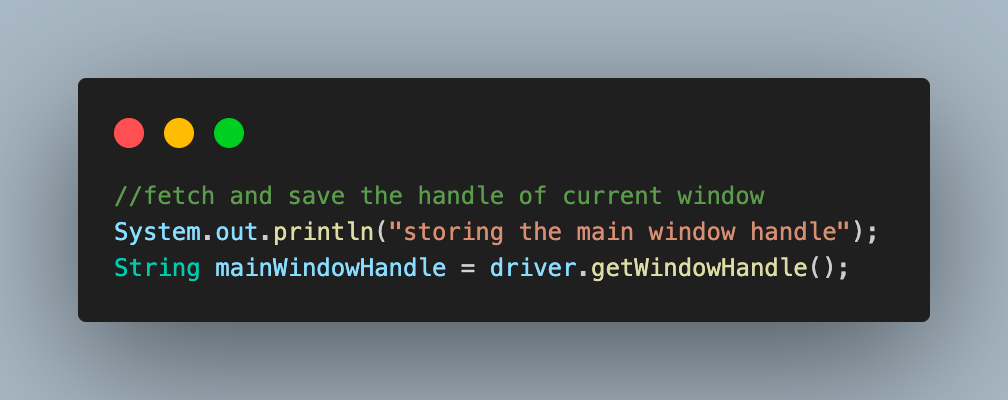
Step 2: Next, we get and save the handle of the main window. This is done as once there is a new popup window, we need to find some way to differentiate between the handle of the current window and the newly opened window.
Step 3: After storing this, the next step is to click on the link text or button, in this case, on the current/main window, to get the new popup window.
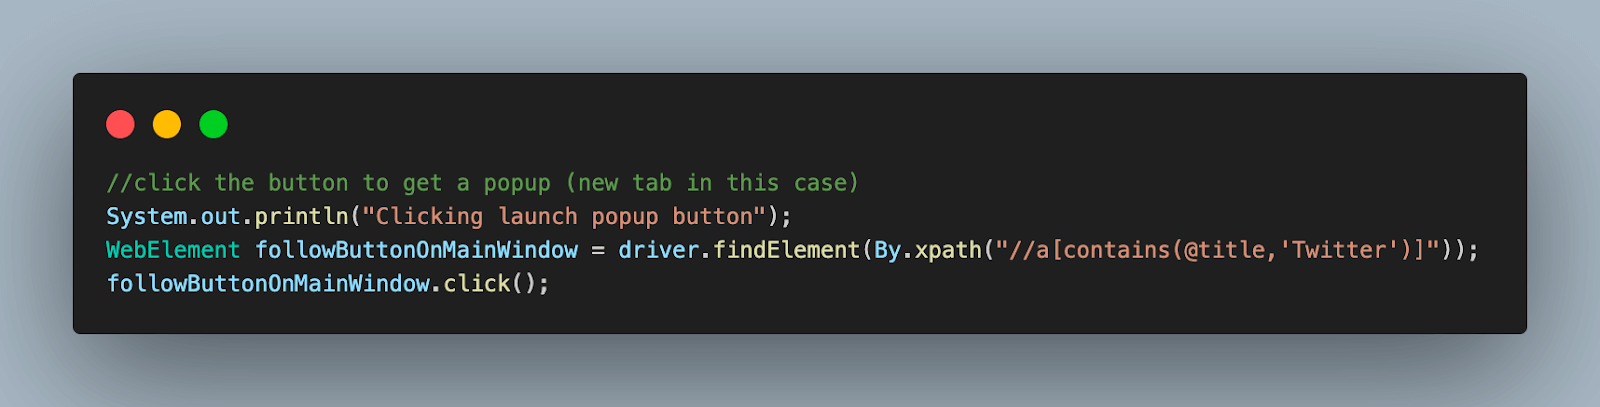
Step 4: Now, as per the test scenario expectation, we should have two windows on the screen. To verify this, use the getWindowHandles() method to get the identifiers (or window handles) of the respective windows.
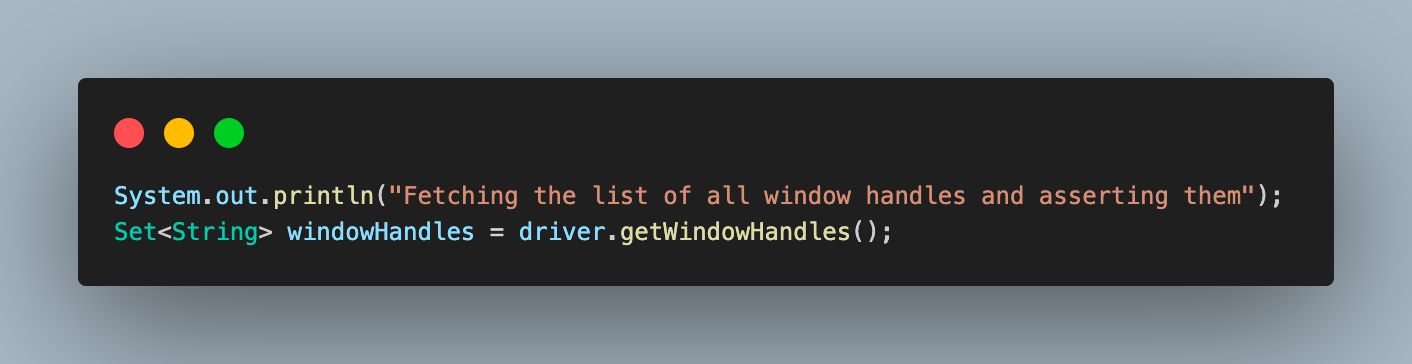
This method returns the list of handles of all the windows, which, to understand, are the IDs of different windows that can be used to identify them. This entire list is stored in a Set type of data structure for easy accessibility.
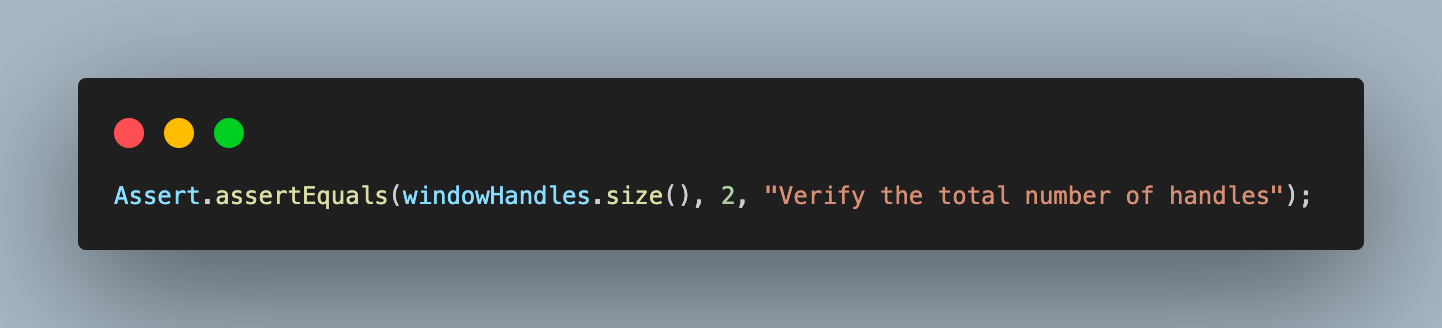
As the number of window handles is stored in the Set type variable, we can use the size() method to fetch the total number of handles in that and assert as per expectation, which is 2 here.
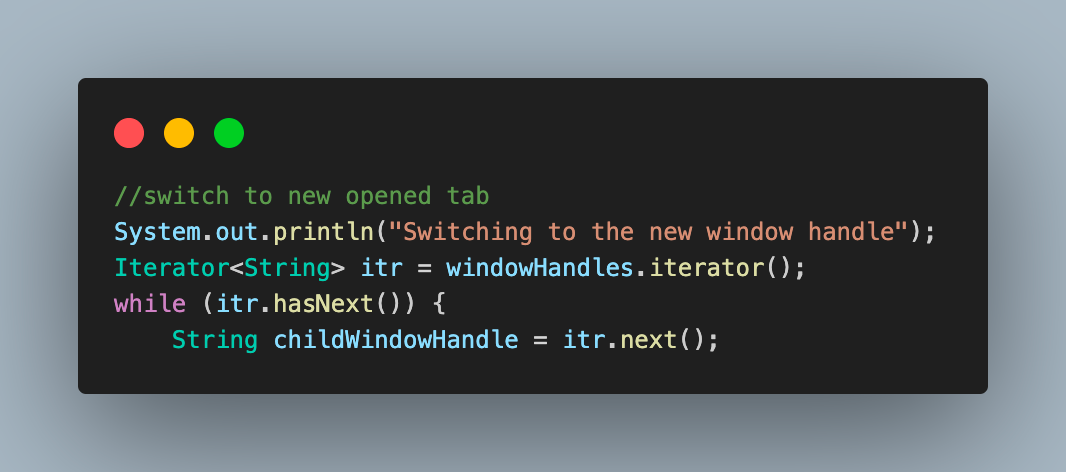
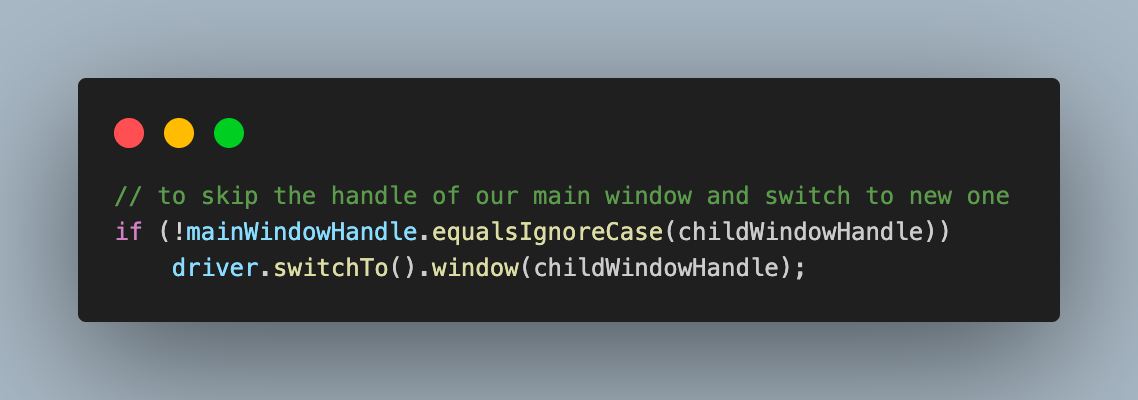
Step 5: The next step would be to switch to the new popup window. For this, we traverse through the list of window handles and compare it with the main window handle value, which we stored in the first step.
For traversal through the Set containing all window handles, we are using Iterator. As the name suggests, it means to visit repeatedly until some point. So here, we keep iterating the set for the next values until we reach the last value.
Step 6: Once we get a non-matching value, we switch to the new popped-up window.
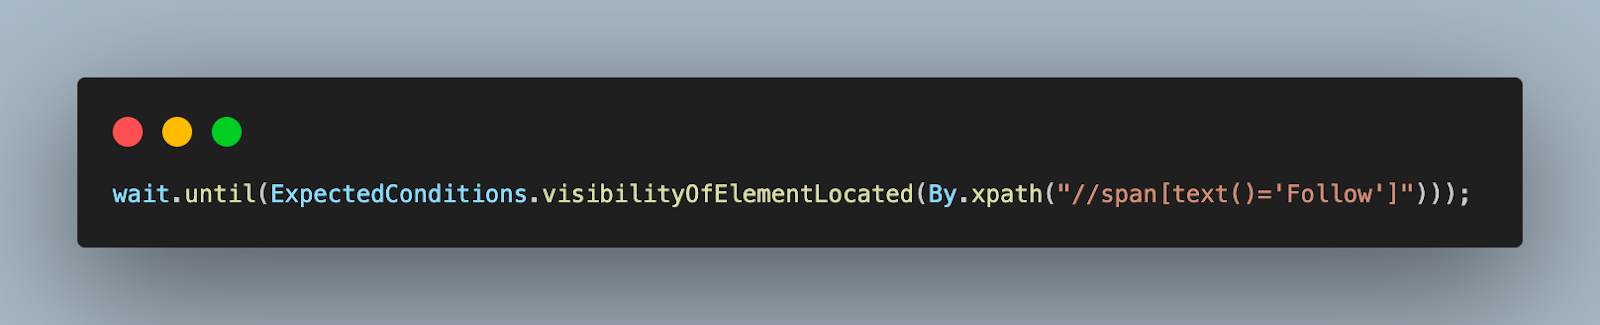
Step 7: Use the explicit wait discussed before to wait for the new popped-up window using the visibilityOfElementLocated() function.
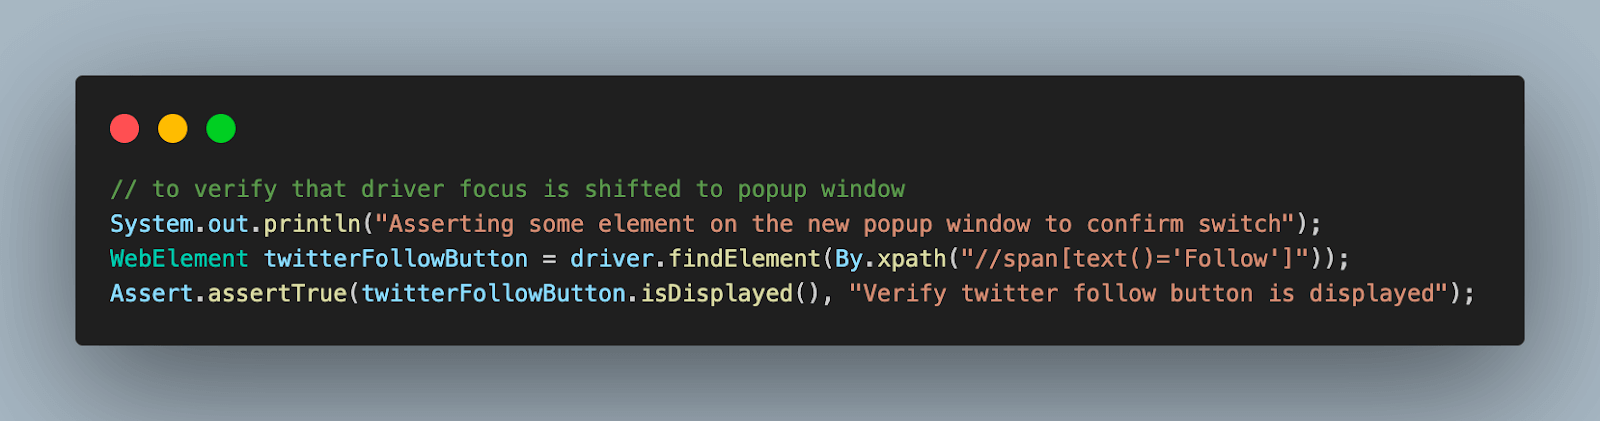
Step 8: Assert the Follow button text on the Twitter page to verify that the driver focus is now switched to the popup window.
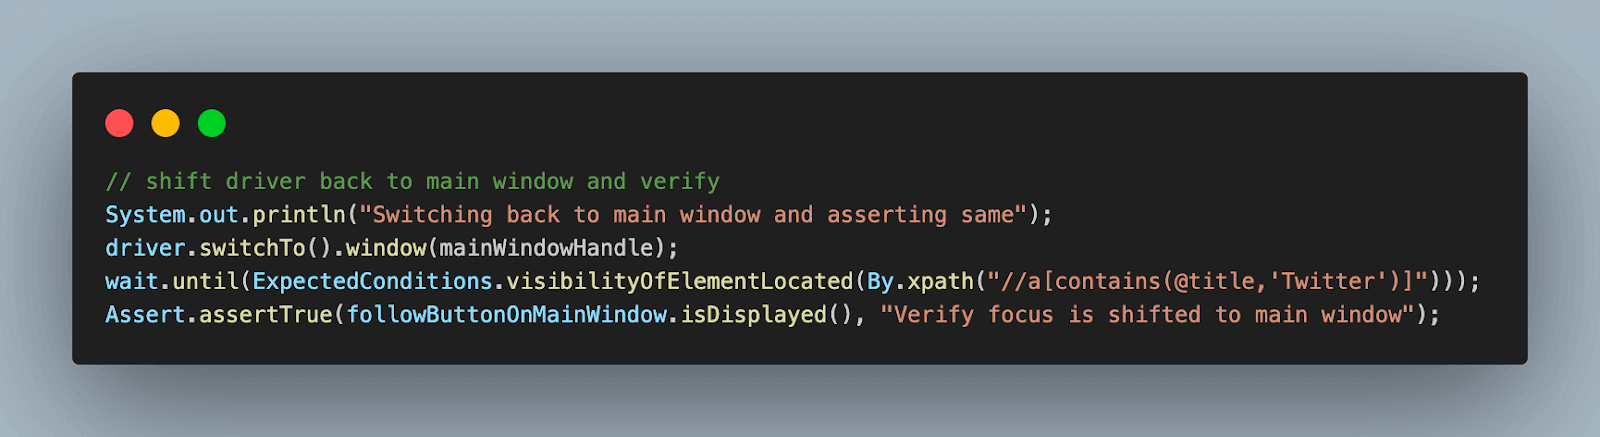
Step 9: Finally, switch back to the main window using its already stored handle and assert some element to verify that the driver focus has been shifted again to the main window.
Test Execution and Result
In a similar way to the one discussed above, after execution, we will get the result on the IDE as follows.
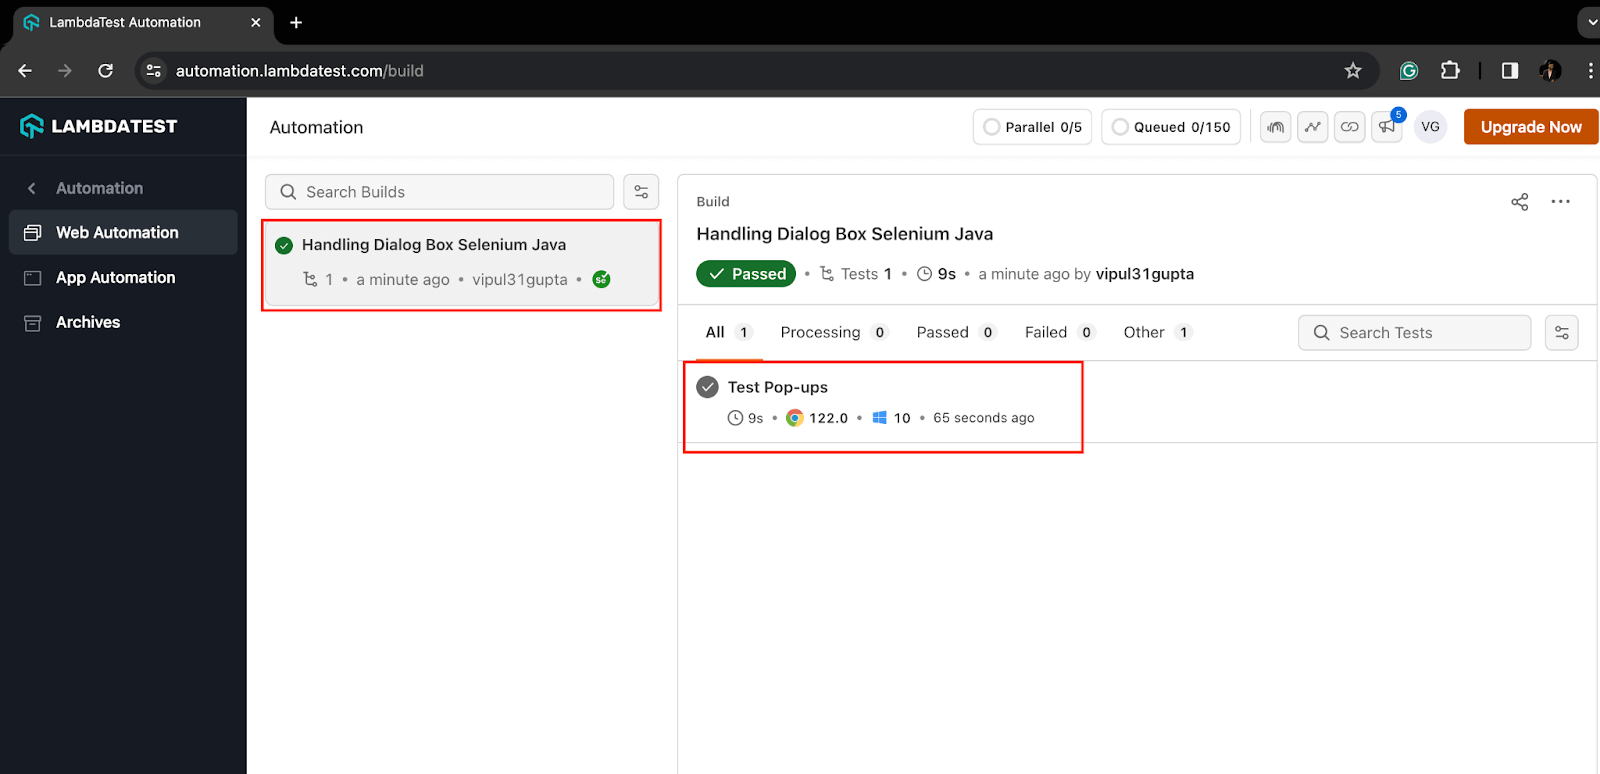
We can see the detailed execution logs on the LambdaTest Web Automation Dashboard by navigating to the test details and can see the data:
If you’re a Java developer looking to improve your skills, the Selenium Java 101 certification from LambdaTest can help. The certification is for beginners to intermediate level Java developers who want to refresh their knowledge of the programming language and learn more about automation testing using Selenium with Java.
By now, you should have a fair understanding of popups and alerts and how to handle modal dialog box in Selenium WebDriver Java over a cloud grid-like LambdaTest. However, if you want to leverage the best features of the cloud setup with faster execution (as good as the speed of a local setup), you can try HyperExecute—a blazing-fast end-to-end test orchestration cloud that is up to 70% faster than any traditional Selenium cloud setup.
Conclusion
With this blog on how to handle modal dialog box in Selenium WebDriver Java, we have learned the implementation and working for all of these in detail, covering all the aspects and functions that you might encounter and need while working with them. By now, you will be confident enough to automate any kind of modal dialog box, alerts, or popups that come up in your automation scripts.
Frequently Asked Questions (FAQs)
Is a dialog box a modal?
Modal dialogs are one of the most useful features for user interface design. They allow you to overlay a dialog box onto your application, allowing the user to interact with or dismiss it without interfering with the main content.
How do you use dialog boxes?
A modal dialog box is a small pane consisting of one or more windows with various controls. It blocks input to all but the active control. To create a modal dialog box, use Visual Basic code or create the template and populate it with controls in the development environment.
To create a dialog box, use the DialogBox function. This function uses a template and the procedure name that is activated when the user makes a choice.
How do I stop popups in Selenium?
To close the popup window with Selenium, we can use the getWindowHandles() and getWindowHandle() to close the popup window. The getWindowHandles() stores all the window handles in Selenium in a Set data structure, and the getWindowHandle() stores the window handle of the popup in focus.
How to handle popups in Selenium?
Handling popups in Selenium depends on their type. For modal dialogs (appearing on top of the page), find the element using locators (id, name, class, etc.) and wait for it to be visible. Then, interact with its elements like any other webpage element. For alert boxes (simple popups with a message), switch focus to the alert using driver.switchTo().alert() and then accept (.accept()) or dismiss (.dismiss()) it. You can also retrieve the alert message using .getText().


Author’s Profile
Vipul Gupta
Vipul Gupta is a passionate Quality Engineer with 6+ years of experience and keen interest in automation testing of Web and API based applications. He is having experience in designing and maintaining various automation frameworks. Currently working as Sr. SDET, he enjoys reading and learning about new test practices and frameworks.
Blogs: 17
Got Questions? Drop them on LambdaTest Community. Visit now