JUnit 5 vs. TestNG: Choosing The Right Framework For Selenium Automation Testing
Shalini Baskaran
Posted On: December 27, 2021
![]() 73101 Views
73101 Views
![]() 22 Min Read
22 Min Read
A framework is a backbone for testing or development activities. It is a set of components that helps frame the tests, execute the tests, and generate the final report of execution. The approach used for designing the test automation framework plays a crucial part in the testing activity.
JUnit and TestNG are considered some of the best Java testing frameworks for Selenium automation testing. You should choose the appropriate test framework for your project’s requirements. JUnit 5 is the latest version of the JUnit framework. In this blog, we do a JUnit 5 vs. TestNG comparison.
The TestNG framework is inspired by the JUnit and NUnit frameworks. However, TestNG outperforms JUnit 5 in parameterized testing, suite testing, and dependency testing.
In this blog on JUnit 5 vs. TestNG comparison, we explore the differences between the JUnit 5 and TestNG from the perspective of Selenium WebDriver. By the end of this blog, you would be in a position to choose the best-suited framework for realizing your Selenium automation testing tasks.
Let’s begin!
TABLE OF CONTENTS
Overview of JUnit5
JUnit is one of the best unit testing frameworks for Selenium Java automation testing. The entire application being developed would first undergo unit testing that the developers perform on small code chunks. Thus, by testing individual code chunks, the developer would be able to test the code and locate bugs (if any).
The latest version of JUnit is JUnit 5, and it has three different sub-components – JUnit Platform, JUnit Jupiter, and JUnit Vintage. The JUnit platform is the basic foundation of the JUnit 5 framework. JUnit Jupiter is used for writing the tests and the JUnit Vintage is used for running earlier versions of JUnit tests such as JUnit 3 and JUnit 4 based tests.
Refer to our learning hub on the Selenium JUnit tutorial to delve deeper into the JUnit framework.
If you still use JUnit 4 or previous versions and wish to migrate your tests to JUnit 5, please explore JUnit 4 vs. JUnit 5 comparison.
Read – Execute JUnit 4 Tests With JUnit 5
This JUnit Tutorial for beginners and professionals will help you learn how to use JUnit framework with Selenium and Java for performing Selenium automation testing.
Overview of TestNG
TestNG is another popular open-source Java-based unit testing framework that provides complete control over the test cases and their execution. It aids in writing robust and flexible test cases by using various features like TestNG annotations, prioritization, grouping, and parameterization.
It simplifies the way of writing test cases. It is relatively simple to implement tests with TestNG, making it easy for the users to implement and maintain the code. It has multiple built-in features that eliminate the need for external plugins. For more information around the TestNG framework for Selenium automation testing, check out our learning hub on the Selenium TestNG tutorial.
Watch this video to learn how to set up and use TestNG with Selenium to automate your testing process. We will also introduce the TestNG Priority method, which allows you to write easy-to-read and maintainable tests.
Read – How to Group Tests in TestNG
Difference between JUnit 5 vs. TestNG
To choose the perfect framework between JUnit vs. TestNG for Selenium automation, let us first understand the differences between JUnit 5 and TestNG. It is important to note that we are comparing JUnit 5 (and not JUnit 4) with TestNG. Also, some features like parallel execution with JUnit 5 are still in the Beta stage; though the features work as per the expectations!
JUnit 5 and TestNG: Setup and Installation
In this section of the JUnit vs TestNG framework comparison, we look at how to install and configure JUnit and TestNG framework.
1. Installing and setting up JUnit5
Step 1: JUnit 5 requires Java version 8 or above versions for running the tests. You can download Java from the official website https://www.oracle.com/java/technologies/downloads/.
Step 2: In the case of a Java project, download the JUnit 5 jars from https://junit.org/junit5/.
Step 3: Open the project and add these external jars through build path configuration.
Step 4: In the case of the Maven project, download maven from the official website https://maven.apache.org/download.cgi.
Step 5: Set up the environment variables.
Step 6: Add the below dependencies in pom.xml for running our JUnit 5 tests.
|
1 2 3 4 5 6 7 8 9 10 11 12 13 14 15 16 17 18 19 20 |
<dependencies> <dependency> <groupId>org.junit.jupiter</groupId> <artifactId>junit-jupiter-engine</artifactId> <version>5.7.1</version> <scope>test</scope> </dependency> <dependency> <groupId>org.junit.platform</groupId> <artifactId>junit-platform-runner</artifactId> <version>5.7.1</version> <scope>test</scope> </dependency> <dependency> <groupId>org.junit.jupiter</groupId> <artifactId>junit-jupiter-api</artifactId> <version>5.7.1</version> <scope>test</scope> </dependency> </dependencies> |
You can also refer to our JUnit video tutorial on how to install JUnit.
2. Installing and Setting up of TestNG
Step1: Download Java from the official website https://www.oracle.com/java/technologies/downloads/.
Step 2: In the case of a Java project, download the jar from https://mvnrepository.com/artifact/org.TestNG/TestNG/6.7.
Step 3: Open the project and add these external jars through build path configuration.
Step 4: In the case of the Maven project, download maven from the official website https://maven.apache.org/download.cgi.
Step 5: Set up the environment variables.
Step 6: Add the TestNG dependency in the pom.xml file.
|
1 2 3 4 5 6 |
<dependency> <groupId>org.TestNG</groupId> <artifactId>TestNG</artifactId> <version>7.4.0</version> <scope>test</scope> </dependency> |
Once the setup is completed, you are ready to go…!
‘Test Suites’ in JUnit 5 and TestNG
A test suite is a collection of tests to be executed in a framework. The test suite defines the test cases and can be quickly executed.
1. JUnit 5 suite
In JUnit 5, the test suite is defined with @RunWith and @Suite annotations.
When we annotate a class with @RunWith annotation, the framework will invoke the given class as the test runner instead of running the default one. The below example specifies a group of test classes to be run along with the class.
|
1 2 3 4 5 6 |
@RunWith(Suite.class) @Suite.SuiteClasses( { JUnitTest1.class, JUnitTest2.class }) |
2. TestNG suite
In TestNG, the suite is defined in an XML file.
|
1 2 3 4 5 6 7 8 9 10 11 |
<?xml version="1.0" encoding="UTF-8"?> <!DOCTYPE suite SYSTEM "http://TestNG.org/TestNG-1.0.dtd"> <suite name="TestSuite" parallel="tests"> <test name="DemoTest"> <classes> <class name="com.pages.LoginPageTest"></class> <class name="com.pages.HomePageTest"></class> <class name="com.pages.ProductPageTest"></class> </classes> </test> </suite> |
With TestNG certification, you can challenge your skills in performing automated testing with TestNG and take your career to the next level.
Here’s a short glimpse of the TestNG certification from LambdaTest:
‘Annotations’ in JUnit 5 and TestNG
Annotations give additional information about the class or test method in the test automation framework. Read our detailed tutorial on TestNG annotations for Selenium automation to know more about the usage of annotations in TestNG.
1. JUnit 5 annotations
The annotations in JUnit 5 are a bit different, even from its previous versions of JUnit. Shown below are some of the popular JUnit 5 annotations:
- @Test – This annotation is used for declaring a test.
- @TestFactory – This annotation is used for defining a method which is a test factory. It is used for the runtime generation of dynamic tests.
- @RepeatedTest – This annotation is used to specify that the method is a template for the tests that can be repeated a specific number of times. For example, the below test method is annotated with @RepeatedTest for a specific number 5, which indicates that this test will be repeated automatically five times.
1234567@RepeatedTest(5)public void print(){// write some code to be executed} - @ParameterizedTest – This annotation is used to indicate that the method is a parameterized test. These parameterized tests are similar to standard test methods but we have to specify a source to provide parameters that would be used for every test.
- @TestMethodOrder – This annotation is used to define the order of the test execution.
- @DisplayName – This annotation is used to specify a customized display name for the method or class.
- @Tag – This annotation is used for filtering the tests at the method or class level by defining the tags.
- @Disabled – This annotation is used to disable a test method or class.
- @BeforeEach – This annotation is used to specify that the said test method has to be executed before each @Test, @RepeatedTest, @ParameterizedTest, or @TestFactory method.
- @AfterEach – This annotation is used to specify that the specific test method has to be executed after each @Test, @RepeatedTest, @ParameterizedTest, or @TestFactory method.
- @BeforeAll – This annotation is used to specify that the specific test method has to be executed before all @Test, @RepeatedTest, @ParameterizedTest, or @TestFactory methods.
- @AfterAll – This annotation is used to specify that the specific test method has to be executed after all @Test, @RepeatedTest, @ParameterizedTest, or @TestFactory methods.
2. TestNG annotations
Below are the various annotations used in TestNG:
- @BeforeMethod – This will be executed before every @Test annotated method.
- @AfterMethod: This annotation will be executed after every @Test annotated method.
- @BeforeClass – This will be executed before the first @Test method execution. It will be executed one only time throughout the test case.
- @AfterClass – This will be executed after all test methods in the current class have been run
- @BeforeTest – This will be executed before the first @Test annotated method. It can be executed multiple times before the test case.
- @AfterTest – A method with this annotation will be executed when all @Test annotated methods complete the execution of those classes inside the <test> tag in the testng.xml file.
- @BeforeSuite – It will run only once before all tests in the suite are executed.
- @AfterSuite – A method with this annotation will run once after the execution of all tests in the suite is complete.
- @BeforeGroups – This method will run before the first test run of that specific group.
- @AfterGroups – This method will run after all test methods of that group complete their execution.
- @Test – This is used for declaring a test.
Watch this video to learn about the TestNG Annotations and how they help provide better structure and readability to the code.
Quick Comparison of JUnit 5 and TestNG Annotations
Let’s compare the annotations between JUnit 5 vs. TestNG.
| Purpose | TestNG |
JUnit 5 |
| Defines the method as the test method | @Test | @Test |
| The method that is annotated is executed before the first test method of the class | @BeforeClass | @BeforeAll |
| The method that is annotated is executed after all the test methods of the current class have been executed. | @AfterClass | @AfterAll |
| The method that is annotated is executed before each test method | @BeforeMethod | @BeforeEach |
| The method that is annotated is executed after each test method | @AfterMethod | @AfterEach |
| The method that is annotated is executed before the suit. | @BeforeSuite | NA |
| The method that is annotated is executed after suit. | @AfterSuite | NA |
| The method that is annotated is executed before the test. | @BeforeTest | NA |
| The method that is annotated is executed before the test. | @AfterTest | NA |
| The method that is annotated is executed before the first test method of any of these groups. | @BeforeGroups | NA |
| The method that is annotated is executed after the first test method of any of these groups. | @AfterGroups | NA |
This JUnit certification establishes testing standards for those who wish to advance their careers in Selenium automation testing with JUnit.
Here’s a short glimpse of the JUnit certification from LambdaTest:
‘Handling Exceptions’ in JUnit 5 and TestNG
In this section of the JUnit 5 vs TestNG comparison, we deep dive into handling exceptions in JUnit 5 and TestNG.
1. Handling exceptions in JUnit 5
To handle the exceptions thrown in the tests, we could use Assertions.assertThrows() API. The assertThrows() method asserts that execution of the code throws an exception of the given type.
This assertion would fail if there is no exception or some other type of exception is thrown. The assertion will pass only if an exception is thrown as provided.
Read: Common Exceptions in Selenium Automation Testing
NumberFormatException is thrown when the input is not a valid number. In the sample shown below, we have provided an invalid number due to which NumberFormatException is thrown.
|
1 2 3 4 5 6 7 8 9 10 11 |
@Test void testExpectedException() { //First argument - specifies the expected exception. //Here it expects that code block will throw NumberFormatException //Second argument - is used to pass an executable code block or lambda expression Assertions.assertThrows(NumberFormatException.class, () -> { Integer.parseInt("Hello"); }); } |
2. Handling exceptions in TestNG
To handle the exceptions thrown in the tests, we can use the expectedExceptions parameter along with the @Test annotation in TestNG.
In the below example, we expect an ArithmeticException to be thrown when the number is divided by zero. Hence, we use expectedExpections in the test so that when the test is executed, it would be marked as passed. This is because the expected condition is met.
|
1 2 3 4 |
@Test(expectedExceptions = ArithmeticException.class) public void DivideByZeroTest() { int i = 20/0; } |
‘Ignoring Tests’ in JUnit 5 and TestNG
In our automation framework, we would have some test cases which have to be avoided for some reason. For example, it would have been obsolete or changed the requirement. In such cases, those cases have to be ignored so that they are not considered in the test run. Let us now see how to handle such cases in JUnit 5 and TestNG.
1. Ignoring tests in JUnit 5
To ignore a test, we can use @Ignore annotation.
|
1 2 3 4 5 6 7 8 9 |
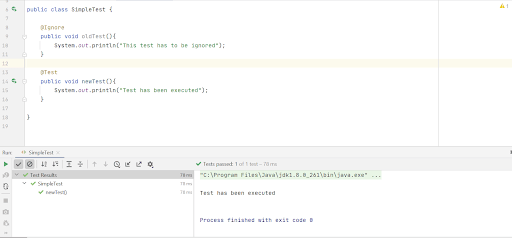
@Ignore public void oldTest(){ System.out.println("This test has to be ignored"); } @Test public void newTest(){ System.out.println("Test has been executed"); } |
Running the above tests would ignore the first test, which is annotated with @Ignore annotation.
Console Output:
2. Ignoring tests in TestNG
To ignore a test in TestNG, we can pass a parameter in the @Test method.
|
1 2 3 4 5 6 7 8 9 10 11 12 13 14 15 16 17 |
package com.pages; import org.TestNG.annotations.Test; public class SimpleTest { @Test public void test1() { System.out.println("This is test1"); } @Test(enabled = false) public void test2() { System.out.println("This is test2"); } } |
The second test has been disabled, so running the class would ignore the second case.
Console Output:

‘Grouping Tests’ in JUnit 5 and TestNG
Grouping of tests helps us to identify the tests and execute them quickly. Let us now see how to group the tests in TestNG and JUnit 5.
1. Grouping tests in JUnit 5
In JUnit 5 we can use an annotation @Tag which helps us to group our tests.
|
1 2 3 4 5 6 7 8 9 10 11 12 13 14 15 16 17 18 19 20 21 22 23 24 |
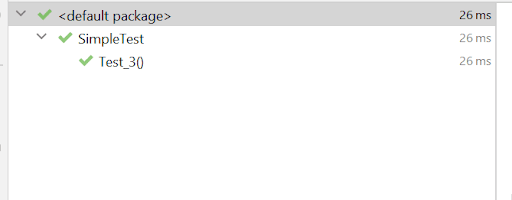
package demo; import org.junit.jupiter.api.Tag; import org.junit.jupiter.api.Test; public class SimpleTest { @Test @Tag("Smoke") public void Test_1(){ System.out.println("Test1 has been executed"); } @Test @Tag("Smoke") public void Test_2(){ System.out.println("Test2 has been executed"); } @Test @Tag("Regression") public void Test_3(){ System.out.println("Test3 has been executed"); } } |
We add the tag in the Run configurations to execute our tests specific to a tag and then execute it.
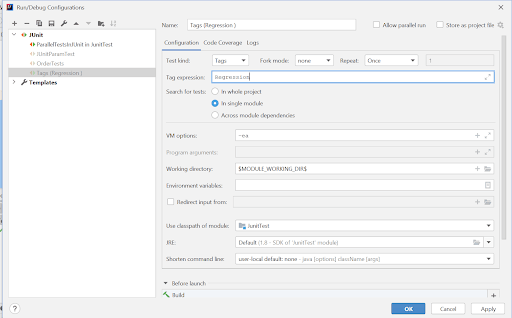
In the example, we have grouped only one test under Regression, and hence only one will be executed when the Regression tag is specified.
Console Output
2. Grouping tests in TestNG
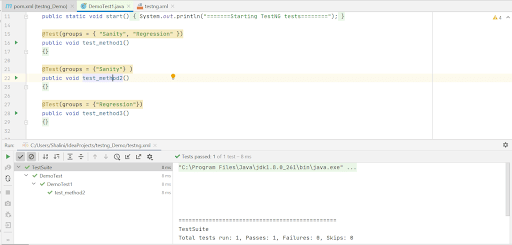
For grouping tests in TestNG under the same category, we use groups parameters along with @Test annotation.
|
1 2 3 4 5 6 7 8 9 10 11 12 13 14 15 16 17 18 19 20 21 22 23 24 25 26 27 28 29 30 31 32 33 34 35 36 37 38 39 |
package com.pages; import org.TestNG.annotations.AfterTest; import org.TestNG.annotations.BeforeTest; import org.TestNG.annotations.Test; public class DemoTest1 { @BeforeTest public static void start() { System.out.println("=======Starting TestNG tests========"); } @Test(groups = { "Sanity", "Regression" }) public void test_method1() { //Test implementation } @Test(groups = {"Sanity"} ) public void test_method2() { //Test implementation } @Test(groups = {"Regression"}) public void test_method3() { //Test implementation } @AfterTest public static void end() { System.out.println("All the tests are executed successfully"); } } |
To execute the tests belonging to a specific category, we have to add the group name in the testng.xml file. We can include (or exclude) multiple groups before executing the tests.
|
1 2 3 4 5 6 7 8 9 10 11 12 13 14 15 |
<?xml version="1.0" encoding="UTF-8"?> <!DOCTYPE suite SYSTEM "http://TestNG.org/TestNG-1.0.dtd"> <suite name="TestSuite" parallel="methods" thread-count="4"> <test name="DemoTest"> <groups> <run> <include name = "Sanity"></include> <exclude name="Regression"></exclude> </run> </groups> <classes> <class name="com.pages.DemoTest1"></class> </classes> </test> </suite> |
In the above snippet, we have two groups – Sanity and Regression. In the testng.xml, we have included the Sanity group and excluded the Regression group. After test execution, we could only see the second test being executed as it belongs only to the Sanity group.
Console Output:
Watch this video to learn how TestNG has become one of the most robust test automation frameworks and all you need to know to get started with TestNG in Selenium.
‘Parameterizing Tests’ in JUnit 5 and TestNG
Parameterizing the tests helps us provide different sets of inputs to test the same test scenario. Now let us see how to parameterize the tests using JUnit 5 and TestNG.
1. Parameterizing tests in TestNG
There are two ways to parameterize the tests in TestNG.
- Using @Parameters and passing the value of the parameter in the TestNG XML file
- Using @DataProvider annotation in TestNG
- Parameterizing the tests using @Parameters
1234567891011121314package com.pages;import org.TestNG.annotations.Parameters;import org.TestNG.annotations.Test;public class SimpleTest {@Test()@Parameters("username")public void test1(String username) {System.out.println("The username "+username + " is passed");}}
In the above example, we have used @Parameter annotation to provide a username. The value will be specified in the testng.xml file.
123456789101112<?xml version="1.0" encoding="UTF-8"?><!DOCTYPE suite SYSTEM "http://TestNG.org/TestNG-1.0.dtd"><suite name="TestSuite" parallel="tests"><test name="DemoTest"><parameter name = "username" value = "Alex"/><classes><class name="com.pages.SimpleTest"></class></classes></test></suite>
Console Output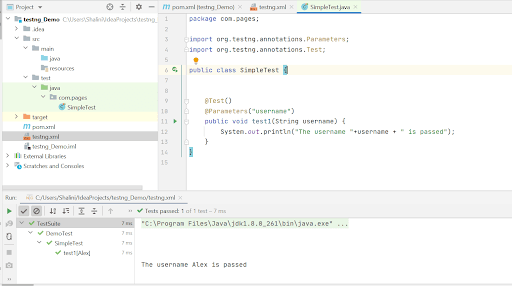
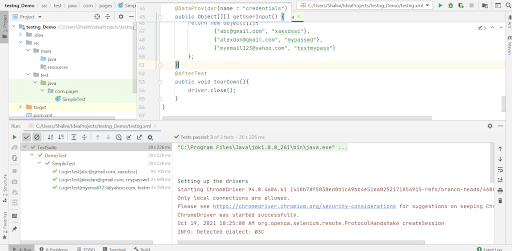
- Parameterizing using @DataProvidersThe @DataProviders annotation is used to provide multiple input values to the test. It has a separate data provider method that is used to pass the parameters.Scenario: To test the login functionality of a webpage using different sets of credentials.In the above example, we have added a test case for the login functionality in a webpage.First, we would locate the webelements for entering the username and password.
123WebElement name = driver.findElement(By.xpath("//input[@name=\"email\"]"));WebElement passwd = driver.findElement(By.xpath("//input[@name=\"password\"]"));
After locating the elements we need to pass different sets of inputs to username and password.
123456name.clear();name.sendKeys(username);passwd.clear();passwd.sendKeys(password);WebElement loginButton = driver.findElement(By.xpath("//button[text()='Login']"));loginButton.click();As mentioned earlier, in order to pass different parameters we would use @Dataproviders.
We implement a Dataprovider method to pass different sets of input and will provide a unique name to identify the data provider.
12345678@DataProvider(name = "credentials")public Object[][] getUserInput() {return new Object[][]{{"abc@gmail.com", "xaxxdssc"},{"alexdan@gmail.com", "mypasswd"},{"myemail123@yahoo.com", "textmypass"}};}To use these inputs in our tests, we provide a parameter dataprovider along with the unique name within the @Test annotation.
12@Test(dataProvider = "credentials")public void LoginTest(String username,String password) {FileName – testng.xml
12345678910<?xml version="1.0" encoding="UTF-8"?><!DOCTYPE suite SYSTEM "http://TestNG.org/TestNG-1.0.dtd"><suite name="TestSuite" parallel="tests"><test name="DemoTest"><classes><class name="com.pages.SimpleTest"></class></classes></test></suite>Console Output:
2. Parameterizing tests in JUnit 5
JUnit provides different ways to parameterize the tests, akin to parameterizing in JUnit 4 framework.
As this article primarily focuses on JUnit 5 let us see how to parameterize the tests in JUnit 5. You will have to add the below dependency to parameterize the tests in JUnit 5.
|
1 2 3 4 5 6 |
<dependency> <groupId>org.junit.jupiter</groupId> <artifactId>junit-jupiter-params</artifactId> <version>5.7.1</version> <scope>test</scope> </dependency> |
Below is the code snippet to run our tests in different browsers by parameterizing the browsers.
As we have parameterized two different browsers, our tests will be executed in two browsers.
Console Output
‘Prioritizing tests’ in JUnit 5 and TestNG
Setting priority for the test cases is pretty important during the test execution as it helps find the critical defects in essential features. Though developing atomic test cases is considered as one of the Selenium best practices, there could be scenarios where you may have to devise inter-dependent tests.
1. Prioritizing the tests in JUnit 5
In JUnit 5, the execution order of tests or priority of the tests can be set using @Order annotation. We also have to use @TestMethodOrder(MethodOrderer.OrderAnnotation.class) to execute the tests in a pre-defined order.
In the below example, we have two tests – enterAndDisplayMessage() and addAndDisplayResult(). The test enterAndDisplayMessage() has the order set to 2 and the test addAndDisplayResult() has the order set to 1.
Console Output
Upon execution, we could see the tests being executed in the order provided.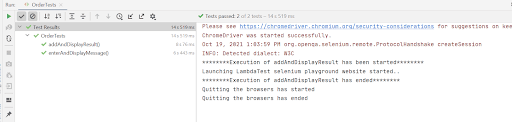
2. Prioritizing tests in TestNG
In TestNG, we can set the execution order or priority by providing the parameter @ priority and the @Test annotation.
Console Output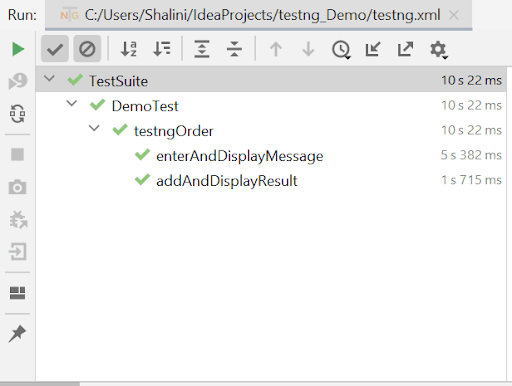
If there is no priority given for the tests, the tests will be executed in alphabetical order.
Consider the same code used above, and we don’t provide any priority explicitly. In that case, you can see the tests executed in alphabetical order.
You can also read this to understand the concept of setting the priority in TestNG – Prioritizing test cases in TestNG
Console Output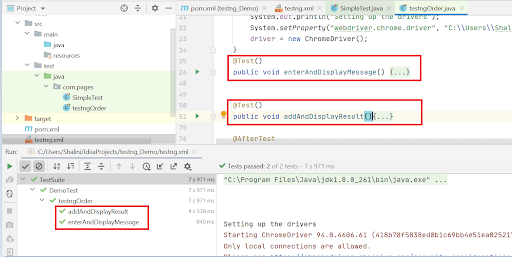
‘Creating Test Dependency’ in JUnit 5 and TestNG
Creating inter-dependent tests is one of the non-recommended practices in Selenium. However, it can be useful when you want to avoid (or skip) the execution of tests depending on the result of some other tests.
Read – Scenarios you cannot automate with Selenium
1. Creating dependency in JUnit 5
The @TestMethodOrder annotation that is used to configure the test execution order is also used for creating test dependencies in JUnit 5. It provides similar functionality that is offered by the @FixMethodOrder annotation in the JUnit 4 framework.
Fixing the execution order is particularly useful when writing functional tests or integration tests. It is majorly used in conjunction with @TestInstance(Lifecycle.PER_CLASS).
For controlling the execution order of the test methods, test classes (or test methods) are annotated with the @TestMethodOrder annotation. The desired order is specified using the MethodOrderer implementation.
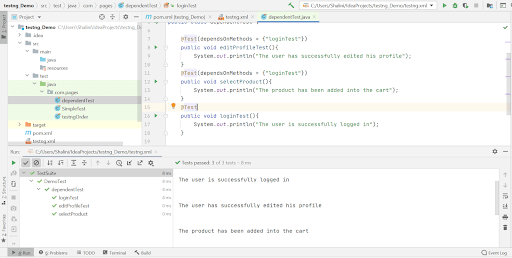
2. Creating dependency in TestNG
In the below example, we have written three tests – editProfileTest(), selectProduct(), and loginTest(). The former two tests are dependent on loginTest().
So when the main test i.e., loginTest() itself, fails, the dependent tests can be skipped as there is no point in testing when the login functionality is not working.
|
1 2 3 4 5 6 7 8 9 10 11 12 13 14 15 16 17 18 19 20 |
package com.pages; import org.TestNG.annotations.Test; public class dependentTest { @Test(dependsOnMethods = {"loginTest"}) public void editProfileTest(){ System.out.println("The user has successfully edited his profile"); } @Test(dependsOnMethods = {"loginTest"}) public void selectProduct(){ System.out.println("The product has been added into the cart"); } @Test public void loginTest(){ System.out.println("The user is successfully logged in"); } } |
Console Output
Parallel Test Execution in JUnit 5 and TestNG
Parallel testing is one of the crucial features to be kept in mind when implementing Selenium test scenarios. It has to be utilized from the early stages of testing. Parallel execution of tests would highly help in cutting the execution time.
Now let us run our tests in parallel using JUnit 5 and TestNG. We can utilize the LambdaTest cloud Selenium Grid to execute our tests in parallel.
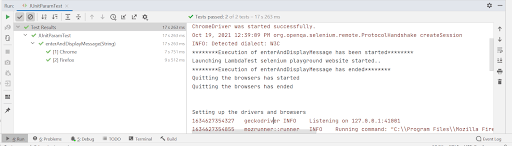
JUnit 5 Parallel Test Execution
Until JUnit 4, the parallel test execution wasn’t supported, which was the biggest drawback of using the Junit in the automation framework. But this was overcome in JUnit 5.
Let’s understand how to perform parallel testing in JUnit with an example.
Scenario 1: Verify the login functionality of LambdaTest Selenium playground.
Step 1: Launch https://www.lambdatest.com/selenium-playground/ website.
Step 2: Enter the valid username and password.
Step 3: Click Login.
Scenario 2: Verify if the user is able to see the message entered in the form.
Step 1: Launch https://www.lambdatest.com/selenium-playground/ website.
Step 2: On the main page, click the Simple Form Demo option.
Step 3: Once the page is navigated to a simple form, enter the message box.
Step 4: Click the Show Message button.
Scenario 3: Verify if the user can select the first option in the checkbox
Step 1: Launch https://www.lambdatest.com/selenium-playground/ website.
Step 2: On the main page, click the CheckBox Demo option.
Step 3: Upon navigation, select the first checkbox.
Step 4: Verify if the first checkbox is selected or not.
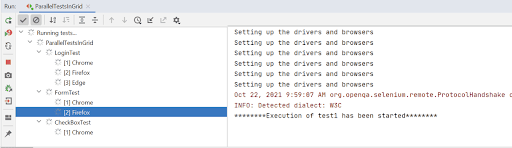
We have three tests to be run in parallel in LambdaTest Selenium Grid. Let us now run these tests across different browsers in parallel.
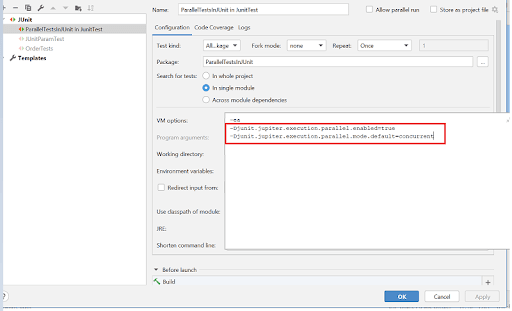
To run the tests in parallel, you can add the below arguments in VM options.
|
1 2 3 |
-Djunit.jupiter.execution.parallel.enabled=true -Djunit.jupiter.execution.parallel.mode.default=concurrent |
Console Output:
We will see the tests running in different browsers in parallel upon execution.
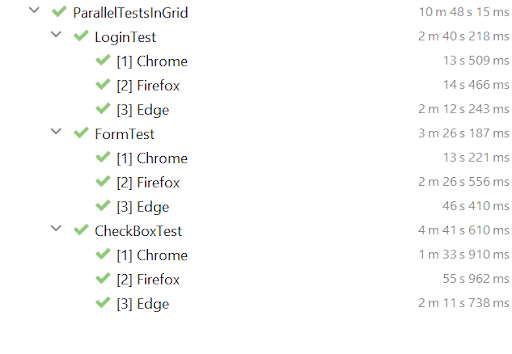
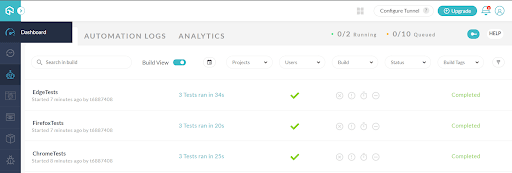
Go to the LambdaTest Automation dashboard; you will notice the three builds run in parallel.
You may also read this article Running JUnit 5 tests in parallel to understand the concept of running the tests in parallel in JUnit5 in detail.
TestNG Parallel Test Execution
Parallel test execution in TestNG can be achieved with ease. However, first, you need to define the parallel execution in testng.xml.
|
1 |
<suite name="Parallel_Testing" parallel="methods" thread-count="8"> |
Parallelism can be achieved at the methods, classes, tests, and instances level. In addition, you can define the number of threads in which the tests have to be executed in parallel. Defining the thread- count, like 8 in the above example, will use eight threads for execution. When the number of tests or methods is greater, the tests will run in a serial manner and wait for the completion of other tests.
Here is a brief video to help you with Parallel Testing in TestNG.
For demonstration, we will use the same tests as those in JUnit 5 parallel testing with minor changes for running tests in parallel in TestNG.
TestNG.xml
In the TestNG.xml file, we pass different browsers as parameters for cross browser testing, and we use parallel = “tests” and thread-count=”4” parameters to run our tests in parallel.
Console Output:
‘Customizing Test Names’ in JUnit 5 and TestNG
The TestNG framework does not allow for the customization of test names. However, we can give the tests a customized name in JUnit 5.
Customizing the test name in JUnit 5
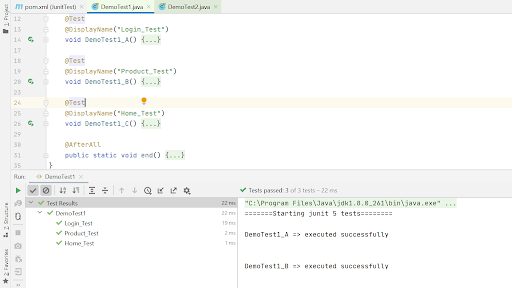
JUnit 5 provides an annotation @DisplayName which aids in customizing the test names for better readability.
Consider the below class with multiple tests, namely DemoTest1_A, DemoTest1_B, and DemoTest1_C. Most of the time, the method name wouldn’t be easier to depict the actual purpose of the test. However, in such cases, we can use the @DisplayName annotation followed by a customized name which would help identify and understand the feature of the test.
The console output shows the tests being named after the customized names given in the @DisplayName annotation.
Console Output
Unfortunately, TestNG doesn’t support customizing the names of the test.
‘Reporting’ in JUnit 5 and TestNG
JUnit 5 doesn’t support any built-in report. But it can be integrated with plugins to generate reports.
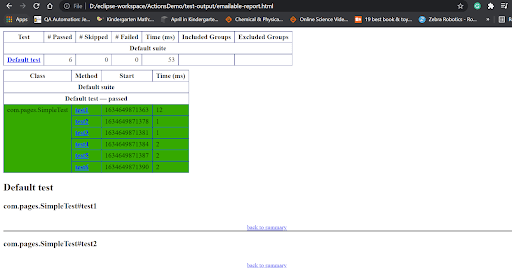
While that’s not the case in TestNG, it has an inbuilt HTML report generated after the test execution. Once the tests are executed by running the TestNG.xml file, a test- output folder will be created, which can be found after refreshing the project.
The report will be named emailable-report.html. Right-click the report 🡪 Open With 🡪 Web Browser.
The TestNG report would appear to be similar to the one below.
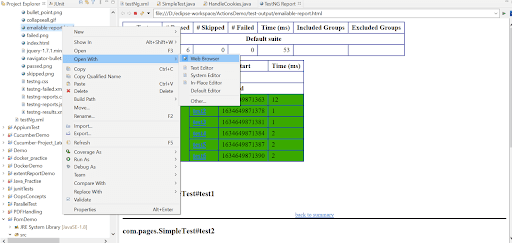
The TestNG report would appear to be similar to the one below.
AnotherTestNG report – index.html, can be viewed by right-clicking the test-output folder 🡪 Open With 🡪 Web Browser.
Index.html report

Choosing the Right framework!
So far, we have debated the various features available in JUnit 5 vs. TestNG. Choosing the right framework between JUnit 5 vs. TestNG has always been a common debate happening over the years. Both JUnit 5 and TestNG have been popular unit testing automation frameworks.
Though JUnit had some drawbacks, it has been fixed and has most of the features as TestNG. Yet there are some differences between JUnit and TestNG. So depending upon the requirement and the features available in these frameworks, we have to choose the right framework for automation.
I hope this comparative study will help you figure out the right automation framework. I would love to hear your comments on this article. If you are preparing for an interview you can learn more through TestNG interview
Happy Testing!

Frequently Asked Questions (FAQs)
Is JUnit better than TestNG?
TestNG and JUnit are both unit testing frameworks. However, TestNG is now more robust than JUnit owing to the inclusion of some new features.
Can I use TestNG with JUnit?
Yes! you can use TestNG with JUnit to run existing JUnit test cases. TestNG can automatically detect and execute JUnit tests, allowing you to use it as a runner for all of your existing tests as well as build new ones.
What are the drawbacks of JUnit?
- In contrast to the TestNG framework, you can’t perform dependency testing.
- It is not appropriate for higher-level testing, such as large test suites.
- JUnit, which is accessible in TestNG, does not support group testing.
- It is not possible to create HTML reports of test cases. To generate HTML reports from tests, you must use ANT.


Author’s Profile
Shalini Baskaran
Shalini works as a Technical Writer at LambdaTest. She loves to explore recent trends in test automation. Other than test automation, Shalini is always up for travel & adventure.
Blogs: 19
Got Questions? Drop them on LambdaTest Community. Visit now