How To Identify Locators In Appium [With Examples]
Wasiq Bhamla
Posted On: September 9, 2022
![]() 150170 Views
150170 Views
![]() 19 Min Read
19 Min Read
Nowadays, automation is becoming integral to the overall quality of the products being developed. Especially for mobile applications, it’s even more important to implement automation robustly.
As per Statista, the number of mobile users is likely to be 7.26 billion by 2022 and will increase up to 7.46 billion by 2025. This indicates how mobile applications will grow in the coming years, making mobile app testing extremely important.

There are many mobile testing frameworks available for performing mobile automation tests, but in this Appium testing tutorial, we will focus on the Appium automation tool to automate Android and iOS applications. To learn more about mobile automation, you can refer to my earlier blog on Appium with TestNG to perform Android automation testing and iOS automation testing.
Based on my experience, I’ve observed test engineers, both beginners and experts, relying on XPaths without careful consideration, leading to unstable tests. Therefore, to ensure robust automation, it’s crucial to comprehend the supported locator strategies in Appium and choose the most suitable one for improved automation performance.
In case you are a beginner to Appium you can learn to perform mobile app testing easily through this tutorial. If you are preparing for an interview you can learn more through Appium Interview Questions.
By the end of this tutorial on using locators in Appium testing, you’ll learn about:
- Common locator strategies are provided by Appium.
- Android-specific locator strategies when the Automation name is UIAutomator2.
- Android-specific locator strategies when the Automation name is Espresso.
- iOS-specific locator strategies.
The code snippets and examples used in this blog on locators in Appium are available on GitHub. You can clone the repository and follow along.
We will be using the Proverbial app for Android and iOS for most of the locator strategies while we will use the API-demo Android app for the UIAutomator -> UiScrollable locator and Espresso-specific Data Matcher and View Matcher locator strategies.
TABLE OF CONTENTS
- Strategies to use locators in Appium
- ID locator in Appium
- Accessibility ID locator in Appium
- Class Name locator in Appium
- XPath locator in Appium
- Strategies to use Android-specific locators in Appium
- Strategies to use iOS-specific locators in Appium
- Demo: Using Locators in Appium
- Frequently Asked Questions (FAQs)
Strategies to use locators in Appium
In Appium, there are some locator strategies that you can use for Android and iOS platforms. These strategies are very straightforward and almost identical to Selenium locators, which we are already used to; thus, all these locators are very easy to use.
Let’s look at all the common strategies to use locators in Appium:
ID locator in Appium
The first common locator that Appium supports is ID. The ID is the resource-id defined in the Android app, while in iOS, it’s the name property for the element.
While using Java, we can use this locator in Appium as shown below:
|
1 2 3 4 |
import io.appium.java_client.MobileBy; import org.openqa.selenium.By; . . . private final By colorById = MobileBy.id ("color"); |
Appium Inspector also suggests using ID if it is declared for the element. The same is shown below:
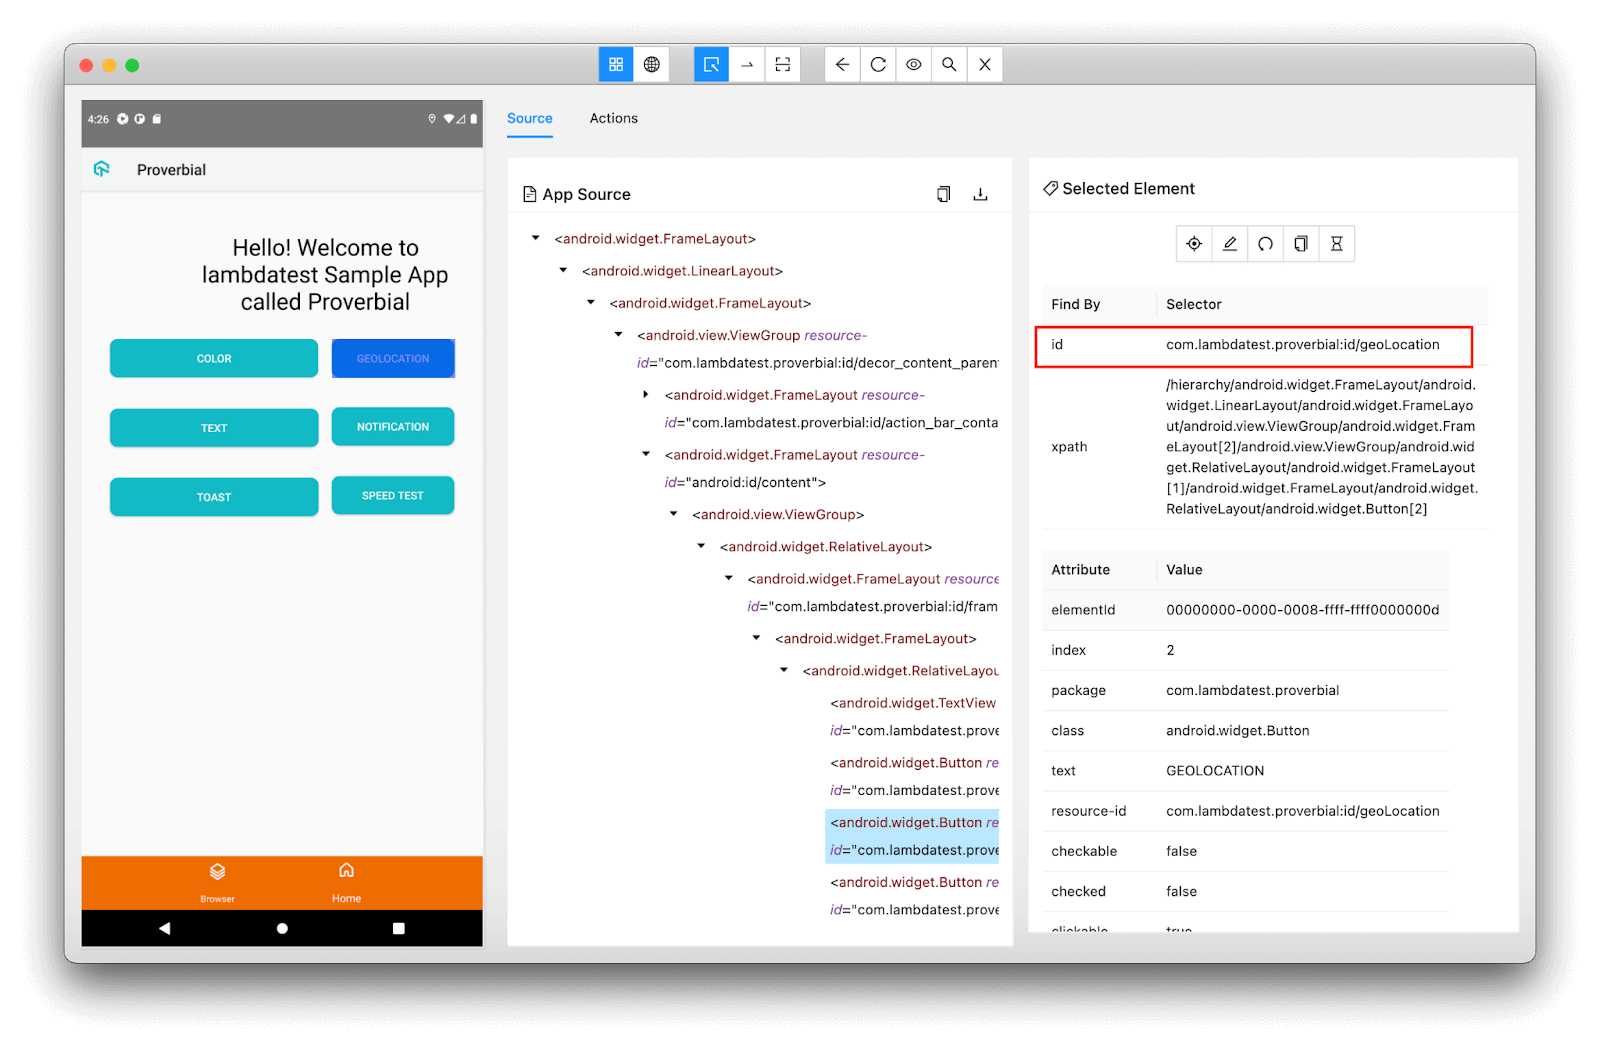
ID locator and Accessibility ID locator are very similar, making finding the element easy due to its uniqueness. If these IDs are set for the locator, then you should always prefer using this locator in Appium over other strategies to use locators in Appium. It is preferred to use an ID locator in Appium because it makes the element unique and results in finding the element much more quicker.
Normally the format of the ID locator for the Android platform is < package-name >:id/< id-name >. So while finding the element, you can use the whole text or only the < id-name >. In the example screenshot, you can either use com.lambdatest.proverbial:id/geoLocation or simply geoLocation.
Accessibility ID locator in Appium
This is also the most preferred strategy after the ID locator in Appium. Accessibility ID for Android is the content-desc property of the element, while in iOS, it’s the accessibility-id property. It is also one of the fastest performing locator strategies.
While using Java, we can use this locator in Appium as shown below:
|
1 2 3 4 |
import io.appium.java_client.MobileBy; import org.openqa.selenium.By; . . . private final By colorByAccessibilityId = MobileBy.AccessibilityId ("color"); |
Appium Inspector will suggest using Accessibility id if it is defined for the element. The same is shown below:

If you find that in your application under test if there is any element that is not dynamic but still does not have the accessibility id set, nor does it have any ID set, then you should ask your development team to add those attributes. This will help you save so much time that you may have to build other locators in Appium like XPath, UISelector, etc.
Class Name locator in Appium
Class name is another common strategy to identify the element in the application. The class is the full name of the XCUI element for iOS, which starts with XCUIElementType, and for Android is the fully qualified name of the element, which normally starts with android.widget.* when you select UIAutomator2 as the Automation name in the capability.
While using Java, you can use this locator in Appium as shown below:
|
1 2 3 4 |
import io.appium.java_client.MobileBy; import org.openqa.selenium.By; . . . private final By colorByClassName = MobileBy.className ("android.widget.Button"); |
You can find exactly what class name there is for any element in Appium Inspector, as shown below:
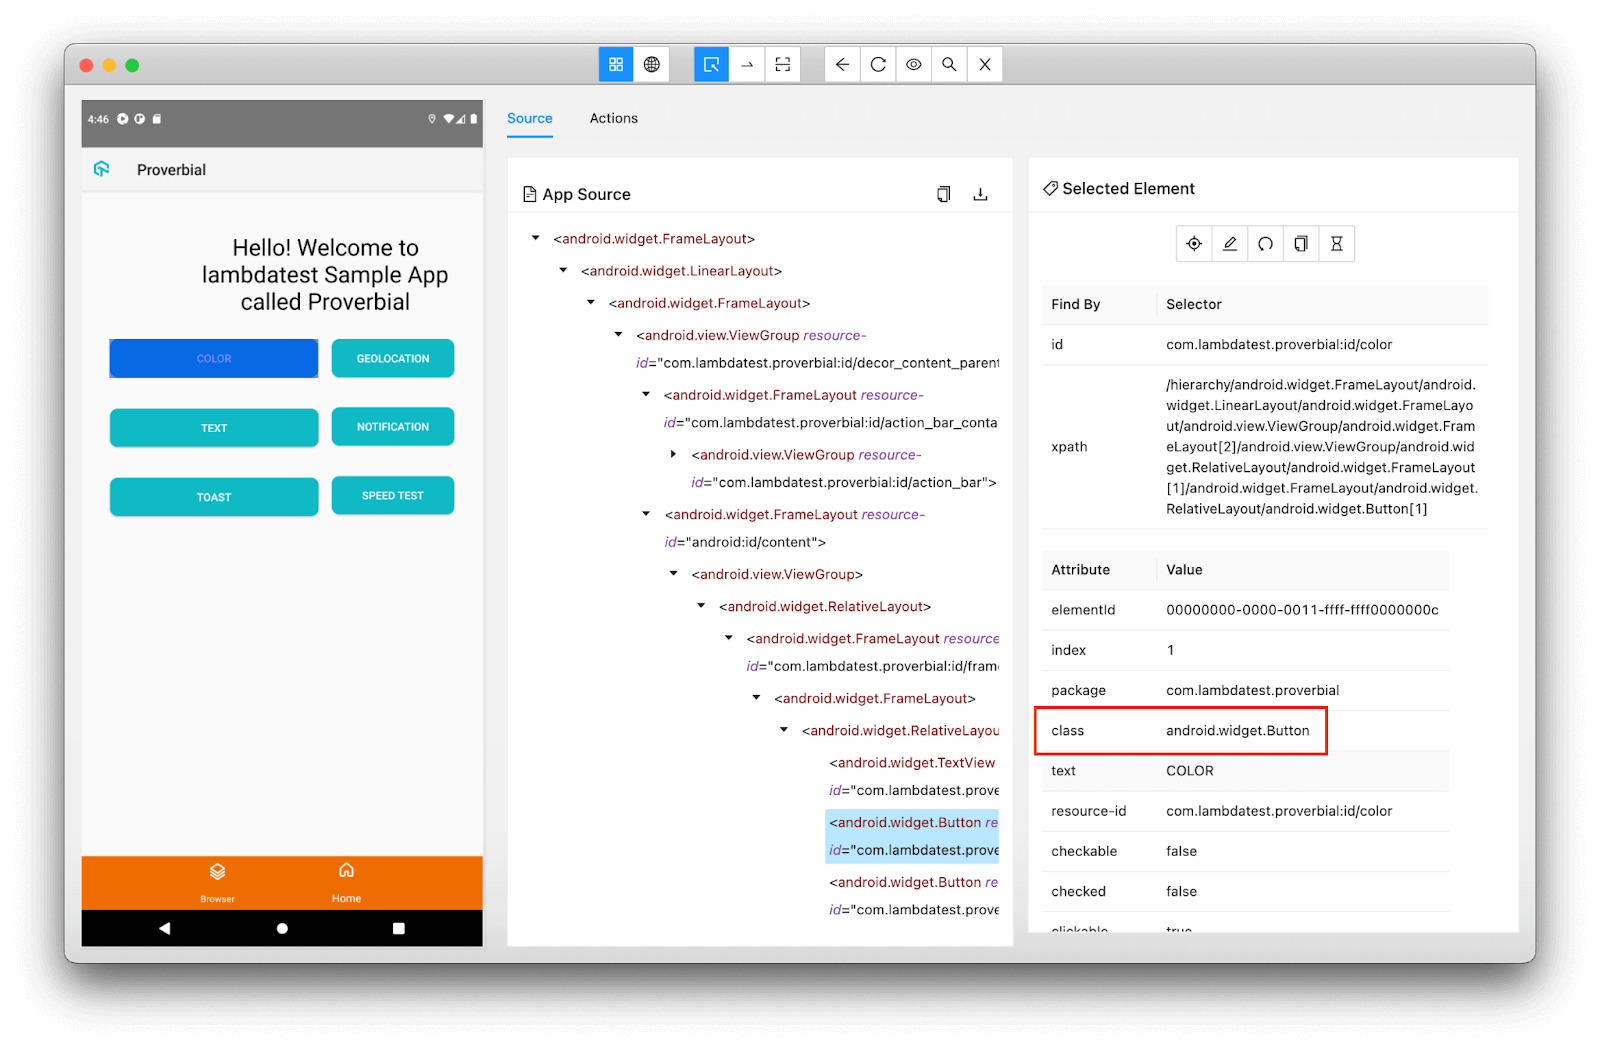
Normally, you won’t need the use of the class name unless the element is a dynamic one. There is only one element for that particular class name. Use cases would be many where you can use the class name locator, but it is highly suggested to use ID or accessibility id wherever possible.
XPath locator in Appium
XPath scans the whole XML source tree of the application screen. It is the only locator in Appium that is not recommended by the Appium team out of all the locator strategies that Appium supports. The reason is that it has performance issues and is also the slowest performing locator strategy. Normally this locator is still supported when in the rare scenario when all the other locator strategies do not work, we can use XPath to find the element.
While using Java, you can use the XPath locator in Appium as shown below:
|
1 2 3 4 |
import io.appium.java_client.MobileBy; import org.openqa.selenium.By; . . . private final By colorByXpath = MobileBy.xpath (".//android.widget.Button[@text='COLOR']"); |
Appium Inspector also helps you with pre-built XPath expressions, which you can use directly. The same is shown below:
It is preferred not to use this locator strategy because even if there is no ID or accessibility id, you can still use other platform-specific locator strategies (which we will look at in some time) to find the element.
Run Appium test automation across 3000+ real devices and OS. Try LambdaTest Now!
Strategies to use Android-specific locators in Appium
After commonly supported strategies to use locators in Appium, there are few platforms and automation type-specific locator strategies. Let’s look into the Android-specific locators in Appium in detail.
UIAutomator2: UIAutomator Selector
The UIAutomator selector locator in Appium is one of the unique locator strategies where you have to create a Java statement and pass it as the locator text to the method. In this statement, you need to use the UiSelector class to build the Java statement.
|
1 |
new UiSelector().<method_name> |
Shown below is an example of using this locator in our Java tests:
|
1 2 3 4 |
import io.appium.java_client.MobileBy; import org.openqa.selenium.By; . . . private final By colorByUiSelector = MobileBy.AndroidUIAutomator ("new UiSelector().text(\"COLOR\")"); |
Here, we are creating an instance for UiSelector and informing the server that we need to find an element that has the text COLOR.
Some of the frequently used methods in the UiSelector class are as follows:
checked: This method takes the expected value for the element to find an element that is checked. Mostly it is used with a checkbox element.className: This method takes a class name string, which you can find from Appium Inspector.classNameMatches: This method takes a regex expression to find an element based on its class name.description: This method takes in the content description attribute for the element, which can be found in Appium InspectordescriptionContains: This method takes in full or partial content description attributes for the element.descriptionMatches: This method uses a regex expression to find the element based on its content description.descriptionStartsWith: This method takes a starting part or full content description to find the element.enabled: This method takes a boolean value to determine whether it’s enabled.index: This method takes the element’s index from the list of elements.resourceId: This method takes in the resource id equivalent to the ID locator.resourceIdMatches: This method takes a regex expression for resource id to find the element based on its resource id.selected: This method takes a boolean value to find the selected or unselected element.text: This method takes in a text value to find an element by its text value.textContains: This method takes a partial text to find an element by its partial text value.textMatches: This method takes a regex value to find an element.textStartsWith: This method takes in a text value for an element to find it based on the text starting value.
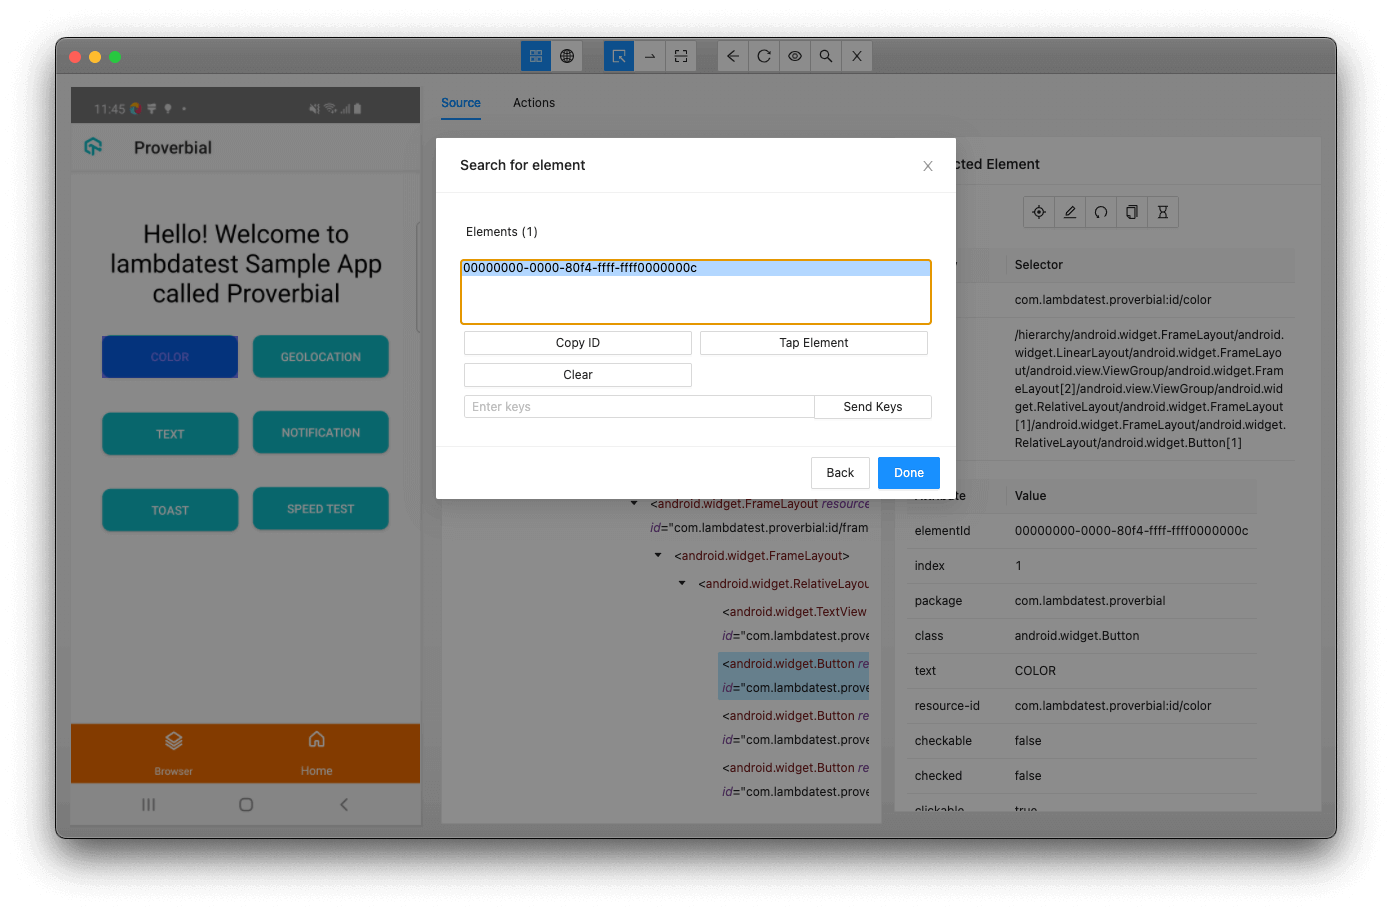
You can verify if your selector is working or not by executing the locator expression in the Search for element window in the Appium Inspector.
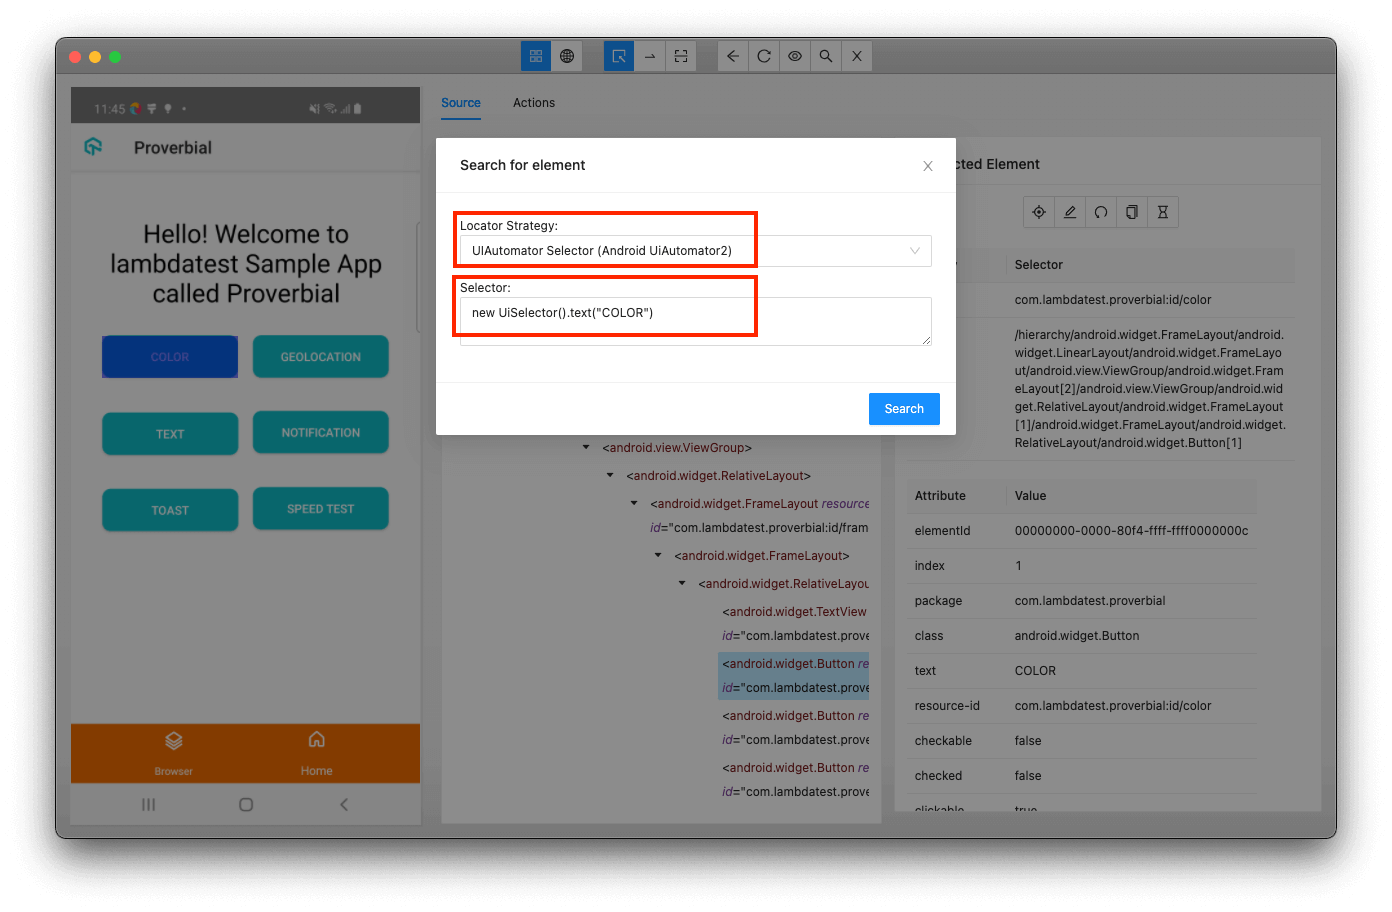
In Appium Inspector, click on the magnifying glass icon and select locator strategy as UIAutomator Selector, create your selector, and click on the Search button. You will see the element once it’s found on the next screen, as shown below:
You can also use the UiScrollable class to make the element move into view along with the UiSelector class.
Let’s check out the UiScrollable example where normal UiSelector cannot find the element not in the viewport, whereas UiScrollable was able to find the element and scroll it into view.
|
1 2 3 4 |
import io.appium.java_client.MobileBy; import org.openqa.selenium.By; . . . private final By colorByUiSelector = MobileBy.AndroidUIAutomator ("new UiScrollable(new UiSelector().scrollable(true)).scrollIntoView(new UiSelector().text(\"PathEffects\"))"); |
The above snippet is added as an example here but the same is not there in our demo project.
In Appium Inspector, we can validate that the UiSelector was not able to find the element as shown below:
However, with UiScrollable, it was able to find and scroll to the element without any problems, the same can be seen below:
These locator strategies are more useful while finding dynamic elements, which normally is difficult to find using other commonly used locator strategies.
Espresso: Data Matcher
In Android, when you want to find any element, only the element visible in the viewport can be found. You cannot find an element at the bottom of the list with 100s of items unless you scroll through the list until you find that element or if you’re using UiScrollable with the UiSelector locator strategy. This is possible when you use Espresso as the Automation type in Appium.
In Appium Espresso driver, there is a specific locator strategy that you can use to find the element anywhere in the list, and it does not matter how many items are in that list. That locator strategy is Data Matcher.
Data matcher will only work on elements that are part of a view, a subtype of AdapterViews, for example, ScrollView, ListView, and GridView. If you were to use native Espresso directly to find that element, then you would write something like shown below:
|
1 2 3 |
onData (hasEntry ("title", "App") .inAdapterView (withId ("android:id/list")) .perform (click ()); |
In Appium you can write the locator similar to this by using Hamcrest exposed methods and create JSON string and pass it to the Data matcher locator method. Let’s see how to do this in Java.
|
1 2 3 4 5 6 7 8 9 10 |
import com.google.common.collect.ImmutableList; import com.google.common.collect.ImmutableMap; import io.appium.java_client.MobileBy; import org.openqa.selenium.By; import org.openqa.selenium.json.Json; . . . private final By appItemDataMatcher = MobileBy.androidDataMatcher (new Json ().toJson (ImmutableMap.of ( "name", "hasEntry", "args", ImmutableList.of ("title", "App") ))); |
If you compare this locator values with the native Espresso expression we used earlier, we are breaking the hasEntry call and creating the JSON string.
Let’s see how you can find the element using the data matcher locator in Appium Inspector.
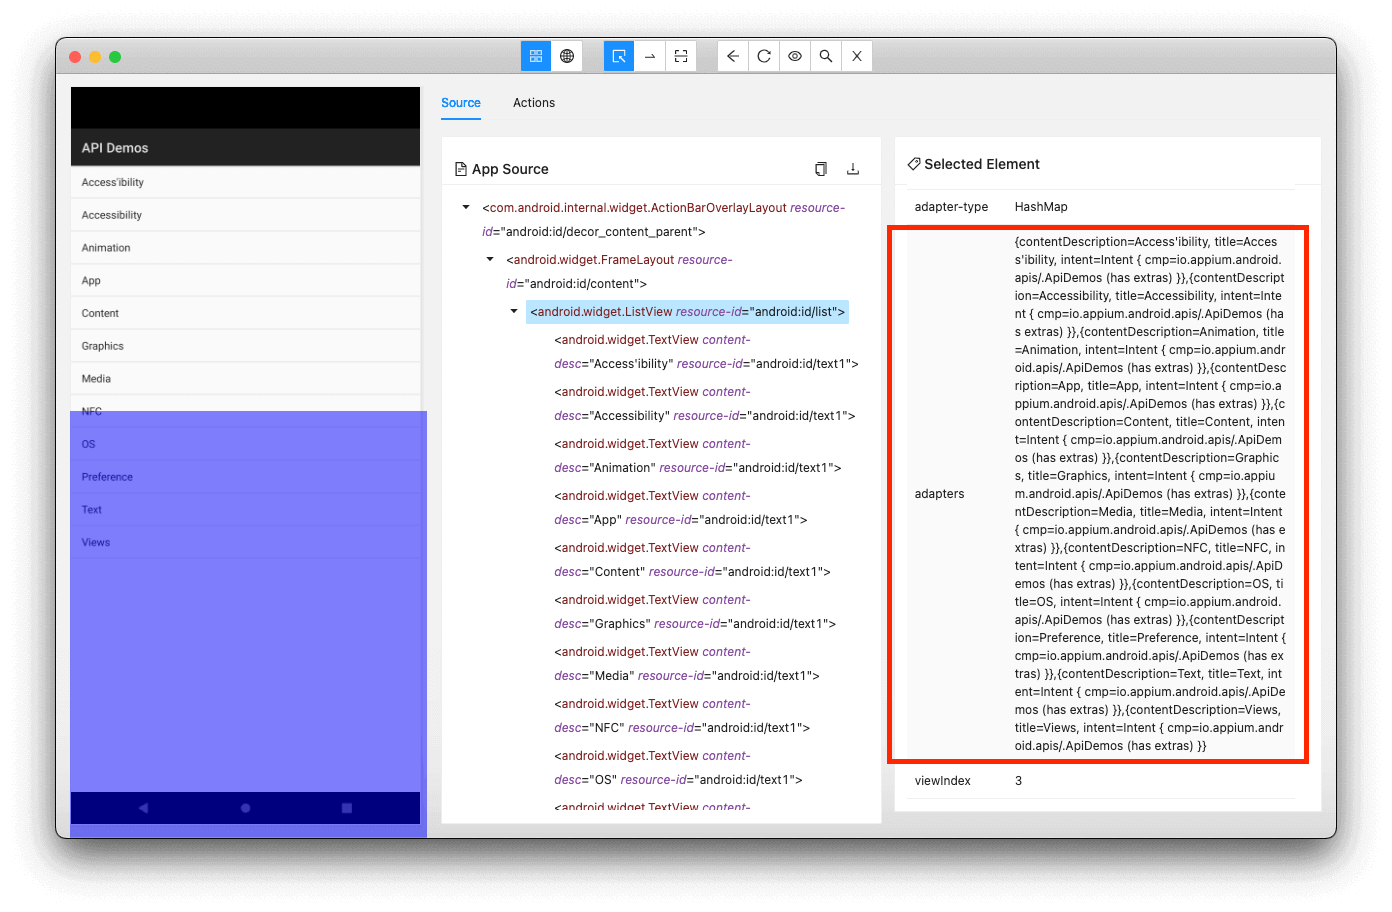
Since we want to find elements from the list, first, we will select the main listview and get the value from its adapters attribute, as shown in the screenshot above.
Let’s see what value is there in the adapters attribute:
Notice the values we used in the Java example for the data matcher locator in Appium for the args field? As mentioned above, we have used the title property, which is part of the adapters attribute. You can use any combination of key/value pairs from these attributes, for example, contentDescription or intent apart from title.
Bonus Tip:
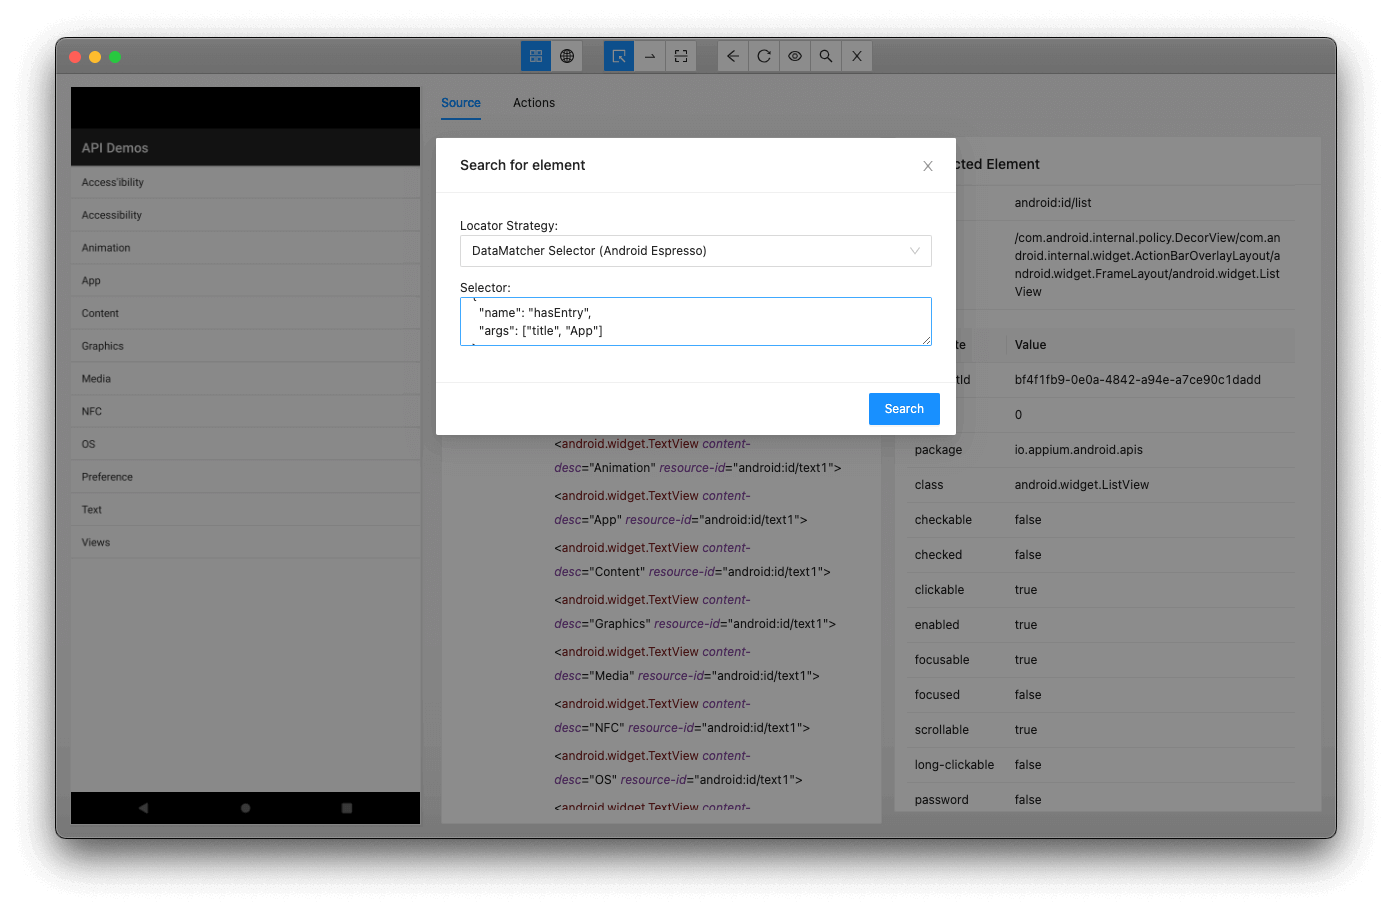
Appium Inspector behaves weirdly when you try to find the element by clicking on it. Instead, you need to find the element from the XML tree. Also, Appium Inspector won’t help provide you with a pre-built locator as it does for other locators in Appium. To ascertain whether the data matcher locator you created works, you can check it by using the Search for element button in the inspector, as shown below.
Espresso: View Matcher
View matcher locator strategy is very similar to the data matcher strategy, where we create a JSON string and pass it to the locator in Appium. The only difference is we use ViewMatchers class methods instead of Hamcrest class. Three fields are passed in the JSON string:
name: This is the method’s name.args: This will have the parameter value for the method.class: This will have the class name which contains the method. Mostly, it will beandroidx.test.espresso.matcher.ViewMatchers.
While using Java, we can use the View Matcher locator in Appium, as shown below.
|
1 2 3 4 5 6 7 8 9 10 |
import com.google.common.collect.ImmutableMap; import io.appium.java_client.MobileBy; import org.openqa.selenium.By; import org.openqa.selenium.json.Json; . . . private final By animationItemViewMatcher = MobileBy.androidViewMatcher (new Json ().toJson (ImmutableMap.of ( "name", "withText", "args", "Animation", "class", "androidx.test.espresso.matcher.ViewMatchers" ))); |
Strategies to use iOS-specific locators in Appium
In iOS, there is only one Automation type, XCUITest, which supports the following strategies to use locators in Appium.
XCUITest: Predicate String
Predicate string locator strategy is similar to a SQL query where you query for a particular element using a combination of its attributes.
While using Java, you can use the predicate string locator in Appium, as shown below.
|
1 2 3 4 |
import io.appium.java_client.MobileBy; import org.openqa.selenium.By; . . . private final By colorByPredicate = MobileBy.iOSNsPredicateString ("label == \"Colour\" AND name == \"color\""); |
Appium Inspector also helps in providing a pre-built predicate string which you simply copy and use in your test. Below is the screenshot showing how Appium Inspector shows the pre-built locator in Appium.

While creating the predicate string, you can also use the following comparison expressions,
Basic comparisons:
=,==: Left-hand expression is equal to right-hand expression.>=,=>: Left-hand expression is greater than and equal to right-hand expression.<=,=<: Left-hand expression is less than and equal to right-hand expression.>: Left-hand expression is greater than right-hand expression.<: Left-hand expression is less than right-hand expression.!=,<>: Left-hand expression is not equal to right-hand expression.-
< INPUT > BETWEEN { lower range, upper range }: Left-hand expression value lies between the range mentioned in the right-hand expression, with both the values inclusive.
Basic predicates:
AND,&&: Logicalandwill check both the connected expressions to betrue.OR,||: Logicalorwill check if any of the connected expressions aretrue.NOT,!: Negating an expression will negate the outcome of the expression with which it is used.
String comparisons:
BEGINSWITH: Checks if the attribute starts with the provided string.CONTAINS: Checks if the attribute contains the provided string.ENDSWITH: Checks if the attribute ends with the provided string.LIKE: Checks if the attribute has the provided string containing wildcards like?and*.Here,?will try to match only one char, while*will try to match 0 or more chars from that position.MATCHES: Checks if the attribute matches the regex string.
XCUITest: Class chain
Class chain locator in Appium is similar to XPath but more stable than XPath. With Class chains, you can combine predicate strings or directly reference child or descendent indexes to get a particular element.
While using Java, you can use the iOS class chain locator in Appium, as shown below.
|
1 2 3 4 |
import io.appium.java_client.MobileBy; import org.openqa.selenium.By; . . . private final By colorByClassChain = MobileBy.iOSClassChain ("**/XCUIElementTypeButton[`label == \"Colour\"`]"); |
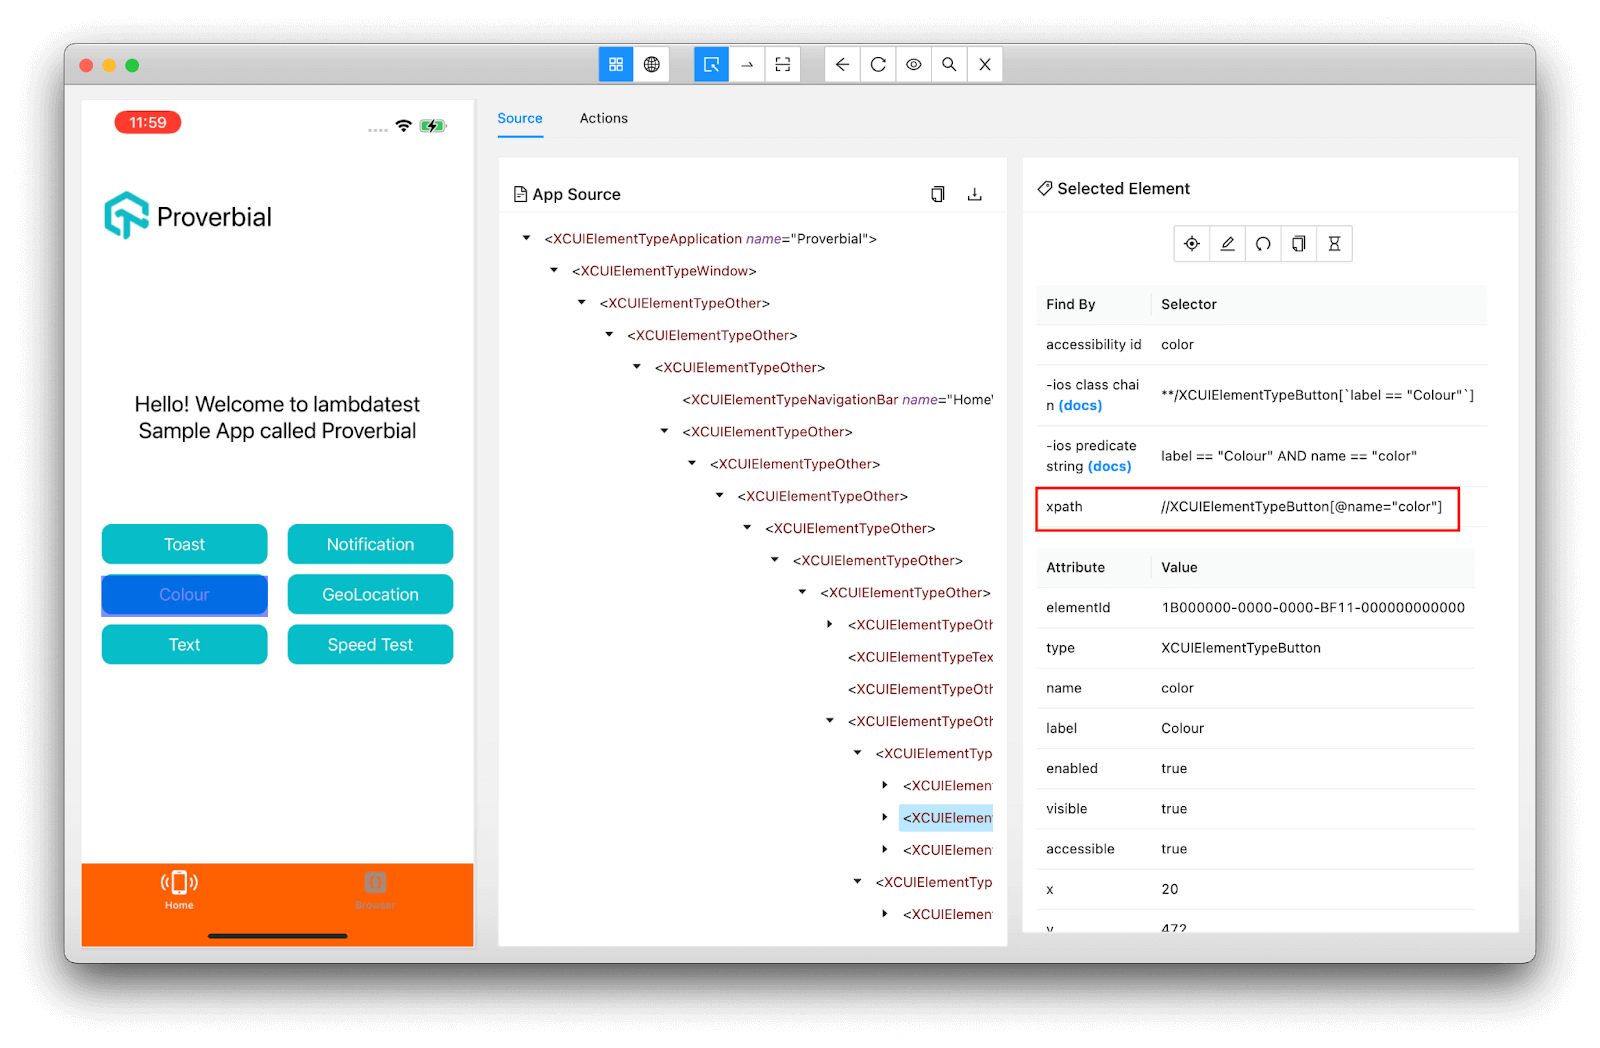
Appium Inspector also helps with providing pre-built iOS class chain locator in Appium as shown below,

Tips when creating a class chain expression:
- You can chain multiple classes in your expression, e.g.:
**/< parent-class >/< target-class > - You can use indexes to get a specific element from the list of locators identified with the expression before the index, e.g.:
< parent-class >[1]/< target-class >[2], where the parent class first instance will be used and then target class 2nd instance will be found with this expression. - Indexes here start from 1 instead of normally 0 index.
- Indexes can also be negative. For example,
-1means the last element from the list of elements. Similarly,-2means the second last item. - You can also combine predicate string expression with class chains like we use indexes, e.g.:
< target-class >[name CONTAINS[cd] "text"] - Predicate strings should always be enclosed in ticks, as shown in the example.
- You can also combine index and predicate strings in the same expression at any level of the hierarchy, e.g.:
**/< parent-class >[name BEGINSWITH "Some Text"][-1]/< target-class >[3]
If you like XPath more, this locator in Appium is the perfect replacement for XPath but is more stable and one of the best-performing locator strategies. Here also, it is suggested that if you can use ID or Accessibility ID or ask the development team to add these IDs to the element, you should use them instead of the Class chain locator in Appium.
Demo: Using Locators in Appium
Until now, we have seen the code snippets. Now let us see the page object and the test we have in the demo project shared on GitHub. You can download and clone the same and follow along.
DriverManager class
This class is used to create driver sessions for different Automation types to demonstrate different locators in Appium specific for that particular Automation type.
Here, we have created a few different create-driver methods to create different driver instances for different automation types. Only for the Espresso driver, we have two methods, one for local execution and one for the cloud. This is because most cloud platform providers are not yet supporting the Espresso driver, due to which we will encounter errors like Data matcher locator strategy not implemented or View matcher locator strategy not implemented.
For cloud test execution, we are using the LambdaTest cloud platform, while for local execution, we start and stop the Appium server from this class directly.
Cloud testing platforms like LambdaTest provide an online device farm of 3000+ real devices and operating systems to perform app test automation at scale over a cloud Appium grid. You can perform mobile automation testing on real Android and iOS devices.
Here’s how you can use LambdaTest’s real device cloud to perform Appium mobile testing:
You can also subscribe to the LambdaTest YouTube Channel and stay updated with the latest tutorials around Selenium testing, Cypress testing, CI/CD, and more.
Page object
There is one page object for Android and one for iOS to demonstrate different locators in Appium. First, let's see the AndroidLocators page object.
|
1 2 3 4 5 6 7 8 9 10 11 12 13 14 15 16 17 18 19 |
import com.google.common.collect.ImmutableList; import com.google.common.collect.ImmutableMap; import io.appium.java_client.MobileBy; import lombok.Getter; import org.openqa.selenium.By; import org.openqa.selenium.json.Json; @Getter public class AndroidLocators { private final By animationItemViewMatcher = MobileBy.androidViewMatcher (new Json ().toJson (ImmutableMap.of ("name", "withText", "args", "Animation", "class", "androidx.test.espresso.matcher.ViewMatchers"))); private final By appItemDataMatcher = MobileBy.androidDataMatcher (new Json ().toJson (ImmutableMap.of ( "name", "hasEntry", "args", ImmutableList.of ("title", "App") ))); private final By colorByClassName = MobileBy.className ("android.widget.Button"); private final By colorById = MobileBy.id ("color"); private final By colorByUiSelector = MobileBy.AndroidUIAutomator ("new UiSelector().text(\"COLOR\")"); private final By colorByXpath = MobileBy.xpath (".//android.widget.Button[@text='COLOR']"); } |
The class seems very straightforward where we have declared all the Android-specific locators. Now let’s see the IOSLocator page object.
|
1 2 3 4 5 6 7 8 9 10 11 |
import io.appium.java_client.MobileBy; import lombok.Getter; import org.openqa.selenium.By; @Getter public class IOSLocators { // Demoed with iOS. private final By colorByAccessibilityId = MobileBy.AccessibilityId ("color"); private final By colorByClassChain = MobileBy.iOSClassChain ("**/XCUIElementTypeButton[`label == \"Colour\"`]"); private final By colorByPredicate = MobileBy.iOSNsPredicateString ("label == \"Colour\" AND name == \"color\""); } |
Here also, we have declared all the iOS specific locators in Appium.
Test classes
BaseTest
Before writing the tests, we have a common BaseTest class, which will be extended to all of our tests. Let’s see what we have in the Base test.
In this class, we have only two methods, one where we quit the driver session and close the local Appium server if it’s running. At the same time, the other method is used to find the element using the locator strategy passed to this method and also prints the time it took to find the element so we can identify which locator strategy is the fastest and which one is the slowest.
LocatorsAndroidEspressoTest
In this class, we will test the locators specific to the Espresso automation type. This test will execute on the local Appium server.
We have one more similar class which runs on LambdaTest cloud platform. But that class will fail, as mentioned earlier.
LocatorsAndroidUiAutomatorTest
In this test, we will test all the locator strategies specific to the UiAutomator2 Automation type along with a few common locators in Appium.
LocatorsIOSTest
In this class we will test all the iOS specific locator strategies for XCUITest automation name.
Test your native apps on XCUITest cloud. Try LambdaTest Now!
Test output
When you execute all the tests which we saw until now, you’ll see an output something as the one shown below.
|
1 2 3 4 5 6 7 8 9 |
Time taken by View Matcher: 36ms Time taken by Data Matcher: 209ms Time taken by Ui Selector: 230ms Time taken by ID: 251ms Time taken by Predicate: 266ms Time taken by Class Chain: 272ms Time taken by Class Name: 337ms Time taken by Accessibility Id: 376ms Time taken by Xpath: 517ms |
Here, all the locators are mentioned from fastest executing ones to the slowest one.
Note: Boost your Testing efficiency by ultimate guide of Appium Commands Cheat Sheet for Developers.
Conclusion
Now, you might have a fair idea of when to use which locator in Appium, depending on your needs. There are a few other locators in Appium, which were skipped from this blog on locators in Appium because it was either deprecated or an experimental feature by Appium. I hope you liked this blog and learned something new from it.
Frequently Asked Questions (FAQs)
What are the locators used in Appium?
- Some of the commonly used locators in Appium include:
- ID.
- Accessibility ID.
- Class Name.
- XPath.
- Android UI Automator (UI Automator 2)
- Android View Tag (Espresso Only)
- iOS UIAutomation
How do you inspect locators in Appium?
As compared to other mobile automation tools, Appium is unique in that it provides the capability to inspect any element on the screen using very simple steps. This helps a lot in identifying the UI elements. The following steps explain how you can inspect your mobile application elements in Appium:
- Launch your desired app on your local system and then launch the Appium server.
- Open your browser and open the desired URL of the app (http://127.0.0.1:4723)
- Now click on the "Inspect" button in Advanced Settings (This will open a new window with all the elements on the screen).
- Now, simply click on the element in the app view and see the DOM/Source in the next panel and the properties on the right side of the selected element. Done!
How do I write XPath in Appium?
To create a simple XPath query in Appium, click on the Spy icon button to get the Native/Web properties of all the objects on the screen. Then, right-click on one or more properties and then click on Copy XPath.


Author’s Profile
Wasiq Bhamla
Wasiq is a Test Automation specialist having more than 15 years of experience in Manual and Automation testing. He has vast experience in automating Desktop, Web, API, Android, and iOS based applications. He is also an active open source contributor on GitHub, a freelancer, a mentor, and a blogger.
Blogs: 5
Got Questions? Drop them on LambdaTest Community. Visit now