Nightwatch JS Tutorial: Guide to Automation With Selenium and Nightwatch
Harita Ravindranath
Posted On: December 11, 2020
![]() 154309 Views
154309 Views
![]() 19 Min Read
19 Min Read
Nightwatch JS is one of the most used JavaScript based end to end automation testing framework. A highly extendible Node.js framework, Nightwatch JS comes with built in command line runner, support for sequential and parallel runs, a integrated support for WebDriver Tutorial services, and support for extending the framework with plugins.
With shorter development cycles and faster releases backed by Agile and DevOps, companies are keen on adopting the right automation testing strategy on par with the development and ensure a high-quality end product. Speeding up automation testing means choosing a plan that aids in handling repetitive work and optimizing tasks with minimal maintenance and effort. And herein lies the importance of implementing the right test automation framework.
Various test automation frameworks are available in the market to choose from. Nightwatch JS is one such well-favored JavaScript-based framework since its release in 2014. This blog will be your guide to everything you need to know to kickstart your journey in Nightwatch JS for Selenium automation testing.
Starting with a brief overview, our primary focus in this Nightwatch JS tutorial would be setting up and configuration of Nightwatch.js into your system. And by the end, you will be able to write your first test in Nightwatch JS and Selenium.
Let’s get started!
TABLE OF CONTENT
What Is Nightwatch JS?
Nightwatch JS is an open-source automated testing framework for browser-based web applications and websites. It is written in Node.js runtime and uses the W3C WebDriver API (formerly Selenium WebDriver) for interacting with various browsers to perform commands and assertions on DOM elements.
Why Is Nightwatch JS So Popular?
The reason behind Nightwatch JS popularity is its out of the box features. Some of the noteworthy features that make Nightwatch JS so popular are:
- Easy To Use – with a clean and simple syntax, code can be written swiftly and efficiently.
- In-Built Test Runner – comes with an inbuilt command-line test runner suite with Grunt support for executing Selenium automated tests.
- Page Object Model – supports CSS and XPath locators making browser automation more manageable.
- Flexibility – enables unit, integration as well as end-to-end testing.
- Selenium Server Support – it can automatically control the standalone Selenium server or various browser web drivers.
- Integrations – provides a single integrated solution for application testing, eliminating the dependency on third-party software.
- Support For Cloud Services – compatible with cloud-based testing platforms like LambdaTest.
- Continuous Integration – supports software like Jenkins, TeamCity, etc., assisting developers in continuously building and testing software.
Do check out the Best JavaScript Testing Frameworks!
Nightwatch JS Installation & Local Set Up
It is time to proceed with the installation and environment set-up for Nightwatch JS automation. We will be going step by step from the beginning. But, before installing Nightwatch.js, make sure your system is pre-equipped with the following.
Prerequisites:
a) Java
Check whether Java is already installed in your system using the following command:
![]()
If not, install the latest JDK appropriate to your machine from here.
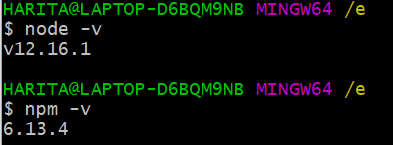
b) Node.js & NPM
Check whether Node.js is already installed in your system using the following command:
![]()
If not, install the latest LTS version from here.
Note: NPM will be installed along with Node.js. So no need for separate installation.
After installation, verify the version of Node.js and npm using these commands:
c) Visual Studio Code
Here, we are using Visual Studio Code as the IDE. You can choose any other IDE of your choice.
If not already installed, you may download VSC from here.
Installing Nightwatch JS & Project Setup
Now let’s proceed with Nightwatch.js installation and basic project configuration. As promised, we will go step by step.
Step 1: Create a folder for your project in the desired location in your system. Open the folder in your IDE.
Step 2: Now, let us initialize our project with the package.json file.
- Open the terminal in Visual Studio Code.
- Verify that it is pointing to the project folder location.
- Give the command:
npm init - You will be asked to fill in project details. You may fill them or leave them blank as of now.
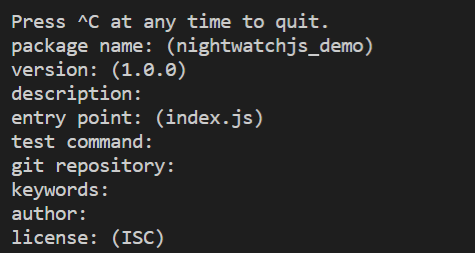
- You will also notice the package.json file is created in your project folder, containing all the project configuration details.
Tip: Save some time by using the following command in order to generate a default package.json file without any questions being asked.
npm init -y
Here y stands for “yes”.
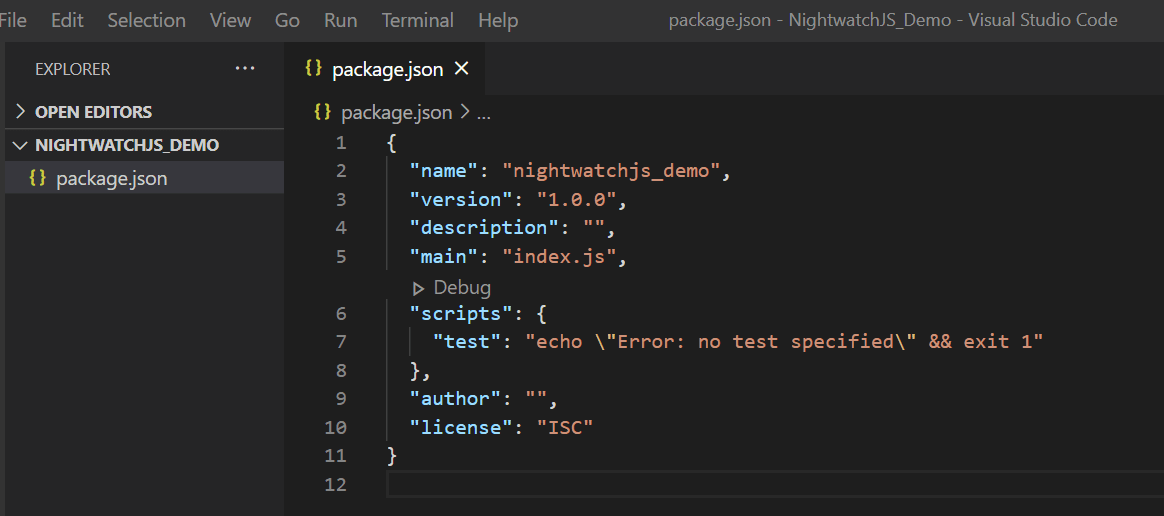
- We have successfully created the package.json file.
Step 3: Let’s install Nightwatch JS to our project.
npm install --save-dev nightwatch
This command will add the “node_modules” folder in your directory and download Nightwatch.js to save it as devDependency in package.json.
You will also notice that the “package-lock.json” file has been created as well. This file is used to lock all the dependencies with the version number so that it will be easier to set up the code in another system.
Tip: You may also install Nightwatch.js globally so that it is accessible for all the projects located anywhere within the system.
|
1 |
npm install --save-dev nightwatch -g |
Here g stands for “global”.
Step 4: Now let us install our browser web driver.
a) ChromeDriver
|
1 |
npm install --save-dev chromedriver |
b) GeckoDriver (Firefox)
|
1 |
npm install --save-dev geckodriver |
Or why not install them all in one go?
|
1 |
$ npm i nightwatch geckodriver chromedriver --save-dev |
Tip: Alternatively, we can combine steps 4 and 5 into a single step. Use the command:
|
1 |
npm install --save-dev nightwatch chromedriver |
It is to be noted that, while the Selenium Server was required with older Nightwatch versions (v0.9 and prior), starting with version 1.0 Selenium is no longer necessary.
The setup is now completed! Let’s run some demo tests now!
Running A Demo Test
Do you know Nightwatch JS comes with some sample tests? Shall we try running that? That’s what this section of our Nightwatch JS tutorial is all about.
Let us begin-
Step 1: Go to the folder “node_modules/nightwatch/examples/tests/”.
Step 2: Under the ‘tests’ folder, you can find some sample tests.
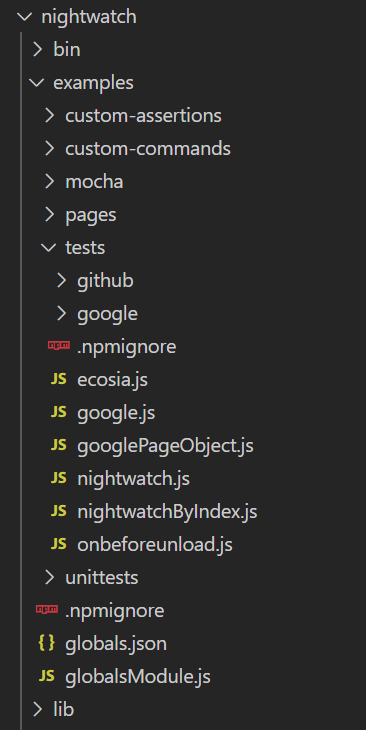
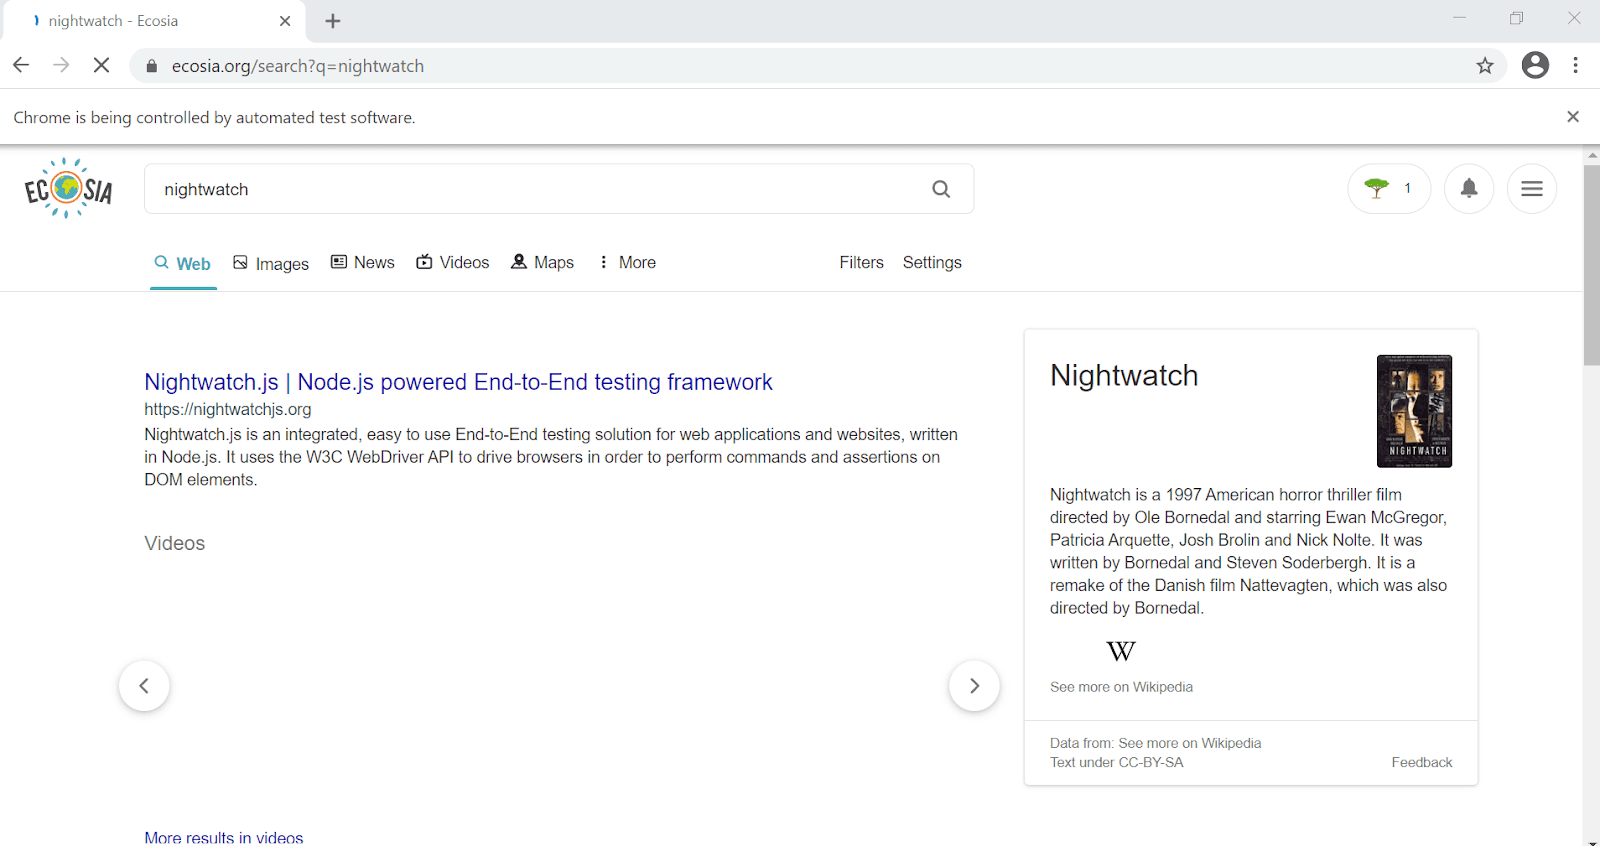
Step 3: Let us run the first sample test “ecosia.js”.
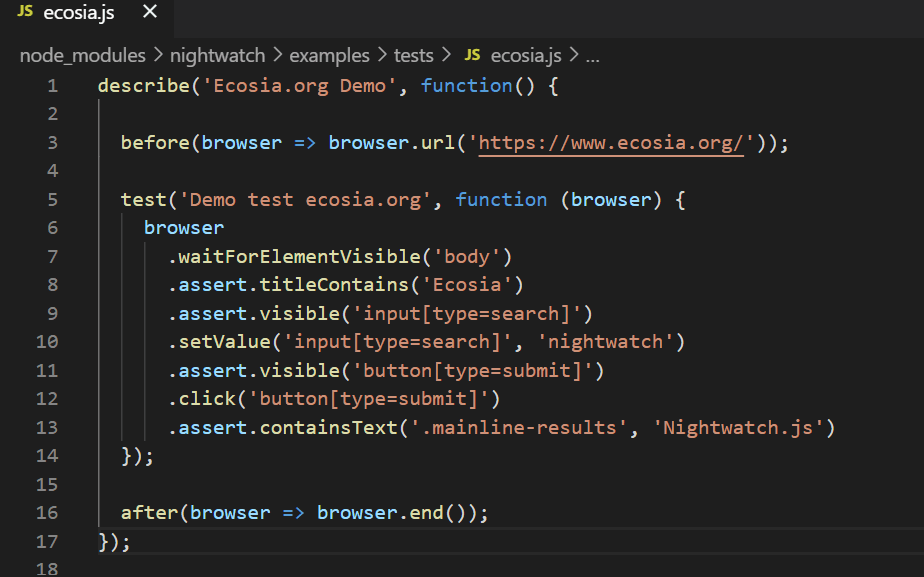
This is a simple, straightforward program which-
- Launches the default browser
- Opens the search engine “Ecosia”
- Inputs “nightwatch” in search field
- Verifies the search result.
Let’s go for it!
Step 4: In the terminal run the command:
|
1 |
./node_modules/.bin/nightwatch node_modules/nightwatch/examples/tests/ecosia.js |
Here, “./node_modules/.bin/nightwatch” represents the path of nightwatch.js executable.
“node_modules/nightwatch/examples/tests/ecosia.js” gives the path of the test file.
Step 5: The code gets executed, and the test starts running. Default browser will get launched, and the test gets executed successfully.
Step 6: Observe the test run result in your terminal.
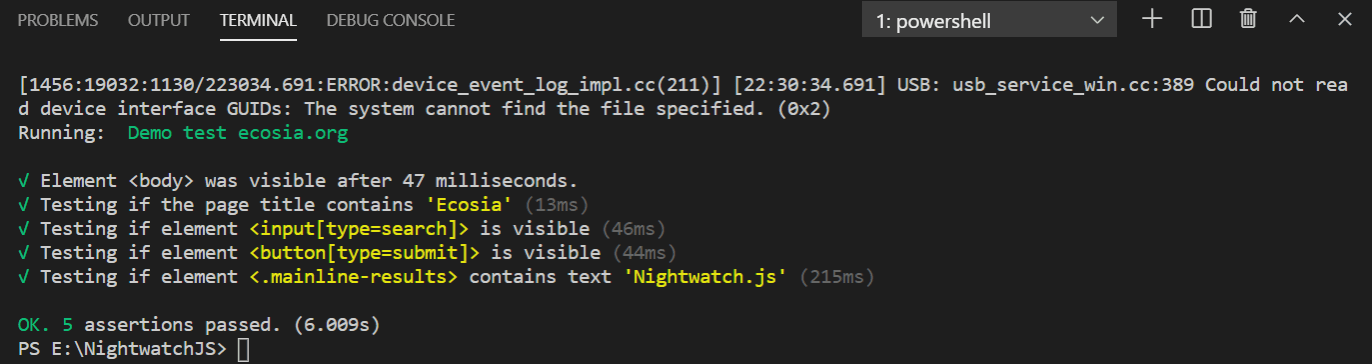
Congrats! Nightwatch JS is now successfully configured in your system.
Nightwatch.js Tutorial For Test Automation Beginners – With Examples
Writing Your First Nightwatch JS Automation Test Script
In the previous section, we were able to run a demo test successfully. But we need to write our own scripts, don’t we?
Now that we have got a basic hand-on, it’s time to get our hands dirty. In this session, we will be writing and running our very first test file using Nightwatch JS automation. Let’s check out the configurations that need to be done.
Configurations
Our goal is to run our test files using the “npm test” command from the project’s base directory. Also, we are setting Chrome as our default browser in the example. But feel free to use the browser of your choice.
Now let’s start step by step.
Step 1: Let us create two folders in our root directory – “tests” for keeping test files and “reports” where reports will get stored after each test run.
(You can provide any folder name of your choice. However, it should be properly mapped in the nightwatch.json file about which we will discuss in step 3.)
Step 2: In your package.json file, replace “scripts – test” to “nightwatch”.
|
1 2 3 |
“scripts”: { “test”: “nightwatch” } |
Step 3: In root, create a “nightwatch.json” file. Paste the following snippet.
|
1 2 3 4 5 6 7 8 9 10 11 12 13 14 15 16 17 18 |
{ "src_folders" : "tests", "output_folder" : "reports", "webdriver" : { "start_process": true, "server_path": "node_modules/chromedriver/lib/chromedriver/chromedriver.exe", "host": "localhost", "port": 4444 }, "test_settings" : { "default" : { "desiredCapabilities" : { "browserName" : "chrome" } } } } |
The “nightwatch.json” is the configuration file which the nightwatch test runner binary expects.
Let’s have a close look into the above code structure of “nightwatch.json”.
- src_folders: indicates the location that contains the test suites. You can also give an array of folders. If not specified, we should pass the test location inline as the second argument to the test runner, as we did in our demo test.
- output_folder: indicates the location where test reports get saved, i.e., JUnit report files, XML reports, test logs, selenium log, screenshots, video logs, network logs, etc.
- webdriver: an object containing WebDriver related configuration options.
- start_process: a boolean value that indicates that, once we start our test, the nightwatch will automatically start/stop the webdriver instance in the background as a child process.
- server_path: Here, we are giving the path of the chrome driver executable. Only useful if start_process is enabled.
- host: We are using localhost for running our test. Mainly needed when the WebDriver service is running on a different machine.
- port: The port number on which the WebDriver service will listen and/or on which Nightwatch will attempt to connect.
- test-settings: Defines the browser we want to use.
You may also create “nightwatch.conf.js” for configuration. If both these files are present in the project, the nightwatch.conf.js file will be given more precedence over nightwatch.json.
Step 4: Configurations are done. Now let us write our first test.

Subscribe to Coding Jag and get the best news around the testing world delivered to your inbox every Thursday morning.
Woo-hoo! Thanks for signing up for LambdaTest’s weekly newsletter!
Writing Nightwatch JS Automation Tests?
We have already created a “tests” folder. Now we will be creating test files inside this folder. Each file inside it will be loaded as a test suite by the Nightwatch test runner. Let’s start!
Step 1: Create a test file and name it as – testfile1.js
Step 2: Let’s create the test structure.
|
1 2 3 |
module.exports = { } |
Step 3: Inside each file, the test runner will look for different keys that are exported. The key is basically the test case name. Each key is mapped to a function in which the browser instance will be passed as an argument.
|
1 2 3 |
module.exports = { "Get URL and title" : function(browser) { } |
Step 4: Inside this function, we write our test code. Let’s see the snippet below:
|
1 2 3 4 5 6 7 8 9 |
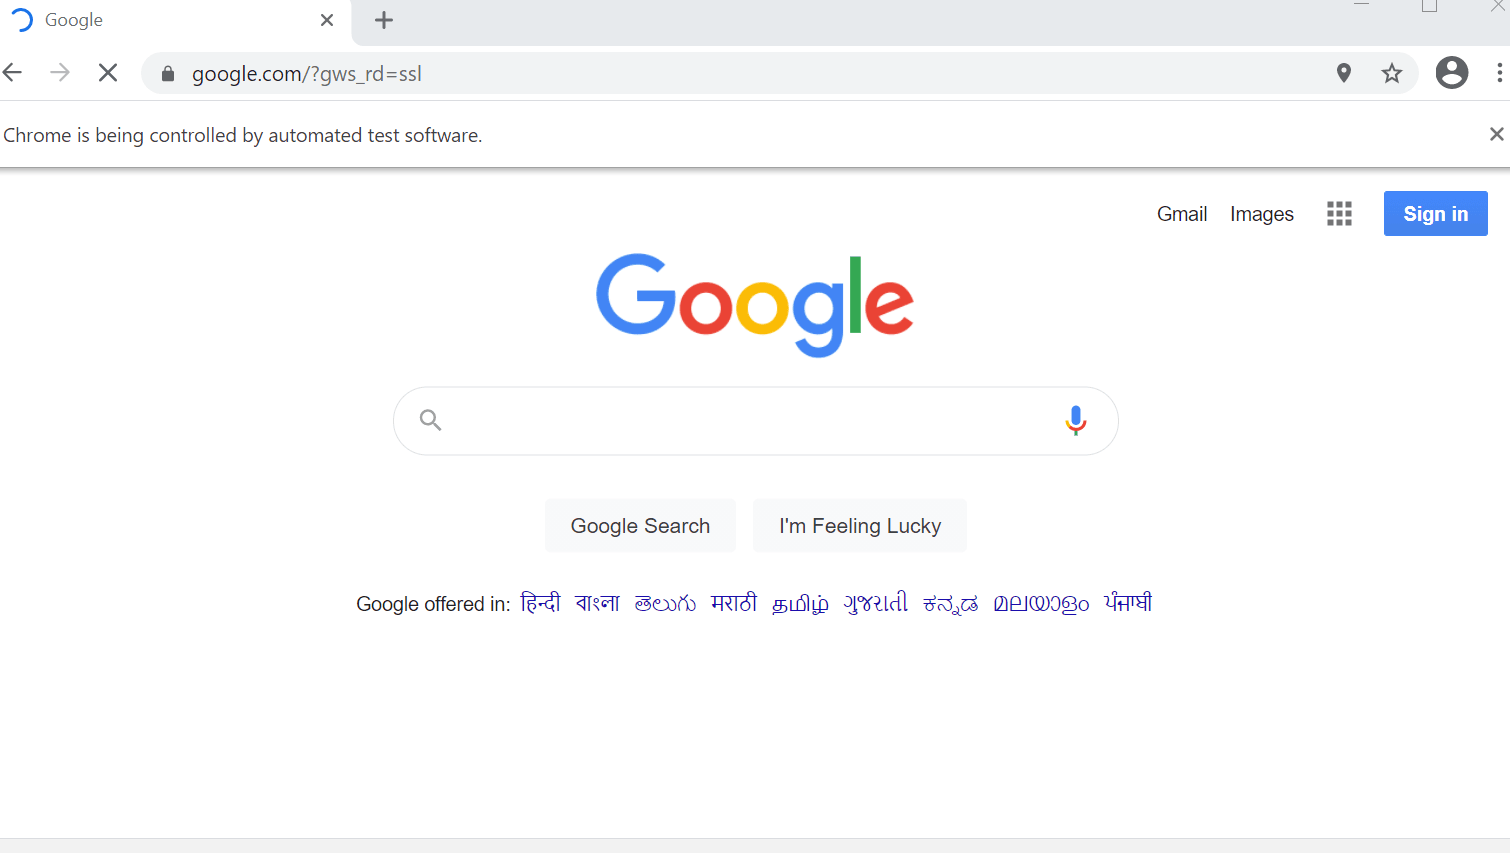
module.exports = { "Get URL and title" : function(browser) { browser .url("http://www.google.com") .assert.urlContains("google") .assert.title("Google") .pause(3000); } } |
Here we are trying to launch Google and verify that the title and URL of the output page match the expected result. Simple and straightforward.
Let’s understand the code now.
- url() – navigate to a specific URL.
- urlContains() – checks if the current URL contains the given value.
- title() – checks if the page title equals the given value.
- pause() – suspends the test for the given time in milliseconds.
- assert – when an assertion fails, the test ends, skipping all other assertions.
Step 5: Now it’s time to run the code. Go to the terminal. Verify you are in the project base directory. Give the following command:
|
1 |
npm test |
The test will start running, and the browser will be launched.
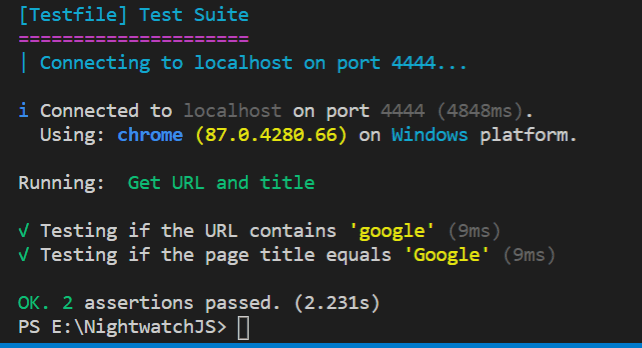
All assertions are passed. Congrats, you have successfully written your first test code!
Step 6: Check out the reports generated in your “reports” folder.
In this sample test case, we have explored only a few commands. Feel free to explore more by visiting the official API documentation.
Parallel Testing Using Nightwatch JS
We can enable parallel testing in Nightwatch JS using a quick and simple configuration in our “nightwatch.json” file.
|
1 2 3 4 |
"test_workers": { "enabled": true, "workers": "auto" }, |
By enabling “test_workers” to be true, we are enabling parallel testing. Let’s look into the steps now:
Step 1: Add the above code in your “nightwatch.json” file.
Step 2: Create an additional test file in the “tests” folder for running in parallel with the first test file.
Step 3: In the Terminal, give the command:
|
1 |
npm test |
Step 4: Two browser windows get launched, executing the test files in parallel.
Step 5: After execution, observe the reports generated.
Cross Browser Testing & Test Coverage Across Devices
We came to a detailed understanding of Nightwatch JS setup and test execution in our local machine through the previous sections of this Nightwatch.js tutorial. We have also created our first test file, did parallel testing, and generated reports.
But to stay ahead in a highly competitive market, it is our duty as testers to ensure the quality of the application in all scenarios, i.e, the app should behave as expected across all platforms, browsers, and devices without crashing. This is where the terms test coverage and cross browser testing comes into the picture.
To leverage the test coverage, cloud-based solutions are widely adopted by companies due to various merits like:
- Low investment cost compared to buying the infrastructure.
- Provides access to hundreds of device and platform combinations.
- Extends supports to old and outdated browser versions and OS devices
- No set-up or installation, or maintenance needs to be done locally.
- Scalability.
When it comes to distributed test execution, Selenium Grid is always a good call. It has the capability to run test cases on different versions of browsers and different operating systems simultaneously.
Hence, using a combination of Selenium Grid with the right cloud-based solution provider for cross browser compatibility testing is the optimum strategy that you can deploy to assure quality. Now let us see how we can perform automated browser testing using a remote Selenium Grid provided by LambdaTest.
Test Execution With Selenium Grid Cloud
LambdaTest is trusted by 100,000 companies worldwide as a reliable online Selenium Grid provider to fulfill their cross browser testing needs. LambdaTest provides you access to 3000+ browsers for both mobile and desktop to help you gain the maximum test coverage during the automated browser testing.
You can even leverage parallel testing with Selenium automation testing, along with our open Selenium API to help you extract test reports of your Selenium script execution over LambdaTest, effortlessly.
Now, let us try and execute the above test case using the remote WebDriver for LambdaTest’s Selenium Grid cloud. You can achieve this using a few simple and easy steps with few changes in your existing script for local setup. Let’s look into it step by step.
Step 1: We need to pass browser and environment details to the LambdaTest Selenium Grid via the desired capabilities class. Unlike in local setup, now we have the flexibility to choose the precise settings we want.
There is a helpful tool provided by LambdaTest to generate desired capabilities based on the combination we want. Visit LambdaTest Desired Capabilities page to generate them.
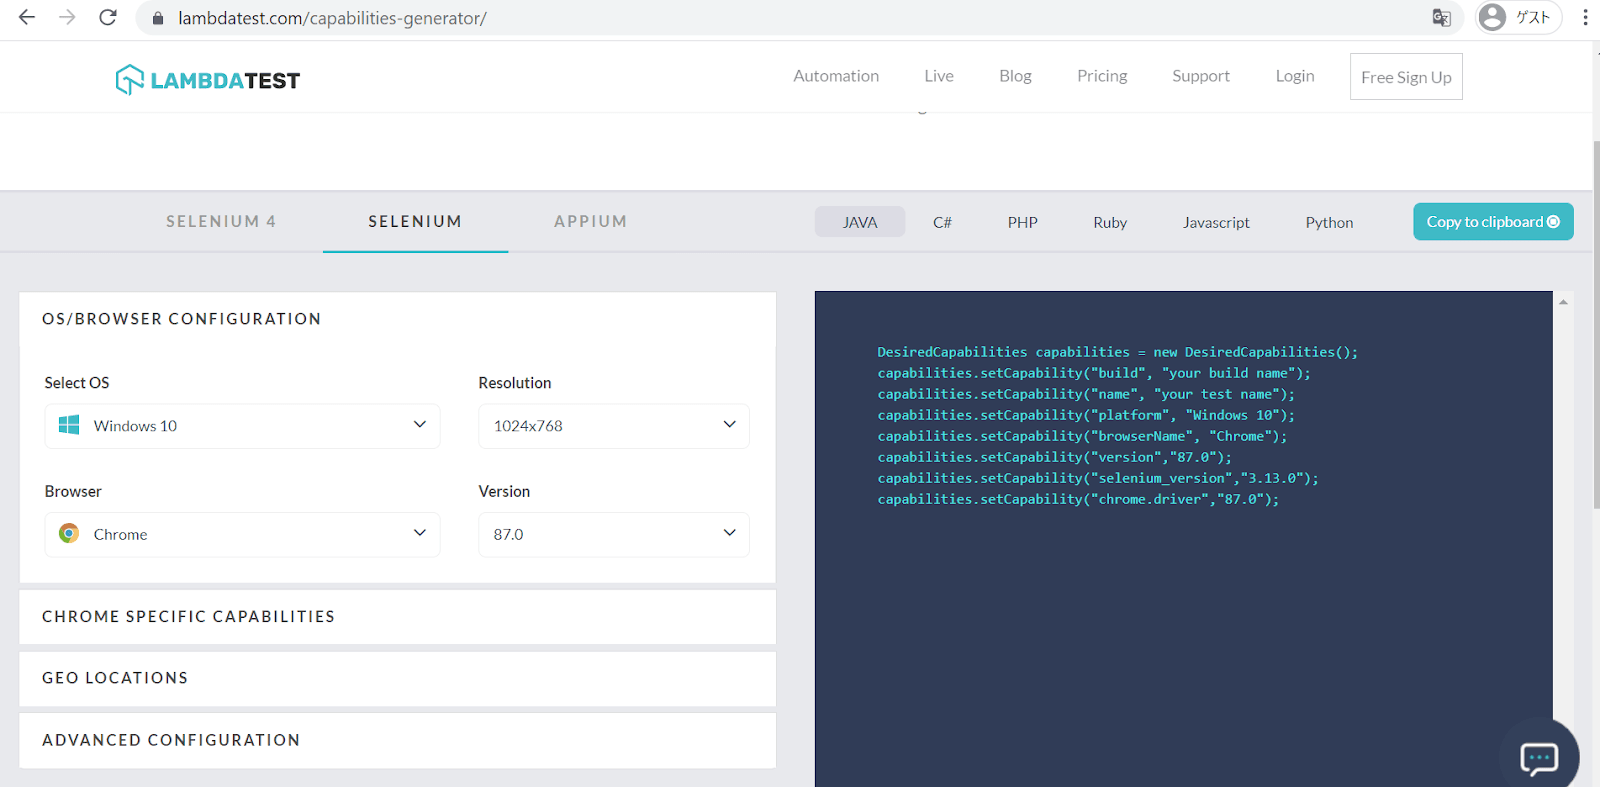
In this case, the desired capabilities class in nightwatch.json will look like this:
|
1 2 3 4 5 6 7 8 9 |
"desiredCapabilities": { "build":"Nightwatch-Selenium--Test", "platform" : "Windows 10", "browserName" : "Chrome", "version" : "87.0", "selenium_version" : "3.13.0", "geoLocation" : "IN", "chrome.driver" : "87.0", } |
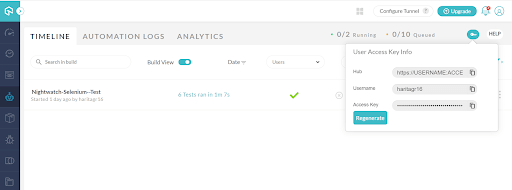
Step 2: Now you need to fetch your unique Access token and username.
Step 3: Log in to LambdaTest or create your account. A unique access token will be created for you.
This token is used as a secret key to link your local scripts with the LambdaTest platform.
There are 3 ways to find it:
- If already logged in, from the Capabilities generator page, you can fetch it.
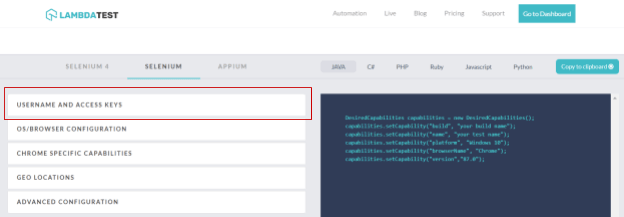
- You can also fetch the details from the Profile section.

- Or from the Automation dashboard page, by clicking the key button in the top right corner.
Step 4: Paste the following snippet in your nightwatch.conf.js file. (If not created already, you can create this file in your root)
Here we are declaring the user configuration for an access key, username, host, and port for the test.
|
1 2 3 4 5 6 7 8 9 10 11 12 13 14 15 16 |
module.exports = (function(settings) { console.log(settings["test_settings"]["default"]["username"]) if (process.env.LT_USERNAME) { settings["test_settings"]["default"]["username"] = process.env.LT_USERNAME; } if (process.env.LT_ACCESS_KEY) { settings["test_settings"]["default"]["access_key"] = process.env.LT_ACCESS_KEY; } if (process.env.SELENIUM_HOST) { settings.selenium.host = process.env.SELENIUM_HOST; } if (process.env.SELENIUM_PORT) { settings.selenium.host = process.env.SELENIUM_PORT; } return settings; })(require('./nightwatch.json')); |
Step 5: Configure your nightwatch.json file. Since we are using LambdaTest, why don’t we go for cross browser testing across multiple platforms?
In this code, we are configuring for the script to run across 3 browsers – Chrome, Firefox, and Safari on 2 different platforms – Windows and macOS.
Check out the code below and let’s look into the required changes and additions to be made on your existing file:
|
1 2 3 4 5 6 7 8 9 10 11 12 13 14 15 16 17 18 19 20 21 22 23 24 25 26 27 28 29 30 31 32 33 34 35 36 37 38 39 40 41 42 43 44 45 46 47 48 49 50 51 52 53 54 55 56 57 58 59 60 61 62 63 64 65 66 67 68 69 70 71 72 73 74 75 76 77 78 79 80 |
{ "src_folders" : "tests", "output_folder" : "reports", "test_workers": { "enabled": true, "workers": "auto" }, "selenium" : { "start_process" : false, "server_path" : "", "log_path" : "", "host" : "hub.lambdatest.com", "port" : 80, "cli_args" : { "webdriver.chrome.driver" : "", "webdriver.ie.driver" : "", "webdriver.firefox.profile" : "" } }, "test_settings" : { "default" : { "launch_url" : "http://google.com", "selenium_port" : 80, "selenium_host" : "https://lambdatest.com", "silent": false, "screenshots" : { "enabled" : true, "path" : "" }, "username" : "haritagr16", "access_key" : "123456789", "skip_testcases_on_fail": false, "desiredCapabilities": { "build":"Nightwatch-Selenium--Test", "platform" : "Windows 10", "browserName" : "Chrome", "version" : "87.0", "selenium_version" : "3.13.0", "visual":true, "video":true, "console":true, "geoLocation" : "IN", "chrome.driver" : "87.0", "network":true } }, "chrome": { "desiredCapabilities": { "platform": "Windows 10", "browserName": "chrome", "version": "87.0" } }, "safari" : { "desiredCapabilities": { "platform": "macos 10.13", "browserName": "safari", "version": "11.0" } }, "firefox" : { "desiredCapabilities": { "platform": "win10", "browserName": "firefox", "version": "60" } }, "edge" : { "desiredCapabilities": { "platform": "Windows 10", "browserName": "MicrosoftEdge", "version": "17.0" } } } } |
- Pass your Access Token and User details.
- Provide Desired Capabilities for all the browsers.
- Set the Hostname corresponding to LambdaTest.
- Optionally we have also enabled report formats like video recording, console, network logs, etc., to be true.
A more detailed explanation is given below but feel free to skip to Step 6.
We have used additional parameters to configure “nightwatch.json” for cloud-based cross browser testing. They are:
- selenium – an object containing Selenium Server related configuration options. If “selenium” is not used, “webdriver” options should be set instead (as we did in our local set up). Starting with Nightwatch 1.0, Selenium is only required when testing against a grid setup or a cloud testing service such as LambdaTest.
- cli_args – list of CLI args to be passed to Selenium process, basically browser drivers.
- test_settings:
- silent – whether to show the extended HTTP traffic command logs from the WebDriver or Selenium server.
- desiredCapabilities – an object to specify browser name for instance along with other capabilities.
- username and access_key – Usually only needed for cloud testing Selenium services. In case the server requires credentials these values will be used to compute the Authorization header.
Step 6: In package.json, change the “ scripts – test” argument value.
This is important as it is here where we are specifying the browsers where we need to run our test.
|
1 2 3 |
"scripts": { "test": "./node_modules/.bin/nightwatch -e firefox,safari,chrome tests" } |
Step 7: Execute the test.
npm test
The code starts running and logs can be observed in the terminal.

To observe live running status go to your Automation dashboard in LambdaTest.
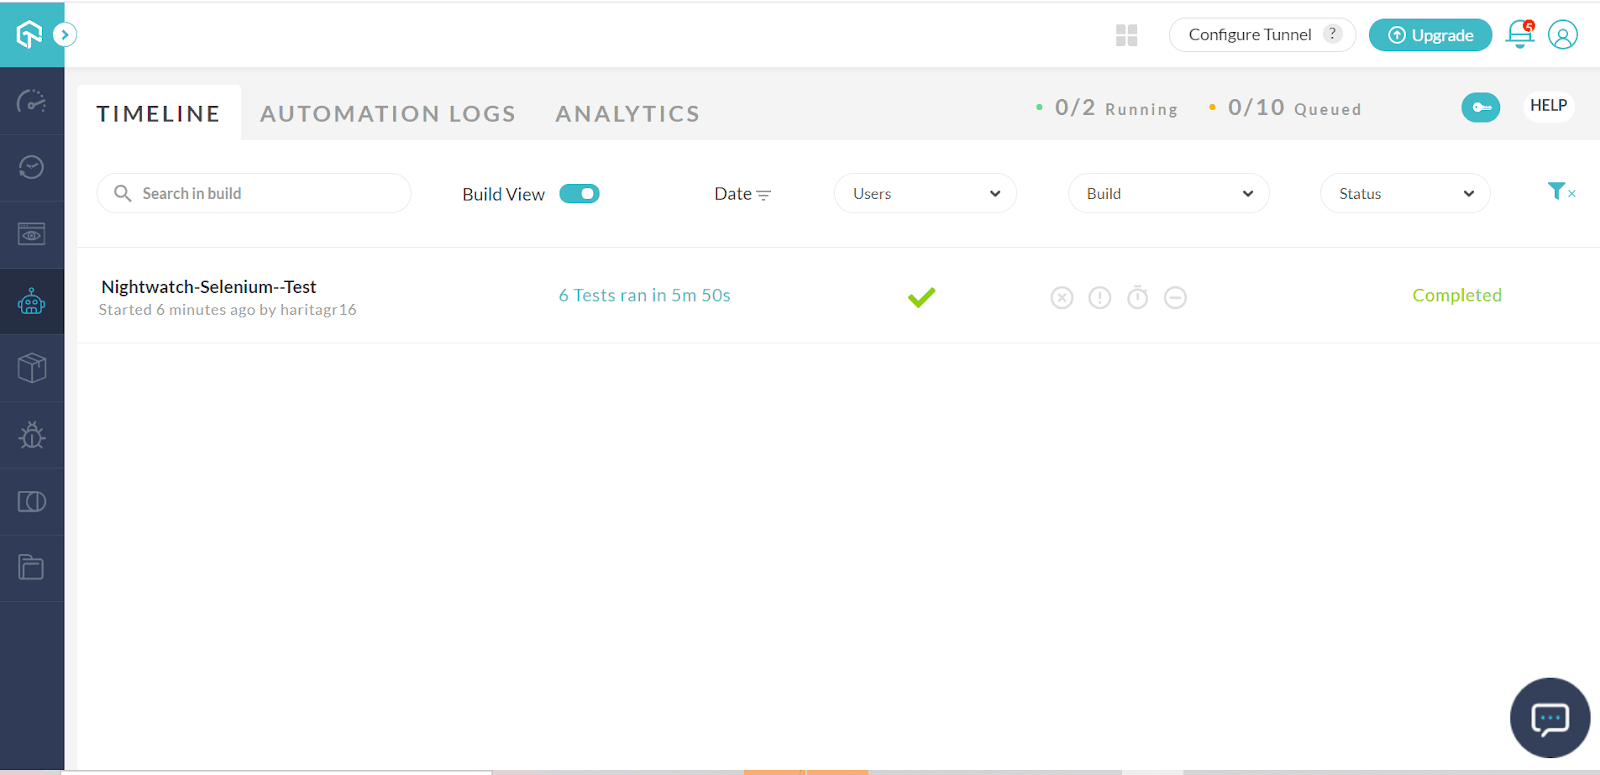
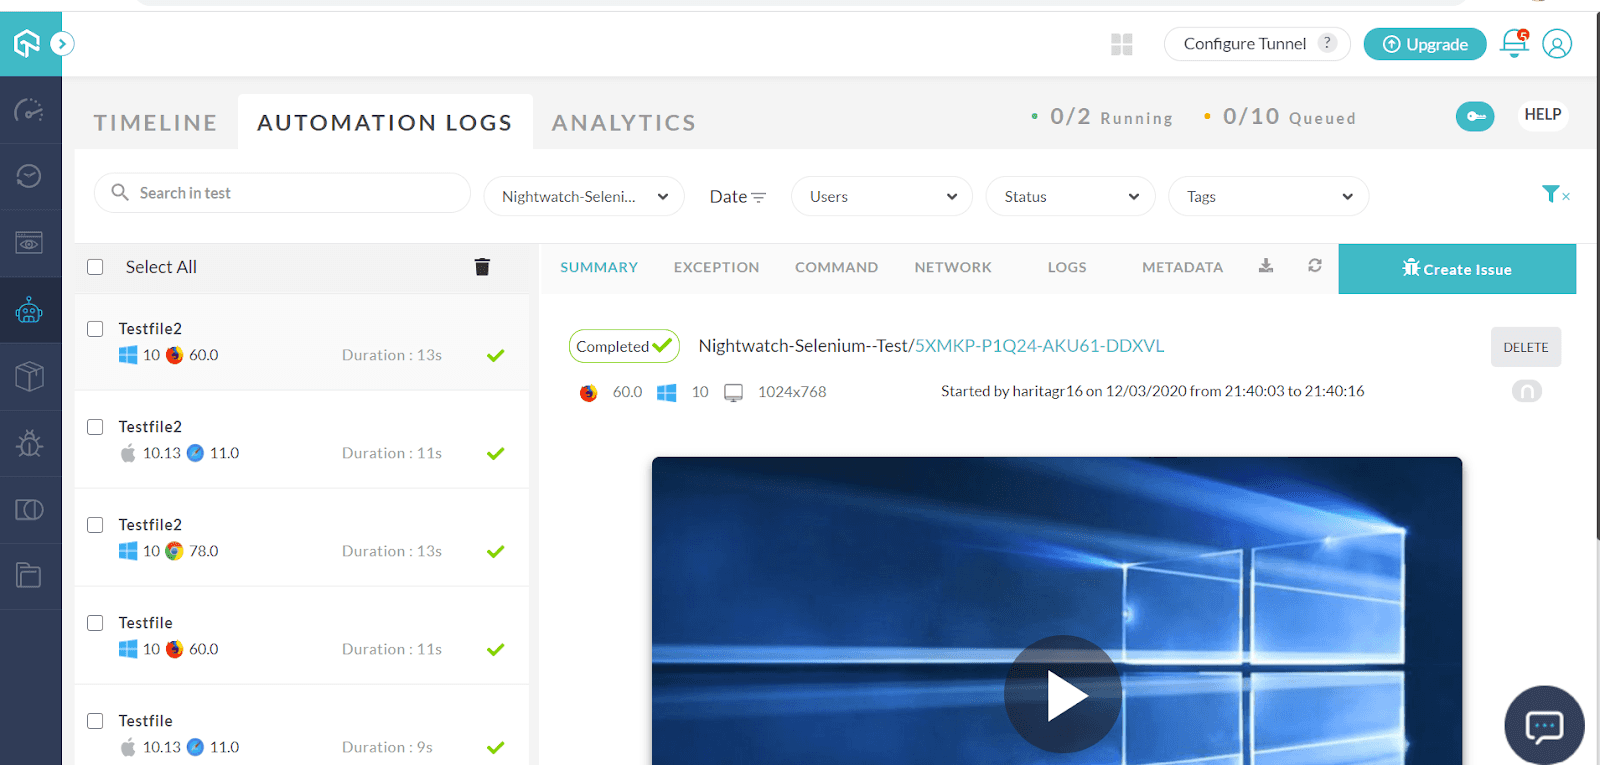
We can analyze individual test run reports from Automation Logs.
We have successfully run our test cases using an automated cross browser testing solution provided by LambdaTest through a hassle-free experience!
Conclusion
Nightwatch JS is one of the most in-demand Selenium Javascript-based automation testing frameworks known for its simplicity and integrated features. In this blog, we have looked into Nightwatch JS installation and setup, along with a detailed walkthrough on configurations. Additionally, we have also leveraged our automation testing by adopting test coverage concepts and cross browser testing.
Hopefully, this Nightwatch JS tutorial will enable you to kickstart your journey in Nightwatch JS automation. If you wish to optimize your web application quality by unlocking coverage in a wider variety of platforms or browsers or versions, feel free to explore the LambdaTest platform.
Happy testing!
Frequently Asked Questions
How do you run the Nightwatch test?
There are some basic prerequisites that are required to get started with this Nightwatch JS tutorial for testing with Selenium and JavaScript.
- Node.js
- Node Package Manager (npm)
- Java – SDK
- Selenium Server
- Chrome Driver
Nightwatch JS offers an in-built test runner that expects a JSON configuration file to be passed. The default configuration file is nightwatch.json, which should be present in the project’s root directory. Alternatively, the nightwatch.conf.js configuration file can also be used and will be loaded from the root directory of the project for Nightwatch testing.
Continued at https://www.lambdatest.com/blog/nightwatch-js-tutorial-for-test-automation-beginners/
How do I use Nightwatch JS?
Nightwatch JS works by communicating with WebDrivers of different browsers, like ChromeDriver for Chrome or GeckoDriver for Firefox. Nightwatch.js offers an in-built test runner that expects a JSON configuration file to be passed. The default configuration file is nightwatch.json, which should be present in the project’s root directory.
Alternatively, the nightwatch.conf.js configuration file can also be used and will be loaded from the root directory of the project for Nightwatch testing.
Is Nightwatch open source?
Yes. Nightwatch JS is an open-source automated testing framework for browser-based web applications and websites. It is written in Node.js runtime and uses the W3C WebDriver API (formerly Selenium WebDriver) for interacting with various browsers to perform commands and assertions on DOM elements.
What is end to end testing?
The technical definition of end to end testing is – a type of testing to ensure that the behavioral flow of an application works as expected by performing complete, thorough testing from the beginning to end of the product-user interaction to realize any dependency or flaw in the workflow of the application.


Author’s Profile
Harita Ravindranath
A seasoned Quality Engineer with enthusiasm in Full Stack Development. Harita also enjoys reading, blogging and learning Japanese.
Blogs: 17
Got Questions? Drop them on LambdaTest Community. Visit now