How To Use NUnit Annotations For Selenium Automation Testing?
Himanshu Sheth
Posted On: March 1, 2021
![]() 123738 Views
123738 Views
![]() 4 Min Read
4 Min Read
This article is a part of our Content Hub. For more in-depth resources, check out our content hub on Selenium NUnit Tutorial.
When it comes to using object-oriented programming languages for development & testing, C# is still considered a good choice by the developer community. MSTest/Visual Studio, xUnit.net, and NUnit are some of the top-most frameworks that can be used for automated browser testing. While using NUnit, you can further leverage the capabilities of NUnit Annotations to build a more robust framework.
Any discussion about testing is incomplete without the mention of the Selenium framework. Selenium is a powerful test framework that can be used for automated browser testing as it is compatible with popular programming languages like C#, Python, etc.
Selenium testing is immensely popular as it enables website/web app testing on a wide range of web browsers like Chrome, Firefox, Internet Explorer, etc. It does so using Selenium WebDriver, an important component through which test code interfaces with the underlying web browser.
If you’re new to Selenium and wondering what it is then we recommend checking out our guide – What is Selenium? If you’re looking to improve your NUnit interview skills, check out our curated list of NUnit interview questions and answers.
TABLE OF CONTENT
NUnit Framework – Features & Execution Flow
NUnit is a popular unit-test framework that can be used with C#. NUnit is a part of the .Net foundation and is derived from JUnit. The latest version of NUnit is 3.13.1.
Features of NUnit Framework
NUnit is a feature-rich test framework hence, it is the most sought-after test framework used with C#. Some of the salient features of NUnit are:
- Multiple asserts can now be raised using Assert.Multiple().
- Parallelism at test methods and test fixtures level.
- Ability to perform Test-Driven Development (TDD).
- Multiple author attribution to the implemented code.
- Annotations to speed up test development & execution.
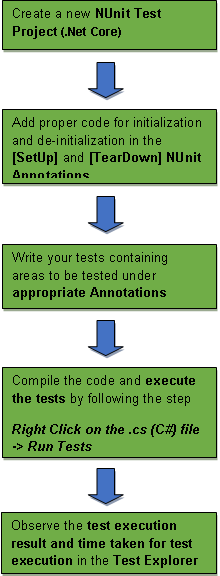
Execution Flow of NUnit Test with Selenium
A basic process flow of a Selenium Testing program with NUnit involves the following steps:
Setting up NUnit Framework
NUnit framework can be downloaded through the NuGet Package Manager. Its features can be best explored when it is used with C# on the Visual Studio IDE. Below are the requisites for setting up the NUnit framework:
- .Net Core SDK. Click on the link to download the latest version of .Net Core SDK.
- Visual Studio (2019 or earlier) for setting up the NUnit test project.
- Selenium WebDriver of the preferred web browser
|
Browser |
Download location |
|
Opera |
https://github.com/operasoftware/operachromiumdriver/releases |
|
Firefox |
|
|
Chrome |
|
|
Internet Explorer |
https://github.com/SeleniumHQ/selenium/wiki/InternetExplorerDriver |
|
Microsoft Edge |
https://developer.microsoft.com/en-us/microsoft-edge/tools/webdriver/ |
If you have not explored the NUnit framework, you can refer to our earlier blog that focused on Selenium WebDriver using C# and NUnit.
Take this certification to master the fundamentals of Selenium automation testing with C# and prove your credibility as a tester.
Here’s a short glimpse of the Selenium C# 101 certification from LambdaTest:
NUnit Framework – Annotations and Usage
An annotation is a tag that provides information about a class or method. Annotations tell the underlying framework about how the code needs to be interpreted. Annotations in NUnit are added between [ ]. NUnit framework makes use of annotations since it helps in building a more robust framework. It also improves the clarity of the test code since the implementation is under different annotations.
Before we look at an example that demonstrates automated browser testing with NUnit, we look at important NUnit annotations (or attributes). The primary role of NUnit annotations is to inform the underlying framework on how the source code should be interpreted. Once the code is compiled, a DLL (Dynamic Link Library) is generated, which can be executed using the console or a GUI.
In NUnit, annotations are added between brackets before the method is declared. For example, the basic setup for automated browser Selenium testing can be done using the [SetUp] annotation. The resources allocated during initialization can be freed using the method implemented under the [TearDown] annotation.
Shown below are the NUnit annotations:
Note: Annotations being described here are those in NUnit 2.
|
Annotation |
Description |
|
[SetUp] |
There should be at least one method per test class. Marks a method that should be called before each test method. |
|
[TearDown] |
There should be at least one method per test class. Marks a method that should be called after each test method. |
|
[TestFixture] |
Marks a class that contains tests. |
|
[Test] |
Marks a method, i.e., an actual test case in the test class. |
|
[TestCase] |
Marks a method with parameters and provides the inline arguments. |
|
[TestFixtureSetUp] |
Marks a method that is executed once before the execution of any test method in that fixture. |
|
[TestFixtureTearDown] |
Marks a method that is executed after the last test method in that fixture has finished execution. |
|
[Ignore] |
Marks a test method or test class that should not be considered for execution, i.e., it is ignored. |
|
[Category] |
Specify the category for the test |
|
[Indicates] |
Marks that the test should be skipped unless it is explicitly run. |
|
[OneTimeSetUp] |
Methods that should be called before any of the child tests are executed. |
|
[OneTimeTearDown] |
Methods that should be called after the child tests are executed. |
|
[Culture] |
Indicates cultures for which a test or test fixture should be executed. |
|
[MaxTime] |
Maximum time frame in milliseconds for the successful execution of a method. A method is marked as a fail if the execution does not complete within MaxTime. |
|
[Platform] |
Platforms on which the test execution should be performed. |
|
[TimeOut] |
Timeout value in milliseconds for the test cases under execution. |
|
[Retry] |
Test will re-run if it fails till the time it is either successful or the maximum number of times have reached. |
|
[Repeat] |
Specifies the method that needs to be executed/repeated number of times. |
|
[ExpectedException(ExceptionType)] |
Marks a test that is expected to raise a particular exception, i.e., ExceptionType. |
|
[Random] |
Specifies generation of random values that will be passed as arguments to the parameterized tests. |
The table showed the exhaustive list of NUnit annotations however, you might not be required to use all these annotations during the course of Selenium testing. Let’s cover the most frequently used NUnit annotations in more detail and relevant examples.
[SetUp]
As the name indicates, all the prerequisites, e.g., creation of WebDriver instance, etc., for executing a test are done under this NUnit annotation. The intention is that the implementation under the [SetUp] annotation should not be repeated again for every test.
|
1 2 3 4 5 6 7 8 9 10 11 12 13 14 15 16 17 18 19 20 21 22 23 24 |
[SetUp] public void Initialize() { /* Implementation for Local WebDriver */ driver = new ChromeDriver(); /* Implementation for Remote WebDriver */ String username = "user-name"; String accesskey = "accesskey"; String gridURL = "@hub.lambdatest.com/wd/hub"; DesiredCapabilities capabilities = new DesiredCapabilities(); capabilities.SetCapability("user", username); capabilities.SetCapability("accessKey", accesskey); capabilities.SetCapability("browserName", "Chrome"); capabilities.SetCapability("version", "78.0"); capabilities.SetCapability("platform", "Windows 10"); driver = new RemoteWebDriver(new Uri("https://" + username + ":" + accesskey + gridURL), capabilities, TimeSpan.FromSeconds(600)); } |
In the above example, Chrome WebDriver is initialized (if local WebDriver is used) else Capabilities are imported when Remote WebDriver is used.
[TearDown]
The implementation under this NUnit annotation does a complimentary job of the code that is under [SetUp]. The code under [TearDown] executes in the end after all the test cases are executed.
|
1 2 3 4 5 6 7 8 9 10 11 12 13 14 15 16 |
[TearDown] public void Cleanup() { bool passed = TestContext.CurrentContext.Result.Outcome.Status == NUnit.Framework.Interfaces.TestStatus.Passed; try { ((IJavaScriptExecutor)driver.ExecuteScript("lambda-status=" + (passed ? "passed" : "failed")); } finally { // Terminates the remote webdriver session driver.Quit(); } } |
In the example shown above, cleanup activity, i.e., free resources used by the WebDriver initialized in the [SetUp] annotation, is done in the [TearDown] annotation.
[Test]
The main business logic resides in this annotation. There should be at least one [Test] annotation when you are performing Automated Browser Selenium Testing. All functionalities to be automated are kept inside the [Test] annotation method. It has various attributes based on which the method can be reformed and executed.
|
1 2 3 4 5 6 7 8 9 10 11 12 13 14 15 16 17 18 |
[Test] public void TestCase() { { driver.Url = "https://www.duckduckgo.com"; IWebElement element = driver.Value.FindElement(By.XPath("//*[@id='search_form_input_homepage']")); element.SendKeys("LambdaTest"); /* Submit the Search */ element.Submit(); /* Perform wait to check the output */ System.Threading.Thread.Sleep(2000); } } |
In the example shown above, a test case named TestCase is implemented. The target URL is set to DuckDuckGo, and a search for “LambdaTest” is performed. A wait of 2 seconds is added to check the output.
If you want to use parameterization for performing Selenium testing, NUnit annotations [TestCase ] and [TestCaseSource] are used.
[TestCase]
This annotation can be used in place of [Test] annotation if you plan to use parameters/inline arguments for the tests.
|
1 2 3 4 5 6 7 8 9 10 11 |
[TestCase("http://www.duckduckgo.com")] [TestCase("http://www.google.com")] public void TestCase_param(string url) { { driver.Url = url; ............................ } } |
In the example shown above, the test TestCase_param executes two times with the input parameter as http://www.duckduckgo.com and http://www.google.com.
[TestFixture]
The [TestFixture] attribute marks a class that contains tests and optionally SetUp or TearDown methods. Parameterized and generic TestFixtures were introduced in NUnit 2.5. A class that is marked as a test fixture should not have an abstract and must be a publicly exported type.
A non-parameterized fixture must have a default constructor, and a parameterized fixture must have a constructor that matches the parameters that are provided for the test. We will have a detailed look at the usage of parameterized testfixtures in subsequent sections.
|
1 2 3 4 5 6 7 8 9 10 11 |
namespace NUnit.Tests { using System; using NUnit.Framework; [TestFixture] public class TestCase_1 { // ... } } |
Shown above is a non-parameterized testfixture. The [TestFixture] attribute/annotation is optional for non-parameterized or non-generic testfixtures.
This is an example of parameterized TestFixture where the fixture will be instantiated four times, passing in each set of arguments to the appropriate constructor. There are two different constructors which match the data types that are provided as arguments.
|
1 2 3 4 5 6 7 8 9 10 11 12 13 14 15 16 17 18 19 20 21 22 23 24 25 26 27 28 29 30 31 32 33 34 35 36 37 38 39 40 41 42 43 44 45 46 47 |
using System; using OpenQA.Selenium; using OpenQA.Selenium.Remote; using NUnit.Framework; using System.Threading; using System.Collections.Generic; namespace Parameterized_TestFixtures { // Matches Constructor 1 [TestFixture("chrome", "http://www.duckduckgo.com")] [TestFixture("internet explorer", "http://www.google.com")] [TestFixture("MicrosoftEdge", "http://www.lambdatest.com")] // Matches Constructor 2 [TestFixture("chrome", "18.0", "Windows 10", "http://www.lambdatest.com")] public class Parameterized_Fixs { ThreadLocal<IWebDriver> driver = new ThreadLocal<IWebDriver>(); private String browser; private String version; private String os; private String url; // Constructor - 1 public Parameterized_Fixs(String browser, String url) { this.browser = browser; this.url = url; } // Constructor - 2 public Parameterized_Fixs(String browser, String version, String os, String url) { this.browser = browser; this.version = version; this.os = os; this.url = url; } ............................................................... ............................................................... } ............................................................... ............................................................... } |
[Category]
As the name indicates, the [Category] annotation specifies the category for the test. It is an alternative to suites when dealing with a group of tests. When categories are used, only the tests that are implemented under selected categories are executed.
|
1 2 3 4 5 6 7 8 9 10 11 12 13 14 15 16 17 |
namespace NUnit.Tests { using System; using NUnit.Framework; [TestFixture] public class TestCase_1 { [Test] [Category("Test_IE")] public void IE_BrowTest() { /* ... */ } [Category("Test_Chrome")] public void Chrome_BrowTest() { /* ... */ } } |
Here, the tests under Category Test_IE are executed first, and then tests under Test_Chrome are executed.
[Ignore]
The [Ignore] annotation is used in case the implementation under [Test] or [TestFixture] fixture has to be ignored/not tested for a period of time. In Selenium testing, this can be considered an optimal way to temporary halt the execution of a certain test rather than commenting on the entire test.
|
1 2 3 4 5 6 7 8 9 10 11 12 13 14 15 16 17 18 19 20 21 22 23 |
namespace NUnit.Tests { using System; using NUnit.Framework; [TestFixture] public class Browser_ops { [Test] [Ignore("Test on Chrome Browser")] public void Chrome_Test() { ......................... ......................... } [Test] /* This test will not be ignored */ public void IE_Test() { ......................... ......................... } } |
In the example shown above, there are two tests Chrome_Test() and IE_Test(). The test Chrome_Test() will be ignored from execution as it is marked with the attribute [Ignore], whereas the test IE_Test() will be executed since it is not under the [Ignore] annotation.
This NUnit Tutorial for beginners and professionals will help you learn how to use NUnit framework with Selenium C# for performing Selenium automation testing.
Execution sequence of Annotations in NUnit for Selenium
There is a lot of confusion regarding the execution sequence of an NUnit test, and that is why it is still one of the most searched queries on popular search engines and developer support websites. The simple answer is that by default, an NUnit test runs alphabetically, i.e., the execution order depends on the test name.
When you have CI/CD (Continuous Integration/Continuous Delivery) integrated into the build system, you may want to execute some tests first as certain tests might take more time to execute. The [Category] annotation can be particularly useful when you are trying to isolate lengthy tests, e.g., integration tests that would otherwise slow down the entire test process.
|
1 2 3 4 5 6 7 8 9 10 11 12 13 14 15 16 17 |
[TestFixture] public class SimpleTestFixture { [Test] public void Fast_Test() { Assert.AreEqual(10, 5 * 2); } [Test, Category("SlowTests")] public void Slow_Test() { /* Addition of 8 seconds delay to slow down the test execution */ System.Threading.Thread.Sleep(8000); Assert.AreEqual(10, 5 * 2); } } |
In the above example, the Category() attribute is used with the SlowTests label to tag tests that take longer execution time. NUnit annotations like [TestFixtureSetUp] and [TestFixtureTearDown] can be used for tests dependent on certain environmental conditions as they allow to mark methods to be executed before and after your tests.
However, what can be done if you want to actually order the execution of the tests? You can make use of the Order() attribute where the order number (specified with the Order attribute) decides the execution order of the test. We modify the previous example and add order to the tests.
|
1 2 3 4 5 6 7 8 9 10 11 12 13 14 15 16 17 |
[TestFixture] public class SimpleTestFixture { [Test, Order(1)] public void Fast_Test() { Assert.AreEqual(10, 5 * 2); } [Test, Order(2)] public void Slow_Test() { /* Addition of 8 seconds delay to slow down the test execution */ System.Threading.Thread.Sleep(8000); Assert.AreEqual(10, 5 * 2); } } |
The test case Fast_Test() has been assigned Order(1), and Slow_Test() has been assigned Order(2). This attribute can be handy when you want to sequence the execution of tests.
Whether you have to write test cases related to automated browser Selenium testing or test cases with complex business logic, the thumb rule is that the tests should not be interrelated to each other. You may have to change the test code to align with the design or developmental changes, and the test code may break/fail if there is dependency between the tests as failure of one test may cause other dependent tests to fail!
NUnit for Automated Browser Testing
Selenium testing is widely used for cross browser testing or automated browser testing. The functionalities of your web product, i.e., website or web application, might work perfectly fine on browsers or devices on which your team did the testing, but that does not mean that the functionalities/features are foolproof. Your customers may be using an outdated browser like Internet Explorer, or they could use a web browser on a device where testing was never performed.
This makes testing on varied combinations of browsers, browser versions, and devices of utmost importance since you cannot command your customer’s usage preferences. NUnit with Selenium and C# is a killer combination when it comes to automated browser Selenium testing.
You have the option to perform automated browser Selenium testing with local Selenium WebDriver, but the only limitation is that the test coverage might not be 100% as you require a local setup that houses different combinations of web browsers, devices, and operating systems.
Test Scenario 1 – Annotation usage using Local WebDriver
We have a look at a test scenario where the same test is to be performed on Chrome and Firefox web browsers. The test is to be performed sequentially, i.e., search on Chrome should be executed first, and search on Firefox should be done next.
NUnit annotations demonstrated – [SetUp], [Test], [TestFixture], and [TearDown]
FileName – Test_Annotation_example.cs
|
1 2 3 4 5 6 7 8 9 10 11 12 13 14 15 16 17 18 19 20 21 22 23 24 25 26 27 28 29 30 31 32 33 34 35 36 37 38 39 40 41 42 43 44 45 46 47 48 49 50 51 52 53 54 55 56 57 58 59 60 61 62 63 64 65 66 67 68 69 70 71 72 |
using NUnit.Framework; using OpenQA.Selenium; using OpenQA.Selenium.Chrome; using OpenQA.Selenium.Firefox; using System; using System.Collections.Generic; using System.Linq; using System.Text; using System.Threading.Tasks; using OpenQA.Selenium.IE; using System.Configuration; /* For using Remote Selenium WebDriver */ using OpenQA.Selenium.Remote; using System.Threading; namespace NUnit_Demo { [TestFixture("Chrome")] [TestFixture("Firefox")] public class NUnitDemo { IWebDriver driver; private String browser; public String g_browser; public NUnitDemo(String browser) { this.browser = browser; g_browser = browser; } [SetUp] public void Initialize() { switch (g_browser) { case "Chrome": driver = new ChromeDriver(); break; case "Firefox": driver = new FirefoxDriver(); break; } driver.Manage().Window.Maximize(); } [Test] public void test_google() { driver.Url = "https://www.google.com"; System.Threading.Thread.Sleep(4000); IWebElement element = driver.FindElement(By.XPath("//*[@id='tsf']/div[2]/div[1]/div[1]/div/div[2]/input")); element.SendKeys("LambdaTest"); /* Submit the Search */ element.Submit(); /* Perform wait to check the output */ System.Threading.Thread.Sleep(2000); } [TearDown] public void closeBrowser() { // Terminates the local webdriver session driver.Quit(); } } } |
Code Walkthrough:
[TestFixture] annotation is used with parameters that represent the browsers under test, i.e., Chrome & Firefox.
|
1 2 |
[TestFixture("Chrome")] [TestFixture("Firefox")] |
Instance of local Selenium WebDriver is instantiated under the [SetUp] annotation.
|
1 2 3 4 5 6 7 8 9 10 11 12 13 14 |
[SetUp] public void Initialize() { switch (g_browser) { case "Chrome": driver = new ChromeDriver(); break; case "Firefox": driver = new FirefoxDriver(); break; } driver.Manage().Window.Maximize(); } |
The actual business logic or core functionality, i.e., searching for LambdaTest on Google, is performed under the test logic, which is under the [Test] annotation.
|
1 2 3 4 5 6 7 8 9 10 11 12 13 14 15 |
[Test] public void test_google() { driver.Url = "https://www.google.com"; ...................................... ...................................... IWebElement element = driver.FindElement(By.XPath("//*[@id='tsf']/div[2]/div[1]/div[1]/div/div[2]/input")); ...................................... ...................................... /* Perform wait to check the output */ System.Threading.Thread.Sleep(2000); } |
Once the tests for automated browser testing are complete, the resources allocated under the [SetUp] annotation are released in the [TearDown] attribute.
|
1 2 3 4 5 6 |
[TearDown] public void closeBrowser() { // Terminates the local webdriver session driver.Quit(); } |
For executing the test, right-click on the Test Code (.cs) and select ‘Run Tests.’
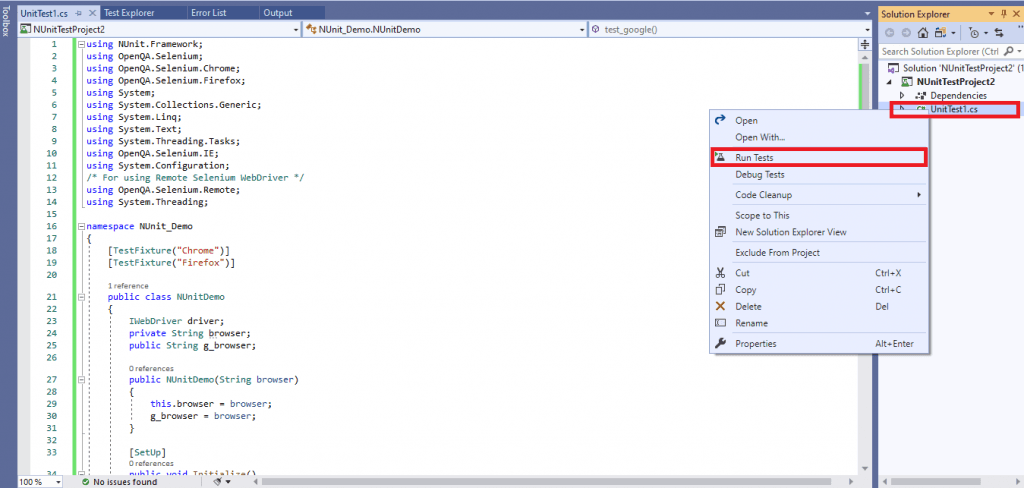
The test status and output are available in the Test Explorer window of Visual Studio.

Test Scenario 2 – Annotation usage using Remote WebDriver & Parallel execution
When it comes to automated browser testing, speed of execution and test coverage are the important parameters based on which you can measure the success of a test. The functionalities of your website might work on Chrome 78.0 (installed on Windows 10), but what if you want to test on Chrome 70.0 (installed on Windows 10). Surely, you can uninstall the Chrome browser and install the 77.0 version of Chrome, but this will be a tedious exercise. You may end up more time uninstalling & installing web browsers than on Selenium testing for your web property.
So, what is a feasible and scalable solution? Automated browser testing on the Cloud, and this is where LambdaTest infrastructure can be used. Using LambdaTest, you can perform cross browser testing on 3000+ browsers and operating systems online. The entire process of automated browser Selenium testing can be accelerated by taking advantage of Parallel execution via concurrent sessions.
We first create an account on LambdaTest, post which we make a note of the user name & access key from the Profile Page since they would be used for accessing the Selenium Grid on LambdaTest. The status of tests can be checked by visiting the Automation Tab on the website.
For demonstrating usage of NUnit annotations with the Selenium framework, we make use of the same test that was demonstrated earlier. The only difference is that this time Remote Selenium WebDriver is used instead of Local Selenium WebDriver. For faster execution, we make use of parallelism on LambdaTest. In my case, my LambdaTest plan enables me to use two concurrent sessions.
NUnit annotations demonstrated – [SetUp], [Test], [TestFixture], and [TearDown]
FileName – 2_Test_Annotation_example.cs
|
1 2 3 4 5 6 7 8 9 10 11 12 13 14 15 16 17 18 19 20 21 22 23 24 25 26 27 28 29 30 31 32 33 34 35 36 37 38 39 40 41 42 43 44 45 46 47 48 49 50 51 52 53 54 55 56 57 58 59 60 61 62 63 64 65 66 67 68 69 70 71 72 73 74 75 76 77 78 79 80 81 |
using System; using OpenQA.Selenium; using OpenQA.Selenium.Remote; using NUnit.Framework; using System.Threading; using System.Collections.Generic; namespace ParallelLTSelenium { [TestFixture("Chrome", "72.0", "Windows 10")] [TestFixture("Firefox", "66.0", "Windows 10")] [Parallelizable(ParallelScope.All)] public class ParallelLTTests { ThreadLocal<IWebDriver> driver = new ThreadLocal<IWebDriver>(); private String browser; private String version; private String os; public ParallelLTTests(String browser, String version, String os) { this.browser = browser; this.version = version; this.os = os; } [SetUp] public void Init() { String username = "himanshu.sheth"; String accesskey = "fbI6kxucn5iRzwt5GWYiNvaPb4Olu9R8lwBsXWTSaIOebXn4x9"; String gridURL = "@hub.lambdatest.com/wd/hub"; DesiredCapabilities capabilities = new DesiredCapabilities(); capabilities.SetCapability("user", username); capabilities.SetCapability("accessKey", accesskey); capabilities.SetCapability("browserName", browser); capabilities.SetCapability("version", version); capabilities.SetCapability("platform", os); driver.Value = new RemoteWebDriver(new Uri("https://" + username + ":" + accesskey + gridURL), capabilities, TimeSpan.FromSeconds(600)); System.Threading.Thread.Sleep(2000); } [Test] public void Google_Test() { { driver.Value.Url = "https://www.google.com"; IWebElement element = driver.Value.FindElement(By.XPath("//*[@id='tsf']/div[2]/div[1]/div[1]/div/div[2]/input")); element.SendKeys("LambdaTest"); /* Submit the Search */ element.Submit(); /* Perform wait to check the output */ System.Threading.Thread.Sleep(2000); } } [TearDown] public void Cleanup() { bool passed = TestContext.CurrentContext.Result.Outcome.Status == NUnit.Framework.Interfaces.TestStatus.Passed; try { // Logs the result to Lambdatest ((IJavaScriptExecutor)driver.Value).ExecuteScript("lambda-status=" + (passed ? "passed" : "failed")); } finally { // Terminates the remote webdriver session driver.Value.Quit(); } } } } |
Code Walkthrough:
As the tests have to be executed in parallel, we make use of the Parallelizable attribute so that both the tests are triggered at the same time on the server.
|
1 2 3 |
[TestFixture("Chrome", "72.0", "Windows 10")] [TestFixture("Firefox", "66.0", "Windows 10")] [Parallelizable(ParallelScope.All)] |
An instance of IWebDriver is created in a manner that data is stored on a per-thread basis.
|
1 2 3 4 5 6 |
public class ParallelLTTests { ThreadLocal<IWebDriver> driver = new ThreadLocal<IWebDriver>(); ................... ................... } |
As the [TestFixture] is parameterized, a constructor is created where the arguments match the number & data-type of parameters in the test.
|
1 2 3 4 5 6 |
public ParallelLTTests(String browser, String version, String os) { this.browser = browser; this.version = version; this.os = os; } |
As a part of the [SetUp] attribute, per-thread remote WebDriver instance is created with three arguments. Two main arguments are a. Access information (username & access key) required for accessing LambdaTest infrastructure and b. Browser & Platform capabilities
|
1 2 3 4 5 6 7 8 9 10 11 12 13 14 15 16 |
[SetUp] public void Init() { String username = "user-name"; String accesskey = "access-key"; String gridURL = "@hub.lambdatest.com/wd/hub"; DesiredCapabilities capabilities = new DesiredCapabilities(); ................................................... ................................................... driver.Value = new RemoteWebDriver(new Uri("https://" + username + ":" + accesskey + gridURL), capabilities, TimeSpan.FromSeconds(600)); System.Threading.Thread.Sleep(2000); } |
The implementation under [Test] & [TearDown] attributes remains largely unchanged except that per-thread remote WebDriver instances are used in the code.
|
1 2 3 4 5 6 7 8 9 10 11 12 13 14 15 |
[Test] public void Google_Test() { { driver.Value.Url = "https://www.google.com"; IWebElement element = driver.Value.FindElement(By.XPath("//*[@id='tsf']/div[2]/div[1]/div[1]/div/div[2]/input")); ................................................... ................................................... /* Perform wait to check the output */ System.Threading.Thread.Sleep(2000); } } |
As seen in the screenshot obtained from the Automation dashboard, it is clear that two tests were executed in parallel, thereby making optimum utilization of the resources in hand.
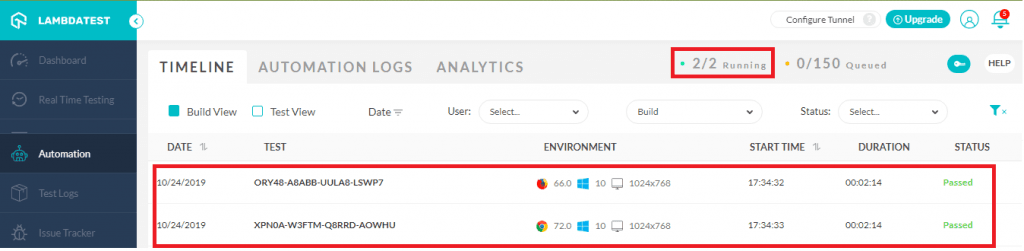
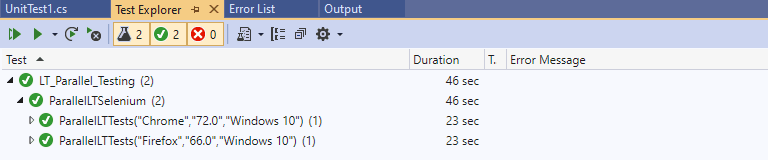
The total execution time is 46 seconds, i.e., 23 seconds per test. The time would be significantly more if the tests are executed sequentially.
With this, we demonstrated the most frequently used NUnit annotations. However, while doing automated browser testing, there could be cases where you might need to play around with different NUnit annotations to come up with an ideal test implementation.
Closing Notes
Annotations are used to help in building a more robust test framework. Initialization and De-initialization are normally performed as a part of the [SetUp] and [TearDown] annotations. Tests for Selenium testing are placed under the [Test] attribute. [TestFixtures] is used when the test developer wants to pass parameters to the tests. In ideal cases, there should be no dependency whatsoever between the test cases. Else, failure of one test case can impact the execution of the other dependent tests.
As a part of this article, we tried covering the most widely used NUnit annotations. In case you have used other annotations more often than the one’s demonstrated above, do leave your feedback in the comments section. Happy Testing ☺


Author’s Profile
Himanshu Sheth
Himanshu Sheth is a seasoned technologist and blogger with more than 15+ years of diverse working experience. He currently works as the 'Lead Developer Evangelist' and 'Senior Manager [Technical Content Marketing]' at LambdaTest. He is very active with the startup community in Bengaluru (and down South) and loves interacting with passionate founders on his personal blog (which he has been maintaining since last 15+ years).
Blogs: 132
Got Questions? Drop them on LambdaTest Community. Visit now