How To Generate Pytest Code Coverage Report
Idowu (Paul) Omisola
Posted On: February 17, 2023
![]() 122558 Views
122558 Views
![]() 22 Min Read
22 Min Read
The software quality level depends on how much you test. But it’s not unusual to miss some code parts or testing requirements during testing. This might result in bug or defect leakages if left unchecked. Code coverage helps you audit your test suite to determine which parts of your application are missing under test.
Thus, you can be sure where your test covers. While using test coverage, you’ll get analytical insights about parts of your program that you’ve covered, those missed, and those you need to test. Code coverage is even easier with Python, considering Python’s simplicity.
In this Selenium Python tutorial on pytest code coverage report, learn how to use code coverage with Python’s coverage.py using the pytest framework.
Watch this in-depth pytest tutorial that will help you master the pytest framework and assist you in writing efficient and effective automation tests.
So, let’s get started!
TABLE OF CONTENTS
- What is Code Coverage?
- Code Coverage vs. Test Coverage
- Benefits of Code Coverage
- Types of Code Coverage
- Why pytest for Code Coverage Report
- Tools for Generating pytest Code Coverage Report
- Code Coverage Demonstration using coverage.py
- How to Implement Code Coverage on the Cloud Grid?
- Frequently Asked Questions (FAQs)
What is Code Coverage?
Code coverage is a simple statistic that measures the total lines of code that a test suite validates. It uses set metrics to calculate the total number of lines of code in your application source code that runs successfully in a test—typically expressed as a percentage.
Theoretically, code coverage can be calculated by taking the total lines of code executed during testing and dividing it by the sum of lines tested. This result is then multiplied by 100 to obtain a percentage coverage.
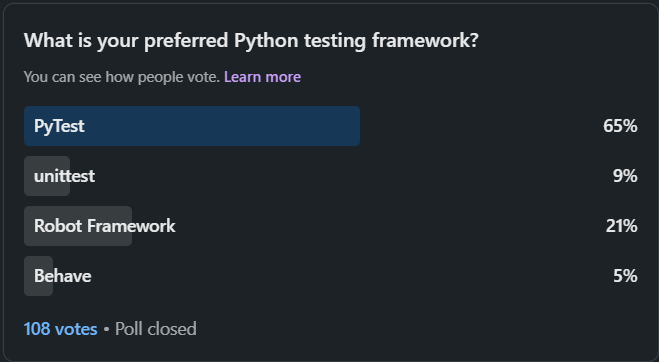
In a recent LinkedIn poll targeting developers, we inquired about their preferred Python testing framework. Many respondents highlighted their preference for Pytest, noting its simplicity and robust capabilities, particularly in Pytest coverage. This feedback not only demonstrates Pytest’s increasing popularity in generating effective code coverage reports but also emphasizes the significance of selecting appropriate and efficient testing tools.
We can wrap this up using the simple mathematical equation below.
Code coverage = (total code lines testedtotal code lines subjected to testing) 100
For instance, testing a class containing 100 code lines in your source code involves subjecting the entire 100 lines of code to testing. If your test omits 40 lines of this class after testing, you can say your test suite has covered 60% of your code.
In that case, the number of actual code lines tested was 60, whereas the number of lines exposed to testing was 100. There might be bugs buried within the 40 omitted lines you don’t want to slip through to production. You want to improve your test and source code to increase coverage in that case.
Is 100 Percent Code Coverage Possible?
Here’s the thing: 100 percent code coverage isn’t enough reason to conclude that your application is free from bugs. For instance, you might still get 100% code coverage if you naively test functions, code lines, or components irrelevant to your app or its user story.
While it can be time and resource-intensive, it’s best to improve your code consistently rather than aim for crisp 100% code coverage. The essence of code coverage is to expose underlying bugs and get more insights about what your test suite needs to cover. Invariably, it helps you improve your test reach.
Code Coverage vs. Test Coverage
Code Coverage vs. Test Coverage Many people, including testers and developers, use code and test coverage synonymously. But while these terms are closely related, there are still some differences.
Test Coverage
Test coverage is a qualitative black box validation of all the functionalities required to run an application smoothly. While analyzing this coverage type, you don’t need to understand the internal working mechanisms of the source code running the software under test.
For example, your application design typically lists specific features it must satisfy to be fully functional. As a QA engineer, you want to ensure that your test suite covers all the required functionalities before you verify the software’s quality.
Code Coverage
As explained, code coverage verifies the extent to which your test covers your source code. It’s a white-box approach that requires you to understand the underlying mechanisms of the source code driving the application under test.
Benefits of Code Coverage
Performing code coverage has many advantages.
- It helps audit your test suite and check test completeness.
- It prevents defect or bug leakage, as it helps you find and fix bugs in your source code easily.
- It helps discover missing requirements easily.
- It helps write better tests, increasing overall code quality.
- It helps track and assess underused or garbage functions that usually introduce bugs.
- It provides deeper code and user story insights and unveils more test cases, extending your test reach.
- It enhances final software quality.
Run your Python automated scripts on 3000+ browser environments. Try LambdaTest Now!
Types of Code Coverage
Code coverage can use a few different methods. We’ll discuss each below.
Branch Coverage
Branch coverage validates whether a test covers the code execution path. It’s part of code coverage that checks whether each branch in your code, including loops and conditions, runs at least once during testing.
Branch coverage is inclusive, as it seeks to leave no execution path unchecked. For instance, if you write a code that executes an action only if A > B, subjecting it to branch coverage first validates the condition (A > B). It then covers every statement (action) under that condition as well.
However, your test doesn’t cover the code if the condition (A > B) is false. To capture the branch, you might need to run a test where the boolean condition returns both true and false. And that’s why you need a solid working knowledge of the source code or application during unit testing.
Statement Coverage
Statement coverage is more niche. Unlike branch coverage, it only validates the statements or actions within a code path. It doesn’t consider the parent code that prompts the execution of the action.
It means if a test doesn’t cover the branch that determines an action execution (if branch coverage is zero), statement coverage for that branch is also zero.
For example, if A > B is false, the branch statement (action) may not run under test. It’s safe to say statement coverage is partly dependent on branch coverage.
But sometimes, a test might fail to cover the statements (actions) under a branch if it contains a bug somewhere.
Decision Coverage
Decision coverage is a subset of branch coverage that verifies if a test covers all the conditions in the source code. Unlike branch coverage, which validates all code paths, including loops, decision coverage only checks the boolean conditions that run during testing.
Due to its design, decision coverage might omit false conditions, reducing the code coverage report.
Loop Coverage
Like decision coverage, loop coverage also falls under branch coverage. It validates the number (in percentage) of loops that run at least once under a test suite.
Function Coverage
Function coverage is the part of code coverage that evaluates the percentage of code functions that run during testing.
Why pytest for Code Coverage Report?
Pytest has plugins and supported modules for evaluating code coverage. Here are some reasons you want to use pytest for code coverage report generation:
- It provides a straightforward approach for calculating coverage with a few lines of code.
- It features a couple of code coverage tools.
- It gives comprehensive statistics of your code coverage score.
- It features plugins that can help you prettify pytest code coverage reports.
- It features a command-line utility for executing code coverage.
- It supports distributed and localized testing.
Now that I have covered the basics of the pytest code coverage report, let me walk you through some of the tools used for the pytest code coverage report.
Tools for Generating pytest Code Coverage Report
Here are some of the most-used pytest code coverage tools.
- coverage.py
- pytest-cov
The coverage.py library is one of the most-used pytest code coverage reporting tools. It’s a simple Python tool for producing comprehensive pytest code coverage reports in table format. You can use it as a command-line utility or plug it into your test script as an API to generate coverage analysis.
The API option is recommended in case you need to prevent repeating a bunch of terminal commands each time you want to run the coverage analysis.
While its command line utility might require a few patches to prevent reports from getting muffed, the API option provides clean, pre-styled HTML reports that you can view via a web browser.
In this pytest Tutorial, learn how to generate HTML and Allure test reports in pytest and how to apply them while performing test automation:
Below is the terminal line for executing code coverage with pytest using coverag.py.
|
1 |
coverage run -m pytest |
The above command runs all pytest test suites with names starting with “test.”
All you need to do to generate reports while using its API is to specify a destination folder in your test code. It then overwrites the folder’s HTML report in subsequent tests.
You’ll see its API usage as you read further through the code coverage demonstration section.
pytest-cov is a code coverage plugin and command line utility for pytest. It also provides extended support for coverage.py.
Like coverage.py, you can use it to generate XML or HTML reports and view a pretty code coverage analysis via the browser. Although using pytest-cov involves running a simple command via the terminal, the terminal command becomes longer and more complex as you add more coverage options.
For instance, generating a command-line-only report is as simple as running the following command:
|
1 |
pytest --cov |
The result of the pytest –cov command is below:

But generating an HTML report requires additional command:
|
1 |
pytest --cov --cov-report=html:coverage_re |
Where coverage_re is the coverage report directory.
Below is the report when viewed via the browser.
Here is a list of widely-used command line options with –cov:
| –cov options | |
|---|---|
| -cov=PATH | Measure coverage for a filesystem path. (multi-allowed) |
| –cov-report=type | To specify the type of report to generate. Type can be HTML, XML, annotate, term, term-missing, or lcov. term, term- missing may be followed by “:skip-covered”. annotate, html, xml, and lcov may be followed by “:DEST” where DEST specifies the output location. |
| –cov-config=path | Config file for coverage. Default: .coveragerc |
| –no-cov-on-fail | Do not report coverage if the test fails. Default: False |
| –no-cov | Disable coverage report completely (useful for debuggers). Default: False |
| –cov-reset | Reset cov sources accumulated in options so far. Mostly useful for scripts and configuration files. |
| –cov-fail-under=MIN | Fail if the total coverage is less than MIN. |
| –cov-append | Do not delete coverage but append to current. Default: False |
| –cov-branch | Enable branch coverage. |
| –cov-context | Choose the method for setting the dynamic context. |
Code Coverage Demonstration using coverage.py
The code coverage demonstration for this blog includes a test for the following:
- A plain name tweaker class example to show why you may not achieve 100% code coverage and how you can use its result to extend your test reach.
- Registration steps code coverage demonstration using the LambdaTest eCommerce Playground, executed on the cloud grid.
We’ll use Python’s coverage module, coverage.py, to demonstrate the code coverage for all the tests in this tutorial on the pytest code coverage report. So you need to install the coverage.py module since it’s third-party. You’ll also need to install the Selenium WebDriver (to access web elements) and python-dotenv (to mask your secret keys).
Create a requirements.txt file in your project root directory and insert the following packages:
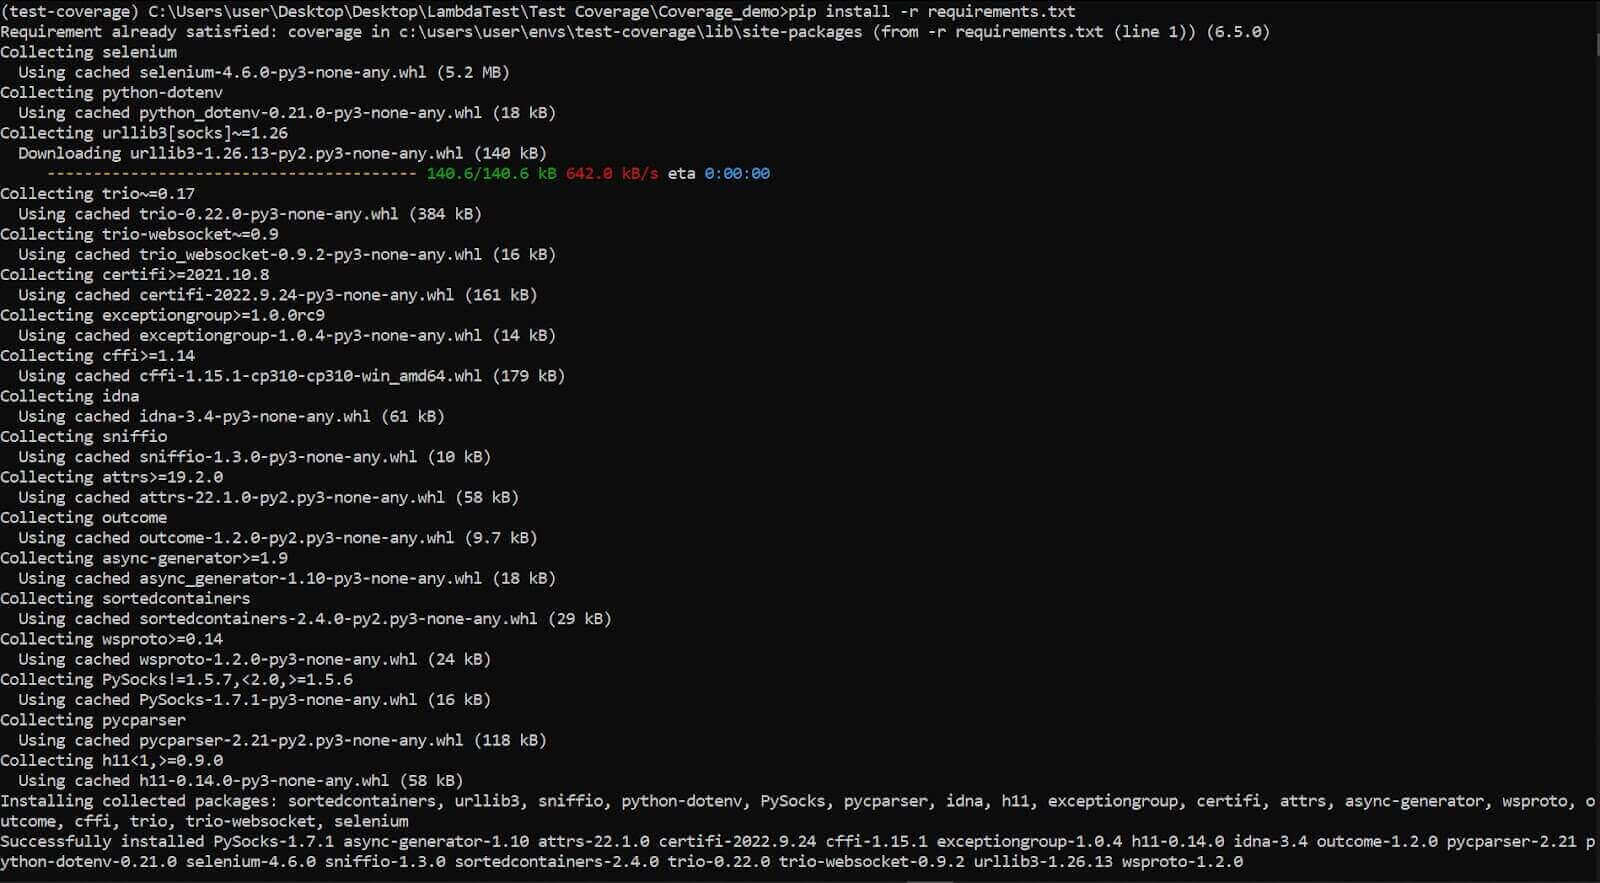
Next, install the packages using pip:
|
1 |
pip install -r requirements.txt |
The command installs the required packages as shown:
As mentioned, coverage.py lets you generate and write coverage reports inside an HTML file and view it in the browser. You’ll see how to do this later.
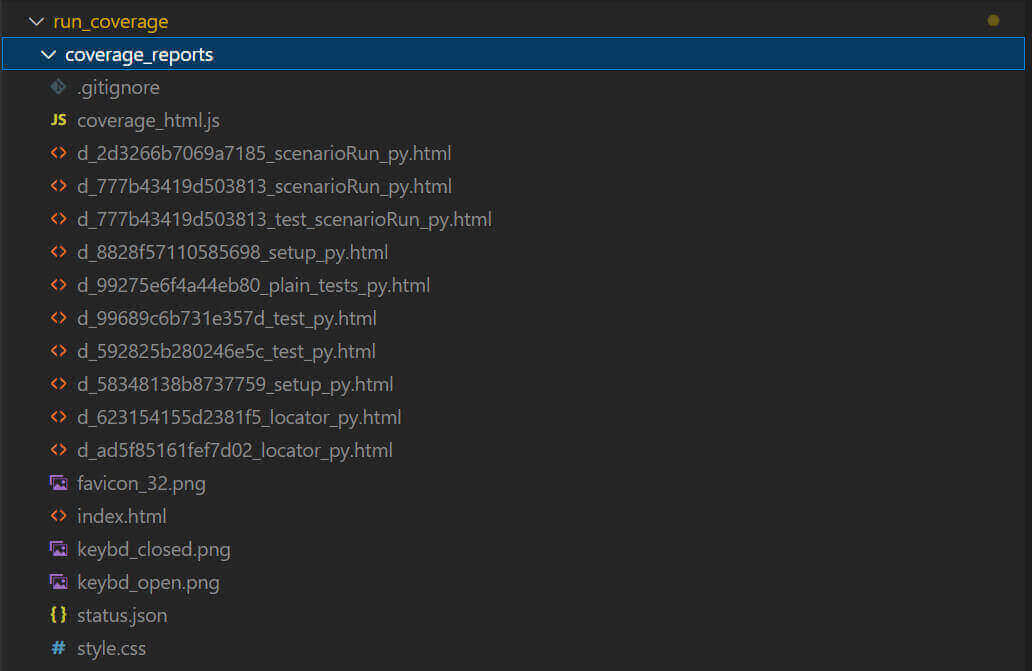
Below is a screenshot of the project structure inside VS Code.
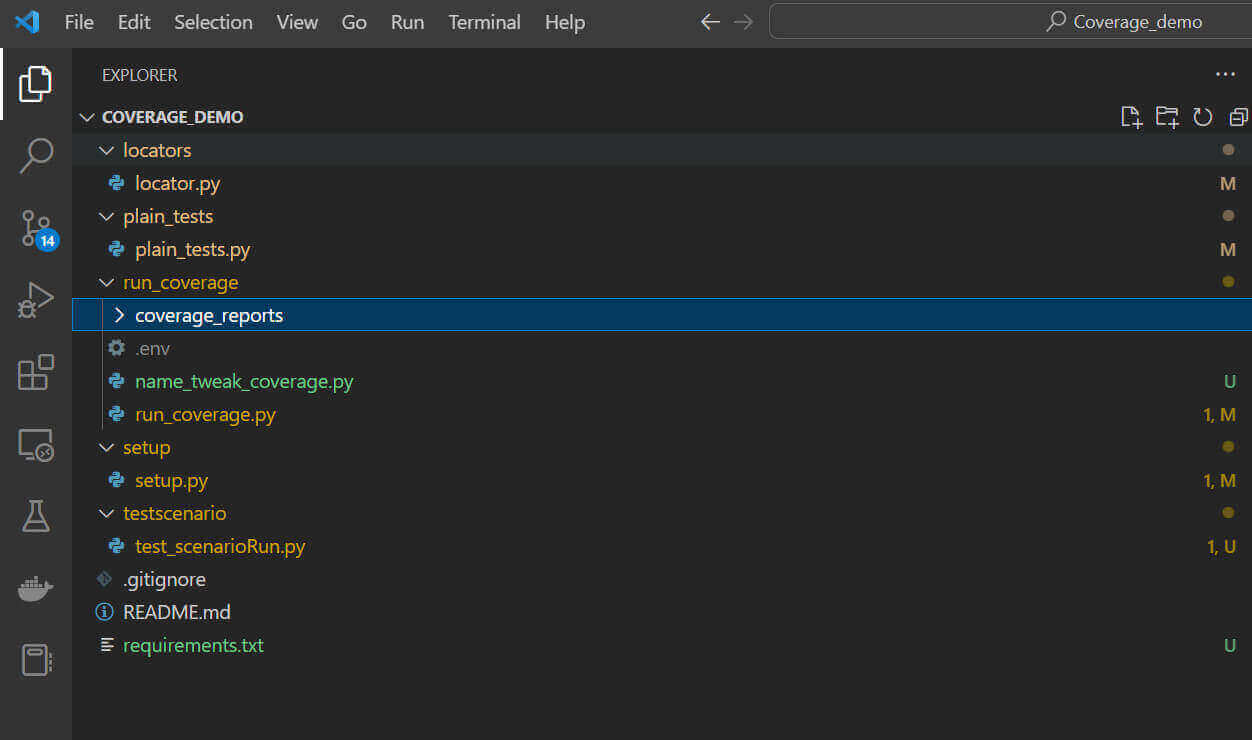
The locators folder contains the web locator for the LambdaTest playground test. However, the plain_test folder contains the test class for the example name tweaking scenario.
The run_coverage folder holds the test runners for the entire test suite. It also contains a dedicated folder for storing the auto-generated coverage reports.
The setup directory is the LamdaTest grid setup for the registration steps test case. And finally, the test scenario directory contains the file with the class that executes the web actions in locators.py.
How Code Coverage helps you extend your test reach: Name Tweaker Class Test Example
We’ll start by considering an example test for the name tweaking class to demonstrate why you may not achieve 100% code coverage. And you’ll also see how to extend your code coverage.
The name tweaking class contains two methods. One is for concatenating a new and an old name, while the other is for changing an existing name.
For this example:
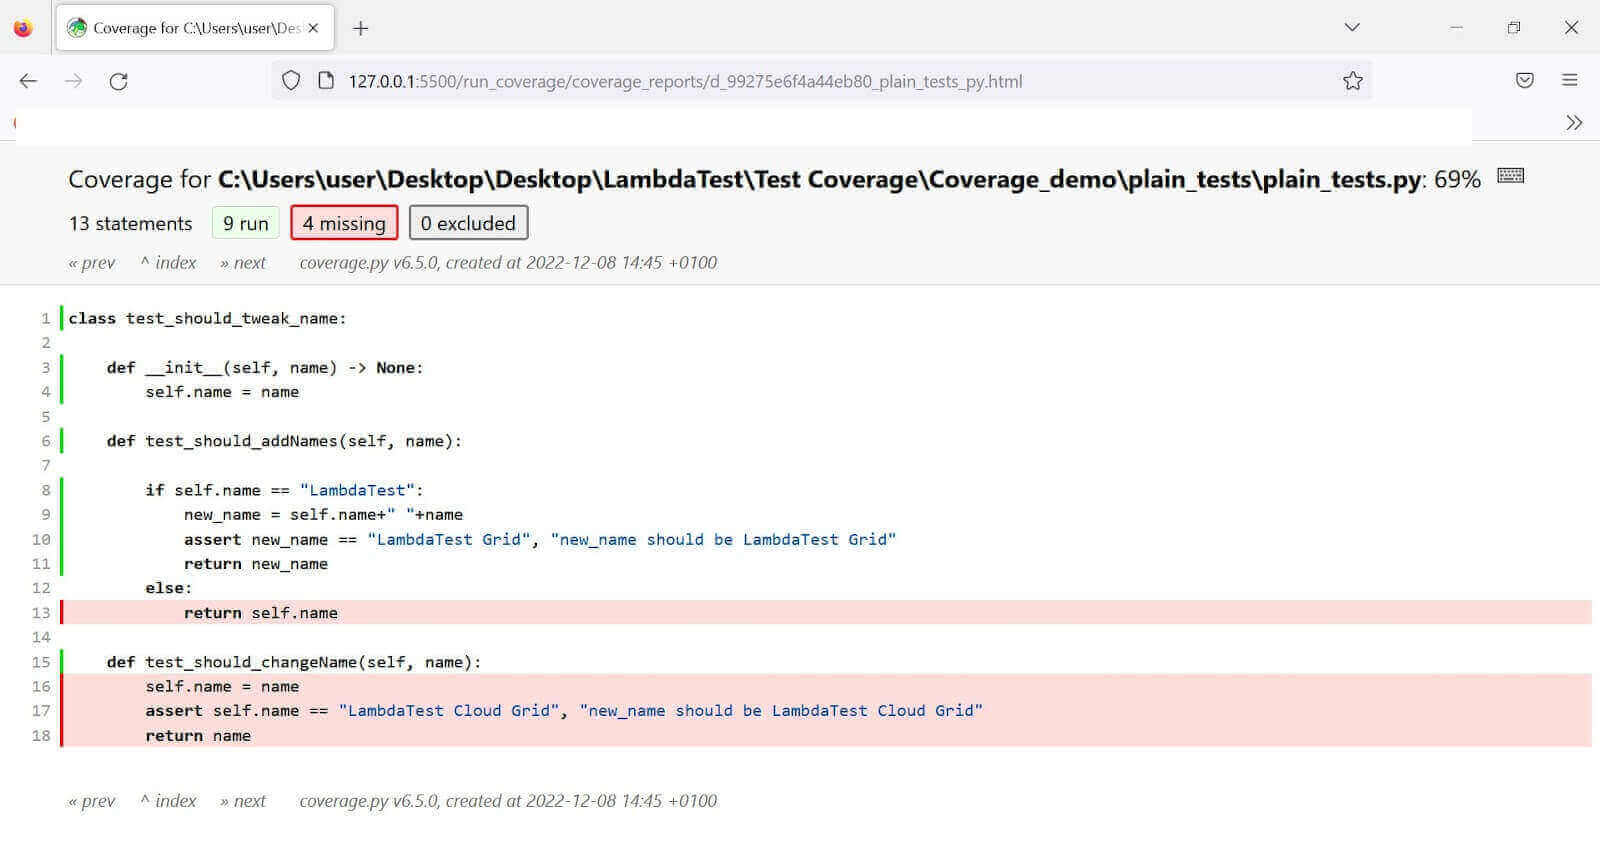
To execute the test and get code coverage less than 100%, we’ll start by omitting a test case for the else statement in the first method and also ignore the second method entirely (test_should_changeName).
Run the test by running the following command:
|
1 |
run_coverage/name_tweak_coverage.py |
The coverage generates a report folder like so:
Go into the coverage_reports folder and run index.html via your browser. The test yields 69% coverage (as shown below) since it omits the two named instances.
Let’s extend the code coverage:
Although we’ve deliberately ignored the second method in that class, it was easy to forget to include a case for the else statement in the test. That’s because we only focused on validating the true condition. Including a test case that assumes negativity (where the condition returns false) extends the code coverage.
So what if we add a test case for the second method and another one that assumes that the supplied name in the first method isn’t LambdaTest?
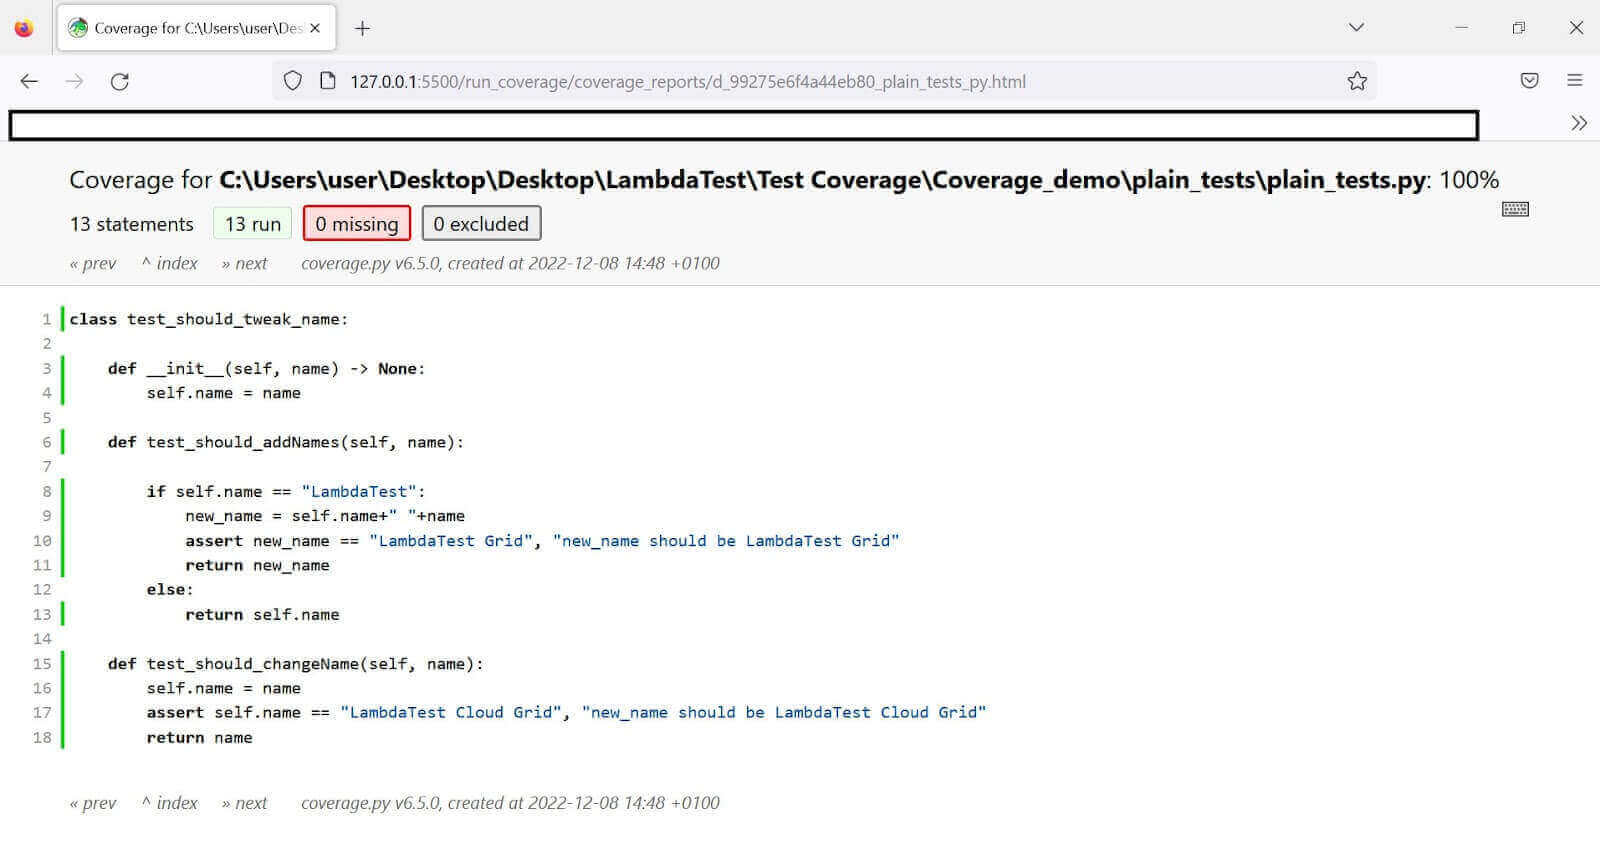
The code coverage yields 100% since we’re considering all possible scenarios for the class under test.
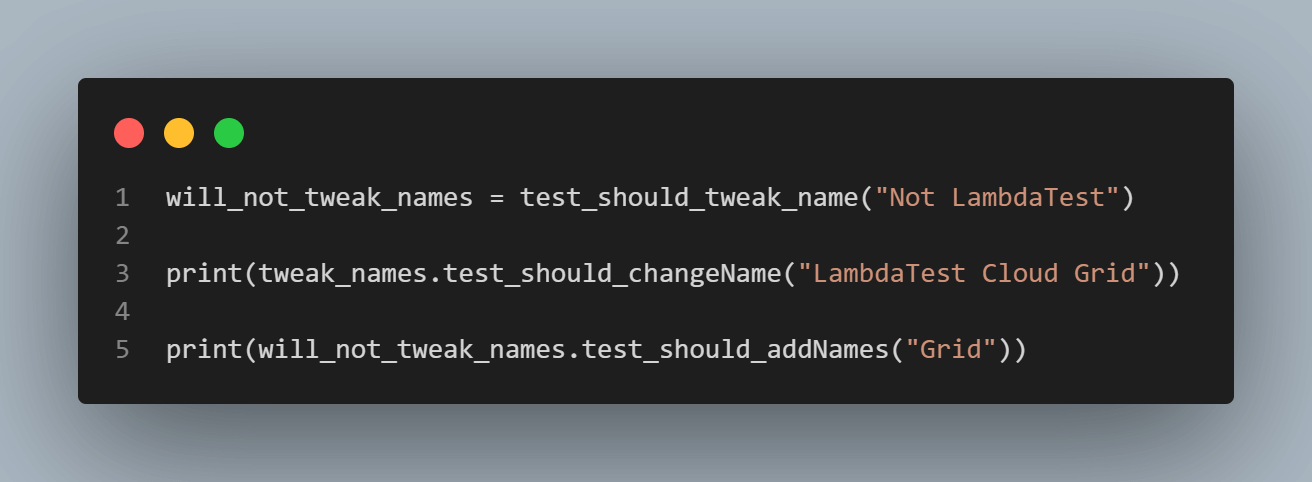
So a more inclusive test looks like this:
Adding the will_not_tweak_names variable covers the else condition in the test. Additionally, calling test_should_changeName from the class instance captures the second method in that class.
Extending the coverage this way generates 100% code coverage, as seen below.
How to Implement Code Coverage on the Cloud Grid?
We’ll build on the previous code structure for this test demo. Here, we’ll write test cases for the registration web actions on the LambdaTest eCommerce Playground. Then we’ll run the test on the LambdaTest cloud grid based on these actions without supplying some parameters; this might involve failure to fill in some form fields or submitting an invalid email address.
LambdaTest is a cloud-based continuous quality platform that enables you to conduct Python automation testing on a dependable and scalable online Selenium Grid infrastructure, spanning over 3000 real web browsers and operating systems. Additionally, it offers parallel test execution that can significantly reduce your build times while performing Python web automation.
You can also Subscribe to the LambdaTest YouTube Channel and stay updated with the latest tutorials around automated browser testing, Selenium testing, Cypress E2E testing, CI/CD, and more.
We’ll compute the code coverage under the following test scenarios:
- Submit the registration form with an invalid email address and missing fields.
- Submit the form with all fields filled appropriately (successful registration).
We’ll also see how adding the missing parameters can extend the code coverage.
Setting up the test environment

Code Walkthrough
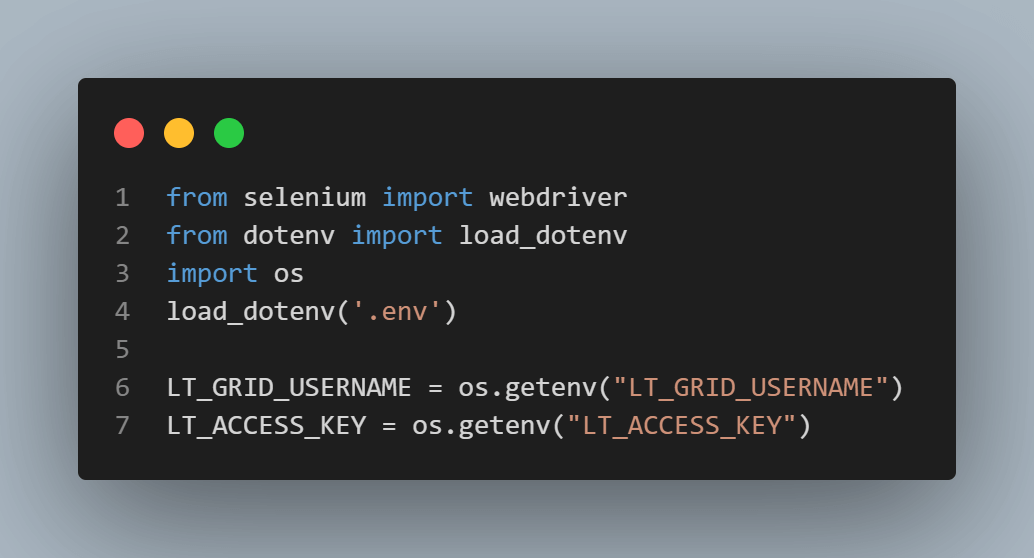
First, import the Selenium WebDriver to configure the test driver. Get your grid username and access key (passed as LT_GRID_USERNAME and LT_GRID_ACCESS_KEY, respectively) from the cloud grid.
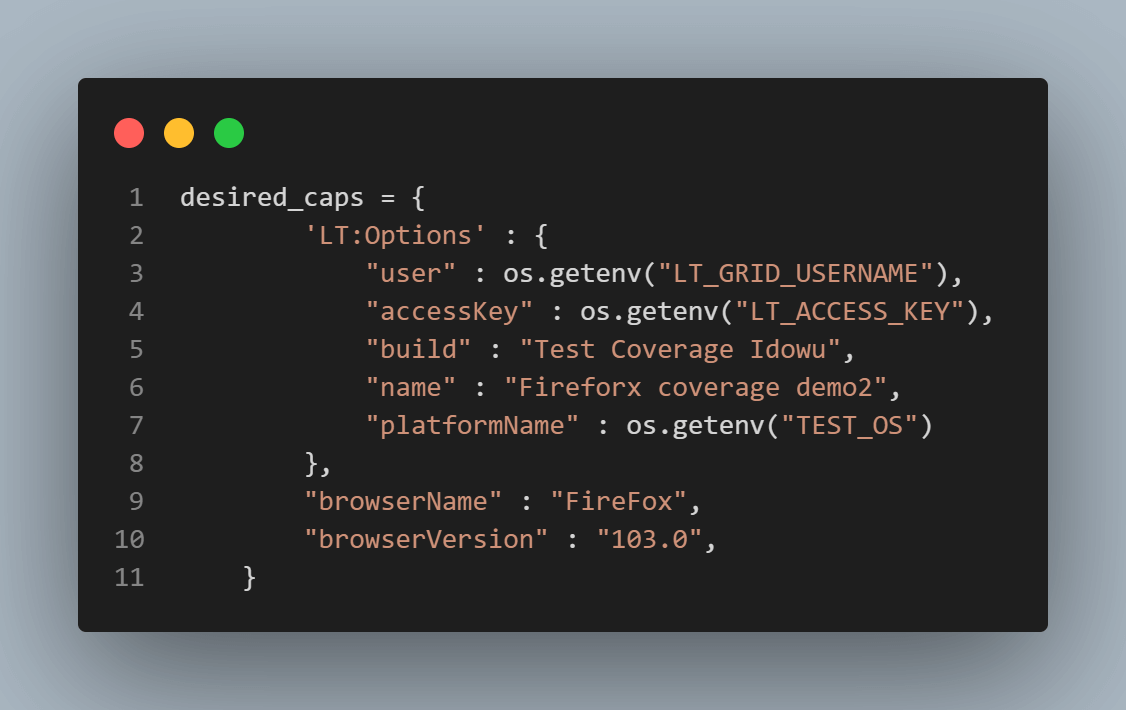
The desired_caps is a dictionary of the desired capabilities for the test suite. It details your username, access key, browser name, version, build name, and platform type that runs your driver.
Next is the grid URL. We access this using the access key and username declared earlier. We then pass this URL and the desired capability into the driver attribute inside the __init__ function.
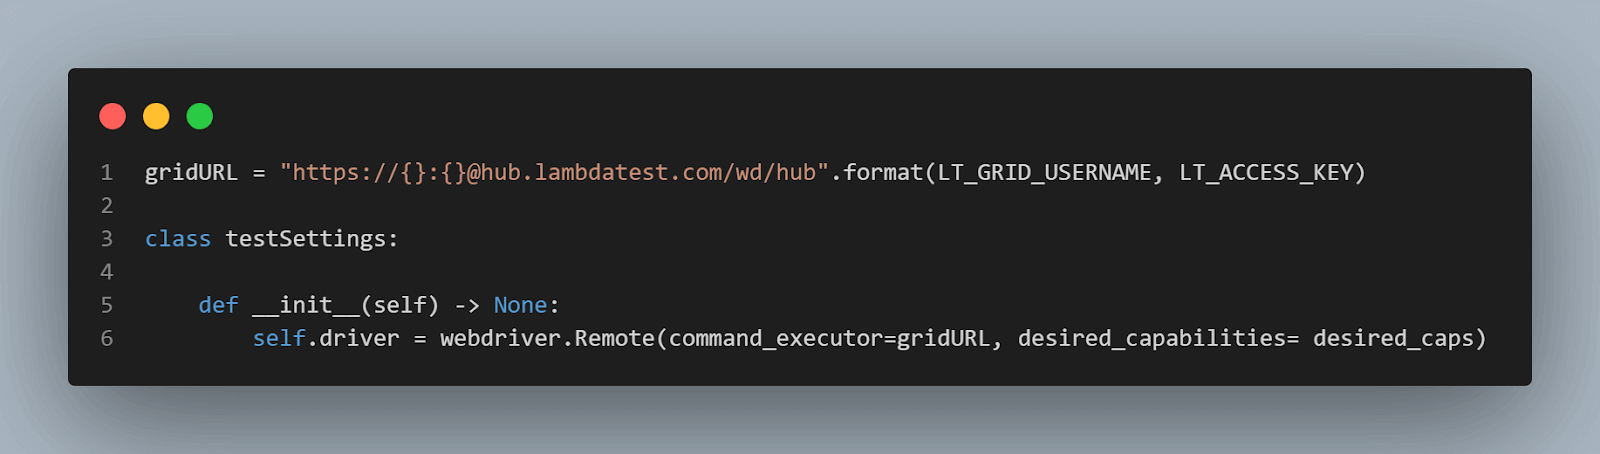
Write a testSetup method that initiates the test suite. It works by using the implicitly_wait function to pause for the DOM to load elements. It then uses the maximize_window method to expand the chosen browser frame.
However, the tearDown method helps stop the test instance and closes the browser using the quit method.

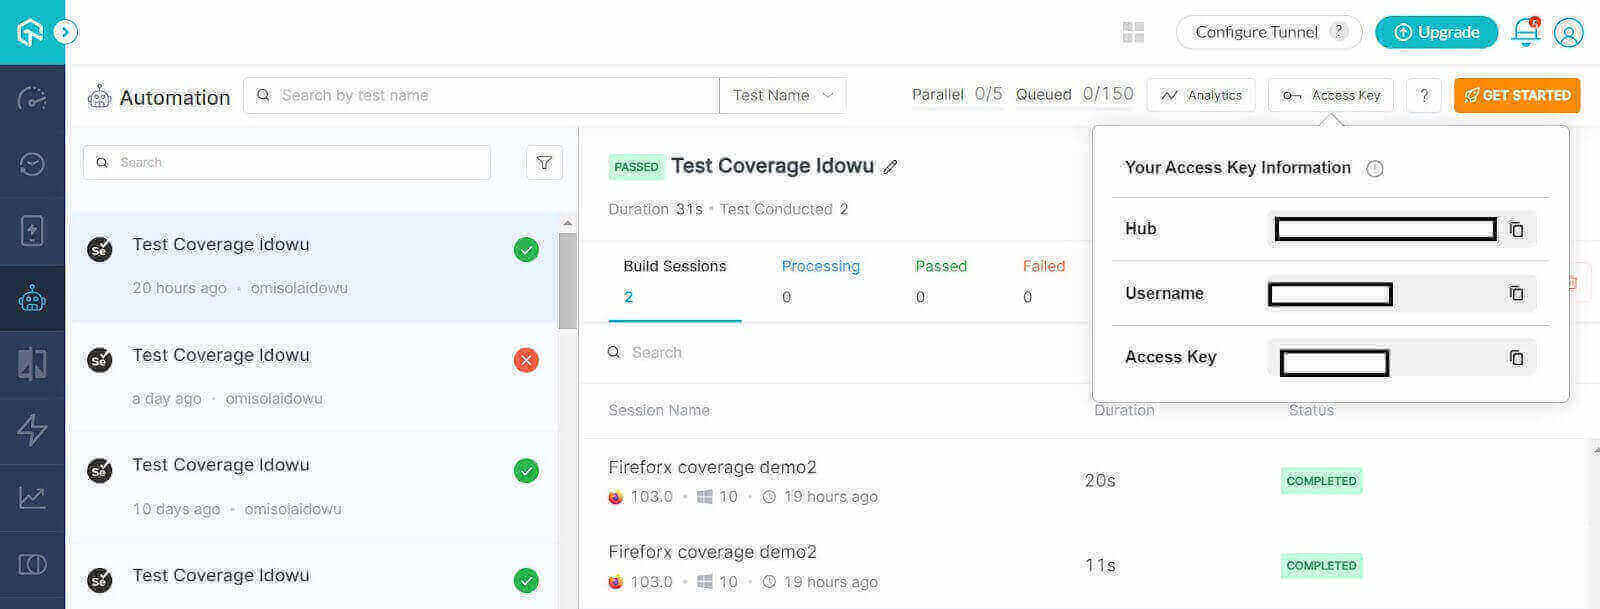
To get your LambdaTest username and access key, go to the LambdaTest Builds Section of your dashboard and click Access Key at the top right to display this information.
Start by importing Selenium By object into the file to declare the locator pattern for the DOM. We’ll use the NoSuchElementException to check for an error message in the DOM (in case of invalid inputs). To learn more about it, go through this tutorial on handling errors and exceptions in Selenium Python.
Next, declare a class to hold the web elements. Then create another class to handle the web actions for the registration form.
The element_selector class contains the web element locations. Each uses the XPath locator.
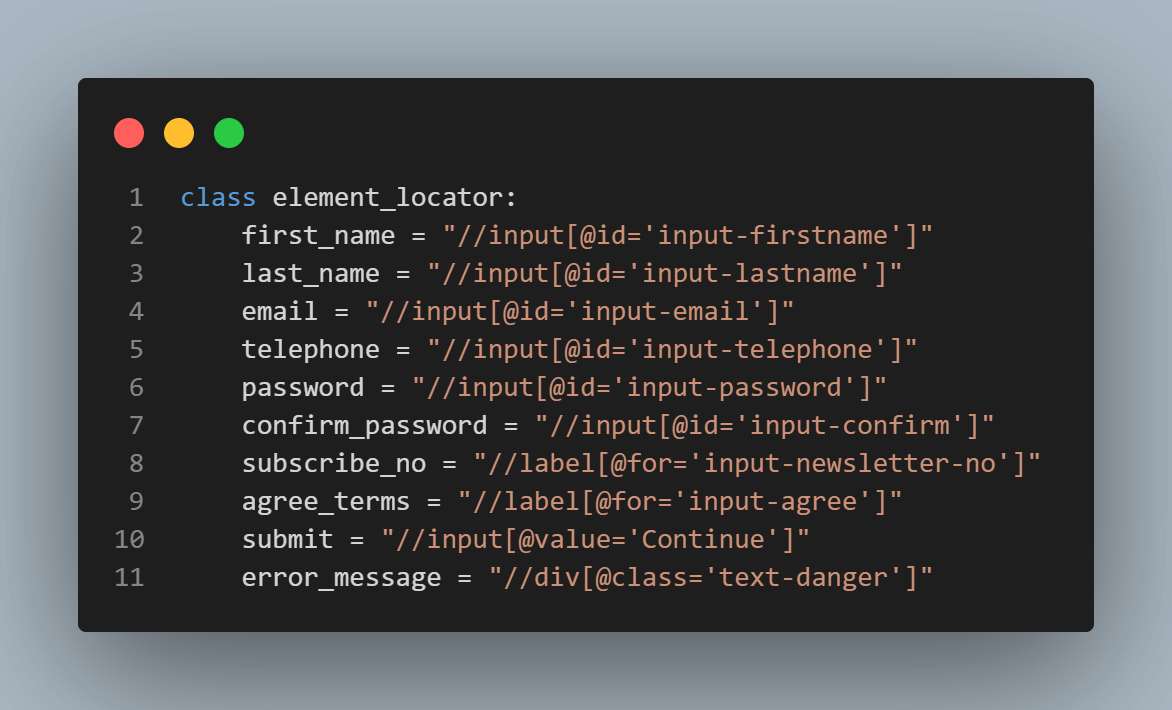
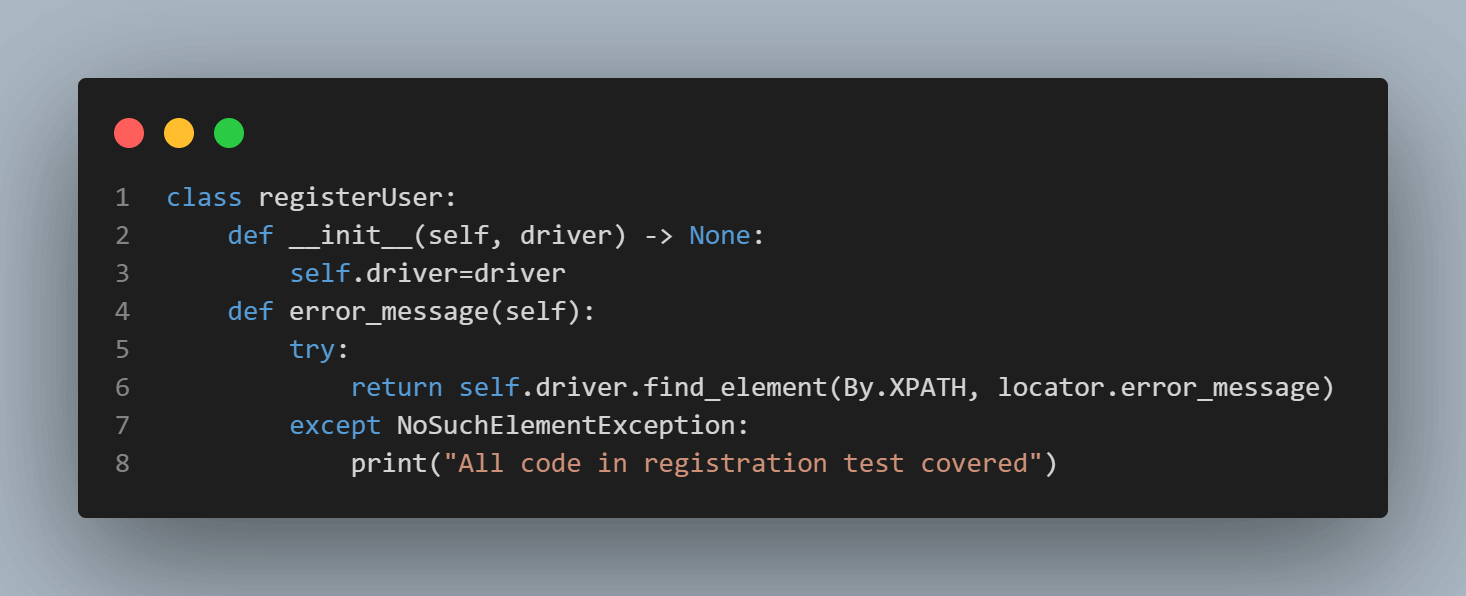
The registerUser class accepts the driver attribute to initiate web actions. You’ll get the driver attribute from the setup class while instantiating the registerUser class.
The error_message method inside the registerUser class does two things. First, it checks for invalid field error messages in the DOM when the test tries to submit the registration form with unacceptable inputs. The check runs every time inside a try block. So the test covers it regardless.
Secondly, it runs the code in the try block if it finds an input error message element in the DOM. This prevents the except block from running, flagging it as non-covered code.
Otherwise, Selenium raises a NoSuchElementException. This forces the test to log the print in the except block and mark it as covered code. This feels like a reverse strategy. But it helps code coverage capture more scenarios.
So besides capturing omitted fields (web action methods not included in the test execution), it ensures that the test accounts for an invalid email address or empty string input.
Thus, if the error message is displayed in the DOM, the method returns the error message element. Otherwise, Selenium raises a NoSuchElementException, forcing the test to log the printed message, as shown below.
The rest of the class methods are web action declarations for the locators in the element_locator class. Excluding the fields that require a click action, the other class methods accept a data parameter, a string that goes into the input fields.

Now let’s run each test scenario to see its computed code coverage.
But first, create a test runner file for the code coverage scenarios. You’ll execute this file to run the test and calculate the code coverage.
The above code starts by importing the coverage module. Next, declare an instance of the Coverage class and call the start method at the top of the code. Once code coverage begins, import the test_registration class from scenarioRun.py. Instantiate the class as registration.
The class method, it_should_register_user is a test method that executes the test case (you’ll see this class in the next section). Use cov.stop() to close the code coverage process. Then use cov.save() to capture the coverage report.
The cov.html_report method writes the coverage result into an HTML file inside the declared directory (coverage_reports).
And running this file executes the test and coverage report.
Now let’s tweak the web action methods inside scenarioRun.py to see the difference in code coverage for each scenario.
Scenario 1: Submit the registration form with an invalid email address and some missing fields.
Pay attention to the imported built-in and third-party modules. We start by importing the registerUser and testSettings classes we wrote earlier. The testSettings class contains the testSetup() and tearDown() methods for setting up and closing the test respectively. We instantiate this class as a setup.
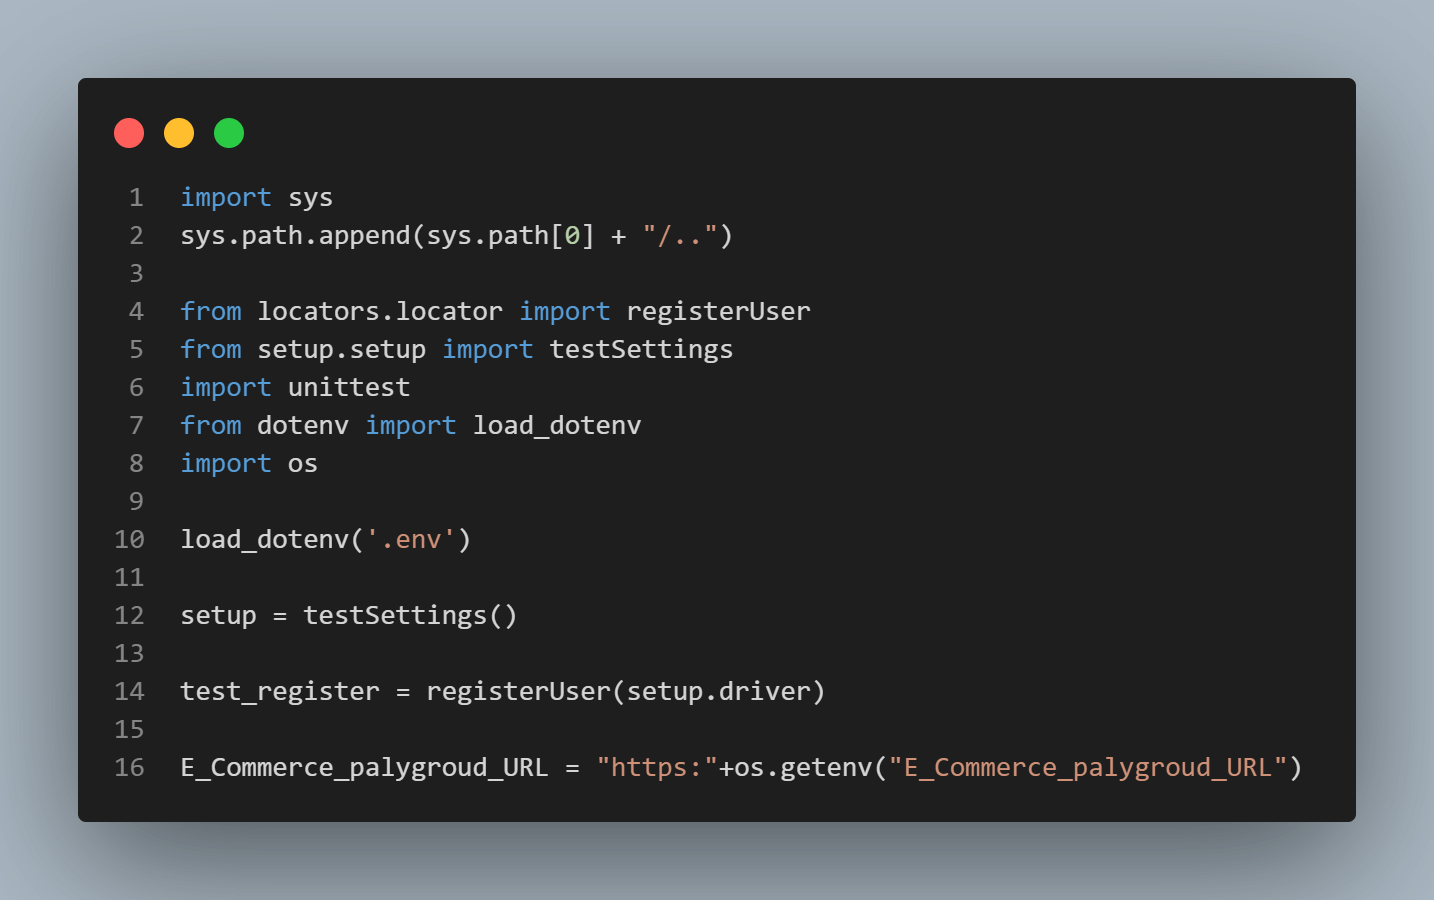
As seen below, the registerUser class instantiates as test_register using the setup’s driver attribute. We also need the unittest’s assert function. So we import that at the top level as well. The dotenv package lets you get the test website’s URL from the environment variable.
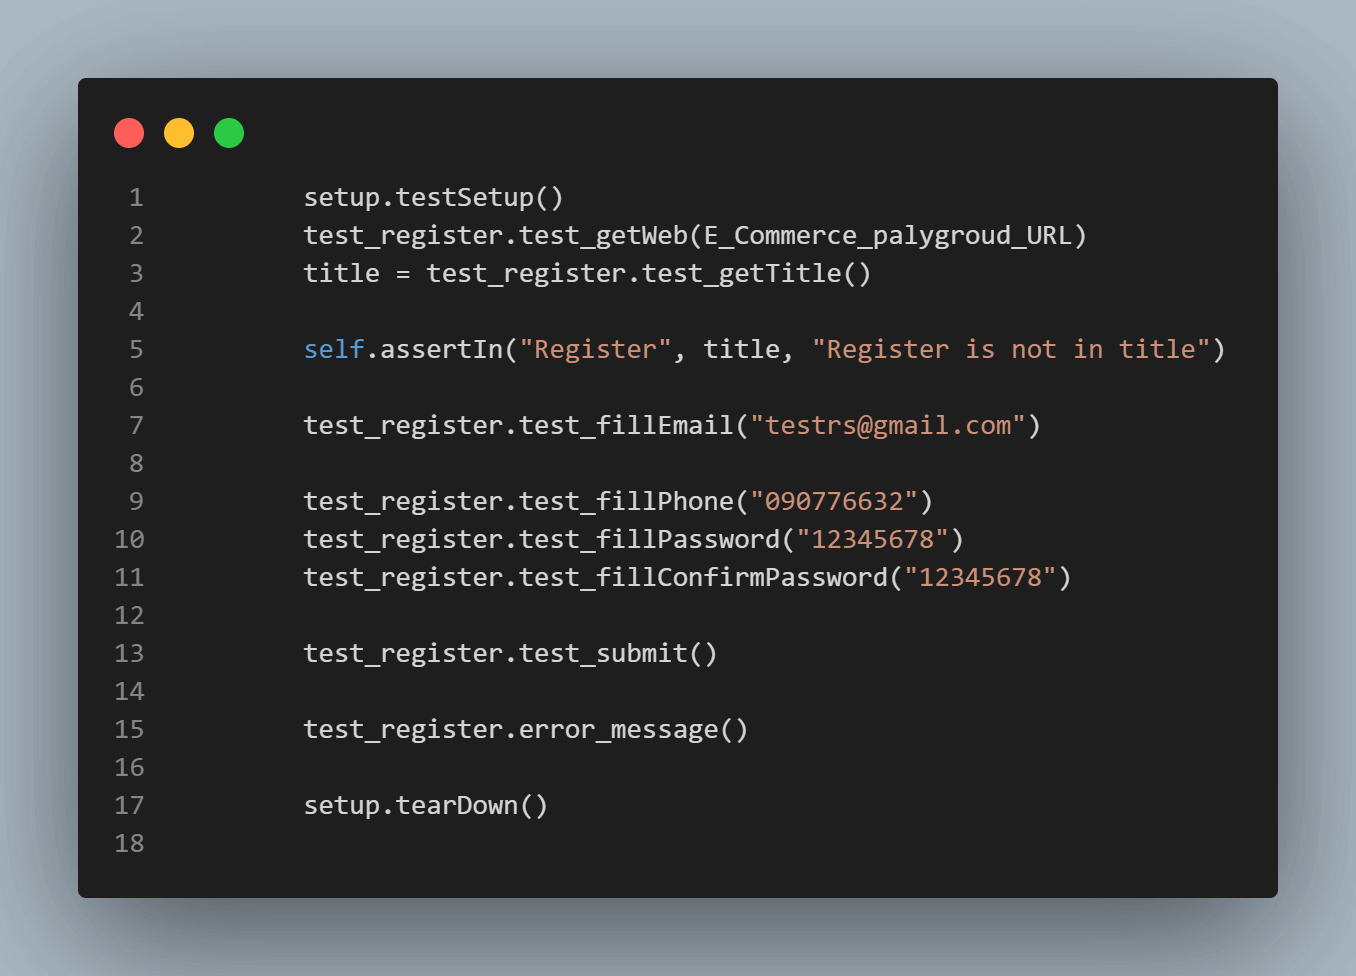
The test.testSetup method initiates the test case (it_should_registerUser method) and prepares the test environment. Next, we launch the website using the test_getWeb method. This accepts the website URL declared earlier. The inherited property from the unittest test, assertIn, checks whether the declared string is in the title. Use the setup.tearDown to close the browser and clean the test environment.
As earlier stated, the rest of the test case omits some methods from the registerUser class to see its effect on code coverage.
Scenario 1 code coverage execution:
To execute the test and code coverage, cd into the test_run_coverage folder and run the run_coverage.py file using pytest:
|
1 |
pytest |
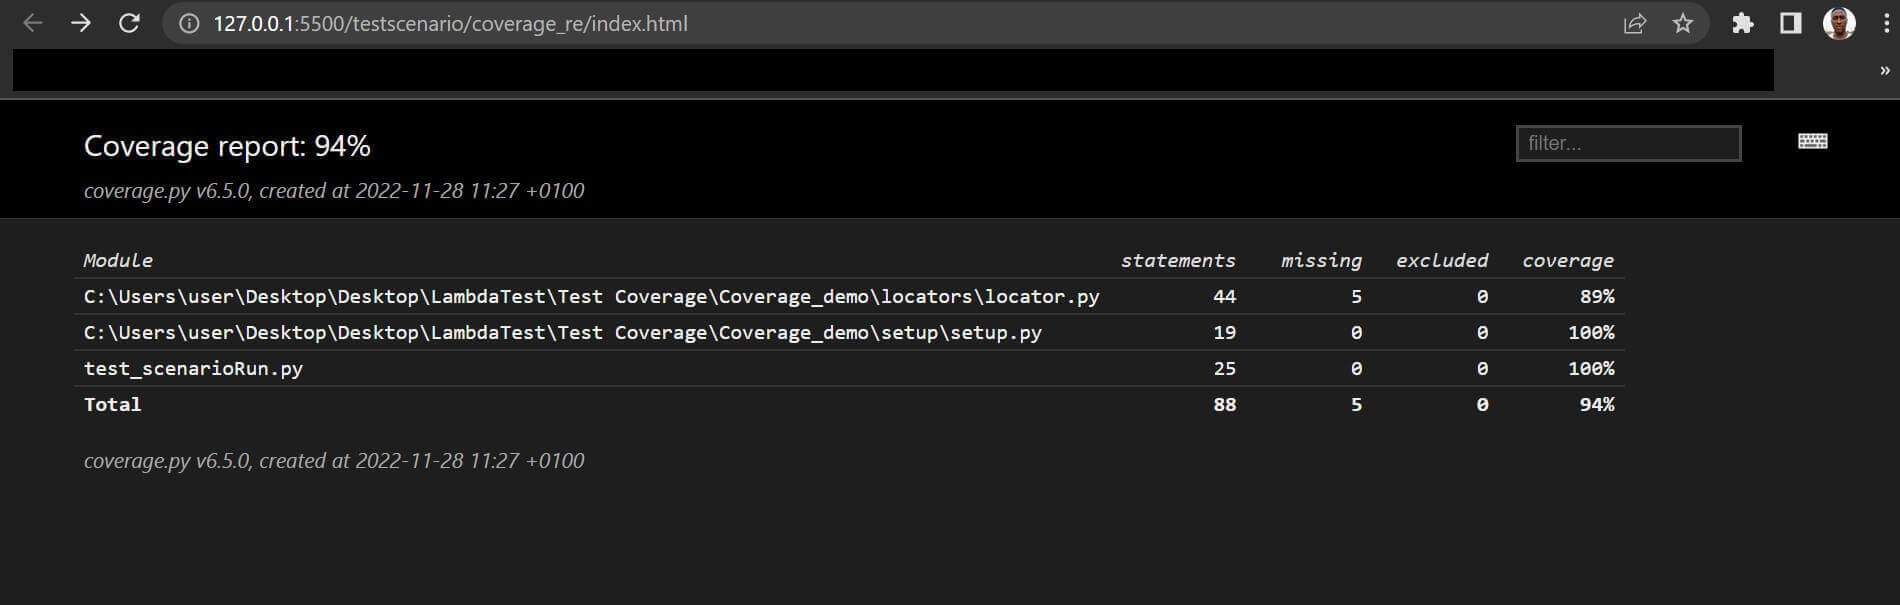
Once the code runs successfully, open the coverage_reports folder and open the index.html file via a browser. The code coverage reads 94%, as shown below.
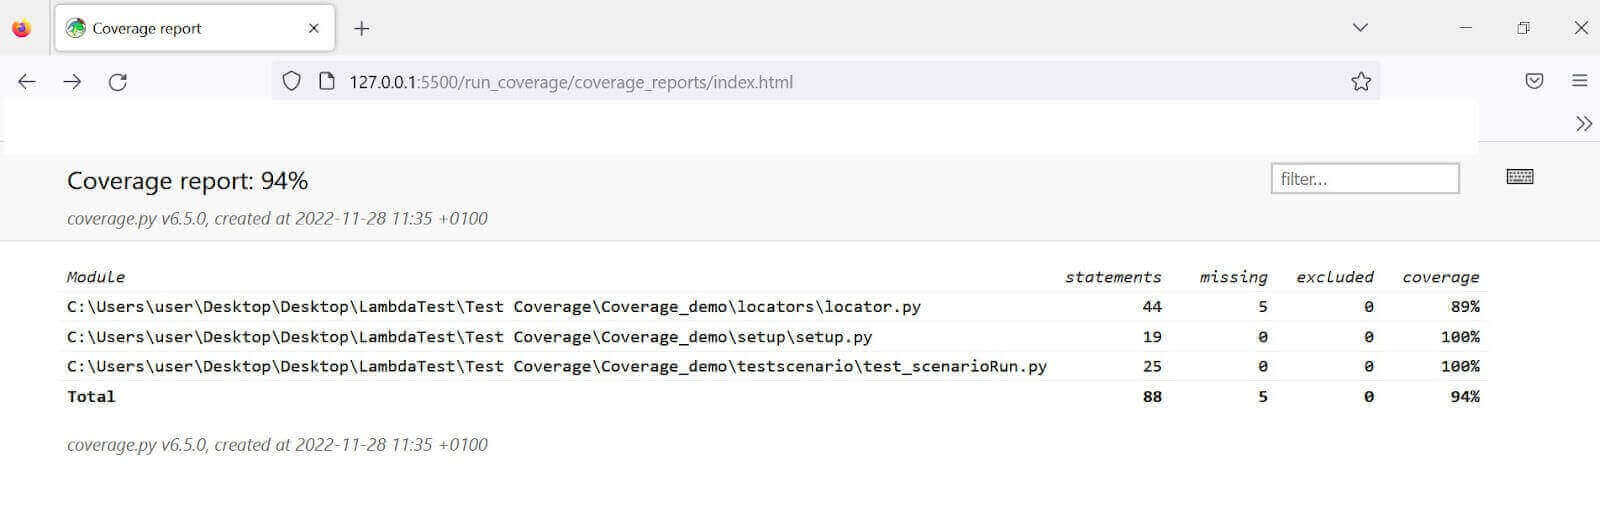
Although the other test files read 100%, locator.py has 89% of its code covered, reducing the overall score to 94%. This is because we omitted some web actions and filled in an invalid email address while running the test.
Opening locator.py gives more insights into the missing steps (highlighted in red), as shown below.
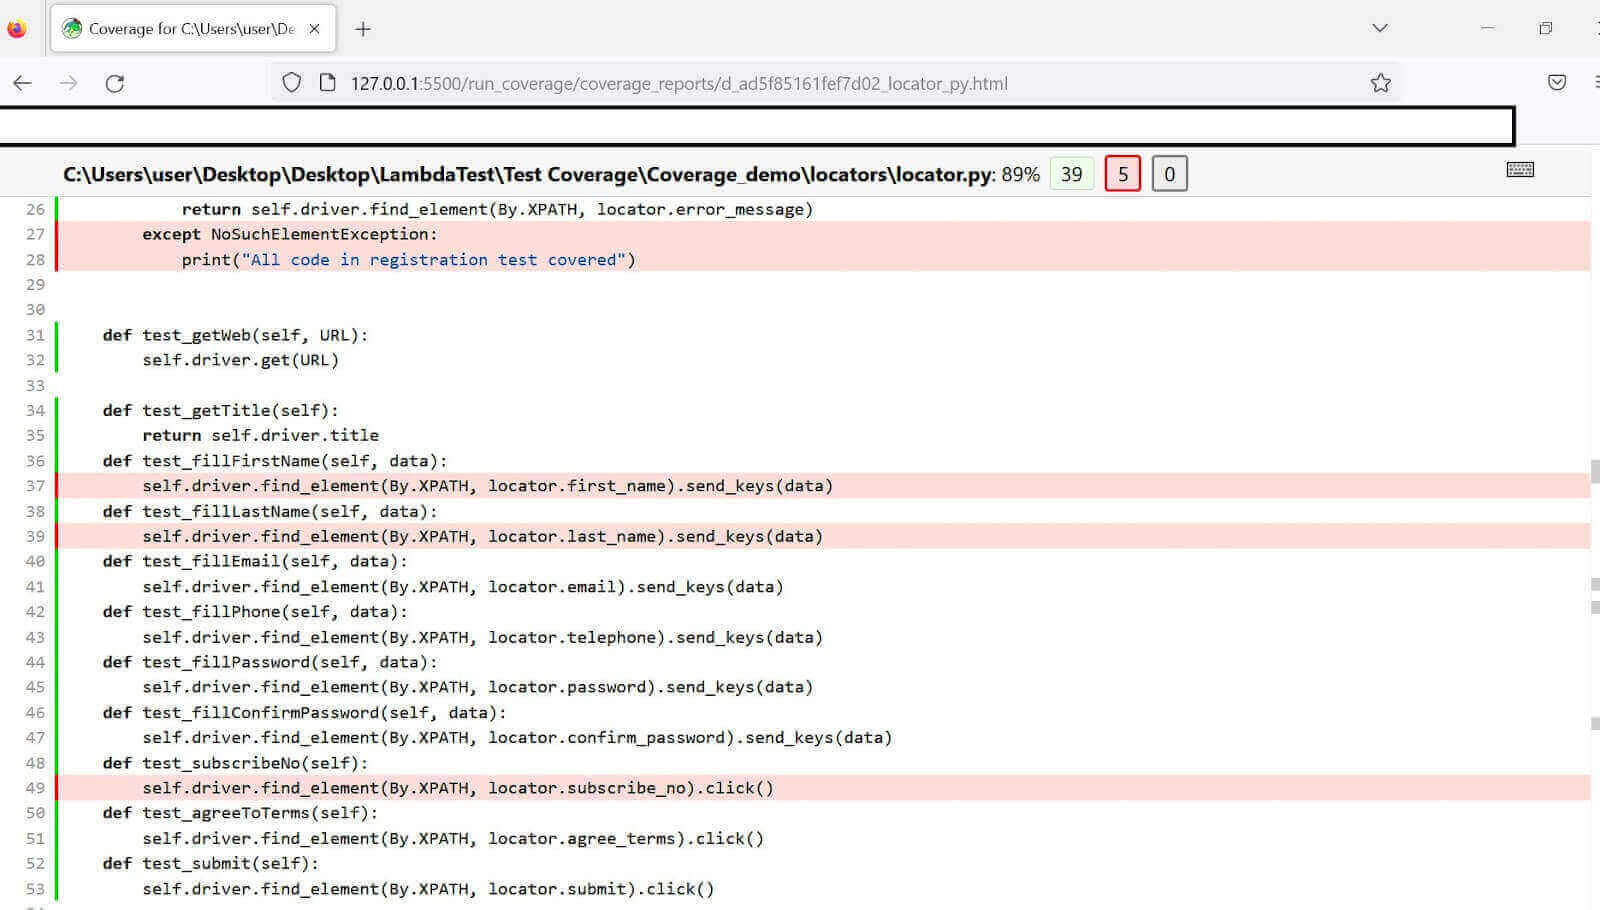
Although you might expect the coverage to flag the test_fillEmail method, it doesn’t because the test provided an email address; it was only invalid. The except block is the invalid parameter indicator. And it only runs if the input error message element isn’t in the DOM.
As seen, the test flags the except block this time since the input error message appears in the DOM due to invalid entries.
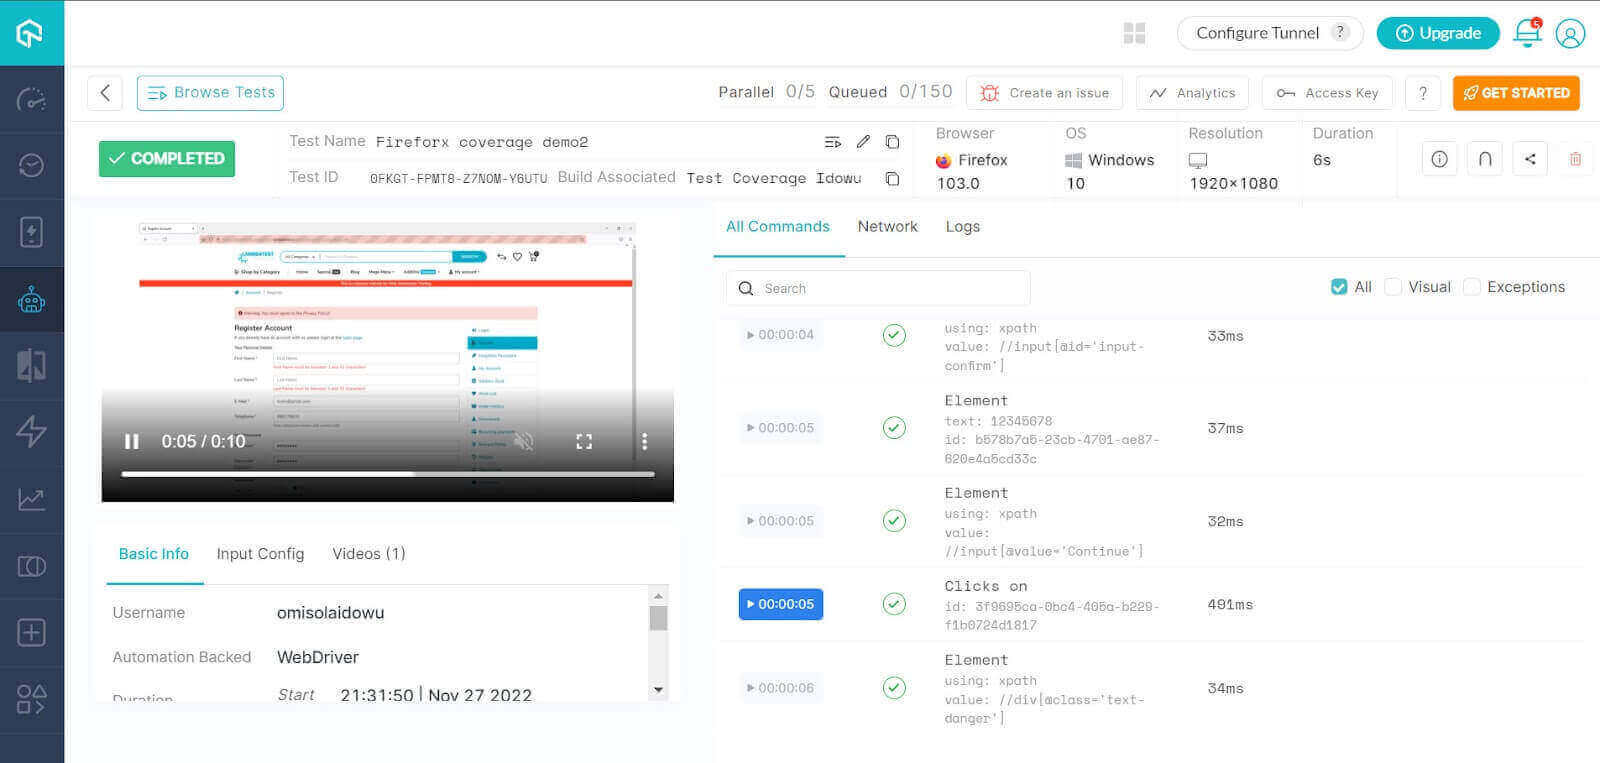
The test suite runs on the cloud grid with some red flags in the test video, as shown below.
Scenario 2: Submit the form with all fields filled appropriately (successful registration).
|
1 2 3 4 5 6 7 8 9 10 11 12 13 14 15 16 17 18 19 20 21 22 23 24 25 26 27 28 29 30 31 32 33 34 35 36 37 38 39 40 41 42 43 |
import sys sys.path.append(sys.path[0] + "/..") from locators.locator import registerUser from setup.setup import testSettings import unittest from dotenv import load_dotenv import os load_dotenv('.env') setup = testSettings() test_register = registerUser(setup.driver) E_Commerce_palygroud_URL = "https:"+os.getenv("E_Commerce_palygroud_URL") class test_registration(unittest.TestCase): def it_should_register_user(self): setup.testSetup() test_register.test_getWeb(E_Commerce_palygroud_URL) title = test_register.test_getTitle() self.assertIn("Register", title, "Register is not in title") test_register.test_fillFirstName("Idowu") test_register.test_fillLastName("Omisola") test_register.test_fillEmail("testrs@gmail.com") test_register.test_fillPhone("090776632") test_register.test_fillPassword("12345678") test_register.test_fillConfirmPassword("12345678") test_register.test_subscribeNo() test_register.test_agreeToTerms() test_register.test_submit() test_register.error_message() setup.tearDown() |
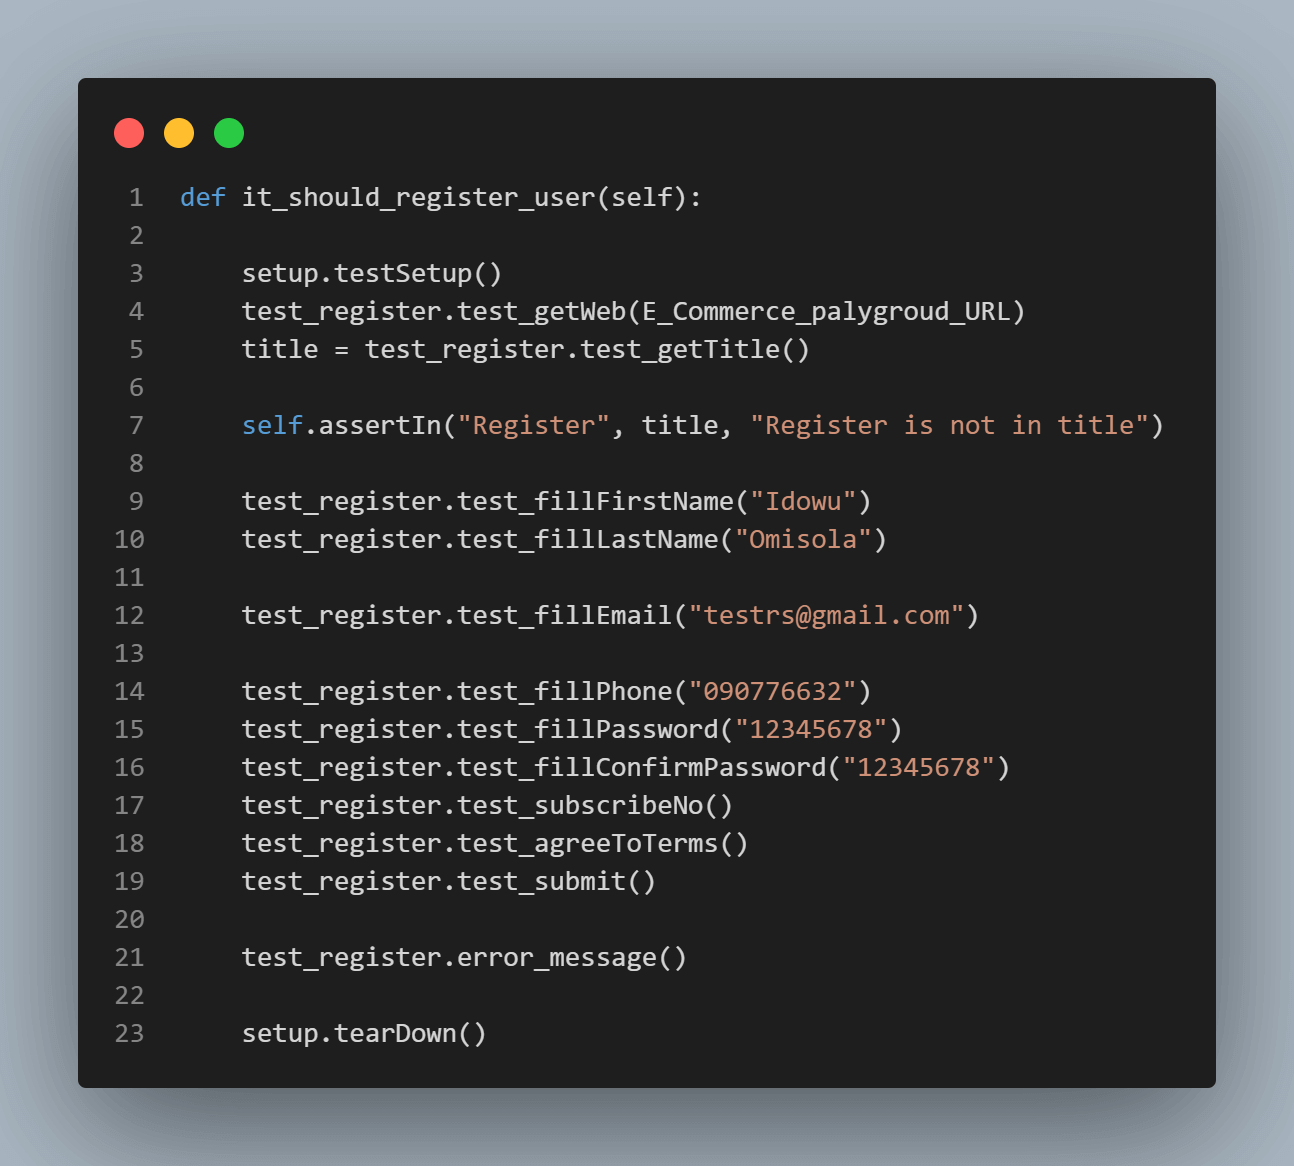
Scenario 2 has a similar code structure and naming convention to scenario 1. However, we’ve expanded the test reach to cover all test steps in scenario 2. Import the needed modules as in the previous scenario. Then instantiate the testSettings and registerUser classes as setup and test_register, respectively.
To get an inclusive test suit, ensure that you execute all the test steps from the registerUser class, as shown below. We expect this to generate 100% code coverage.
Scenario 2 code coverage execution:
Go into the run_coverage folder and run the pytest command to execute the test_run_coverage.py file:
|
1 |
pytest |
Open the index.html file inside the coverage reports via a browser to see your pytest code coverage report. It’s now 100%, as shown below. This means the test doesn’t omit any web action.
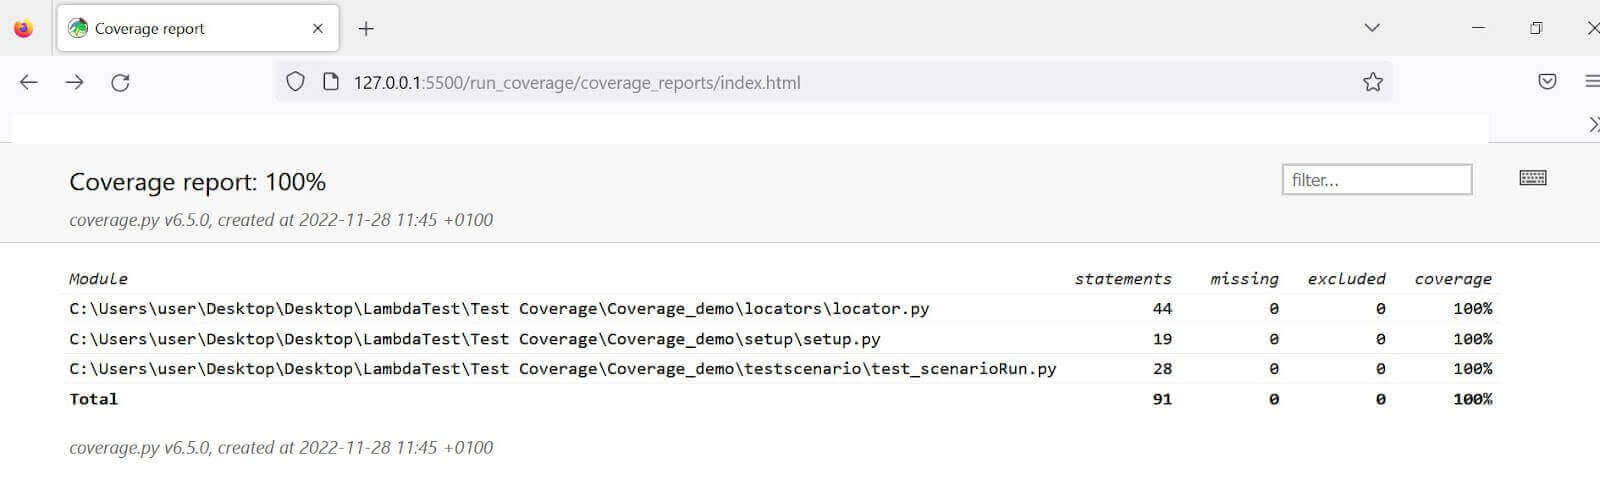
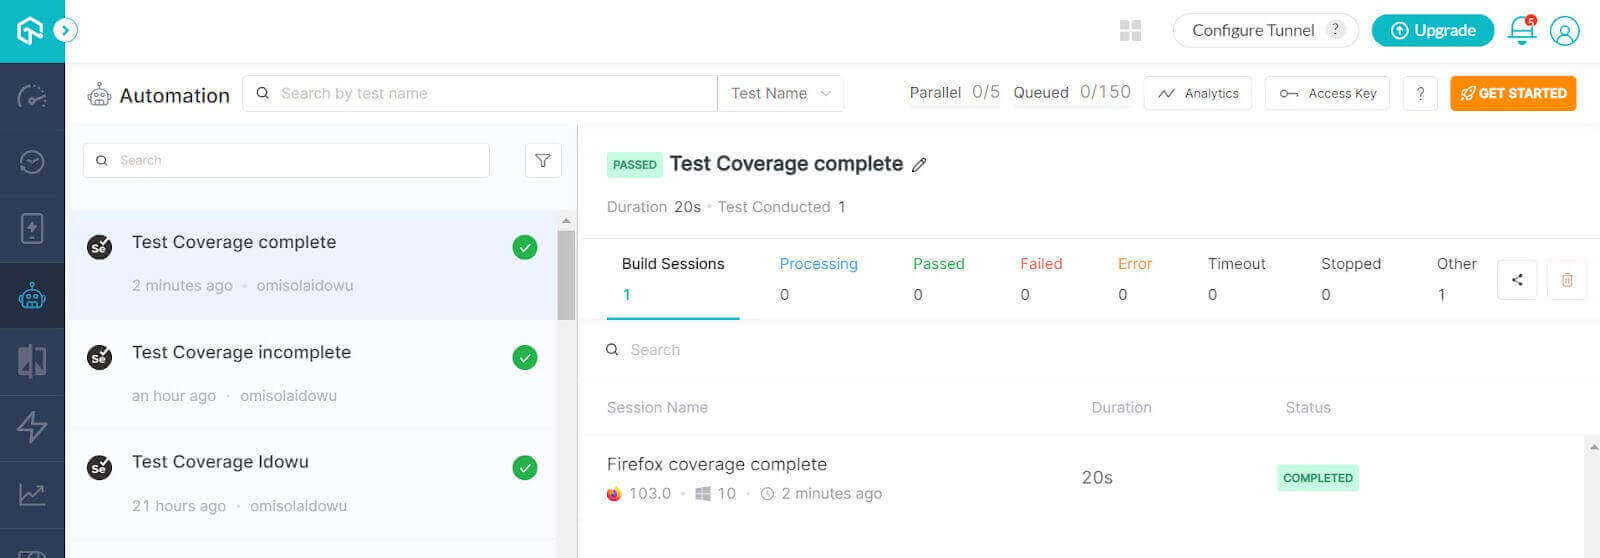
Below is the test suite execution on the cloud grid.
If you’re aiming to develop expertise in automation testing and enhance your skills in Python, pursuing a Selenium Python 101 certification can be a great starting point. Doing so can establish a solid base in utilizing Selenium Python for testing, setting you on the path to a thriving career in this domain.

Conclusion
Manually auditing your test suite can be an uphill battle, especially if your application code base is large. While performing Selenium Python testing, leveraging a dedicated code coverage tool boosts your productivity, as it helps you flag untested code parts to detect potential bugs easily. Although you’ll still need human inputs to decide your test requirements and coverage, performing a code coverage analysis gives you clear direction.
As you’ve seen, Python even brings further simplicity to code coverage with detailed human-friendly reports.
Frequently Asked Questions (FAQs)
How do I create a Pytest code coverage report?
Pytest is a popular testing framework for Python, and it includes a built-in plugin for generating coverage reports called pytest-cov. You can customize the coverage report by passing additional options to pytest-cov, such as ignoring certain files or setting a minimum coverage threshold.
What is code coverage in Python Pytest?
Code coverage measures how much of your code is executed during automated tests. In the context of Python and pytest, code coverage refers to the percentage of code lines that are executed during tests.
Pytest has a built-in coverage plugin, pytest-cov, that can measure code coverage during testing. When you run your tests with pytest-cov, it tracks which lines of code are executed during the tests and generates a report showing the coverage percentage for each file.


Author’s Profile
Idowu (Paul) Omisola
Idowu is a self-taught programmer, coding YouTuber, and technical writer with a penchant for teaching. He started his coding career in 2018 but combined it with technical writing a year later and has never looked back. He has worked for a couple of websites over the years, and you'll find some of his coding guides on popular websites like MUO. He loves discussing software structure and coding topics in Python, JavaScript, Golang, and TypeScript. And when it comes to software testing, he's a fan of Playwright and Selenium.
Blogs: 6
Got Questions? Drop them on LambdaTest Community. Visit now