Selenium Webdriver Java Tutorial – Guide for Beginners
Sadhvi Singh
Posted On: June 4, 2019
![]() 133491 Views
133491 Views
![]() 11 Min Read
11 Min Read
Automation testing at first may sound like a nightmare especially when you have been into the manual testing business for quite long. Looking at the pace with which the need for automation testing is arising, it has become inevitable for website testers to deep dive into the automation river and starts swimming. To become a pro swimmer it takes time, similar is the case with becoming a successful automation tester. It requires knowledge & deep understanding of numerous automation tools & frameworks. As a beginner in automation testing, you may be looking forward to grabbing your hands on an open-source testing framework. After doing so the question that arises is what next? How do I go about using the open-source tool, framework, or platform, & I am here to help you out in that regard. Today, we will be looking at one of the most renowned open-source automation testing frameworks known as Selenium. In this Selenium Java tutorial, I will demonstrate a Selenium login example with Java to help you automate the login process.
Automating login process using Selenium with Java or any other programming language is the very first baby step towards becoming a successful automation tester. Without further ado, let’s get started.
If you’re looking to improve your Selenium interview skills, check out our curated list of Selenium interview questions and answers.
Some Prerequisites For Selenium Java Tutorial
Before we begin with our Selenium Java tutorial for the login process, we need to be aware of the prerequisites. To begin with, all applications regardless of the domain they may target, 95% of the time have a login functionality flow associated with them. Be it e-commerce, banking, medical, education, etc all request user to login to the application for further usage. As the name suggests “Selenium Java Tutorial”, this tutorial offers a basic level understanding to help beginners getting started with automation testing using Selenium & Java. We will be looking into a Selenium login example with Java(one of the most versatile languages used for multiple techniques and field). In order to kick-start, you need to have a basic understanding of Java. Do not get freaked out from hearing the word Java & Selenium. We will take it to step by step. So how do you start off? First, make sure you have all the prerequisites to start writing your first login script using Java & Selenium. You need to have the following:
- Download and Install JDK(Java Development Kit) from here.
- Install Eclipse from the official website.
- Download the Selenium Java Client version from here.
- Driver executable- depending upon the browser you wish to execute your script in, you can choose to download its Selenium executable from here. As you go down the page, various browsers like Chrome, Mozilla, Opera, Edge, etc drivers will be available for download to help you perform Selenium.
That is all. Open eclipse and create your project. Add your Selenium jar in your Java build path and you are good to go. On details on how to setup project and jar file refer the below link:
Basic Steps For A Selenium Test Case
Before we perform automation testing for login validation using Selenium & Java, there are some basic steps that need to be followed for whichever test case you intend to write, be it login, logout, profile, dashboard etc. If you follow them, you will never have incomplete test cases in your automation suite:
- Create a Selenium WebDriver instance.
- Configure your browser if required(for example maximize browser, disable browser notifications etc.).
- Navigate to the required URL (Web page).
- Locate the HTML element.
- Perform action on the located HTML element.
- Verify and validate the action (concluded step).
- Take screenshots and generate report using framework for the test cases.
If you are planning to devise an automation testing strategy for your organization but are confused about where to start from? Follow my blog to start automation testing from scratch.
This certification demonstrates your knowledge of Selenium and Java, and your expertise at automating tests for any project.
Here’s a short glimpse of the Selenium Java 101 certification from LambdaTest:
Let’s Automate Selenium Login With Java
The script I will be mentioning in the article below, will be referencing these steps. We will not be considering step seven, as that would require a dedicated article on itself & I plan to do so in my upcoming blogs, so stay tuned! Now, let us look into those steps in detail to help us perform automation testing using Selenium for login with Java:
1. Create A Selenium WebDriver Instance
Webdriver driver=new ChromeDriver();
In order to launch the website in the desired browser, you need to set the system properties to the path of the driver for the required browser. In this Selenium Java tutorial, we will use chromedriver for demonstrating Selenium login example with Java. The syntax for the same will be:
System.setProperty(“webdriver.chrome.driver”, “File path for the Exe”);
2. Configure Your Browser If Required
Based on the needs, we can configure the browser. For example, in this Selenium Java tutorial regarding Selenium login with Java, a browser by default, will be minimized mode, we can set up the browser in the maximize mode. Below is the syntax used for the same.
driver.manage().window().maximize();
Other things that you can do for configuring your browser is set up different options like disabling info bars, browser notifications, adding extensions, etc. You can also use the capabilities class to run your script on various browsers thereby helping in cross browser testing.
3. Navigate To The Required URL
Pretty simple, open the browser with the desired URL. All you have to do is write the below syntax and you have your URL open in the desired instantiated browser.
driver.get(“https://www.linkedin.com/login”);
4. Locate The HTML Element
This is the heart of writing a Selenium script. For this to function, you need to have a clear understanding of the different locators used to find the HTML element. You can refer my below articles that talks about the different locators available in selenium and how to locate the element with different examples:
- ID locator in Selenium WebDriver
- Name Locator in Selenium WebDriver
- TagName Locator in Selenium WebDriver
- CSS Selector in Selenium WebDriver
- XPath in Selenium WebDriver
For example, lets try to locate the email and password field of the login form of LinkedIn
Below is the DOM structure for the email input box:

You can locate it via ID locator in Selenium WebDriver as below:
driver.findElement(By.id(“username”));
Since this returns a webelement, you can store it in webelement variable as below
WebElement username=driver.findElement(By.id(“username”));
The same can be achieved for password and login button field which is
|
1 2 3 4 |
driver.findElement(By.id(“password”)); WebElement password=driver.findElement(By.id(“password”)); driver.findElement(By.xpath(“//button[text()=’Sign in’]”)); WebElement login= driver.findElement(By.xpath(“//button[text()=’Sign in’]”)); |
5. Perform Action On The Located HTML Element
Once located, you need to perform the desired action which in our case is sending text to email and password field and clicking on the login button. To execute this action in Selenium login example with Java, we make use of methods as sendKeys and click provided by Selenium as below:
|
1 2 3 |
username.sendKeys(“xyz@gmail.com”); password.sendKeys(“exampleAboutSelenium123”); login.click(); |
And guess what, you just finished writing the most important parts of the script. Now, in this Selenium Java Tutorial, you only need to ensure these actions have successfully logged in the user, which comes to our final step of script creation for using Selenium to login with Java.
6. Verify & Validate The Action
In order to validate the results, all you need to do is use assertion. Assertions are vital for comparing the expected results vs the actual results. Almost similar to your test cases, wherein each test case has an actual and expected behavior to it. If it matches, the test case pass, if not, then the test case fails. Assertions do exactly the same. Assertion class is provided by both JUnit and TestNG framework, you can opt to choose any. The below syntax will help to assert (validate) the outcome from actions by performing Selenium login with Java.
Assert.assertEquals(String actual, String expected);
So, in this case, we will save our actual url post login into a string value which is:
String actualUrl=” https://www.linkedin.com/feed/”;
And expected URL can be found from the below method:
String expectedUrl= driver.getCurrentUrl();
So your final assertion would become as:
Assert.assertEquals(actualUrl, expectedUrl);
Note: In order to use assertion, you need to use the annotations of TestNG or JUnit ‘@Test’ for assertions to function. In case, right now you don’t want to get into the hassle of going into the framework keywords, you can simply match the string using an ‘if’ statement and print the results in console accordingly, something like below:
|
1 2 3 4 5 6 7 8 |
if(actualUrl.equalsIgnoreCase(expectedUrl)) { System.out.println(“Test passed”) } else { System.out.println(“Test failed”) } |
Bingo!! You have executed automation testing using Selenium login example with Java.
If you are curious about using annotations then follow our blog on Selenium Java Tutorial On JUnit Annotations In Selenium With Examples.
Below is the collective code of all the statements explained above using assertions.
|
1 2 3 4 5 6 7 8 9 10 11 12 13 14 15 16 17 18 19 20 21 22 23 24 25 26 27 28 29 30 31 32 33 34 35 36 37 |
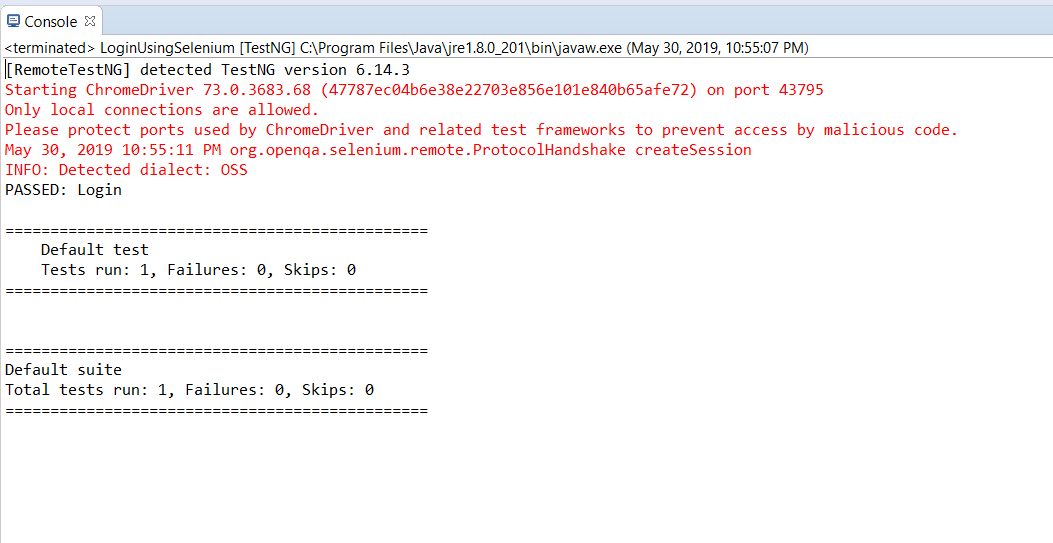
import java.util.concurrent.TimeUnit; import org.openqa.selenium.By; import org.openqa.selenium.WebDriver; import org.openqa.selenium.WebElement; import org.openqa.selenium.chrome.ChromeDriver; import org.testng.Assert; import org.testng.annotations.Test; public class LoginUsingSelenium { @Test public void login() { // TODO Auto-generated method stub System.setProperty("webdriver.chrome.driver", "path of driver"); WebDriver driver=new ChromeDriver(); driver.manage().window().maximize(); driver.get("https://www.linkedin.com/login"); WebElement username=driver.findElement(By.id("username")); WebElement password=driver.findElement(By.id("password")); WebElement login=driver.findElement(By.xpath("//button[text()='Sign in']")); username.sendKeys("example@gmail.com"); password.sendKeys("password"); login.click(); String actualUrl="https://www.linkedin.com/feed/"; String expectedUrl= driver.getCurrentUrl(); Assert.assertEquals(expectedUrl,actualUrl); } } |
Console Output:
Below is the collective code of all the statements explained above using the if statement:
|
1 2 3 4 5 6 7 8 9 10 11 12 13 14 15 16 17 18 19 20 21 22 23 24 25 26 27 28 29 30 31 32 33 34 35 36 37 38 39 40 41 42 43 |
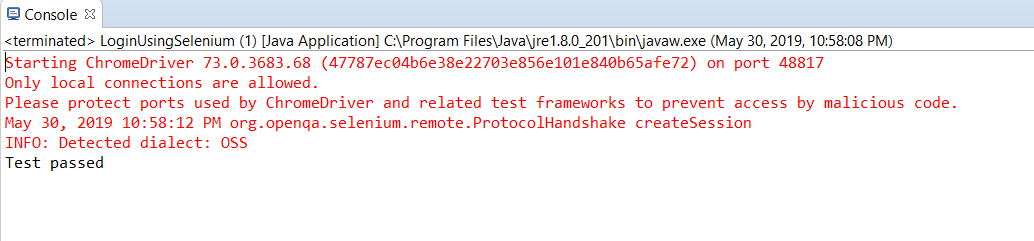
import java.util.concurrent.TimeUnit; import org.openqa.selenium.By; import org.openqa.selenium.WebDriver; import org.openqa.selenium.WebElement; import org.openqa.selenium.chrome.ChromeDriver; import org.testng.Assert; public class LoginUsingSelenium { public static void main(String[] args) { // TODO Auto-generated method stub System.setProperty("webdriver.chrome.driver", " path of driver "); WebDriver driver=new ChromeDriver(); driver.manage().window().maximize(); driver.get("https://www.linkedin.com/login"); WebElement username=driver.findElement(By.id("username")); WebElement password=driver.findElement(By.id("password")); WebElement login=driver.findElement(By.xpath("//button[text()='Sign in']")); username.sendKeys("example@gmail.com"); password.sendKeys("password"); login.click(); String actualUrl="https://www.linkedin.com/feed/"; String expectedUrl= driver.getCurrentUrl(); if(actualUrl.equalsIgnoreCase(expectedUrl)) { System.out.println("Test passed"); } else { System.out.println("Test failed"); } } } |
Console Output:
Moving Selenium Tests On Cloud
Selenium empowers automation testers to fast track their efforts & test cycles. However, other than the benefits of Selenium WebDriver, there comes some cons too. The most prominent ones include the sequential execution of tests which can take a while for larger automated test suites. Keeping that in mind, the Selenium Grid was introduced to help people run Selenium tests in parallel. However, there is a downside to that as well & that is test coverage & CPU consumption. You can only perform browser compatibility testing on browsers that are installed on your local machine. Installing numerous browsers isn’t a feasible consideration.
This is why nowadays it’s all about running your Selenium tests on cloud through multiple browsers in parallel, to execute faster cross browser testing using tools such as LambdaTest.
LambdaTest is a cross browser testing cloud offering a Selenium Grid of 3000+ real browsers & browser versions running on various operating systems. You can integrate with numerous CI/CD tools & extract Selenium test reports without logging into LambdaTest using our RESTful API.
Check out all of the LambdaTest integrations to multiple CI/CD tools, project management tool, IM-based collaboration tool.
We can run the same login script used in previous sections on LambdaTest by defining the platform, browser, and version to run this script. This helps in running your script on multiple browsers, whichever your project/product supports.
In order to run your script for Selenium login with Java, all you have to do is setup the RemoteWebDriver URL through which you will connect to your LambdaTest platform. This URL is a combination of your username, access key, and the LamdaTest hub URL.

Post this using desired capabilities class, you can set the platform like Windows 8 or 10 or Mac, etc. Then define the browser on which you wish to run your tests on and its version. Name of the build and other attributes like video, screenshots, logs, etc can be also provided. You can make use of our Selenium Desired Capabilities Generator for fetching the values based on your desired capabilities. That is it! Now use your same login script as defined above to run your test on the cloud-based platform. Below is the referenced code snippet for it:
|
1 2 3 4 5 6 7 8 9 10 11 12 13 14 15 16 17 18 19 20 21 22 23 24 25 26 27 28 29 30 31 32 33 34 35 36 37 38 39 40 41 42 43 44 45 46 47 48 49 50 51 52 53 54 55 56 57 58 59 60 61 62 63 64 65 66 67 68 69 70 71 72 73 74 75 76 77 78 79 80 81 82 83 84 85 86 87 88 89 90 91 92 93 94 95 96 |
import java.net.URL; import java.util.concurrent.TimeUnit; import org.openqa.selenium.By; import org.openqa.selenium.JavascriptExecutor; import org.openqa.selenium.WebDriver; import org.openqa.selenium.WebElement; import org.openqa.selenium.chrome.ChromeDriver; import org.openqa.selenium.remote.DesiredCapabilities; import org.openqa.selenium.remote.RemoteWebDriver; import org.testng.Assert; import org.testng.annotations.BeforeClass; import org.testng.annotations.Test; public class LoginUsingSelenium { public RemoteWebDriver driver = null; public String url = "https://www.lambdatest.com/"; public static final String username= "sadhvisingh24"; public static final String auth_key = "auth key generated"; public static final String URL = "@hub.lambdatest.com/wd/hub"; boolean status = false; @Test public void login () { // TODO Auto-generated method stub try { driver.manage().window().maximize(); driver.get("https://www.linkedin.com/login"); WebElement username = driver.findElement(By.id("username")); WebElement password = driver.findElement(By.id("password")); WebElement login = driver.findElement(By.xpath("//button[text()='Sign in']")); username.sendKeys("linkedin username"); password.sendKeys("fake password"); login.click(); String actualUrl = "https://www.linkedin.com/feed/"; String expectedUrl = driver.getCurrentUrl(); if (actualUrl.equalsIgnoreCase(expectedUrl)) { System.out.println("Test passed"); status = true; //Lambda status will be reflected as passed } else { System.out.println("Test failed"); //Lambda status will be reflected as passed } } catch (Exception e) { System.out.println(e.getMessage()); } finally { tearDown(); } } @BeforeClass public void setUp() { DesiredCapabilities capabilities = new DesiredCapabilities(); capabilities.setCapability("browserName", "chrome"); capabilities.setCapability("version", "72.0"); capabilities.setCapability("platform", "win8"); // If this cap isn't specified, it will just get the any available one capabilities.setCapability("build", "TestNG_login_1"); capabilities.setCapability("name", "TestNG_login_1"); capabilities.setCapability("network", true); // To enable network logs capabilities.setCapability("visual", true); // To enable step by step screenshot capabilities.setCapability("video", true); // To enable video recording capabilities.setCapability("console", true); // To capture console logs try { driver = new RemoteWebDriver(new URL("https://" + username + ":" + auth_key + URL), capabilities); } catch (Exception e) { System.out.println("Invalid grid URL" + e.getMessage()); } } private void tearDown () { if (driver != null) { ((JavascriptExecutor) driver).executeScript("lambda-status=" + status); //Lambda status will be reflected as either passed/ failed driver.quit(); System.out.println("The setup process is completed"); } } } |
Start your Test Automation. LambdaTest provides you with the status of your test run and its corresponding video, logs, network details as well as screenshots.
Below is the screenshot of our Selenium script execution on LambdaTest Selenium Grid.

How Was That?
Kudos! You have successfully executed automation testing for login process using Selenium & Java. How did you find this Selenium Java tutorial for login process? Let me know your thoughts in the comment section below. I look forward to your replies. Happy testing! 🙂
Additional Resource: Java Tutorial for Beginners


Author’s Profile
Sadhvi Singh
Sadhvi Singh is a QA Manager. In 7 years of her professional journey, she has worked on multiple domains and testing techniques like Automation testing, Database testing, API testing, Manual testing, and Security testing. With multiple tools exposure added to her experience, she has skilled herself further through her two major accolades at International level through ISTQB with foundation and advanced levels.
Blogs: 12
Got Questions? Drop them on LambdaTest Community. Visit now