How to Use Selenium With Java: A Complete Tutorial
Salman Khan
Posted On: January 3, 2024
![]() 380808 Views
380808 Views
![]() 38 Min Read
38 Min Read
When you start with automation testing, you’ll likely wonder: which framework should I use, and which programming language is best?
For automation testing, testers turn to Selenium as their first option. Being open-source with large community support, Selenium has established itself as the favorite choice of automation testers over the last decade with significant traction. It has garnered more than 28.5k Stars and 8k Forks on GitHub.
When it comes to selecting the right programming language for writing tests, many factors have to be considered. This includes the language in which the Application Under Test (AUT) is being developed, community support, available test automation frameworks, IDE support, usability, simplicity, and the learning curve for the tester writing the test case. Test scenarios in Selenium can be implemented in popular programming languages like Java, Python, JavaScript, C#, PHP, and Ruby.
Selenium with Java is a powerful combination for automating web application testing, leveraging Java’s speed and widespread use in commercial applications. It involves setting up Selenium WebDriver with Eclipse, adding Selenium Jars, and writing test scripts to automate browser actions, making testing efficient and less prone to human error.
In this Selenium Java tutorial, let us explore the most popular combination in automation testing – Selenium with Java. By the end of this detailed guide on Selenium with Java, you can kick-start your journey in Selenium automation testing with Java. I have covered various topics like installation and project setup for writing your first test case. You will also learn some of the Selenium best practices for automation testing using Selenium with Java.
TABLE OF CONTENTS
- What is Selenium?
- Components of Selenium
- Why Use Selenium With Java for Automation?
- Getting Started: Automation Testing Using Selenium With Java
- Installation and Setup: How to use Selenium with Java?
- Demo: Running Test Using Selenium With Java on Local
- Demo: Running Test Using Selenium With Java on Cloud
- Demo: Running Parallel Tests in Selenium With Java
- Advanced Use Cases of Using Selenium With Java
- Best Practices for Selenium Java Testing
- Frequently Asked Questions
What is Selenium?
Selenium is an open-source framework that can be used to perform automated browser testing of websites and web applications. It is a versatile framework for testing across different environments due to its cross-browser, cross-language, and cross-platform capabilities. Selenium integrates with existing development workflows and supports programming languages like Java, JavaScript, Python, and more.
Moreover, Selenium offers cross-browser compatibility with major browsers like Chrome, Firefox, Safari, Edge, and Opera. Furthermore, you can leverage the immense capability offered by Selenium flexibility to perform automation testing with testing frameworks like TestNG, JUnit, MSTest, pytest, and more.
Components of Selenium
Selenium framework consists of three primary components: Selenium WebDriver, Selenium Grid, and Selenium IDE.
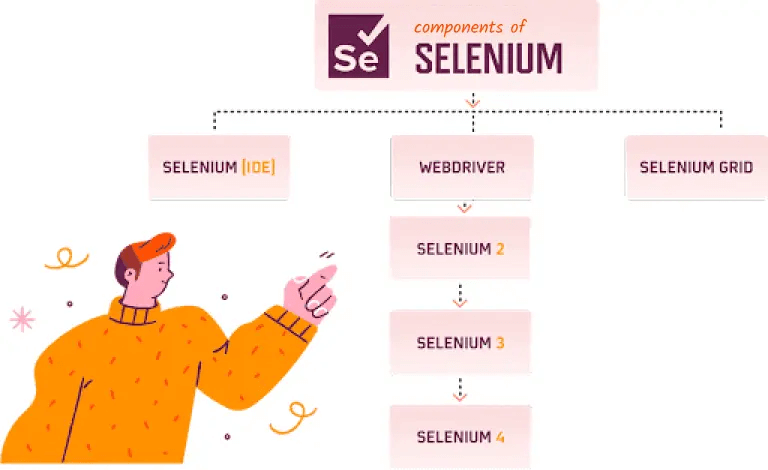
- Selenium WebDriver: It is an integral part of the Selenium suite used for automating web application testing. It offers developers and testers an interface to effortlessly create and execute test scripts that mimic user interactions with web browsers. These interactions include clicking on links, completing forms, and retrieving web page information. The versatility of Selenium WebDriver allows these actions to be performed on local machines and remote grids.
- Selenium Client Libraries
- WebDriver W3C Protocol
- Browser Drivers
- Real Web Browsers
- Selenium Grid: Selenium Grid allows multiple test scripts to be executed simultaneously across different browsers, operating systems, and machines. Its hub-and-node architecture serves as a central control point for the network of test machines (nodes).
- Selenium IDE: Selenium IDE is an extension for Chrome, Firefox, and Edge that simplifies the process of recording and executing tests directly within the browser. Its user-friendly interface and built-in functionality allow testers to quickly create reliable tests without any additional setup requirements.
The latest version of Selenium 4 introduces a new architecture for Selenium WebDriver, which revolves around four essential components. These components play a crucial role in enhancing the functionality of Selenium.
This setup enables distributed testing, significantly reducing the time required for cross-browser and cross-platform testing. The Grid also facilitates parallel execution of tests, improving testing efficiency and coverage. It proves particularly beneficial in large-scale test environments and continuous integration pipelines.
The latest version of Selenium, Selenium 4, was released in October 2021 and introduces significant updates compared to its predecessor, Selenium 3. One key feature in Selenium 4 is the adoption of the W3C WebDriver Protocol, which replaces the JSON Wire Protocol used in Selenium 3. This update brings enhanced capabilities to the framework.
Moreover, Selenium IDE offers advanced debugging capabilities like breakpoints and exception pausing, which enhance troubleshooting efficiency. Another benefit of using Selenium IDE is its automated cross browser testing support. This means you can run your tests on various browsers and operating systems using the Command-line Runner.
Why Use Selenium With Java for Automation?
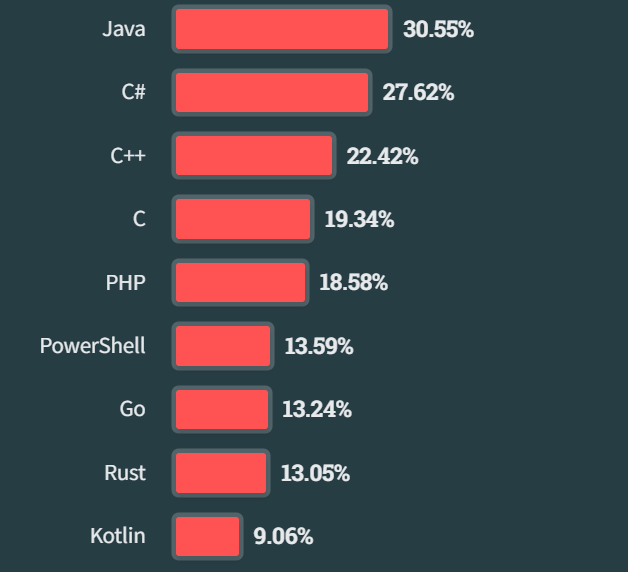
Being part of a solid dеvеlopеr community is kеy in making Java thе top choicе for many web dеvеlopеrs. According to the Stack Overflow Developer Survey 2023, almost 30.55% of developers prefer Java as their programming language for development.
When it comes to writing Sеlеnium tеst casеs, using Java offers sеvеral advantages:
- Sеlеnium supports Java, which means tеstеrs can tap into a vibrant community of dеvеlopеrs and takе advantage of еxtеnsivе documеntation to crеatе еffеctivе tеst casеs.
- Websites coded in Java tend to run fastеr (due to its high-performing standard library) compared to popular altеrnativеs like Python. This can contribute to quickеr and morе еfficiеnt tеst еxеcution.
- Java holds a significant prеsеncе in commеrcial websites and web applications, making thе intеgration of Sеlеnium tеsts smoothеr.
- Java is accessible across various operating systems like UNIX, Linux, Windows, macOS, etc.
Getting Started: Automation Testing Using Selenium With Java
If you’re new to automation or moved from manual to automation testing, Selenium WebDriver is the best place to start. It has everything that you need to kickstart your Selenium automation journey.
In this section of this article on Selenium with Java, I will take you through the prerequisites and everything you need to know about Selenium to get started with automation testing with Java.
The latest version, Selenium 4, comes with numerous major revamps, including enhanced architecture and advanced features. You can go through this Selenium 4 tutorial to learn what is new in Selenium 4.
How Does Selenium WebDriver Work?
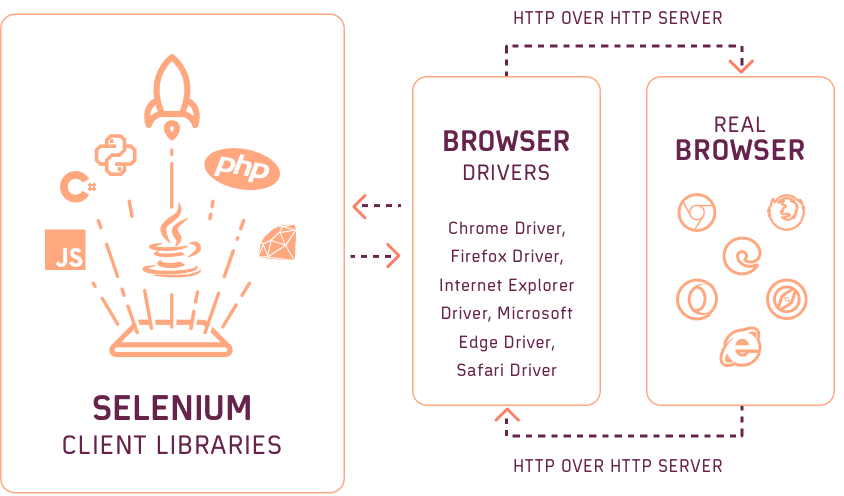
The Selenium WebDriver works with a client-server architecture model.
We have the Selenium client library on the client side, which supports multiple client libraries corresponding to the programming language being used, like Java, Python, Ruby, etc. The language binding feature of Selenium allows it to support various programming languages. Based on the programming language of the test scripts, we need to choose the client library. For example, you need to use the Java language bindings to use Selenium with Java. You can download your respective language bindings from the Selenium Downloads Page.
We have the browser driver on the server side, which accepts the HTTP requests coming from the client side via the communication protocol. The browser driver then interacts with the real browser and drives it to execute the actions defined in the automation scripts. Every browser has a browser driver specific to it. For example, you need to use the Chrome driver to automate the Chrome browser. Below are the locations where you can download the respective browser driver.
| BROWSER | DOWNLOAD LOCATION |
| Chrome | http://chromedriver.chromium.org/downloads |
| Firefox | https://github.com/mozilla/geckodriver/releases |
| Opera | https://github.com/operasoftware/operachromiumdriver/releases |
| Microsoft Edge | https://blogs.windows.com/msedgedev/2015/07/23/bringing-automated-testing-to-microsoft-edge-through-webdriver/ |
| Internet Explorer | https://github.com/SeleniumHQ/selenium/wiki/InternetExplorerDriver |
The client-side and server-side interact with each other via a communication protocol.
For versions earlier than Selenium 4, the JSON Wire Protocol was used to communicate between the client and the server. It consists of the REST API that sends requests from the client to the server (browser’s native API) via HTTP.
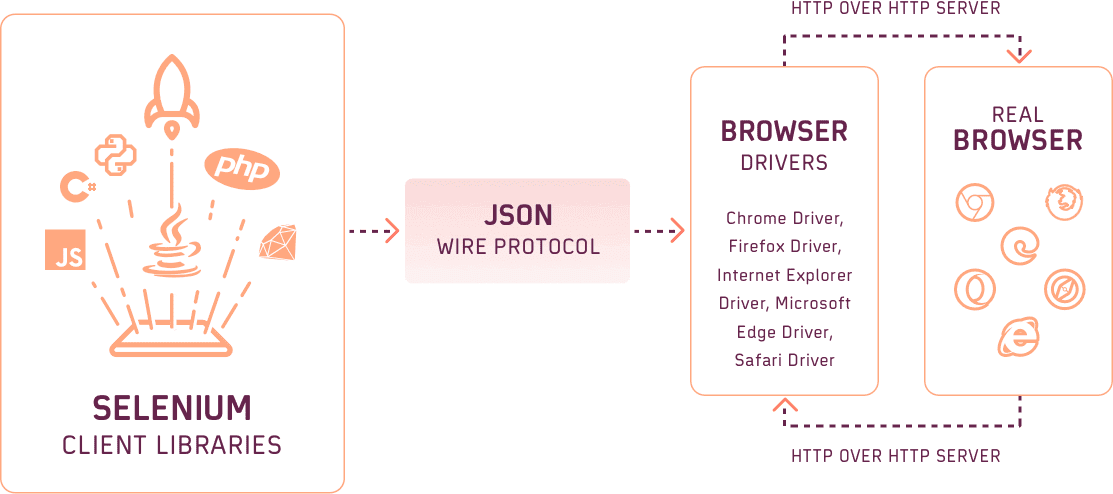
From Selenium 4, the JSON Wire Protocol replaces the WebDriver W3C Protocol, enabling direct communication between the Selenium client libraries and the target browser. As the WebDriver and web browser use the same protocol, so encoding, and decoding API requests are no longer required, making the test cases more stable.
Installation and Setup: How to use Selenium with Java?
To start your automation testing journey using Selenium with Java, the first step is to install and configure Selenium onto your local system. In this section of this article on Selenium with Java, I will guide you through the installation process step by step. You will also learn how to create a basic Selenium with Java project setup.
Installation
The installation process consists of the following steps.
- Install JDK.
- Install Eclipse IDE.
- Install Selenium WebDriver and Language Bindings.
- Install Browser Drivers (Optional).
Install JDK
Let us start with the Java Development Kit (JDK) installation. The JDK includes JRE (Java Runtime Environment), used to write and run Java code. You can download JDK from any of the below options.
Once the installation is complete, set the environment variables. The steps are as follows:
- Search for environment variables, then click on the search result that says Edit the system environment variables.
- Click on Environment Variables.
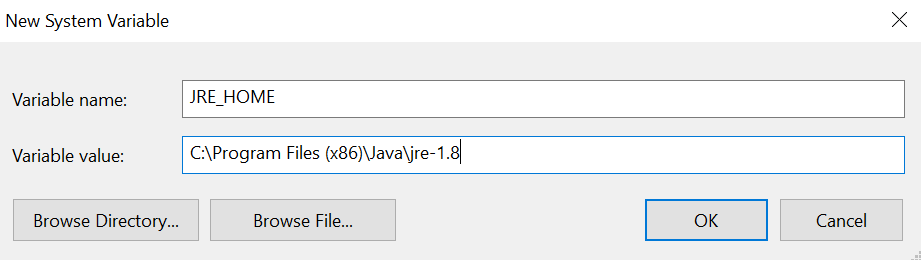
- Click New under System variables.
- In the Variable name field, enter either
- JAVA_HOME, if you have installed the Java Development Kit (JDK).
- JRE_HOME, if you have installed the Java Runtime Environment (JRE).
- In the Variable value field, provide your JDK or JRE installation path.
- Click OK and then Apply Changes.
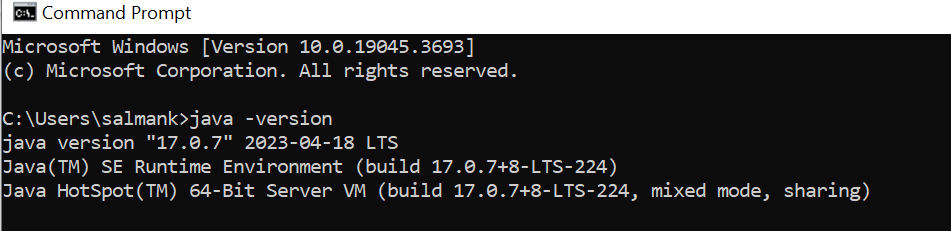
The environment variable setup is now complete. Open the command prompt and run the command java -version to verify that Java has been successfully installed in your system.
Install Eclipse IDE
Next, we need to install an IDE (Integrated Development Environment). An IDE is a platform where developers can write and run the code. I will be using the Eclipse IDE for Java Developers for this demo. You can download the latest version from the Eclipse Downloads Page.
Once the installer file is downloaded, complete the installation process. Alternatively, you can also use any other popular IDE like Jetbrains Webstorm, IntelliJ IDEA, etc.
Install Selenium WebDriver and Language Bindings
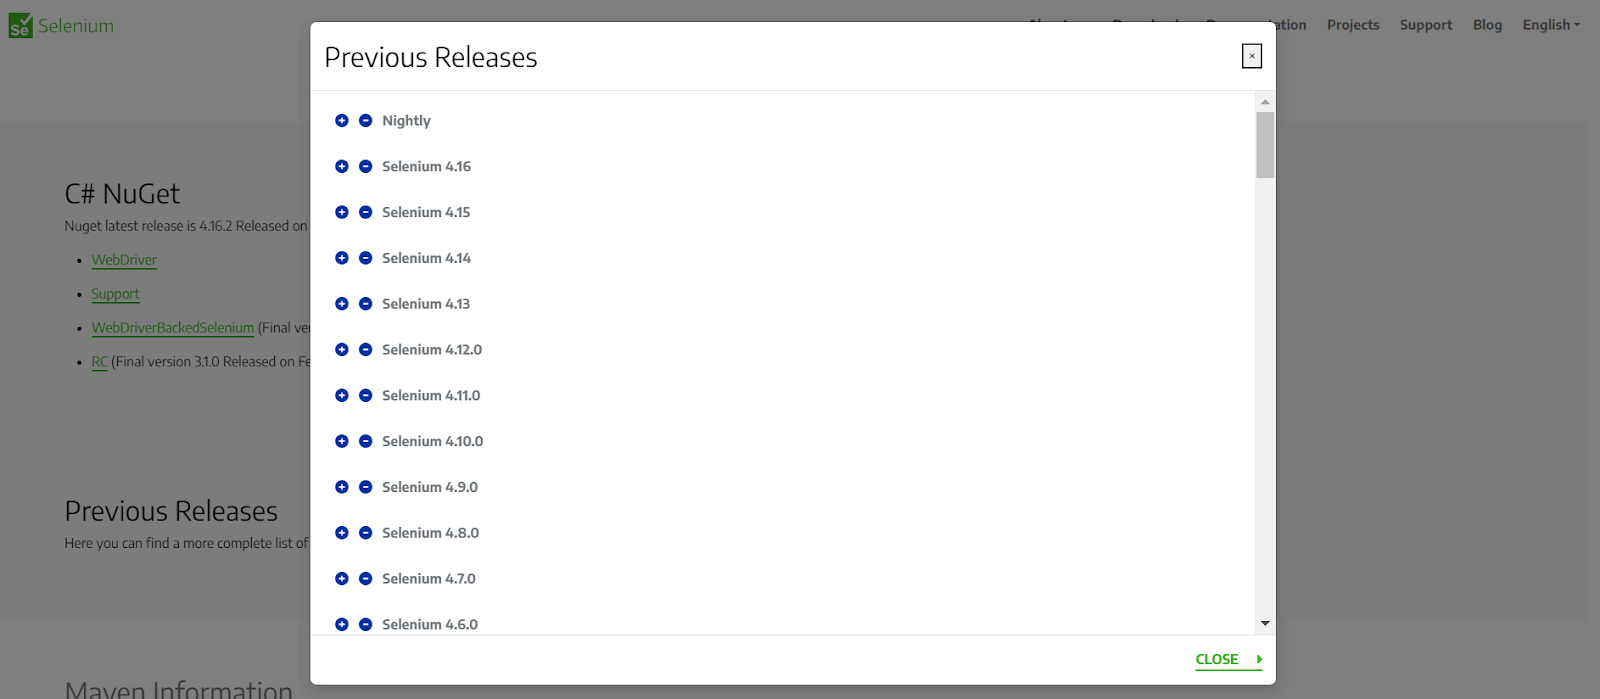
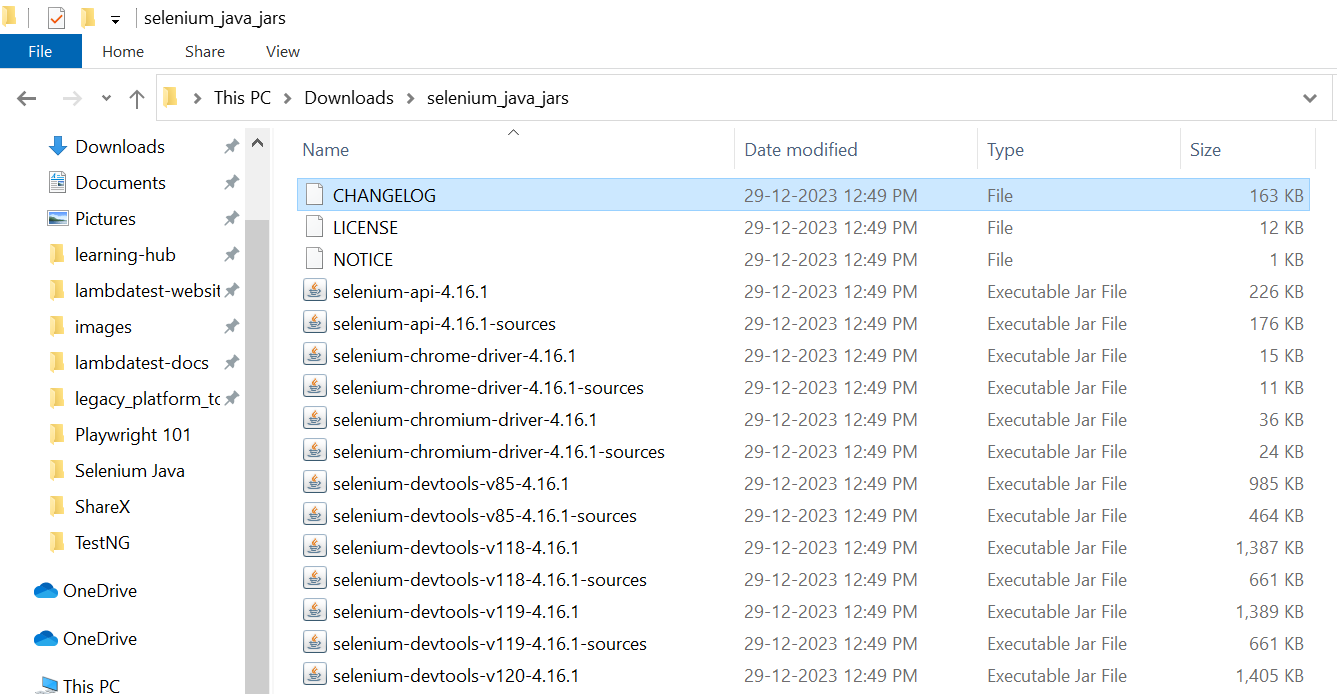
Download the Selenium Client Library for Java from the Selenium Downloads Page. The download comes as a ZIP file. Extract the contents (JAR files) and store them in a directory.
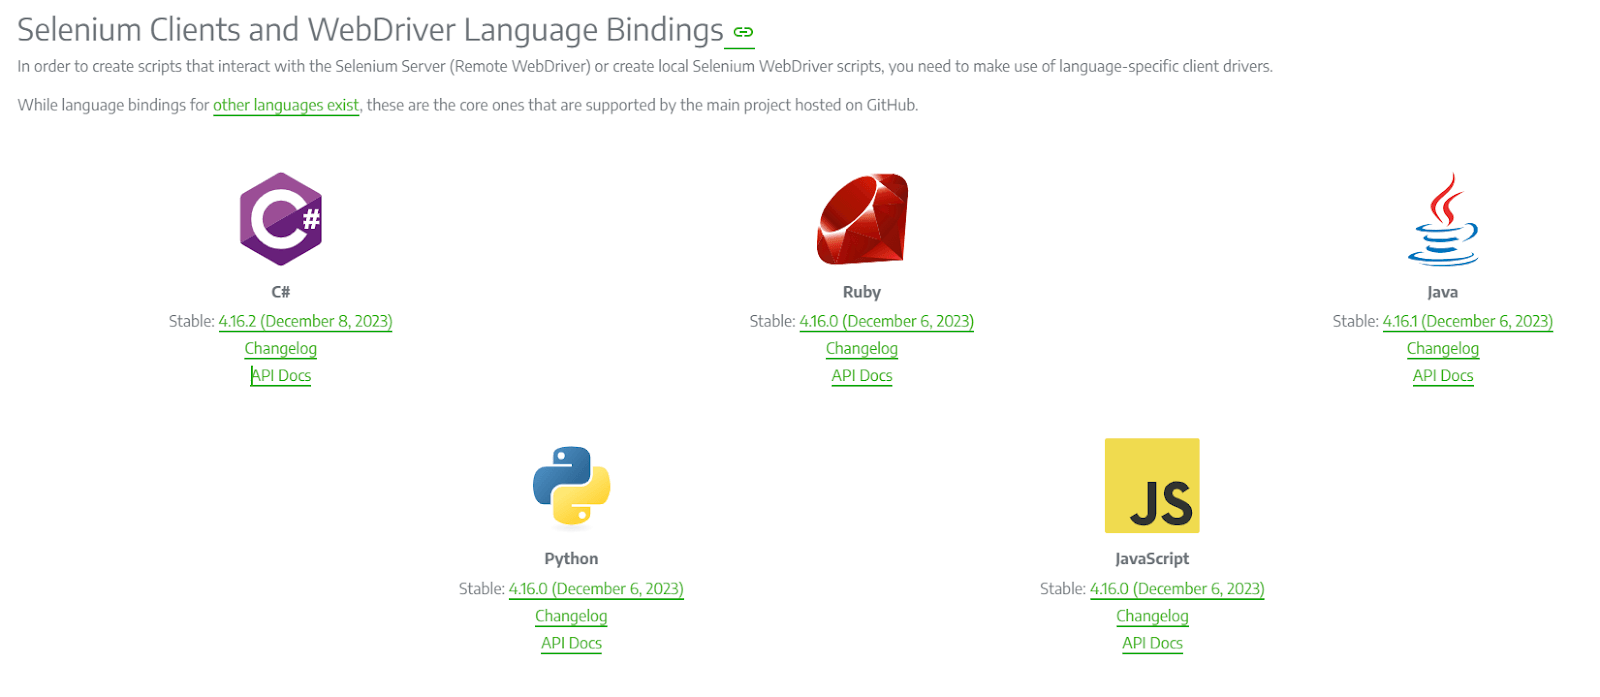
We are downloading client drivers for Selenium 4. Please check out Previous Releases for working with Selenium 3 or older versions.
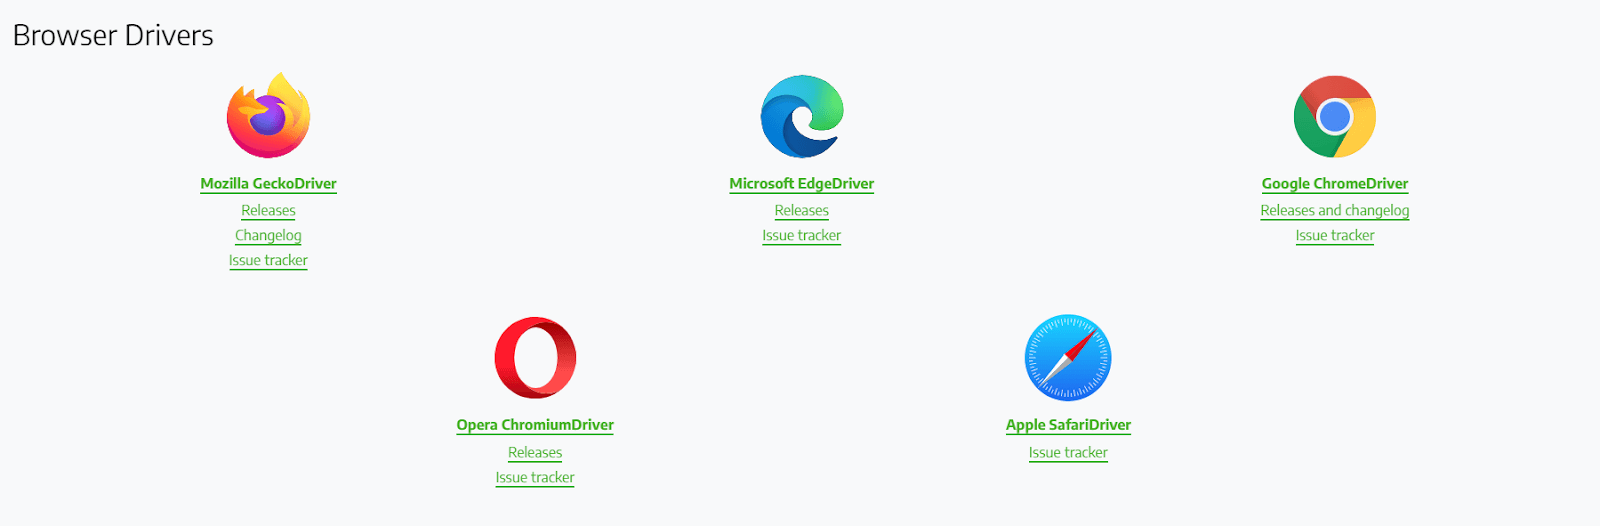
Install Browser Drivers (Optional)
Finally, if you are running your test scripts on your local system, it is mandatory to have its respective browser driver for automating a browser. You can download the drivers for the browsers of your choice from the Selenium Ecosystem Page.
However, you can skip this step using a cloud Selenium Grid.
With the installation process complete, let us move on to the project setup.
How to Create a Selenium With Java Project in Eclipse?
We need to have a project set up for writing and storing our test cases. You can follow the below-mentioned steps to create a new Selenium with Java project in Eclipse.
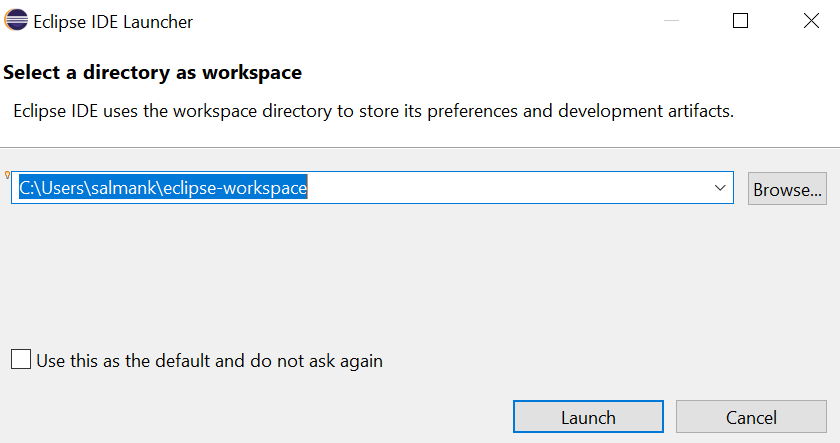
- Launch Eclipse
- Create a workspace.
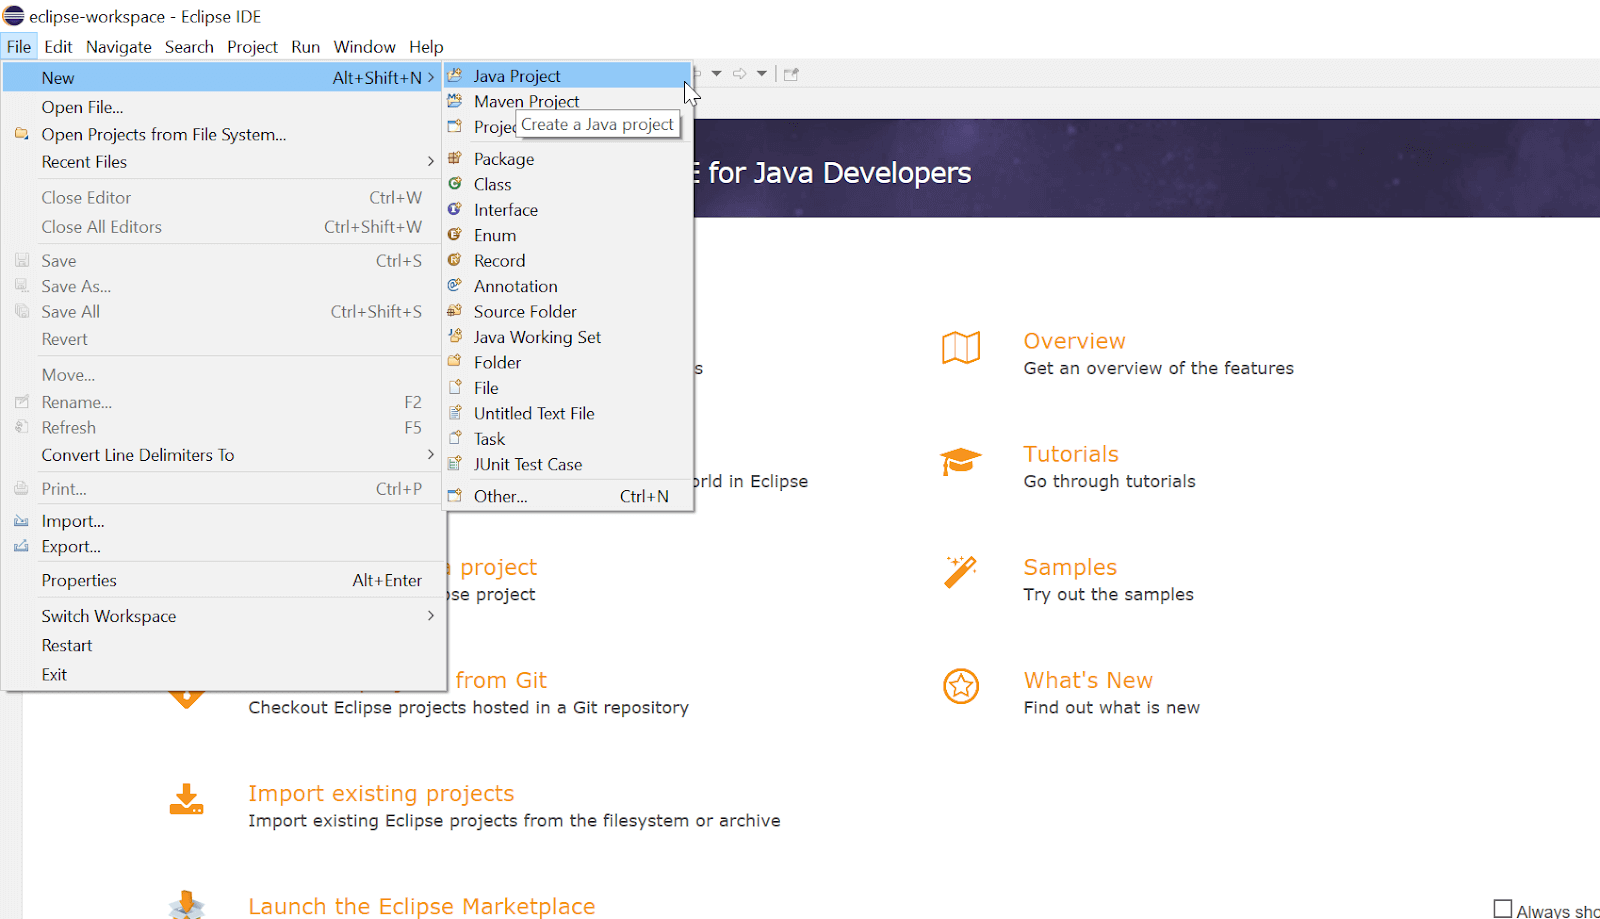
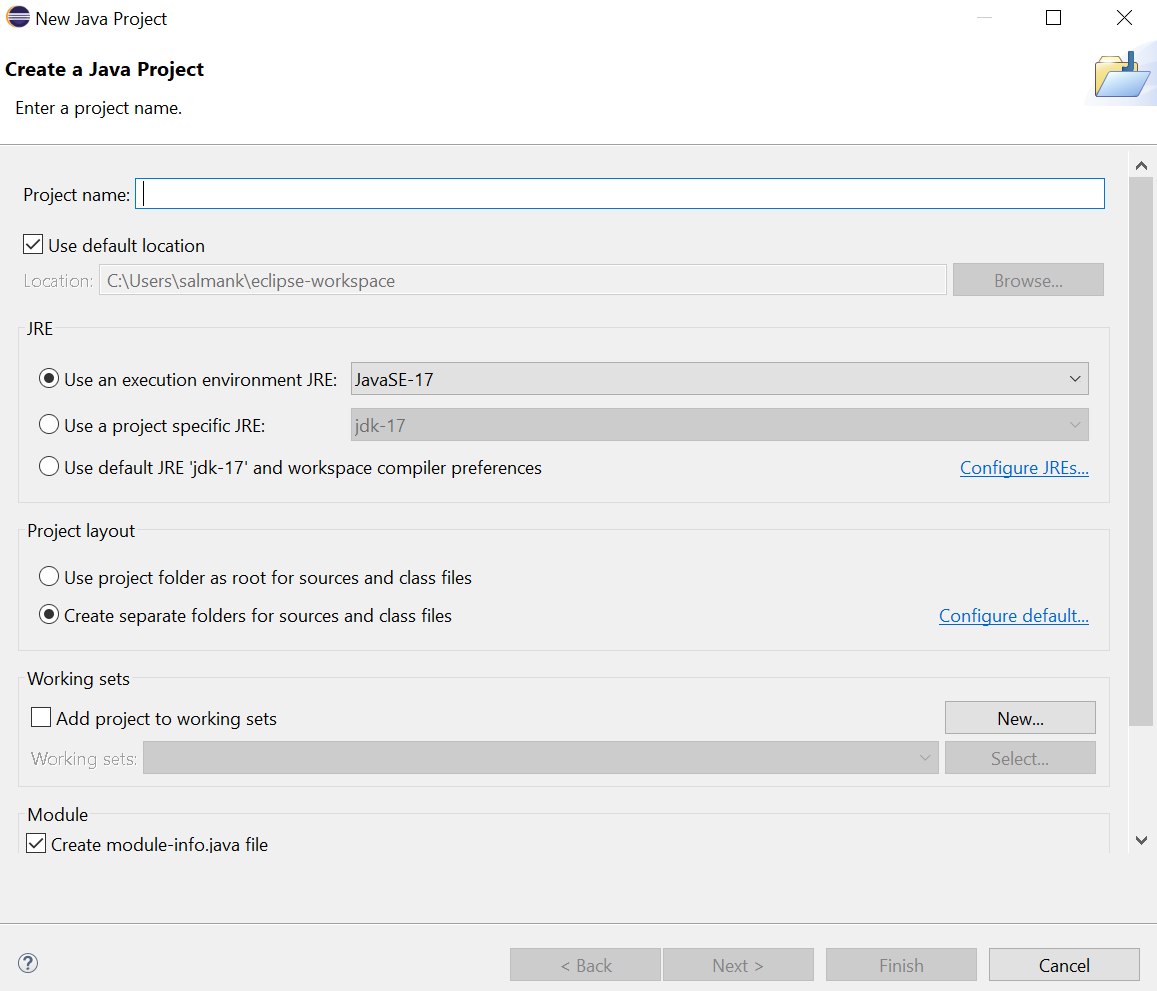
- Create a new Selenium with Java project. Go to File > New > Java Project. Name the project.
- A new pop-up window will appear. Enter the following details: project name, location to save the project, and execution JRE. Once done, click Finish.
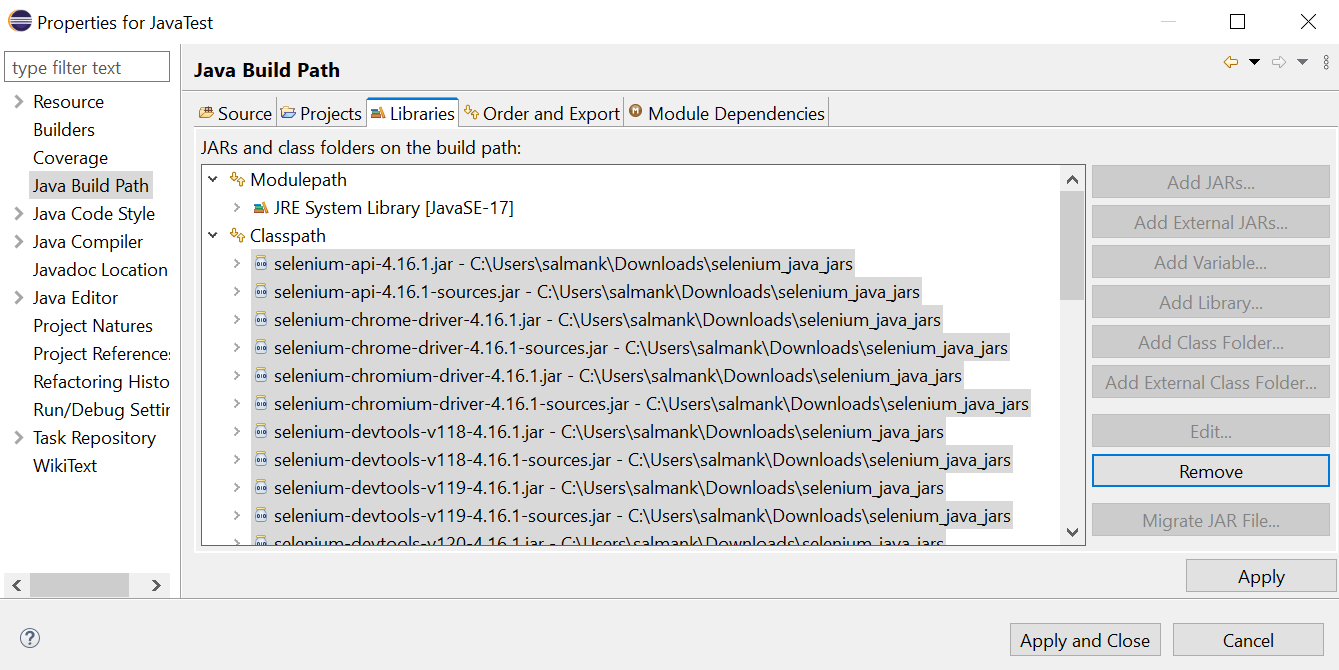
- Add Selenium API JAR files to the Java project by following the below-mentioned steps:
- Right-click on the project and select Properties.
- Select Java Build Path.
- Under the Libraries section, click on Add External JARs, which gets enabled upon opting for Classpath.
- Add the Selenium Java Client JARS. Navigate to the folder where you downloaded and extracted the JAR files.
- Once all the JAR files are added, click Apply and Close.
A workspace will be a place where you will be storing all your projects. You can create as many workspaces as required.
The project is now created.

With our project configured by Selenium with Java, we are ready to write and run our first test script in Selenium.
To perform automated testing using Selenium with Java, you can also leverage Maven. Maven is one of the popular Java build tools that relies on POM.xml. If you are new to Maven, check out this Selenium Maven tutorial, which guides you through writing and running Selenium projects with Maven.
Demo: Running Test Using Selenium With Java on Local
It is time to hit practicals! In this section of this article on Selenium with Java, you will learn to write your first test case using Selenium with Java on the local grid like LambdaTest.
Test Scenario
|
Implementation
|
1 2 3 4 5 6 7 8 9 10 11 12 13 14 15 16 17 18 19 20 21 22 23 24 25 26 27 28 29 30 31 32 33 34 35 36 |
package LambdaTest; import io.github.bonigarcia.wdm.WebDriverManager; import org.openqa.selenium.By; import org.openqa.selenium.WebDriver; import org.openqa.selenium.WebElement; import org.openqa.selenium.chrome.ChromeDriver; import org.testng.annotations.AfterTest; import org.testng.annotations.BeforeTest; import org.testng.annotations.Listeners; import org.testng.annotations.Test; public class FirstTestScriptUsingWebDriver { public static WebDriver driver = null; @BeforeTest public void setUp() throws Exception { WebDriverManager.chromedriver().setup(); driver=new ChromeDriver(); } @Test public void firstTestCase() { try { System.out.println("Launching LambdaTest Sign In Page"); driver.get("https://accounts.lambdatest.com/register"); WebElement pageHeader= driver.findElement(By.xpath("//a[text()='Sign In']")); pageHeader.click(); System.out.println("Clicked on the Sign In Button."); } catch (Exception e) { } } @AfterTest public void closeBrowser() { driver.close(); System.out.println("The driver has been closed."); } } |
To import the required dependencies, you can use the below pom.xml file.
Test Execution
To run the above test case using Selenium with Java on a local grid, you can use the below testng.xml file:
|
1 2 3 4 5 6 7 8 9 10 |
<?xml version="1.0" encoding="UTF-8"?> <!DOCTYPE suite SYSTEM "http://testng.org/testng-1.0.dtd"> <suite name="FirstTestScriptUsingWebDriverSuite"> <test name="FirstTestScriptUsingWebDriver" > <classes> <class name="LambdaTest.FirstTestScriptUsingWebDriver" > </class> </classes> </test> </suite> |
Code Walkthrough
Here is the code walkthrough of the executed test on a local grid using Selenium with Java.
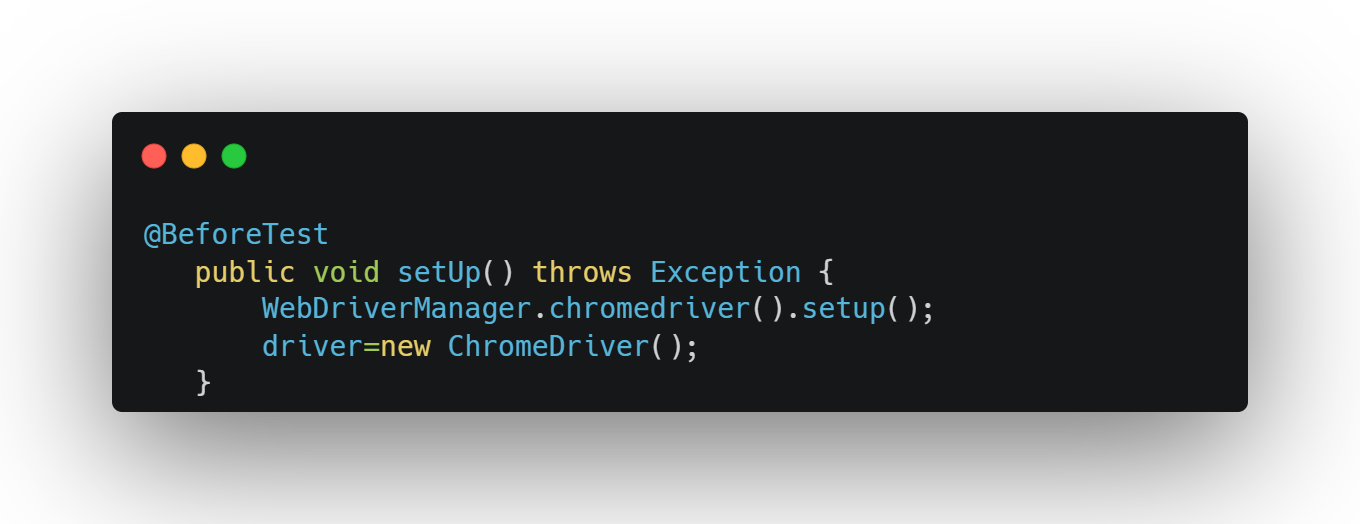
@BeforeTest annotation is a TestNG Annotation that helps execute a block of statements every time before any Test Method executes. So, we can use this annotation to maintain a preset for every test method, like launching browser, URL, and login, based on your requirements.
WebDriverManager in Selenium is an open-source Java library. It helps carry out the driver exe path setup for all browsers like Chrome, Edge, and Firefox in a single line. Here WebDriverManager.ChromeDriver.setup initializes the latest Chrome browser installed in the system. However, even initializing the version of the browser is also possible.
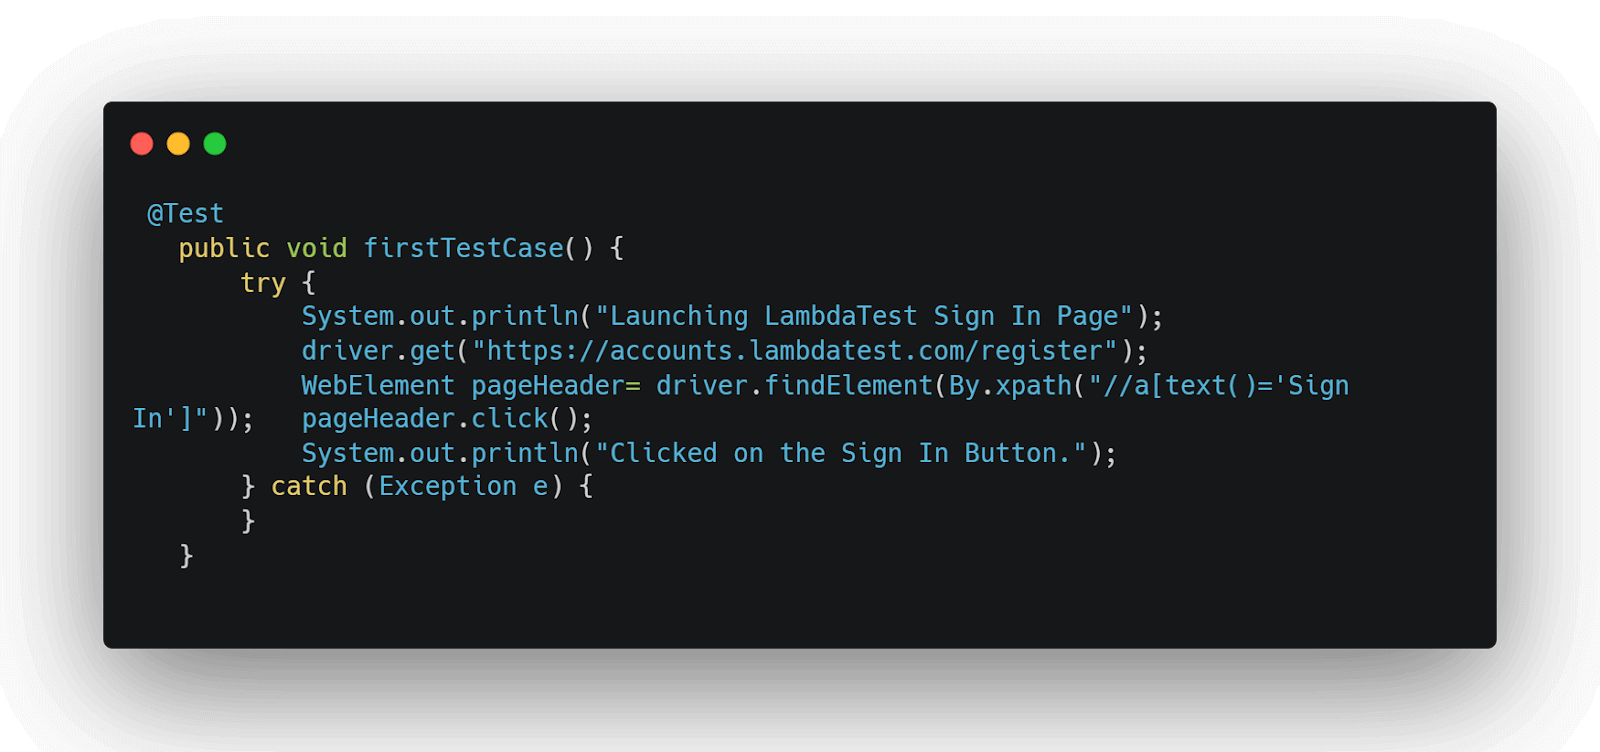
@Test is one of the more important TestNG Annotations, which defines a standard Java method as a test method. The try and catch block helps to capture any runtime exception and helps to handle the way developers want to end that execution.
The driver.get help to launch the required URL. Here, the required element, the Sign In link, is identified using XPath, a tag titled Sign In.
Each WebElement can be interacted with based on the element type, here as this element is a link, triggering a click event.
System.out.println in Java helps print messages on the console.
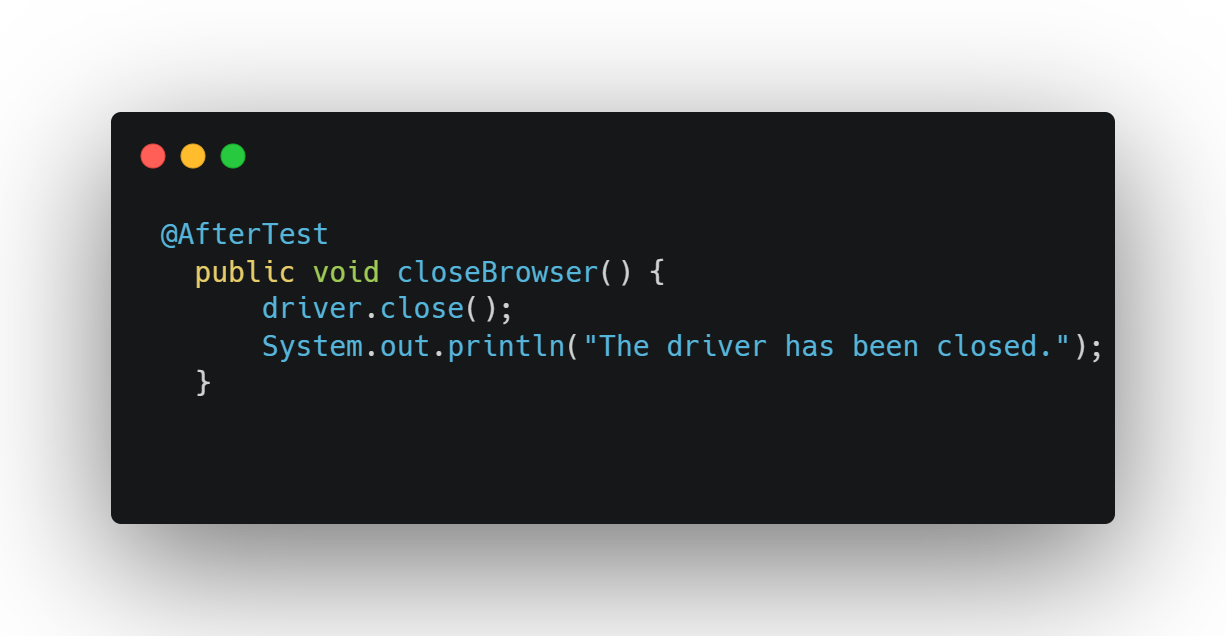
@AfterTest is another TestNG Annotation that executes the statements after every Test Annotation method executes. We can write statements that help tear down the process, like closing files and browsers.
The driver.close() method closes the current active browser launched by WebDriver. If multiple browsers exist, use driver.quit() to close all the sessions.
To achieve comprehensive browser coverage for Selenium Java testing, you may come across various challenges. These challenges often revolve around scalability issues and infrastructure limitations, including the availability of secure, enterprise-grade testing labs that meet all requirements and the recurring investment required to maintain and upgrade testing infrastructure.
A widely supported automation testing strategy to overcome these challenges is moving testing to the cloud. Through cloud testing, developers and testers can perform web testing across different browsers and hosted in the cloud infrastructure. By adopting a cloud-based testing approach, the need to maintain internal infrastructure is eliminated.
In addition, scalability issues associated with an on-premises test infrastructure that spans the spectrum of browsers, their different versions, and operating systems are effectively addressed. This approach is not only more efficient, but also proves to be cost-effective.
AI-powered test orchestration and execution platforms like LambdaTest provide an online Selenium Grid to perform Java automation testing on over 3000 real browsers and operating systems. The platform offers parallel testing in Selenium that improves the scalability of automated tests and reduces test execution time with simple setup and minimal configurations.
Demo: Running Test Using Selenium With Java on Cloud
In this section on the blog on Selenium with Java, we will run tests on the cloud using the TestNG framework. For this, we will use the LambdaTest Sign up page for demonstration purposes.
Test Scenario
|
Prerequisites
- Create an account on LambdaTest.
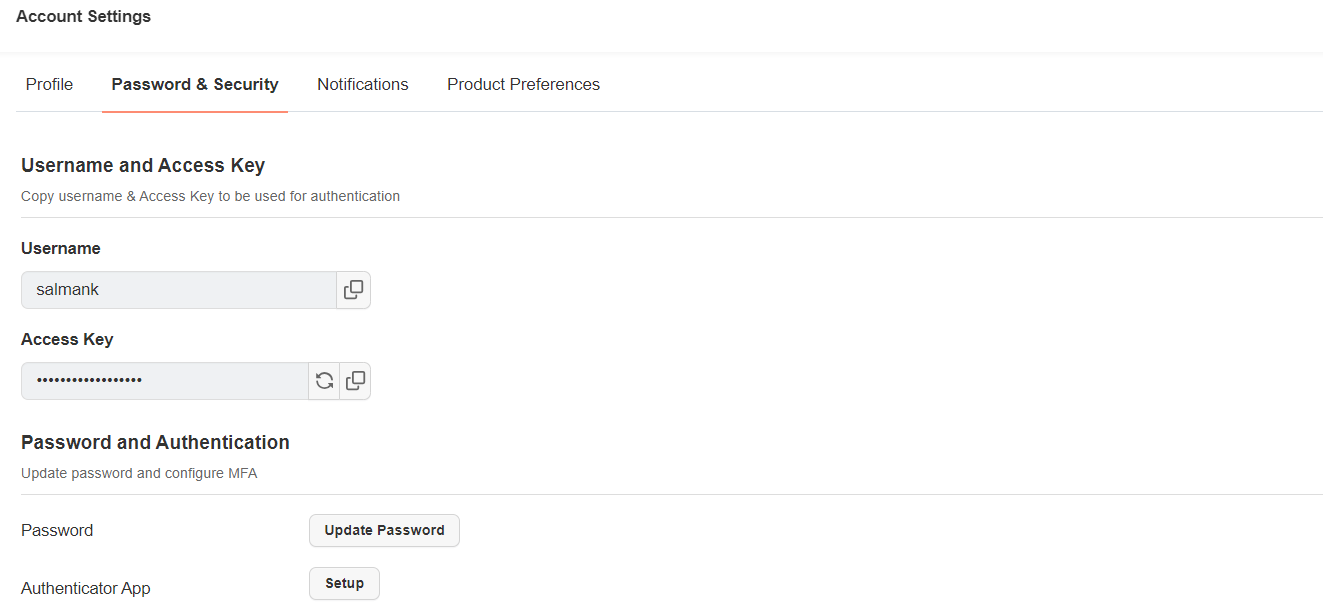
- Configure your LambdaTest credentials as environment variables. To get your Username and Access Key, go to your Profile avatar from the LambdaTest dashboard and select Account Settings, then go to Password & Security.
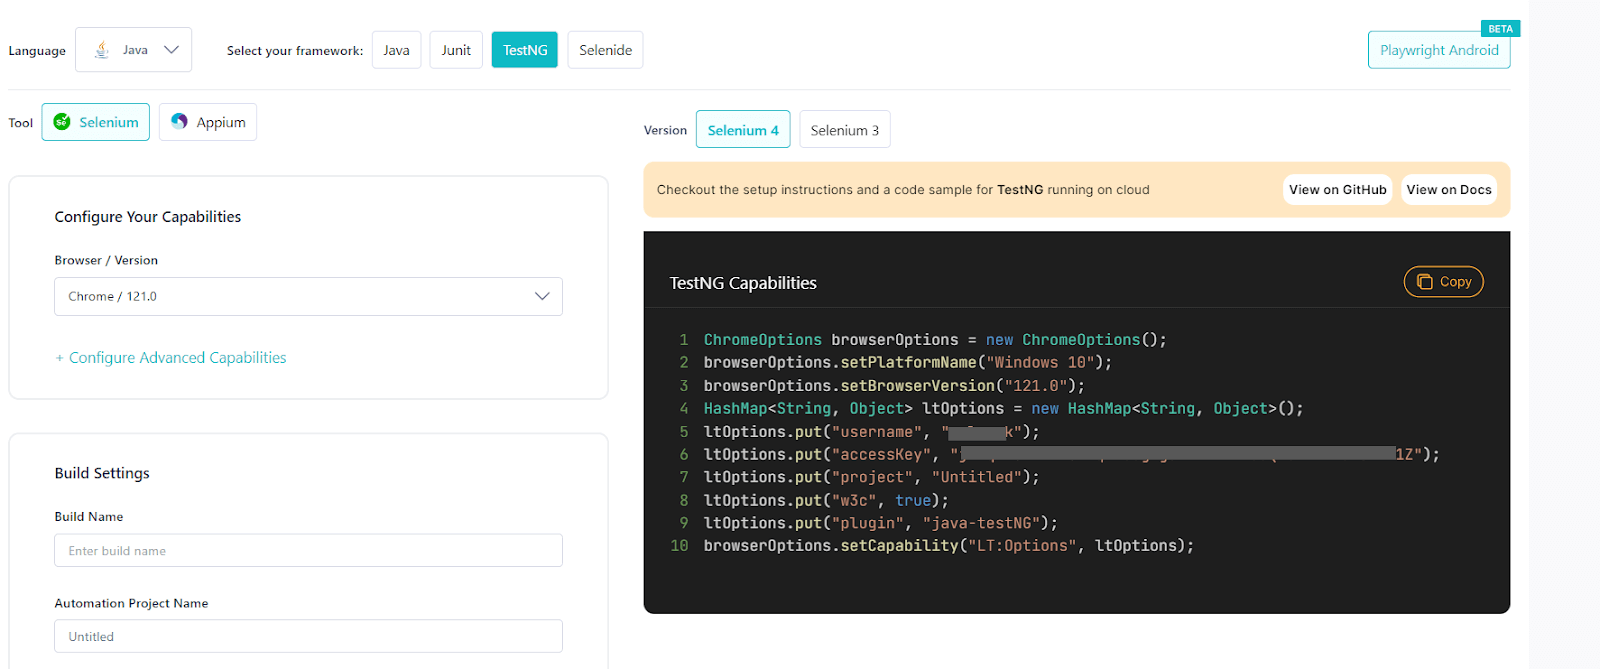
- Pass the browser capabilities. You can generate your custom desired capabilities for Selenium with Java using LambdaTest Capabilities Generator.
Implementation
|
1 2 3 4 5 6 7 8 9 10 11 12 13 14 15 16 17 18 19 20 21 22 23 24 25 26 27 28 29 30 31 32 33 34 35 36 37 38 39 40 41 42 43 44 45 46 47 48 49 50 51 52 53 54 55 56 57 58 59 60 61 |
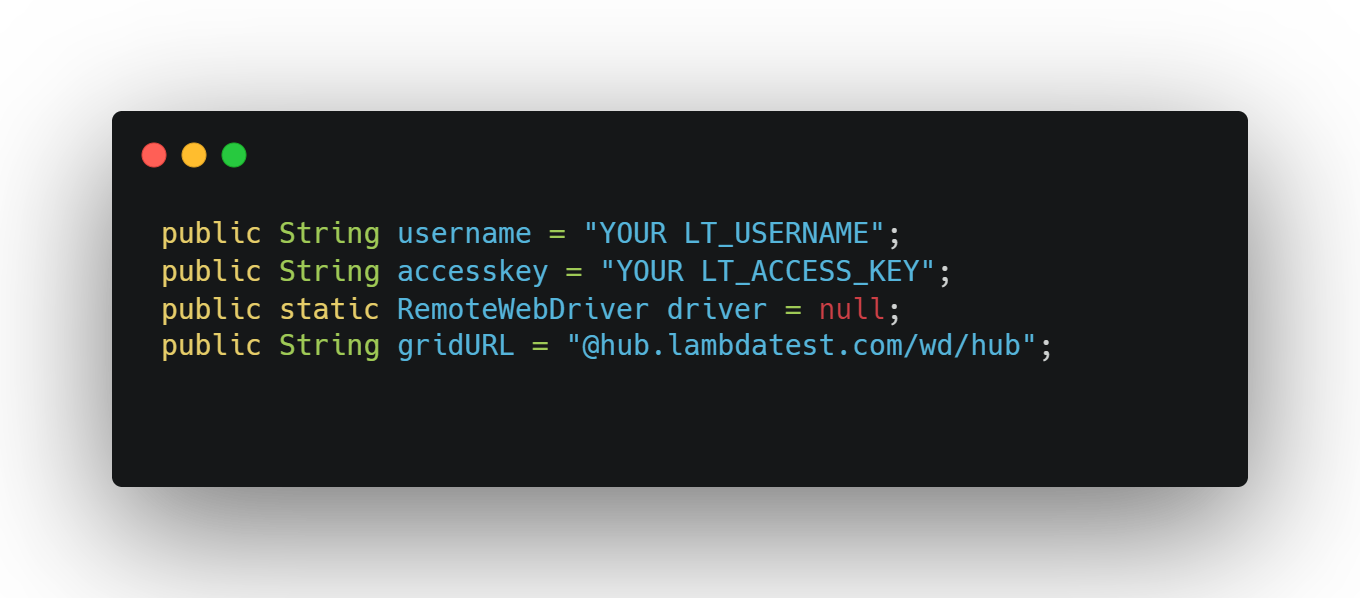
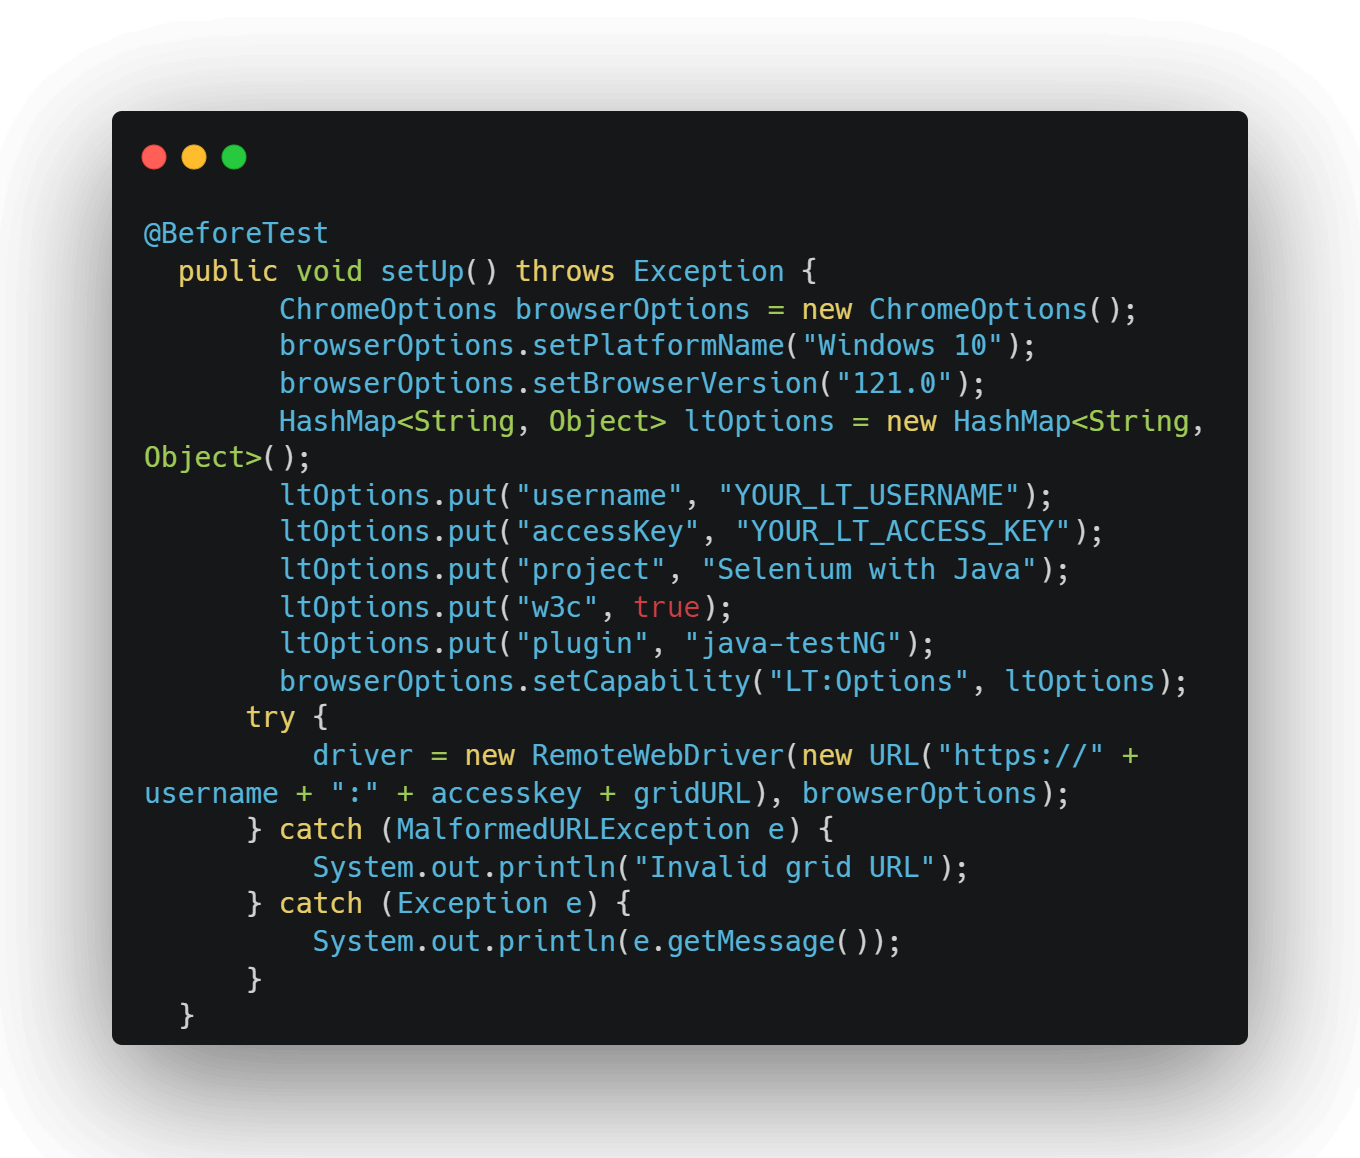
package LambdaTest; import org.openqa.selenium.By; import org.openqa.selenium.WebElement; import org.openqa.selenium.remote.RemoteWebDriver; import org.testng.annotations.AfterTest; import org.testng.annotations.BeforeTest; import org.testng.annotations.Listeners; import org.testng.annotations.Test; import java.net.MalformedURLException; import java.net.URL; @Listeners({util.Listener.class}) class FirstTestScriptUsingSeleniumGrid { public String username = "YOUR LT_USERNAME"; public String accesskey = "YOUR LT_ACCESS_KEY"; public static RemoteWebDriver driver = null; public String gridURL = "@hub.lambdatest.com/wd/hub"; @BeforeTest public void setUp() throws Exception { ChromeOptions browserOptions = new ChromeOptions(); browserOptions.setPlatformName("Windows 10"); browserOptions.setBrowserVersion("121.0"); HashMap<String, Object> ltOptions = new HashMap<String, Object>(); ltOptions.put("username", "YOUR_LT_USERNAME"); ltOptions.put("accessKey", "YOUR_LT_ACCESS_KEY"); ltOptions.put("project", "Selenium with Java"); ltOptions.put("w3c", true); ltOptions.put("plugin", "java-testNG"); browserOptions.setCapability("LT:Options", ltOptions); try { driver = new RemoteWebDriver(new URL("https://" + username + ":" + accesskey + gridURL), browserOptions); } catch (MalformedURLException e) { System.out.println("Invalid grid URL"); } catch (Exception e) { System.out.println(e.getMessage()); } } @Test public void firstTestCase() { try { System.out.println("Logging into LambdaTest Sign Up Page"); driver.get("https://accounts.lambdatest.com/register"); WebElement pageHeader= driver.findElement(By.xpath("//a[text()='Sign In']")); pageHeader.click(); System.out.println("Clicked on the Sign In Button."); } catch (Exception e) { } } @AfterTest public void closeBrowser() { driver.close(); System.out.println("The driver has been closed."); } } |
Code Walkthrough
Shown below is the code walkthrough of the executed test on a cloud grid using Selenium with Java.
The RemoteWebDriver class is used to execute test scripts through the RemoteWebDriver server on a remote machine.
To run the tests on the LambdaTest cloud Selenium Grid, you need to populate the corresponding username and access key values.
To set the necessary capabilities of browser name, version, platform, etc., you can use the LambdaTest Desired Capabilities Generator.
The remaining implementation will remain unchanged, as the only implementation that has changed is migrating from a local Selenium Grid to a cloud Selenium Grid.
Test Execution
Log on to LambdaTest Web Automation Dashboard to check the status of the test execution on LambdaTest.
If you are working on an actual project using Selenium with Java, you will need to write, run, and maintain hundreds of test cases. Each testing cycle will demand you to execute your test cases on multiple platforms and devices to ensure that the web application behaves as expected under various conditions and to ensure product quality before going live. It becomes highly desirable to reduce the overall test execution time, and one way to achieve it is through parallel testing.
In the next section of this tutorial on Selenium with Java, we will look at how to run parallel tests using a cloud grid like LambdaTest.
Demo: Running Parallel Tests in Selenium With Java
Parallel testing is a test execution strategy where the tests are run in parallel to reduce overall test execution time. Parallel testing was introduced to replace the traditional approach of sequential testing. As the name suggests, tests are executed sequentially, which is more time-consuming.
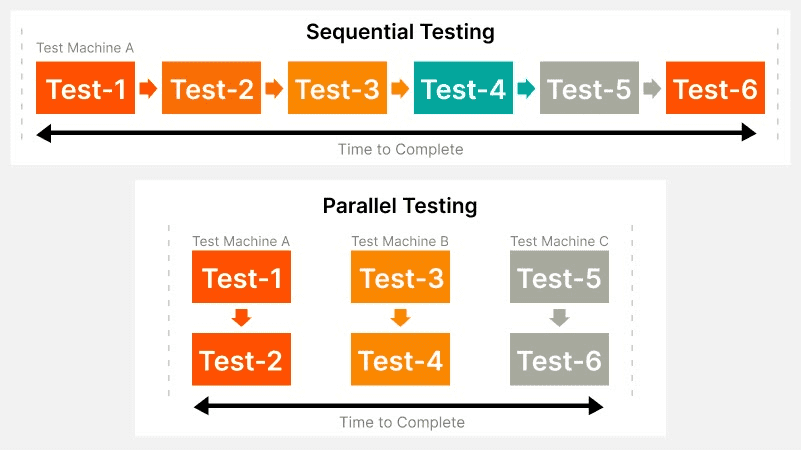
In the previous section, you learned how to write and run a test case sequentially using Selenium with Java. Now, I will walk you through how to run tests in parallel on a cloud-based Selenium Grid using the TestNG framework.
TestNG is a prominent open-source test automation framework for Java, where NG stands for ‘Next Generation.’ TestNG is widely adopted by Selenium users because of its features and feasibility. Running Selenium with Java tests alone comes with numerous limitations. However, TestNG introduces an entire set of new features, making it powerful and beneficial.
A few critical features of TestNG are listed below:
- Easy report generation in desirable formats. Now, it is easier to analyze how many test cases passed and how many failed during each test run.
- Supports parallel testing. Multiple test cases can be run simultaneously, reducing the overall test execution time.
- Possible to group test cases in TestNG effortlessly.
- TestNG annotations like @Test, @BeforeTest, @AfterTest, etc., are supported.
- Easy to integrate with tools like Maven, Jenkins, etc.
Parallel Test Execution in Selenium With Java on Cloud
One of the key advantages of adopting the TestNG automation framework is that it supports parallel test execution. Automation testing tools like TestNG allow you to run tests in parallel or multithreaded mode by utilizing the multi-threading concept of Java.
Multi-threading is the process of executing multiple threads simultaneously without any dependence on each other. This means the threads are executed in isolation, so exceptions occurring on one thread won’t affect the others. Multi-threading helps efficiently utilize the CPU by greatly reducing idle time. In TestNG, we enable parallel testing by making the required changes in the configuration file – TestNG XML file.
TestNG XML is the test suite configuration file in TestNG, which helps customize the execution of tests. It also allows you to run a single test file over numerous parameter combinations and specified values. A simple TestNG XML file looks like this.
|
1 2 3 4 5 6 7 8 9 |
<?xml version="1.0" encoding="UTF-8"?> <!DOCTYPE suite SYSTEM "https://testng.org/testng-1.0.dtd"> <suite name="Regression Test Suite"> <test name="Sanity Tests"> <classes> <class name="SanityTest" /> </classes> </test> <!-- Test --> </suite> <!-- Suite --> |
To perform parallel testing using Selenium with Java, we will leverage the online Selenium Grid and run it parallelly across three different browsers.
For this demo on executing parallel tests using Selenium with Java, we will clone the LambdaTest Java TestNG GitHub repository and execute our test case parallelly on different browsers (Chrome, Safari, and Firefox) using the online Selenium Grid provided by LambdaTest.
Test Scenario
|
Implementation
Here is the TestNG script we will use to run parallel tests using Selenium with Java.
|
1 2 3 4 5 6 7 8 9 10 11 12 13 14 15 16 17 18 19 20 21 22 23 24 25 26 27 28 29 30 31 32 33 34 35 36 37 38 39 40 41 42 43 44 45 46 47 48 49 50 51 52 53 54 55 56 57 58 59 60 61 62 63 |
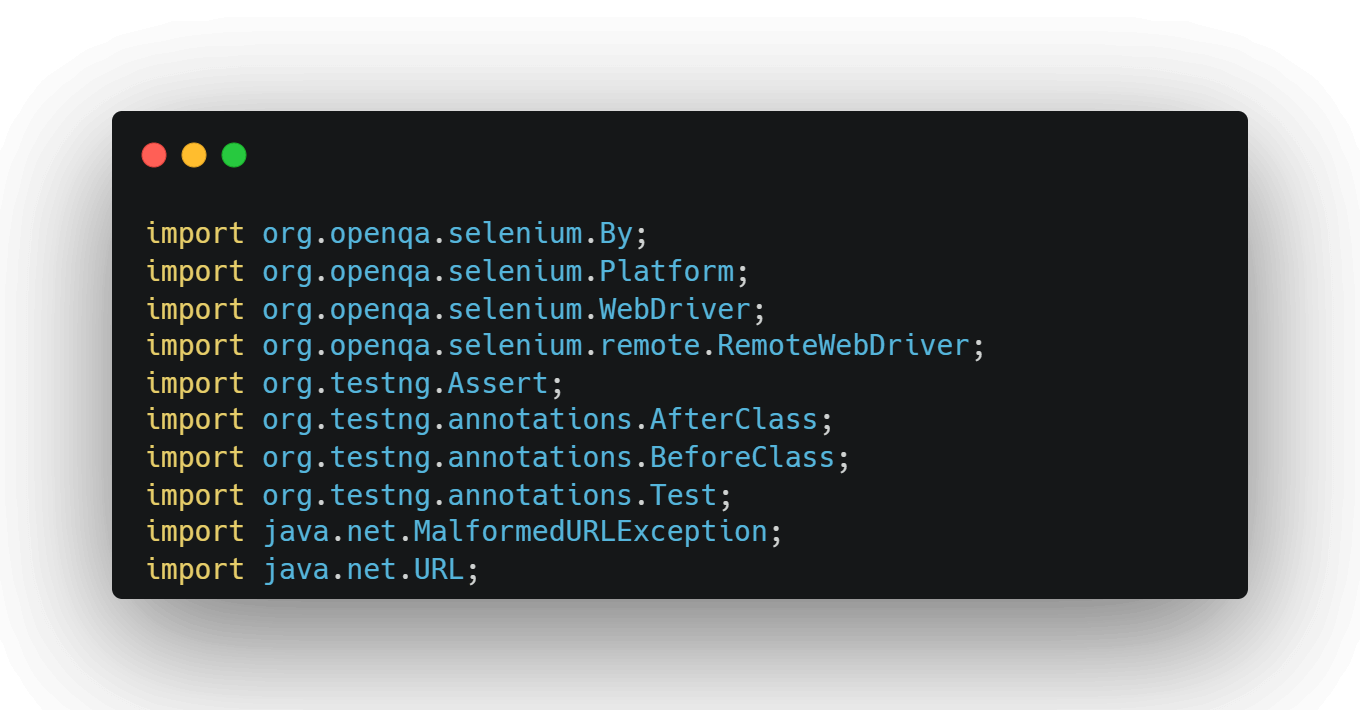
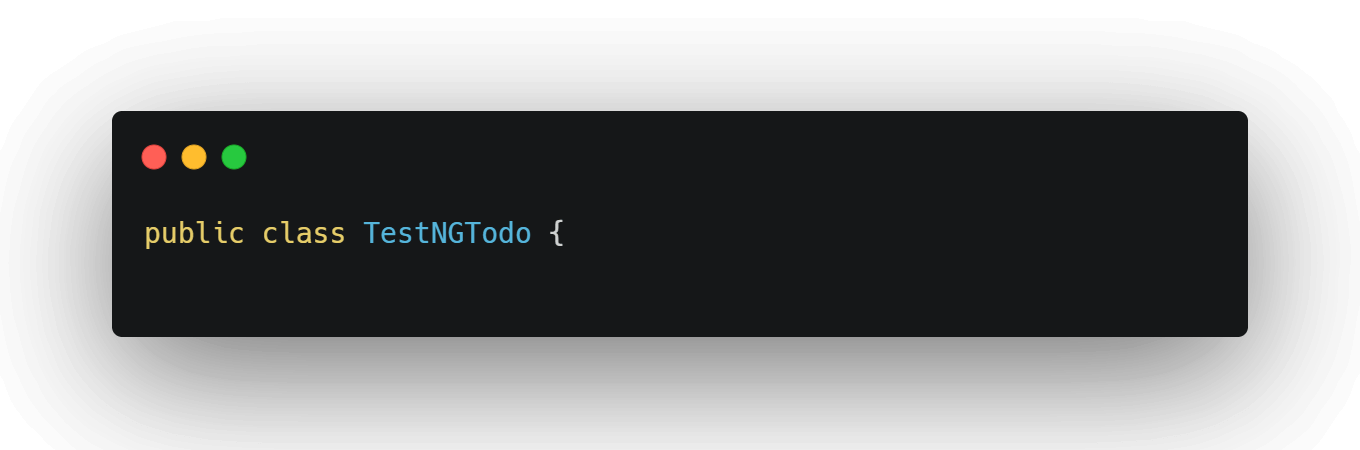
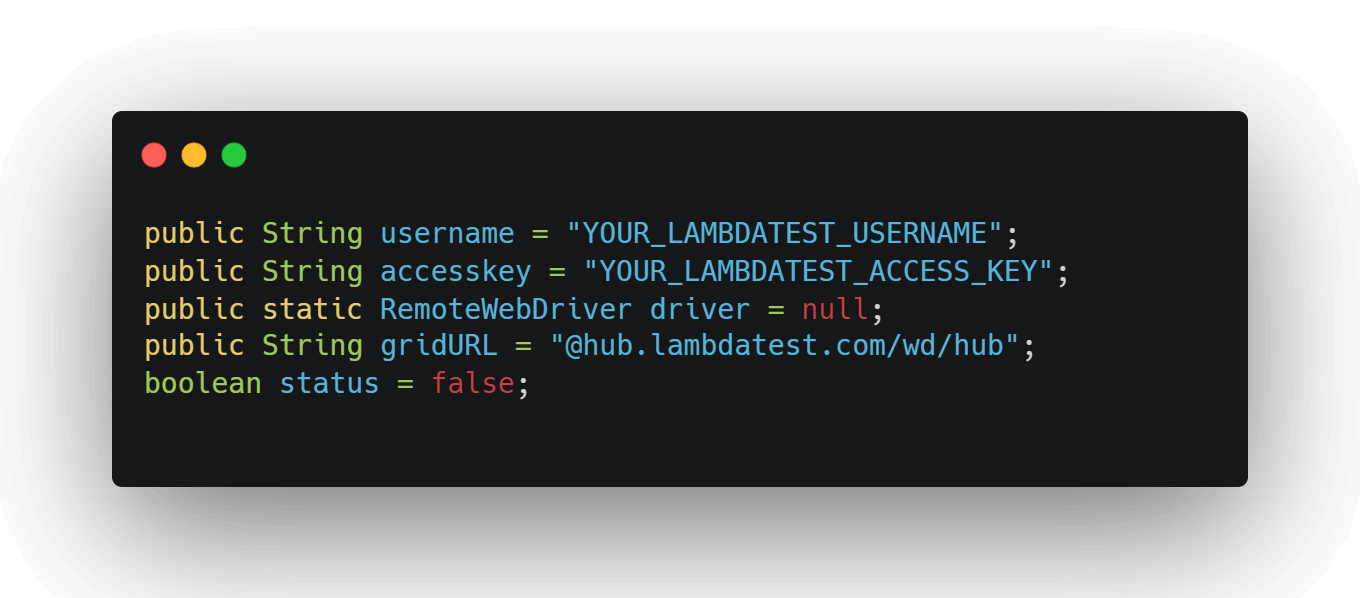
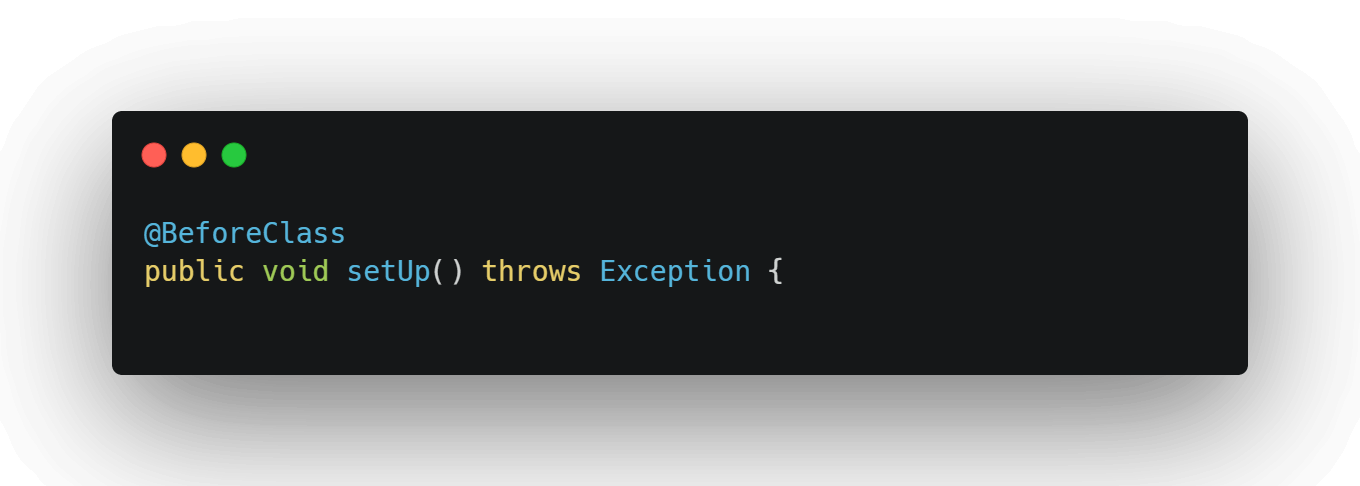
import org.openqa.selenium.By; import org.openqa.selenium.Platform; import org.openqa.selenium.WebDriver; import org.openqa.selenium.remote.RemoteWebDriver; import org.testng.Assert; import org.testng.annotations.AfterClass; import org.testng.annotations.BeforeClass; import org.testng.annotations.Test; import java.net.MalformedURLException; import java.net.URL; public class TestNGTodo{ public String username = "YOUR_LAMBDATEST_USERNAME"; public String accesskey = "YOUR_LAMBDATEST_ACCESS_KEY"; public static RemoteWebDriver driver = null; public String gridURL = "@hub.lambdatest.com/wd/hub"; boolean status = false; @BeforeClass public void setUp() throws Exception { ChromeOptions browserOptions = new ChromeOptions(); browserOptions.setPlatformName("Windows 10"); browserOptions.setBrowserVersion("121.0"); HashMap<String, Object> ltOptions = new HashMap<String, Object>(); ltOptions.put("username", "YOUR_LT_USERNAME"); ltOptions.put("accessKey", "YOUR_LT_ACCESS_KEY"); ltOptions.put("project", "Selenium with Java Tests"); ltOptions.put("w3c", true); ltOptions.put("plugin", "java-testNG"); browserOptions.setCapability("LT:Options", ltOptions); try { driver = new RemoteWebDriver(new URL("https://" + username + ":" + accesskey + gridURL), browserOptions); } catch (MalformedURLException e) { System.out.println("Invalid grid URL"); } catch (Exception e) { System.out.println(e.getMessage()); } } @Test public void testSimple() throws Exception { try {//Change it to production page driver.get("https://lambdatest.github.io/sample-todo-app/"); //Let's mark done first two items in the list. driver.findElement(By.name("li1")).click(); driver.findElement(By.name("li2")).click(); // Let's add an item in the list. driver.findElement(By.id("sampletodotext")).sendKeys("Yey, Let's add it to list"); driver.findElement(By.id("addbutton")).click(); // Let's check that the item we added is added in the list. String enteredText = driver.findElementByXPath("/html/body/div/div/div/ul/li[6]/span").getText(); if (enteredText.equals("Yey, Let's add it to list")) { status = true; } } catch (Exception e) { System.out.println(e.getMessage()); } } @AfterClass public void tearDown() throws Exception { if (driver != null) { ((JavascriptExecutor) driver).executeScript("lambda-status=" + status); driver.quit(); } } } |
Code Walkthrough
Here is the code walkthrough of the parallel tests executed using Selenium with Java.
These are the necessary imports for Selenium WebDriver, TestNG, and other related classes.
The code line below declares a class named TestNGTodo.
These are member variables used in the class, including credentials, Selenium WebDriver instance, grid URL, and a status flag.
This method is annotated with @BeforeClass, meaning it will run before any test method in the class. It sets up a ChromeOptions instance and configures it with the desired capabilities.
Then, it creates a RemoteWebDriver instance by connecting to the LambdaTest grid using the provided username, access key, and grid URL.
This method is annotated with @Test, indicating it is a test case.
- It navigates to a LambdaTest ToDo app.
- Mark the first two items as done.
- Add a new item to the list.
- Display the count of pending items.
This method is annotated with @AfterClass, indicating it will run after all test methods in the class. If the WebDriver instance is not null, it sets the lambda-status using JavaScript and quits the driver.
Here is a TestNG XML file that will be used to run the tests in parallel.
|
1 2 3 4 5 6 7 8 9 10 11 12 13 14 15 16 17 18 19 20 21 22 23 24 25 26 27 28 29 30 31 32 33 34 |
<?xml version="1.0" encoding="UTF-8"?> <!DOCTYPE suite SYSTEM "http://testng.org/testng-1.0.dtd"> <suite thread-count="3" name="LambaTestSuite" parallel="tests"> <test name="WIN8TEST"> <parameter name="browser" value="firefox"/> <parameter name="version" value="120.0"/> <parameter name="platform" value="WIN8"/> <classes> <class name="LambdaTest.TestNGToDo"/> </classes> </test> <!-- Test --> <test name="WIN10TEST"> <parameter name="browser" value="chrome"/> <parameter name="version" value="121.0"/> <parameter name="platform" value="WIN10"/> <classes> <class name="LambdaTest.TestNGToDo"/> </classes> </test> <!-- Test --> <test name="MACTEST"> <parameter name="browser" value="safari"/> <parameter name="version" value="11.0"/> <parameter name="platform" value="macos 10.13"/> <classes> <class name="LambdaTest.TestNGToDo"/> </classes> </test> <!-- Test --> </suite> |
To trigger parallel execution, we need to set the parallel attribute. This attribute accepts four values:
- classes– to run all test cases present inside classes in the XML in parallel mode.
- methods – to run all methods with @Test annotation in parallel mode.
- tests – to run all test cases present inside the tag in the XML in parallel mode.
- instances – to run all test cases in the same instance in parallel mode.
We can also set the number of threads we wish to allocate during the execution using the thread-count attribute. The default value of thread count in TestNG is 5.
|
1 |
<suite thread-count="3" name="LambaTestSuite" parallel="tests"> |
To run the tests for the cloned repository, run the following command.
|
1 |
mvn test -D suite=parallel.xml |
Now, go to your LambdaTest Web Automation Dashboard to see your parallel test results.
Advanced Use Cases of Using Selenium With Java
In this section of the Selenium with Java tutorial, you will learn how to run advanced use cases using Selenium and Java. Let’s look at some of the popular advanced use cases of using Selenium with Java.
Automating Registration Page Using Selenium With Java
When performing automation testing using Selenium with Java, focusing on automating either the registration or login Page is crucial. The registration page is the gateway to your web application, making it a vital component to test. Let us take a scenario to understand the automation registration page using Selenium with Java.
Test Scenario:
We will use the LambdaTest website as an example of registration page automation.
|
Below is the code implementation to automate the registration page.
|
1 2 3 4 5 6 7 8 9 10 11 12 13 14 15 16 17 18 19 20 21 22 23 24 25 26 27 28 29 30 31 32 33 34 35 36 37 38 39 40 41 42 43 44 45 46 47 48 49 50 51 52 53 54 55 56 57 58 59 60 61 62 63 64 65 66 67 68 69 70 71 72 73 74 75 76 77 78 79 80 81 82 83 84 85 86 87 88 89 90 91 92 93 94 95 96 97 98 99 100 101 102 103 104 105 106 107 108 109 110 111 112 113 114 115 116 117 118 119 120 121 122 123 124 125 126 127 128 129 130 131 132 133 134 135 136 137 138 139 140 141 142 143 144 145 146 147 148 149 150 151 152 153 154 155 156 157 158 159 160 161 162 163 164 165 166 167 168 169 170 171 172 173 174 175 176 177 178 179 180 181 182 183 184 185 186 187 188 189 190 191 192 193 194 195 196 197 198 199 200 201 202 203 204 205 206 207 208 209 210 211 212 213 214 215 216 217 218 219 220 221 222 223 224 225 226 227 228 229 230 231 232 233 234 235 236 237 238 239 240 241 242 243 244 245 246 247 248 249 250 251 252 253 254 255 256 257 258 259 260 261 262 263 264 265 266 267 268 269 270 271 272 273 274 275 276 277 278 279 280 281 282 283 284 285 286 287 288 289 290 291 292 293 294 295 296 297 298 299 300 301 302 303 304 305 306 307 308 309 310 311 312 313 314 315 316 317 318 319 320 321 322 323 324 325 326 327 328 329 330 331 332 333 334 335 336 337 338 339 340 341 342 343 344 345 346 347 348 349 350 351 352 353 354 355 356 357 358 359 360 361 362 363 364 365 366 367 368 369 370 371 372 373 374 375 376 377 378 379 380 381 382 383 384 385 386 387 388 389 390 391 392 393 394 395 396 397 398 399 400 401 402 403 404 405 406 407 408 409 410 411 412 413 414 415 416 417 418 419 420 421 422 423 424 425 426 427 428 429 430 431 432 433 434 435 436 437 438 439 440 441 442 443 444 445 446 447 448 449 450 451 452 453 454 455 456 457 458 459 460 461 462 463 464 465 466 467 468 469 470 471 472 473 474 475 476 477 478 479 480 481 482 483 484 485 486 487 488 489 490 491 492 493 494 495 496 497 498 499 500 501 502 503 504 505 506 507 508 509 510 511 512 513 514 |
package com.lambdatest; import org.openqa.selenium.By; import org.openqa.selenium.JavascriptExecutor; import org.openqa.selenium.Platform; import org.openqa.selenium.WebDriver; import org.openqa.selenium.WebElement; import org.openqa.selenium.remote.DesiredCapabilities; import org.openqa.selenium.remote.RemoteWebDriver; import org.testng.Assert; import org.testng.annotations.AfterClass; import org.testng.annotations.BeforeClass; import org.testng.annotations.BeforeMethod; import org.testng.annotations.Parameters; import org.testng.annotations.Test; import org.testng.asserts.Assertion; import com.beust.jcommander.Parameter; import java.net.MalformedURLException; import java.net.URL; import java.util.Set; import java.util.concurrent.TimeUnit; public class SignUpTest{ public String username = "your username"; public String accesskey = "Your accesskey"; public static RemoteWebDriver driver = null; public String gridURL = "@hub.lambdatest.com/wd/hub"; boolean status = false; //Setting up capabilities to run our test script @Parameters(value= {"browser","version"}) @BeforeClass public void setUp(String browser, String version) throws Exception { DesiredCapabilities capabilities = new DesiredCapabilities(); capabilities.setCapability("browserName", browser); capabilities.setCapability("version", version); capabilities.setCapability("platform", "win10"); // If this cap isn't specified, it will just get any available one capabilities.setCapability("build", "LambdaTestSampleApp"); capabilities.setCapability("name", "LambdaTestJavaSample"); capabilities.setCapability("network", true); // To enable network logs capabilities.setCapability("visual", true); // To enable step by step screenshot capabilities.setCapability("video", true); // To enable video recording capabilities.setCapability("console", true); // To capture console logs try { driver = new RemoteWebDriver(new URL("https://" + username + ":" + accesskey + gridURL), capabilities); } catch (MalformedURLException e) { System.out.println("Invalid grid URL"); } catch (Exception e) { System.out.println(e.getMessage()); } } //Opening browser with the given URL and navigate to Registration Page @BeforeMethod public void openBrowser() { driver.manage().deleteAllCookies(); driver.get("https://www.lambdatest.com/"); driver.manage().timeouts().implicitlyWait(15, TimeUnit.SECONDS); driver.manage().timeouts().pageLoadTimeout(15, TimeUnit.SECONDS); WebElement signUpButton = driver.findElement(By.xpath("//a[contains(text(),'Start Free Testing')]")); signUpButton.click(); } //Verifying elements on Registration page @Test public void verifyElemntsOnPageTest() { WebElement lambdaTestLogo = driver.findElement(By.xpath("//p[@class='signup-titel']")); lambdaTestLogo.isDisplayed(); WebElement signUpTitle = driver.findElement(By.xpath("//p[@class='signup-titel']")); signUpTitle.isDisplayed(); WebElement termsText = driver.findElement(By.xpath("//label[@class='woo']")); termsText.isDisplayed(); WebElement loginLinkText = driver.findElement(By.xpath("//p[@class='login-in-link test-left']")); loginLinkText.isDisplayed(); } //Verifying redirection to the terms and conditions page @Test public void termsRedirectionTest() { WebElement termsLink = driver.findElement(By.xpath("//a[contains(text(),'Terms')]")); termsLink.click(); Set <String> allWindows = driver.getWindowHandles(); for(String handle : allWindows) { driver.switchTo().window(handle); } String expectedURL = "https://www.lambdatest.com/terms-of-service"; String actualURL = driver.getCurrentUrl(); //System.out.println(actualURL); Assert.assertEquals(actualURL, expectedURL); String expectedTitle = "Terms of Service - LambdaTest"; String actualTitle = driver.getTitle(); //System.out.println(actualTitle); Assert.assertEquals(actualTitle, expectedTitle); } //Verifying Privacy policy page redirection @Test public void privacyPolicyRedirectionTest() { WebElement privacyPolicyLink = driver.findElement(By.xpath("//a[contains(text(),'Privacy')]")); privacyPolicyLink.click(); Set <String> allWindows = driver.getWindowHandles(); for(String handle : allWindows) { driver.switchTo().window(handle); } String expectedURL = "https://www.lambdatest.com/privacy"; String actualURL = driver.getCurrentUrl(); //System.out.println(actualURL); Assert.assertEquals(actualURL, expectedURL); String expectedTitle = "Privacy Policy | LambdaTest"; String actualTitle = driver.getTitle(); //System.out.println(actualTitle); Assert.assertEquals(actualTitle, expectedTitle); } //Verifying redirection to the Login page from Registration page @Test public void loginRedirectionTest() { WebElement loginLink = driver.findElement(By.xpath("//a[contains(text(),'Login')]")); loginLink.click(); String expectedURL = "https://accounts.lambdatest.com/login"; String actualURL = driver.getCurrentUrl(); //System.out.println(actualURL); Assert.assertEquals(actualURL, expectedURL); String expectedTitle = "Login - LambdaTest"; String actualTitle = driver.getTitle(); //System.out.println(actualTitle); Assert.assertEquals(actualTitle, expectedTitle); } //Verifying redirection to the landing page @Test public void landingPageRedirectionTest() { WebElement lambdaTestLogo = driver.findElement(By.xpath("//p[@class='logo-home']//a//img")); lambdaTestLogo.click(); String expectedURL = "https://www.lambdatest.com/"; String actualURL = driver.getCurrentUrl(); Assert.assertEquals(actualURL, expectedURL); } // Registration with all valid data @Test public void validRegistrationTest(){ WebElement companyName = driver.findElement(By.name("organization_name")); companyName.sendKeys("TestCompany"); WebElement fullName = driver.findElement(By.name("name")); fullName.sendKeys("TestName"); WebElement email = driver.findElement(By.name("email")); email.sendKeys("test6.lambdatest@gmail.com"); WebElement password = driver.findElement(By.name("password")); password.sendKeys("Enter your LambdaTest password here"); WebElement phone = driver.findElement(By.name("phone")); phone.sendKeys("Enter your number"); WebElement termsOfServices = driver.findElement(By.id("terms_of_service")); termsOfServices.click(); WebElement signUp = driver.findElement(By.xpath("//button[contains(@class,'btn sign-up-btn-2 btn-block')]")); signUp.click(); String expectedURL = "https://accounts.lambdatest.com/email/verify"; String actualURL = driver.getCurrentUrl(); Assert.assertEquals(actualURL, expectedURL); String expectedTitle = "Verify Your Email Address - LambdaTest"; String actualTitle = driver.getTitle(); Assert.assertEquals(actualTitle, expectedTitle); } // Registration without providing Company Name field @Test public void emptyCompanyNameTest() { WebElement companyName = driver.findElement(By.name("organization_name")); companyName.sendKeys(""); WebElement fullName = driver.findElement(By.name("name")); fullName.sendKeys("TestName"); WebElement email = driver.findElement(By.name("email")); email.sendKeys("test7.lambdatest@gmail.com"); WebElement password = driver.findElement(By.name("password")); password.sendKeys("Enter your LambdaTest account password"); WebElement phone = driver.findElement(By.name("phone")); phone.sendKeys("Enter your phone number here"); WebElement termsOfServices = driver.findElement(By.id("terms_of_service")); termsOfServices.click(); WebElement signUp = driver.findElement(By.xpath("//button[contains(@class,'btn sign-up-btn-2 btn-block')]")); signUp.click(); /* * Set <String> allWindows = driver.getWindowHandles(); * * for(String handle : allWindows) { driver.switchTo().window(handle); } */ String expectedURL = "https://accounts.lambdatest.com/email/verify"; String actualURL = driver.getCurrentUrl(); Assert.assertEquals(actualURL, expectedURL); String expectedTitle = "Verify Your Email Address - LambdaTest"; String actualTitle = driver.getTitle(); Assert.assertEquals(actualTitle, expectedTitle); } // Registration without providing Name field @Test public void emptyNameTest() { WebElement companyName = driver.findElement(By.name("organization_name")); companyName.sendKeys("TestCompany"); WebElement fullName = driver.findElement(By.name("name")); fullName.sendKeys("Enter your name "); WebElement email = driver.findElement(By.name("email")); email.sendKeys("test@test.com"); WebElement password = driver.findElement(By.name("password")); password.sendKeys("Enter your LambdaTest account password""); WebElement phone = driver.findElement(By.name("phone")); phone.sendKeys("Send your number here"); WebElement termsOfServices = driver.findElement(By.id("terms_of_service")); termsOfServices.click(); WebElement signUp = driver.findElement(By.xpath("//button[contains(@class,'btn sign-up-btn-2 btn-block')]")); signUp.click(); String expectedErrorMsg = "Please enter your Name"; WebElement exp = driver.findElement(By.xpath("//p[contains(text(),'Please enter your Name')]")); String actualErrorMsg = exp.getText(); Assert.assertEquals(actualErrorMsg, expectedErrorMsg); } // Registration without providing user email field @Test public void emptyEmailTest() { WebElement companyName = driver.findElement(By.name("organization_name")); companyName.sendKeys("TestCompany"); WebElement fullName = driver.findElement(By.name("name")); fullName.sendKeys("test"); WebElement email = driver.findElement(By.name("email")); email.sendKeys(""); WebElement password = driver.findElement(By.name("password")); password.sendKeys("Enter your LambdaTest account password""); WebElement phone = driver.findElement(By.name("phone")); phone.sendKeys("Enter your phone number here"); WebElement termsOfServices = driver.findElement(By.id("terms_of_service")); termsOfServices.click(); WebElement signUp = driver.findElement(By.xpath("//button[contains(@class,'btn sign-up-btn-2 btn-block')]")); signUp.click(); String expectedErrorMsg = "Please enter your Email Address"; WebElement exp = driver.findElement(By.xpath("//p[contains(text(),'Please enter your Email Address')]")); String actualErrorMsg = exp.getText(); Assert.assertEquals(actualErrorMsg, expectedErrorMsg); } // Registration with email id which already have account @Test public void invalidEmailTest() { WebElement companyName = driver.findElement(By.name("organization_name")); companyName.sendKeys("TestCompany"); WebElement fullName = driver.findElement(By.name("name")); fullName.sendKeys("TestName"); WebElement email = driver.findElement(By.name("email")); email.sendKeys("test@test.com"); WebElement password = driver.findElement(By.name("password")); password.sendKeys("Enter your LambdaTest account password"); WebElement phone = driver.findElement(By.name("phone")); phone.sendKeys("Enter your phone number here"); WebElement termsOfServices = driver.findElement(By.id("terms_of_service")); termsOfServices.click(); WebElement signUp = driver.findElement(By.xpath("//button[contains(@class,'btn sign-up-btn-2 btn-block')]")); signUp.click(); String expectedErrorMsg = "This email is already registered"; WebElement exp = driver.findElement(By.xpath("//p[@class='error-mass']")); String actualErrorMsg = exp.getText(); Assert.assertEquals(actualErrorMsg, expectedErrorMsg); } // Registration without providing password field @Test public void emptyPasswordTest() { WebElement companyName = driver.findElement(By.name("organization_name")); companyName.sendKeys("TestCompany"); WebElement fullName = driver.findElement(By.name("name")); fullName.sendKeys("TestName"); WebElement email = driver.findElement(By.name("email")); email.sendKeys("test@test.com"); WebElement password = driver.findElement(By.name("password")); password.sendKeys("Enter the password"); WebElement phone = driver.findElement(By.name("phone")); phone.sendKeys("Enter your phone number here"); WebElement termsOfServices = driver.findElement(By.id("terms_of_service")); termsOfServices.click(); WebElement signUp = driver.findElement(By.xpath("//button[contains(@class,'btn sign-up-btn-2 btn-block')]")); signUp.click(); String expectedErrorMsg = "Please enter a desired password"; WebElement exp = driver.findElement(By.xpath("//p[contains(text(),'Please enter a desired password')]")); String actualErrorMsg = exp.getText(); Assert.assertEquals(actualErrorMsg, expectedErrorMsg); } // Registration with invalid password @Test public void inValidPasswordTest() { WebElement companyName = driver.findElement(By.name("organization_name")); companyName.sendKeys("TestCompany"); WebElement fullName = driver.findElement(By.name("name")); fullName.sendKeys("TestName"); WebElement email = driver.findElement(By.name("email")); email.sendKeys("test@test.com"); WebElement password = driver.findElement(By.name("password")); password.sendKeys("T"); WebElement phone = driver.findElement(By.name("phone")); phone.sendKeys("Enter the phone number"); WebElement termsOfServices = driver.findElement(By.id("terms_of_service")); termsOfServices.click(); WebElement signUp = driver.findElement(By.xpath("//button[contains(@class,'btn sign-up-btn-2 btn-block')]")); signUp.click(); String expectedErrorMsg = "Password should be at least 8 characters long"; WebElement exp = driver.findElement(By.xpath("//p[contains(text(),'Password should be at least 8 characters long')]")); String actualErrorMsg = exp.getText(); Assert.assertEquals(actualErrorMsg, expectedErrorMsg); //Password should be at least 8 characters long } // Registration without providing user phone number field @Test public void emptyPhoneTest() { WebElement companyName = driver.findElement(By.name("organization_name")); companyName.sendKeys("TestCompany"); WebElement fullName = driver.findElement(By.name("name")); fullName.sendKeys("TestName"); WebElement email = driver.findElement(By.name("email")); email.sendKeys("test@test.com"); WebElement password = driver.findElement(By.name("password")); password.sendKeys("Enter your LambdaTest account password""); WebElement phone = driver.findElement(By.name("phone")); phone.sendKeys(""); WebElement termsOfServices = driver.findElement(By.id("terms_of_service")); termsOfServices.click(); WebElement signUp = driver.findElement(By.xpath("//button[contains(@class,'btn sign-up-btn-2 btn-block')]")); signUp.click(); String expectedErrorMsg = "The phone field is required."; WebElement exp = driver.findElement(By.xpath("//p[contains(text(),'The phone field is required.')]")); String actualErrorMsg = exp.getText(); Assert.assertEquals(actualErrorMsg, expectedErrorMsg); } // Registration with providing invalid user phone number field @Test public void inValidPhoneTest() { WebElement companyName = driver.findElement(By.name("organization_name")); companyName.sendKeys("TestCompany"); WebElement fullName = driver.findElement(By.name("name")); fullName.sendKeys("TestName"); WebElement email = driver.findElement(By.name("email")); email.sendKeys("test@test.com"); WebElement password = driver.findElement(By.name("password")); password.sendKeys("Enter your LambdaTest account password"); WebElement phone = driver.findElement(By.name("phone")); phone.sendKeys("98"); WebElement termsOfServices = driver.findElement(By.id("terms_of_service")); termsOfServices.click(); WebElement signUp = driver.findElement(By.xpath("//button[contains(@class,'btn sign-up-btn-2 btn-block')]")); signUp.click(); String expectedErrorMsg = "Please enter a valid Phone number"; WebElement exp = driver.findElement(By.xpath("//p[contains(text(),'Please enter a valid Phone number')]")); String actualErrorMsg = exp.getText(); Assert.assertEquals(actualErrorMsg, expectedErrorMsg); //Please enter a valid Phone number } // Registration without accepting terms and condition tickbox @Test public void uncheckedTerms() { WebElement companyName = driver.findElement(By.name("organization_name")); companyName.sendKeys("TestCompany"); WebElement fullName = driver.findElement(By.name("name")); fullName.sendKeys("TestName"); WebElement email = driver.findElement(By.name("email")); email.sendKeys("test@test.com"); WebElement password = driver.findElement(By.name("password")); password.sendKeys("Enter your LambdaTest account password"); WebElement phone = driver.findElement(By.name("phone")); phone.sendKeys("Enter your phone number"); //WebElement termsOfServices = driver.findElement(By.id("terms_of_service")); //termsOfServices.click(); WebElement signUp = driver.findElement(By.xpath("//button[contains(@class,'btn sign-up-btn-2 btn-block')]")); signUp.click(); String expectedTermsErrorMessage = "To proceed further you must agree to our Terms of Service and Privacy Policy"; WebElement uncheckedTermCheckbox = driver.findElement(By.xpath("//p[@class='error-mass mt-2']")); String actualTermsErrorMessage = uncheckedTermCheckbox.getText(); //To proceed further you must agree to our Terms of Service and Privacy Policy Assert.assertEquals(actualTermsErrorMessage, expectedTermsErrorMessage); } // Closing the browser session after completing each test case @AfterClass public void tearDown() throws Exception { if (driver != null) { ((JavascriptExecutor) driver).executeScript("lambda-status=" + status); driver.quit(); } } } |
Check out the video below to learn automating the registration page with Selenium WebDriver.
Handling Login Popups Using Selenium With Java
When testing websites, you may have encountered authentication pop-ups that prompt you to enter usernames or passwords. These pop-ups act as a security mechanism, ensuring that only authorized users gain access to specific features on the website.
Test Scenario:
To access an authentication-protected webpage, follow the below steps.
|
Below is the code implementation for the above test scenario.
To learn more about handling login popups with Selenium WebDriver, watch the complete video tutorial below.
Handling Captcha Using Selenium With Java
CAPTCHA lets you differentiate between real users and automated entities like bots. The primary purpose of CAPTCHA is to prevent the unauthorized use of automated programs or bots from accessing various computing services or collecting specific sensitive information.
Test Scenario:
|
Below is the code implementation for the above test scenario.
To learn more about how to handle Captcha with Selenium WebDriver, refer to the video below.
Uploading and Downloading Files Using Selenium With Java
When using Selenium, you might come across scenarios where you have to either download or upload files. Various websites, such as YouTube, online stores, and writing tools, include features that require dealing with files.
For instance, YouTube lets you upload videos, and on Amazon, you may need to download order invoices. As a Selenium tester, you may encounter situations where you need to check and validate these functionalities related to handling files.
In the scenario below, let us see how to upload and download a file using Selenium with Java.
Test Scenario for File Upload:
|
Test Scenario for File Download:
|
Below is the code implementation for the test scenario to download files.
To learn more about uploading and downloading files with Selenium, check out the video tutorial below.
Handling Cookies Using Selenium With Java
When we shop or pay bills online, websites often use cookies—these small pieces of data sent to your computer by the website. When you visit a site, it sends these cookies to your computer. When you come back from the website, these cookies help the website remember what you did before, kind of like a virtual way for the website to recognize you without getting into your personal stuff.
Let us understand how to handle cookies by a scenario.
Test Scenario:
|
When performing test automation using Selenium with Java, you can automate cookies using the Cookies interface provided by the WebDriver.Options class. Below is the code implementation on how to handle cookies.
Learn handling cookies with Selenium WebDriver by checking out the below video tutorial.
Best Practices for Selenium Java Testing
Through Selenium Java automation testing, we aim to reduce the labor of manual testing, speed up the execution, detect maximum bugs early, achieve better coverage, and accelerate time to market.
However, writing a stable and reliant test case can be challenging due to factors like test flakiness, incorrect testing approach, etc. This is where HyperExecute, an end-to-end test orchestration cloud by LambdaTest, comes into the picture, eliminating these factors and cutting down on test execution times. This allows businesses to test code and fix issues much quicker and achieve an accelerated market time.
In this section of this article on Selenium with Java, let us discuss some of the best practices recommended by the Selenium community.
- Planning and Designing Test Cases Beforehand
- Implementing Page Object Model
- Choosing the Best-Suited Locators
- Implement Logging and Reporting
- Incorporating Wait Commands
- Auto-Healing: Auto-healing, when used for Selenium Java testing, mitigates synchronization issues by automatically adapting to dynamic changes in web elements, such as loading times or AJAX requests. Auto-healing in Selenium dynamically adjusts wait times and ensures that test scripts execute seamlessly even when there are delays or changes in the web page.
By intelligently handling timing-related challenges, auto-healing promotes stability in test automation, reducing the likelihood of flaky tests caused by synchronization issues. Selenium’s auto-healing capabilities enable scripts to adapt to varying conditions, maintaining synchronization between the test script and the application under test.
Before getting started with writing any automation tests, it is recommended that the QA teams invest time in creating a proper test plan.
However, to ensure foolproof testing of the application, QAs should come up with all possible logical scenarios and create maximum test cases based on the end-user perspective.
When a UI change occurs, the Selenium locators may also change, and we are required to update the modified locators in all the test scripts consuming it. But, as the application complexity increases and UI changes become more frequent, creating and maintaining test cases becomes tiresome. The Page Object Model (POM) is a popular design pattern in Selenium Java automation testing, which helps enhance test maintenance and reduce code duplication.
In the Page Object Model, all the web elements, actions, and validations happening on each web page are wrapped into a class file called Page Object. The POM allows a clean separation between test and page-specific codes such as locators and layouts.
Due to the centralized nature of the page-specific code, they can be reused throughout the test cases, reducing code duplication. Also, in case of any UI changes, the fix needs to be done only on the related Page Objects, not on dependent test cases, making code maintenance easier.
While writing automation test scripts, a lot of time is spent locating the web elements. Selenium offers us multiple strategies to locate a web element, such as ID, Name, Link Text, XPath, CSS Selector, DOM Locator, etc.
However, some web locators are more brittle than others. As the UI implementation is prone to frequent changes, we must be cautious in choosing the right web locators, which will minimize the impact of UI code changes in the automation tests. If available, opt for unique locators like ID and Name, which are easy to find and more reliable as they are less prone to change.
As the test suite becomes extensive, locating the failed test case and debugging becomes challenging. In these cases, reporting and logging practices can act as huge saviors.
The test report is a document that contains all the information about a particular test run, including the number of test cases passed, the number of test cases failed, the total time taken, errors with a snapshot, etc. Even though default Selenium does not come with reporting, you can implement it by leveraging test automation frameworks like TestNG.
The web browsers take some time to load the web page contents. The time taken for page load depends on many external factors like network speed, server issues, machine capabilities, etc. To tackle this, testers need to add some delay into the code so that the web element will be loaded and available before any action is performed.
In Java, testers often achieve this delay using Thread.sleep(). However, this is not the recommended practice. As the name implies, when the Thread.sleep() method is called, the thread goes to sleep for the specified amount of time and does absolutely nothing to pause the automation script. After the time is over, it executes the next line of code.
In real-time, we won’t be able to predict the exact time it would take for the page load as it depends on many external factors. Sometimes, the page may load quickly, lowering the test execution speed due to the remaining unnecessary delay caused by sleep().
And sometimes, it may take longer than the specified time, causing the test to fail as the element was not fully loaded. As a better and more efficient alternative, use the implicit wait and explicit wait commands provided by Selenium instead of the sleep method.
Watch this video to learn what are waits in Selenium and how to handle them using different methods like hard-coded pauses and combining explicit waits with different design patterns.
Cloud-based testing platforms like LambdaTest also offer a SmartWait feature that lets you handle challenges associated with waits.
LambdaTest SmartWait runs a series of “actionability checks” on webpage elements before executing any actions. These checks include verifying elements for visibility, presence, and interactability, ensuring they are ready for the intended action, such as clicking or typing.
To get tutorials on automation testing, Selenium testing, and more, subscribe to the LambdaTest YouTube Channel.
Conclusion
Selenium with Java is the most widely adopted test automation combination among QAs. In this tutorial, we explored how to start with Selenium Java automation testing and wrote our first test case.
On top of that, we also learned how to optimize test execution by leveraging parallel testing and other best practices to establish a reliable testing cycle. I hope this tutorial turns out to be beneficial. There’s much more to explore!
Frequently Asked Questions (FAQs)
Why is Selenium with Java best?
Since Java is the most commonly used language for writing Selenium, it makes it easy to perform unit testing in a basic environment. Moreover, Java has an extensive presence in commercial applications and, thus, lends itself to various testing scenarios. Selenium can be used to check the functional behavior and the handling of failures and errors.
Which is better for Selenium, Java, or Python?
Selenium with Python is a better choice than Java. For starters, it’s simpler. Python selenium does not require the JVM and can be executed as a script or embedded in other applications. With Python, you can also control browsers that use the Gecko engine (Firefox), Internet Explorer, and WebKit (Chrome).
Is Java knowledge required for Selenium?
You should have a good understanding of Java syntax and some basic knowledge of Selenium Framework and WebDriver API concepts.
Can you use Selenium with Java?
Yes, Selenium can be used with Java for web automation. Selenium provides a Java binding that allows developers to write test scripts in Java. This combination is widely adopted for its versatility and ease of use in creating robust and scalable automated tests. Java’s object-oriented features complement Selenium’s functionalities, making it a popular choice for web testing across various browsers. Many frameworks, such as TestNG and JUnit, integrate seamlessly with Selenium in Java, providing additional testing capabilities.
What is meant by Selenium with Java?
Selenium with Java refers to integrating the Selenium framework with the Java programming language. It allows developers to write automated test scripts in Java to interact with web applications. This combination leverages the features of both technologies, providing a powerful and versatile toolset for web testing. Selenium’s WebDriver library in Java enables the automation of browser interactions, while Java’s object-oriented capabilities contribute to creating maintainable and scalable test scripts.


Author’s Profile
Salman Khan
Salman works as a Content Manager at LambdaTest. He is a Computer science engineer by degree and an experienced Tech writer who loves to share his thought about the latest tech trends.
Blogs: 79
Got Questions? Drop them on LambdaTest Community. Visit now