How To Speed Up Selenium Test Cases Execution?
Himanshu Sheth
Posted On: April 7, 2021
![]() 127302 Views
127302 Views
![]() 19 Min Read
19 Min Read
The primary intent of Selenium test automation is to expedite the testing process. In the majority of the cases, automation tests using Selenium perform exceptionally better than the manual counterparts. However, there might be possibilities to speed up Selenium tests using Selenium test automation best practices to its truest potential. I have come across umpteen cases in my career where there was potential to speed up selenium tests.
There are choices for using different types of waits, different types of web locators, different browser preferences, and making the wisest choices can aid in speeding up the Selenium tests. When looking to speed up Selenium tests, you should also look at optimizing the Selenium test infrastructure as that can significantly boost the speed of test execution.
In this blog, we cover Selenium web testing best practices primarily from a speed and performance point of view. By the end of it, you would be better positioned to accelerate the Selenium tests to achieve faster test results. If you are preparing for an interview you can learn more through Selenium interview questions.
Best Practices To Speed Up Selenium Tests
The process of maintaining and upgrading Selenium tests starts getting overly complicated with major updates in the product. Rather than keeping Selenium test performance at bay, it is essential to speed up Selenium tests from the very beginning.
Irrespective of the scenario under test, here is what a Selenium test is supposed to do:
- Open the URL under test using local Selenium WebDriver or Remote Selenium WebDriver.
- Locate the required WebElements using the most appropriate web Selenium locators (i.e., XPath, CssSelector, Linktext, etc.).
- Perform necessary actions on the located WebElements. Make assertions on the page under test.
- Free the resources used by the WebDriver.
Run your Selenium tests with AWS marketplace directly on the cloud.
Though the “30,000-foot view” of every Selenium test is the same, its performance largely depends on the structure and internals of the test methods. In this section, we look at some of the Selenium web testing best practices to speed up Selenium test case execution:
Choose The Appropriate Web Locators
Web Locators in Selenium are considered the essential building blocks of any test scenario. For automating the interaction with any web element, first, we locate the WebElement using a suitable web locator and then perform appropriate action on the element.
Here are some of the widely used Web Locators in Selenium (in no particular order):
- XPath
- CSS Selector
- Name
- LinkText
- Partial LinkText
- TagName
- ClassName
Appropriate Web Locators are used in conjunction with the find_element [or find_elements] method. The question is ‘Which web locator is fastest in locating elements in Selenium?’.
In terms of the speed for locating WebElements, ID is the fastest Web Locator since the ID locator in Selenium WebDriver is unique for every element on the page. The ID locator returns WebElement that matches with the specified value (or string). If more than one element with the same ID exists on the page, the document.getElementById() returns the first matching element.
Popular web browsers optimize the document.getElementById() method, thereby helping in providing the WebElement from the DOM at a faster pace.
In case the WebElement does not have an ID attribute, it is recommended to go with the NAME attribute. In case the WebElement neither has the ID or NAME attribute, you should go for the CSS Selector Web Locator. The CSS Engine is consistent across all the major browsers, and their performance is tuned for better performance with CSS Selectors in Selenium.
This also means that you would face fewer browser compatibility issues with this particular Web Locator. CSS Selector provides faster element identification and reduced test execution time. Also, CSS Selector is best suited for retired browsers like Internet Explorer and also provides better readability in comparison to XPath.
XPath is the slowest web locator, and you might have XPath consistency issues when moving from one browser to another. Use XPath for locating Web Elements only when you do not have a choice to use other reliable Web Locators in Selenium WebDriver.
Listed below are the Web Locators in ascending order of the execution speed:
- ID
- Name
- CSS Selector
- XPath
Use Fewer Web Locators
Now that you have identified the best-suited web locators to speed up Selenium tests, the next step should be to keep the number of locators to the minimum.
Every usage of the find_element(By) or find_elements(By) method for locating the desired Web Element(s) performs access to the DOM tree. More the number of accesses to the DOM tree more will be the execution time of the Selenium script. Using fewer web locators is one of the Selenium web testing best practices, especially if you target the Selenium script’s optimum execution speed.
This practice also improves the test script readability, thereby minimizing the time involved in the maintenance of the scripts.
Avoid Thread.sleep() at all costs
A website or web application can comprise of content that is static or dynamic in nature. Modern-day websites use AJAX (Asynchronous JavaScript And XML) for the dynamic loading of content on the web page. Hence, WebElements on the page might load at different intervals, thereby posing difficulties when performing operations on elements that are not yet in the DOM.
It is recommended to check the DOM state by monitoring the status of document.readyState. When document.readyState is complete, it means that all the resources on the page are loaded. Now relevant operations can be performed on the WebElements present on the page. Waits (for a few seconds) in the test code also adds the necessary delay necessary for the loading of the resources on the page.
Though there are different ways for adding waits in Selenium, Thread.sleep(sleep_in_miliseconds) must be avoided at all costs. The Thread.sleep() method in Selenium pauses the code execution for the specified amount of time.
|
1 2 |
/* Pauses test execution for specified time in milliseconds */ Thread.sleep(5000); |
In the above snippet, we have added a wait of 5 seconds. What if the page elements are loaded well within the specified duration (e.g., 2 seconds)? In such a scenario, the wait of 3 seconds unnecessarily increases the test execution time. Since the page load time depends on various external parameters (i.e., server load, page design, caching, network bandwidth, etc.), there is no way to predict the page’s load time. It is a good practice to measure page load time in Selenium when performing automated browser testing.
It is recommended to avoid the usage of Thread.sleep() to speed up Selenium tests, as the method performs sleep (for a fixed time duration) irrespective of the state of the web page.
Re-use The Existing Browser Instance
All the test automation frameworks usable with Selenium provide Annotations for speeding up the test development and execution. Annotations also facilitate the execution of tests with different input values. However, using the right set of annotations depending on the test requirements can speed up Selenium tests.
Here are some of the widely used annotations for popular test automation frameworks:
There are scenarios where you might want to run a single test (or a group of tests) on the same browser and OS combination. In such cases, creating a new instance of Selenium WebDriver at the start of every test adds additional overhead in the test execution.
JUnit for Selenium
Here is the execution sequence of annotations in JUnit for Selenium:
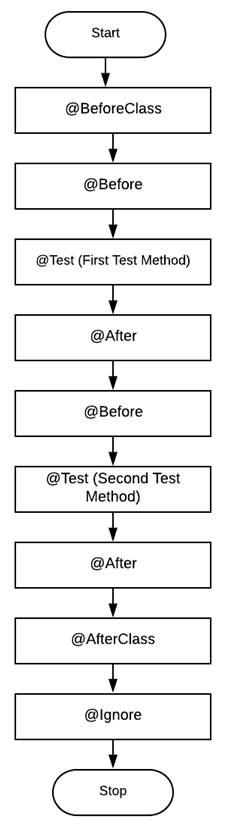
In a Selenium automation test with the JUnit framework, the Selenium WebDriver instance is created in the SetUp method implemented under the @Before annotation. The created instance is destroyed in the TearDown method implemented under the @After annotation.
TestNG for Selenium
Here is the execution sequence of annotations in TestNG for Selenium:

On a similar line, for the TestNG test in Selenium, the SetUp method is implemented under @BeforeMethod annotation, and the TearDown method is implemented under the @AfterMethod annotation.
Running a series of tests on browser & OS combinations
In case three tests have to be executed on the same browser & OS combination, here is how the test execution will take place (with both the test automation frameworks):
JUnit Framework
TestNG Framework
As seen above, the browser instance is created and destroyed after every test scenario.
Re-using Browser Instance In JUnit & TestNG Frameworks
Instead, the same browser instance can be shared across the scripts using the appropriate annotations:
JUnit Framework
TestNG Framework
In this case, the same browser instance is used for all the test scenarios, and the instance is destroyed once all the tests have completed execution. The same technique cannot be used when the tests have to be run on different browser and OS combinations. In that case, the test combinations have to be created & destroyed after each test scenario.
Use Explicit Waits For Automation Testing With Selenium
Implicit Wait in Selenium is applied to all the Web Elements in the test script. The major downside about implicit wait is that you cannot perform wait on conditions like Element is Visible, Element is Clickable, Element is Selectable, etc.
On the other hand, explicit wait in Selenium lets you perform conditional wait on WebElements present on the page. For example, ElementNotVisibleException is thrown if the specified WebElement is visible within the duration mentioned in Explicit Wait. The elementToBeClickable method returns a WebElement if the located element is clickable.
The combination of WebDriverWait and ExpectedConditions classes is used for performing explicit wait on WebElements. The upside about Explicit Wait runs on the code instead of the remote Selenium part. Explicit wait does not wait till the completion of the time duration, instead of the wait exits as soon as the specified condition is met. If the condition finds the WebElement, the element is returned as a result. TimeoutException is thrown if the WebElement is not present in the DOM even when the duration specified in the condition is elapsed.
In the snippet shown below, an explicit wait of 5 seconds is performed on the visibilityOfElementLocated condition. In case the WebElement with ID = ‘element’ is located within 5 seconds, the explicit wait exits, and the required WebElement is returned.
|
1 2 3 |
/* Trigger an explicit wait of 5 Seconds */ WebDriverWait wait = new WebDriverWait(driver, Duration.ofSeconds(5)); WebElement element = wait.until(ExpectedConditions.visibilityOfElementLocated(By.id("element")); |
The test script performance is better with the explicit wait as the WebElement is accessible as soon as the element is located. Explicit waits speed up Selenium tests as the wait is not ‘always’ performed for the entire wait duration.
Create Atomic and Autonomous Test Scripts
This is the most fundamental requirement to write efficient Selenium tests. Irrespective of the test scenario’s complexity, it is essential to break the complex scenario into multiple ‘independent and atomic’ test cases.
Test automation frameworks like TestNG support the declaration of explicit dependencies between the test methods via annotations like dependsOnMethods (for methods) and dependsOnGroups (for groups). However, test dependency should only be used in Selenium test scripts when you want data and state to be shared between the test methods.
On the other hand, atomic tests are useful in the detection of failures. Keeping tests short & atomic also helps in reducing the effort spent on the maintenance of tests.
Having atomicity in Selenium tests minimizes test dependency, helps in isolation of problems in the test implementation, reduces maintenance effort, and speeds up Selenium tests.
Leverage Parallel Testing in Selenium Automation
Parallel testing in Selenium lets you run the same tests simultaneously on different test environments. In case you are planning to use an in-house Selenium Grid for distributed testing, it is recommended to leverage the capabilities offered by Selenium Grid 4 for speeding the execution of the test scenarios.
Based on the scenarios under test, opt for parallelization at either of the two levels – Class Level or Method Level. This approach can be further enhanced by:
- Grouping test scenarios
- Parameterization of the test scenarios
- Opting for a cloud-based Selenium Grid
Group Test Scenarios
The test suite’s complexity grows multifold as multiple test files and test methods are added to the suite. To minimize the complexities involved in the implementation and maintenance of test suite(s), group the tests depending on the functionality under test.
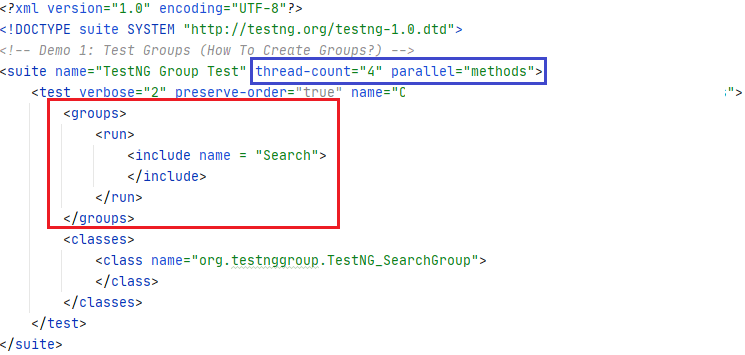
As seen in the example showcased in Grouping test cases in TestNG, two test groups (i.e., Search and ToDo) are created, and parallelism is performed at the ‘methods’ level. The thread-count attribute in TestNG lets you perform parallel execution of the test methods by specifying the maximum number of threads to be created during test execution.

Grouping test scenarios reduce the complexities involved in the maintenance of test suite(s) and faster execution times (depending on the approach chosen to achieve parallelization).
Use Selenium 4 (instead of Selenium 3)
Selenium 4 is one of the most awaited releases of the Selenium automation framework. As of writing this article, the latest release of Selenium 4 was 4.0.0-beta-1. There are significant improvements and enhancements in Selenium. Some of the major are below:
- Improved and Optimized Selenium Grid
- Selenium WebDriver W3C Standardization
- Enhanced Selenium 4 IDE
- Introduction of Chrome DevTools
- Introduction of Relative Locators
The enhancements in Selenium 4 can play an instrumental role to speed up Selenium tests.
Selenium 3 uses the JSON Wired Protocol for communication between the web browser & test code. This causes an additional overhead of encoding and decoding the API requests using the W3C protocol. On the other hand, Selenium 4 uses the WebDriver W3C protocol, thereby expediting the communication with the web browser. This architectural change speeds up the Selenium tests and also enhances the stability of the tests.
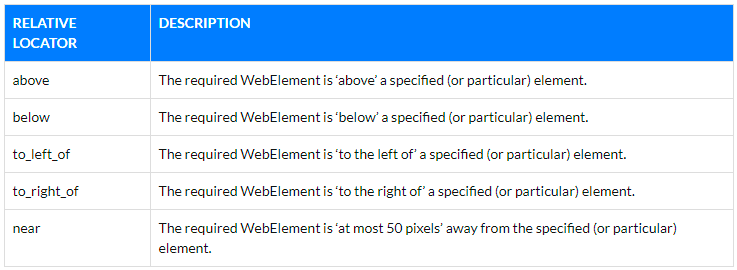
Relative Locators in Selenium 4 are useful when accessing the WebElements close to (or near to) a particular WebElement. Shown below are the newly introduced relative locators in Selenium 4:
Instead of using the find_element()/find_elements() method for every WebElement on the page, relative locators in conjunction with TagName (in Selenium 4 Java) let you access relative WebElements at a quicker pace. Hence, relative locators can speed up Selenium tests in scenarios where you have to access a WebElement(s) relative to the DOM element.
Since upgrading from Selenium 3 to Selenium 4 is pretty seamless, you should check out if features and capabilities offered by Selenium 4 can be leveraged for speeding up the Selenium tests.
Use cloud-based Selenium Grid for Automation Testing
Running tests in parallel on an in-house (or local) Selenium Grid has severe shortcomings when it comes to scalability and reliability of the Grid. The approach is not suited for large-scale web applications where many test suites have to be executed in parallel on umpteen browsers, OS, and device combinations.
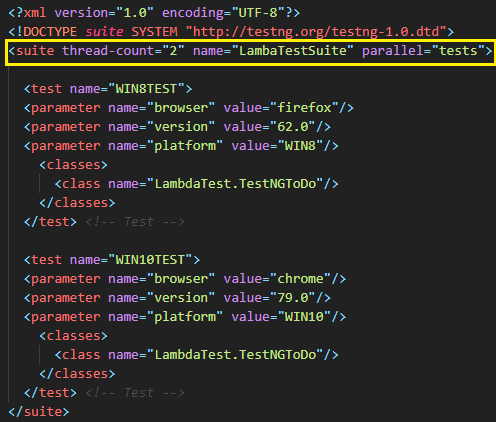
Selenium testing on the cloud helps speed up Selenium tests, as the tests can be executed in parallel on a reliable and scalable cloud-based Selenium Grid like LambdaTest. In the sample testng.xml file shown below, parallelism is achieved at the ‘test’ level, i.e., each &tl;test> tag is run in separate threads. With the thread count set to ‘2’, both the tests (i.e., WIN8TEST and WIN10TEST) are executed parallel on LambdaTest Selenium Grid.
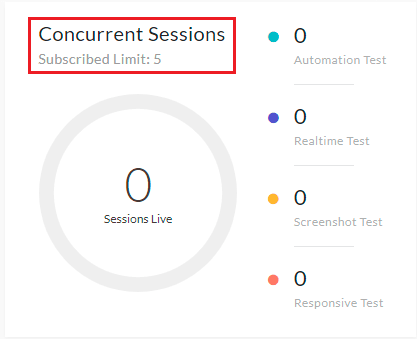
As seen in the execution snapshot, the two tests are running parallel on the cloud-based Selenium Grid.

Using the capabilities offered by a cloud-based Selenium Grid lets you speed up selenium tests since the ‘N’ number of tests can be run in parallel (where ‘N’ depends on the ‘maximum number of concurrent sessions’ supported by your plan).
Cloud-based Selenium Grid is particularly advantageous when you have to run a particular test on different browser and OS combinations. Execution of the Selenium tests on a cloud-based Selenium Grid like LambdaTest is one of the fundamental Selenium test automation best practices which yields significant benefits in the long run.

RUN YOUR TESTING SCRIPT ON SELENIUM GRID
3000+ Browsers AND OS
Attain faster page loads by disabling images on the web page
Once the instance of Selenium WebDriver is created, the driver.get() method in Selenium is used for opening the page under test. The loading of a web page largely depends on the composition of the page. The page load time increases if there are a large number of images on the page.
Based on the test requirements, you could disable the loading of images, thereby expediting the web page’s loading. Using browser-specific settings, you can disable the loading of images in the corresponding web browser.
Disable image loading in Chrome when running Selenium Script
Here is the implementation for disabling image loading in Chrome to speed up Selenium tests:
|
1 2 3 4 5 6 7 8 9 10 11 12 13 14 15 16 17 18 19 20 21 22 23 24 25 26 27 28 29 30 31 32 33 34 35 36 37 38 39 40 41 42 |
package com.disableimages; import org.openqa.selenium.*; import org.openqa.selenium.chrome.ChromeDriver; import org.openqa.selenium.chrome.ChromeOptions; import org.openqa.selenium.firefox.FirefoxDriver; import org.openqa.selenium.firefox.FirefoxOptions; import org.openqa.selenium.firefox.FirefoxProfile; import org.testng.annotations.AfterTest; import org.testng.annotations.Test; import java.util.HashMap; public class test_disable_image_demo { String test_url = "https://www.amazon.com"; WebDriver driver = null; @Test(enabled=true, priority = 1) public void test_disable_images_chrome() throws InterruptedException { ChromeOptions options =new ChromeOptions(); HashMap<String, Object> prefs = new HashMap<String, Object>(); prefs.put("profile.managed_default_content_settings.images", 2); options.setExperimentalOption("prefs", prefs); driver = new ChromeDriver(options); driver.get(test_url); driver.manage().window().maximize(); Thread.sleep(5000); } @AfterTest public void tearDown() { if (driver != null) { driver.quit(); } } } |
As seen in the above implementation, we disable the loading of images on Amazon, which greatly improves the page load time of that e-commerce website.
Disable image loading in Firefox when running Selenium Script
Here is the implementation for disabling image loading in Firefox to speed up Selenium tests:
|
1 2 3 4 5 6 7 8 9 10 11 12 13 14 15 16 17 18 19 20 21 22 23 24 25 26 27 28 29 30 31 32 33 34 35 36 37 38 39 40 41 |
package com.disableimages; import org.openqa.selenium.*; import org.openqa.selenium.chrome.ChromeDriver; import org.openqa.selenium.chrome.ChromeOptions; import org.openqa.selenium.firefox.FirefoxDriver; import org.openqa.selenium.firefox.FirefoxOptions; import org.openqa.selenium.firefox.FirefoxProfile; import org.testng.annotations.AfterTest; import org.testng.annotations.Test; import java.util.HashMap; public class test_disable_image_demo { String test_url = "https://www.amazon.com"; WebDriver driver = null; @Test(enabled=true, priority = 1) public void test_disable_images_firefox() throws InterruptedException { FirefoxProfile profile = new FirefoxProfile(); profile.setPreference("permissions.default.image", 2); FirefoxOptions options = new FirefoxOptions(); options.setProfile(profile); driver = new FirefoxDriver(options); driver.get(test_url); driver.manage().window().maximize(); Thread.sleep(5000); } @AfterTest public void tearDown() { if (driver != null) { driver.quit(); } } } |
In the above implementation, we have disabled the loading of images on Amazon by setting the Firefox preference permissions.default.image to 2. Disabling the load of images is one of the undermined Selenium web testing best practices that should be used, especially when there are many images on the page under test.
Use Data-Driven Testing for Parameterization
There are cases where you would run a particular test scenario across multiple browsers & OS combinations or against different input combinations. Hard coding the values in the test methods is not a good practice. Instead, you should make use of parameterization for running the test against an extensive data set.
Parameterization in Selenium not only improves the test coverage but also helps to speed up the Selenium tests. All the major automation frameworks like MSTest, NUnit, etc. [for Selenium C#]; JUnit, TestNG, etc. [for Selenium Java]; and PyTest [for Selenium Python] have support for parameterized tests.
We have covered parameterized testing in Selenium in the following blogs:
- Parameterization using TestNG (Selenium Java)
- JUnit Parameterized Test for Selenium Automation (Selenium Java)
- NUnit Tutorial: Parameterized Tests With Examples
- Data-driven testing using fixtures in PyTest (Selenium Python)
- Parameterized Tests in MSTest (Selenium C#)
Parameterized tests can help speed up Selenium tests in scenarios where the same test has to be run on multiple test combinations (or test inputs). Test automation frameworks like TestNG lets you pass the parameters through testng.xml, which, when used to achieve parallelism at the “tests” level, can significantly improve the performance of the Selenium tests.
Use Headless Browsers and Drivers (when necessary)
The intent of running Selenium automation tests is to check to verify the interactions with the underlying UI elements. You might want to verify the interactions by invoking the browser driver in the non-headless mode in such cases.
The headless browser lets you run the browser UI tests without the browser GUI or any other GUI. Headless testing enhances the performance of the cross browser tests since the cross browser tests run at the backend. Popular browsers like Chrome, Firefox, etc., can be run in headless mode. The desired browser capabilities for LambdaTest’s cloud-based Selenium Grid with Chrome (89.0) set to run in the headless mode are shown below.
|
1 2 3 4 5 6 7 |
DesiredCapabilities capabilities = new DesiredCapabilities(); capabilities.setCapability("build", "your build name"); capabilities.setCapability("name", "your test name"); capabilities.setCapability("platform", "Windows 10"); capabilities.setCapability("browserName", "Chrome"); capabilities.setCapability("version","89.0"); capabilities.setCapability("headless",true); |
Headless browser testing is one of the Selenium web testing best practices that should be used when you do not intend to check the UI interactions achieved via the test script and corresponding browser driver. No browser UI and no UI of sorts with headless browsers speed up Selenium tests.
Some of the popular forms of headless browser (or drivers) are:
- HtmlUnit
- Splash
- PhantomJS
- TrifleJS
- ZombieJS
- SimpleBrowser
HtmlUnitDriver, based on HtmlUnit, is the lightweight implementation of the headless browser for Selenium WebDriver. HtmlUnitDriver is similar to Chrome, Firefox, etc., browser driver except that it does not offer GUI. Hence, you have the flexibility to perform cross browser testing on headless versions of popular browsers as well as HtmlUnitDriver.
The HtmlUnit browser is written in Java and provides support for handling AJAX and JavaScript. It also offers partial rendering capability. Shown below is the snippet (in Selenium Java) for creating an instance of HtmlUnitDriver and using the same for performing browser tests in Selenium:
|
1 2 3 4 5 6 7 8 9 10 11 12 13 14 |
import org.openqa.selenium.By; import org.openqa.selenium.WebDriver; import org.openqa.selenium.WebElement; import org.openqa.selenium.htmlunit.HtmlUnitDriver; /* Create a new instance of the HtmlUnitDriver */ WebDriver driver = new HtmlUnitDriver(); /* Perform necessary actions as per the desired test requirement */ ................ ................ /* Release the resources held by HtmlUnitDriver */ driver.quit(); |
PhantomJS is another popular headless browser option that is based on JavaScript APIs. It uses QtWebKit as the back-end and offers native support for popular web standards like JSON, Canvas, SVG, DOM handling, and more. PhantomJS is 2.1, which is the latest stable release of PhantomJS that has GhostDriver integrated in it. The PhantomJS project has been suspended till further notice.
PhantomJS is available for popular platforms like Windows, Linux, and macOS X. It can be extensively used for the following use cases:
- Headless web testing
- Page automation
- Screen Capture
- Network Monitoring
Shown below is the snippet (in Selenium Java) for creating an instance of PhantomJS Driver and using the same for performing browser tests in Selenium:
|
1 2 3 4 5 6 7 8 9 10 11 12 13 |
import org.openqa.selenium.By; import org.openqa.selenium.WebDriver; import org.openqa.selenium.WebElement; import org.openqa.selenium.phantomjs.PhantomJSDriver; /* Create a new instance of the PhantomJS Driver*/ WebDriver driver = new PhantomJSDriver(); /* Perform necessary actions as per the desired test requirement */ ................ ................ /* Release the resources held by PhantomJS Driver */ driver.quit(); |
Depending on the test requirements, headless browser testing should be leveraged to speed up Selenium tests. Apart from HtmlUnitDriver and PhantomJSDriver, headless versions of browsers like Chrome, Firefox, etc., can be used for speeding up and attaining higher accuracy in the Selenium tests.
Let’s Speed Up
When writing Selenium tests, it is important to keep a close look at the performance of the tests. One of the major factors that impact the performance is the speed at which the tests are running. Parallel test execution and Selenium testing on a cloud-based Selenium Grid are the major ways to speed up Selenium tests.
The Selenium web testing best practices covered in this blog can be used across different languages and test automation frameworks. Once we speed up Selenium tests, it will lead to a positive impact on the test performance, eventually helping in attaining better test coverage and improved product quality.


Author’s Profile
Himanshu Sheth
Himanshu Sheth is a seasoned technologist and blogger with more than 15+ years of diverse working experience. He currently works as the 'Lead Developer Evangelist' and 'Senior Manager [Technical Content Marketing]' at LambdaTest. He is very active with the startup community in Bengaluru (and down South) and loves interacting with passionate founders on his personal blog (which he has been maintaining since last 15+ years).
Blogs: 132
Got Questions? Drop them on LambdaTest Community. Visit now