22 Practical Tips To Test Automation With Selenium WebDriver
Himanshu Sheth
Posted On: July 2, 2019
![]() 95773 Views
95773 Views
![]() 16 Min Read
16 Min Read
Test automation with Selenium has empowered website testers over the globe to perform automated website testing with ease. Webdriver is a core component of the Selenium framework using which you can perform automated cross browser testing of your website or web application against different types of browsers e.g. Google Chrome, Mozilla Firefox, Safari, Opera, Internet Explorer, Microsoft Edge, etc.
The primary advantage of performing test automation with Selenium Webdriver over other web automation tools/frameworks is the support for a wide number of programming languages namely Python, Java, C#, Ruby, PHP, JavaScript, .Net, Perl, etc. If you are new to automation testing with Selenium WebDriver, then you can have a look at our Selenium WebDriver tutorial for automated cross browser testing where we talk about the overall architecture of Selenium and how the framework can be used with popular programming languages. You can also check my previous article on Selenium Grid setup Tutorial for cross browser testing, to leverage the ability of parallel testing with Selenium. Irrespective of the programming language being used, there are certain best practices that are applicable for performing test automation with Selenium Webdriver (independent of the development language).
In this article, I will share with you some key tips for Selenium automation testing, that touch upon aspects of code optimization, performance improvements, dynamic web-page loading, handling CSS and HTML code, etc.
Note – Majority of these coding tips for test automation with Selenium WebDriver are generic in nature and can be applied irrespective of the programming language used for the development of test scripts. However, for below demonstration, we have made use of Selenium with Python language.
If you’re new to Selenium and wondering what it is then we recommend checking out our guide – What is Selenium? If you are preparing for an interview you can learn more through Selenium interview questions.
Setting The Executable Path Of The Selenium Webdriver
In order to communicate with the browser under test, you need to first download the corresponding plugin/webdriver from their official website. This plugin would be responsible for communicating with the browser and it should be present in your machine (on which you are developing the tests). The plugin/webdriver path has to be set in the Selenium Webdriver configuration.
Though the plugin/webdriver can be placed in any location since you can provide the static/relative path in the Selenium Webdriver configuration, the approach can be error prone and you need to keep track of the file path. A better & more reliable approach is to place the corresponding Selenium Webdriver in the location where the driver executable is present, in which case you need not specify the executable path in the Selenium Webdriver configuration.
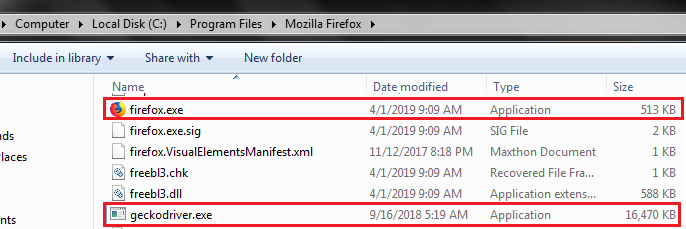
If the geckodriver is not present in the Browser location, you need to manually add the path of the same in the source code. We import the selenium.webdriver.firefox.firefox_binary module to provide the path to the Firefox executable.
|
1 2 3 4 5 |
from selenium import webdriver from selenium.webdriver.firefox.firefox_binary import FirefoxBinary ff_binary = FirefoxBinary('path/to/gecko driver') browser = webdriver.Firefox(firefox_binary=ff_binary) |
As seen in the code snippet below, we have not specified the location of the geckodriver (Firefox Webdriver) since it is placed in the same location where Firefox browser is present. This is more reliable approach compared to the previous one and can help in reducing basic errors in implementation of test automation with Selenium.
|
1 2 3 4 5 6 7 8 |
''' Import the required modules for development ''' from selenium import webdriver from selenium.webdriver.common.keys import Keys from time import sleep '''Creation of Firefox Webdriver ''' driver = webdriver.Firefox() driver.get("https://www.lambdatest.com/") |
Capture Screenshot Of Test Automation With Selenium WebDriver
While performing tests, you would have come across requirements where a screenshot has to be captured for verifying results of the tests. Selenium WebDriver offers three APIs through which you can take a screenshot of a web-page.
- save_screenshot(‘path-where-screenshot-should-be-saved/filename.png’)
- get_screenshot_as_file(‘path-where-screenshot-should-be-saved/filename.png’)
- get_screenshot_as_png()
The first two APIs lets you save the screen of the current window in a .png file. The API returns False if there is an IOError, else it returns True. These APIs would only work if the file extension is .png, else Python throws an error & the saved content might not be viewable. If you wish to capture a screen of your current window in a binary format then make use of get_screenshot_as_png() API.
|
1 2 3 4 5 6 7 8 9 10 11 12 13 14 15 16 17 18 19 20 21 22 23 24 |
''' Import the required modules for development ''' from selenium import webdriver import StringIO from PIL import Image '''Creation of Firefox Webdriver ''' driver = webdriver.Firefox() driver.get("https://www.lambdatest.com/") '''Taking screenshot of the web-page. File would be saved in the location where the source code is present ''' '''Option - 1''' driver.save_screenshot('screenshot_1.png'); '''Option - 2''' driver.get_screenshot_as_file('screenshot_2.png'); '''Option - 3''' screenshot = driver.get_screenshot_as_png(); screenshot_size = (20, 10, 480, 600) image = Image.open (StringIO.StringIO(screen)) region = image.crop(screenshot_size) region.save('screenshot_3.jpg', 'JPEG', optimize=True) |
Refreshing WebPage While Automation Testing With Selenium WebDriver
There might be scenarios where there is a requirement for refreshing a web page, especially while waiting for a specific condition. There are a number of ways through which a webpage can be refreshed while performing test automation with Selenium Webdriver, the popular one is listed below.
1. driver.refresh() method
As the name signifies, the refresh() method is used to refresh the web page. It is asynchronous in nature hence; you should make use of this API in conjunction with document.readyState().
|
1 2 3 4 5 6 7 |
''' Import the required modules for development ''' from selenium import webdriver '''Creation of Firefox Webdriver ''' driver = webdriver.Firefox() driver.get("https://www.lambdatest.com/") driver.refresh() |
2. ActionChains() method
ActionChains() are another way to automate low-level interactions for automation testing with Selenium, such as key press, mouse button actions, etc. In order to refresh the webpage, we make use of the ‘CTRL + F5’ combination.
|
1 2 3 4 5 6 7 8 9 10 11 12 13 14 15 16 17 18 19 20 21 22 23 24 |
import time from selenium import webdriver from selenium.webdriver.common.action_chains import ActionChains from selenium.webdriver.common.keys import Keys '''Creation of Firefox Webdriver ''' # driver = webdriver.Chrome() driver = webdriver.Firefox() driver.get("https://www.lambdatest.com/") time.sleep(5) print("Before refresh") ActionChains(driver) \ .key_down(Keys.CONTROL) \ .send_keys(Keys.F5) \ .key_up(Keys.CONTROL) \ .perform() print("After refresh") sleep(5) driver.quit() |
Open A Webpage In A New Tab With Selenium Webdriver
execute_script can be used to synchronously execute JavaScript code in current window/frame. Argument (a JavaScript) to open the webpage is passed as the argument to execute_script
|
1 2 3 4 5 6 7 8 9 10 11 12 13 14 |
from selenium import webdriver from selenium.webdriver.common.keys import Keys from time import sleep driver = webdriver.Firefox() driver.get("http://www.google.com/") driver.implicitly_wait(10) #open tab driver.execute_script("window.open('https://www.lambdatest.com', 'new tab')") sleep(5) driver.quit() |

Saving Partial Screenshot Of A Web page With Selenium Webdriver
There are cases where you might need to take a partial screenshot of a webpage as your perform test automation with Selenium. In such cases, you can make use of the Pillow module. You need to first install the Pillow/PIL module using the command
pip install pillow
Screenshot of the entire webpage is taken using the get_screenshot_as_png() API. Once the screenshot is ready, the PIL library is used to open the captured image in memory, after which the image (which contains the entire webpage screenshot) is cropped to get the resultant image.
|
1 2 3 4 5 6 7 8 9 10 11 12 13 14 15 16 17 18 19 20 21 22 23 24 25 26 27 28 29 30 |
from selenium import webdriver ''' Install the Pillow module using the command pip install pillow ''' from PIL import Image from io import BytesIO driver = webdriver.Firefox() driver.get('http://google.com/') # Use the Inspection tool to find the location of the logo element = driver.find_element_by_id('hplogo') image_location = element.location size = element.size png = driver.get_screenshot_as_png() ''' Since the webpage screenshot is ready, we can exit the browser.''' driver.quit() ''' PIL Library is used to open the image in memory ''' crop_image = Image.open(BytesIO(png)) ''' Extract the Left, Right, Top, and Bottom co-ordinates ''' left = image_location['x'] top = image_location['y'] right = image_location['x'] + size['width'] bottom = image_location['y'] + size['height'] crop_image = crop_image.crop((left, top, right, bottom)) crop_image.save('logo-screenshot.png') |
Execute JavaScript Code In Selenium Webdriver
execute_script is used to execute JavaScript code as you perform test automation with Selenium WebDriver. The syntax is driver.execute_script(“javascript code here”).
As shown in the example below, a on_click action of Register is performed [Class name is home-cta].
|
1 2 3 4 5 6 7 8 9 10 11 |
from selenium import webdriver from time import sleep driver = webdriver.Firefox() driver.get("https://www.lambdatest.com") driver.execute_script("document.getElementsByClassName('home-cta')[0].click()") sleep(10) driver.close() |
Extracting Results Of JavaScript Code With Selenium Webdriver
After invoking the JavaScript code for automation testing with Selenium, you need to extract the results of these JavaScript codes. You can make use of the return keyword in order to get the result of a JavaScript code as shown in the extended example where we explained JavaScript.
|
1 2 3 4 5 6 7 8 9 10 11 12 13 14 |
from selenium import webdriver from time import sleep driver = webdriver.Firefox() driver.get("https://www.lambdatest.com") driver.execute_script("document.getElementsByClassName('home-cta')[0].click()") result = driver.execute_script("return 0") print(result) sleep(10) driver.close() |
Handling Multiple Browser Types For Automated Cross Browser Testing Using Selenium
There are multiple scenarios that you might need to test your code against different browsers e.g. Firefox, Chrome, Internet Explorer. The practice of testing a website across different browsers is termed as automated browser testing. To perform automated browser testing with Selenium automation testing, you should incorporate selective handling of those browsers in your unittest code or pytest code. A code snippet (which makes use of pytest) to handle multiple browsers is shown below:
|
1 2 3 4 5 6 7 8 9 10 11 12 13 14 15 16 17 18 19 |
# Import the 'modules' that are required for execution import pytest from selenium import webdriver from selenium.webdriver.chrome.options import Options from selenium.webdriver.common.keys import Keys from time import sleep #Fixture for Firefox @pytest.fixture(params=["chrome", "firefox"],scope="class") def driver_init(request): if request.param == "chrome": # Perform necessary actions here if request.param == "firefox": # Perform necessary actions here yield web_driver.close() ........... ........... |

AUTOMATED CROSS BROWSER TESTING
SELENIUM GRID 2000+ Browsers
Locating Elements On A Web Page Using CSS Locators
As you perform test automation with Selenium, locating web elements on a page comes as a foundation to your automation scripts. In case you want to perform conditional execution based on the presence of a particular kind of web element like Tag, Class, ID, etc. you can make use of find_elements_*** API. Some of them are mentioned below
- find_elements_by_class_name – Find elements by Class Name
- find_elements – Find elements by strategy and locator
- find_element_by_link_text – Find element by link text
- find_element_by_partial_link_text – Find element by partial match of link text
Shown below is the usage of find_element_by_partial_link_text & find_elements_by_class_name where the elements are searched on https://www.lambdatest.com/ which is the URL under test.
|
1 2 3 4 5 6 7 8 9 10 11 12 13 14 15 16 17 18 19 |
from selenium import webdriver from selenium.webdriver.chrome.options import Options from selenium.webdriver.common.keys import Keys from time import sleep from selenium.common.exceptions import NoSuchElementException driver = webdriver.Firefox() driver.get("https://www.lambdatest.com") try: element = driver.find_element_by_partial_link_text("START TESTING") print("Partial text Element found") element = driver.find_elements_by_class_name('home-btn-2') print("Button Element found") except NoSuchElementException: print("No element found") sleep(10) driver.close() |
HTML Source Of WebElement In Selenium Webdriver
innerHTML property can be used to capture the source code of a WebPage. innerHTML is also used to examine any changes in the page since the page was first loaded by the web browser. You can write the entire source code in a .html file for future reference.
|
1 2 3 4 5 6 7 8 9 10 11 12 13 14 15 16 17 18 19 |
from selenium import webdriver from selenium.webdriver.chrome.options import Options from selenium.webdriver.common.keys import Keys from time import sleep import io driver = webdriver.Firefox() driver.get("https://www.lambdatest.com") elem = driver.find_element_by_xpath("//*") source_code = elem.get_attribute("innerHTML") filename = open('lambdatest_page_source.html', 'w') filename.write(source_code) filename.close() sleep(10) driver.close() |
Perform Mouse Over Actions In Selenium Webdriver
There would be scenarios where you might need to perform a click on an item which is a part of the menu or an item which is a part of a multi-level menu. First, we locate the Menu item and then perform a click operation on the intended menu item.
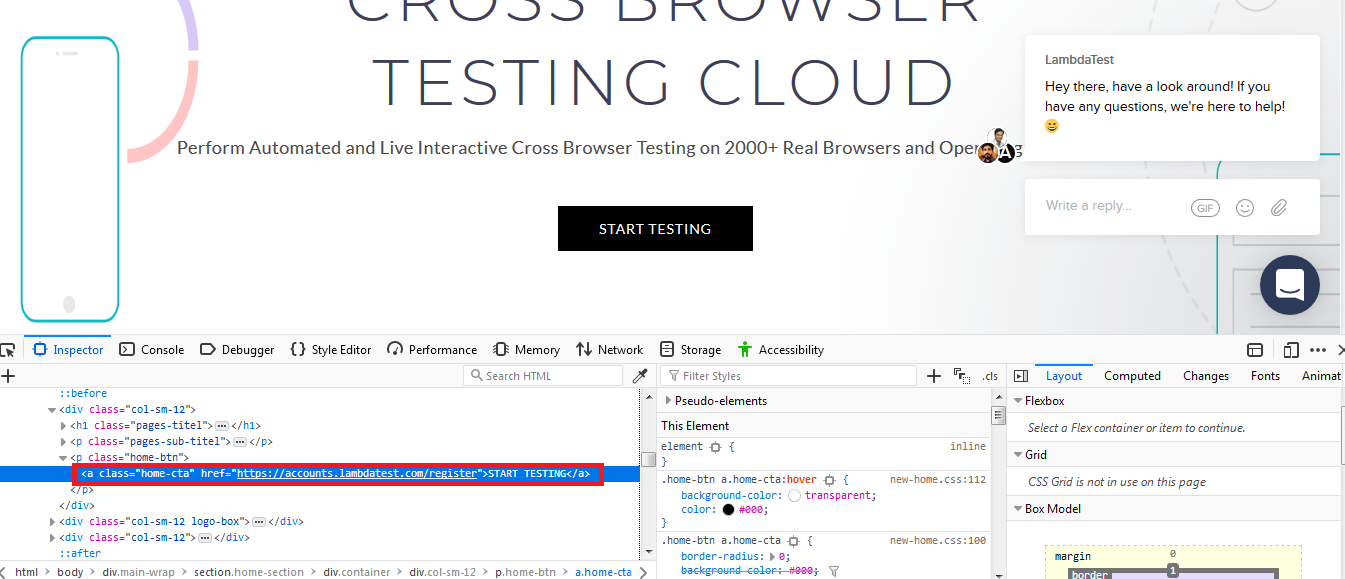
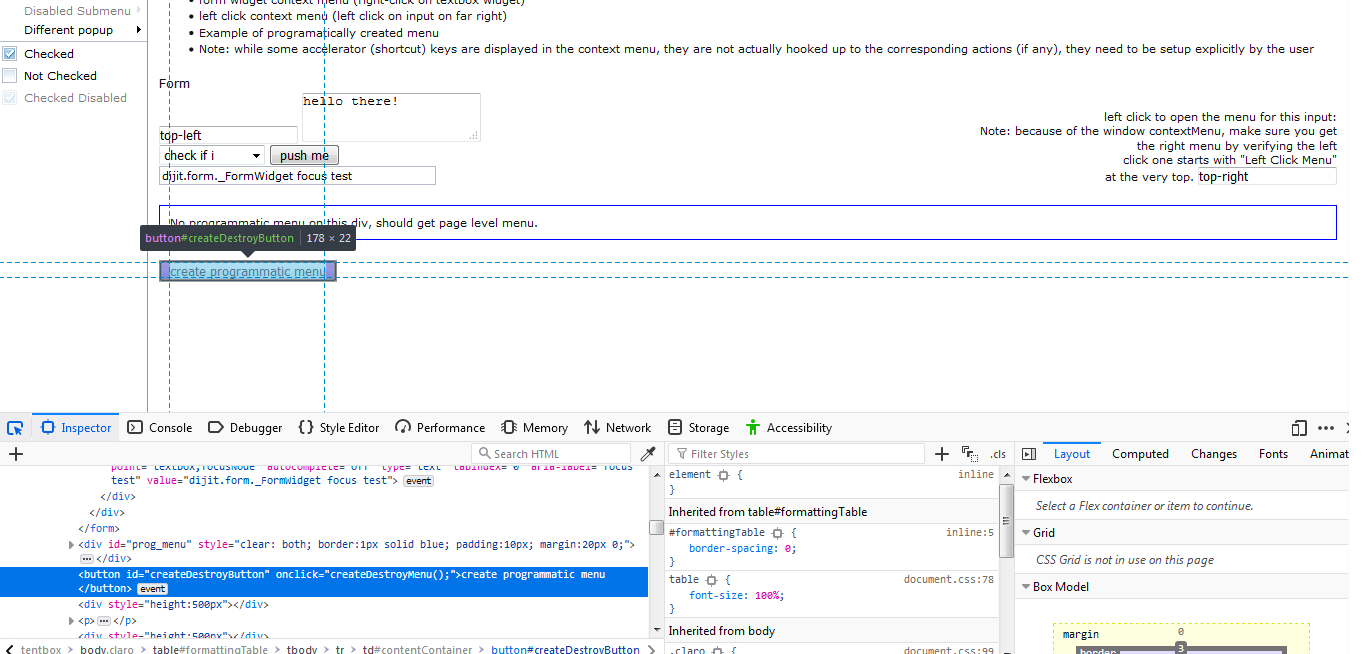
In the example below, the URL under test is https://www.lambdatest.com/. The intent is to navigate to the Selenium on the home page. The first task is to locate the Menu which matches the ID bs-example-navbar-collapse-1. By using the Inspect Tool, we get the correct element-id, details is as shown in the snapshot
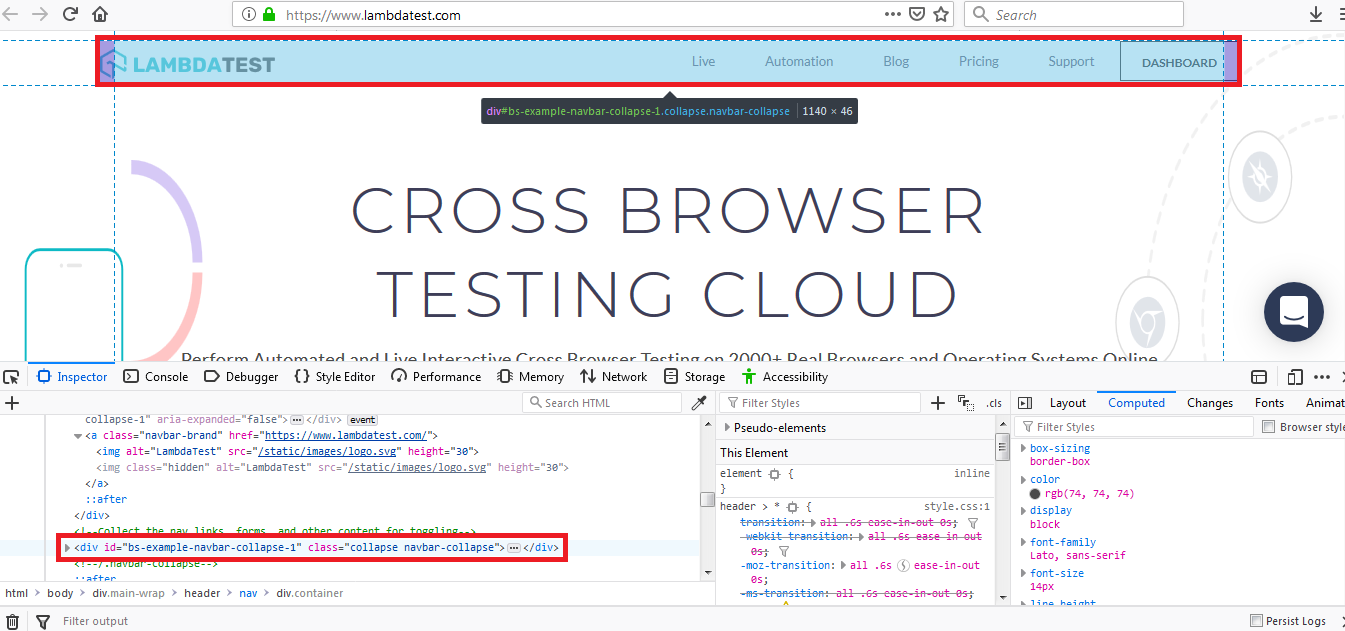
We move to the Menu using the move_to_element operation which is a part of the action_chains module. Next task is to locate the Menu item which contains the text ‘Automation’ for which we make use of find_element_by_xpath(“//a[contains(text(),’Automation’)]”) after which Click operation is performed.
|
1 2 3 4 5 6 7 8 9 10 11 12 13 14 15 16 17 18 19 20 |
from selenium import webdriver from selenium.webdriver.common.action_chains import ActionChains from time import sleep driver = webdriver.Firefox() driver.get("https://www.lambdatest.com") action = ActionChains(driver); # Head on the top-level menu on Lambdatest website parent_level_menu = driver.find_element_by_id("bs-example-navbar-collapse-1") action.move_to_element(parent_level_menu).perform() # Perform a click operation on the Menu item which contains text Automation child_level_menu = driver.find_element_by_xpath("//a[contains(text(),'Automation')]") child_level_menu.click(); sleep(10) driver.close() |
Closing Tabs Without Closing The Browser In Selenium Webdriver
One of the most basic yet mandatory tips for any test automation Selenium script is to realize how to close tabs without closing the entire browser. driver.close() closes the focused tab and driver.quit() will close all the tabs (of the browser) along with quitting of the driver. In case you need to keep the browser window open (and quitting all other tabs), you can make use of switch_to.window method which has the input parameter as window handle-id.
Note – There are other methods to approach this problem. window.open method can be used with appropriate options (i.e. opening new window, opening new tab, etc.). Sending the right key combinations using send_keys can be used, but the behavior has a dependency on the version of geckodriver (for Firefox), version of chromedriver, etc. Hence, send_keys approach is not preferable since the output can vary based on WebDriver versions.
In the below example, we open one new window which contains the test URL and close other windows. We only make use of window_handles to achieve the requirement.
|
1 2 3 4 5 6 7 8 9 10 11 12 13 14 15 16 17 18 19 20 21 |
from selenium import webdriver import time driver = webdriver.Firefox() driver.get('https://www.google.com') # Open a new window driver.execute_script("window.open('');") time.sleep(5) # Switch to the new window since the focus would still be on the old window driver.switch_to.window(driver.window_handles[1]) driver.get("https://lambdatest.com") time.sleep(5) # close the active tab driver.close() time.sleep(5) # Switch back to the first tab driver.switch_to.window(driver.window_handles[0]) driver.get("https://www.yahoo.com") time.sleep(5) # Close the only tab, will also close the browser. #driver.close() |
Handling Drop-Down Menu In A Page With Selenium Webdriver
There is a requirement where you have to select a particular option from a drop-down menu present in a web-page. There are a number of ways in which you can select the desired option from the drop-down menu.
- select_by_index(desired_index_value)
- select_by_visible_text(“text_to_be_selected_from_drop_down_menu”)
- select_by_value(value)
We will use http://demos.dojotoolkit.org/dijit/tests/test_Menu.html for Selenium automation testing on this requirement. Before we select the required element from the drop-down menu, it is important to get the ID of the element under test. We use find_element_by_xpath method to locate the element and once we have located the element (using the ID), we select the value from the drop-down menu.
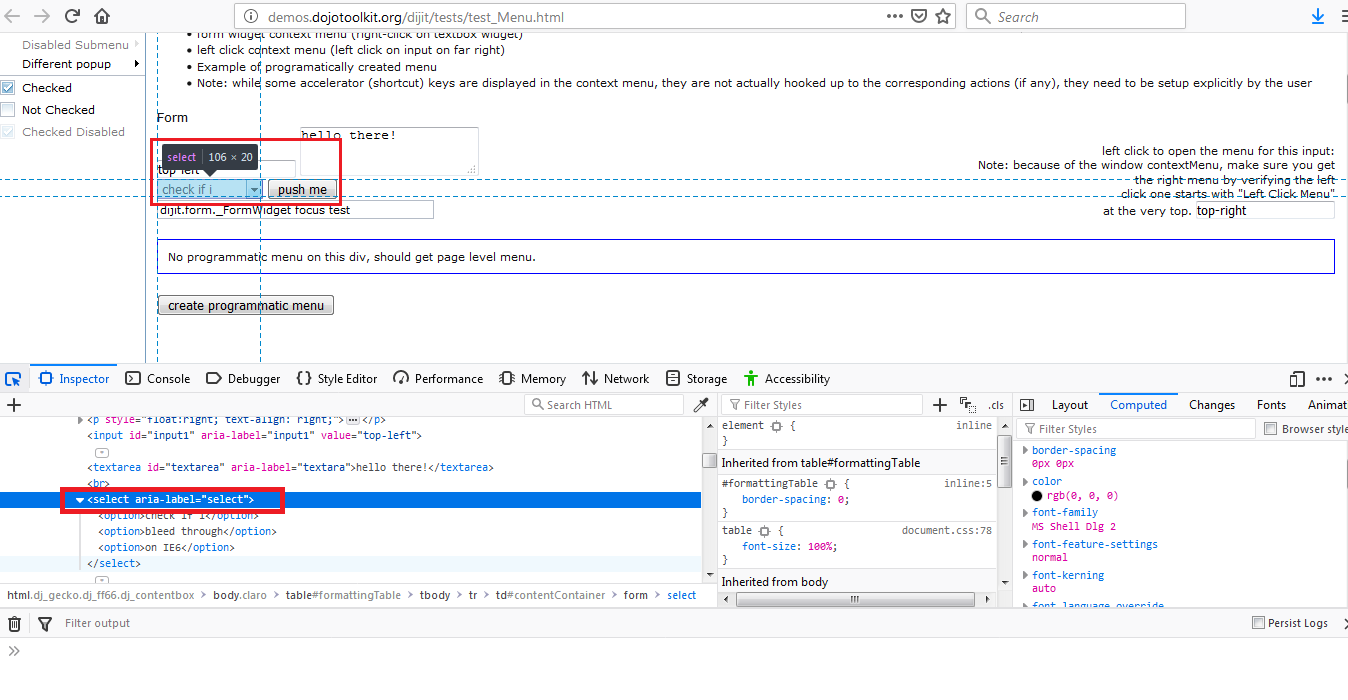
In the example below, we have shown the different methods through which you can select an element from the menu (@aria-label=’select’)
|
1 2 3 4 5 6 7 8 9 10 11 12 13 14 15 16 17 18 19 20 21 22 23 24 25 26 27 28 29 30 31 32 33 |
from selenium import webdriver from selenium.webdriver.support.ui import Select from time import sleep from selenium.common.exceptions import NoSuchElementException from pip._vendor.distlib import resources driver = webdriver.Firefox() driver.get("http://demos.dojotoolkit.org/dijit/tests/test_Menu.html") ''' Let the page load completely ''' sleep(5) try: ''' You can derive these details by using Web Inspector ''' select_element = Select(driver.find_element_by_xpath("//select[@aria-label='select']")) # Option 1 - Selecting the drop-down item by using the text select_element.select_by_visible_text("bleed through") sleep(5) # Option 2 - Selecting the drop-down item by using the index value select_element.select_by_index(0) sleep(5) # Option 3 - Selection of desired option using value ''' This option would fail since there is no value in the page which we are testing right now ''' # select_element.select_by_value('2') except NoSuchElementException: print("Element not found") ''' Addition of delay so that we can have a look at the output ''' sleep(5) ''' Release the resources ''' driver.quit() |
Handling Operations With Check Boxes With Selenium Webdriver
Check boxes are common elements in web pages that are used in scenarios where you have to select only one option from a number of options. Like drop-down menu handling, we locate the required checkbox using find_element_by_xpath method and once we find the checkbox, a click operation is performed.
We will use http://demos.dojotoolkit.org/dijit/tests/form/test_CheckBox.html for Selenium automation testing and the requirement is to ‘check’ the checkbox which has the value cb7: normal checkbox. The matching is done using driver.find_elements_by_xpath(“//*[contains(text(), ‘text to be searched’)]”).
|
1 2 3 4 5 6 7 8 9 10 11 12 13 14 15 16 17 18 19 20 21 22 23 |
from selenium import webdriver from selenium.webdriver.support.ui import Select from time import sleep from selenium.common.exceptions import NoSuchElementException from pip._vendor.distlib import resources driver = webdriver.Firefox() driver.get("http://demos.dojotoolkit.org/dijit/tests/form/test_CheckBox.html") ''' Let the page load completely ''' sleep(20) try: ''' You can derive these details by using Web Inspector ''' driver.find_element_by_xpath("//*[contains(text(), 'cb7: normal checkbox')]").click() except NoSuchElementException: print("Element not found") ''' Addition of delay so that we can have a look at the output ''' sleep(5) ''' Release the resources ''' driver.quit() |
Selecting Element via CSS Selector In Selenium Webdriver
There is a provision to locate elements on a webpage using the CSS locator as you perform test automation with Selenium. find_elements_by_css_selector can be used for locating elements where details of element (label, link, ID, etc.) to be located have to passed as the input argument. It finds a list of elements within this element’s children by CSS Selector.
The intent is to locate the Login button on https://lambdatest.com/ using find_elements_by_css_selector and perform click operation. The code associated with Login is below. Code inspection tool snapshot also gives the required information.
|
1 2 3 4 5 6 7 |
<html> ........ <li class="login"> <a href="https://accounts.lambdatest.com/register">Free Sign Up</a> </li> ..... </html> |
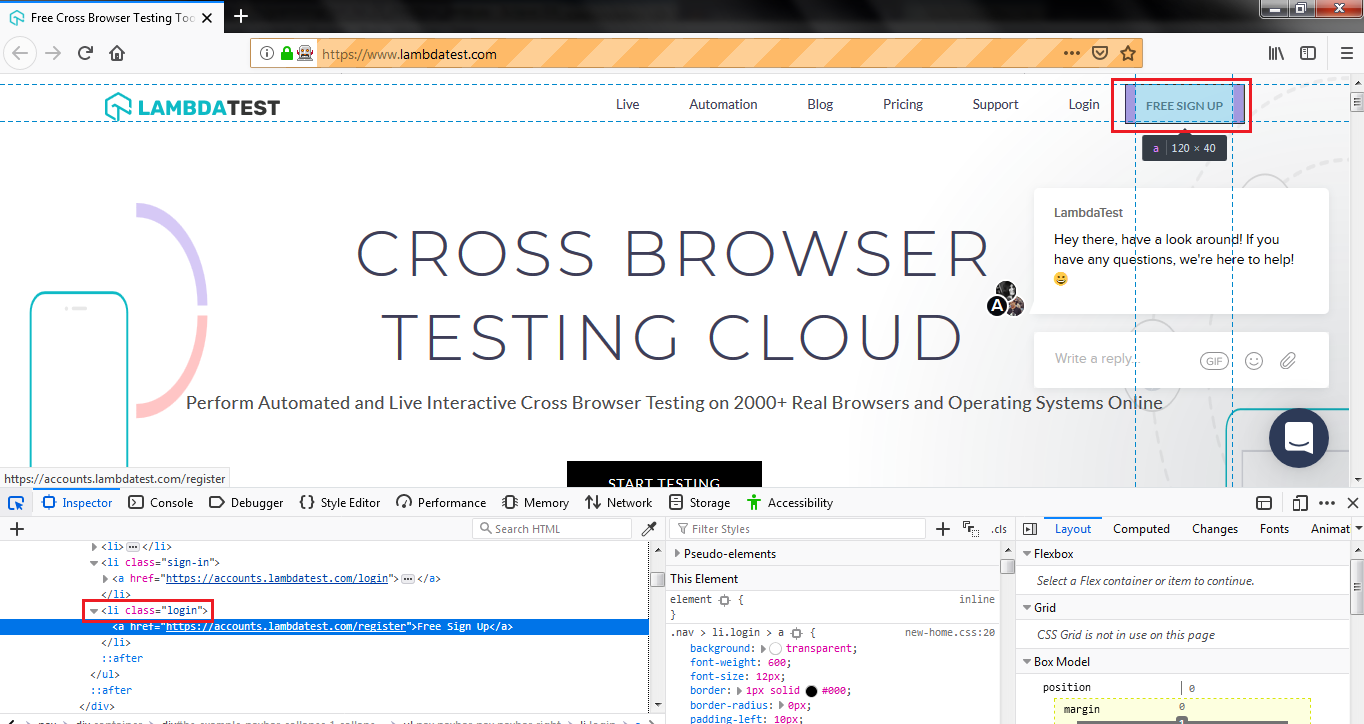
Hence, we pass li.login as an argument to find_element_by_css_selector and once it locates the element, Click operation is performed.
|
1 2 3 4 5 6 7 8 9 10 11 12 13 14 15 16 17 18 19 20 21 22 23 |
from selenium import webdriver from selenium.webdriver.support.ui import Select from time import sleep from selenium.common.exceptions import NoSuchElementException from pip._vendor.distlib import resources driver = webdriver.Firefox() driver.get("https://www.lambdatest.com/") ''' Let the page load completely ''' sleep(20) try: ''' You can derive these details by using Web Inspector ''' driver.find_element_by_css_selector("li.login").click() except NoSuchElementException: print("Element not found") ''' Addition of delay so that we can have a look at the output ''' sleep(5) ''' Release the resources ''' driver.quit() |
Explicit Wait For Handling Different Scenarios In Selenium Webdriver
It is very normal to observe a scenario in Selenium automation testing where a webpage may take time to load or you want a particular web element on the page to be visible before triggering your test code. In such cases, you need to perform Explicit Wait which is a piece of code through which define a condition to occur before you proceed further in the code.
Selenium has WebDriverWait which can be applied on any web element with a condition & time duration. It can throw an exception in case the element on which the wait is performed is not present or a timeout occurs.
In the example below, we wait for link_text ‘Sitemap’ to load on the page and the timeout is specified in the WebDriverWait method. If the element is not loaded within the timeout duration, we throw an exception.
|
1 2 3 4 5 6 7 8 9 10 11 12 13 14 15 16 17 18 19 20 21 |
from selenium import webdriver from selenium.common.exceptions import TimeoutException from selenium.common.exceptions import NoSuchElementException from selenium.webdriver.common.by import By from pip._vendor.distlib import resources from selenium.webdriver.support.ui import WebDriverWait from selenium.webdriver.support import expected_conditions as EC driver = webdriver.Firefox() driver.get("https://www.lambdatest.com/") timeout = 10 try: ''' We wait till the time link with text SITEMAP is loaded ''' ''' If that link text is not present on the page, it gives a time out ''' ''' Try replacing Sitemap with Sitemap123 and you can encounter a timeout ''' element_present = EC.presence_of_element_located((By.LINK_TEXT, 'Sitemap')) WebDriverWait(driver, timeout).until(element_present) except TimeoutException: print("Timed out while waiting for page to load") driver.quit() |
Scroll Operations In A Web Page With Selenium Webdriver
You may have a requirement where you need to perform scroll-up/scroll-down operation on a page while performing test automation with Selenium. You can achieve the same using execute_script with window.scrollTo JS code as the argument. In the example below, we scroll to the end of the page after the website under test is loaded.
|
1 2 3 4 5 6 7 8 9 10 11 12 13 14 15 16 17 18 |
from selenium import webdriver from time import sleep driver = webdriver.Firefox() driver.get("https://www.lambdatest.com/") timeout = 10 ''' Scroll to the end of the page ''' driver.execute_script("window.scrollTo(0, document.body.scrollHeight);") ''' Sleep is added so that you can have a look at the output ''' sleep(10) ''' Scroll again to the top of the page ''' driver.execute_script("window.scroll(0, 0);") sleep(10) driver.quit() |
Zoom In & Zoom out using Selenium
In order to zoom in or zoom out while Selenium automation testing, you should use the transform CSS property (for the corresponding browser) that lets you perform zoom in, zoom out, rotate, skew, etc. operations on the page.
The CSS parameters for different types of browsers are below
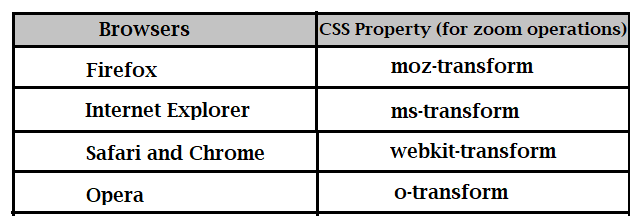
In the example below, we zoom-out the web page that is loaded in the browser by 200% and later zoom in by 100% (i.e. back to normal). Since we are using the Firefox browser, we have made use of MozTransform CSS property.
|
1 2 3 4 5 6 7 8 9 10 11 12 13 14 15 16 17 18 19 20 21 22 23 |
from selenium import webdriver from time import sleep driver = webdriver.Firefox() driver.get("https://www.lambdatest.com/") timeout = 10 ''' Zoom in by 200% ''' driver.execute_script('document.body.style.MozTransform = "scale(2.0)";') driver.execute_script('document.body.style.MozTransformOrigin = "0 0";') sleep(10) ''' Zoom out by 100% ''' driver.execute_script('document.body.style.MozTransform = "scale(1.0)";') driver.execute_script('document.body.style.MozTransformOrigin = "0 0";') ''' Sleep is added so that you can have a look at the output ''' sleep(10) ''' Release all the resources ''' driver.quit() |
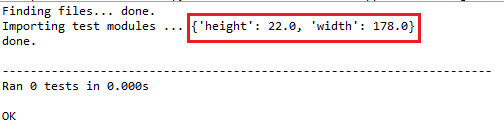
Find Size Of An Element In A Web Page With Selenium
You have to first search for the element by ID and then use the .size property to calculate the size of the searched element. In the example below, we calculate the size of the button create_programmatic_menu (ID = createDestoryButton) in the page http://demos.dojotoolkit.org/dijit/tests/test_Menu.html
|
1 2 3 4 5 6 7 8 9 10 11 12 13 |
from selenium import webdriver from time import sleep driver = webdriver.Firefox() driver.get("http://demos.dojotoolkit.org/dijit/tests/test_Menu.html") timeout = 10 search_element = driver.find_element_by_id("createDestroyButton") print(search_element.size) ''' Release all the resources ''' driver.quit() |
When you execute the above code, it would output the size of the button (ID – CreateDestroyButton).
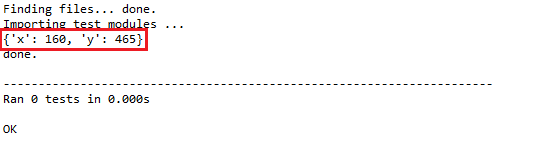
Get X & Y coordinates Of An Element In A Web Page In Selenium Webdriver
You have to follow a similar approach which you used for calculating the size of an element. You have to first search for the element by ID and then use the .location property to calculate the X & Y coordinates of the searched element.
The test URL is http://demos.dojotoolkit.org/dijit/tests/test_Menu.html and we calculate the X & Y co-ordinates of the button create_programmatic_menu (ID = createDestoryButton)
|
1 2 3 4 5 6 7 8 9 10 11 12 13 |
from selenium import webdriver from time import sleep driver = webdriver.Firefox() driver.get("http://demos.dojotoolkit.org/dijit/tests/test_Menu.html") timeout = 10 search_element = driver.find_element_by_id("createDestroyButton") print(search_element.location) ''' Release all the resources ''' driver.quit() |
When you execute the above code, it would output the X, Y coordinates e of the button (ID – CreateDestroyButton).
Disable JavaScript Using Custom Profile Using Selenium Webdriver
In case you want to disable JavaScript support of the browser to validate automated cross browser compatibility with Selenium automation testing, you need to change the profile settings of the browser under test (in our case, it is Firefox) and apply the changes to the profile. We make use of DEFAULT_PREFERENCES[‘frozen’][‘javascript.enabled’] = False to disable the JavaScript support for the browser.
Once the code is executed, you should verify the profile changes by typing about:config in the address bar and searching for the value of javascript.enabled property.
|
1 2 3 4 5 6 7 8 9 10 11 12 13 14 15 16 17 18 |
from selenium import webdriver ''' Since we have the geckodriver & Firefox browser in same location ''' ''' We do not pass the location of the Firefox profile ''' ff_profile = webdriver.FirefoxProfile() ff_profile.DEFAULT_PREFERENCES['frozen']['javascript.enabled'] = False ff_profile.set_preference("app.update.auto", False) ff_profile.set_preference("app.update.enabled", False) ''' Update the preferences ''' ff_profile.update_preferences() ''' Load the Firefox browser with the updated profile ''' driver = webdriver.Firefox(ff_profile) ''' Verify whether the changes are working fine or not ''' driver.get("about:config") |
Below is the screenshot of about:config settings (after the code execution) in Firefox

Setting Manual Proxy Settings With Selenium
In some scenarios, you may want to change the Proxy Settings in order to execute your tests. For changing the proxy settings, you need to first import the module selenium.webdriver.common.proxy. You have to set the proxy type to MANUAL, after which you change the proxy settings and apply to the new settings to the browser under test (in our case it is Firefox).
You need to replace ip_address & port_number with the IP address & port number that you plan to use for your testing.
|
1 2 3 4 5 6 7 8 9 10 11 12 13 14 15 16 17 18 19 |
from selenium import webdriver from selenium.webdriver.common.proxy import Proxy, ProxyType proxy_settings = Proxy() ''' The proxy settings are first changed to Manual ''' proxy_settings.proxy_type = ProxyType.MANUAL ''' Replace ip_address with Proxy IP address and ''' ''' port_number with the port number which you plan to use ''' proxy_settings.http_proxy = "ip_address:port_number" proxy_settings.socks_proxy = "ip_address:port_number" proxy_settings.ssl_proxy = "ip_address:port_number" ''' You can add capabilties for different browsers & devices ''' capabilities = webdriver.DesiredCapabilities.FIREFOX proxy_settings.add_to_capabilities(capabilities) driver = webdriver.Firefox(desired_capabilities=capabilities) |
Conclusion
We have covered the majority of the Selenium tips to help you perform test automation with Selenium like a professional. Though you can verify your website/web-app on different browsers, devices, and operating systems using your local machine, the extent of testing will be limited since you cannot cover the complete spectrum of devices + operating systems + browsers (& browser versions). This is where you should make use of these tips & tricks to perform automated cross browser testing for your website/web application.
You have to make minimal changes in order to move your local Selenium automation test code to LambdaTest Selenium as you begin to expand your test coverage by testing your web-app on more than 2000 real browsers + OS + devices combinations. You also get integrations to numerous CI CD tools, project management tools and more. Check out all of the LambdaTest integrations.
Test automation with Selenium can be a tough task but with the actionable insights, rather practical tips for Selenium automation testing that I listed above in this article. You can be proficient with test automation in Selenium. Let me know if there are any other tips for test automation with Selenium that have helped you fast track your test cycles. Cheers & happy testing! 🙂


Author’s Profile
Himanshu Sheth
Himanshu Sheth is a seasoned technologist and blogger with more than 15+ years of diverse working experience. He currently works as the 'Lead Developer Evangelist' and 'Senior Manager [Technical Content Marketing]' at LambdaTest. He is very active with the startup community in Bengaluru (and down South) and loves interacting with passionate founders on his personal blog (which he has been maintaining since last 15+ years).
Blogs: 132
Got Questions? Drop them on LambdaTest Community. Visit now