
How To Use GitLab CI To Run Tests Locally
Piyusha
Posted On: March 10, 2021
![]() 166560 Views
166560 Views
![]() 17 Min Read
17 Min Read
Taking over from its predecessor, Jenkins, GitLab CI is a continuous integration/continuous delivery (CI/CD) server. It helps development teams to test code from a centralized location, all while providing built-in integration with Git repositories. In this tutorial, we will be looking at how to use GitLab CI to run tests locally.
Integrate and automate your Selenium test suites with GitLab CI on LambdaTest.
TABLE OF CONTENT
What is GitLab CI?
Several times every day, developers send code updates to the Git repository. To reduce the possibility of errors being added to your software, you can create a set of scripts to automatically build and validate your application with any push to the repository. This is nothing more than continuous integration; it automatically and continuously designs and reviews any change contributed to an application, ensuring that the implemented changes satisfy all of the checks, regulations, and code enforcement criteria you have specified for your software.
An example of using Continuous Integration as a method of software development is GitLab itself. There is a collection of scripts for every push to the project where the code is tested against the push.
Features of GitLab CI that help overcoming the testing challenges discussed above
- Multi-platform: Run builds for Unix, Windows, macOS, and every other Go-supported platform.
- Multi-language: Command-line has driven Build Scripts to operate with Java, PHP, Ruby, C, and any other language.
- Parallel builds: Builds split by GitLab CI/CD are designed for faster execution over multiple machines.
- Versioned pipelines: The test scripts and overall process steps are stored in a .gitlab-ci.yml file, allowing everyone to contribute changes and ensuring that every branch gets the pipeline it needs.
- Autoscaling: To reduce costs and ensure that your builds are processed instantly, spin up and down VM’s automatically.
- Test locally: Several executors are available, and experiments can be replicated locally.
- Docker support: There are several ways to integrate Docker. By using custom Docker images, spinning up services as part of testing, building new Docker images, even running on Kubernetes.
How does GitLab CI work?
To use GitLab CI, all you need is an application’s base code hosted in a Git repository, and a file called .gitlab-ci.yml, located in the root path of your repository, must be defined for your build, test, and deployment scripts.
You can define the scripts that you want to run in this file, define the include and cache dependencies, pick commands that you want to run in sequence and those in parallel, and determine if you wish to run the scripts automatically or trigger them manually.
When your .gitlab-ci.yml configuration file has been added to your repository, GitLab can detect it and run your scripts with the GitLab Runner app, which functions just like your terminal and substantially helps us reproduce production-like scenarios.
This GitLab Tutorial for beginners and professionals will help you learn how to use GitLab, one of the most popular CI/CD tools used in DevOps.
Local Testing and its Challenges
Although there are varied “Local Testing” concepts that have arisen in recent years, there is only one that developers and testers alike generally embrace. We describe local testing as any test performed on the local machine of a developer and tester. You run the tests locally, whether they be automated or manual, as opposed to externally, i.e., on any hosted server or testing grid, like code development done in the Dev region.
There are advantages to this technique, namely the fact that you can run unit tests efficiently to check the consistency of your code or run manual tests on your app for one-off problems that might occur in development. However, accompanies few challenges to running the tests only locally:
1. Older browser support implies decreased quality.
You may have a few different browsers on your machine, for sure. Chances are, however, that your clients are using browsers that you haven’t downloaded on your local computer. Besides, several individuals might still be using various browser versions to which you do not have access. This likely results in inconsistent results.
2. The same applies to Operating Systems.
All versions of Windows and macOS and their components can not be accounted for by your local machine to ensure that your app runs as intended. A lack of coverage across various combinations of browser / OS means that local-only testing does not guarantee that your software is up to the quality levels anticipated by your users.
3. Still a bottleneck
In an optimistic situation, assume that your local machine is configured to access every browser and operating system accessed by the users. Issue fixed, huh? Not so quickly! Running tests from your local computer, even though you have the coverage, ensures that each of those tests must be performed one at a time, even if they are automated. To delight your customers, you might implement serial testing, but this substantially slows down the speed. And if you work in the CI / CD workflow, you have to wait for your tests to finish before executing the entire build.
4. Challenges in Cloud
Let us say that in a local environment with a reasonably speedy internet connection, the tester is designing and running specific tests, and the tests pass.
Come to Cloud. Now you want to run the tests with the CI framework, which is linked to a test service based on a cloud browser. Cloud-based web testing services will add more complexity for all their ease, as they can be accessed via a business VPN and then depend on the speed and reliability of the test service for the cloud browser. One potential effect of this may be flaky timeout tests due to a latency that has not been applied in the local testing environment.

Overcoming Local Testing Challenges
If there is one thing you can always do, maintain the test suite! In a way, to every bug you patch, add new tests to every new feature.
Running GitLab CI via Docker Locally
Only add your .gitlab-ci.yml file to your project, create a new branch, push it, create a Merge Request, and if you like, the CI will kick in, with several parallel jobs. The CI would not let me fail, even though I forgot to run my tests.
However, keeping a CI up and running allows you to pause and maintain your specs. You will often wonder why a test runs on your local computer, but does the CI server continue to fail?
That is why it is super helpful to run the CI docker image locally, to iron out quirks based on the rest of the world.
And by running the GitLab CI Runner itself, you can do just that. It will pick up the .gitlab-ci.yml of your project and run it via Docker locally. So ultimately, any issue you see on the server will undoubtedly happen locally, ensuring good test coverage locally. There are queues of jobs waiting to run with the added advantage that you don’t need to wait in line in case.
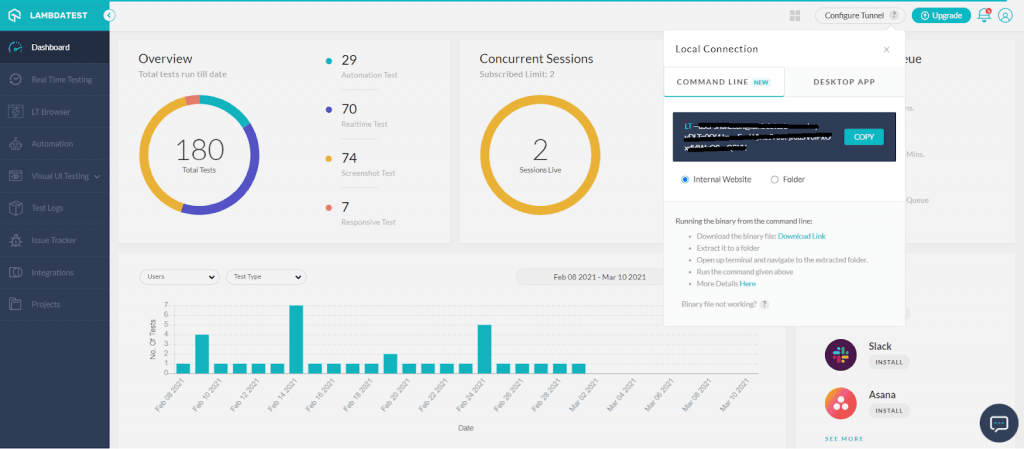
Configuring LambdaTest Tunnel to Test Locally
The LambdaTest Tunnel allows you to connect your local system with LambdaTest servers via an SSH-based integration Tunnel. Once this Tunnel is established, you can perform local page testing on all 3000+ browser environments present on the platform.
Apologies for throwing a few jargons like Gitlab CI Runner / .gitlab-ci.yml / Docker / Lamba Tunnel ahead of any introduction. But do not worry, the guide is intended to deep dive into several of these strategies to circumvent quirks in running tests locally.
How to Test GitLab CI locally?
To configure GitLab CI locally, it is essential to understand .gitlab-ci.yml file creation.
The .gitlab-ci.yml file that resides in your repository root is where you configure what your project is doing with CI. It specifies the structures of the pipelines and their order and determines:
- What to perform using the GitLab Runner.
- What decisions to make when particular situations are encountered. For instance, when a process is successful or fails.
Upon any push to your repository, GitLab will scan for a .gitlab-ci.yml file and start jobs on Runner based on the contents of the file.
Because .gitlab-ci.yml is in the repository and is version managed,
- Old versions are still successfully installed.
- Forks can easily use CI.
- Branches can have multiple pipelines and jobs.
- For CI, you have a single source of reality.
Creating a simple file for .gitlab-ci.yml
In the root directory of your repository, you must create a file called .gitlab-ci.yml. This is a YAML file, so you need to pay special attention to indentation. Always use tabs, not spaces.
A sample .gitlab-ci.yml for a Ruby on Rails project
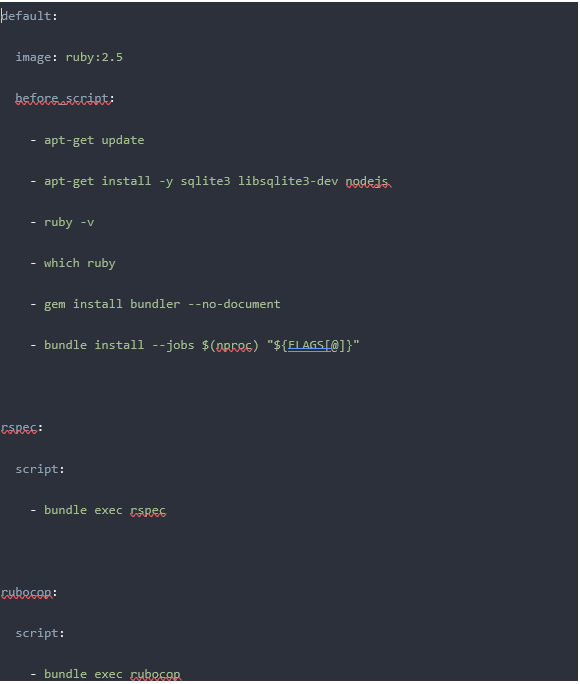
For most Ruby applications, this is the easiest possible configuration that will work:
- Specify two jobs, RSpec and RuboCop jobs (the names are random), with various commands to execute.
- The script commands are executed before each job.
Jobs are the fundamental part of the .gitlab-ci.yml file. It specifies job sets with restrictions as to how and when to run them. The jobs are classified as top-level elements with a name (RSpec and RuboCop in this case) and must always contain a keyword – ‘script.’ Jobs are used to build jobs, which are then chosen and executed by Runners within the Runner’s environment.
Each job must run separately from the other.
Validate .gitlab-ci.yml-ci file
Each GitLab CI / CD instance has an embedded debug tool that validates the content of your .gitlab-ci.yml files, called the CI Lint tool. Under the ci/lint page in your project namespace, you will find the Lint. HTTPs:/gitlab.example.com/gitlab-org/project-123/-/ci/lint, for example.
For a graphical representation of your .gitlab-ci.yml file, you can use the CI/CD configuration visualization. For more detail and the full .gitlab-ci.yml syntax, please read the reference documentation on .gitlab-ci.yml.
Let’s say you have a .gitlab-ci.yml file, and you want to test this file locally.
Gitlab Runner is the tool to accomplish this! It is an application that works to run jobs in a pipeline with GitLab CI / CD.
Installation:
Install GitLab Runner on the infrastructure you own or control but just make sure that it is installed on a different machine from the one that hosts an instance of GitLab.
GitLab Runner installation is supported by various OS. The following table identifies supporting compatibilities and installation links.
|
Supported Binaries |
x86, AMD64, ARM64, ARM, s390x |
|
|
Linux platforms |
CentOS, Debian, Ubuntu, RHEL, Fedora, Mint |
|
|
OS |
Linux, Windows, macOS, FreeBSD
|
|
|
Docker Service |
It is also possible to run the GitLab Runner within a Docker container or deploy it in a Kubernetes cluster. |
See some best practices on how the GitLab Runner should be used and administered.
Also, we should make sure GitLab Runner should be the same version as GitLab.
Registration:
You need to register individual Runners after installation. When you do so, you establish a communication between your Gitlab instance and the machine which has Runner installed.
Typically, Runners process jobs on the same machine where you installed GitLab Runner. However, you may also have a Runner process job in a container, in a Kubernetes cluster, or in auto-scaled instances in the cloud.
Depending on which OS/platform/binaries Runner is installed, you can refer to the Runner registration guide for registration steps.
Executors:
An Executor decides the environment each job runs in. When a Runner is registered, you must select an executor.
Several Executors supported by Gitlab Runner:
The table below shows the main facts that will help you determine which executor to use with each executor.
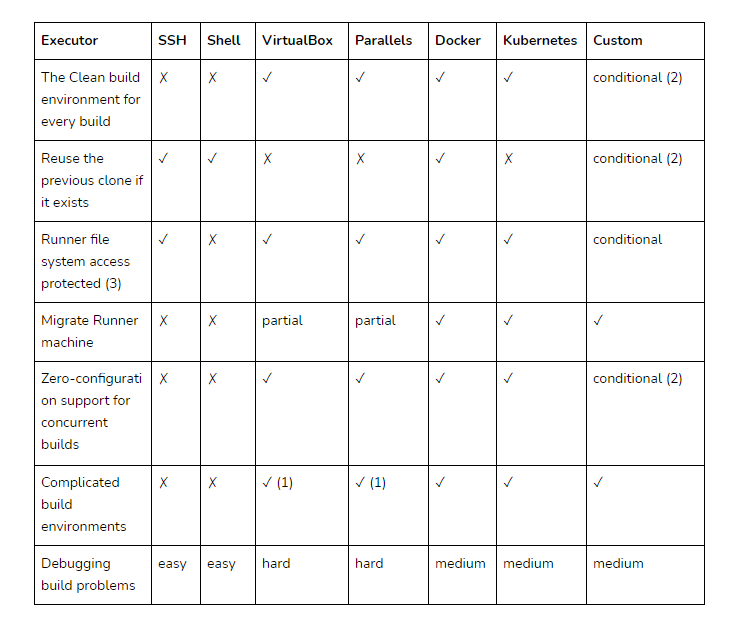
- Using Vagrant
- Dependent on what kind of environment you are provisioning. It can be completely isolated or shared between each build.
- When access to a Runner file system is not secured, jobs can access the entire system, including the Runner token, cache, and code. Executors marked with ‘✓’ do not allow Runner by default to access the file system.
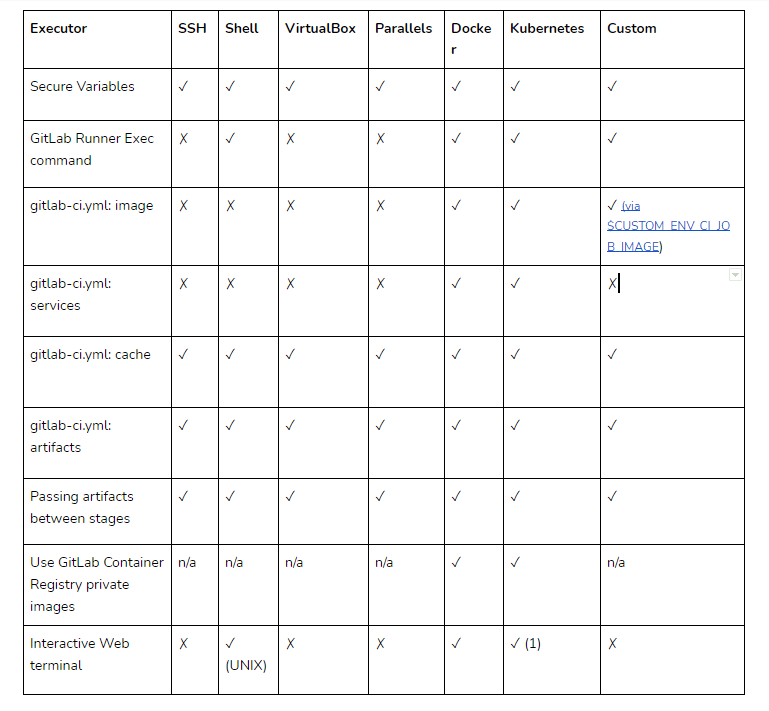
Features supported by different Executors:
Of all the choices mentioned above, below could be best opted.
- You could install GitLab Runner on a Windows server and then register a Runner that uses the shell executor if you want your CI / CD job to run PowerShell commands.
- You could install GitLab Runner on a Linux server and register a Runner that uses the Docker executor if you want your CI / CD job to run commands in a custom Docker container. It is often referred to as a “Docker-in-Docker” configuration when installing GitLab Runner in a Docker container and selecting the Docker executor to run your tasks. We would see a couple of implementations of testing locally using different GitLab Runner & executors in the subsequent section.
- You can install GitLab Runner on a virtual machine and have another virtual machine used as an executor.
GitLab Runner commands
Below are the set commands used to build, test, register, etc., you would see by giving ‘gitlab-Runner’ without any argument.
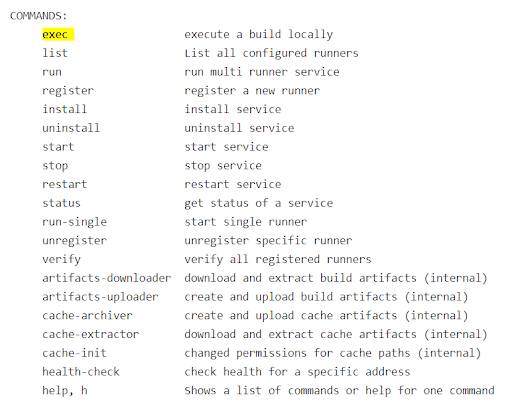
The ‘exec’ command is our apple of the eye!
‘gitlab-Runner exec’ command is the command that easily lets you test builds locally.
It allows the jobs specified in .gitlab-ci.yml to run locally! This, in turn, allows for quicker test cycles and makes it easier for broken builds to be patched.
The way it works is, it aims to reproduce the CI Environment as similar as possible to the way it should function. Instead of connecting to GitLab instance, it reads the local .gitlab-ci.yml file and creates a new environment where all the build steps are executed.
Since gitlab-Runner exec clones the current state of the local Git repository, be sure to have committed any changes you want to test beforehand.
The exec command should be executed directly from the root directory because .gitlab-ci.yml is present there. And while executing it, you must specify the executor and the name of the job.
The following instruction, for example, executes a job called ‘test’ locally using a shell executor.
‘gitlab-Runner exec shell tests’
Let us now try to use all the above information to test a change locally!
Testing Using Docker as an Executor
In order to use Docker, follow the below-mentioned steps:
- Install Bleeding Edge Runner release locally.
- Run the build: ‘gitlab-Runner exec docker my-local-job.’ ( the job name is arbitrary*)
This will run ‘my-local-job’ defined in the docker container specified in the local .gitlab-ci.yml file.
Note: https://docs.gitlab.com/ee/ci/yaml/README.html : Even though job names are arbitrary, there are specific keywords listed in this link that you cannot use as job names. An excellent link that extensively contains keywords, syntax, and usage.
Using exec with Docker
- Install a docker-machine.
- Create a new docker VM: ‘docker-machine create -d virtualbox Runner.’
- Configure shell settings : eval $(docker-machine env Runner).
For best practices on Docker as an executor, go through the document on GitLab Runner with Docker.
Using Shell as an executor on MacOSX:
- Install gitlab-Runner via brew.
- Register the gitlab-Runner by URL and token in Setup a specific Runner manually section in Project Settings > CI / CD.
- Now we must enter the executor type. In this case, it’s Shell.
- Execute the ‘gitlab-Runner register’ command on the Shell. A wizard opens when this command runs on the shell. Anything written about the project, such as a description, will be shown in Project Settings > CI / CD > Runners tab.
- Assume to have a .gitlab-ci.yml file with two stages – Test & Deploy.
- Executing the ‘gitlab-Runner exec shell my_project_test’ will run the job ‘my_project_test’ under stage ‘test’ locally.
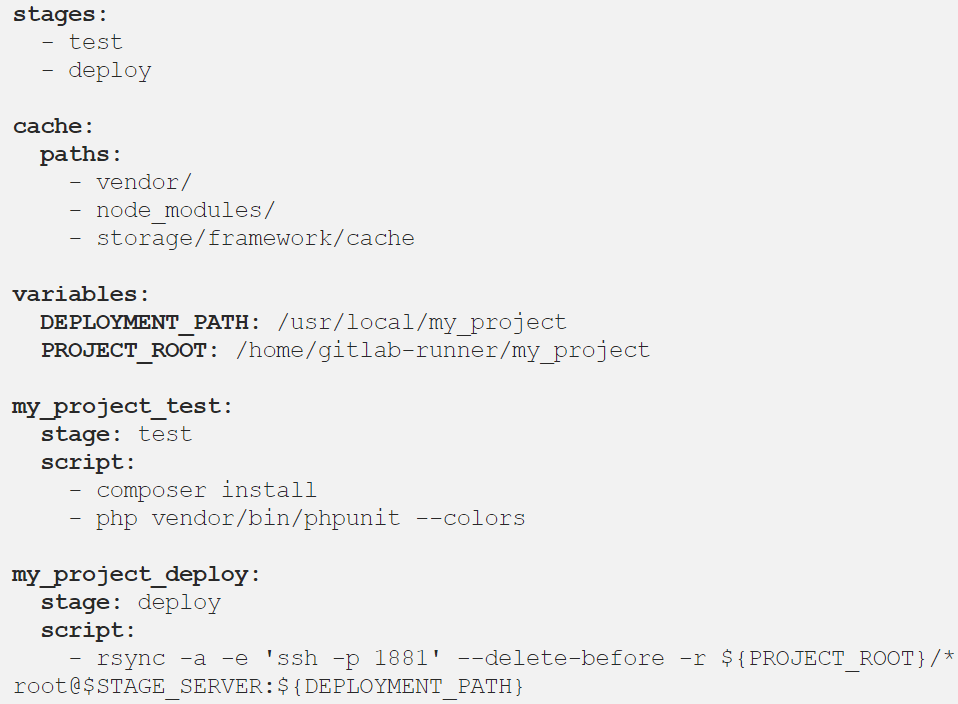
Basically, in both cases, the gitlab-Runner exec command clones the project from the Gitlab repository, installs all related dependencies, and runs the tests locally!!
This was all about introducing GitLab CI to run tests locally and overcome significant challenges of testing locally otherwise.
Run Selenium Test in GitLab CI locally Using LambdaTest Tunnel
The LambdaTest GitLab Integration allows you to create a card directly in your repository from the LambdaTest platform.
Integrate and automate your Selenium test suites with GitLab CI on LambdaTest.
LambdaTest Tunnel App can be used to execute local tests efficiently. This is a confidence booster before deploying any UI change into production because it lets you test your development thoroughly with the Secure Shell(SSH) network protocol hosted by LambdaTest Tunnel. Experience the flexibility to securely test your website on 3000+ browsers and their assorted versions, running on real OS code for cross-platform and cross browser compatibility, even before it gets deployed over the production environment. Before any configurations, download LambdaTunnel for your OS using,
The below .gitlab-ci.yml file would show you how to leverage LambdaTest’s cloud Selenium Grid by performing a browser test through your testing server contained in your GitLab CI build.
|
1 2 3 4 5 6 7 8 9 10 11 12 13 14 15 16 17 18 19 20 21 22 23 24 25 26 27 28 |
// Example of .gitlab-ci.yml for Lambda Tunnel image: node:7.10 before_script: - | cd /builds/qarachit/protractor-selenium-sample-gitlab wget https://s3.amazonaws.com/lambda-tunnel/LT_Linux.zip #Extracting tunnel binary sudo apt-get install unzip unzip LT_Linux.zip #Executing tunnel library ./LT -user ${LAMBDATEST_EMAIL} -key ${LAMBDATEST_KEY} & sleep 30 #Installing Dependencies echo 'export LT_USERNAME="{your_lambdatest_username}"' >> ~/.bashrc echo 'export LT_ACCESS_KEY="{your_lambda_access_key}"' >> ~/.bashrc npm install npm install -g protractor job: script: #Running Test! protractor single.conf.js Once the tunnel is successfully set up, you can start testing in your network by adding the below code. "desiredCapabilities": { "tunnel":true } |
While you get LambdaTest Tunnel configured on your suitable machine, if you are working in a team, you could also configure Tunnel to be operated in shared mode!
This removes any overheads arising in shuffling their SSH Tunnel connection across team members to enable access across the team. Maybe a case where a team has, say, seven members, and everyone configured their Tunnel.
Now, a user can only work on a user-specific SSH Tunnel connection. In case you wish to keep a common SSH Tunnel connection across all your teammates, you will need to establish a shared LambdaTest Tunnel that would work for all of the teammates listed under your organization at LambdaTest.
Integrate and automate your Selenium test suites with GitLab CI on LambdaTest.
Conclusion
Kudos!! You now know how to perform local testing by running GitLab CI via Docker successfully. Getting GitLab CI at work or UI-based application using Lambdatest Tunnel is just to ensure how we could integrate spears to execute tests locally, giving us enough confidence as we face production deployment!
If you want to build an automated testing pipeline with GitLab CI/CD & Selenium Grid, LambdaTest can help you do that as well.
Happy Implementations!


Author’s Profile
Piyusha
After being an avid Software developer by profession, I am an Inside content writer who enjoys writing. I enjoy conducting the necessary research to make my articles relevant, current and interesting.
Blogs: 10
Got Questions? Drop them on LambdaTest Community. Visit now


