Comparison Settings for SmartUI - Pixel to Pixel Comparison
Our Pixel to Pixel (P2P) Comparison Options
We offer multiple options for comparing the Baseline and the Test Output screenshots captured during your automation testing suites.
Here are the following common test setting options -
largeImageThreshold- Sets the pixel granularity at the rate to which the pixel blocks are created.errorType- Show the differences in the output screen by identifying the pixel changes type and capture the intended view.ignore- To remove the Pixel to Pixel false-positive rate in identifying the screenshot.transparency- To help adjust test transparency settings and strike a balance between highlighting in visual screening.boundingBoxes: [box1, box2]- By specifying a bounding box measured in pixels from the top left, you can narrow down the area of comparison.ignoredBoxes: [box1, box2]- By specifying a bounding box measured in pixels from the top left, you can exclude part of the image from comparison.ignoreAreasColoredWith- By specifying a RGBA color, you can exclude colored areas of the image from comparison.
Examples with comparison settings
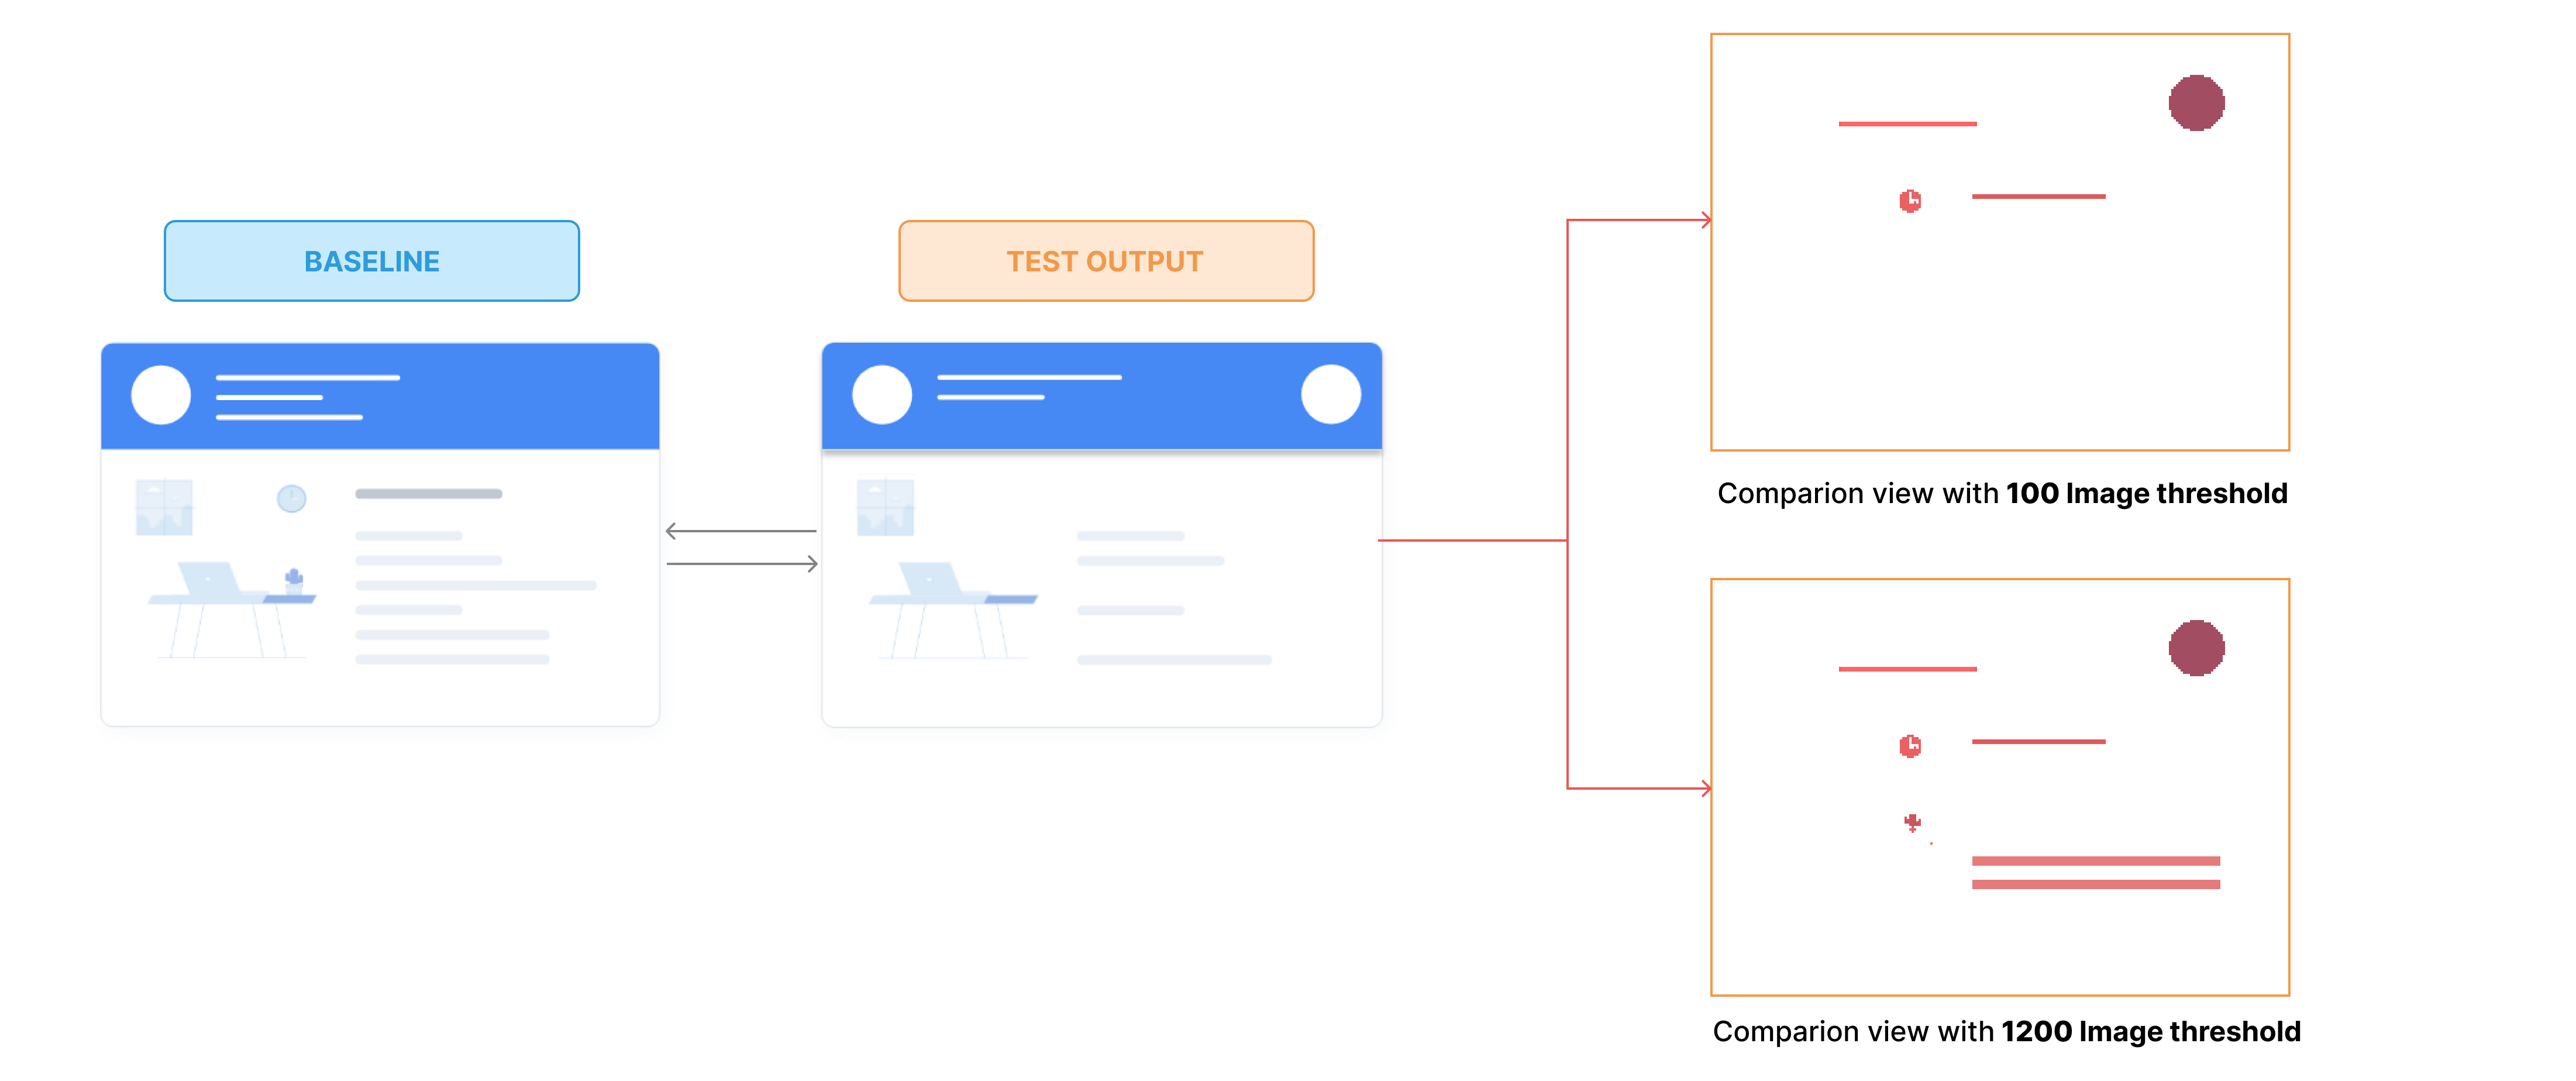
Image Threshold
The image threshold settings helps you in analyzing the granularity of the pixel resolution for each block which shall be created by the algorithm for the comparison.
You can specify the following capability in the following format:
- Selenium
- Cypress
let capabilities = {

  /*  ....Your Selenium capabilities go here */

  "smartUI.project": "<Your Project Name>" // Your SmartUI project name
  "smartUI.options": {
    "largeImageThreshold": 100 // The image threshold for comparison the min of 100 and max of 1200
  }
};
"smart_ui": {
      "project": "<Your Project Name>" // Add your SmartUI Project Name here
      "options": {
        "largeImageThreshold": 100 // The image threshold for comparison the min of 100 and max of 1200
      }
    }
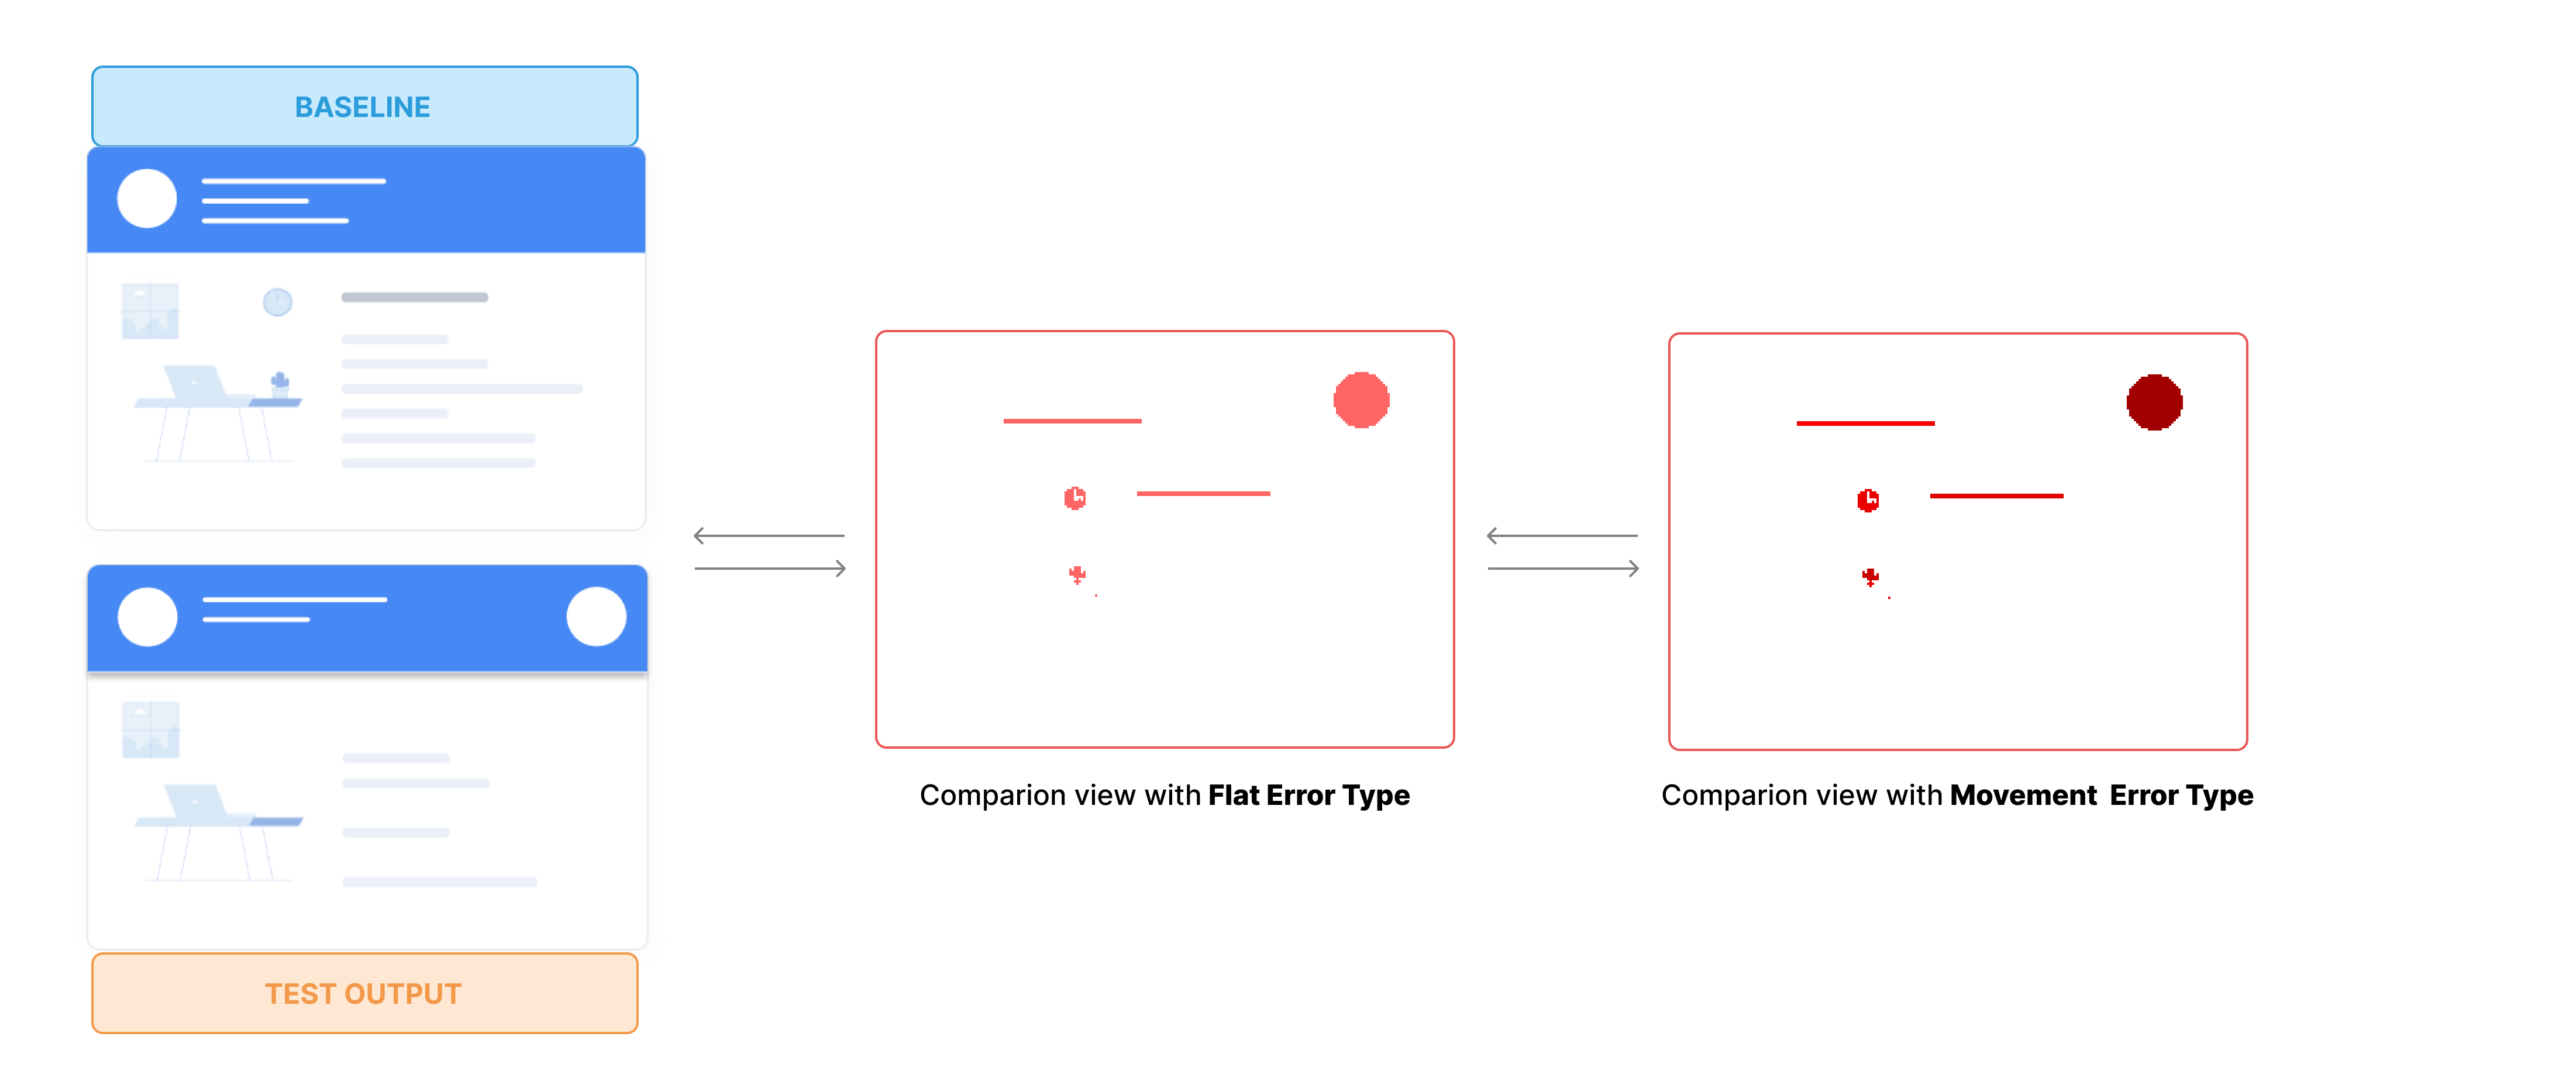
Error Identifier Types�
The pixel to pixel comparison at which we offer for the error highlighting in the test output is determined by the changes in the pixel distribution for the Baseline screenshot to the Comparison screenshot. This feature will help in determining for the approver that the pixels can be easily identified.
The following are the supported options for the pixel comparison feature:
movement- specifies the pixel movementsflat- specifies the pixel value changes
You can specify the following capability in the following format:
- Selenium
- Cypress
let capabilities = {

  /*  ....Your Selenium capabilities go here */

  "smartUI.project": "<Your Project Name>" // Your SmartUI project name
  "smartUI.options": {
    "errorType": "movement" // To set the error identifier
  }
};
"smart_ui": {
      "project": "<Your Project Name>" // Add your SmartUI Project Name here
      "options": {
        "errorType": "movement" // To set the error identifier
      }
    }
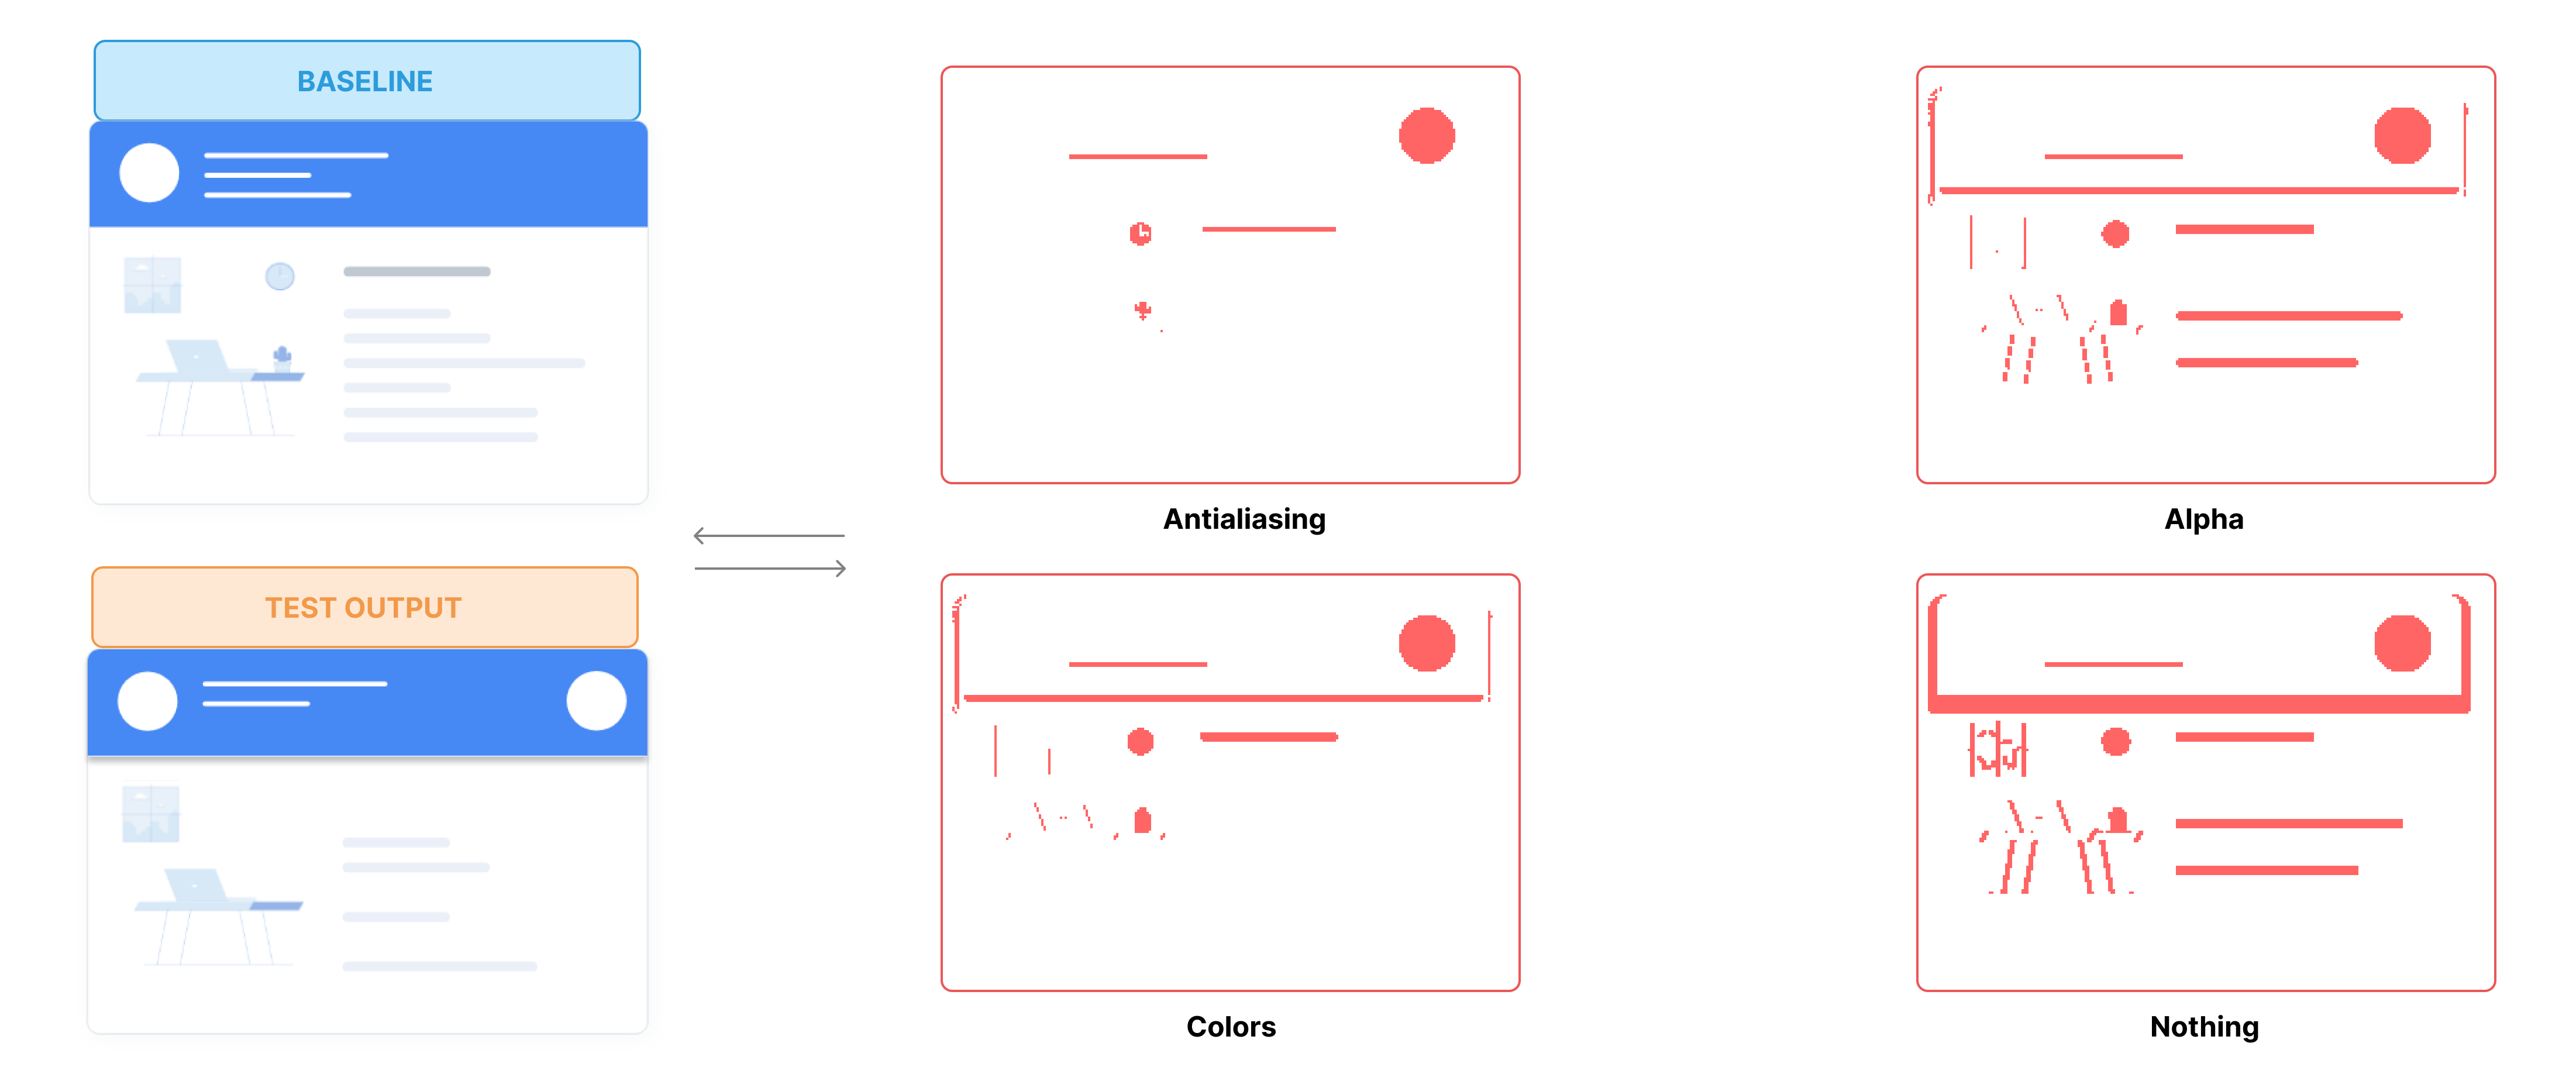
Ignore - P2P False Positives
When the screenshot is captured and it is then compressed to a file format such as .png,.jpg,.jpeg,etc.. then there is high chance of pixelation enhancement will be made to the screenshot to enhance the quality of the image. This could be mis-leading to a visual appearance on the browser for the comparison with the current Baseline version. We provide you with options to mitigate this risk of flakiness in your comparison output.
The following are the supported options for the pixel comparison feature:
antialiasing- ignores the smoothing of edges in digital images.alpha- ignores the alpha of the pixel color and makes into solid color without any opacity, click here to know more.colors- added corrected lightness to the screenshot by ignoring the default pixel color value.nothing- ignores none of the false positive options from the comparison.
You can specify the following capability in the following format:
- Selenium
- Cypress
let capabilities = {

  /*  ....Your Selenium capabilities go here */

  "smartUI.project": "<Your Project Name>" // Your SmartUI project name
  "smartUI.options": {
    "ignore": "antialiasing" // To set the ignore identifier
  }
};
"smart_ui": {
      "project": "<Your Project Name>" // Add your SmartUI Project Name here
      "options": {
        "ignore": "antialiasing" // To set the ignore identifier
      }
    }
Transparency
An advanced configuration to set the comparison view image to be displayed as a opquae or transparent for easy identification for the approver.
You can specify the following capability in the following format:
- Selenium
- Cypress
let capabilities = {

  /*  ....Your Selenium capabilities go here */

  "smartUI.project": "<Your Project Name>" // Your SmartUI project name
  "smartUI.options": {
    "transparency": 0.3 // minimum = 0 and maximum = 1 supports upto one decimal such as 0.1 to 0.9
  }
};
"smart_ui": {
      "project": "<Your Project Name>" // Add your SmartUI Project Name here
      "options": {
        "transparency": 0.3 // minimum = 0 and maximum = 1 supports upto one decimal such as 0.1 to 0.9
      }
    }
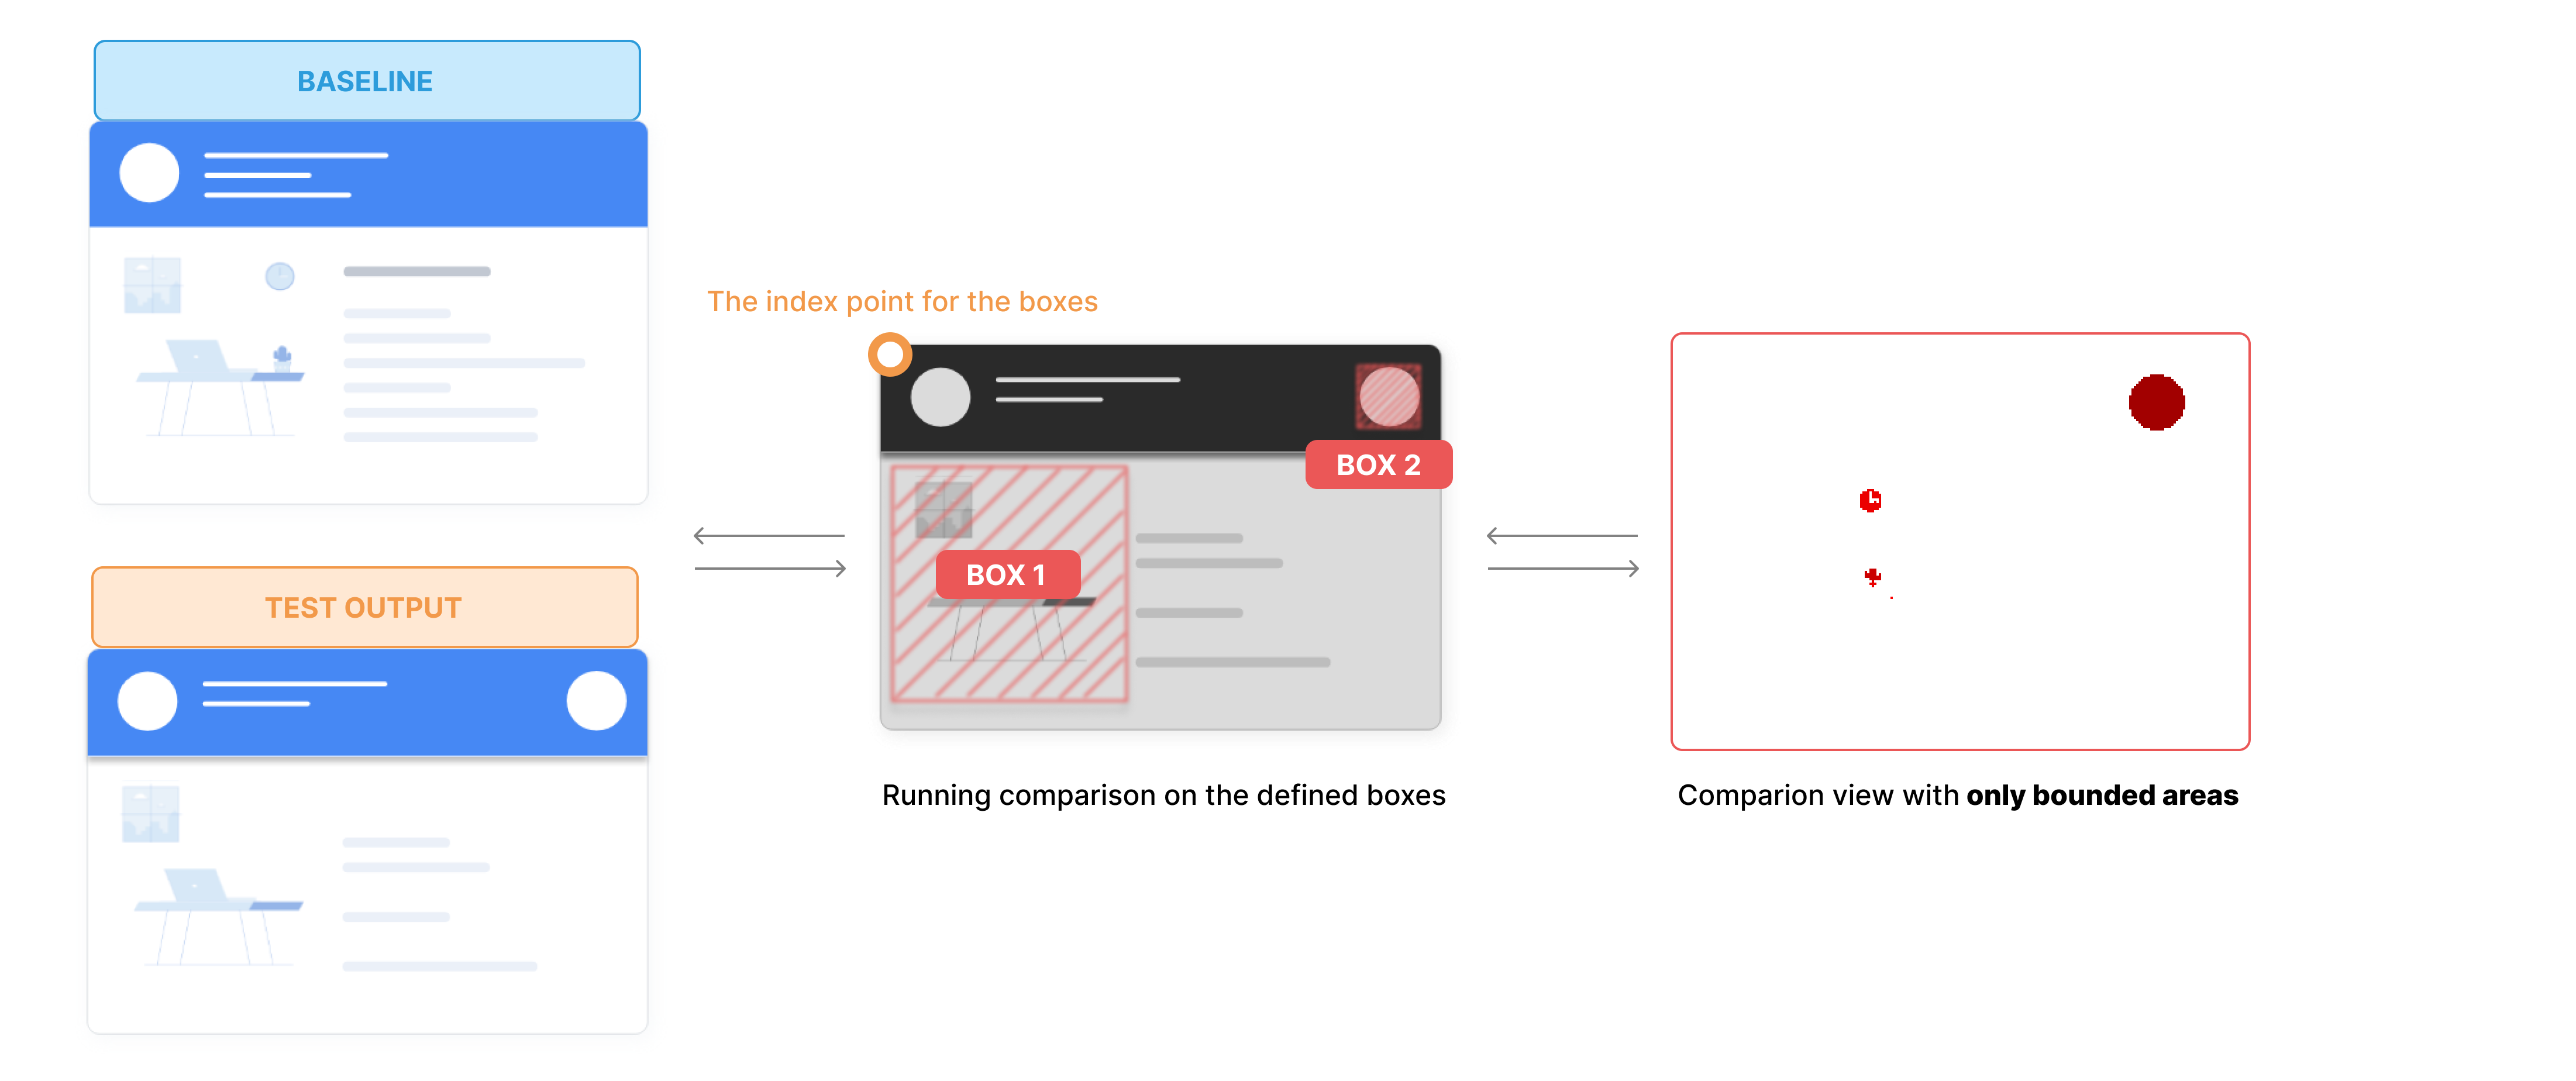
Bounding Boxes - Compare only specific area
The bounding boxes are the areas created on the screenshot which needs to be compared with the baseline ignoring other areas from the screenshot.
This specific case is used to compare only a specific area of the screenshot from the baseline.
You can specify the following capability in the following format:
- Selenium
- Cypress
// Bounding box sample settings
const box1 = {
left: 100,
top: 500,
right: 800,
bottom: 300
};

const box2 = {
left: 800,
top: 50,
right: 20,
bottom: 700
};

let capabilities = {

  /*  ....Your Selenium capabilities go here */

  "smartUI.project": "<Your Project Name>" // Your SmartUI project name
  "boundingBoxes" : [box1, box2] // Your bounding box configuration
};
"smart_ui":{
   "project":"<Your Project Name>",
   "boundingBoxes":[
      {
         "left":100,
         "top":500,
         "right":800,
         "bottom":300
      },
      {
         "left":800,
         "top":50,
         "right":20,
         "bottom":700
      }
   ]
}
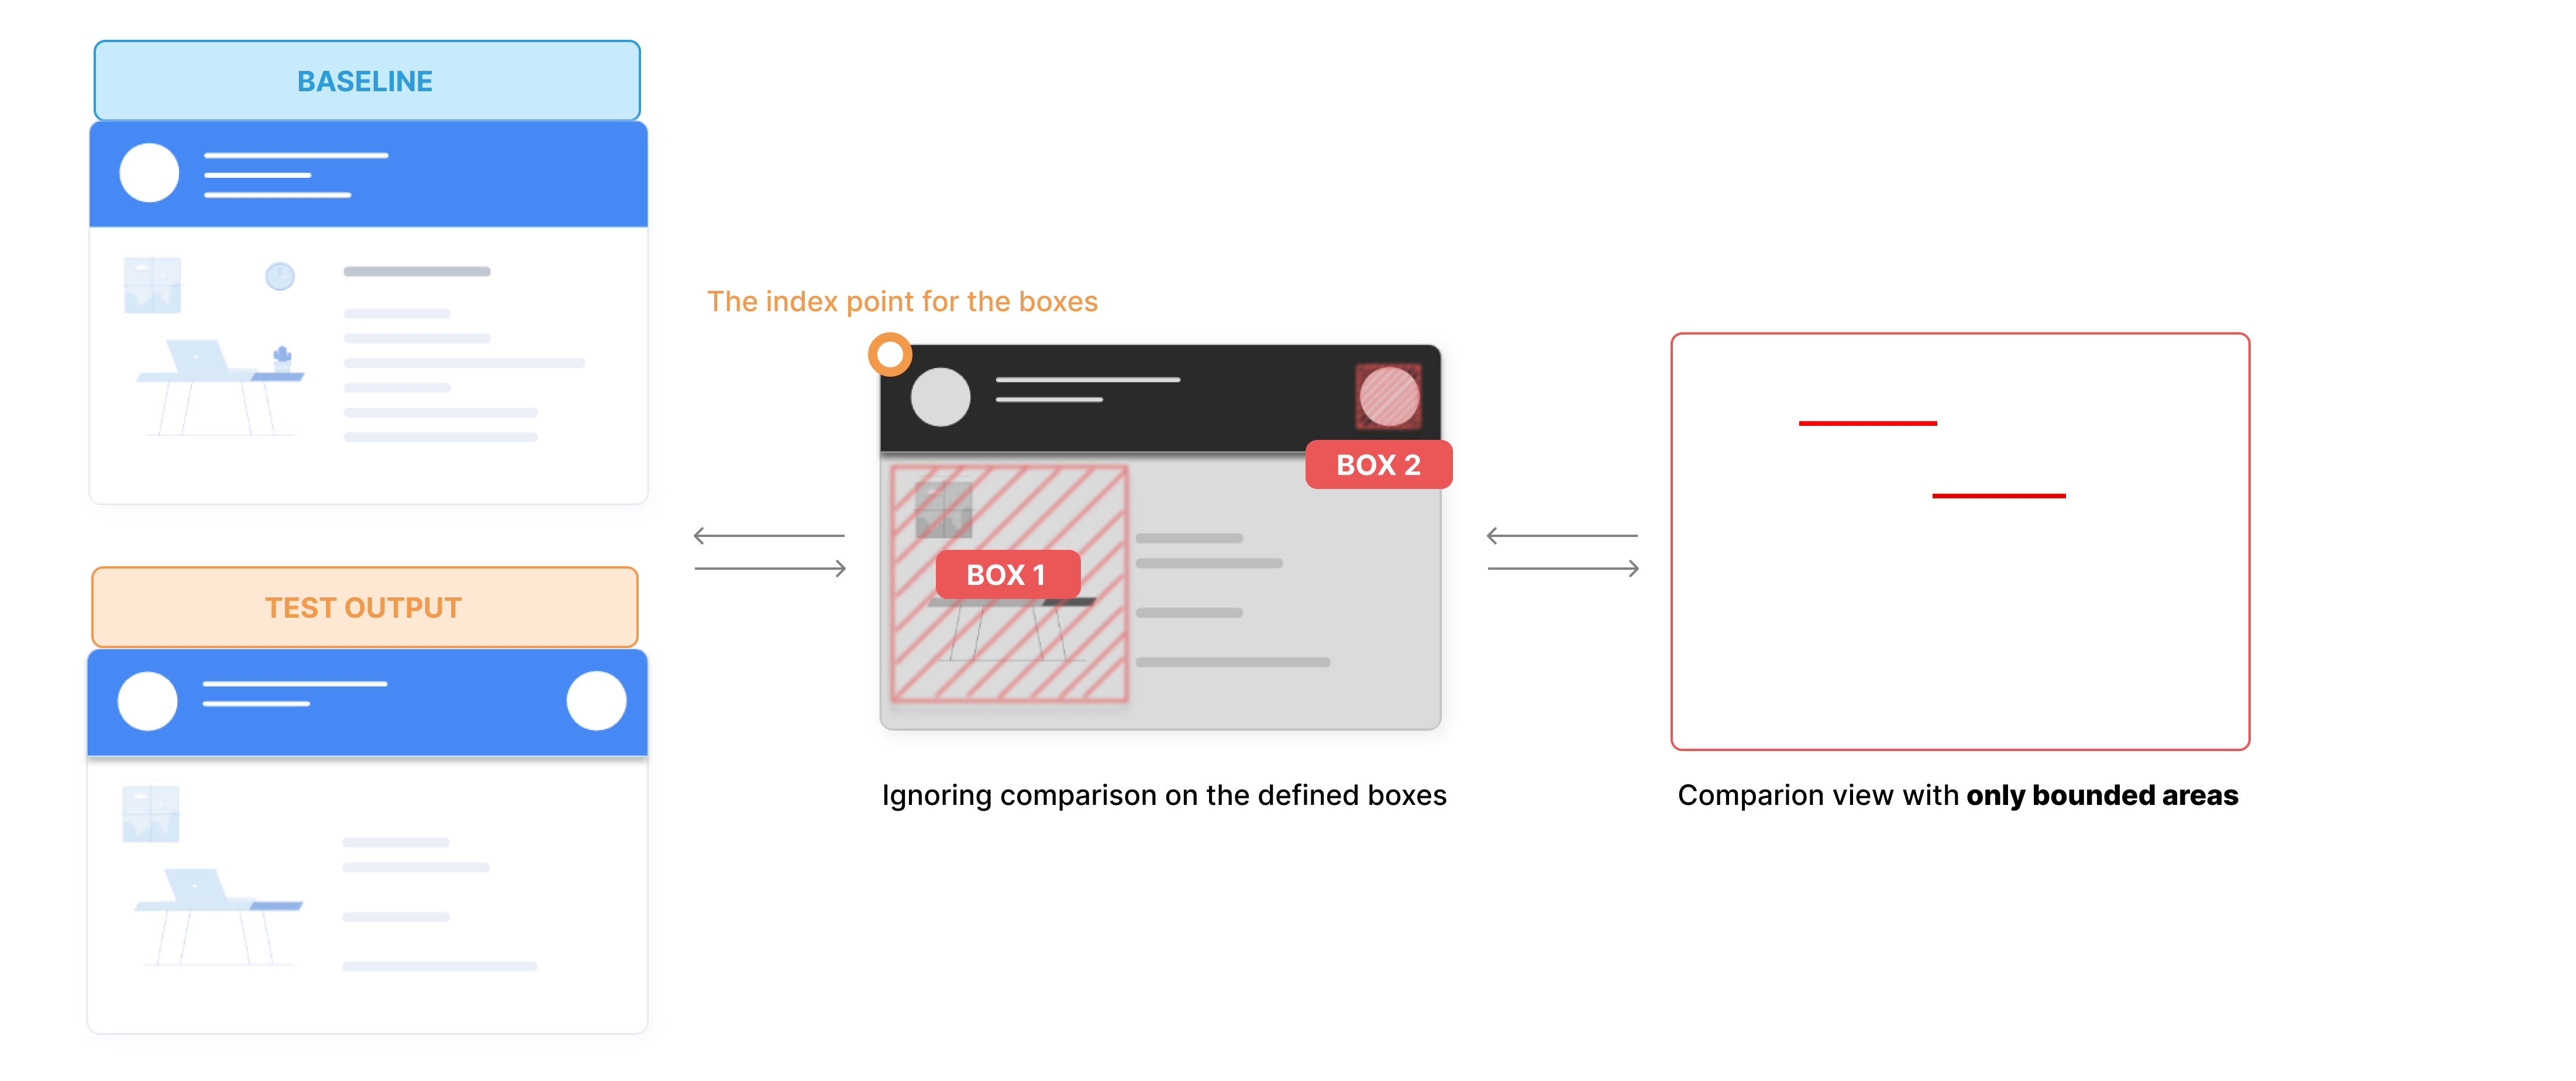
Ignore Boxes - Ignore only specific area
The ignored boxes are the areas created on the screenshot which needs to be ignored with the baseline comparing the other areas from the screenshot.
This specific case is used to ignore only a specific area of the screenshot from the baseline.
You can specify the following capability in the following format:
- Selenium
- Cypress
// Bounding box sample settings
const box1 = {
left: 100,
top: 500,
right: 800,
bottom: 300
};

const box2 = {
left: 800,
top: 50,
right: 20,
bottom: 700
};

let capabilities = {

  /*  ....Your Selenium capabilities go here */

  "smartUI.project": "<Your Project Name>" // Your SmartUI project name
  "ignoredBoxes" : [box1, box2] // Your bounding box configuration
};
"smart_ui":{
   "project":"<Your Project Name>",
   "ignoredBoxes":[
      {
         "left":100,
         "top":500,
         "right":800,
         "bottom":300
      },
      {
         "left":800,
         "top":50,
         "right":20,
         "bottom":700
      }
   ]
}
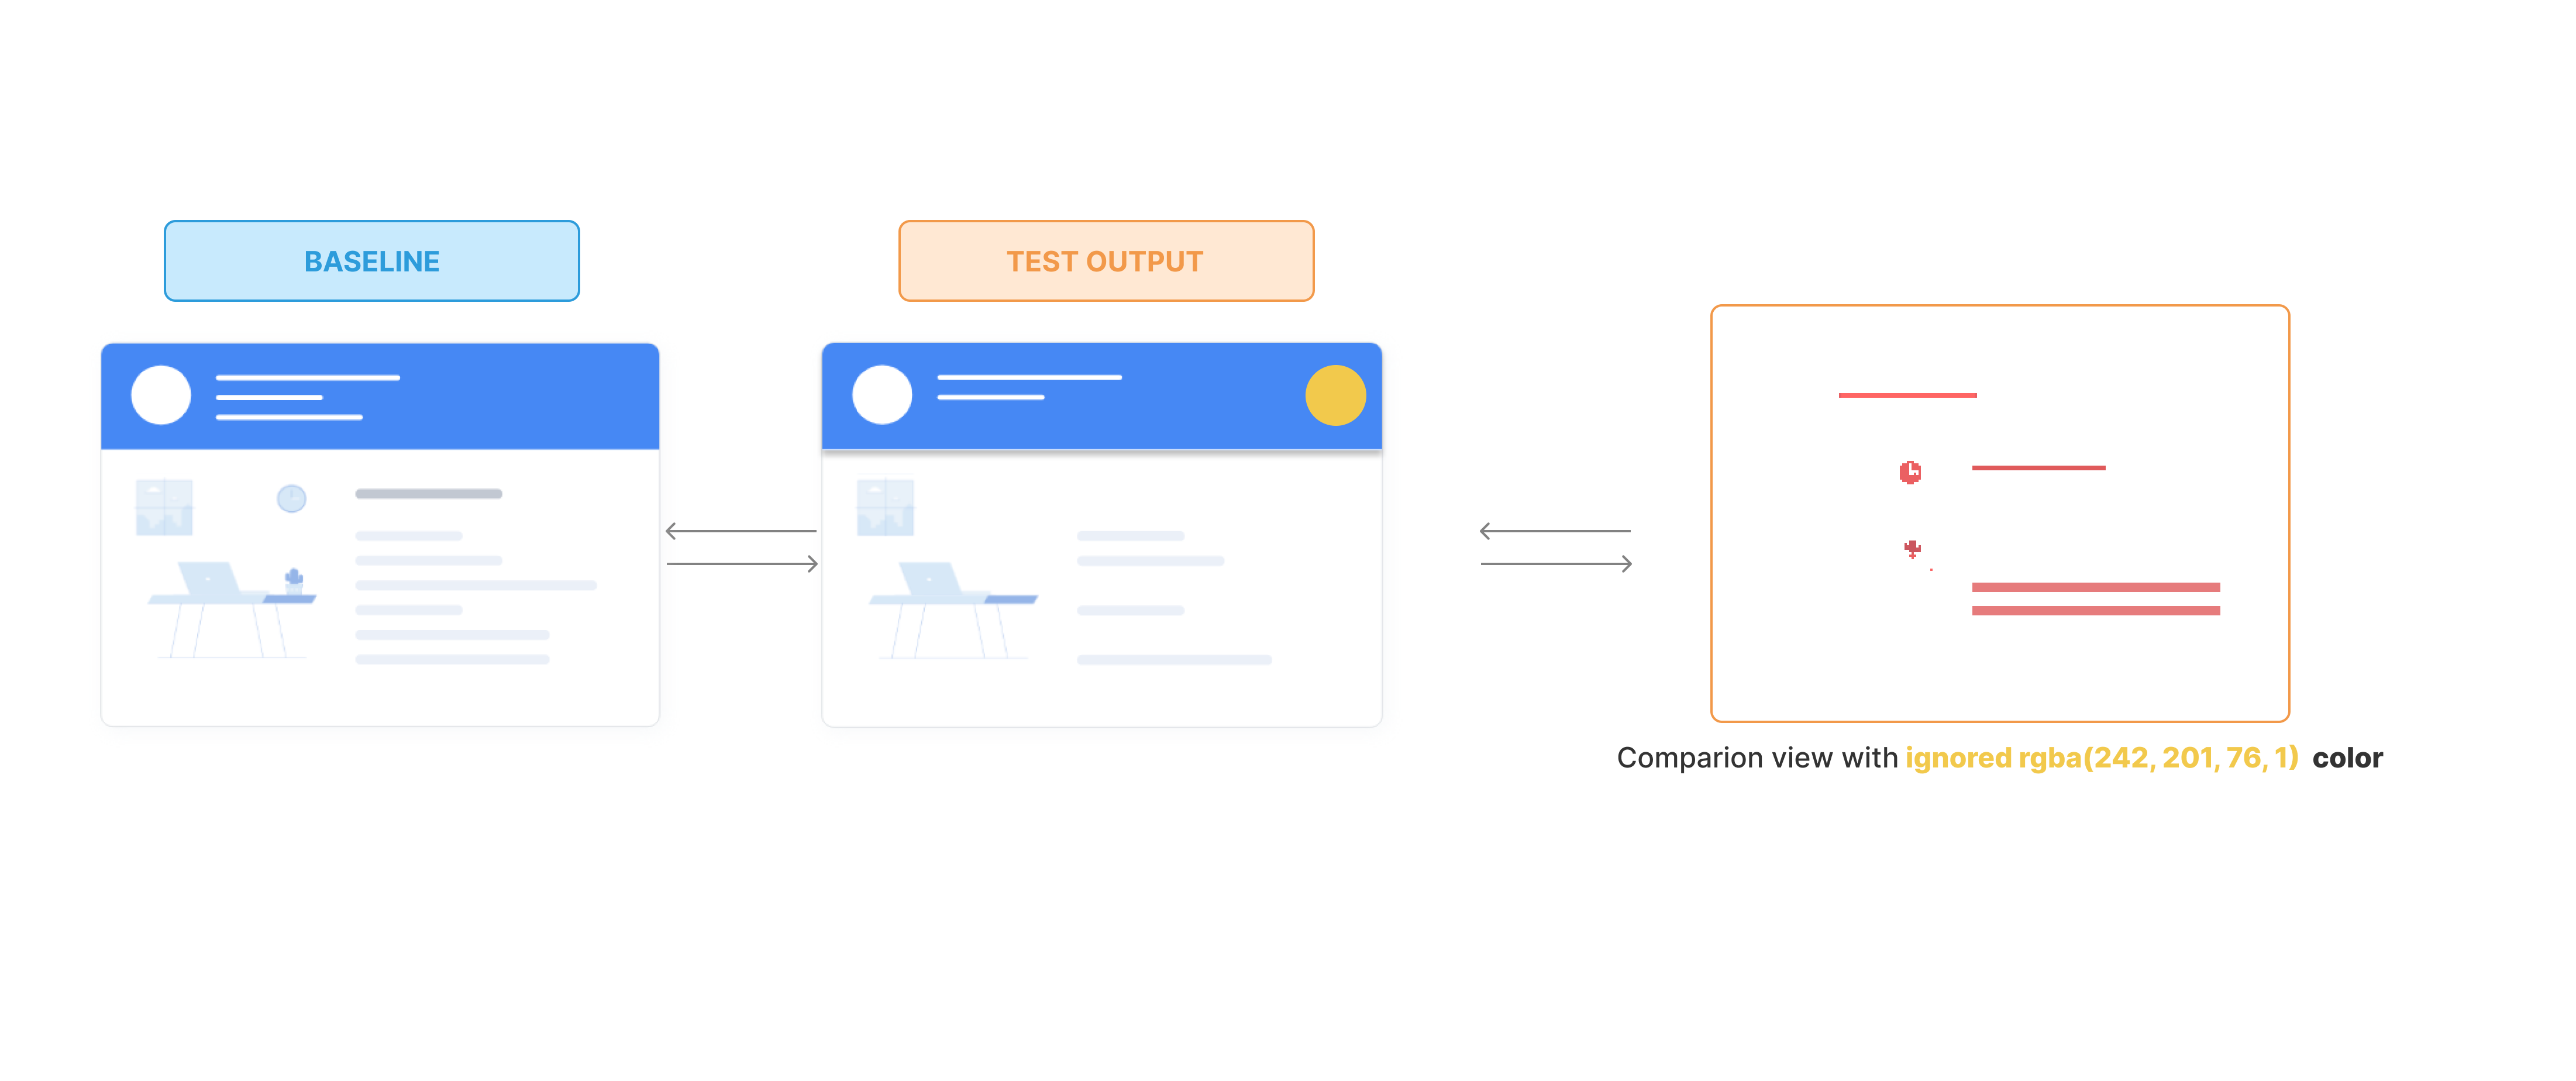
Ignore Areas Colored - Removes the colored content from the comparison
You can exclude the pixels that match the specified color on a baseline image from the comparison view. This feature will ignore that specific regions with the color pixels and shows the comparison view.
You can specify the following capability in the following format:
- Selenium
- Cypress
// Bounding box sample settings
const color = {
  r: 242,
  g: 201,
  b: 76,
  a: 1
};

let capabilities = {

  /*  ....Your Selenium capabilities go here */

  "smartUI.project": "<Your Project Name>" // Your SmartUI project name
  "ignoreAreasColoredWith" : color // Your bounding box configuration
};
"smart_ui":{
   "project":"<Your Project Name>",
   "ignoreAreasColoredWith": {
      "r": 242,
      "g": 201,
      "b": 76,
      "a": 1
  }
}