Advanced Features in Web Scanner
Overview
Web Scanner provides advanced configuration options to enhance your scanning capabilities. These features allow you to test authenticated pages, access network-restricted resources, simulate different geographic locations, and scan locally hosted applications.
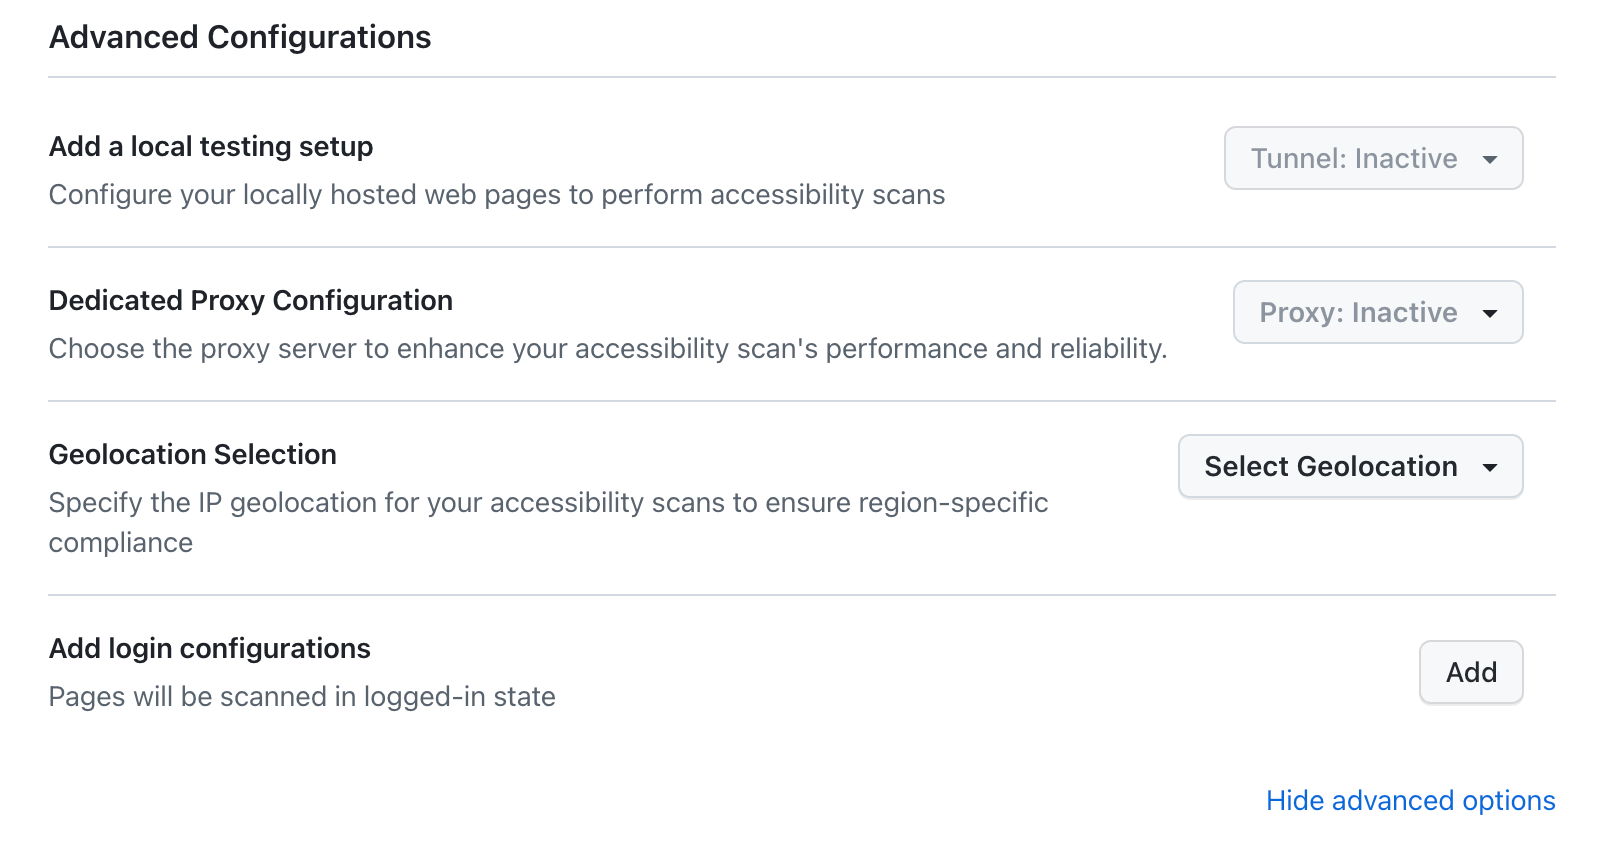
The advanced features are accessible from the Advanced Configurations section when setting up your scan. You can configure:
- Authentication: Test pages protected by Basic Auth or form-based authentication
- Dedicated Proxy: Access network-restricted resources through a whitelisted IP
- Geolocation: Simulate scans from different geographic locations
- Tunnel: Scan locally hosted web pages and applications
Authentication
Web Scanner supports two types of authentication methods to scan pages that require login credentials:
Basic Authentication
Basic Authentication is an HTTP authentication method where credentials are sent in the Authorization header. This method is useful for pages protected by HTTP Basic Auth.
When to Use Basic Authentication
- Pages protected by HTTP Basic Auth (e.g.,
https://username:password@example.com) - Staging or development environments with basic authentication
- Pages that require simple username/password authentication
Configuration Steps
- Navigate to Advanced Configurations in your scan setup
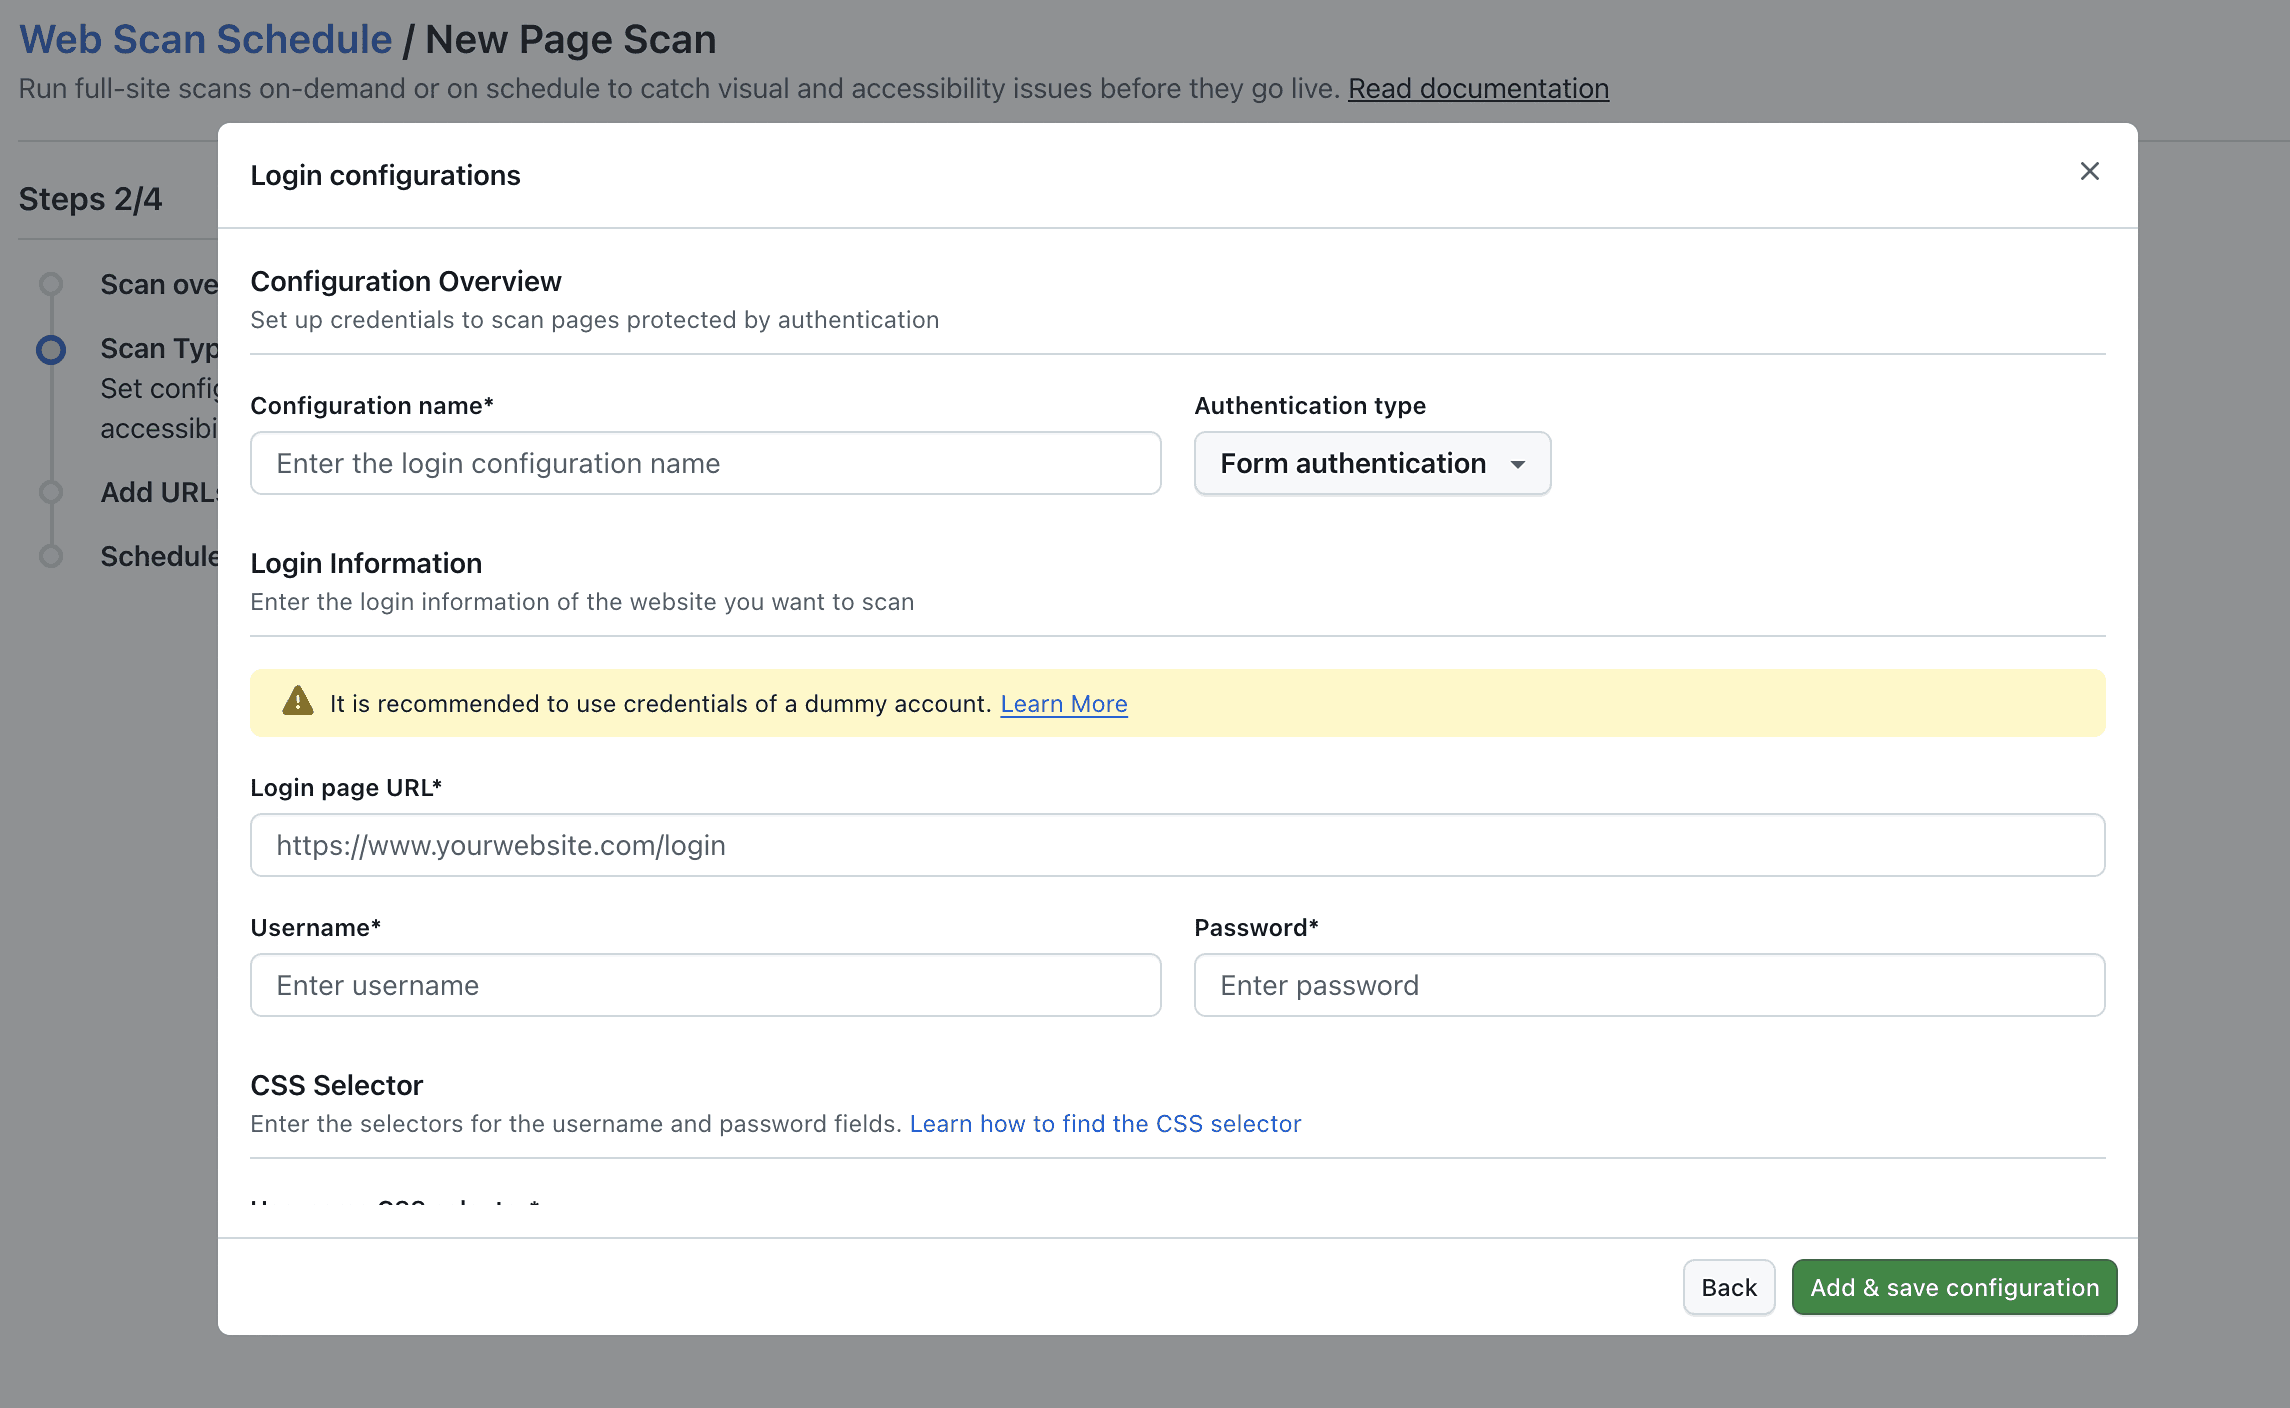
- Click Add login configurations
- In the Configuration Overview section:
- Enter a Configuration name (e.g., "Staging Environment")
- Select Authentication type as Basic authentication
- In the Login Information section:
- Enter your Username
- Enter your Password
- Click Add & save configuration
Note: It is recommended to use credentials of a dummy/test account for scanning purposes. Never use production credentials.
Form Authentication
Form Authentication allows you to authenticate using login forms on your website. This method requires CSS selectors to identify the username and password fields.
When to Use Form Authentication
- Websites with custom login forms
- Pages that require multi-step authentication
- Applications with complex authentication flows
Configuration Steps
- Navigate to Advanced Configurations in your scan setup
- Click Add login configurations
- In the Configuration Overview section:
- Enter a Configuration name (e.g., "Production Login")
- Select Authentication type as Form authentication
- In the Login Information section:
- Enter the Login page URL (e.g.,
https://www.yourwebsite.com/login) - Enter your Username
- Enter your Password
- Enter the Login page URL (e.g.,
- In the CSS Selector section:
- Enter the CSS selector for the username field (e.g.,
#username,.login-email,input[name="email"]) - Enter the CSS selector for the password field (e.g.,
#password,.login-password,input[type="password"])
- Enter the CSS selector for the username field (e.g.,
- Click Add & save configuration
Finding CSS Selectors
To find the CSS selector for form fields:
- Open your login page in a browser
- Right-click on the username field and select Inspect
- In the developer tools, right-click on the highlighted HTML element
- Select Copy > Copy selector or Copy CSS selector
- Use this selector in the Web Scanner configuration
Common CSS selector patterns:
- ID selector:
#username,#password - Class selector:
.login-email,.login-password - Attribute selector:
input[name="email"],input[type="password"] - Combined selector:
form.login-form input#username
Best Practices for Authentication
- Use Test Accounts: Always use dedicated test accounts with minimal permissions
- Secure Credentials: Never share authentication configurations publicly
- Verify Selectors: Test your CSS selectors before running full scans
- Handle Dynamic Content: Ensure selectors work even if page structure changes slightly
- Multiple Configurations: You can create multiple authentication configurations for different environments
Dedicated Proxy
Dedicated Proxy allows Web Scanner to access network-restricted resources through a whitelisted IP address. This is particularly useful for enterprise environments where resources are protected by IP whitelisting.
For detailed information about dedicated proxy configuration and IP whitelisting, refer to the Dedicated Proxy Documentation.
When to Use Dedicated Proxy
- Accessing resources behind corporate firewalls
- Testing applications with IP-based access restrictions
- Ensuring consistent IP address for compliance requirements
- Enterprise environments requiring network isolation
How Dedicated Proxy Works
- TestMu AI allocates a dedicated proxy server with a static IP address
- Your network administrator whitelists this IP address
- Web Scanner routes all scan requests through the dedicated proxy
- The proxy accesses your network-restricted resources using the whitelisted IP
Configuration Steps
- Navigate to Advanced Configurations in your scan setup
- Click on Dedicated Proxy Configuration
- Select your dedicated proxy region from the dropdown
- The proxy will be active for your scan session
Note: Dedicated Proxy is an enterprise feature. Contact your TestMu AI account manager to enable this feature for your organization.
Benefits of Dedicated Proxy
- Single IP Whitelisting: Only one IP address needs to be whitelisted instead of multiple IP ranges
- Consistent Access: All scans use the same IP address for predictable access patterns
- Network Security: Maintains your network security policies while enabling cloud-based scanning
- Compliance: Meets enterprise security and compliance requirements
Prerequisites
- Your organization must have a dedicated proxy enabled (enterprise feature)
- Network resources must be publicly discoverable but access-restricted
- The dedicated proxy IP must be whitelisted by your network administrators
Geolocation
Geolocation allows you to simulate scans from different geographic locations. This is essential for testing region-specific content, compliance requirements, and localized user experiences.
When to Use Geolocation
- Testing region-specific pricing or content
- Validating compliance with local regulations (GDPR, CCPA, etc.)
- Testing localized user experiences
- Verifying geo-targeted marketing campaigns
- Testing region-specific cookie consent banners
Configuration Steps
Geolocation can be configured in two ways:
Method 1: Advanced Configurations
- Navigate to Advanced Configurations in your scan setup
- Click on Geolocation Selection
- Use the search bar to find and select your desired country or region
- The scan will be executed with traffic routed through the selected location
Method 2: Scheduling Phase
- Geolocation can also be configured by selecting the timezone during the scheduling phase. When you set up your scan schedule, you can choose a timezone that corresponds to your desired geographic location.
For more information about geolocation capabilities and supported locations, refer to the Selenium Geolocation Documentation.
Supported Locations
Web Scanner supports geolocation simulation for numerous countries and regions worldwide. You can select from a comprehensive list including:
- Americas: United States, Canada, Brazil, Mexico, Argentina, and more
- Europe: United Kingdom, Germany, France, Spain, Italy, and more
- Asia-Pacific: India, Japan, China, Australia, Singapore, and more
- Middle East & Africa: UAE, Saudi Arabia, South Africa, and more
Use Cases
- Localized Content Testing: Verify that region-specific content displays correctly
- Compliance Testing: Ensure cookie consent banners and privacy notices appear for specific regions
- Pricing Validation: Test that region-specific pricing is displayed accurately
- Language Testing: Verify that the correct language is served based on geolocation
- Performance Testing: Test how your site performs from different geographic locations
Important Notes
- Geolocation affects the IP address used for scanning, not just the browser location
- Some features may not be available in all regions
- Geolocation cannot be used simultaneously with Tunnel in a single scan (use parallel scans if both are needed)
Tunnel
Tunnel enables Web Scanner to access locally hosted web pages and applications. This is essential for testing development environments, staging servers, or applications behind firewalls.
For comprehensive tunnel setup instructions, configuration options, and troubleshooting, refer to the Testing Locally Hosted Pages Documentation.
When to Use Tunnel
- Testing locally hosted applications (localhost, 127.0.0.1)
- Scanning development or staging environments
- Accessing applications behind corporate firewalls
- Testing applications not publicly accessible
How Tunnel Works
TestMu AI Tunnel creates a secure, encrypted connection between your local machine and the TestMu AI cloud infrastructure:
- You download and run the TestMu AI Tunnel binary on your local machine
- The tunnel establishes a secure connection to TestMu AI's cloud
- Web Scanner routes requests through the tunnel to access your local resources
- All communication is encrypted and secure
Configuration Steps
Step 1: Download Tunnel Binary
Download the TestMu AI Tunnel binary for your platform:
- Windows
- macOS
- Linux
Windows (64-bit)
https://downloads.lambdatest.com/tunnel/v3/windows/amd64/LT.exe
Windows (32-bit)
https://downloads.lambdatest.com/tunnel/v3/windows/386/LT.exe
macOS (Intel)
https://downloads.lambdatest.com/tunnel/v3/mac/amd64/LT
macOS (Apple Silicon)
https://downloads.lambdatest.com/tunnel/v3/mac/arm64/LT
Linux (64-bit)
https://downloads.lambdatest.com/tunnel/v3/linux/amd64/LT
Linux (ARM64)
https://downloads.lambdatest.com/tunnel/v3/linux/arm64/LT
Step 2: Start the Tunnel
- Windows
- macOS/Linux
LT.exe --user YOUR_LAMBDATEST_USERNAME --key YOUR_LAMBDATEST_ACCESS_KEY --tunnelName YOUR_TUNNEL_NAME
chmod +x LT
./LT --user YOUR_LAMBDATEST_USERNAME --key YOUR_LAMBDATEST_ACCESS_KEY --tunnelName YOUR_TUNNEL_NAME
Replace:
YOUR_LAMBDATEST_USERNAME: Your TestMu AI usernameYOUR_LAMBDATEST_ACCESS_KEY: Your TestMu AI access keyYOUR_TUNNEL_NAME: A unique name for your tunnel (e.g., "web-scanner-tunnel")
Step 3: Configure Tunnel in Web Scanner
- Navigate to Advanced Configurations in your scan setup
- Click on Add a local testing setup
- Select your tunnel from the dropdown (it should show as "Active" if running)
- The tunnel will be used to access your locally hosted pages
Tunnel Benefits
- Secure Connection: All tunnel traffic is encrypted using TLS 1.2
- No Public Access Required: Test applications that aren't publicly accessible
- Local Development Testing: Scan localhost and development servers
- Firewall Bypass: Access resources behind corporate firewalls
- Cost Effective: No need to deploy applications publicly for testing
Tunnel Best Practices
- Keep Tunnel Running: Ensure the tunnel is running before starting your scan
- Unique Tunnel Names: Use descriptive, unique names for multiple tunnels
- Network Stability: Ensure stable network connection for reliable tunnel operation
- Security: Never share tunnel credentials or expose them in public repositories
- Resource Management: Close tunnels when not in use to free up resources
Troubleshooting Tunnel Issues
- Connection Failures: Verify your network allows outbound connections on port 443
- Tunnel Not Appearing: Ensure the tunnel is running and you've used the correct credentials
- Timeout Errors: Check your local server is running and accessible
- Firewall Issues: Ensure your firewall allows the tunnel binary to make outbound connections
Combining Advanced Features
You can combine multiple advanced features in a single scan:
- Authentication + Tunnel: Test authenticated pages on locally hosted applications
- Geolocation + Dedicated Proxy: Test region-specific content through a dedicated proxy
- Authentication + Geolocation: Test authenticated pages from specific geographic locations
Note: Some feature combinations may have limitations. For example, Tunnel and Geolocation cannot be used simultaneously in a single scan. Use parallel scans if you need both features.
