Create & Manage Test Cases
Test Manager streamlines the process of creating, managing, and editing test cases. It enables users to develop manual test cases, allowing efficient management of all testing activities from a single platform.
Creating a Test Case
After selecting your project, type your test case title to create a new test case. You can create a folders to organize and store the test cases.

To add a new test case, click on the Add Test Case button on the right side or use Command + \ for Mac and Control + \ for Windows shortcut to create a new test case.
Press shift + Enter to create multiple test cases simultaneously.

After test case is created you will be redirected to a screen listing all the test cases.
By default test cases having no parent folder are stored under Untitled folder.

Filter Test Cases
Search by test case ID or title, and use the filters beside the search bar to narrow the list:
- Status and Tags.
- Under More: Automation Status, Created At, Created By, Issues, Priority, Type, PR Status, and the custom fields linked to the project.
Filters apply to the folder you are viewing, together with any search text. The Archived view and the Shared Incoming view offer the same filters, and Shared Incoming adds a Project filter for the source project.
Include or Exclude Values
Each filter that lists values has two modes, which you switch next to the filter's search box:
- Equals (default): shows test cases that have any of the selected values.
- Not Equals: hides test cases that have any of the selected values.
To exclude values:
- Open a filter, for example Tags.
- Select Not Equals next to the filter's search box.
- Select the values to leave out.
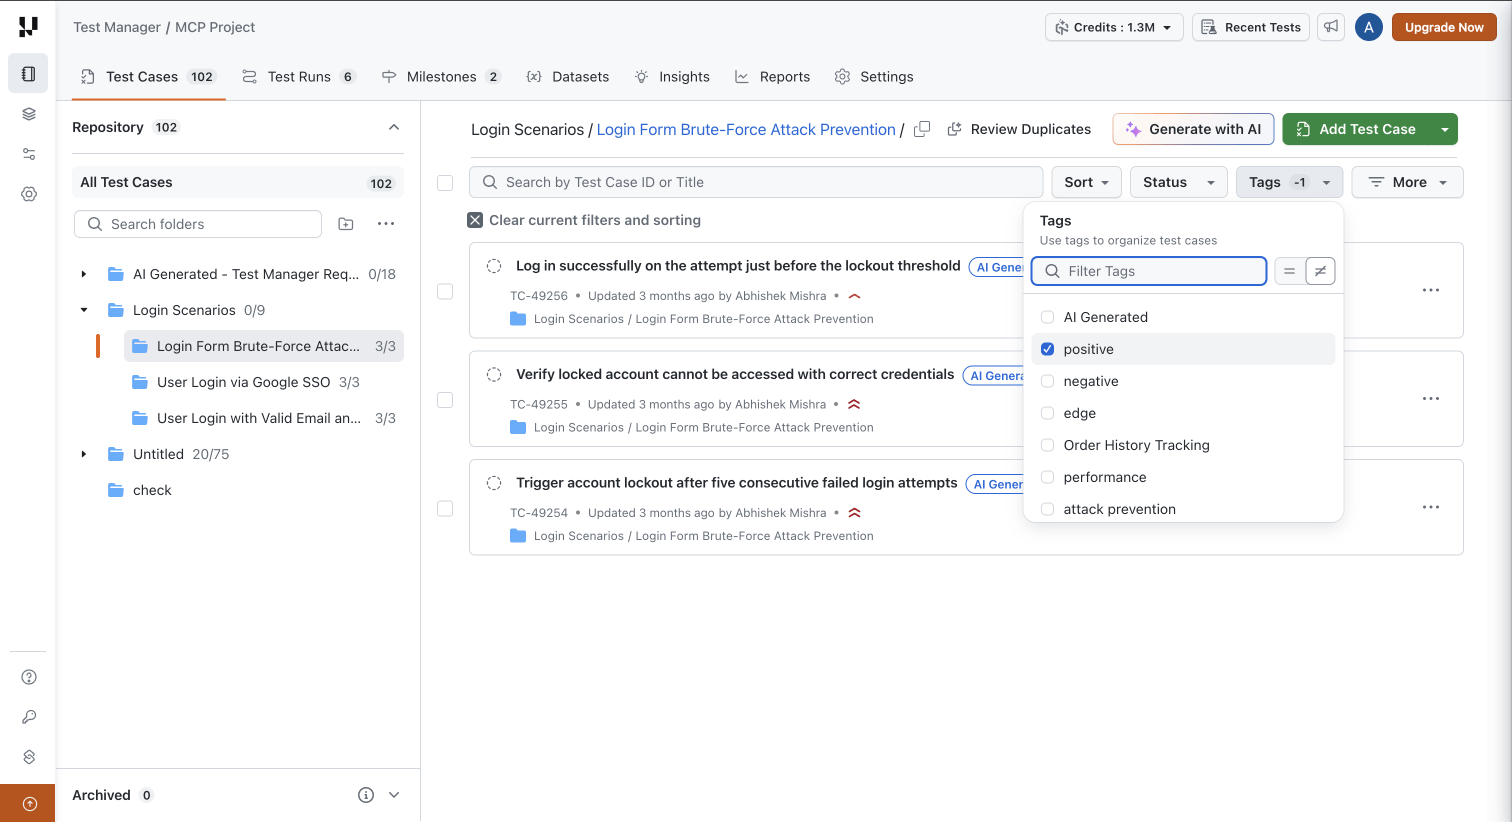
Switching between Equals and Not Equals keeps the values you selected. Selecting Not Equals without choosing any value does not change the list.
Test Cases With No Value Are Kept
Not Equals hides only the test cases that hold a selected value. Test cases with no value for that field stay in the list.
For example, say a custom field Layer has the values API, UI, and E2E, and older test cases were never given a layer. Excluding API and UI shows the E2E test cases and the test cases with no layer. Selecting E2E under Equals would show only the E2E test cases.
Fields that every test case has, such as Status, are never empty. Excluding every value of such a field leaves no test cases.
Fields With Multiple Values
Tags and multi select custom fields can hold several values on one test case. Under Not Equals, a test case is hidden if it has any of the excluded values. Excluding the tag iOS hides a test case tagged iOS and Android, and keeps a test case tagged only Android as well as test cases with no tags.
Combining Filters
- Within one filter, Equals matches test cases that have any of the selected values, and Not Equals hides test cases that have any of them.
- Across filters, a test case has to match every filter. Each filter can be in its own mode, for example Priority Equals High together with Tags Not Equals
flaky. - The folder you are viewing and the search text narrow the result further.
Fields That Support Not Equals
| Supports Not Equals | Does not support Not Equals |
|---|---|
| Status, Tags, Automation Status, Created By, Issues, Priority, Type, PR Status, Project (in Shared Incoming) | Created At, which filters by date range |
| Custom fields of type Dropdown (Single Select), Dropdown (Multi Select), and User | Custom fields of type String, Textarea, Number, URL, Date, and Boolean (Checkbox) |
Share a Filtered View
Your filters, including the Not Equals mode, are saved in the page URL. Reload the page, bookmark it, or share the link, and the same filtered list opens. Select Clear current filters and sorting to reset the list.
Act on Filtered Test Cases
When you select all test cases in a filtered list, bulk actions such as updating fields, moving, exporting, archiving, and deleting apply to exactly the test cases the filters show. Test cases hidden by a Not Equals filter are left untouched.
Manage Test Case
To retire a test case without deleting it, use Archive in the test case's three-dot menu. An archived test case leaves the repository and becomes read-only, but keeps its version history, past run results, and linked issues, and can be restored at any time. See Archive and Restore Test Cases.
Test Case Details
When you select a test case, you’ll be redirected to the Test Case Details page, where you can view Test Case details such as: Test Case Title, Description, Precondition , Attachments, System Fields: Type, Status, Priority, Tag(s) & Custom Fields

Testers can read the same details from a test instance without leaving the test run, on its Test case details tab. See Read the Test Case Details During Execution.
Test Case Steps
Test Steps can be accessed from the Test Steps section, present in the Summary Page of a Test Case.

The Test Manager offers a comprehensive Steps section with a rich text editor and these features:

1. Add Step level Attachments
2. Add Steps and Modules in between Steps
3. Duplicate a Step: Click the three-dot menu on any created step and select Duplicate Step to create a copy of that step immediately below it. This option is available for individual steps only and is not available for Modules.
4. Importing or Creating a Module:
-
Select Test Steps & click on the
Create Moduleoption to make a sharable module out of them. -
Import existing Modules by clicking on the Modules button.
To know more about how to use Modules refer the Modules doc.
5. Use Variables, Parameters, and Secrets: Type {{ in a step to insert a variable or secret, or ${ to insert a parameter. To learn more, see Variables, Parameters, and Secrets in Manual Test Cases and Modules.
In the Classic experience, modules that contain If-Else blocks or While Loops run only in KaneAI test cases. Selecting one in the Add Module dialog leaves Add in step disabled. Modules that use variables, parameters, or secrets can be added. See Importing Modules into Test Cases.
Add New Step:
To add a new step click on on the Add Test Step button.

You can use the Generate with AI option to ask agent to analyse your test case details & generate the next step of action for you.
Save Changes:
To save the changes made in the Test Case click on the Save Changes button OR use the Command + / for Mac & Ctrl + / shortcut.
Any change in the Test Case, on saving will create a new version for that Test Case. You can add a commit message to note the reason for changes. To know more about how versioning works checkout the Versioning doc.
Automate with KaneAI
A saved test case can be handed to KaneAI for automated authoring. Open the test case and click Automate with KaneAI in the Automate section of the test case detail. This opens a KaneAI session pre-filled with the test case's steps, where you author the automated test and then execute it.
If the test case uses environment variables, choose the environment in the Environment field before you start testing. The environment cannot be changed once the session starts. See Choose an Environment When Automating With KaneAI.
This works for both test case templates:
| Template | What KaneAI receives |
|---|---|
| Manual Test Steps | The ordered steps and their expected results |
| Behaviour Driven Development | The Given / When / Then scenarios, read directly — no conversion is needed |
The action requires KaneAI access, and the test case must have content — a test case with no steps or no scenarios cannot be automated.
Test Case Runs Section
Test Case Runs Section provides an overview of a test case's executions & plannings, whether are manual or automated. It includes detailed information of Test Instances of the Test case such as applied configuration, executed by, Test Run name, Test Instance Execution Status, Execution time and filters based on available fields.
Executed Test Instances of Test Case
- This section displays test instances that have been executed. You can filter the test instances based on the executor and the current status.

Planned Test Instances of Test Case
- This section shows Planned Instances that are included in a Test Run but their execution is not yet started. You can filter Test Instances based on the Assignee of the Test Instance.

- On clicking on that Test Case's execution you will be redirected to
Automation Dashboardif its a Automation execution, theTest Instance Pageif its Manual Instance orTest Runs Pageif its a unexecuted Automation Instance.
Issues section
This section lists the linked Jira/ADO Issues with the Test Case. For more information refer this page
Version History
This section allows you to manage the Version History of the test caase by comparing Versions, Viewing or Reverting to them. For more information refer this page.

 Chat with Us