Bitbucket Pipeline Integration with SmartUI
Bitbucket is a web-based version control repository hosting service owned by Atlassian. It is primarily designed for development teams to manage their code, collaborate on projects, and streamline their workflows.
This document will show you how to integrate Bitbucket Pipeline with SmartUI to shorten your test cycles.
Steps to Integrate Bitbucket Pipeline with SmartUI
To integrate Bitbucket Pipeline with SmartUI, follow the below steps. You can use your own project to configure and test it. For demo purposes, we are using the sample repository.
Download or Clone the code sample from the TestMu AI GitHub repository to run the tests on the SmartUI.
 View on GitHub
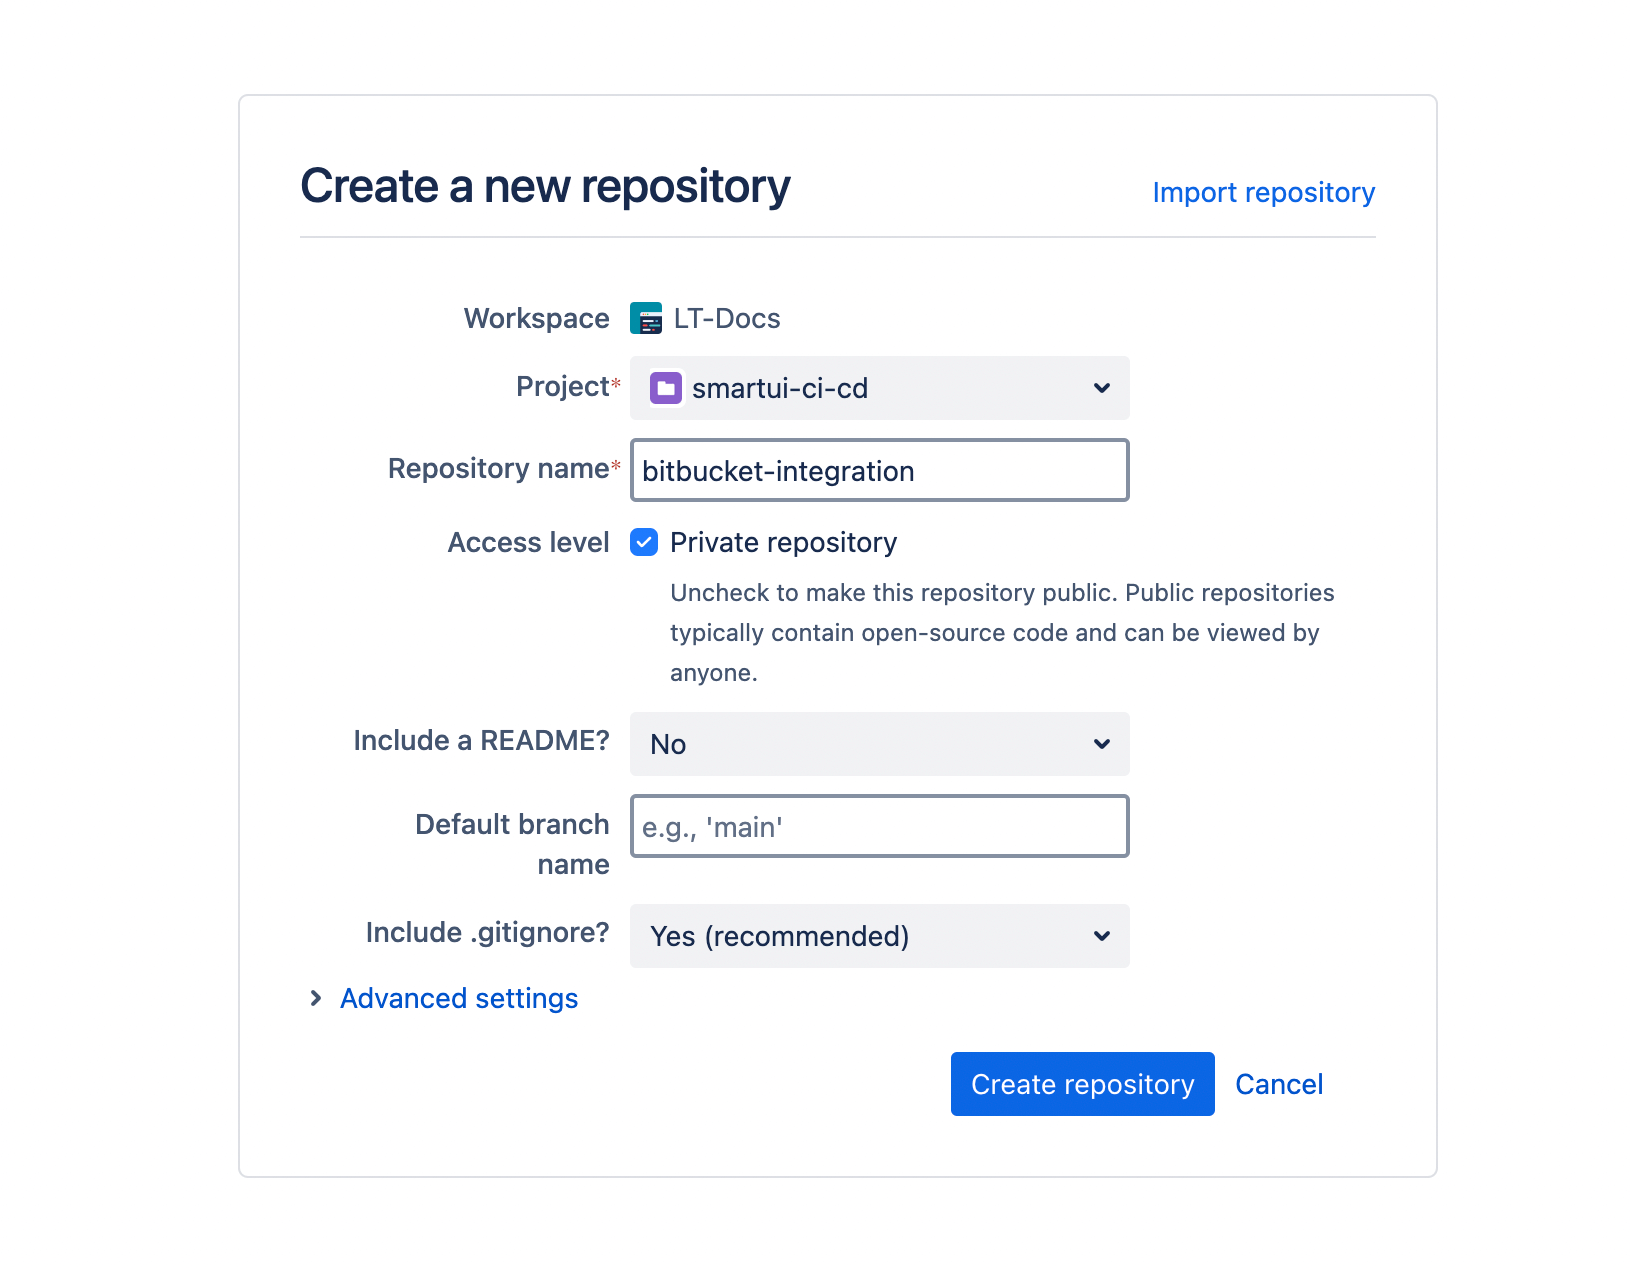
Step 1: Setup your Projects and Repository in Bitbucket
- Click on the Create >> Project.
- Enter your Project details and click on Create Project.

- Now click on the Create Repository button. You can either create a new repository or import your existing repository.
Step 2: Create a New Workflow
- Navigate to the Deployment section. Select your required template for CI/CD workflow file. For the demo we are using the Test template.
- Now, write your workflow YAML file. Here is the sample file for your reference.
- Commit this yaml file in your repository and make the required changes in your code to automatically trigger the pipeline.
loading...
You can also store your LT_USERNAME, LT_ACCESS_KEY and PROJECT_TOKEN as secrets in your Bitbucket project repository.
Step 3: Check the output
- After triggering the workflow, check your results in the SmartUI Dashboard

Best Practices
- Secret Management
- Pipeline Optimization
- Build Naming
- Error Handling
- Resource Management
- Resource Management
Secret Management
- Never commit credentials to repository
- Use Bitbucket Pipelines Variables for all sensitive data
- Rotate secrets regularly
- Use different secrets for different environments
Pipeline Optimization
- Use parallel steps for faster execution
- Cache dependencies to speed up pipelines
- Only run visual tests on relevant branches
- Set up pipeline conditions to avoid unnecessary runs
Example:
branches:
  main:
    - step:
        name: Run Visual Tests
Build Naming
- Use meaningful build names that include branch/commit info
- Include commit SHA for traceability
- Use consistent naming conventions
Example:
variables:
  BUILD_NAME: $BITBUCKET_BRANCH-$BITBUCKET_COMMIT"
Error Handling
- Set up proper error handling in pipelines
- Use pipeline status checks
- Configure notifications for failures
- Add retry logic for flaky tests
Resource Management
- Limit concurrent pipeline runs
- Clean up old builds regularly
- Monitor pipeline execution time
- Optimize test execution order
Resource Management
- Limit concurrent pipeline runs
- Clean up old builds regularly
- Monitor pipeline execution time
- Optimize test execution order
Troubleshooting
- Pipeline Fails with Variable Not Found
- PROJECT_TOKEN Not Available
- Tests Run But No Results in Dashboard
- Pipeline Times Out
- Dependencies Installation Fails
- SmartUI CLI Not Found
Issue: Pipeline Fails with "Variable Not Found"
Symptoms: Pipeline fails with error about missing variables
Possible Causes:
- Variables not created in Bitbucket repository
- Variable names don't match
- Variables not accessible to pipeline
Solutions:
-
Verify variables exist in repository settings:
- Go to Repository Settings → Pipelines → Repository variables
- Check
LT_USERNAME,LT_ACCESS_KEY, andPROJECT_TOKENexist
-
Ensure variable names match exactly (case-sensitive)
-
Check variable scope (repository, workspace, or deployment level)
-
Verify variables are secured if needed
Issue: PROJECT_TOKEN Not Available
Symptoms: Pipeline prompts for PROJECT_TOKEN or token not found
Possible Causes:
- PROJECT_TOKEN not set as repository variable
- Variable not passed to step
- Variable secured incorrectly
Solutions:
-
Add PROJECT_TOKEN as Bitbucket Repository Variable
-
Pass variable to step:
variables:
PROJECT_TOKEN: $PROJECT_TOKEN -
Check variable is secured if needed
-
Verify variable scope includes your branch
Issue: Tests Run But No Results in Dashboard
Symptoms: Pipeline completes but screenshots don't appear in SmartUI
Possible Causes:
- Incorrect PROJECT_TOKEN
- Project name mismatch
- Network issues
- Pipeline step failure
Solutions:
-
Verify PROJECT_TOKEN is correct:
- Check token in SmartUI Project Settings
- Ensure token includes project ID prefix
-
Check pipeline logs for errors:
after-script:
- echo Checking logs..." -
Verify network connectivity in pipeline
-
Check if SmartUI CLI step completed successfully
Issue: Pipeline Times Out
Symptoms: Pipeline execution exceeds time limit
Possible Causes:
- Too many tests running
- Slow test execution
- Network latency
- Resource constraints
Solutions:
-
Increase pipeline timeout in Bitbucket settings
-
Run tests in parallel using parallel steps:
parallel:
  - step:
      name: Test Group 1
  - step:
name: Test Group 2 -
Optimize test execution
-
Split tests across multiple pipeline steps
Issue: Dependencies Installation Fails
Symptoms: npm install or dependency installation fails
Possible Causes:
- Network issues
- Package registry problems
- Version conflicts
- Node version mismatch
Solutions:
-
Use specific Node version:
image: node:18 -
Clear npm cache:
script:
  - npm cache clean --force
- npm install -
Use package-lock.json for consistent installs
-
Check for version conflicts in package.json
Issue: SmartUI CLI Not Found
Symptoms: npx smartui command fails with command not found"
Possible Causes:
- Node.js not available in image
- npm not available
- PATH issues
Solutions:
-
Ensure Node.js is available:
image: node:18 -
Verify npm is available:
script:
- npm --version -
Install SmartUI CLI explicitly:
script:
  - npm install -g @lambdatest/smartui-cli
Getting Help
If you encounter issues not covered here:
- Review Bitbucket Pipelines Documentation
- Check SmartUI CLI Documentation for CLI-specific issues
- Visit TestMu AI Support for additional resources
- Contact support at support@testmu.ai or use 24/7 Chat Support
