How to Run Your First Cypress Test on TestMu AI
If you already write Cypress tests, running your End-to-End (E2E) testing on TestMu AI lets you execute those same tests across multiple browser versions on the cloud instead of a single local browser. You do it by cloning the sample project, setting your credentials, configuring capabilities in lambdatest-config.json, and running the test with the TestMu AI Cypress CLI.
Prerequisites
Set up the following before you run the test so the CLI can authenticate and locate your project.
Clone the TestMu AI sample Cypress Cloud repo used in this document to follow along with the same files shown here.  View on GitHub
Complete these three steps to prepare your environment for the first run.
- Clone the TestMu AI Cypress-Cloud GitHub repo and navigate to the cloned directory.
git clone https://github.com/LambdaTest/Cypress-Cloud.git
cd Cypress-Cloud
- To run Cypress tests, set your TestMu AI username and access key in the environment variables. You can get them from the TestMu AI Automation Dashboard.
Windows
Verifiedset LT_USERNAME="YOUR_LAMBDATEST_USERNAME"
set LT_ACCESS_KEY="YOUR_LAMBDATEST_ACCESS_KEY"
macOS/Linux
Verifiedexport LT_USERNAME="YOUR_LAMBDATEST_USERNAME"
export LT_ACCESS_KEY="YOUR_LAMBDATEST_ACCESS_KEY"
- Install Node.js version 12 or higher. You can download it from the official Node.js website.
Authentication
TestMu AI reads your credentials in one of three ways. When more than one is set, this order of precedence applies: CLI arguments > lambdatest-config.json > environment variables.
Environment variables: set LT_USERNAME and LT_ACCESS_KEY as shown in Prerequisites.
| Env variable | Accepted value |
|---|---|
LT_USERNAME | Your TestMu AI username |
LT_ACCESS_KEY | Your TestMu AI access key |
lambdatest-config.json: set them under the lambdatest_auth block:
"lambdatest_auth": {
   "username": "<your username>",
   "access_key": "<your access key>"
}
CLI arguments: pass them on the run command (these override the other two methods):
| Arg | Shorthand | Value |
|---|---|---|
--username | --user | Your TestMu AI username |
--access_key | --ak | Your TestMu AI access key |
lambdatest-cypress run --username=<your username> --ak=<your access key>
Running Your First Test
Follow these steps to run your first Cypress test on the TestMu AI platform. The steps cover both Cypress v10 and Cypress v9 projects, so pick the tab that matches your setup as you go.
- Install the TestMu AI Cypress CLI using the below command.
npm install -g lambdatest-cypress-cli
- Clone the Cypress kitchen sink repo using the following command.
- Cypress v10
- Cypress v9
# Clone the kitchen sink repo
git clone https://github.com/cypress-io/cypress-example-kitchensink.git

# Go to the cloned directory
cd cypress-example-kitchensink
# Clone the kitchen sink repo
git clone https://github.com/cypress-io/cypress-example-kitchensink.git

# Go to the cloned directory
cd cypress-example-kitchensink

# Checkout to this commit
git checkout ab10094ef7b199ae7febafec413a0626414bcd3c
Once you clone the kitchen sink repo, below will be the structure of your Cypress project.
Verified- Cypress v10
- Cypress v9
...
cypress
|-- fixtures
|-- e2e
|-- support
cypress.config.js
...
...
cypress
|-- fixtures
|-- integration
|-- plugins
|-- support
cypress.json
...
- Install the npm dependencies by passing the below command.
npm install
- Create the
lambdatest-config.jsonfile that contains configurations like auth, capabilities, and test settings needed to run successfully on TestMu AI.
Use init command to generate the sample configuration files.
- Cypress v10
- Cypress v9
lambdatest-cypress init --cv=10
lambdatest-cypress init
Once you run the above command, below is the project structure for the lambdatest-config.json file.
- Cypress v10
- Cypress v9
{
  "lambdatest_auth": {
     "username": "<your TestMu AI username>",
     "access_key": "<your TestMu AI access key>"
  },
  "browsers": [
     {
        "browser": "Chrome",
        "platform": "Windows 10",
        "versions": [
           "latest-1"
        ]
     },
     {
        "browser": "Firefox",
        "platform": "Windows 10",
        "versions": [
           "latest-1"
        ]
     }
  ],
  "run_settings": {
     "cypress_config_file": "cypress.config.js",
     "reporter_config_file": "base_reporter_config.json",
     "build_name": "build-name",
     "parallels": 1,
     "specs": "./*.cy.js",
     "ignore_files": "",
     "network": false,
     "headless": false,
     "npm_dependencies": {
        "cypress": "10.0.0"
     }
  },
  "tunnel_settings": {
     "tunnel": false,
     "tunnel_name": null
  }
}
app
{
  "lambdatest_auth": {
     "username": "<your TestMu AI username>",
     "access_key": "<your TestMu AI access key>"
  },
  "browsers": [
     {
        "browser": "Chrome",
        "platform": "Windows 10",
        "versions": [
           "latest-1"
        ]
     },
     {
        "browser": "Firefox",
        "platform": "Windows 10",
        "versions": [
           "latest-1"
        ]
     }
  ],
  "run_settings": {
     "cypress_config_file": "cypress.json",
     "reporter_config_file": "base_reporter_config.json",
     "build_name": "build-name",
     "parallels": 1,
     "specs": "./*.spec.js",
     "ignore_files": "",
     "network": false,
     "headless": false,
     "npm_dependencies": {
        "cypress": "9.0.0"
     }
  },
  "tunnel_settings": {
     "tunnel": false,
     "tunnel_name": null
  }
}
- Pass the below command to run the test.
lambdatest-cypress run
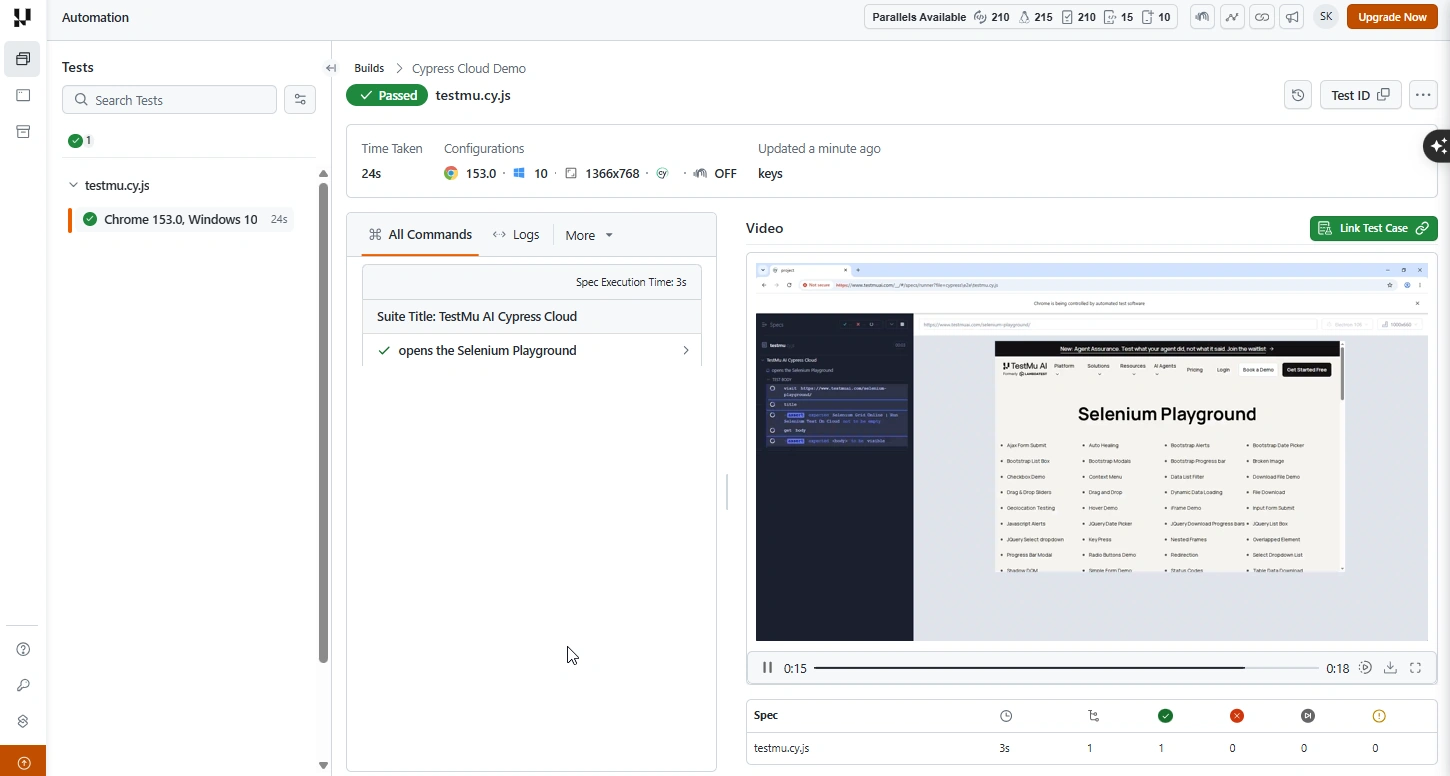
- Visit the TestMu AI Automation dashboard to view your test results. The CLI also prints a link to view the Cypress test build.
Run Your Tests in Parallel
Once your first test runs, you can execute multiple Cypress tests at once to cut total run time. Configure parallel execution in either of two ways.
Using the CLI: pass the --parallels flag with the number of sessions:
--parallels <number of parallel sessions>
For example, to run your Cypress tests on 5 parallel sessions:
Verifiedlambdatest-cypress run --parallels 5
Using lambdatest-config.json: set the parallels key under run_settings:
{
  "run_settings": {
    "parallels": 5
  }
}
The number of parallel tests running at a time depends on the concurrency plan of your TestMu AI account. If you request more parallel tests than your plan allows, the extra tests are queued and run as running tests finish. For example, on a 5-session plan, running 50 tests runs 5 at a time and queues the other 45.
Testing Locally Hosted or Privately Hosted Projects
To test locally hosted websites on the TestMu AI platform, set up the TestMu AI tunnel and run commands using the CLI, or use UnderPass, the TestMu AI GUI-based desktop app. Once the TestMu AI tunnel or UnderPass is set up and started, you can use Cypress to test locally hosted websites.
Next, activate the tunnel capability in the lambdatest-config.json file under the tunnel_settings section as shown below.
  "tunnel_settings": {
		"tunnel": true,
		"tunnel_name": "LT_Tunnel"
	}
You can provide the name of the TestMu AI tunnel as per your requirements.
Related Cypress Guides
Continue with the guides below to generate, configure, and scale your Cypress runs on TestMu AI.
- Generate Cypress tests with AI coding assistants using Cypress Agent Skills.
- Reference the Cypress CLI commands for the full lambdatest-cypress command and flag list.
- Check the supported browsers and OS to see the versions and platforms you can target.


 Chat with Us