LambdaTest SSO & Google Workspace Using SAML
LambdaTest provides seamless Single Sign-On (SSO) integration with Google Workspace, enabling your team to access LambdaTest using their existing Google credentials. This integration streamlines user management and enhances security by centralizing authentication through your Google Workspace identity provider.
This comprehensive guide will walk you through configuring SAML-based SSO between your LambdaTest organization and Google Workspace, ensuring a smooth and secure authentication experience for your team.
Prerequisites
Before configuring SSO integration, ensure you have the following:
- LambdaTest Enterprise Plan: SSO functionality is available with our Enterprise subscription. Learn more about managing your subscription.
- LambdaTest Organization Admin Access: You must have administrative privileges within your LambdaTest organization to configure SSO settings.
- Google Workspace Super Admin Access: Administrative access to your organization's Google Workspace instance is required to create and configure SAML applications.
Configuration Guide
The SSO integration process involves configuring both Google Workspace and LambdaTest. We'll guide you through each step to ensure a successful setup.
Step 1: Create SAML App in Google Workspace
-
Access Google Admin Console: Sign in to the Google Admin Console using a user account. This level of access is required to create and configure SAML applications.
-
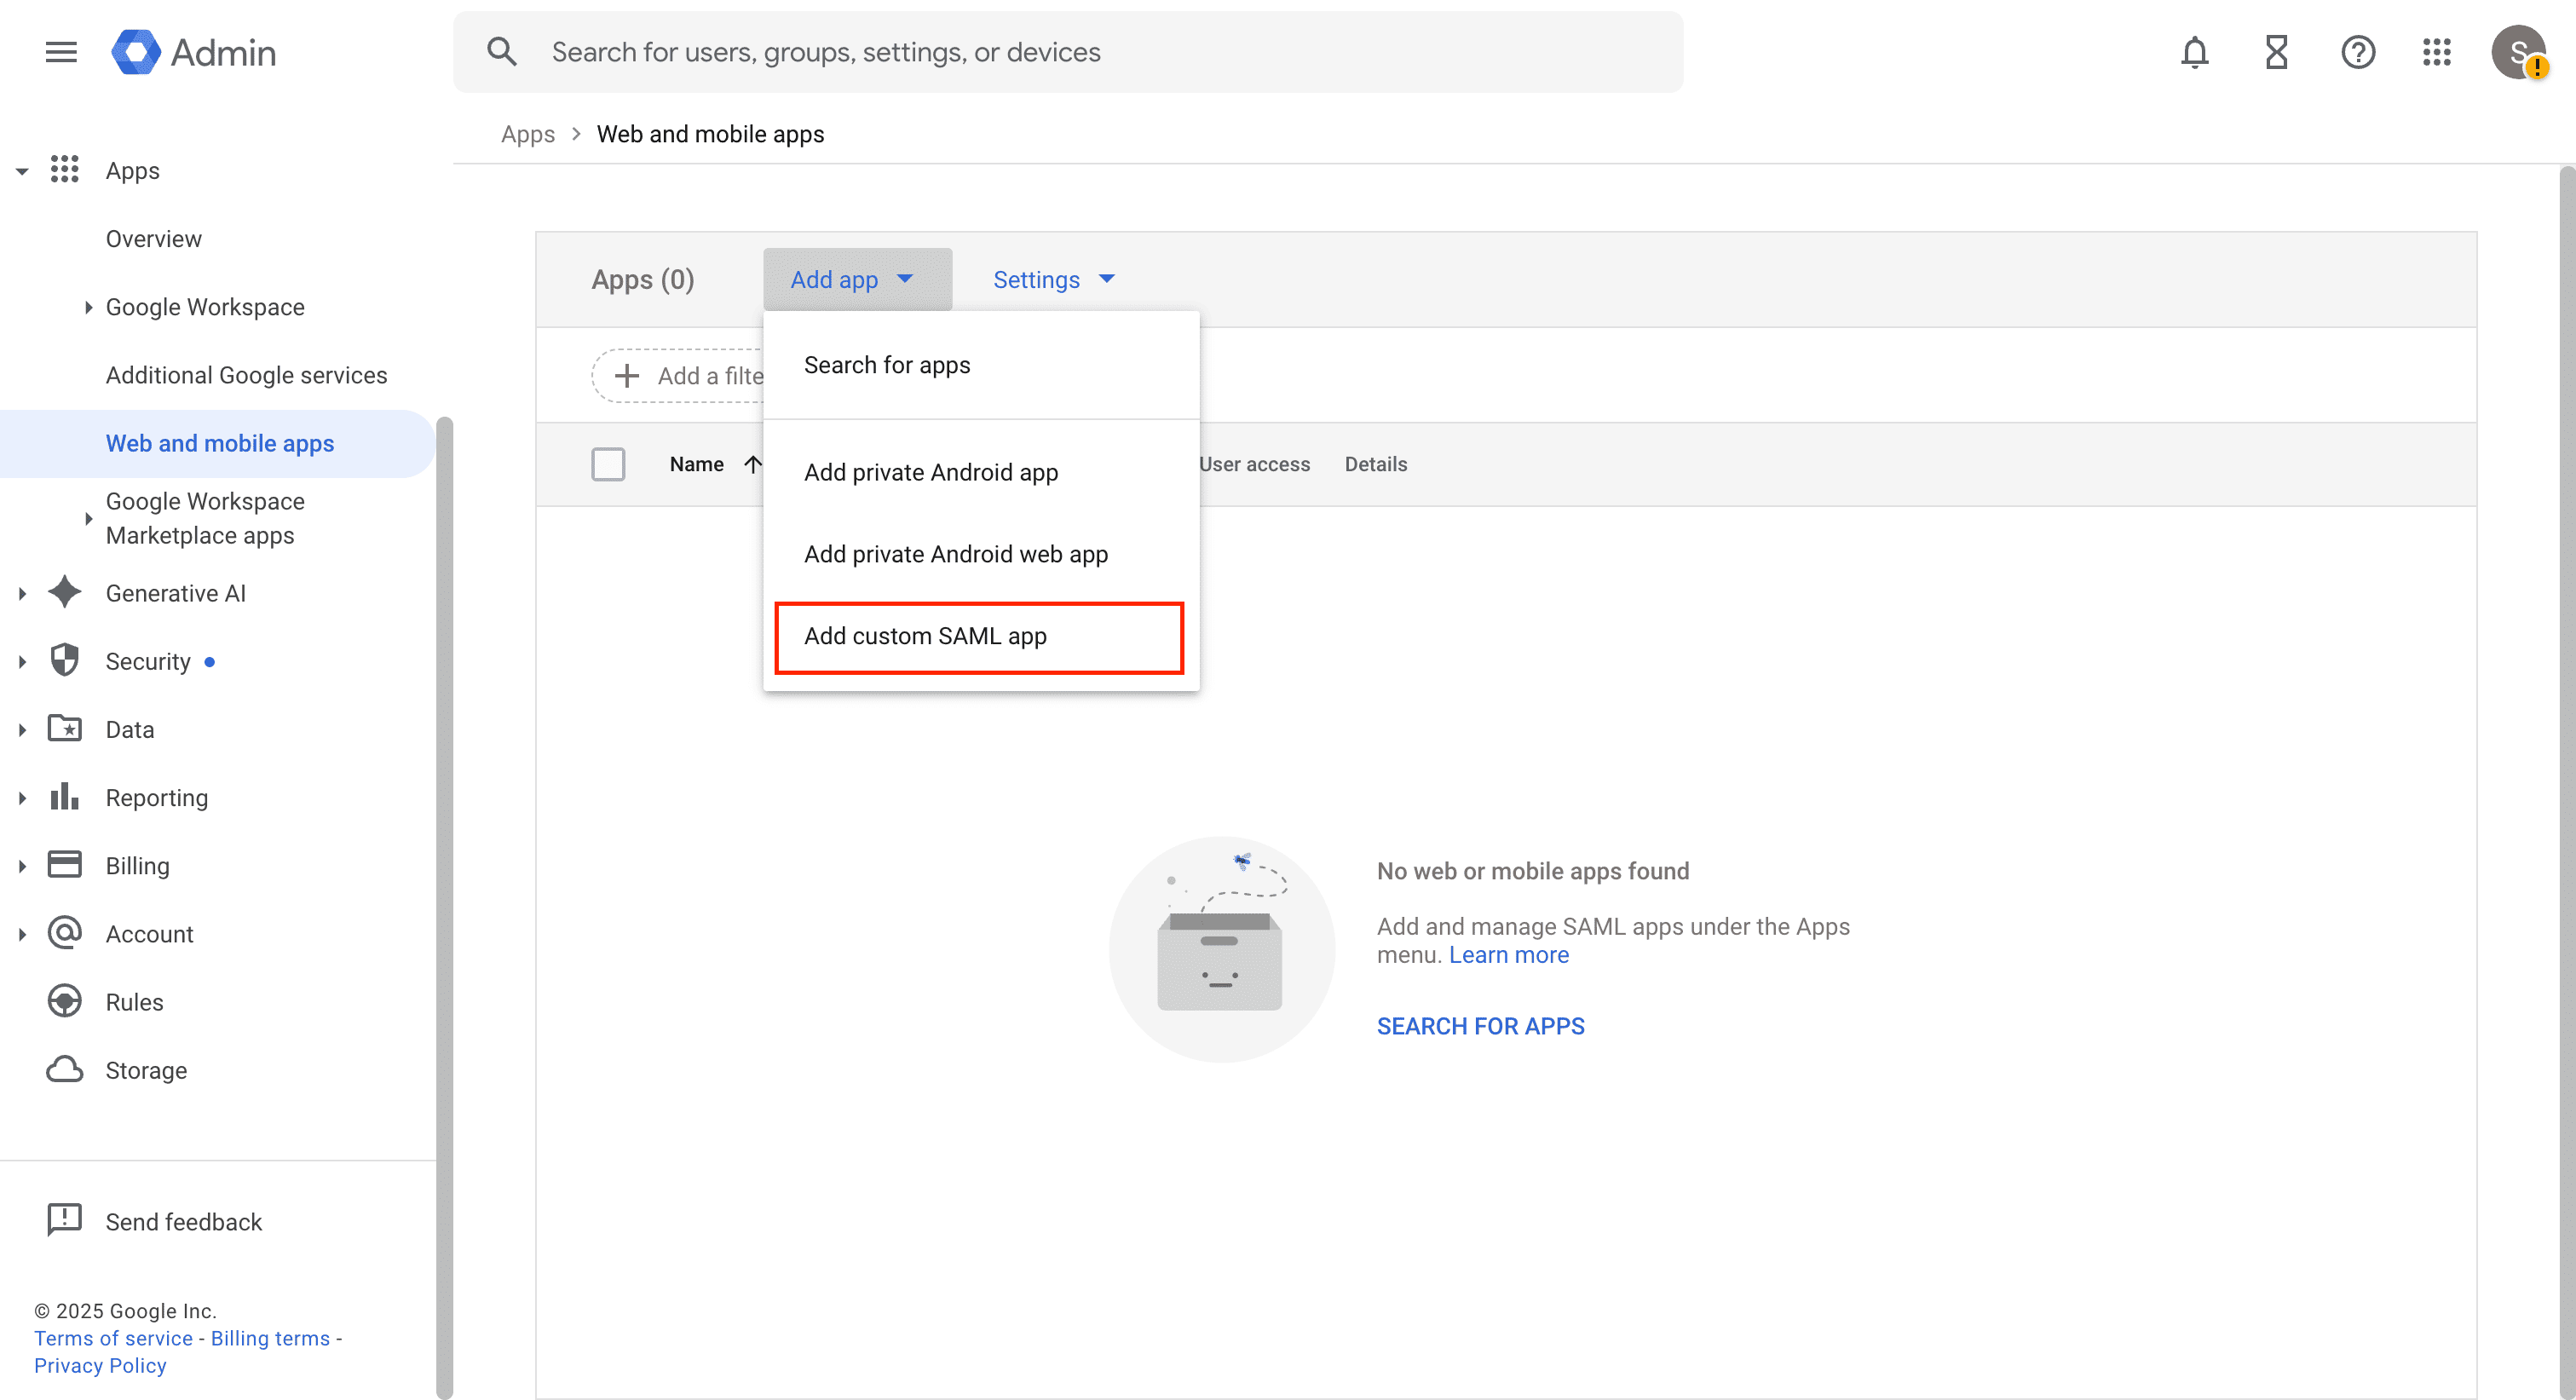
Navigate to Web and Mobile Apps: In the Google Admin Console, navigate to Menu > Apps > Web and mobile apps to access the application management section.
-
Add Custom SAML App: Click Add App and select Add custom SAML app to create a new SAML application for LambdaTest integration.
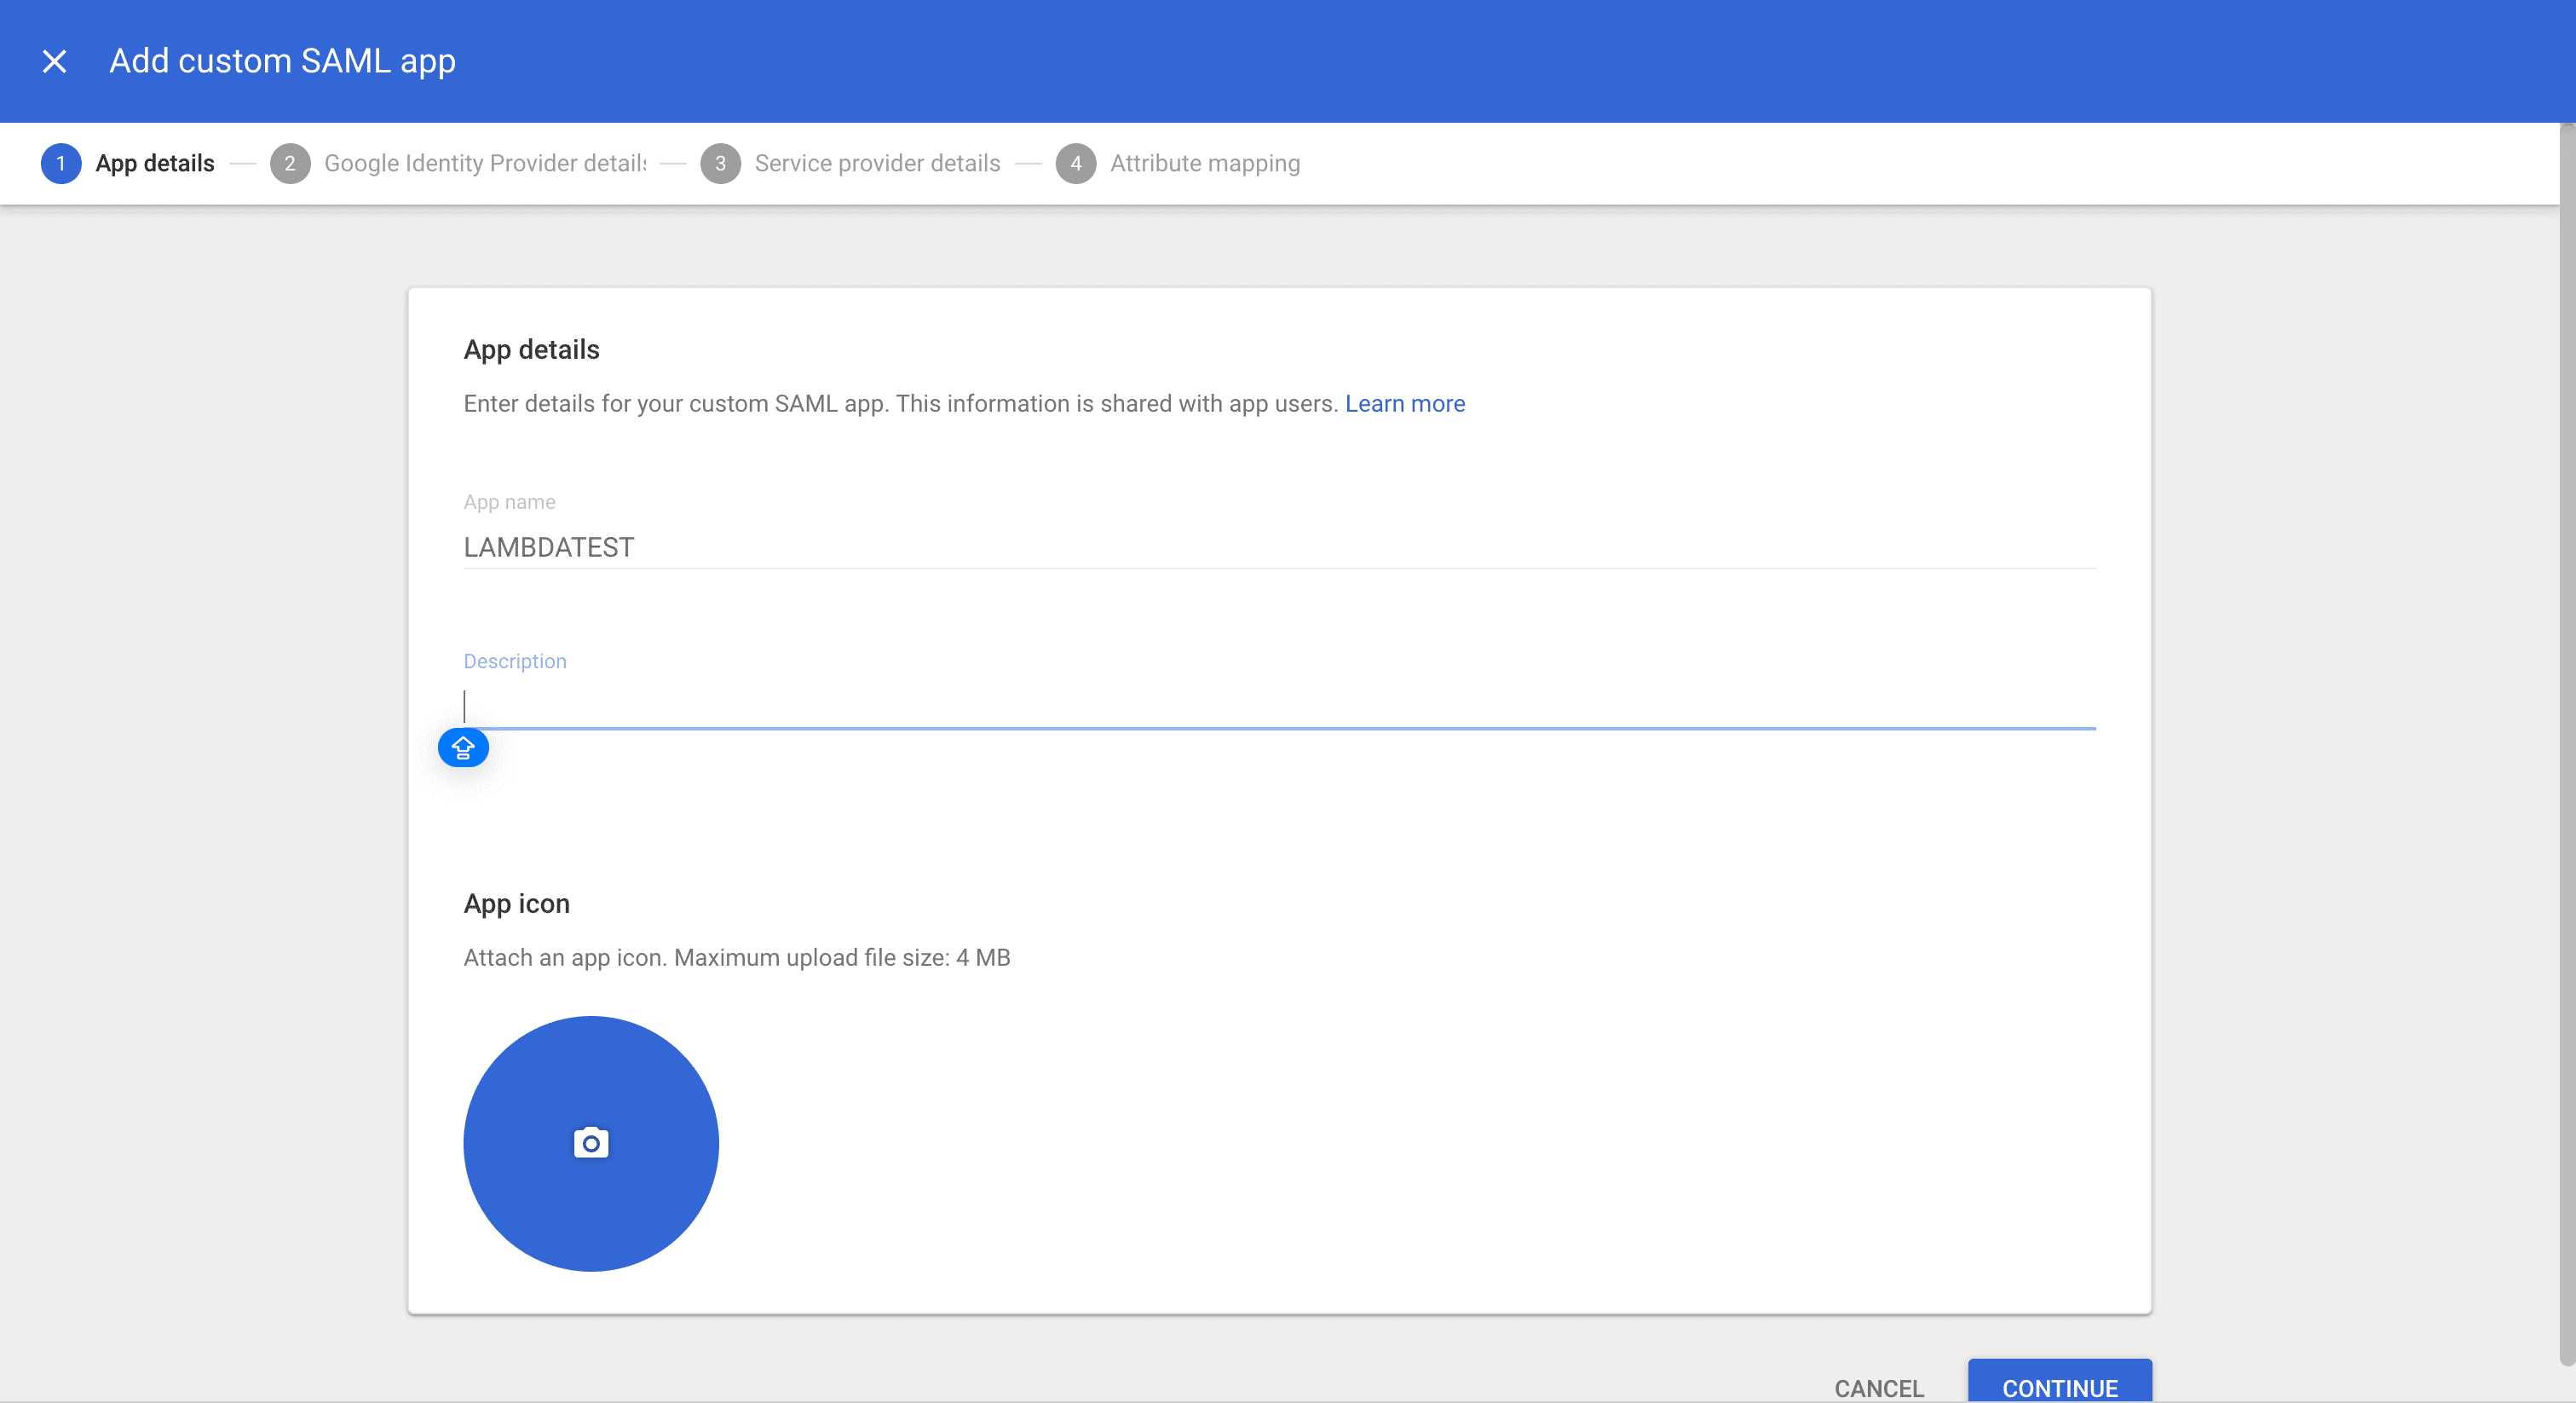
- Configure Application Details:
- App name: Enter a descriptive name such as "LambdaTest SSO" or "LambdaTest SSO App" to easily identify this application in your Google Workspace admin console.
- Click Continue to proceed to the next configuration step.
-
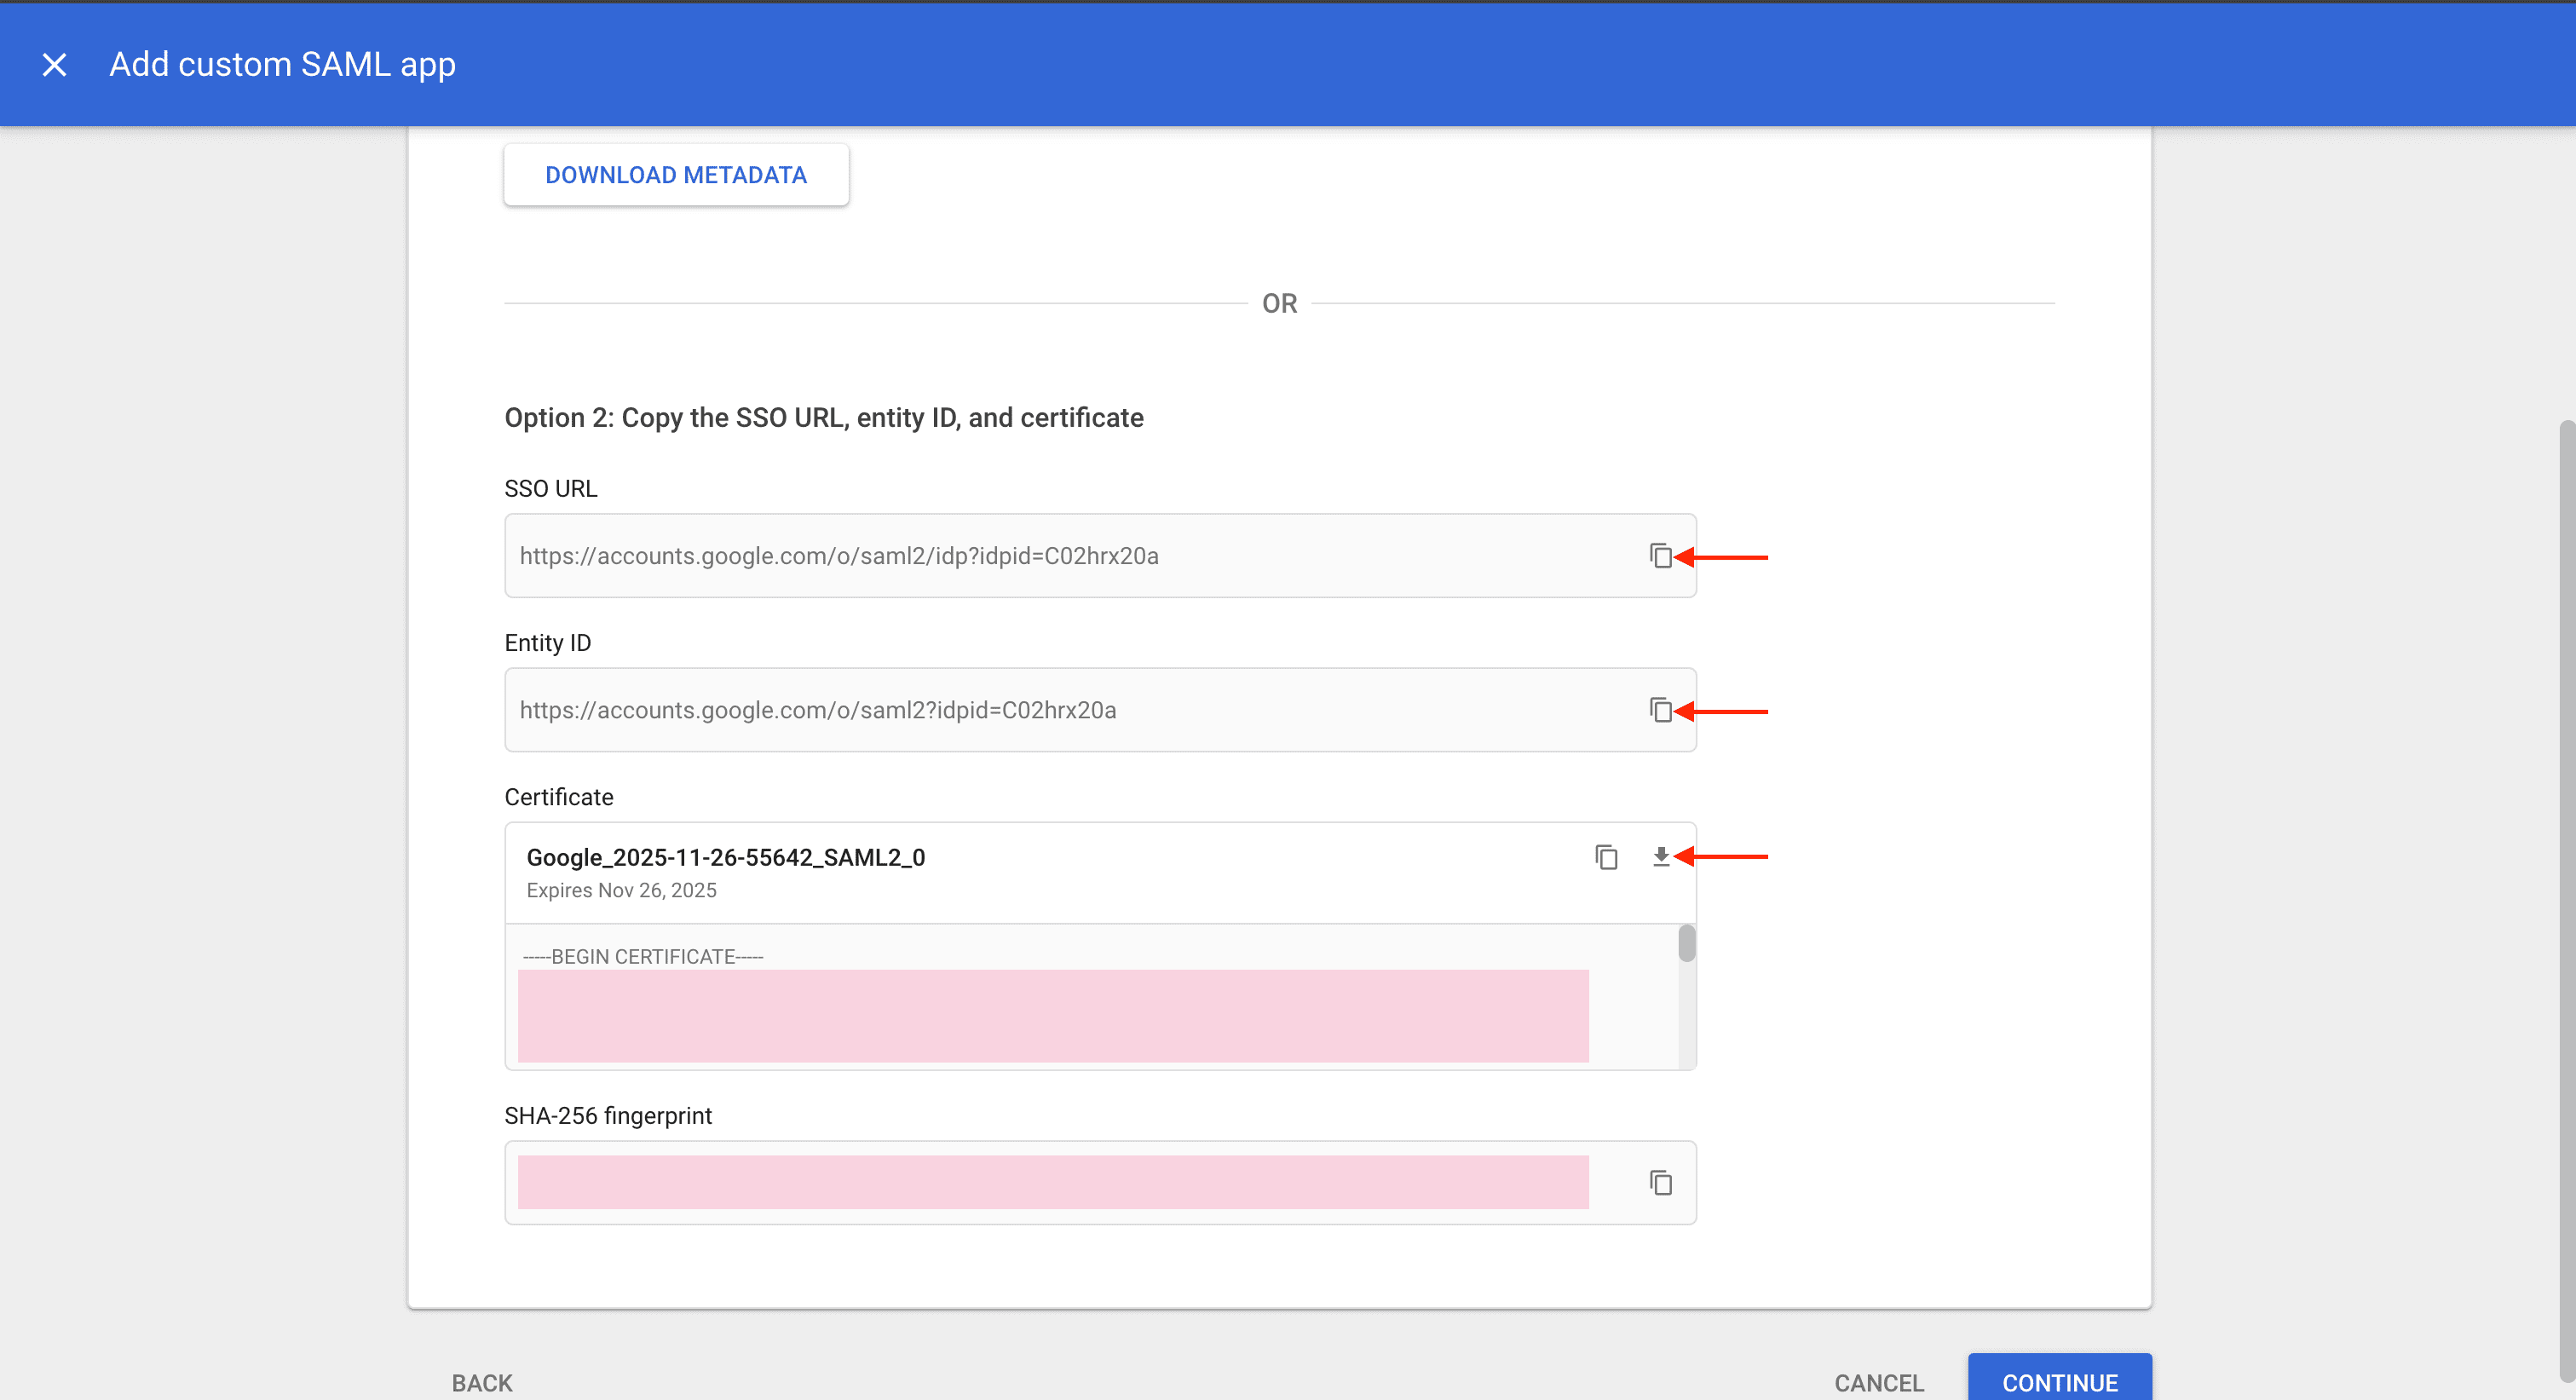
Retrieve Google Identity Provider Details: On the Google Identity Provider details page, you'll need to collect the following information for LambdaTest configuration:
- SSO URL: Copy this URL - LambdaTest will use this endpoint to initiate authentication requests
- Entity ID: Copy this unique identifier - this serves as Google's identity in the SAML exchange
- Certificate: Download the X.509 certificate file in PEM format - LambdaTest will use this to verify Google's SAML responses
Important: Keep this information secure and readily accessible, as you'll need to enter these details in LambdaTest's SSO configuration.
Click Continue to proceed.
Step 2: Create Connection in LambdaTest
-
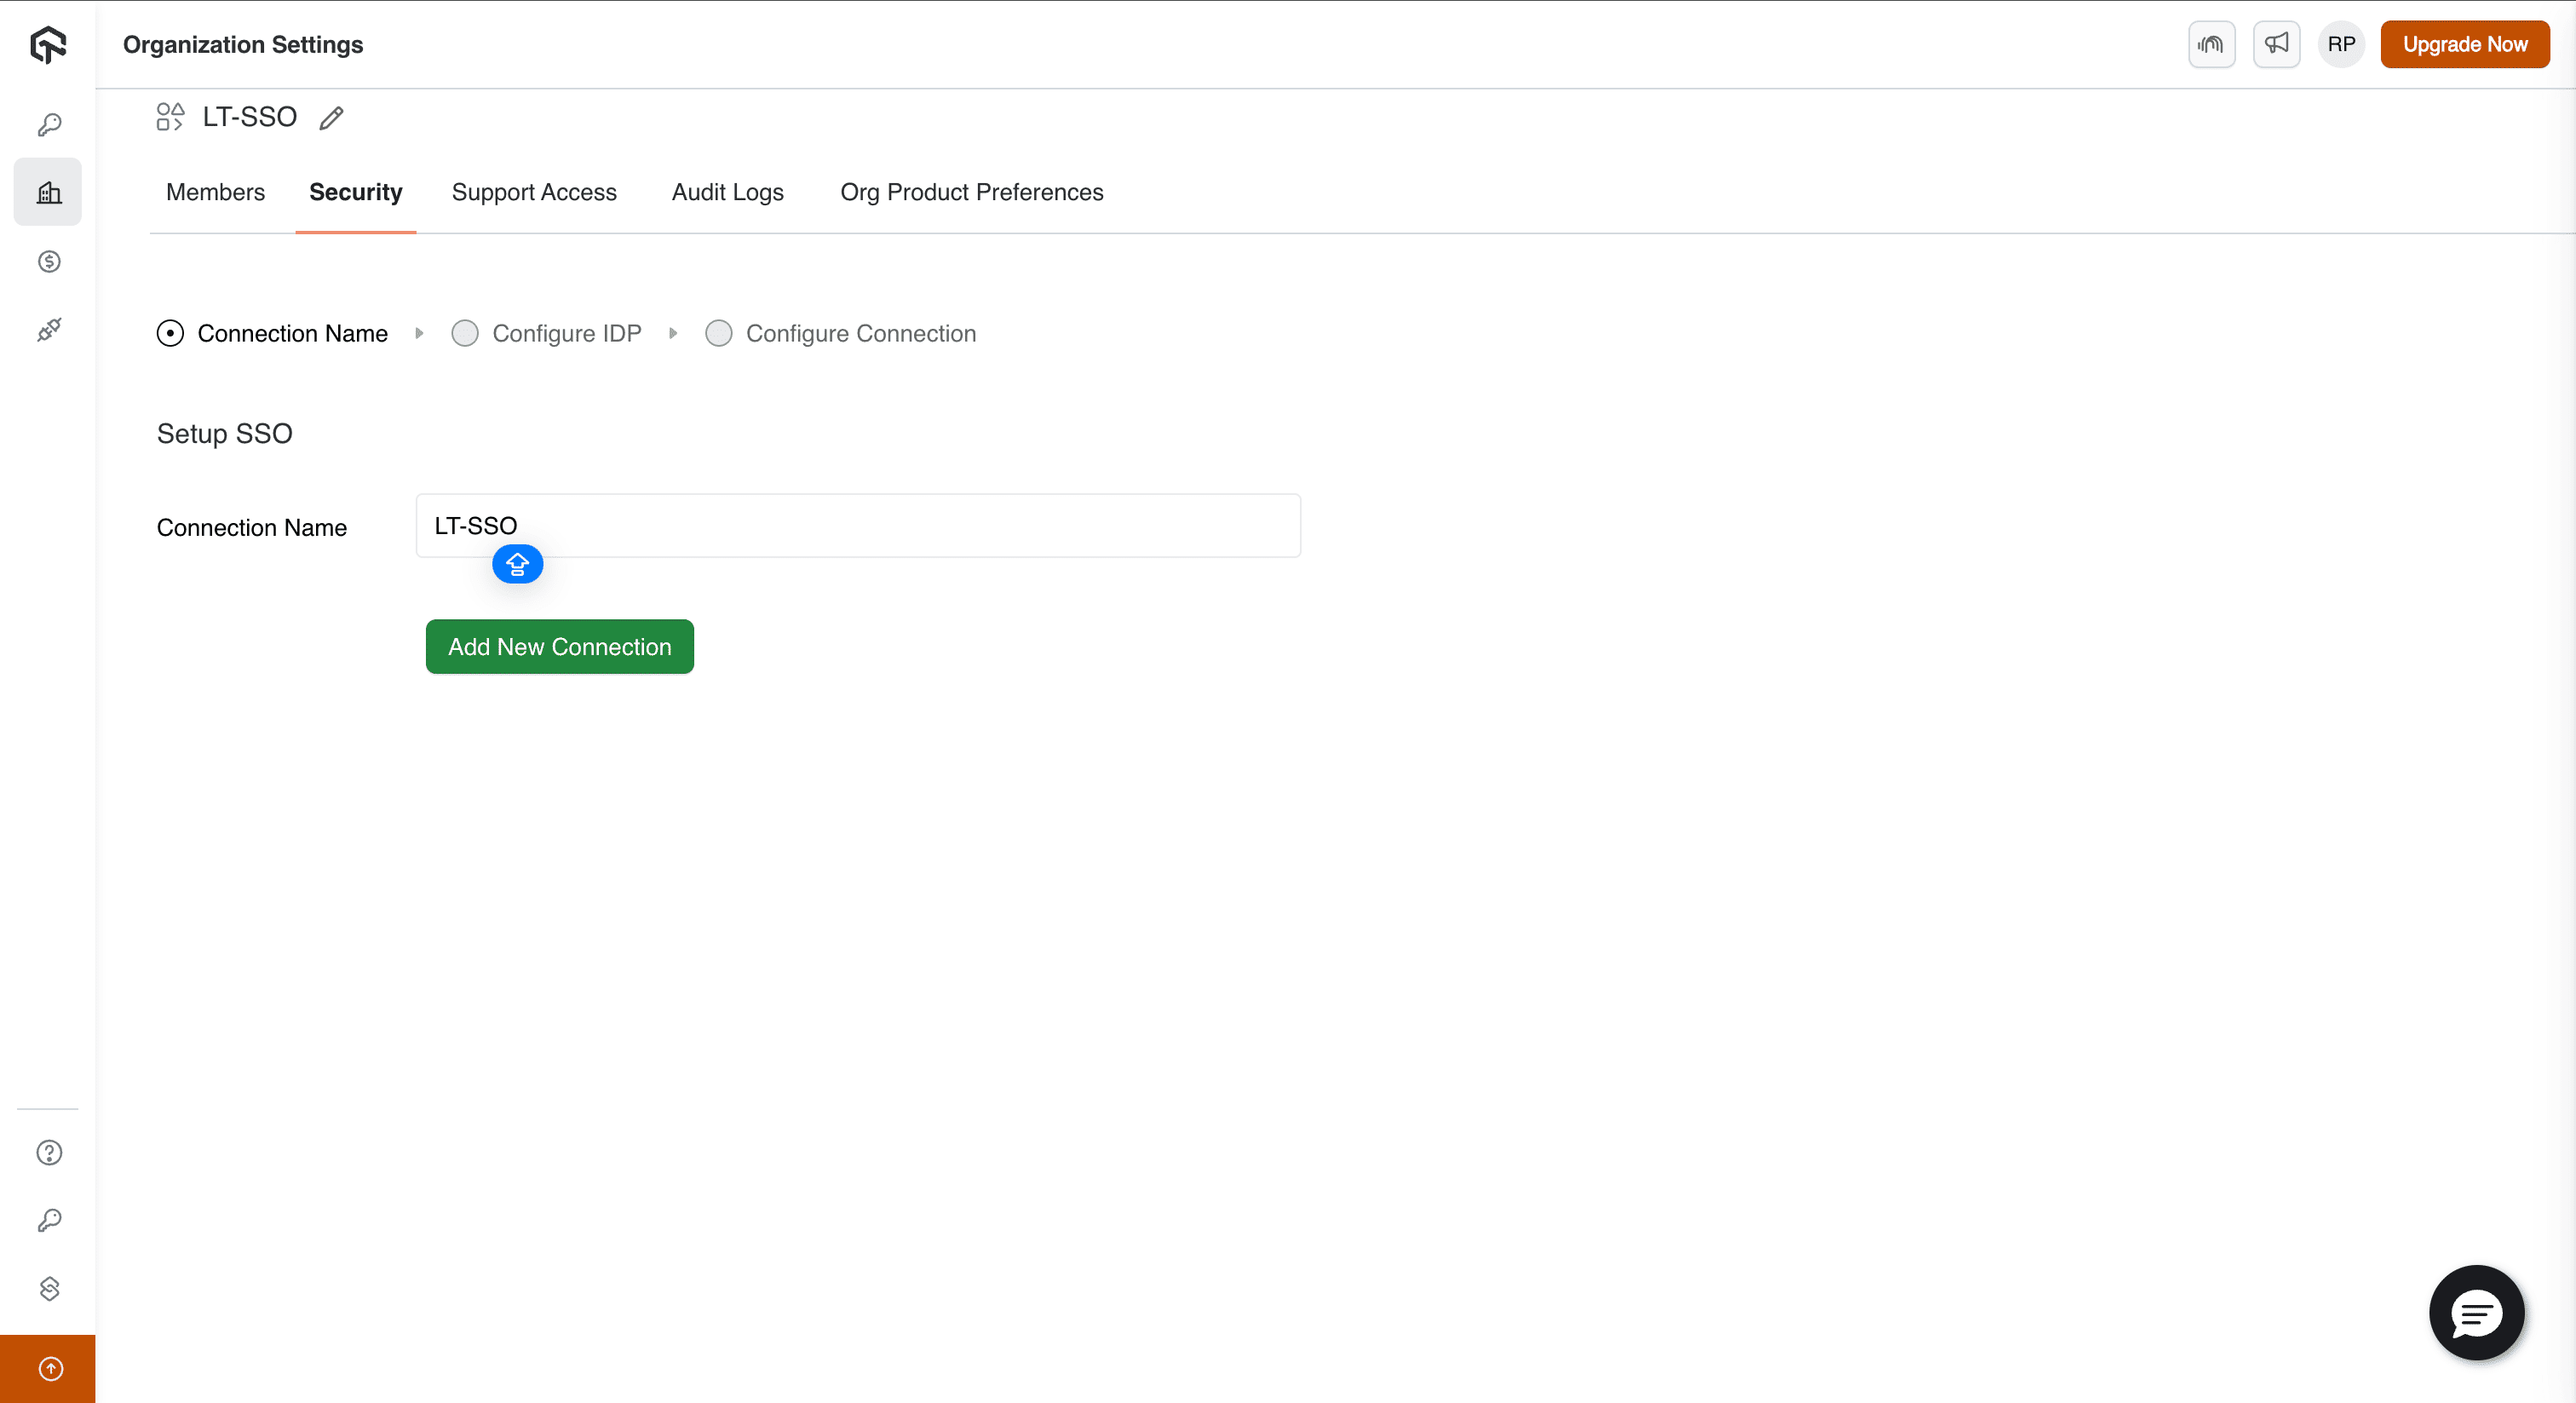
Access LambdaTest SSO Configuration: Navigate to the LambdaTest Authentication & SSO settings page. This dashboard provides comprehensive management of your organization's single sign-on configuration. Click Setup SSO to initiate the integration process.
-
Create New SSO Connection: In the connection setup wizard, enter a descriptive connection name such as "Google Workspace SSO" or "LambdaTest Google SSO". This name will help you identify and manage this connection in your LambdaTest organization. Click Add New Connection to proceed.
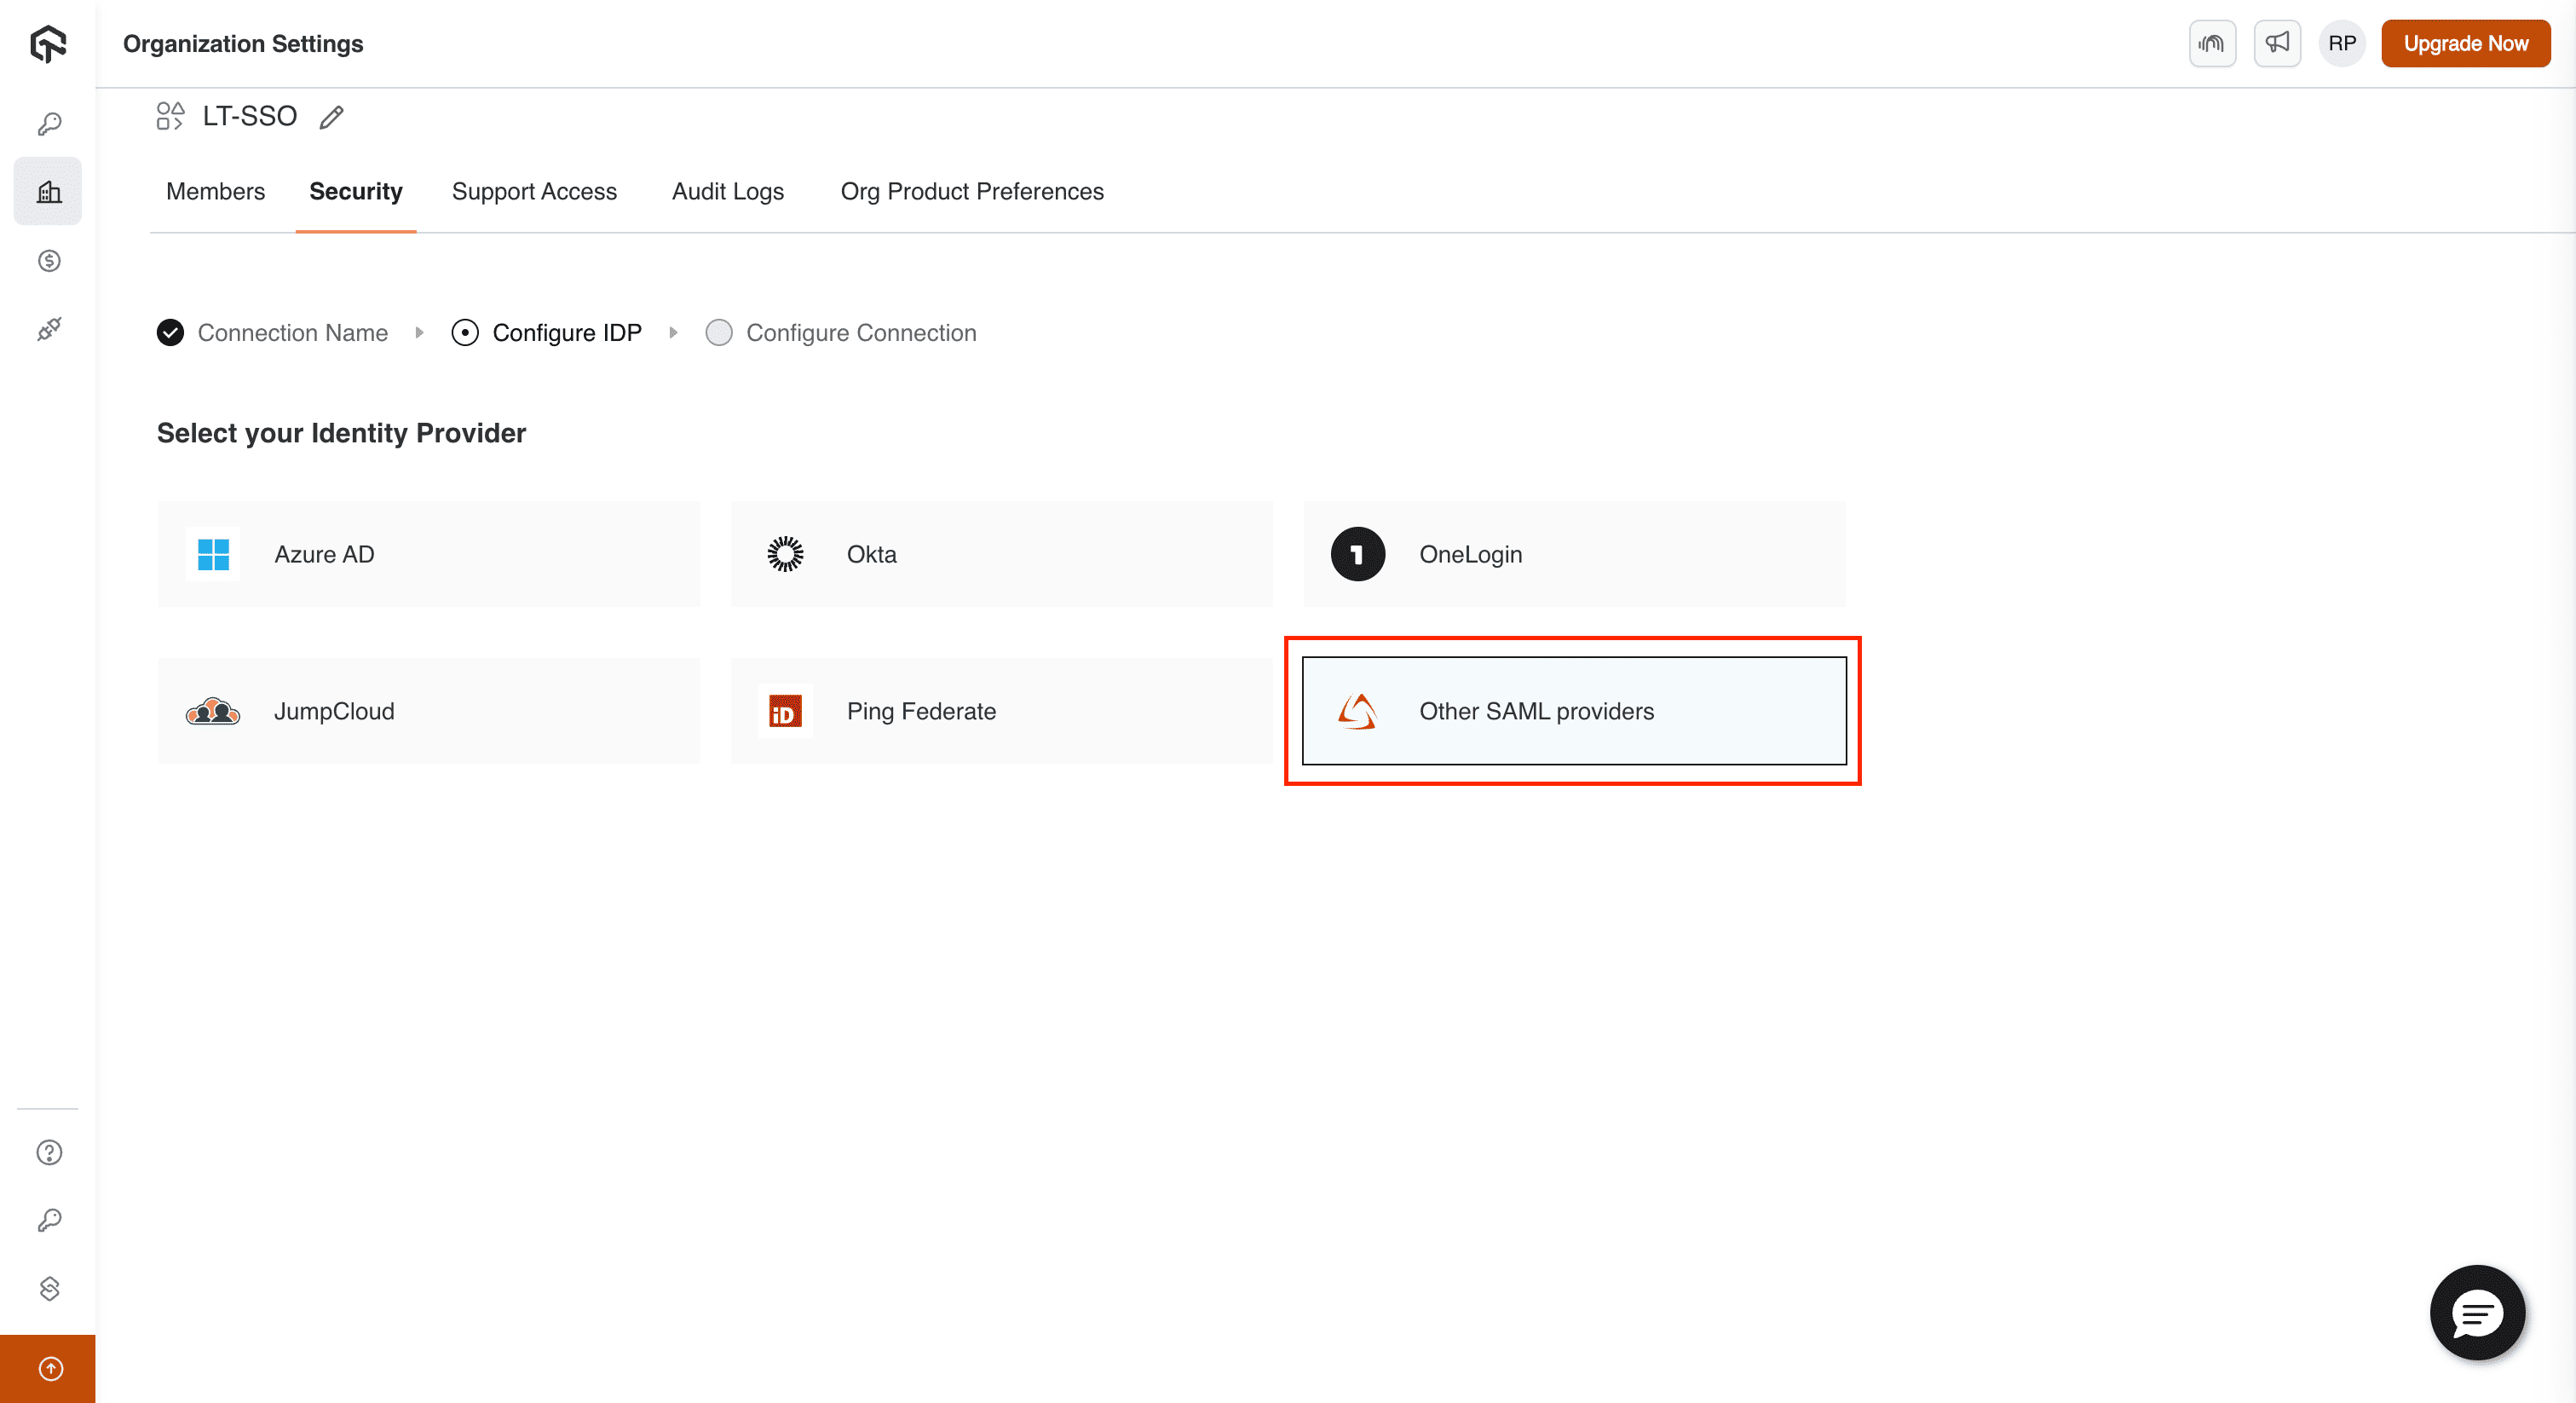
- Select Identity Provider: From the list of supported identity providers, select Other SAML Provider to configure Google Workspace integration.
- Retrieve LambdaTest Configuration Details: LambdaTest will generate and display the configuration details required for your Google Workspace setup. These critical details include:
- Assertion Consumer Service (ACS) URL: The secure endpoint where Google will send SAML authentication responses
- Entity ID: LambdaTest's unique identifier in the SAML exchange protocol
- X.509 Certificate: LambdaTest's public certificate for verifying SAML response authenticity
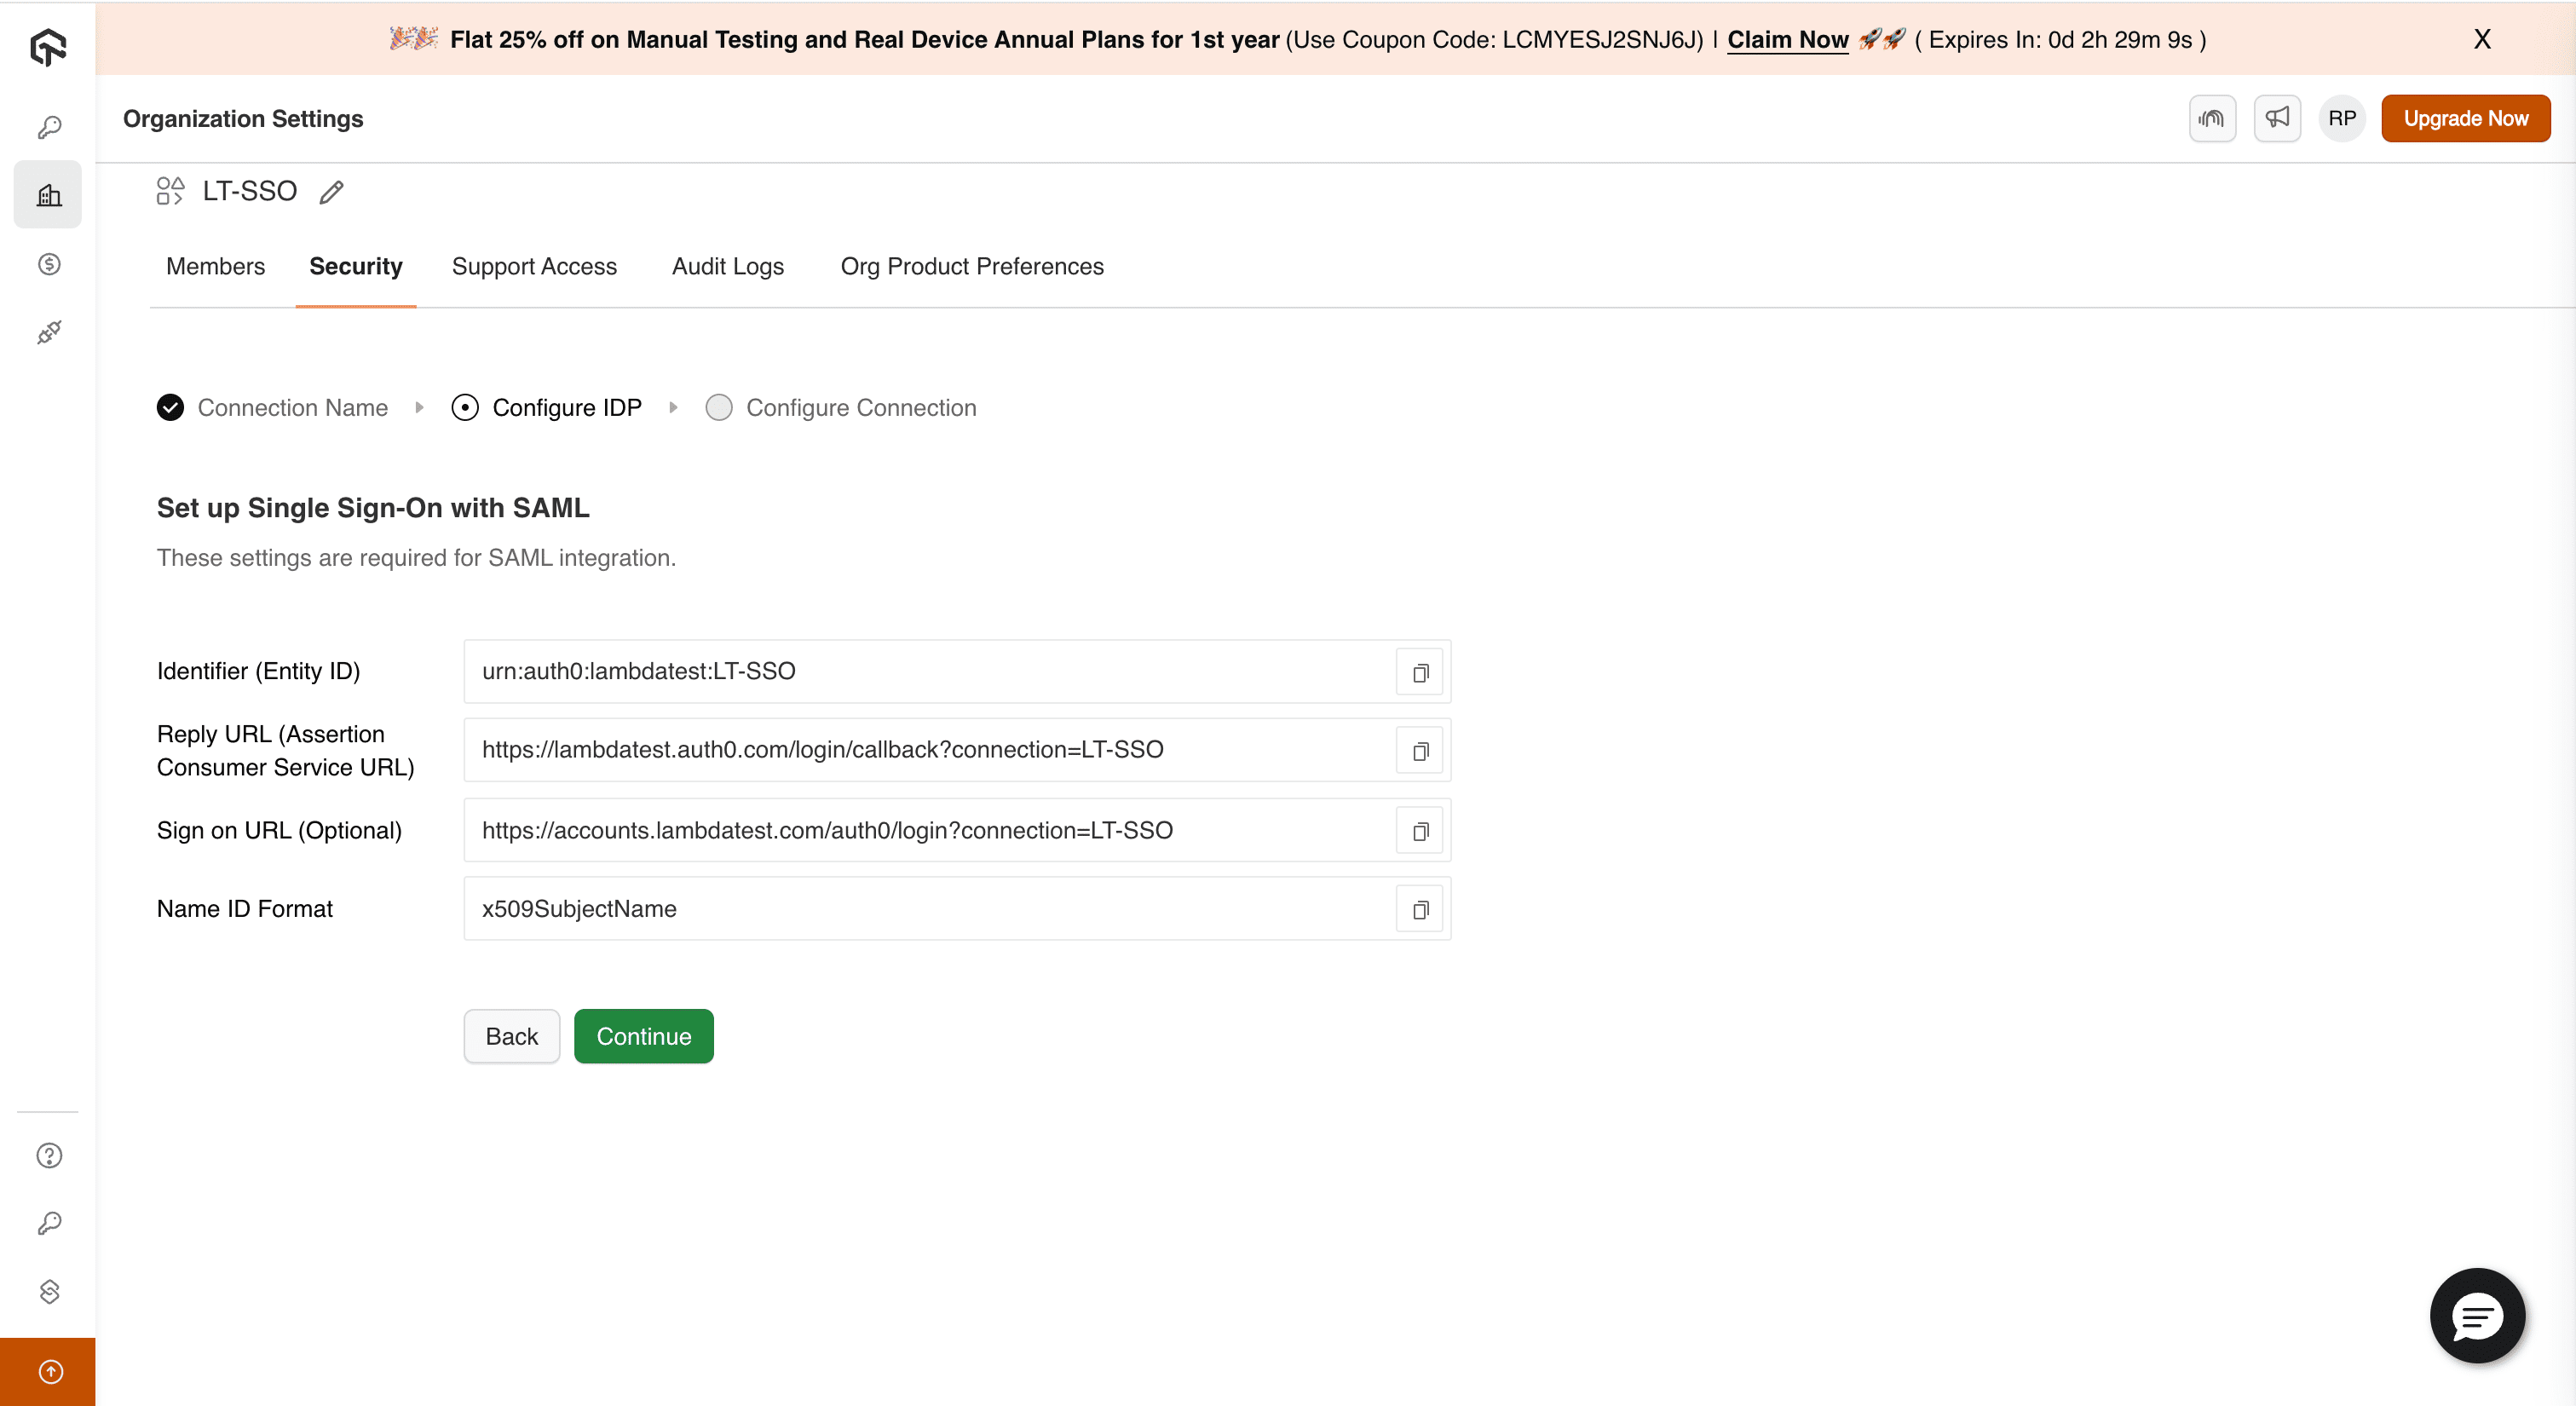
Click Continue to proceed to the next step.
- Review Attribute Mapping Requirements: LambdaTest displays the user attributes that must be mapped from your Google Workspace directory. The essential attributes for proper user provisioning include:
- Email Address: User's primary email address for account identification
- First Name: User's given name for personalization
- Last Name: User's surname for complete user profiles
- Display Name: User's full display name (optional but recommended)
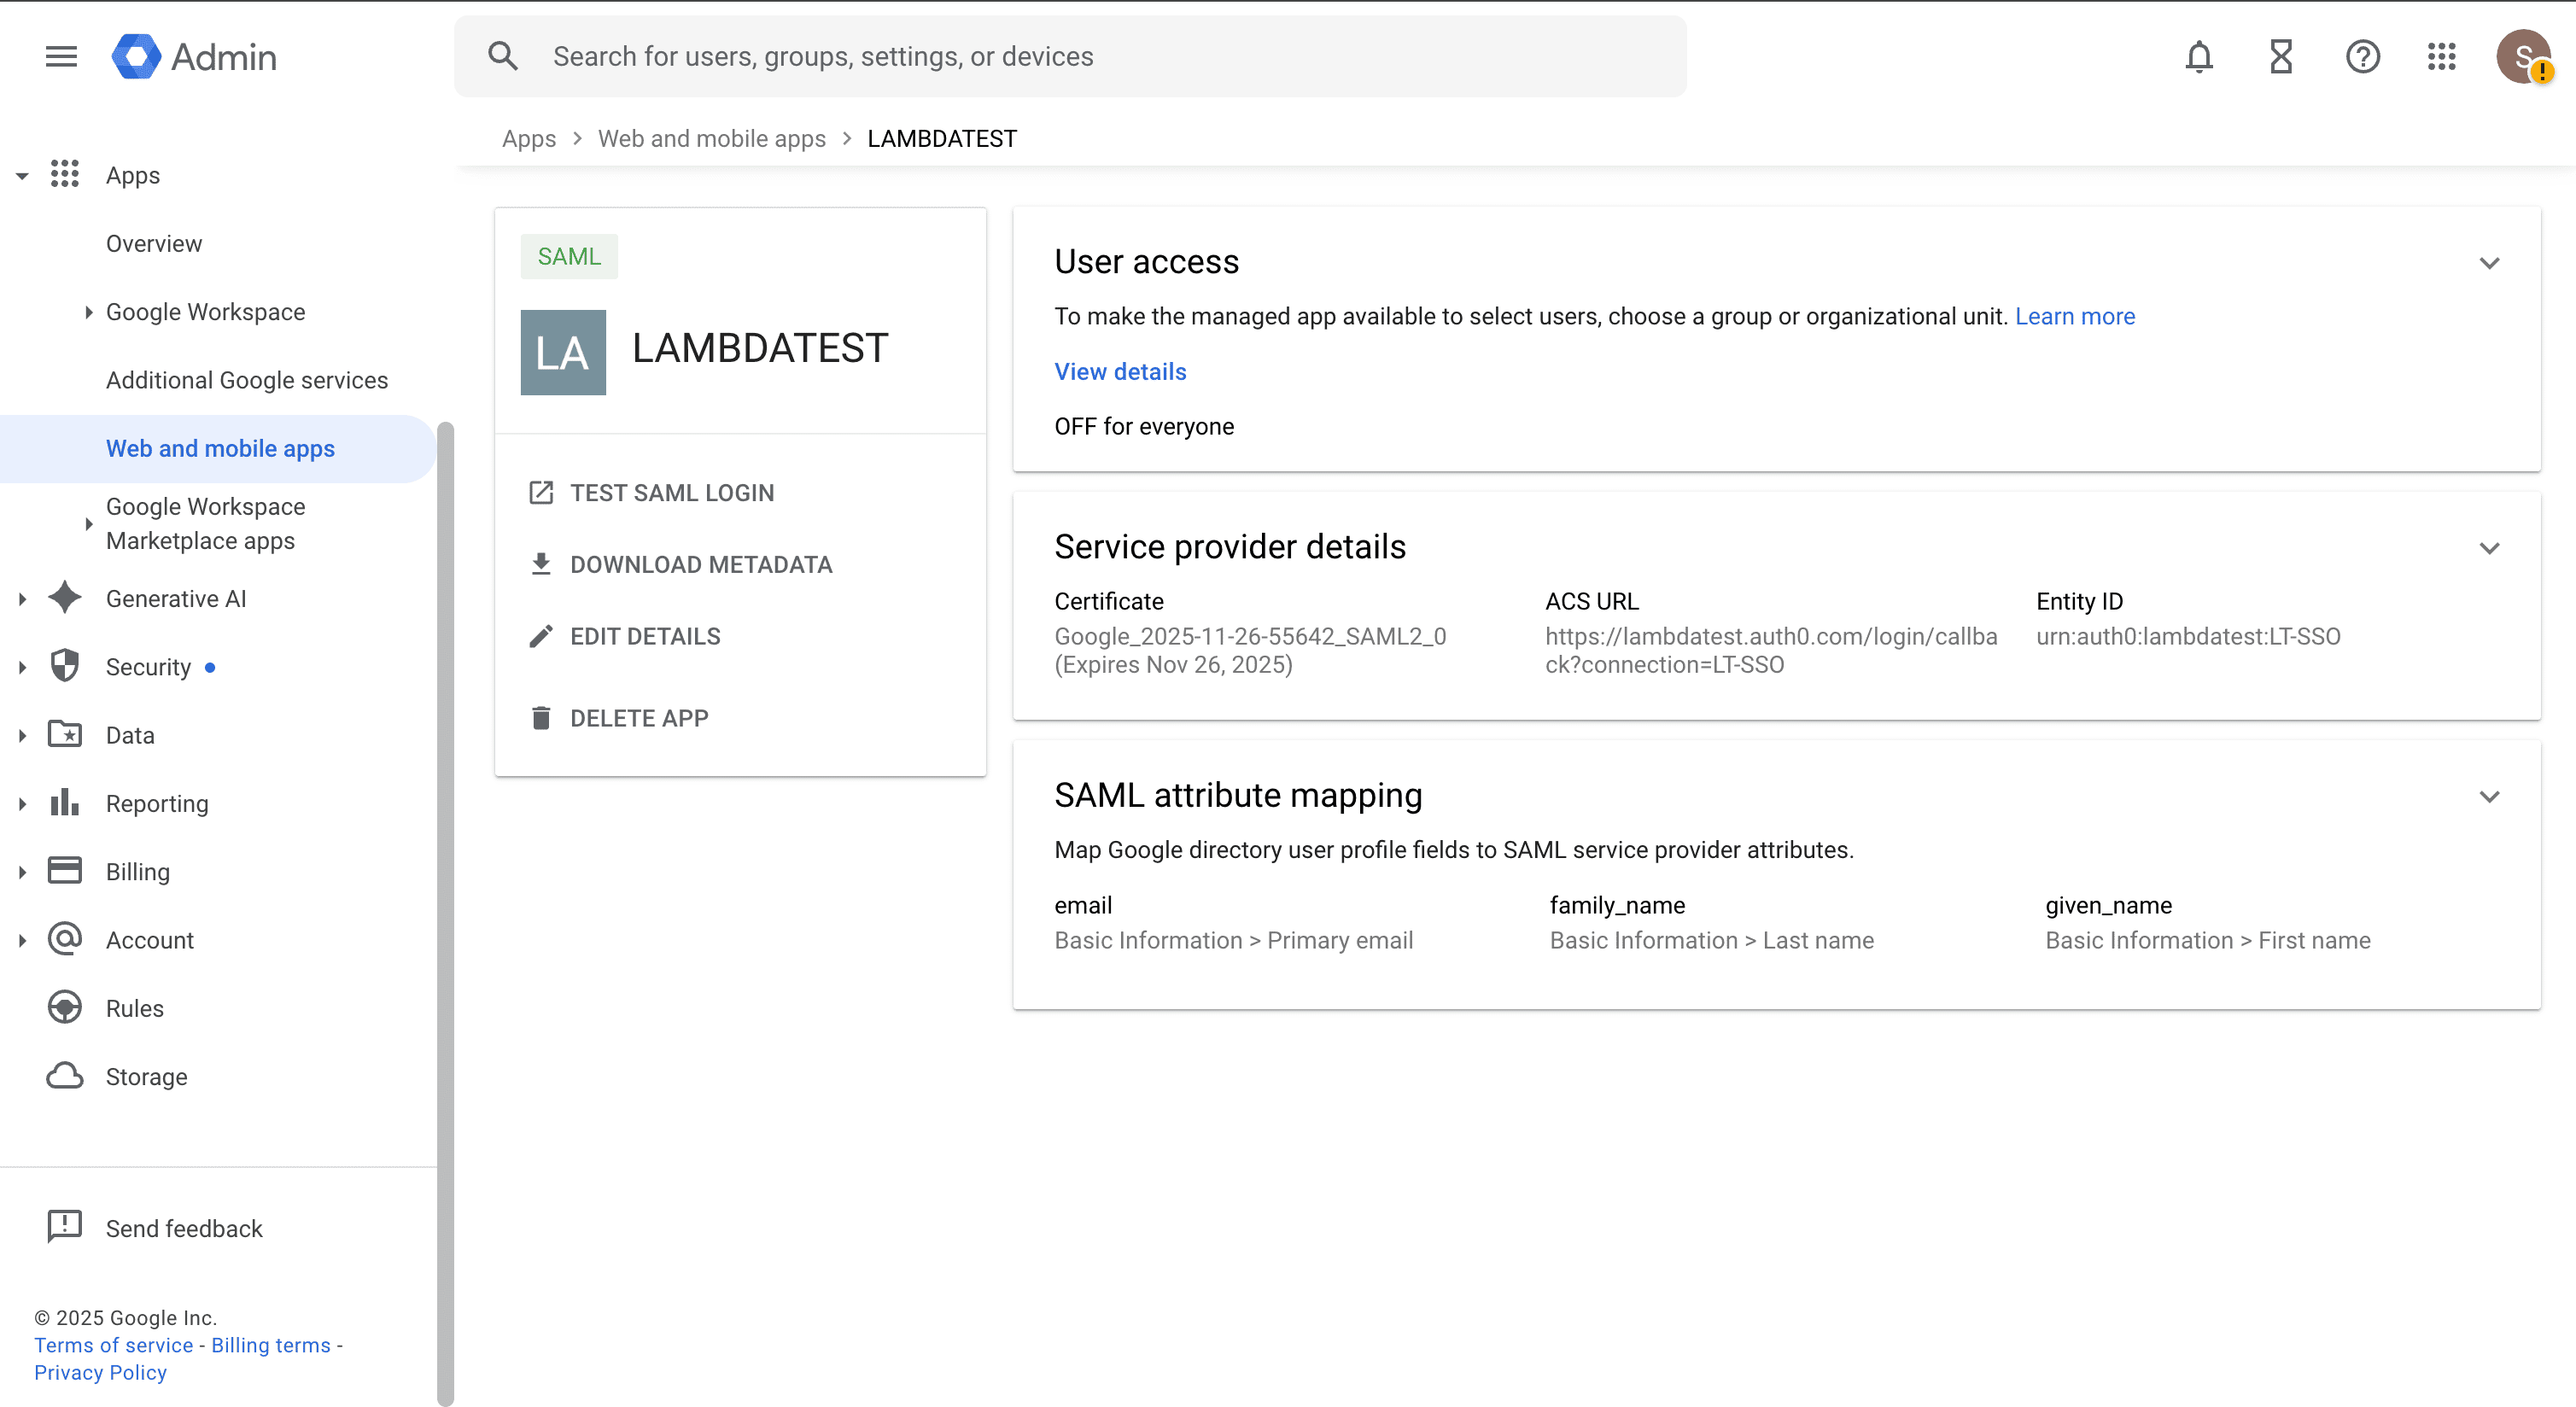
Step 3: Complete Google Workspace Configuration
-
Return to Google Workspace Configuration: Navigate back to the Google Admin Console tab where you were configuring the SAML application.
-
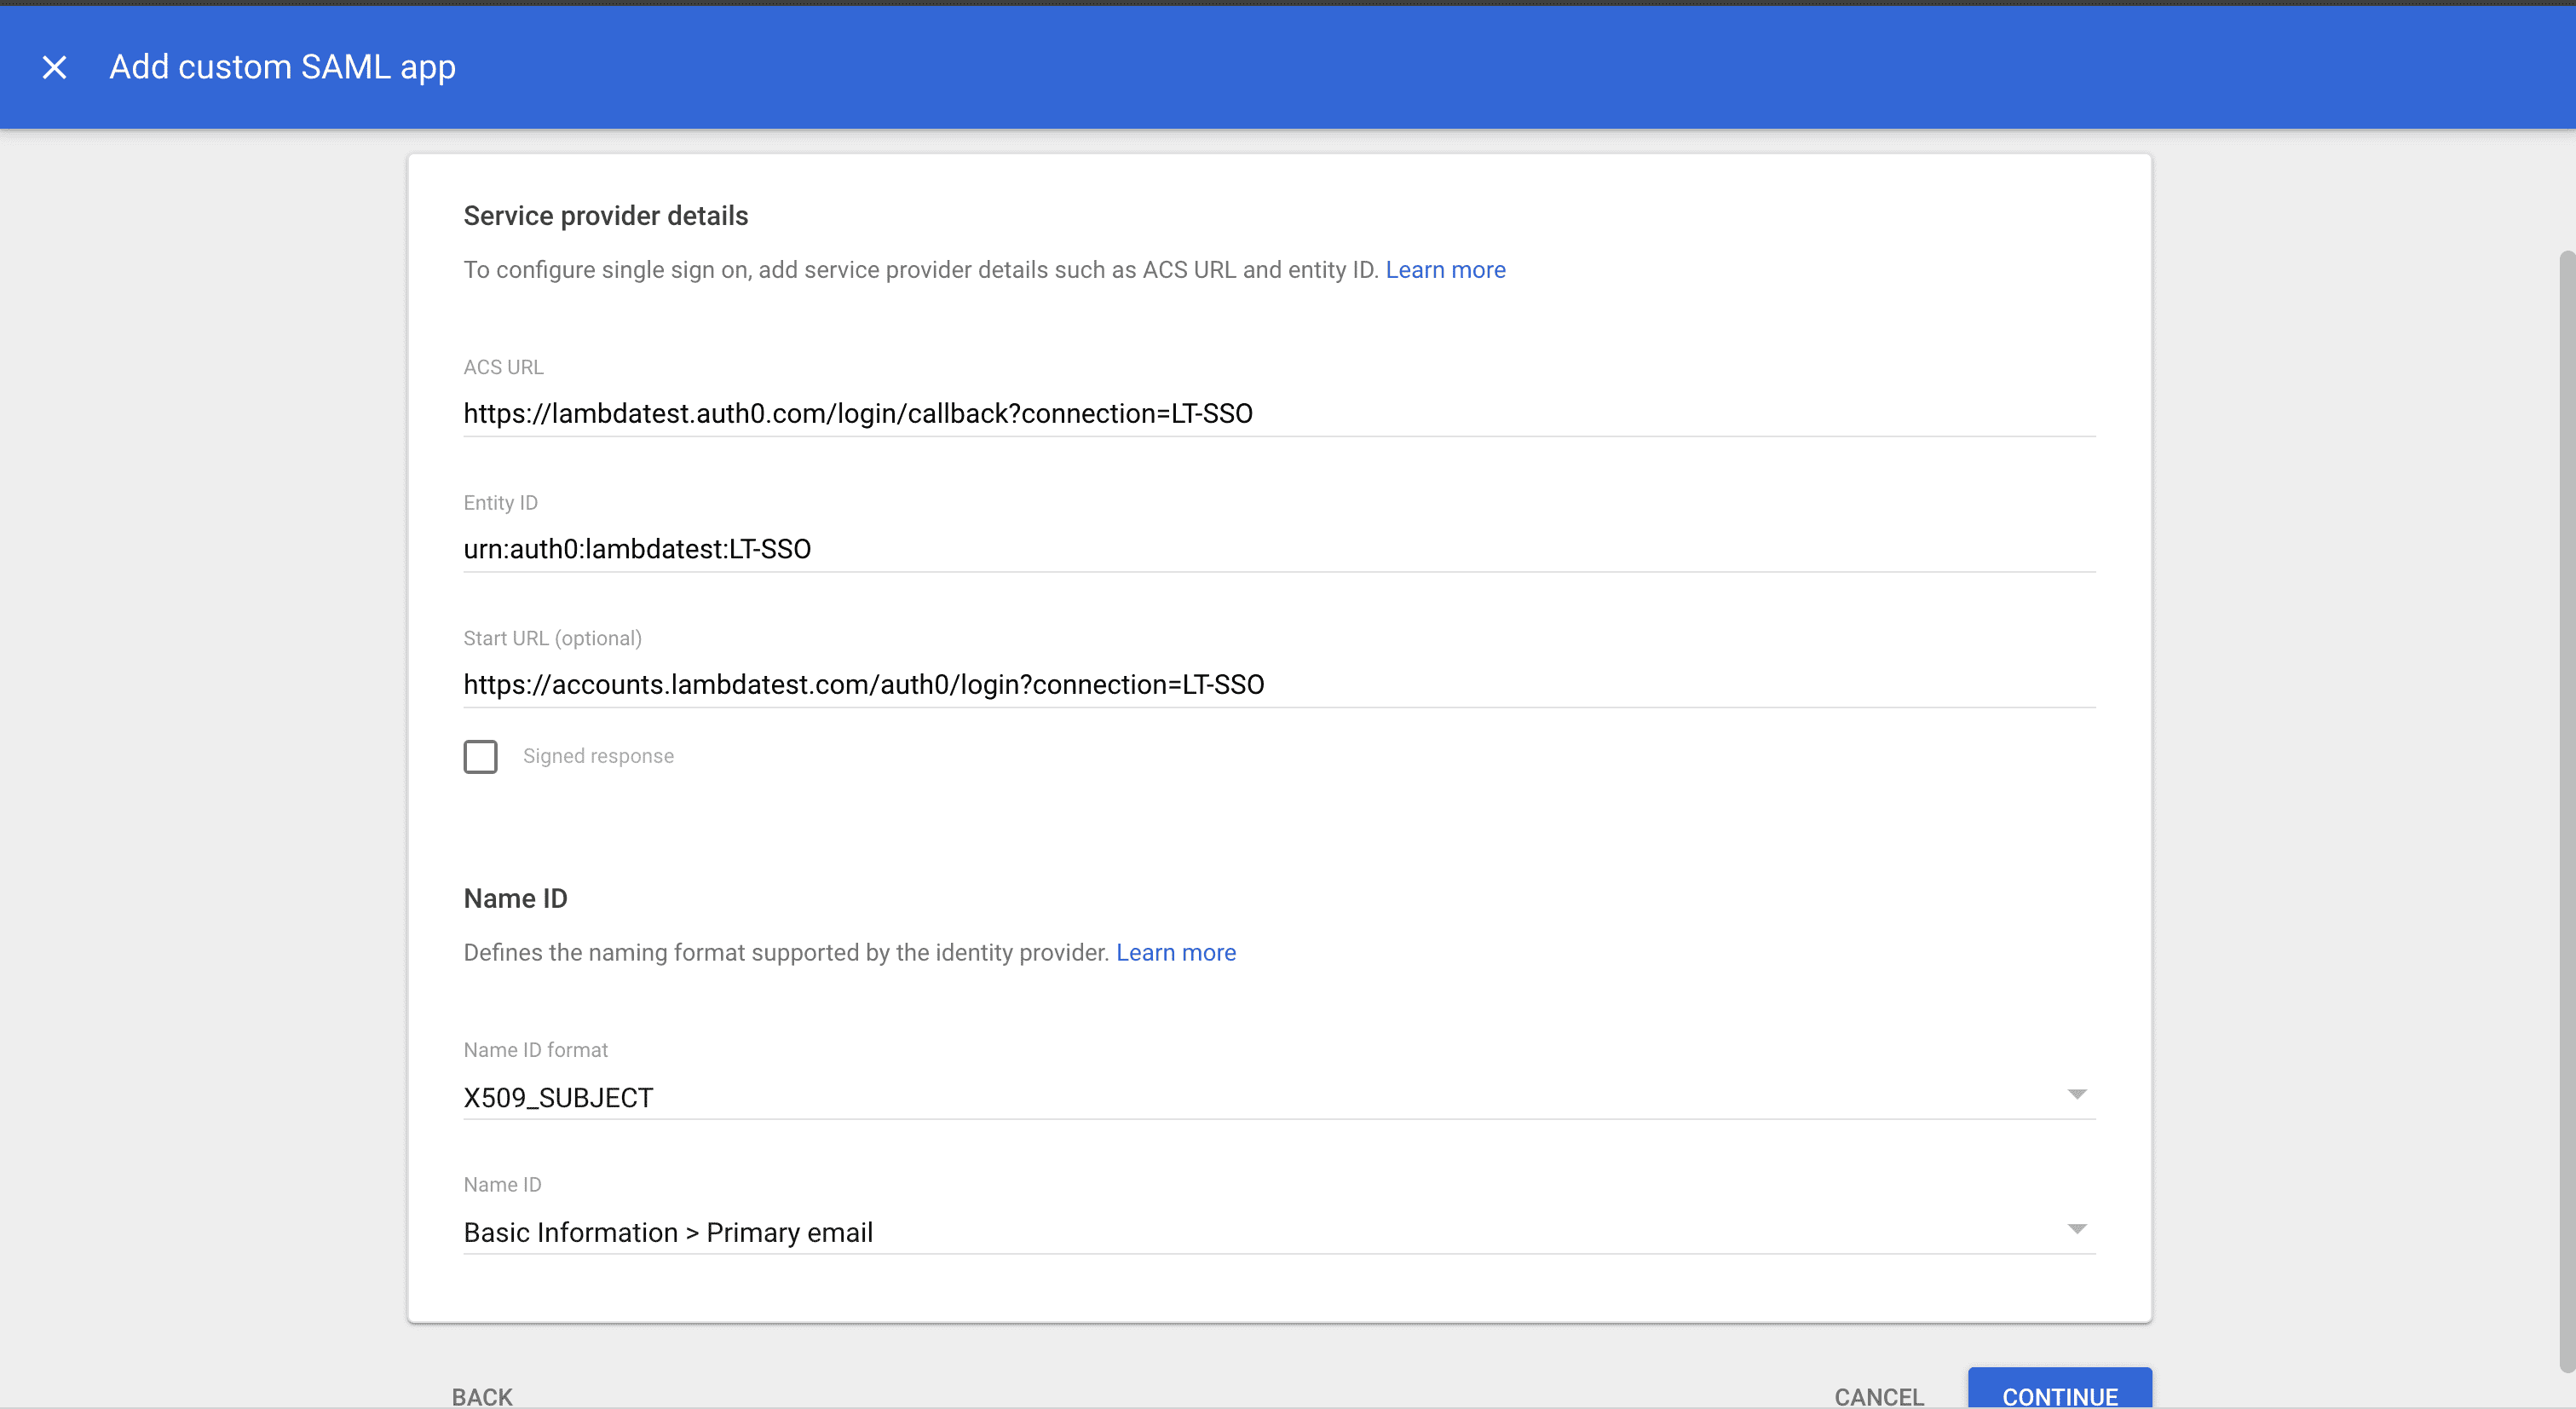
Configure Service Provider Details: In the Service Provider Details window, enter the LambdaTest configuration details you copied in step 9:
- ACS URL: Paste the Assertion Consumer Service URL from LambdaTest. This secure endpoint will receive SAML authentication responses from Google.
- Entity ID: Enter LambdaTest's Entity ID. This unique identifier enables Google to recognize LambdaTest in the SAML exchange.
- Start URL: (Optional) Leave blank or enter your LambdaTest organization URL for direct user redirection after authentication.
- Name ID Format: Set to "X509_SUBJECT" - this specifies the format for the Name ID attribute
- Name ID: Set to "Basic Information > Primary Email" - this serves as the primary user identifier
-
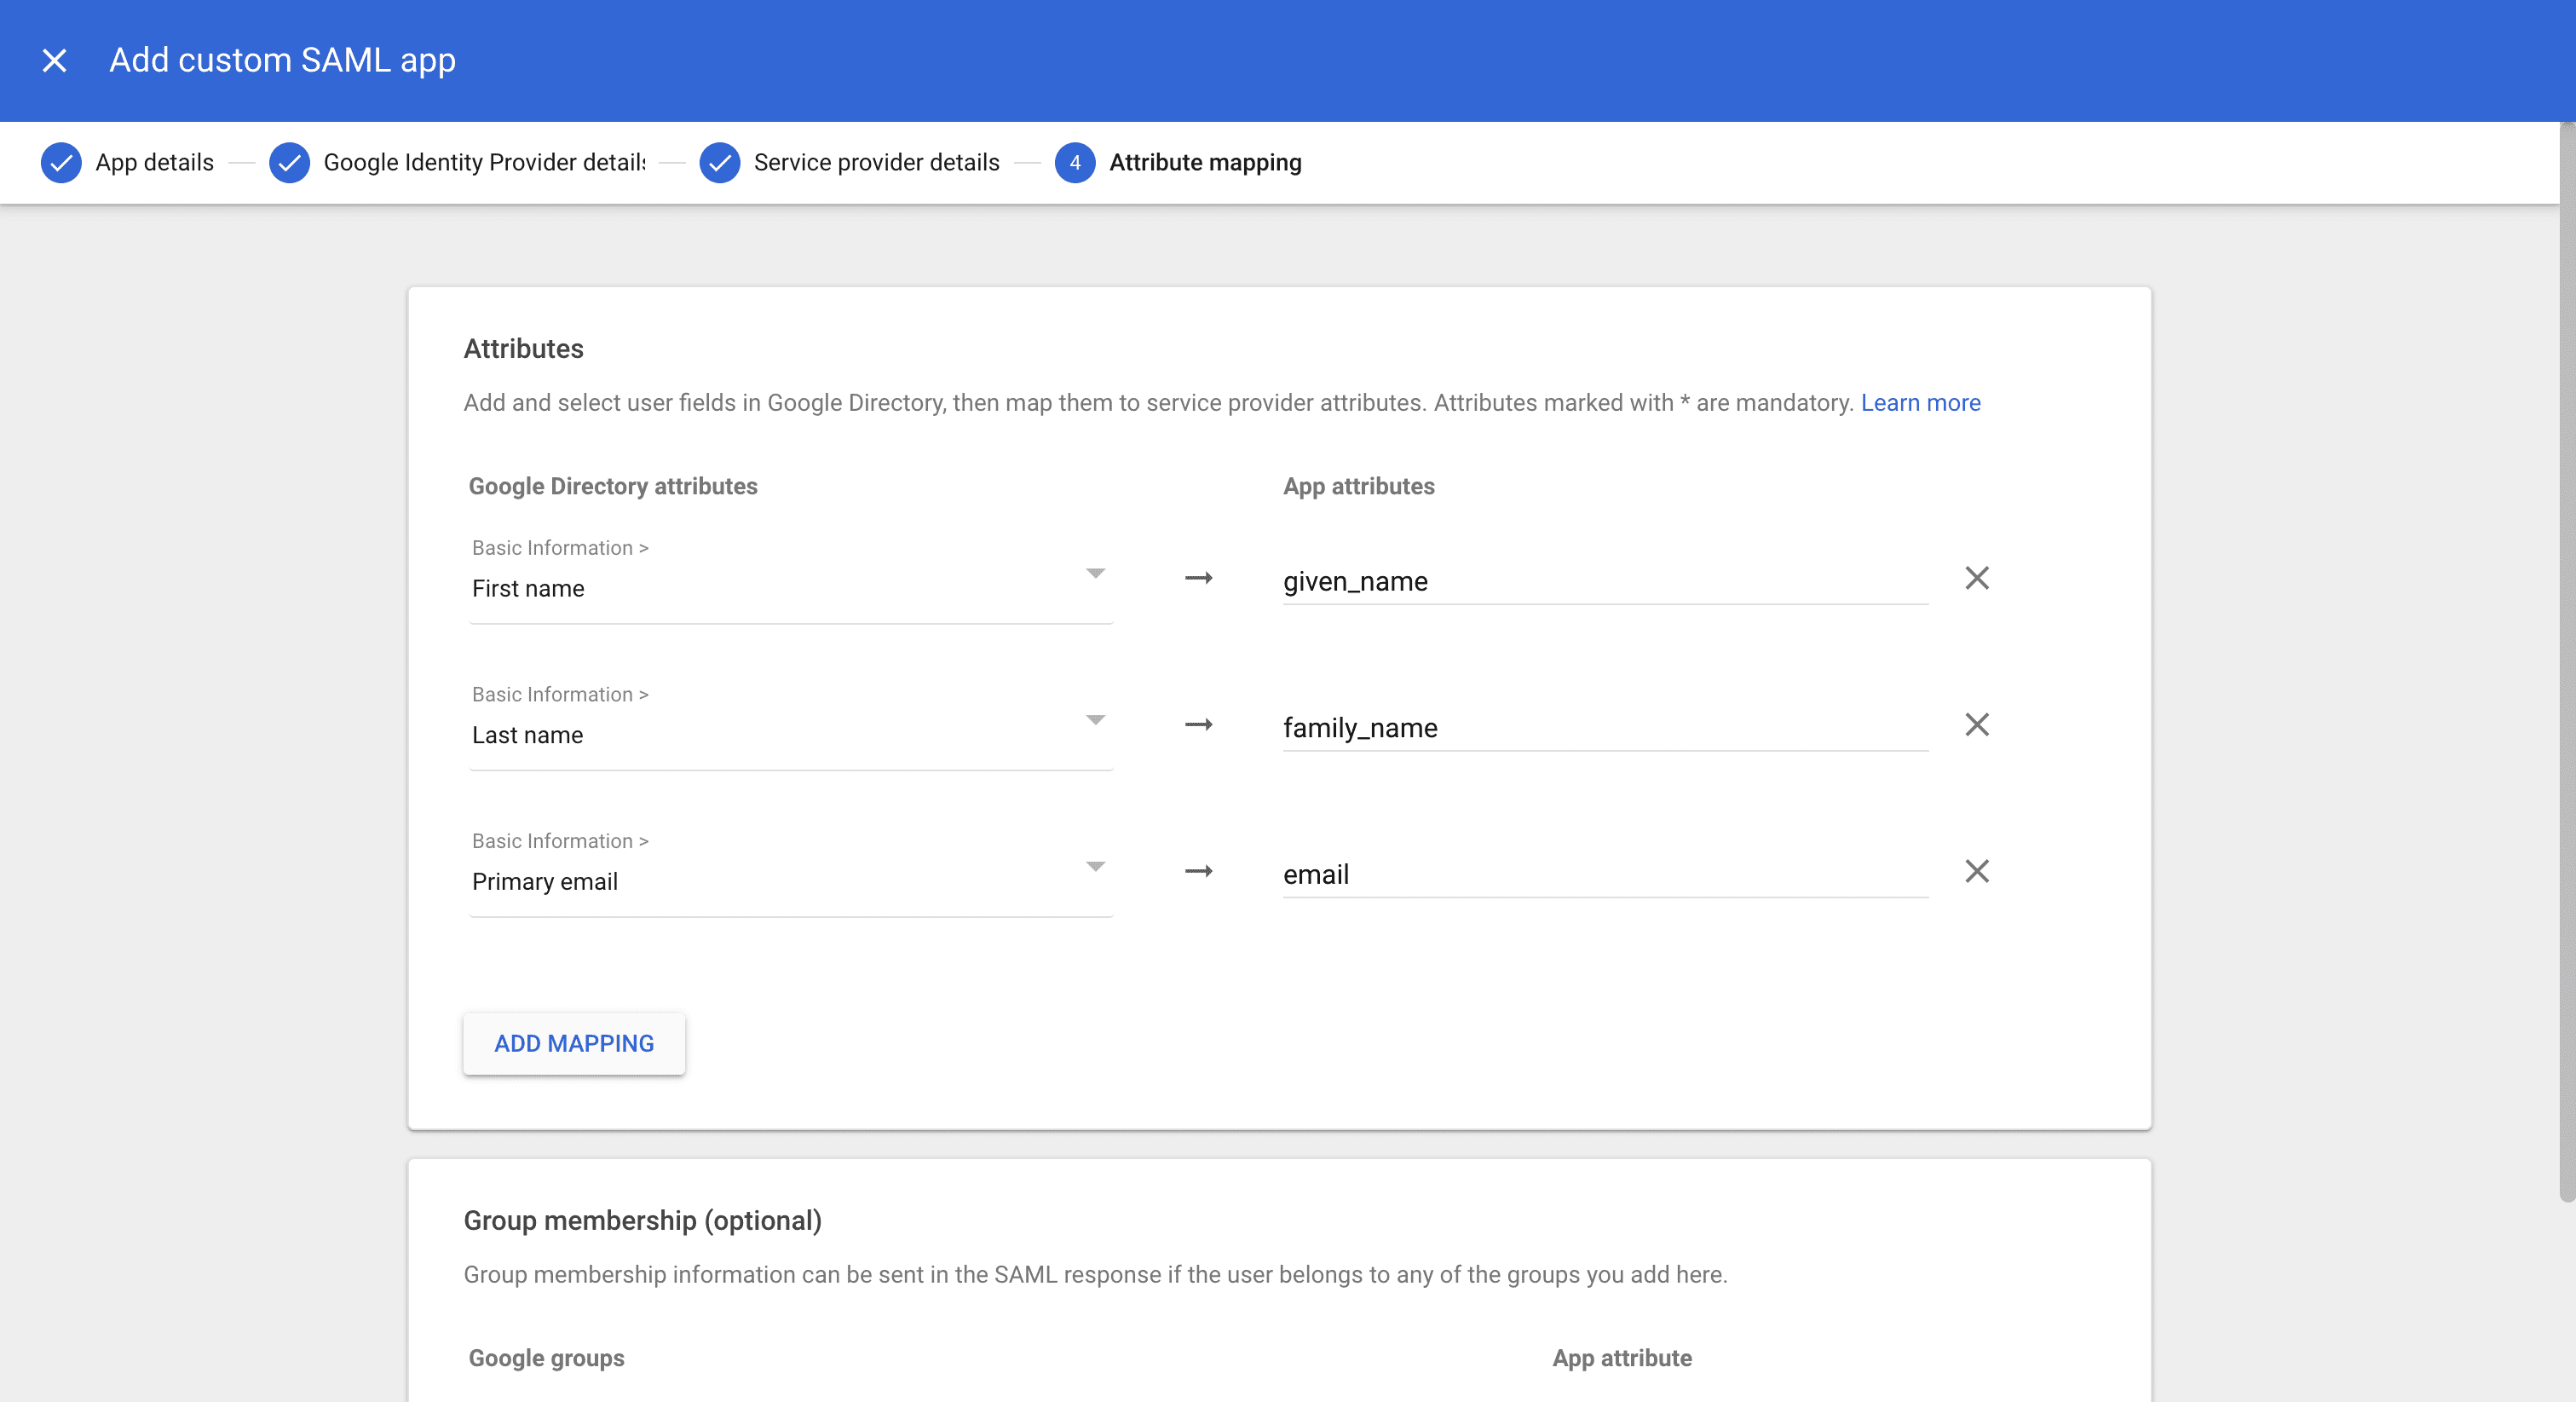
Configure Attribute Mapping: Click Add mapping to establish the user attribute mappings required by LambdaTest:
- Google Directory attributes: Select the appropriate field from the Google directory attributes dropdown
- App attributes: Enter the corresponding attribute name that LambdaTest expects
Configure the following essential mappings:
- Primary Email: Map to
email - First Name: Map to
given_name - Last Name: Map to
family_name
-
Complete Google Workspace Setup: Click Finish to finalize the SAML application configuration in Google Workspace.
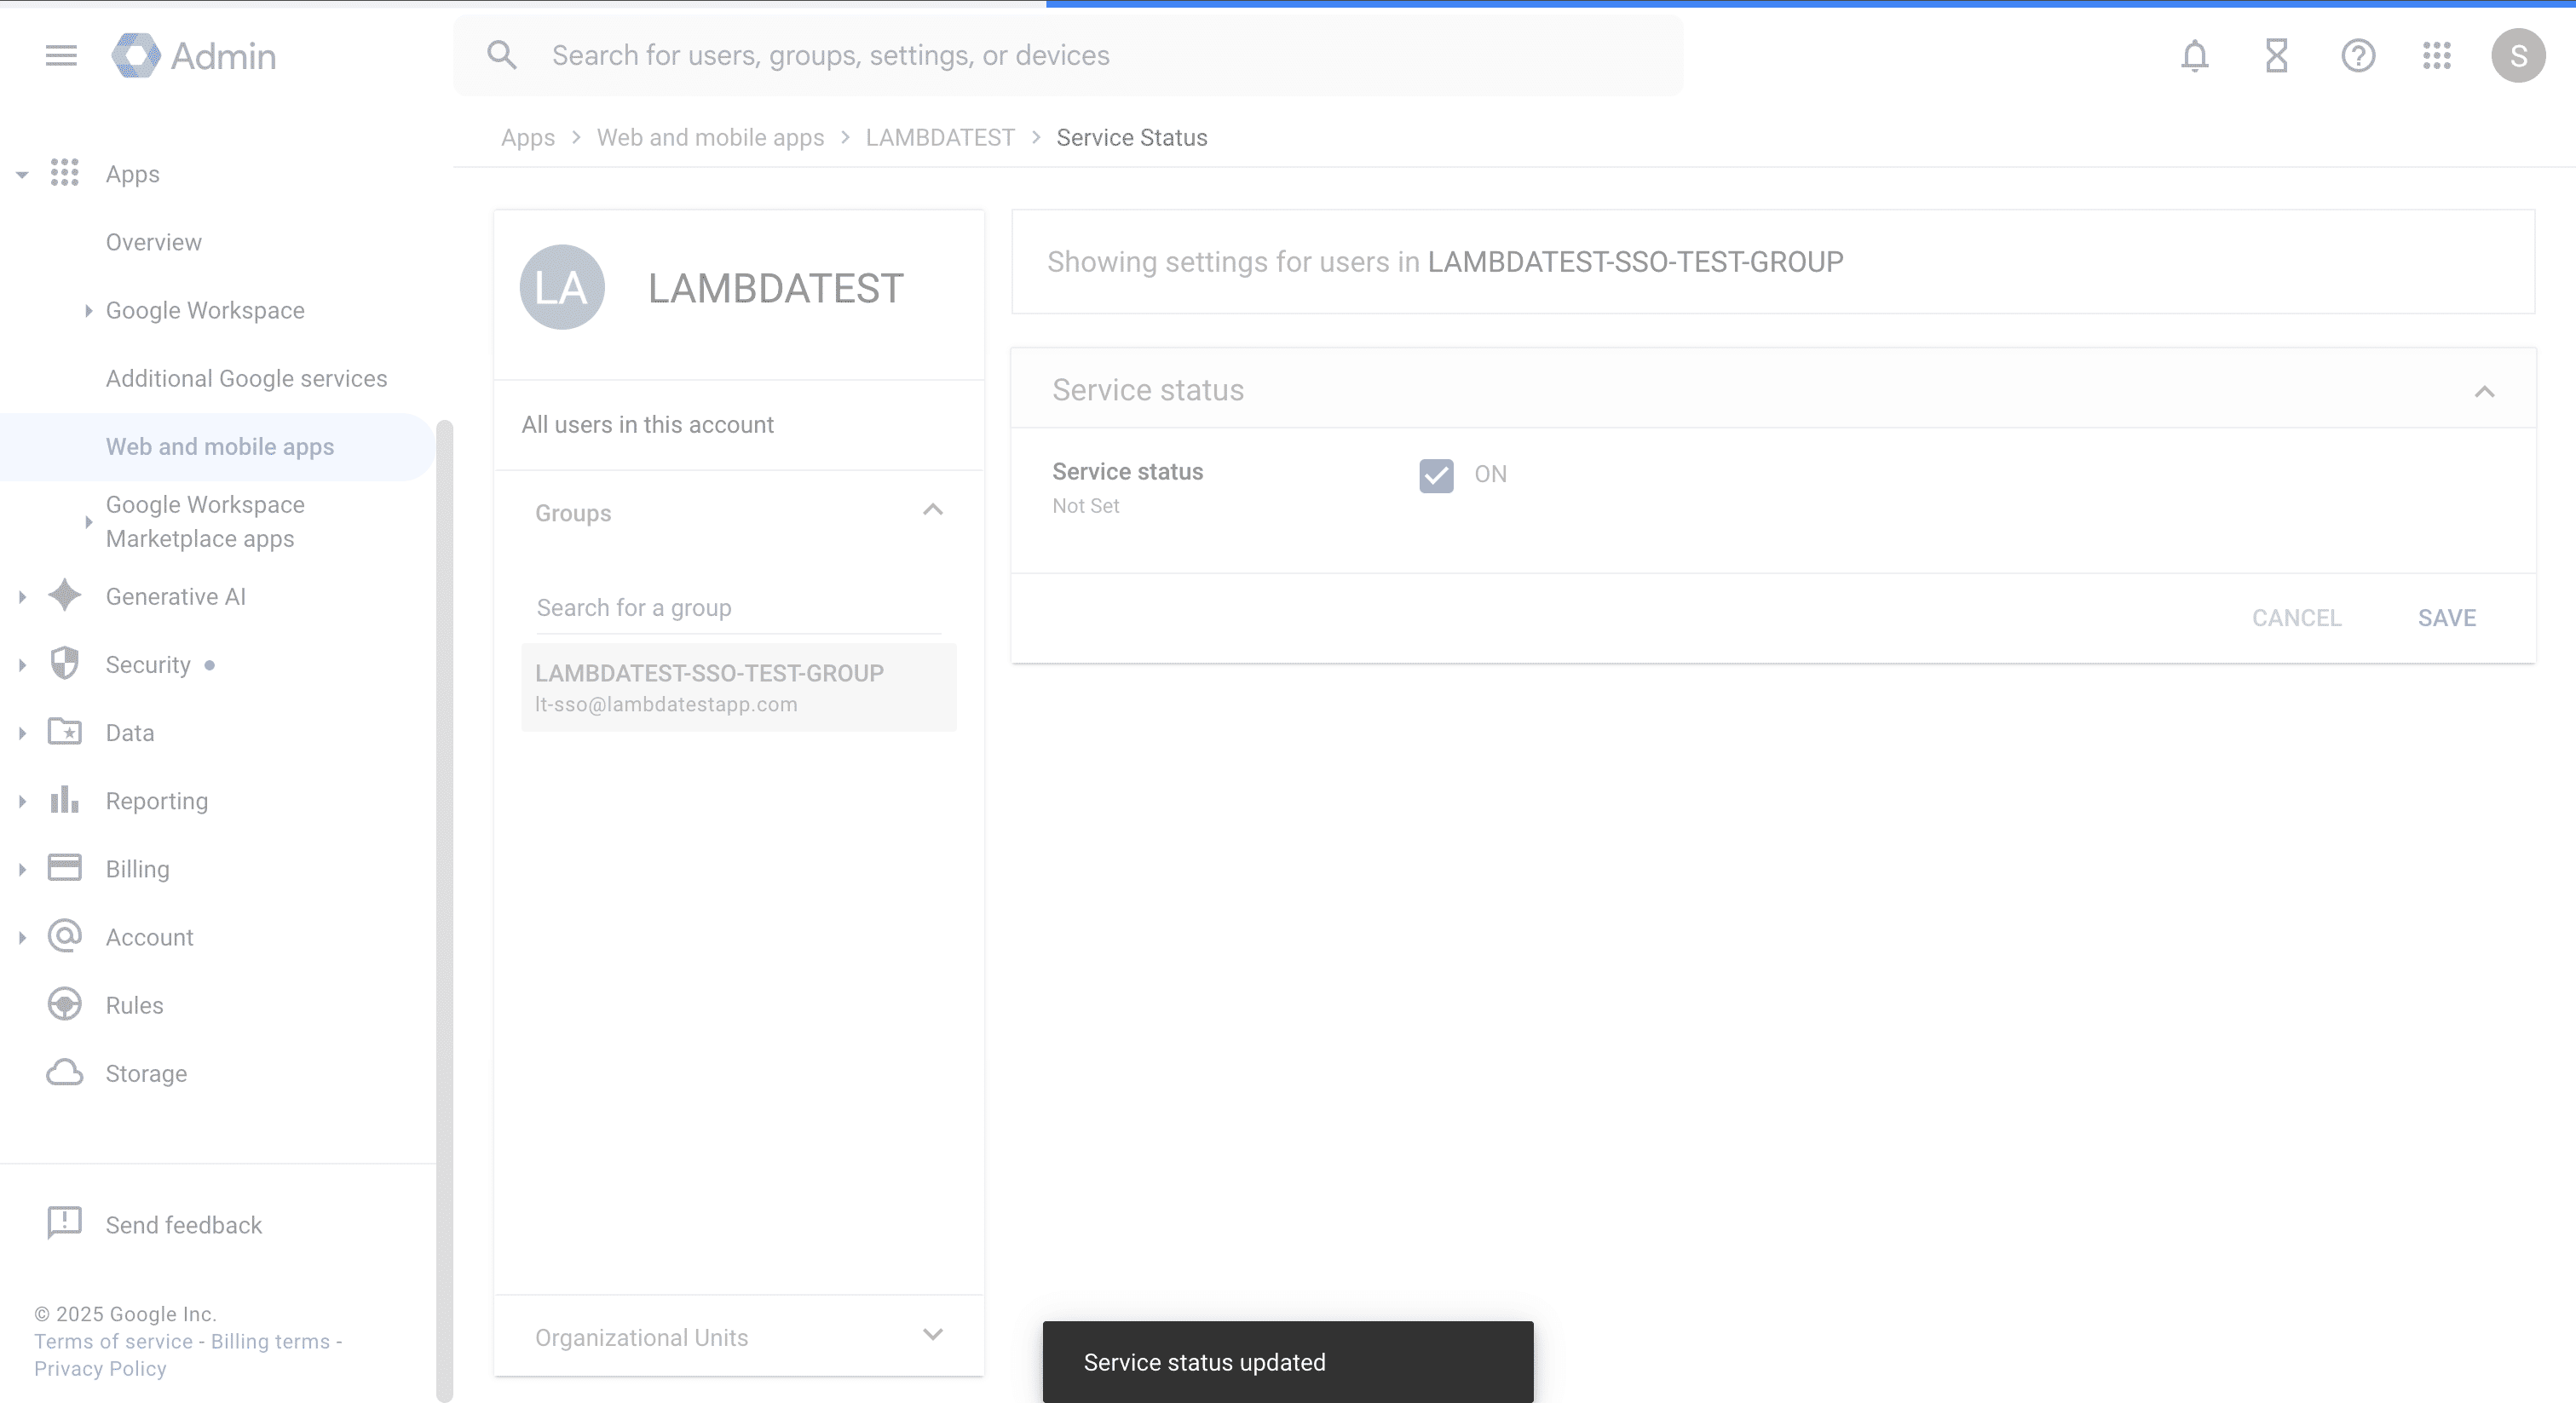
- Enable SAML Application: In the Google Admin Console, navigate to Menu > Apps > Web and mobile apps, locate the LambdaTest SAML application you created, click User access, then configure access for your organization:
- On for everyone: Enable access for all users in your organization
- On for some organizations: Enable access for specific organizational units
- On for some groups: Enable access for specific groups of users
- Off for everyone: Disable access (not recommended for production)
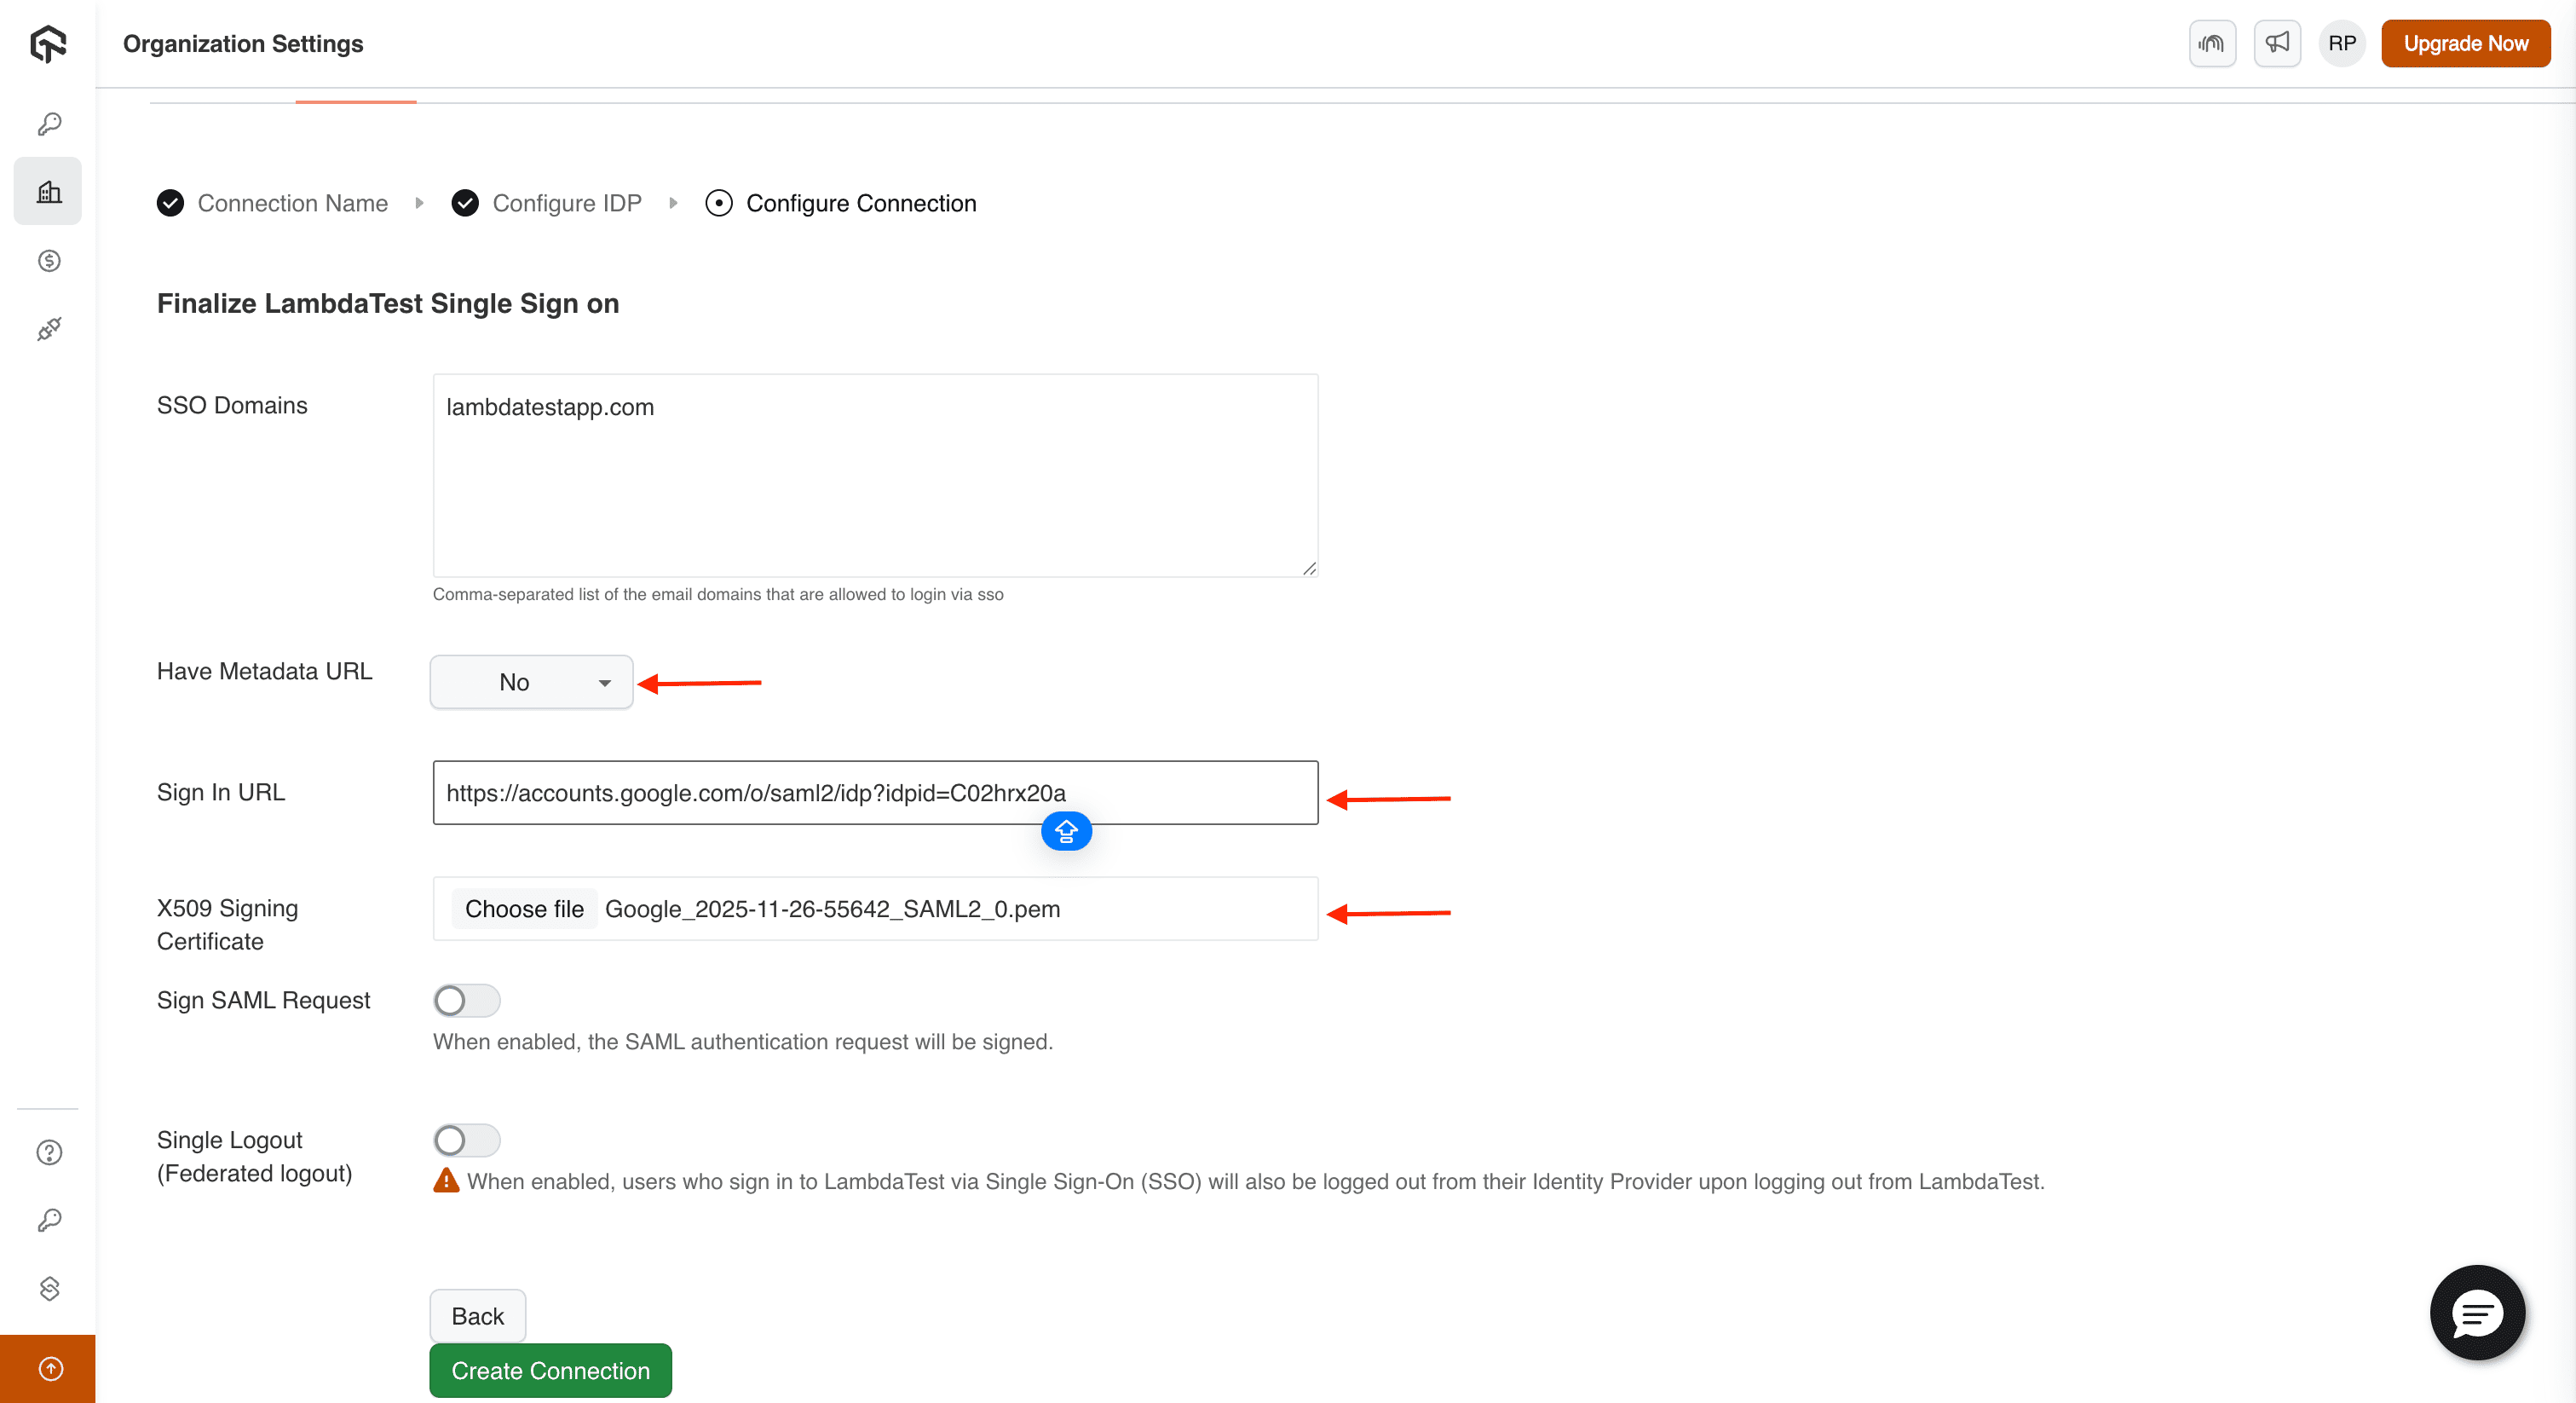
Step 4: Complete LambdaTest Integration
-
Return to LambdaTest Configuration: Navigate back to the LambdaTest SSO configuration page to complete the integration by providing Google Workspace details.
-
Provide Google Workspace Configuration: Enter the Google Workspace SAML configuration details you collected earlier:
-
Configure SSO Domain Restrictions: Specify the email domains that are authorized to authenticate through this SSO connection:
yourcompany.com- enables authentication for all users with @yourcompany.com email addressessubsidiary.com,partner.com- supports multiple domains (comma-separated)
-
Pre-Integration Verification: Before finalizing the connection, ensure the following:
- All required configuration fields are properly completed
- The X.509 certificate file has been successfully uploaded and validated
- SSO URL and Entity ID values are accurately entered
- SSO domain restrictions align with your organization's email domains
- Configuration details are consistent between Google Workspace and LambdaTest
-
Finalize SSO Integration: After verification, click Create Connection to complete the SSO integration and activate the authentication flow.
SSO Verification and Testing
After completing the integration, verify that your SSO setup is functioning correctly by testing both authentication flows.
Identity Provider-Initiated (IdP) SSO Testing
- Access Test Functionality: In the Google Admin Console, navigate to Menu > Apps > Web and mobile apps.
- Select LambdaTest Application: Locate and select the LambdaTest SAML application you configured.
- Execute Test Login: Click Test SAML login in the top-left corner of the application details page.
- Verify Successful Redirect: LambdaTest should open in a new browser tab. If the test fails, review the SAML error messages and update your configuration accordingly, then retest.
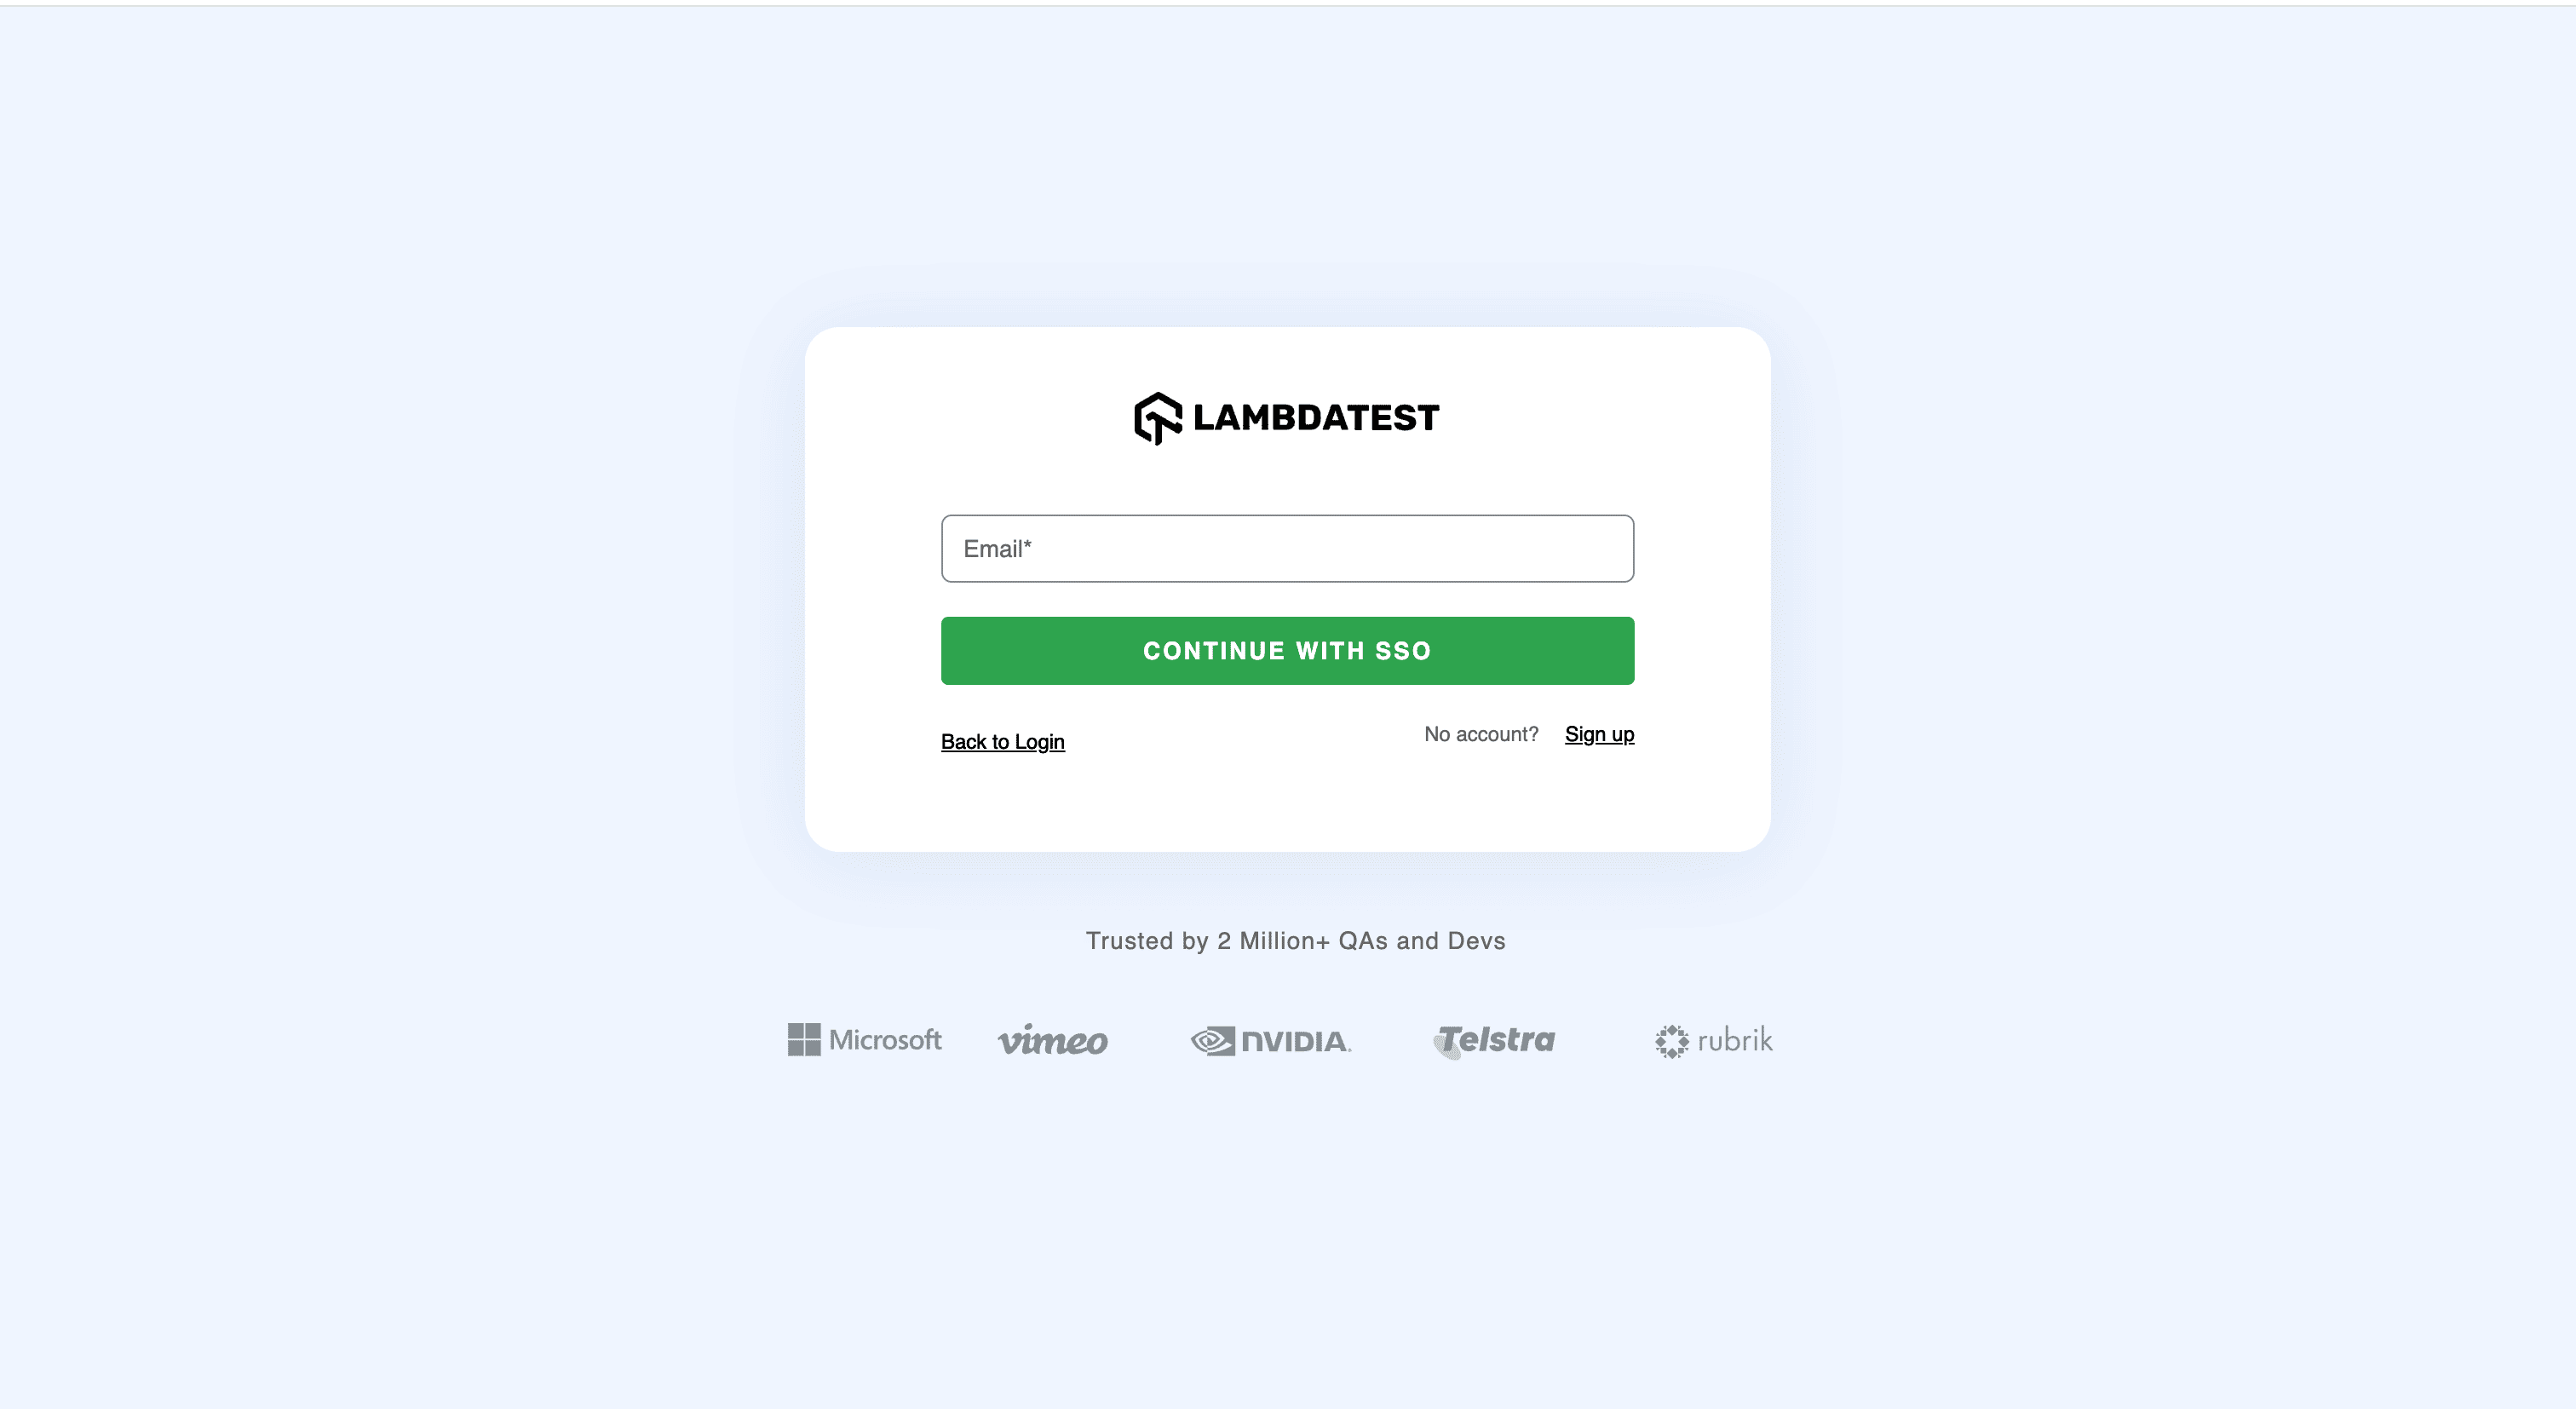
Service Provider-Initiated (SP) SSO Testing
- Access LambdaTest SSO: Navigate to https://accounts.lambdatest.com/sso to access the LambdaTest SSO login page.
- Enter Email Address: Enter your Google Workspace email address in the email field.
- Initiate SSO: Click CONTINUE WITH SSO to begin the authentication process.
- Complete Authentication: You'll be redirected to Google's sign-in page. Enter your Google Workspace credentials.
- Verify Successful Authentication: After successful authentication, you should be automatically redirected to your LambdaTest organization.
Troubleshooting Common Issues
If you encounter issues with your SSO integration, the following troubleshooting guide will help you resolve common problems:
Application Not Enabled Error
If you receive an "App not enabled" error, the SAML application hasn't been properly activated for your users in Google Workspace.
Resolution: Return to the Google Admin Console, navigate to your SAML application, and ensure it's enabled for the appropriate users or organizational units.
Common Configuration Issues
- Certificate Mismatch: Verify that the X.509 certificate uploaded to LambdaTest exactly matches the certificate from Google Workspace
- URL Configuration: Ensure the ACS URL and Entity ID are accurately copied between both platforms
- Attribute Mapping: Confirm that attribute names match precisely between Google Workspace and LambdaTest
- Domain Restrictions: Verify that SSO domains in LambdaTest correspond to your organization's email domains
- User Permissions: Ensure users have appropriate access to the SAML application in Google Workspace
Integration Complete! Your LambdaTest organization is now successfully integrated with Google Workspace SSO. Your team can now access LambdaTest using their Google Workspace credentials. If you encounter any issues or need assistance, our Support Team is here to help. You can also reach us at support@lambdatest.com. Happy Testing!
