Getting Started With Puppeteer Testing
Puppeteer is a Node package that automates the Chrome browser for web testing. Over the DevTools Protocol, it provides a high-level API for controlling headless Chrome or Chromium. It may also be set to run full (non-headless) Chrome or Chromium.
TestMu AI allows you to run Puppeteer tests on a browser farm of 40+ real browsers and operating system combinations. This guide will cover the basics of getting started with Puppeteer testing on the TestMu AI platform.
Prerequisites
Note: All the code samples in this documentation can be found in the TestMu AI's Repository on GitHub. You can either download or clone the repository to quickly run your tests.
View on GitHub
-
Clone the TestMu AI-Puppeteer repository on your system.
-
Install the npm dependencies.
npm install
- Add browserWSEndpoint (browser end point URL) in your test script.
`wss://cdp.lambdatest.com/puppeteer?capabilities=${encodeURIComponent(JSON.stringify(capabilities))}`
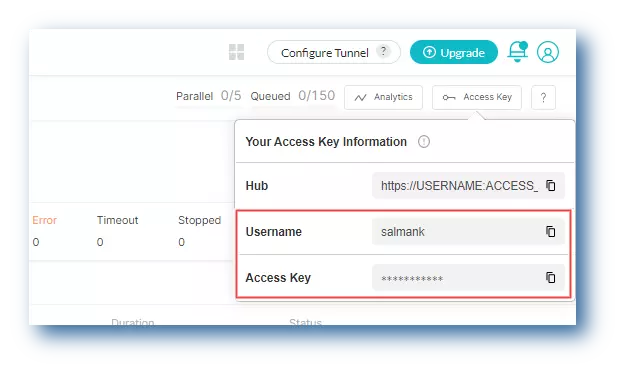
- In order to run your Puppeteer tests, you will need to set your TestMu AI username and access key in the environment variables. Click the Access Key button at the top-right of the Automation Dashboard to access it.
Windows
set LT_USERNAME="YOUR_LAMBDATEST_USERNAME"
set LT_ACCESS_KEY="YOUR_LAMBDATEST_ACCESS_KEY"
macOS/Linux
export LT_USERNAME="YOUR_LAMBDATEST_USERNAME"
export LT_ACCESS_KEY="YOUR_LAMBDATEST_ACCESS_KEY"
Run Your First Puppeteer Test
Shown below are the steps on running Puppeteer tests on the TestMu AI platform.
- Clone the TestMu AI-Puppeteer GitHub repository and switch to the cloned directory.
git clone https://github.com/LambdaTest/puppeteer-sample.git
cd puppeteer-sample
-
Ensure you have npm dependencies installed.
-
Configure your TestMu AI authentication credentials.
Once you are done with the above-mentioned steps, you can initiate your first Puppeteer test on TestMu AI.
Test Scenario: The below test script runs on Chrome browser running Windows 10. It visits the TestMu AI platform, clicks on the Pricing page, and navigates to the Automation Testing page.
'use strict';
const { strict } = require('once');
const puppeteer = require('puppeteer');
const expect = require('chai').expect;

(async () => {
    const capabilities = {
        'browserName': 'Chrome',
        'browserVersion': 'latest',
        'LT:Options': {
            'platform': 'Windows 10',
            'build': 'puppeteer-build-1',
            'name': 'My first Puppeteer test',
            'resolution':'1366x768',
            'user': process.env.LT_USERNAME || "Your Username",
            'accessKey': process.env.LT_ACCESS_KEY || "Your Access Key",,
            'network': true
        }
   };

    try {
        const browser = await puppeteer.connect({
            browserWSEndpoint:
                `wss://cdp.lambdatest.com/puppeteer?capabilities=${encodeURIComponent(JSON.stringify(capabilities))}`,
        });

        const page = await browser.newPage();
        await page.setViewport({
            width: 1024,
            height: 768,
            deviceScaleFactor: 1,
          });
        console.log("Navigating to LambdaTest");
        await page.goto('https://www.lambdatest.com/');
        console.log("Navigating to Pricing");
        await page.goto('https://www.lambdatest.com/pricing');
        console.log("Navigating to Automation");
        await page.goto('https://www.lambdatest.com/automation-testing');
        console.log("Closing browser");
        await browser.close();

    } catch (e) {
        console.log("Error - ", e);
    }
})();
- Pass the below command to run the test.
node navigation.js
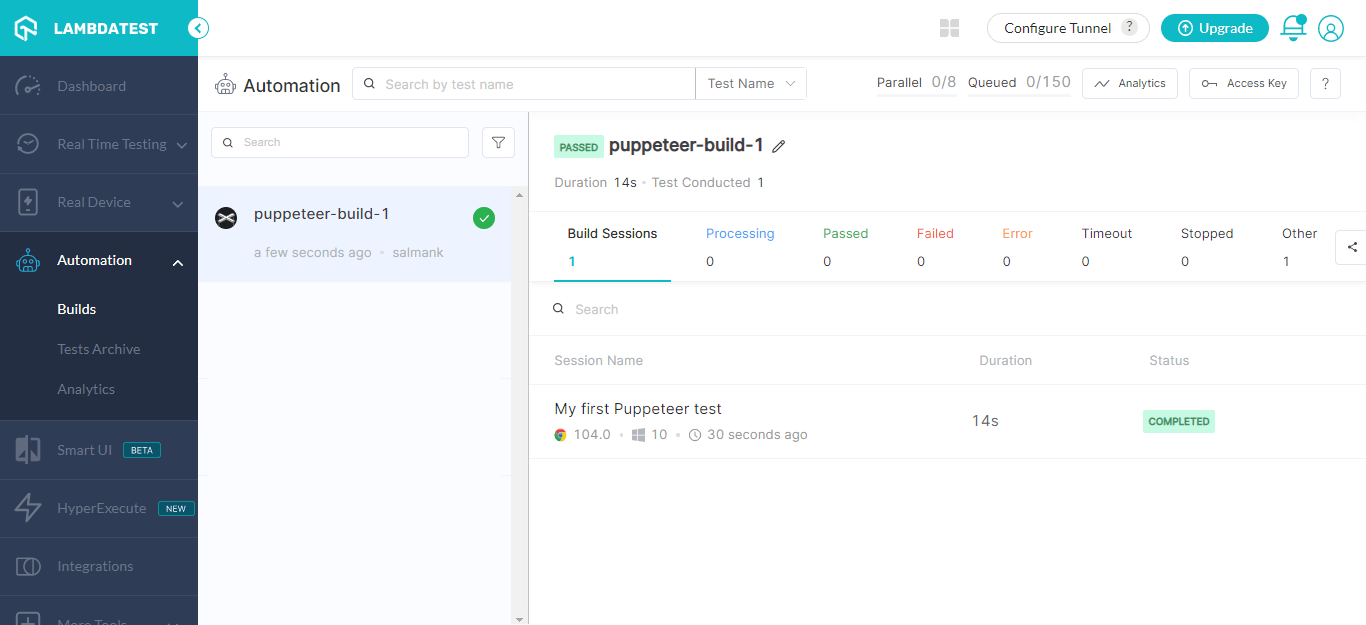
View your Puppeteer test results
The TestMu AI Automation Dashboard is where you can see the results of your Puppeteer tests after running them on the TestMu AI platform.
The below screenshot of TestMu AI Automation Dashboard shows the Puppeteer build on the left and the build sessions associated with the selected build on the right.
On clicking the session name of the respective test, you can view the details of Puppeteer test session that you just executed. For example, the below screenshot shows a test execution details of Puppeteer test like Test Name, Test ID, selected configurations, test logs, basic info, input config, and test session video.

