Capture Static URLs via CLI
With SmartUI CLI, you can seamlessly perform visual regression testing on the TestMu AI platform using your command line, identifying Visual UI Regression bugs effortlessly. This guide will walk you through the process of running successful Visual Regression tests using SmartUI CLI.
Prerequisites for running SmartUI CLI
- Basic understanding of Command Line Interface is required.
- Login to TestMu AI SmartUI with your credentials.
The following steps will guide you in running your first Visual Regression test on TestMu AI platform using SmartUI CLI.
Create a SmartUI Web-Project
The first step is to create a project with the application in which we will combine all your builds run on the project. To create a SmartUI Project, follow these steps:
- Go to Projects page
- Click on the
new projectbutton - Select the platform as CLI for executing your
CLItests. - Add name of the project, approvers for the changes found, tags for any filter or easy navigation.
- Click on the Submit.
Step 1: Install the Dependencies
Install required NPM modules for TestMu AI SmartUI CLI globally or in your project:
Global Installation (Recommended):
npm install -g @lambdatest/smartui-cli
Local Installation:
npm install @lambdatest/smartui-cli
If you face any problems executing tests with SmartUI-CLI versions >= v4.x.x, upgrade your Node.js version to v20.3 or above.
Step 2: Create URL file
smartui config:create-web-static urls.json
Once, the URLs file will be created, you will be seeing the sample pre-filled URLs in the urls.json file:
[
  {
    "name": "lambdatest-home-page",
    "url": "https://www.testmuai.com",
    "waitForTimeout": 1000 //Optional
  },
  {
    "name": "example-page",
    "url": "https://example.com/"
  }
]
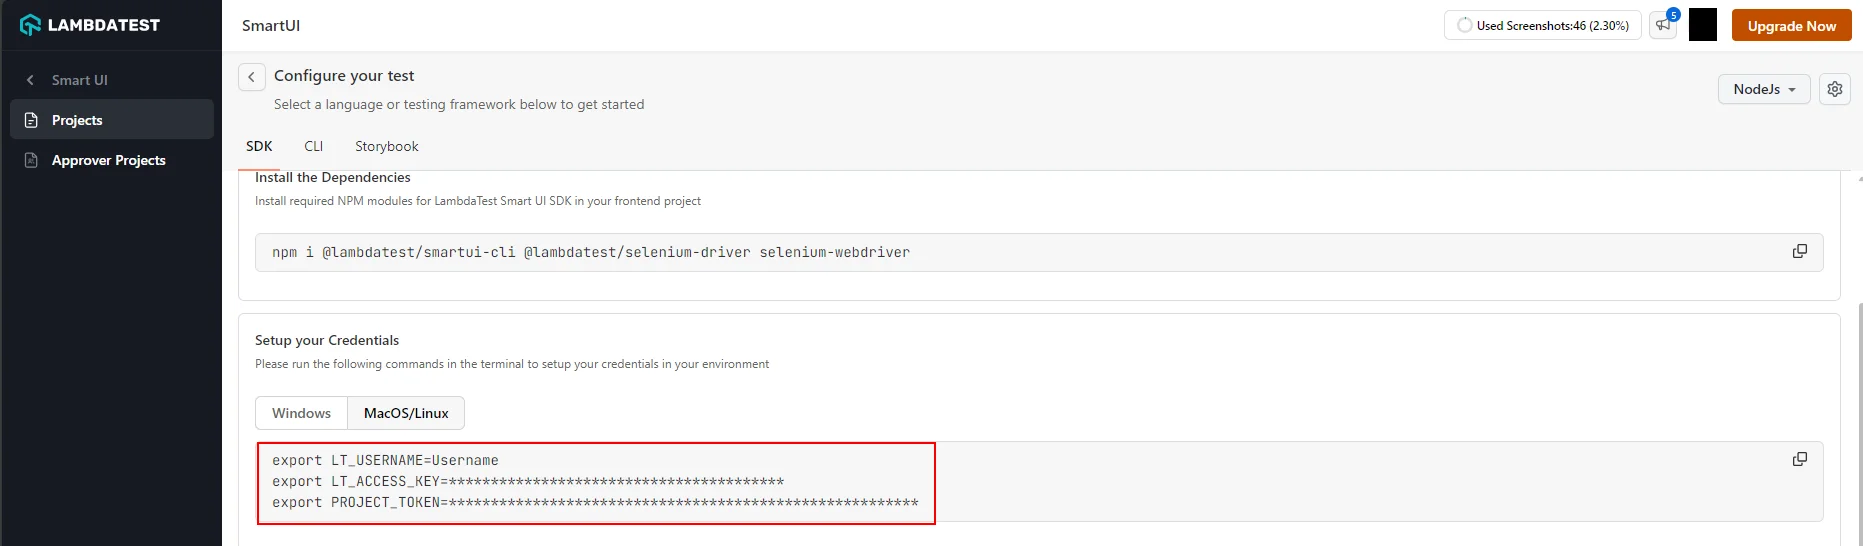
Step 3: Configure your Project Token
Setup your project token shown in the SmartUI app after creating your project.
- MacOS/Linux
- Windows - CMD
- PowerShell
export PROJECT_TOKEN="123456#1234abcd-****-****-****-************"
set PROJECT_TOKEN="123456#1234abcd-****-****-****-************"
$env:PROJECT_TOKEN="123456#1234abcd-****-****-****-************"
Step 4: Create and Configure SmartUI Config
You can now configure your project settings on using various available options to run your tests with the SmartUI integration. To generate the configuration file, please execute the following command:
npx smartui config:create .smartui.json
Once, the configuration file will be created, you will be seeing the default configuration pre-filled in the configuration file:
{
  "web": {
    "browsers": [
      "chrome",
      "firefox",
      "safari",
      "edge"
    ],
    "viewports": [
      [
        1920
      ],
      [
        1366
      ],
      [
        1028
      ]
    ] // Full Page screenshots are captured by default for web viewports
  },
  "mobile": {
    "devices": [
      "iPhone 14",  //iPhone 14 viewport
      "Galaxy S24"  //Galaxy S24 viewport
    ],
    "fullPage": true, //Full Page is true by default for mobile viewports
    "orientation": "portrait" //Change to "landscape" for landscape snapshot
  }
}
For capturing viewport screenshots
To capture a screenshot of the content currently visible in your viewport, rather than the entire page, it's important to define the viewport's width and height in your configuration settings. Specify the desired width and height parameters as demonstrated in the following example to ensure that the screenshot encompasses only the viewport area.
    "viewports": [
      [
        1920,
        1080
      ],
      [
        1366,
        768
      ],
      [
        360,
        640
      ]
    ],
You may use the smartui --help command in case you are facing issues during the execution of SmartUI commands in the CLI.
SmartUI CLI Config Options
Please read the following table for more information about the configuration file:
| Config Key | Description | Usage |
|---|---|---|
| browsers | You can add all the supported browsers brands here to run your tests for SmartUI. Ex: "chrome", "firefox", "safari", "edge", etc.. | Mandatory |
| viewports | You can add all the supported browser viewpoints here to run your tests for SmartUI Ex: [1920, 1080],[width, height] etc.. | Mandatory |
Step 5: Execute the Tests on SmartUI Cloud using CLI
You can now execute tests for Visual Regression Testing using the following options:.
npx smartui capture urls.json --config .smartui.json
Additional Options
You can also use the following options with the capture command:
--scheduled <string>- Specify schedule ID for scheduled test runs--userName <string>- Override TestMu AI username--accessKey <string>- Override TestMu AI access key--buildName <string>- Specify a custom build name--fetch-results [filename]- Fetch and save results to JSON file
Example with additional options:
npx smartui capture urls.json --config .smartui.json --buildName "Release-v1.0" --fetch-results results.json
Executing browser scripts using the Capture Command
SmartUI CLI provides the flexibility to execute custom JavaScript code on target URLs at specific stages of the snapshot process. This feature is crucial for:
- Interacting with dynamic elements
- Managing loading states
- Modifying page content
- Validating page states
- Performing actions like accepting cookies, clicking on buttons, etc. These capabilities ensure that your visual tests accurately capture the true representation of your web pages.
You can execute any valid JavaScript code that you would typically run inside a browser. For example, to simulate a button click, you might use:
document.querySelector('.my-button-example').click();
Execute Option Keys
The execute option accepts an object with the following keys:
-
afterNavigation: This function is called after the page navigates to the specified URL. It is useful for actions that need to occur once the page has loaded.
-
beforeSnapshot: This function is called just before SmartUI captures a snapshot. It is ideal for final adjustments or interactions needed to prepare the page for capture.
Example usage in a configuration:
{
  "name": "Example Page",
  "url": "https://example.com/",
  "waitForTimeout": 3000,
  "execute": {
    "afterNavigation": "await page.waitForSelector('.loading', { hidden: true })",
    "beforeSnapshot": "document.querySelector('.cookie-banner').click()"
  }
}
This example waits for a loading element to disappear after navigation and clicks a cookie banner before taking a snapshot.
Fetch results
You can fetch build results by adding the --fetch-results flag to your test execution command. Here are different ways to use this feature:
Default Usage
If no filename is specified, results will be stored in results.json:
npx smartui capture urls.json --config .smartui.json --fetch-results
Custom Filename
Specify a custom filename for your results:
npx smartui capture urls.json --config .smartui.json --fetch-results custom-results.json
Adding a custom build name
You can add a custom build name by adding the --buildName flag to your test execution command. Here is how you can utilise this feature:
Specify a custom build name to group your screenshots in the following way:
npx smartui capture urls.json --buildName "Sample Build Name" --config .smartui.json
Note:
- If no build name is provided, a random name will be automatically assigned to the build.
- Specifying the name of an existing build within the project will append the screenshots to that build.
- Existing screenshots with the same name and configuration in the build will be overwritten during a re-run.
Setup with Continuous Integration (CI)
If you are using the Continuous Integration (CI) pipeline for your application and want to integrate SmartUI CLI execution then the following are the steps needs to be added to your .yaml file:
steps:
  - name: Running SmartUI CLI Tests
    - run: |
       npm install -g @lambdatest/smartui-cli
       npx playwright install-deps
       smartui capture urls.json --config smartui-web.json
SmartUI CLI Options and Keys
The following are supported CLI (Command Line Interface) options for Visual Regression Testing with SmartUI:
| CLI Flag Key | Description | Usage |
|---|---|---|
| --config | This is the reference configuration file containing the SmartUI Cloud Configuration | Optional |
| --help | This will print all help information for the SmartUI CLI options | Optional |
View SmartUI Results
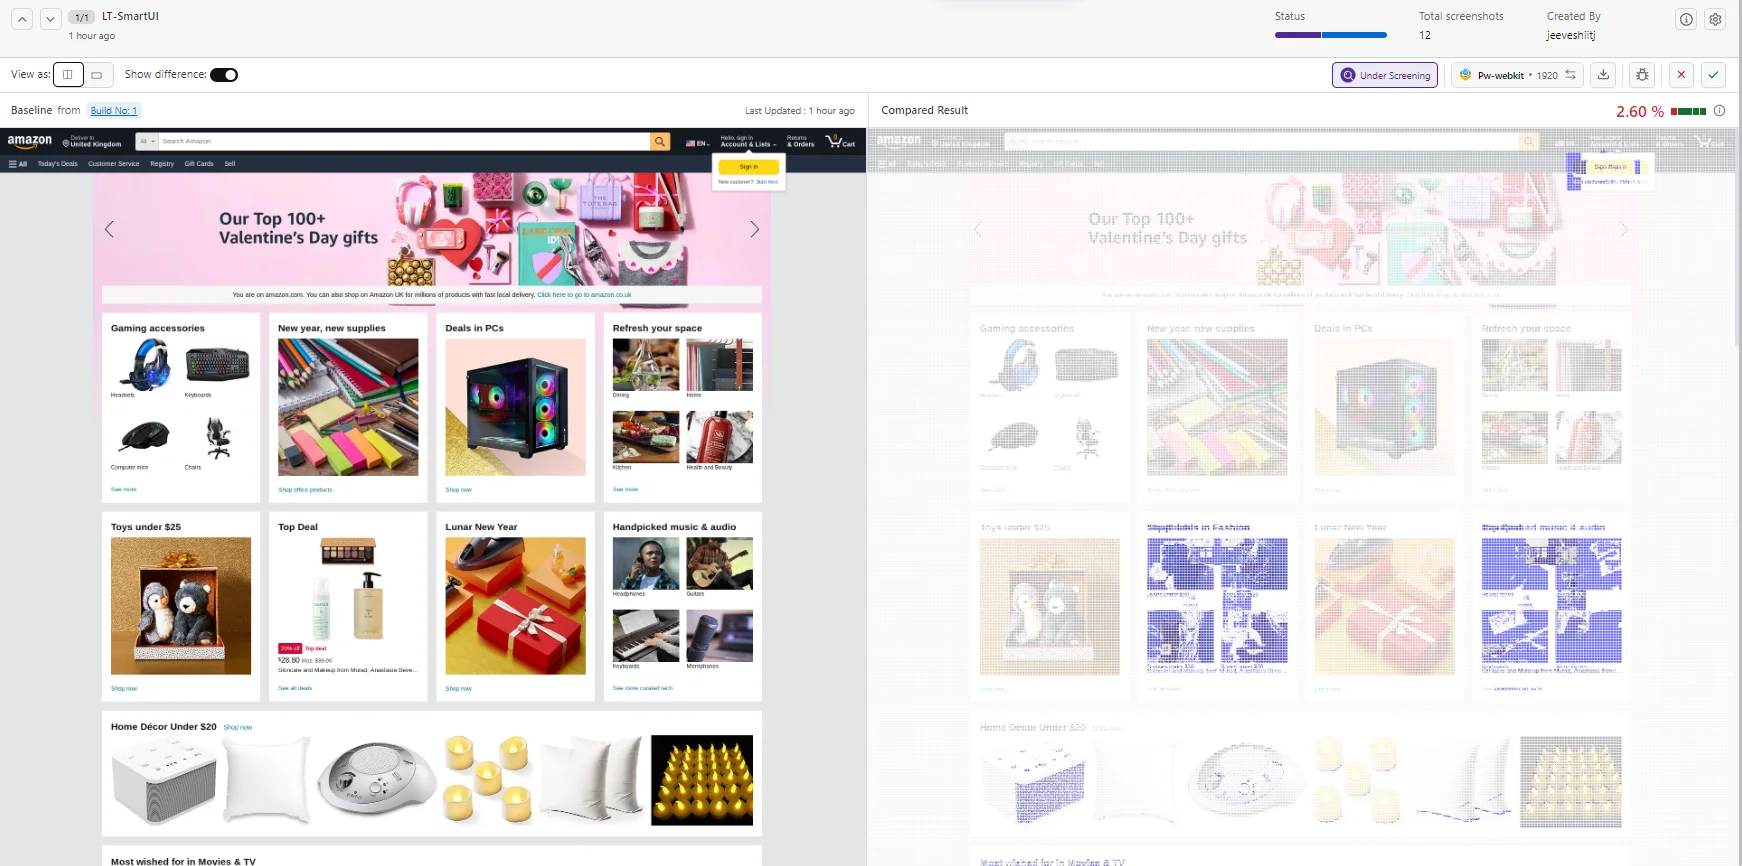
You can see the SmartUI dashboard to view the results. This will help you identify the Mismatches from the existing Baseline build and do the required visual testing.
Parallel execution of static URLs
You can reduce the build time by executing parallel URLs in the following way.
npx smartui capture urls.json --config .smartui.json --parallel <number-of-parallels> --fetch-results
- The
--parallelflag determines how many URLs will be processed simultaneously per browser - Each thread captures screenshots independently, maximizing throughput
- Use
--forceflag to forcefully apply parallel instances even if not optimal
Example:
npx smartui capture urls.json --config .smartui.json --parallel 3 --fetch-results
Example with force flag:
npx smartui capture urls.json --config .smartui.json --parallel 5 --force --fetch-results
Determining Optimal Thread Count
The maximum number of parallel threads is calculated using the formula: log2(N) where N is the total number of URLs.
For example:
- For 100 URLs: Maximum parallel threads = log2(100) = 6 threads
- For 50 URLs: Maximum parallel threads = log2(50) = 5 threads
- For 25 URLs: Maximum parallel threads = log2(25) = 4 threads
Best Practices for parallel execution
- Start with a lower thread count and gradually increase based on your system's performance
- Monitor system resources during execution
- Ensure stable internet connection for reliable parallel processing
