Git Branching Strategy in SmartUI Storybook Integration
This is the guide to understand our Git Branching with SmartUI projects which can detect the commit history and execute the appropriate actions for your visual regression testing.
Prerequisites for running Git with SmartUI
- You have an account with LambdaTest.
- You must have an active subscription plan with valid screenshots limit.
- You must have created an Project on the SmartUI web app.
The following steps will guide you in running your Git branching Visual Regression test on TestMu AI SmartUI platform:
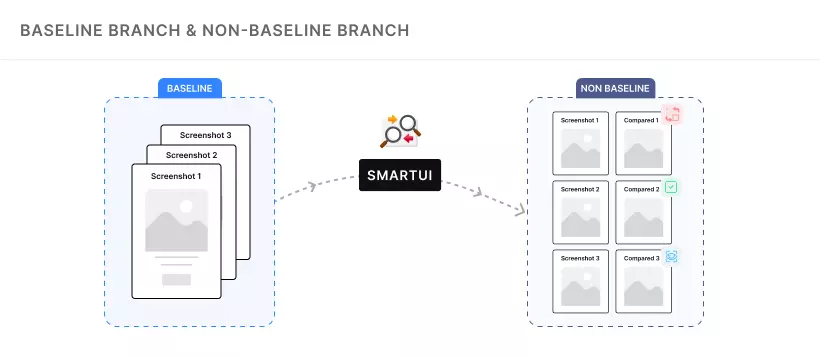
Baseline Branch: A baseline branch build is a set of screenshots which are captured using SmartUI where all the screenshots are compared against for the non-baseline branch builds.
Non-Baseline Branches: A non-baseline branch(s) build is a set of screenshots which are captured using SmartUI where all the screenshots are compared against with the Baseline build which are matched with the screenshot names.
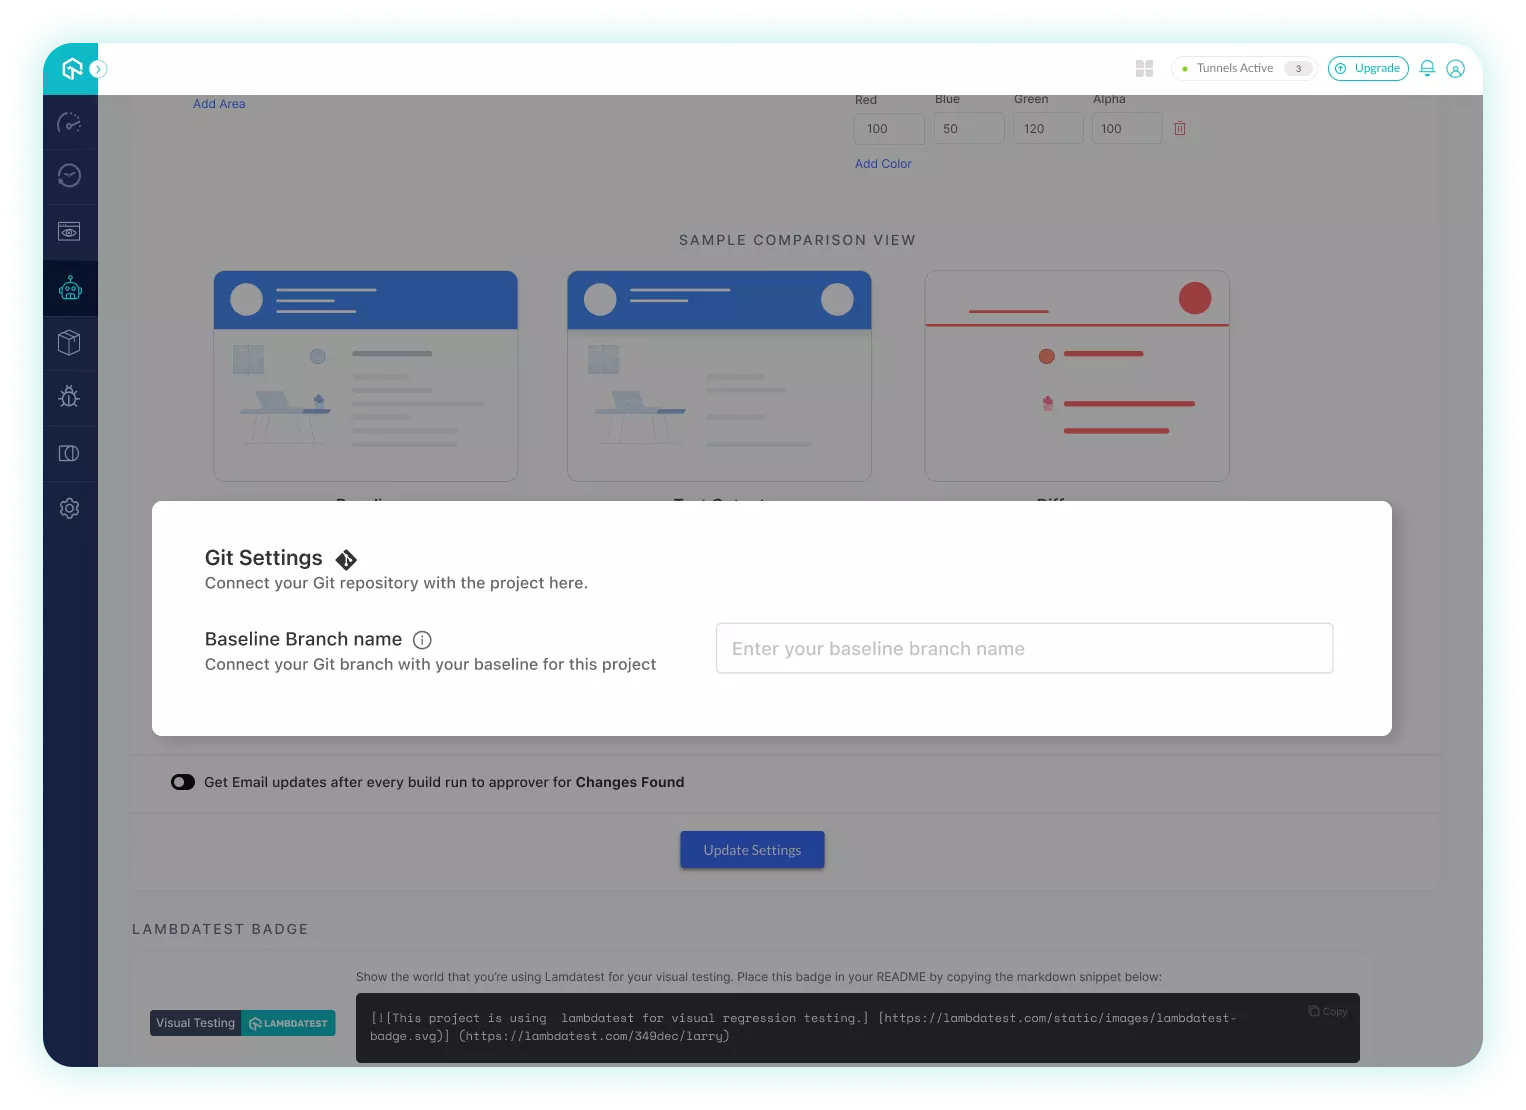
Step 1: Setup your Git Baseline branch in the Project Settings
The following are the steps to add Baseline branch to your StoryBook projects with Git commits:
- Go to Project Settings page for the created project.
- Search for Git Settings and add your required Baseline branch in the input box.
- Click on Update Settings button to update the project settings and set your Baseline Git branch.
Now, after the successful setup of your Baseline branch of your project.
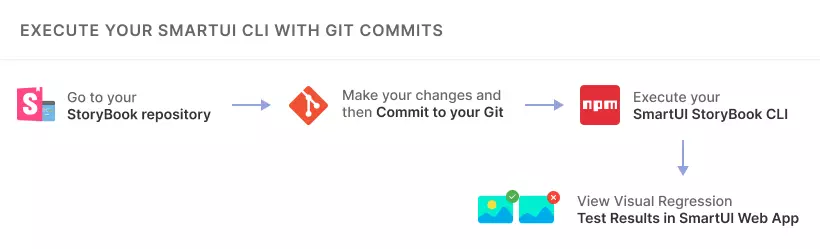
Step 2: Execute your SmartUI CLI with Git commits
The following are the steps to execute your SmartUI CLI with Git commits on StoryBook projects:
- Go to your current StoryBook repository and run the following command:
git init --y
You can ignore the above step if you already have a repository with Git initialized
- Now, make your changes in your
.storiesfiles and then commit the changes to yourGit:
git commit -m "Your commit message"
- Execute your SmartUI StoryBook CLI command to execute the Visual Regression tests for your
.storiesfiles:
- For Locally Hosted Server
- For Static Build
npm run storybook                                                 // Starts your local StoryBook server
smartui storybook http://localhost:6006 --config .smartui.json    // Captures all the stories running on local server
npm run build-storybook                                           // Creates a Static Build Folder of StoryBook Stories
smartui storybook ./storybook-static --config .smartui.json       // Captures all the stories added in the static build folder

Git Branching Workflows and Strategies
Ability to set the Baseline Branch
You can set any branch name as your Baseline branch in the SmartUI project settings page. You can follow the steps below to set your baseline branch:
- Go to the SmartUI Web App.
- Select the project in which you want to configure the
Gitbaseline branch for. - Go to the project settings section by clicking on the top right icon on the
Buildslist page. - In the project settings section you can provide the input of the
branchname. - Click on the
Update Settingsbutton to update the settings.
Displaying the Git Commit Meta data
If you are using the Git based workflow with SmartUI StoryBook CLI then the following information is displayed on the UI of the SmartUI Web App - Builds list page:
- Branch Name is set as the
Build Namein the SmartUI project. - The latest commit IDof the Git commit added to the current repository.
- The commit message of the Git commit of the
commit IDto the current repository. - The commit author username of the Git commit to the current repository.

The above metadata is displayed only for StoryBook Git repositories.
Git Baseline Branch Selection and Comparison Strategy:
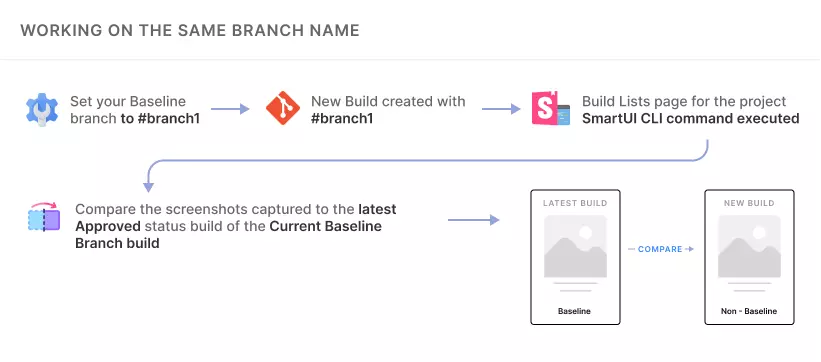
Working on the same branch name
In this workflow, if you are working on the same branch name and want to execute the SmartUI StoryBook CLI command to run the Visual Regression tests for your .stories.
And, if you have created a project and set your Baseline branch name to master then executed the following commands:
// Your current branch name
$ git branch
* <Your Current Active branch>
  <--Other branches-->

// Adds a new commit to your current active branch
$ git commit -m "Your commit message"

// Executing the SmartUI StoryBook tests
$ smartui storybook <Your localhost URL or Static Build folder path> --config .smartui.json
Then, a new build will be created with your Current Active Branch on the SmartUI Web App - Build Lists page for the project in which the SmartUI CLI command is executed.
If the current Baseline build branch is set to Current Active Branch in the SmartUI project settings, then SmartUI will compare the screenshots captured to the latest APPROVED status build of the Current Active Branch branch available in the same project.
Here is an example of the above workflow:
$ git branch
* master

$ git commit -m "Second Build Changes"

$ smartui storybook http://localhost:6006 --config .smartui.json
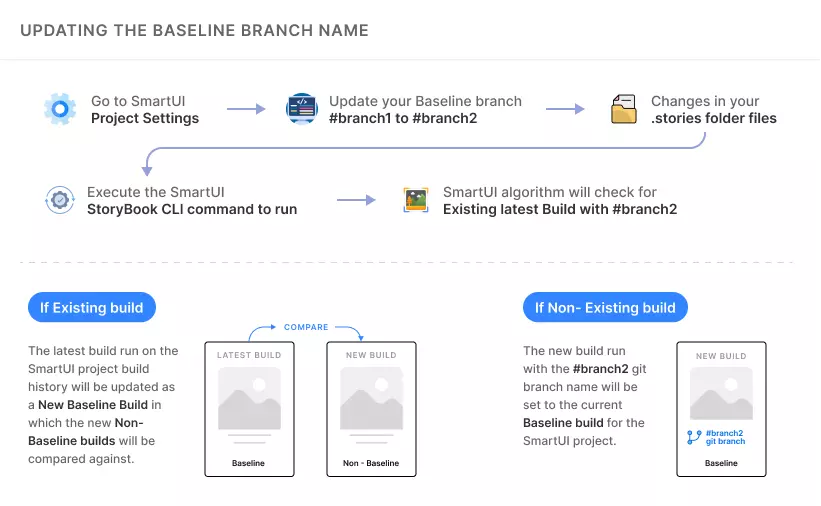
Updating the Baseline Branch Name
In this workflow, if you have created a SmartUI project on the Web App and have executed few builds with a Branch Name: Master and want to switch your Baseline branch to development branch in your Git, then following will be the workflow that will help you in switching the Baseline Branch for your project:
- You have to go to the
SmartUI Project Settingspage to update your Baseline Branch in the project settings frommastertodevelopment. - Make changes in your
.storiesfolder files in your repository. - Now, execute the
SmartUI StoryBookCLI command to run the Visual Regression tests. - Then, SmartUI algorithm will check for existing latest
buildwithdevelopmentrun on the SmartUI project in Builds history.
The following are the cases that SmartUI will update the Baseline build for the branch set in your SmartUI project settings:
Case 1: If a build with development branch exists in build history
In this case, the latest build run on the SmartUI project build history will be updated as a New Baseline Build in which the new Non-Baseline builds will be compared against.
Case 2: If a build with development branch does not exist in build history
In this case, the new build run with the development git branch name will be set to the current Baseline build for the SmartUI project.
Detect changes for Git commit added to Baseline Branch
In this workflow, if I make changes in the set Baseline branch in the SmartUI project that is master and make an commit to the Git then,
Execute SmartUI Storybook CLI commands to execute the .stories tests will compare the results with the latest APPROVED build run for Baseline Branch build in the SmartUI project.
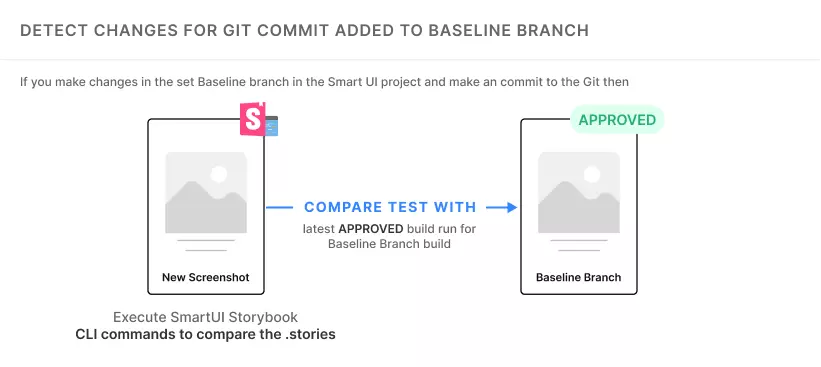
On approval of the all the screenshots then the new build will be updated as Baseline build for the baseline branch.
Here is an example of the above workflow:
// Step 1 - Commit changes to Git
$ git commit -am "Changes in login stories"
(git) Changes added to your branch

// Step 2 - Execute SmartUI CLI to trigger Build in the SmartUI project
$ smartui storybook http://localhost:6006 --config .smatui.json
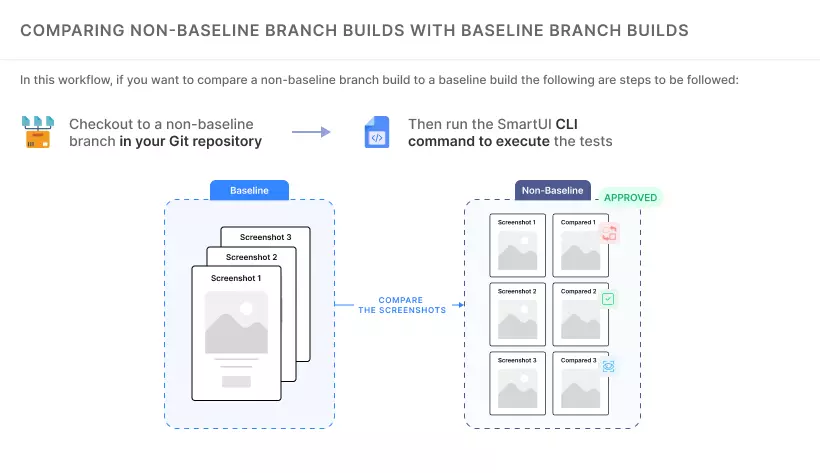
Comparing Non-Baseline Branch builds with Baseline branch builds
In this workflow, if you want to compare a non-baseline branch build to a baseline build the following are steps to be followed:
Step 1: Checkout to a non-baseline branch in your Git repository.
Step 2: Then run the SmartUI CLI command to execute the tests should compare the screenshots captured of Non-Baseline branch build with the Baseline branch latest APPROVED build in the SmartUI project.
Here is an example of the above workflow:
// Baseline Branch
$ git branch
* master

// Non-Baseline branch
$ git checkout -b develop
* develop
  master

// Executing SmartUI Build with Non-Baseline Git branch
$ smartui storybook http://localhost:6006 --config .smartui.json
Auto Updating Baseline build for the Baseline branch
In this workflow, once all the Changes Found are approved by the approver for the screenshots in the Baseline branch's Non-Baseline build then the latest approved Baseline Branch build will be updated to the Baseline.

In case if the Baseline branch does not have an existing build then by default the new build run will be set as Baseline build.
Running Force Builds
In this workflow, If you have not added any commit to your current Git in the repository after making the changes then SmartUI will consider that no changes are made to your .stories files, then you will need to use the following command to execute the build:
$ smartui storybook <Your localhost URL or Static Build folder path> --config .smartui.json --force-rebuild
