GitLab PR Checks with SmartUI Exec (SDK)
This guide shows you how to integrate SmartUI visual regression testing with GitLab merge requests using the SmartUI SDK/Exec method. This works for both web testing (Selenium, Playwright, Cypress, Puppeteer) and mobile app testing (Appium, WebdriverIO) across all supported languages.
This guide covers the SmartUI SDK/Exec approach, where you use npx smartui exec -- <command> to run your tests. This is different from the Hooks approach:
SmartUI SDK/Exec (This Guide):
- ✅ Uses
npx smartui exec -- <your-test-command> - ✅ Works with Java SDK and CLI-based projects
- ✅ Requires SmartUI CLI installation
- ✅ Suitable for Selenium/Playwright/Cypress/Puppeteer/Appium
- ✅ Works with web testing (Selenium, Playwright, Cypress, Puppeteer)
- ✅ Works with mobile app testing (Appium, iOS/Android)
SmartUI Hooks:
- No
npx smartui execcommand needed - Tests run normally (e.g.,
npm test,mvn test,pytest) - SmartUI integration happens automatically through capabilities
- See GitLab PR Checks with SmartUI Hooks for Hooks approach
Prerequisites
Before you begin, ensure you have:
- LambdaTest account with active subscription
- GitLab repository with CI/CD enabled
- SmartUI project created in LambdaTest SmartUI Dashboard
- Test suite configured (Selenium/Playwright/Cypress/Puppeteer/Appium/WebdriverIO)
- Test framework configured in your preferred language (TypeScript/JavaScript/Java/Python/Ruby/C#)
- LambdaTest credentials (
LT_USERNAMEandLT_ACCESS_KEY) - SmartUI CLI installed (or use
npx @lambdatest/smartui-cli)
Step 1: Integrate GitLab with LambdaTest
- Go to LambdaTest Integrations page
- Search for GitLab and select the integration
- Click on OAuth as your preferred authentication method
- Click Install and authorize the integration
- After successful authentication, refresh the Integrations page to verify GitLab is installed
You can verify your GitLab integration is active by checking the Integrations page. The GitLab integration should show as "Installed" or "Active".
Step 2: Configure SmartUI Project
Create or update your SmartUI configuration file (.smartui.json):
{
  "projectName": "your-smartui-project-name",
  "buildName": "smartui-build-${CI_PIPELINE_ID}",
  "baseline": false
}
The SmartUI configuration file is used to specify project settings. You can also use environment variables or command-line options to override these settings.
Step 3: Configure GitLab CI/CD Pipeline
Create or update your .gitlab-ci.yml file. The key difference with the Exec method is that you use npx smartui exec --gitURL to run your tests.
Complete GitLab CI/CD Configuration
- TypeScript/JavaScript
- Java
- Python
- Ruby
stages:
  - test

variables:
  NODE_VERSION: "18"
  LT_USERNAME: $LT_USERNAME
  LT_ACCESS_KEY: $LT_ACCESS_KEY
  PROJECT_TOKEN: $PROJECT_TOKEN

visual_regression_tests:
  stage: test
  image: node:${NODE_VERSION}

  before_script:
    - npm ci
    - npm install -g @lambdatest/smartui-cli

  script:
    # Get GitLab project ID and commit SHA
    - |
      PROJECT_ID=${CI_PROJECT_ID}
      COMMIT_SHA=${CI_COMMIT_SHA}

      # For merge requests, use the merge request commit SHA
      if [ -n "$CI_MERGE_REQUEST_IID" ]; then
        COMMIT_SHA=${CI_MERGE_REQUEST_SHA:-${CI_COMMIT_SHA}}
      fi

      # Construct GitLab API URL for status updates
      GIT_URL="https://gitlab.com/api/v4/projects/${PROJECT_ID}/statuses/${COMMIT_SHA}"

      echo "GitLab Project ID: ${PROJECT_ID}"
      echo "Commit SHA: ${COMMIT_SHA}"
      echo "GitLab Status URL: ${GIT_URL}"

      # Run tests with SmartUI Exec and GitLab integration
      npx smartui exec --gitURL "${GIT_URL}" -- npm test
      # Or: npx smartui exec --gitURL "${GIT_URL}" -- npx wdio run wdio.conf.ts
      # Or: npx smartui exec --gitURL "${GIT_URL}" -- npm run test:mobile

  only:
    - merge_requests
    - main
    - develop

  environment:
    name: visual-regression/$CI_COMMIT_REF_NAME
stages:
  - test

variables:
  MAVEN_OPTS: "-Dmaven.repo.local=.m2/repository"
  LT_USERNAME: $LT_USERNAME
  LT_ACCESS_KEY: $LT_ACCESS_KEY
  PROJECT_TOKEN: $PROJECT_TOKEN

visual_regression_tests:
  stage: test
  image: maven:3.8-openjdk-11

  cache:
    paths:
      - .m2/repository/

  before_script:
    - mvn clean install -DskipTests
    - npm install -g @lambdatest/smartui-cli

  script:
    # Get GitLab project ID and commit SHA
    - |
      PROJECT_ID=${CI_PROJECT_ID}
      COMMIT_SHA=${CI_COMMIT_SHA}

      # For merge requests, use the merge request commit SHA
      if [ -n "$CI_MERGE_REQUEST_IID" ]; then
        COMMIT_SHA=${CI_MERGE_REQUEST_SHA:-${CI_COMMIT_SHA}}
      fi

      # Construct GitLab API URL for status updates
      GIT_URL="https://gitlab.com/api/v4/projects/${PROJECT_ID}/statuses/${COMMIT_SHA}"

      echo "GitLab Project ID: ${PROJECT_ID}"
      echo "Commit SHA: ${COMMIT_SHA}"
      echo "GitLab Status URL: ${GIT_URL}"

      # Run tests with SmartUI Exec and GitLab integration
      npx smartui exec --gitURL "${GIT_URL}" -- mvn test
      # Or: npx smartui exec --gitURL "${GIT_URL}" -- ./gradlew test (for Gradle)

  only:
    - merge_requests
    - main
    - develop

  environment:
    name: visual-regression/$CI_COMMIT_REF_NAME
stages:
  - test

variables:
  PYTHON_VERSION: "3.9"
  LT_USERNAME: $LT_USERNAME
  LT_ACCESS_KEY: $LT_ACCESS_KEY
  PROJECT_TOKEN: $PROJECT_TOKEN

visual_regression_tests:
  stage: test
  image: python:${PYTHON_VERSION}

  before_script:
    - pip install -r requirements.txt
    - npm install -g @lambdatest/smartui-cli

  script:
    # Get GitLab project ID and commit SHA
    - |
      PROJECT_ID=${CI_PROJECT_ID}
      COMMIT_SHA=${CI_COMMIT_SHA}

      # For merge requests, use the merge request commit SHA
      if [ -n "$CI_MERGE_REQUEST_IID" ]; then
        COMMIT_SHA=${CI_MERGE_REQUEST_SHA:-${CI_COMMIT_SHA}}
      fi

      # Construct GitLab API URL for status updates
      GIT_URL="https://gitlab.com/api/v4/projects/${PROJECT_ID}/statuses/${COMMIT_SHA}"

      echo "GitLab Project ID: ${PROJECT_ID}"
      echo "Commit SHA: ${COMMIT_SHA}"
      echo "GitLab Status URL: ${GIT_URL}"

      # Run tests with SmartUI Exec and GitLab integration
      npx smartui exec --gitURL "${GIT_URL}" -- pytest
      # Or: npx smartui exec --gitURL "${GIT_URL}" -- python -m unittest discover
      # Or: npx smartui exec --gitURL "${GIT_URL}" -- behave

  only:
    - merge_requests
    - main
    - develop

  environment:
    name: visual-regression/$CI_COMMIT_REF_NAME
stages:
  - test

variables:
  RUBY_VERSION: "3.1"
  LT_USERNAME: $LT_USERNAME
  LT_ACCESS_KEY: $LT_ACCESS_KEY
  PROJECT_TOKEN: $PROJECT_TOKEN

visual_regression_tests:
  stage: test
  image: ruby:${RUBY_VERSION}

  before_script:
    - bundle install
    - npm install -g @lambdatest/smartui-cli

  script:
    # Get GitLab project ID and commit SHA
    - |
      PROJECT_ID=${CI_PROJECT_ID}
      COMMIT_SHA=${CI_COMMIT_SHA}

      # For merge requests, use the merge request commit SHA
      if [ -n "$CI_MERGE_REQUEST_IID" ]; then
        COMMIT_SHA=${CI_MERGE_REQUEST_SHA:-${CI_COMMIT_SHA}}
      fi

      # Construct GitLab API URL for status updates
      GIT_URL="https://gitlab.com/api/v4/projects/${PROJECT_ID}/statuses/${COMMIT_SHA}"

      echo "GitLab Project ID: ${PROJECT_ID}"
      echo "Commit SHA: ${COMMIT_SHA}"
      echo "GitLab Status URL: ${GIT_URL}"

      # Run tests with SmartUI Exec and GitLab integration
      npx smartui exec --gitURL "${GIT_URL}" -- bundle exec rspec
      # Or: npx smartui exec --gitURL "${GIT_URL}" -- bundle exec cucumber

  only:
    - merge_requests
    - main
    - develop

  environment:
    name: visual-regression/$CI_COMMIT_REF_NAME
Key Configuration Points
- SmartUI CLI Installation: Install SmartUI CLI globally or use
npx @lambdatest/smartui-cli - GitLab Project ID: Automatically available as
CI_PROJECT_IDin GitLab CI/CD - Commit SHA: Use
CI_COMMIT_SHAfor regular commits, orCI_MERGE_REQUEST_SHAfor merge requests - GitLab API URL: Construct as
https://gitlab.com/api/v4/projects/{projectId}/statuses/{commitId} - Exec Command: Use
npx smartui exec --gitURL "${GIT_URL}" -- <your-test-command>
The npx smartui exec command wraps your test execution and provides SmartUI integration:
npx smartui exec --gitURL "<gitlab-url>" -- <your-test-command>
--gitURL: GitLab API URL for status updates (legacy name, works with GitLab)--: Separator before your test command<your-test-command>: Your normal test command (e.g.,npm test,mvn test,pytest)
Step 4: Set Up GitLab CI/CD Variables
Configure the following variables in your GitLab project:
- Go to your GitLab project → Settings → CI/CD → Variables
- Add the following variables:

| Variable Name | Description |
|---|---|
LT_USERNAME | Your LambdaTest username |
LT_ACCESS_KEY | Your LambdaTest access key |
PROJECT_TOKEN | Your SmartUI project token (found in SmartUI project settings) |
The PROJECT_TOKEN is different from LT_USERNAME and LT_ACCESS_KEY. You can find it in your SmartUI project settings in the SmartUI Dashboard.
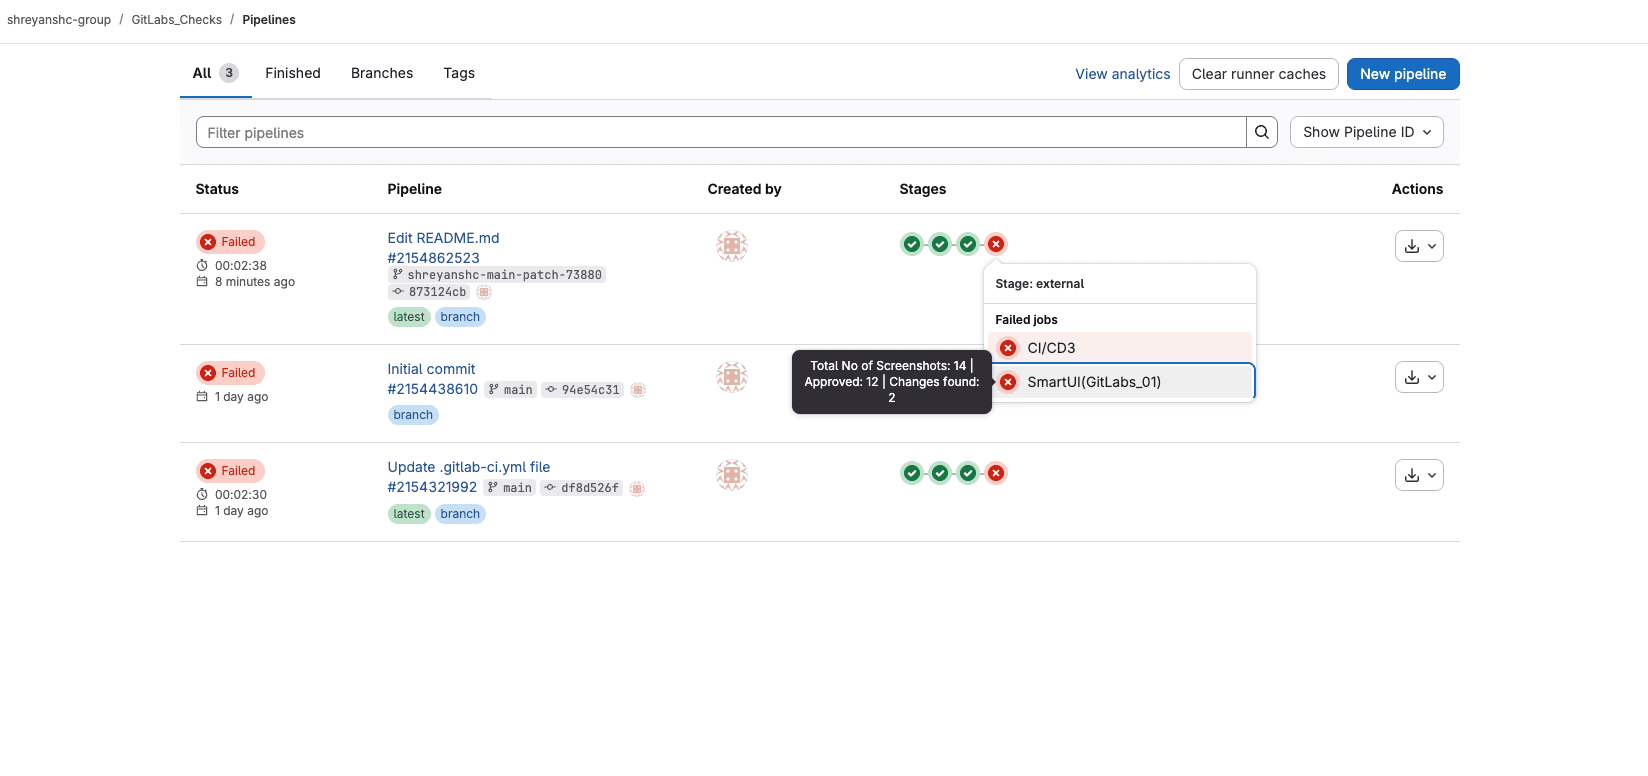
Step 5: View Pipeline Results in GitLab
After your pipeline runs, you can view the results in the GitLab Pipelines page:
The pipeline will show:
- Pipeline status (Success/Failed)
- Job status for SmartUI tests
- Screenshot statistics (Total, Approved, Changes Found) in the job tooltip
Step 6: View PR Check Results in GitLab Merge Request
After your pipeline runs, you'll see SmartUI status checks in your GitLab merge request:
Successful Status
When all visual tests pass:
- ✅ Status: Success
- Details: Click "Details" to view the SmartUI build in the dashboard
- Screenshot: All screenshots match baseline or are approved
Failed Status
When visual differences are detected:
- ❌ Status: Failed
- Details: Click "Details" to review differences in SmartUI dashboard
- Action Required: Review and approve/reject changes in SmartUI dashboard
Complete Working Examples
- Web Testing Example
- Mobile Testing Example
- TypeScript/JavaScript
- Java
stages:
  - test

variables:
  NODE_VERSION: "18"
  LT_USERNAME: $LT_USERNAME
  LT_ACCESS_KEY: $LT_ACCESS_KEY
  PROJECT_TOKEN: $PROJECT_TOKEN

visual_regression_tests:
  stage: test
  image: node:${NODE_VERSION}

  before_script:
    - npm ci
    - npm install -g @lambdatest/smartui-cli

  script:
    - |
      PROJECT_ID=${CI_PROJECT_ID}
      COMMIT_SHA=${CI_COMMIT_SHA}

      if [ -n "$CI_MERGE_REQUEST_IID" ]; then
        COMMIT_SHA=${CI_MERGE_REQUEST_SHA:-${CI_COMMIT_SHA}}
      fi

      GIT_URL="https://gitlab.com/api/v4/projects/${PROJECT_ID}/statuses/${COMMIT_SHA}"

      echo "GitLab Status URL: ${GIT_URL}"

      # Run web tests with SmartUI Exec
      npx smartui exec --gitURL "${GIT_URL}" -- npm test

  only:
    - merge_requests
    - main
stages:
  - test

variables:
  MAVEN_OPTS: "-Dmaven.repo.local=.m2/repository"
  LT_USERNAME: $LT_USERNAME
  LT_ACCESS_KEY: $LT_ACCESS_KEY
  PROJECT_TOKEN: $PROJECT_TOKEN

visual_regression_tests:
  stage: test
  image: maven:3.8-openjdk-11

  cache:
    paths:
      - .m2/repository/

  before_script:
    - mvn clean install -DskipTests
    - npm install -g @lambdatest/smartui-cli

  script:
    - |
      PROJECT_ID=${CI_PROJECT_ID}
      COMMIT_SHA=${CI_COMMIT_SHA}

      if [ -n "$CI_MERGE_REQUEST_IID" ]; then
        COMMIT_SHA=${CI_MERGE_REQUEST_SHA:-${CI_COMMIT_SHA}}
      fi

      GIT_URL="https://gitlab.com/api/v4/projects/${PROJECT_ID}/statuses/${COMMIT_SHA}"

      echo "GitLab Status URL: ${GIT_URL}"

      # Run Java tests with SmartUI Exec
      npx smartui exec --gitURL "${GIT_URL}" -- mvn test

  only:
    - merge_requests
    - main
- TypeScript/JavaScript
- Java
stages:
  - test

variables:
  NODE_VERSION: "18"
  LT_USERNAME: $LT_USERNAME
  LT_ACCESS_KEY: $LT_ACCESS_KEY
  PROJECT_TOKEN: $PROJECT_TOKEN

visual_regression_tests:
  stage: test
  image: node:${NODE_VERSION}

  before_script:
    - npm ci
    - npm install -g @lambdatest/smartui-cli

  script:
    - |
      PROJECT_ID=${CI_PROJECT_ID}
      COMMIT_SHA=${CI_COMMIT_SHA}

      if [ -n "$CI_MERGE_REQUEST_IID" ]; then
        COMMIT_SHA=${CI_MERGE_REQUEST_SHA:-${CI_COMMIT_SHA}}
      fi

      GIT_URL="https://gitlab.com/api/v4/projects/${PROJECT_ID}/statuses/${COMMIT_SHA}"

      echo "GitLab Status URL: ${GIT_URL}"

      # Run mobile tests with SmartUI Exec
      npx smartui exec --gitURL "${GIT_URL}" -- npm run test:mobile
      # Or: npx smartui exec --gitURL "${GIT_URL}" -- npx wdio run wdio.conf.ts

  only:
    - merge_requests
    - main
stages:
  - test

variables:
  MAVEN_OPTS: "-Dmaven.repo.local=.m2/repository"
  LT_USERNAME: $LT_USERNAME
  LT_ACCESS_KEY: $LT_ACCESS_KEY
  PROJECT_TOKEN: $PROJECT_TOKEN

visual_regression_tests:
  stage: test
  image: maven:3.8-openjdk-11

  cache:
    paths:
      - .m2/repository/

  before_script:
    - mvn clean install -DskipTests
    - npm install -g @lambdatest/smartui-cli

  script:
    - |
      PROJECT_ID=${CI_PROJECT_ID}
      COMMIT_SHA=${CI_COMMIT_SHA}

      if [ -n "$CI_MERGE_REQUEST_IID" ]; then
        COMMIT_SHA=${CI_MERGE_REQUEST_SHA:-${CI_COMMIT_SHA}}
      fi

      GIT_URL="https://gitlab.com/api/v4/projects/${PROJECT_ID}/statuses/${COMMIT_SHA}"

      echo "GitLab Status URL: ${GIT_URL}"

      # Run Java mobile tests with SmartUI Exec
      npx smartui exec --gitURL "${GIT_URL}" -- mvn test -D suite=mobile-tests.xml

  only:
    - merge_requests
    - main
Troubleshooting
- PR Check Not Appearing
- Screenshots Not Captured
- Exec Command Fails
Issue: PR Check Not Appearing in GitLab
Symptoms: Pipeline runs but no SmartUI status check appears in merge request.
Solutions:
- Verify GitLab integration is active in LambdaTest Integrations
- Check that
--gitURLparameter is correctly set in the exec command - Verify GitLab API URL format:
https://gitlab.com/api/v4/projects/{projectId}/statuses/{commitId} - Ensure
CI_PROJECT_IDandCI_COMMIT_SHAare correctly set - For merge requests, use
CI_MERGE_REQUEST_SHAinstead ofCI_COMMIT_SHA - Check pipeline logs to ensure tests completed successfully
- Verify SmartUI CLI is installed and accessible
Issue: Tests Run But No Screenshots in SmartUI
Symptoms: Pipeline completes successfully but no screenshots appear in SmartUI dashboard.
Solutions:
- Verify
PROJECT_TOKENis correctly set in GitLab CI/CD variables - Check that SmartUI configuration file (
.smartui.json) exists and is valid - Ensure
LT_USERNAMEandLT_ACCESS_KEYare correctly set - Verify SmartUI project exists and is accessible
- Check test logs for SmartUI execute command errors
- Ensure screenshot commands are being called in your tests
- Verify
SMARTUI_SERVER_ADDRESSis set correctly (if using non-Selenium frameworks)
Issue: SmartUI Exec Command Fails
Symptoms: npx smartui exec command fails or doesn't run tests.
Solutions:
- Verify SmartUI CLI is installed:
npm install -g @lambdatest/smartui-cli - Check that
PROJECT_TOKENenvironment variable is set - Verify
.smartui.jsonconfiguration file exists and is valid - Ensure test command after
--is correct - Check for port conflicts (default port: 49152)
- Review pipeline logs for detailed error messages
- Try running the command locally first to debug
Key Differences: Exec vs Hooks
| Aspect | SmartUI Exec (This Guide) | SmartUI Hooks |
|---|---|---|
| Command | Use npx smartui exec --gitURL <url> -- <command> | Run tests normally (npm test, mvn test, pytest) |
| Integration | Requires CLI wrapper | Automatic via capabilities |
| Setup | Install SmartUI CLI, configure .smartui.json | Add capabilities to test config |
| GitLab Integration | Use --gitURL parameter with exec | Add github.url capability |
| Languages | Java SDK, CLI projects, all frameworks | TypeScript/JS/Java/Python/Ruby/C#/WebdriverIO/Appium |
| Project Token | Required (PROJECT_TOKEN) | Not required (uses LT_USERNAME/LT_ACCESS_KEY) |
| Server Address | May need SMARTUI_SERVER_ADDRESS for non-Selenium | Not required |
Next Steps
- Learn about SmartUI CLI Exec Commands for detailed exec usage
- Check the SmartUI Troubleshooting Guide for common issues
- Review GitLab CI/CD Documentation for advanced pipeline configuration
Related Documentation
- GitLab PR Checks with SmartUI Hooks - Hooks approach for GitLab integration
- SmartUI with GitLab - General GitLab integration guide
- SmartUI CLI Exec Commands - Detailed exec command reference
- SmartUI Project Settings - Configure SmartUI projects
- SmartUI Appium Java SDK - Java SDK documentation
