Auto Healing for Selenium Web Automation
The TestMu AI Auto Healing feature for Selenium testing automatically recovers from certain types of failures during test execution. When enabled, it reduces test flakiness and improves test reliability by handling unexpected situations and errors in your test suites.
Enabling Auto Healing
Pass the autoHeal: true capability in your WebDriver configuration to enable this feature.
const capability = {
    "browserName": "Chrome",
    "browserVersion": "114.0",
    "LT:Options": {
        "platformName": "Windows 10",
        "project": "Untitled",
        "w3c": true,
        "plugin": "node_js-node_js",
        "autoHeal": true
    }
}
Warning: The
autoHealcapability only works whensmartWaitis disabled. Both features cannot be enabled together in the same test session.
No prerequisites are required. Enable auto-healing directly via desired capabilities.
Language Preferences
- Java
- NodeJS
- C#
- PHP
- Python
- Ruby
For Java, use the following code:
ChromeOptions browserOptions = new ChromeOptions();
browserOptions.setBrowserVersion("118.0");
HashMap<String, Object> ltOptions = new HashMap<String, Object>();
ltOptions.put("username", "YOUR_LAMBDATEST_USERNAME");
ltOptions.put("accessKey", "YOUR_LAMBDATEST_ACCESS_KEY");
ltOptions.put("project", "Untitled");
ltOptions.put("selenium_version", "4.0.0");
ltOptions.put("w3c", true);
ltOptions.put("autoHeal", true);
browserOptions.setCapability("LT:Options", ltOptions);
For NodeJS, use the following code:
const capability = {
	"browserName": "Chrome",
	"browserVersion": "118.0",
	"LT:Options": {
		"username": "YOUR_LAMBDATEST_USERNAME",
		"accessKey": "YOUR_LAMBDATEST_ACCESS_KEY",
		"project": "Untitled",
		"w3c": true,
		"plugin": "node_js-node_js",
		"autoHeal": true
	}
}
For C#, use the following code:
ChromeOptions capabilities = new ChromeOptions();
capabilities.BrowserVersion = "118.0";
Dictionary<string, object> ltOptions = new Dictionary<string, object>();
ltOptions.Add("username", "YOUR_LAMBDATEST_USERNAME");
ltOptions.Add("accessKey", "YOUR_LAMBDATEST_ACCESS_KEY");
ltOptions.Add("project", "Untitled");
ltOptions.Add("w3c", true);
ltOptions.Add("plugin", "c#-c#");
ltOptions.Add("autoHeal", true);
capabilities.AddAdditionalOption("LT:Options", ltOptions);
For PHP, use the following code:
$capability = array(
	"browserName" => "Chrome",
	"browserVersion" => "118.0",
	"LT:Options" => array(
		"username" => "YOUR_LAMBDATEST_USERNAME",
		"accessKey" => "YOUR_LAMBDATEST_ACCESS_KEY",
		"project" => "Untitled",
		"w3c" => true,
		"plugin" => "php-php",
		"autoHeal" => true
	)
);
For Python, use the following code:
options = ChromeOptions()
options.browser_version = "118.0"
lt_options = {}
lt_options["username"] = "YOUR_LAMBDATEST_USERNAME"
lt_options["accessKey"] = "YOUR_LAMBDATEST_ACCESS_KEY"
lt_options["project"] = "Untitled"
lt_options["w3c"] = True
lt_options["plugin"] = "python-python"
lt_options["autoHeal"] = True
options.set_capability('LT:Options', lt_options)
For Ruby, use the following code:
options = Selenium::WebDriver::Options.chrome
options.browser_version = "118.0"
lt_options = {}
lt_options[:username] = "YOUR_LAMBDATEST_USERNAME"
lt_options[:accessKey] = "YOUR_LAMBDATEST_ACCESS_KEY"
lt_options[:project] = "Untitled"
lt_options[:w3c] = true
lt_options[:plugin] = "ruby-ruby"
lt_options[:autoHeal] = true
options.set_capability('LT:Options', lt_options)
How Auto Healing Works
Selenium Locator auto-healing adjusts locators by merging attributes and context to handle inconsistent tests. During runtime, it monitors the web page to identify DOM (Document Object Model) changes.
When an element is successfully located on the page, its DOM path is recorded for later use. If that same element is later referenced on the same page and is missing, the system evaluates the current page and generates new locators for altered elements based on previous benchmarks.
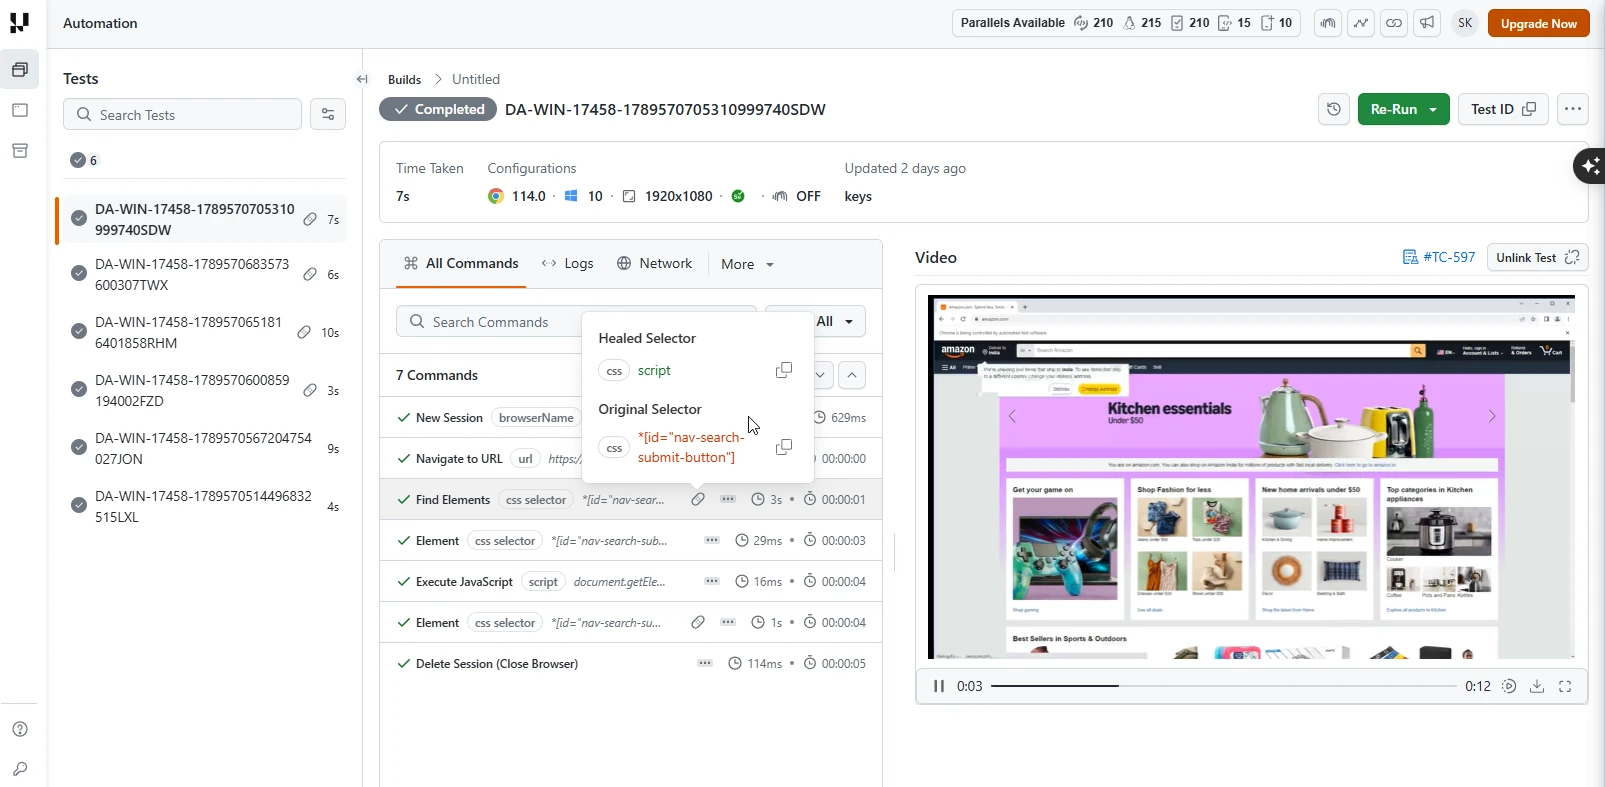
Auto Detection of New Locator
Web elements might change their locators due to updates in the web application. The Auto Healing feature automatically detects the new locator and continues the test execution.
Here is an example test case demonstrating this:
import assert from 'assert';
import { Builder, By, until, Capabilities } from 'selenium-webdriver';

describe('Amazon Search Box Test', function () {
    this.timeout(30000);
    let driver;
    let vars;

    const capability = {
        "browserName": "Chrome",
        "browserVersion": "114.0",
        "LT:Options": {
            "platformName": "Windows 10",
            "project": "Untitled",
            "w3c": true,
            "plugin": "node_js-node_js",
            "autoHeal": true
        }
    }

    beforeEach(async function () {
        driver = await new Builder()
            .usingServer('https://YOUR_LAMBDATEST_USERNAME:YOUR_LAMBDATEST_ACCESS_KEY@hub.lambdatest.com/wd/hub')
            .withCapabilities(capability)
            .build();
        vars = {};
    });

    afterEach(async function () {
        await driver.quit();
    });

    it('should change id of search box and find element', async function () {
        await driver.get('https://www.amazon.com');
        const searchBoxActual = await driver.findElement(By.id('nav-search-submit-button'));
        await driver.executeScript("document.getElementById('nav-search-submit-button').id='amazonsearchbox'");
        // const searchBox = await driver.findElement(By.id('amazonsearchbox'));
        const searchBoxHeal = await driver.findElement(By.id('nav-search-submit-button'));
        assert(searchBoxHeal, 'Element not found');
    });
});
In the above test case, the script changes the id of the search box on Amazon's homepage and then tries to find the element using the old id. The Auto Healing feature automatically detects the new id and finds the element.
To run the test, execute the below command:
./node_modules/.bin/mocha autohealingTest.js
Using Auto Heal with Hooks
You can start or stop Auto Heal at any point in your test script using hooks. This gives you fine-grained control over when element healing should be applied.
Enable Auto Heal
Use the following hook to start Auto Heal at any point in your test script.
driver.execute_script('lambdatest_executor:{"action":"lambda-heal-start"}')
Usage: Place this hook right before interacting with elements that may dynamically change during the test.
Disable Auto Heal
Use the following hook to stop Auto Heal at any point in your test script.
driver.execute_script('lambdatest_executor:{"action":"lambda-heal-stop"}')
Usage: Place this hook immediately after the actions requiring Auto Heal are completed. This ensures subsequent test steps execute with normal Selenium behavior.
Sample Script
import os
import time
from selenium import webdriver
from selenium.webdriver.common.by import By
from selenium.webdriver.chrome.options import Options

options = Options()
options.browser_version = "latest"
lt_options = {
    "build": "Autoheal Hooks Build",
    "name": "Autoheal Test via Hooks",
    "platformName": "Windows 10",
    "w3c": True,
    "autoHeal": True
}
options.set_capability("LT:Options", lt_options)

hub = f"https://{os.getenv('LT_USERNAME')}:{os.getenv('LT_ACCESS_KEY')}@hub.lambdatest.com/wd/hub"
driver = webdriver.Remote(command_executor=hub, options=options)

driver.get("https://www.selenium.dev")
time.sleep(2)

# Start auto-heal before interacting with dynamic elements
driver.execute_script('lambdatest_executor:{"action":"lambda-heal-start"}')

driver.find_element(By.ID, 'td-block-1')
driver.execute_script("document.getElementById('td-block-1').id='updatedtd-block-1';")
driver.find_element(By.ID, 'td-block-1')  # Auto-heal detects the changed ID

# Stop auto-heal after dynamic section
driver.execute_script('lambdatest_executor:{"action":"lambda-heal-stop"}')

driver.quit()
Benefits of Auto Healing
- Increased Test Stability: Tests remain consistent even when the web application's UI undergoes minor changes, reducing flakiness.
- Reduced Test Maintenance: The system automatically adapts to evolving interfaces, reducing the manual effort required to update test scripts.
- Reliable CI Pipeline: Stable tests feeding into CI pipelines reduce unexpected failures and ensure smoother deployments.
Limitations of Auto Healing
While the Auto Healing feature handles a wide range of issues, there are certain limitations to be aware of.
-
Non-recoverable errors: Auto Healing cannot recover from certain types of errors, such as WebDriver initialization errors or system-level failures.
-
Test accuracy: While Auto Healing reduces test flakiness, it may also mask real issues in your web application or test scripts. Review the logs and understand why a test needed healing.
-
Performance impact: While typically minimal, enabling Auto Healing can have a slight impact on test execution time due to additional checks and recovery mechanisms.
The Auto Healing feature enhances your test suite, but it does not replace good test design and error handling practices. Always ensure your tests are well-designed, have proper error handling in place, and are reviewed regularly for issues that may be masked by the Auto Healing feature.
Related Docs
- Playwright Auto Healing:Auto-heal for Playwright web automation tests
- Smart Heal for Appium:AI-powered self-healing for mobile app automation on real devices
- Auto Healing in HyperExecute:Auto-heal for tests executed via HyperExecute
- Auto-Heal in KaneAI:AI-native auto-heal with natural language understanding for KaneAI-authored tests
If you have any questions, please feel free to let us know. Our experts are always available on chat to help you out with any roadblock regarding our product. Happy testing!


 Chat with Us