HyperExecute Projects
Projects serve as a centralized platform for organizing and managing test executions. By grouping similar tests, controlling access, and tracking progress, Projects streamline the testing process. You can configure custom project and workflow setups, as well as integrate Tosca, Tosca DEX, and JMeter tests for unified management. This enables efficient test script creation, automated execution scheduling, and valuable insights into test results.
Organisation admins on the enterprise plan can click View Summary at the top of the project list to open the Organisation Summary Dashboard. It shows KPI tiles, a job status donut and a failure-reason breakdown across every project in your organisation, with a PDF export.
Link Jobs to Projects Using YAML
When you run jobs on HyperExecute, connecting them to projects helps you track performance trends, compare results over time, and get valuable insights from your test history. You can link jobs to projects in two ways using your YAML configuration file.
Method 1: Use an Existing Project
If you already have a project in HyperExecute, follow these steps to connect your jobs to it:
- Go to Projects List tab on HyperExecute Dashboard.
- Select and open the project you want to link your jobs to.
- Click the copy icon next to the project name. This copies the project configuration you'll need for your YAML file.
- Paste the copied details into your YAML file before running your job.
- All jobs using this YAML will automatically appear in your selected project.
The copied project detail which you need to add to the YAML will look like this:
 project:
    name: 'demo-project' #project name
    id: '1abc2345-56de-7890-f1cg-h2ij34k56789' #project id
Method 2: Create a New Project Automatically
Want to start fresh or organize jobs under a new project? You can create one directly from your YAML file. To create a new project for your job run, follow the steps given below.
- Think of a unique name that clearly identifies what you're testing.
- Include the project name in your YAML file in the following format.
 project:
    name: 'unique_project_name'
- All jobs using this YAML will automatically appear in your new project.
If a project with your chosen name already exists, HyperExecute will link your jobs to the existing project instead of creating new.
Setup Custom Project
Step 1: Go to the Projects section in HyperExecute. Click on the New Project to create your projects on HyperExecute.
Step 2: Select Custom Project as the Type of Project. Provide a unique Project Name (required) and select your desired framework and language used in your project. Click on the Continue.
Step 3: Provide your GitHub URL and the Access Token / Bitbucket URL and the Repository Access Tokens / Azure Repo URL and the Access Token of your repository. You can also add your team members as Co-Owners to allow them to edit or delete the project alongside you.
Currently, only GitHub, Bitbucket and Azure repositories are supported.
Click on Save button to finish the setup of your project.
Once the project is created, the project header displays key details including the framework, language, owner, creation time, and a GitHub/Bitbucket/Azure repository link. Click the repository icon to navigate directly to the linked source code repository.
Schedule your Workflows
Within each HyperExecute Project, you can set up one or more workflows. These workflows allow for scheduled execution of your tests, providing you with the flexibility to automate your testing process according to your development and release cycles.
To learn more about Workflows in HyperExecute, refer to our detailed documentation
Project Summary Widgets
When you open a project, the Workflows and Jobs tabs show a row of summary tiles above the table. The tiles give you the state of the project at a glance, so you don't have to scan every row.
Workflows Tab
The Workflows tab shows five tiles:
- Total Workflows: every workflow in the project.
- Active Workflows: workflows that are currently active.
- Workflows Running Successfully: workflows whose recent runs passed.
- Workflows with Issues: workflows whose recent runs failed or need attention.
- Expired Workflows: workflows past their schedule end date.
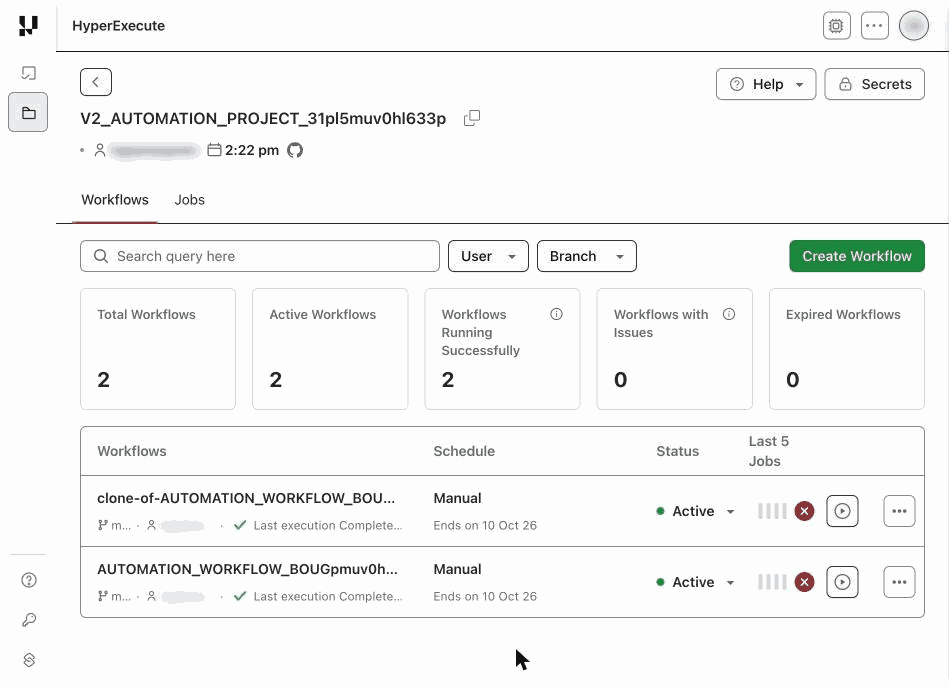
Summary tiles on the Workflows tab.
Jobs Tab
The Jobs tab shows the total job count, the completion rate, a status bar that splits jobs by result, and a breakdown of failure categories. Use these to spot a rise in failures before you open individual jobs.
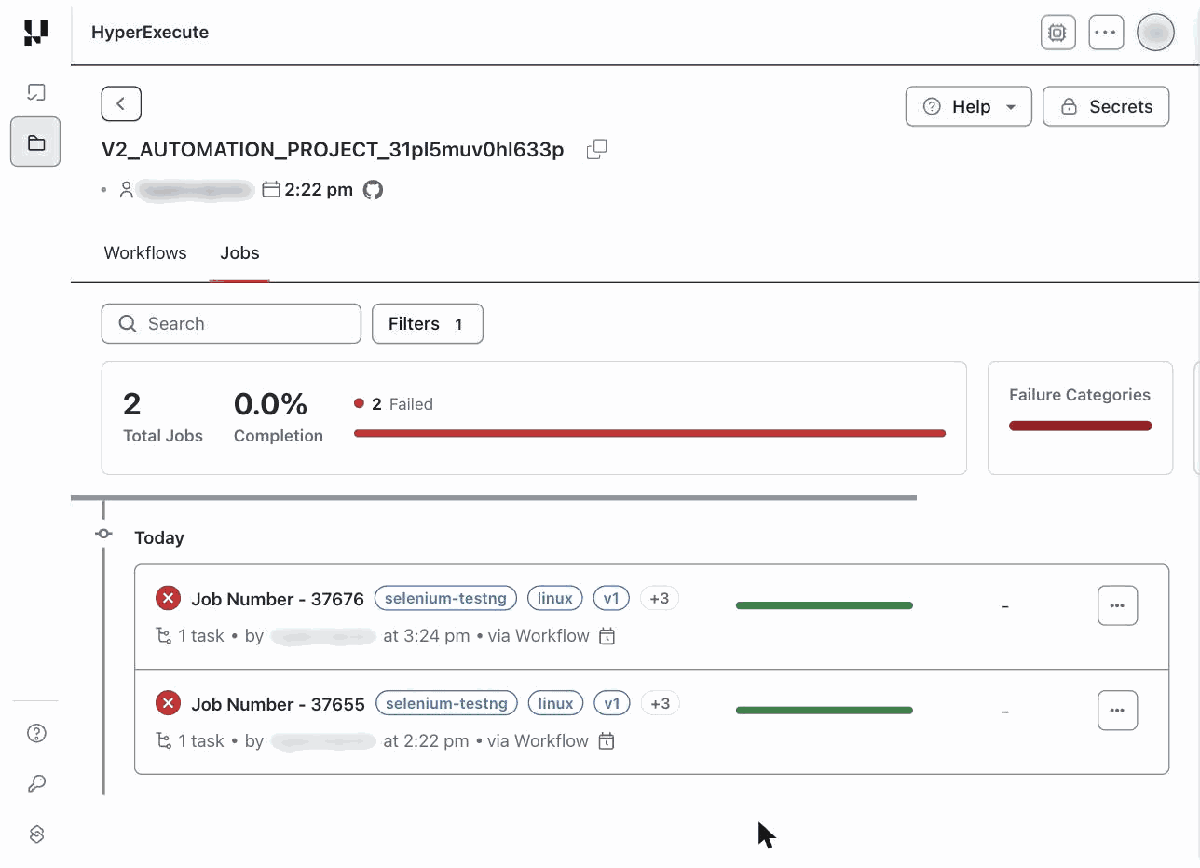
Summary tiles on the Jobs tab.
Filter the Tiles
The tiles follow your filters. Search, or filter by user, branch, status, label, team, type or date, and the tiles recompute to match the rows in the table.
The Jobs tab opens with the Date filter set to Last 7 Days. To see older jobs, open Filters > Date and pick a wider range, such as Last 30 Days or All Time.
Setting Up Specialized Projects
In addition to custom projects, HyperExecute supports integration with specialized testing tools such as Tosca, Tosca DEX, and Performance testing with JMeter. For detailed instructions on setting up these specific projects, please refer to their dedicated documentation pages:
Tosca using Commander
Optimize and accelerate end-to-end testing for your entire digital landscape using Tosca.
Tosca using DEX
Perform end-to-end testing using Tosca DEX with HyperExecute.
Tosca for SAP
Use Tosca for SAP to integrate with HyperExecute.
JMeter
Experience the JMeter Performance Testing with HyperExecute.


 Chat with Us