LambdaTest offers support with Selenium WebDriver to help you instantly execute your automation test scripts. LambdaTest is a cloud-based, cross browser testing tool offering a Selenium grid consisting of 2000+ browsers and browser versions running on real operating systems to pace up automation testing of your web-app or website. In this topic, you will learn how to automate your website testing using SpecFlow Selenium on LambdaTest.
In this topic you will be learning:
The first step in using the LambdaTest platform is to understand LambdaTest’s Selenium Grid capabilities. Our Selenium Grid uses remote WebDriver instead of normal Selenium client browser drivers. So if you are migrating from locally run Selenium, you would have to invoke LambdaTest Selenium remote WebDriver.
Next, you need to specify in your code, which browser, browser versions, operating systems, and resolution you wish to run your test on, along with defining LambdaTest specific capabilities. You can check out LambdaTest Capabilities Generator tool to understand more about how you can define running browser environments and leverage advanced LambdaTest capabilities.
Let us begin with a simple Selenium Remote Webdriver test first. The C# script with SpecFlow Selenium below tests a simple to-do application with basic functionalities like mark items as done, add items in a list, calculate total pending items, etc. You can also find this at our SpecFlow GitHub repository.
Below are steps to help us execute our first test with SpecFlow testing framework:
Step 1: Download the sample SpecFlow GitHub repository and open the “SpecFlow Lambda Sample.sln“.
Step 2: The “sln” or “solution” will automatically open the project in Visual Studio. Make sure you have installed all the required dependencies that are required to run our test.
Step 3: Now we need to update the packages.config file to maintain all the required configurations. Below is the updated packages.config file code:
1 2 3 4 5 6 7 8 9 10 11 12 13 14 15 16 17 18 19 20 21 22 23 24 25 26 27 28 29 30 31 32 33 34 35 36 37 38 39 |
<?xml version="1.0" encoding="utf-8"?> <packages> <package id="BoDi" version="1.4.1" targetFramework="net472" /> <package id="Cucumber.Messages" version="6.0.1" targetFramework="net472" /> <package id="Gherkin" version="6.0.0" targetFramework="net472" /> <package id="Google.Protobuf" version="3.7.0" targetFramework="net472" /> <package id="Microsoft.CodeAnalysis.FxCopAnalyzers" version="2.9.8" targetFramework="net472" developmentDependency="true" /> <package id="Microsoft.CodeAnalysis.VersionCheckAnalyzer" version="2.9.8" targetFramework="net472" developmentDependency="true" /> <package id="Microsoft.CodeQuality.Analyzers" version="2.9.8" targetFramework="net472" developmentDependency="true" /> <package id="Microsoft.NetCore.Analyzers" version="2.9.8" targetFramework="net472" developmentDependency="true" /> <package id="Microsoft.NetFramework.Analyzers" version="2.9.8" targetFramework="net472" developmentDependency="true" /> <package id="MSTest.TestAdapter" version="1.3.2" targetFramework="net472" /> <package id="MSTest.TestFramework" version="1.3.2" targetFramework="net472" /> <package id="NUnit" version="3.11.0" targetFramework="net472" /> <package id="NUnit.Console" version="3.11.1" targetFramework="net472" /> <package id="NUnit.ConsoleRunner" version="3.11.1" targetFramework="net472" /> <package id="NUnit.Extension.NUnitProjectLoader" version="3.6.0" targetFramework="net472" /> <package id="NUnit.Extension.NUnitV2Driver" version="3.8.0" targetFramework="net472" /> <package id="NUnit.Extension.NUnitV2ResultWriter" version="3.6.0" targetFramework="net472" /> <package id="NUnit.Extension.TeamCityEventListener" version="1.0.7" targetFramework="net472" /> <package id="NUnit.Extension.VSProjectLoader" version="3.8.0" targetFramework="net472" /> <package id="NUnit3TestAdapter" version="3.16.1" targetFramework="net472" developmentDependency="true" /> <package id="Selenium.WebDriver" version="3.141.0" targetFramework="net472" /> <package id="SpecFlow" version="3.1.86" targetFramework="net472" /> <package id="SpecFlow.NUnit" version="3.1.86" targetFramework="net472" /> <package id="SpecFlow.Tools.MsBuild.Generation" version="3.1.86" targetFramework="net472" /> <package id="System.IO" version="4.3.0" targetFramework="net472" /> <package id="System.Net.Http" version="4.3.4" targetFramework="net472" /> <package id="System.Reflection.Emit" version="4.3.0" targetFramework="net472" /> <package id="System.Reflection.Emit.Lightweight" version="4.3.0" targetFramework="net472" /> <package id="System.Runtime" version="4.3.0" targetFramework="net472" /> <package id="System.Security.Cryptography.Algorithms" version="4.3.0" targetFramework="net472" /> <package id="System.Security.Cryptography.Encoding" version="4.3.0" targetFramework="net472" /> <package id="System.Security.Cryptography.Primitives" version="4.3.0" targetFramework="net472" /> <package id="System.Security.Cryptography.X509Certificates" version="4.3.0" targetFramework="net472" /> <package id="System.Threading.Tasks.Extensions" version="4.4.0" targetFramework="net472" /> <package id="System.ValueTuple" version="4.4.0" targetFramework="net472" /> <package id="Utf8Json" version="1.3.7" targetFramework="net472" /> </packages> |
Step 4: Next we need to update the App.config file to update the Platform Configuration to specify the desired capabilities for browser/platform combination we want for our test. We can specify any configuration as per our need in this file and step.
In the C# code, we are passing browser, browser version, and operating system information, along with LambdaTest Selenium grid capabilities via capabilities object.
Our Capabilities Generator will automatically generate the program, based on your provided input.
For Instance, if you select the below configurations:
Then, LambdaTest Capabilities Generator will automatically generate the below program:
1 2 3 4 5 6 7 8 9 10 |
DesiredCapabilities capabilities = new DesiredCapabilities(); capabilities.SetCapability("build", "your build name"); capabilities.SetCapability("name", "your test name"); capabilities.SetCapability("platform", "Windows 10"); // Selected Operating System capabilities.SetCapability("browserName", "Chrome"); // Selected browser name capabilities.SetCapability("version","71.0"); // Selected browser version capabilities.SetCapability("resolution","1280x800"); // Selected screen resolution capabilities.SetCapability("selenium_version","3.13.0"); // Selected Selenium version capabilities.SetCapability("visual",true); capabilities.SetCapability("chrome.driver",2.42); |
The most important capabilities to understand here are ‘browserName’, ‘versions’, and ‘platform’. They define which browser environment you wish to run the test on. Rest of the capabilities are important in test management and debugging. We have a inbuilt capabilities generator tool as well that you use to generate capabilities code for your test suite.
Below is the complete and updated code for the same.
1 2 3 4 5 6 7 8 9 10 11 12 13 14 15 16 17 18 19 20 21 22 23 24 25 26 27 28 29 30 31 32 33 34 35 36 37 38 39 40 41 42 43 44 45 46 47 48 49 50 51 52 53 54 55 56 57 58 59 60 61 62 63 64 65 66 67 68 69 70 71 72 73 74 75 76 |
<?xml version="1.0" encoding="utf-8"?> <configuration> <configSections> <sectionGroup name="capabilities"> <section name="single" type="System.Configuration.AppSettingsSection, System.Configuration, Version=4.0.0.0, Culture=neutral, PublicKeyToken=b03f5f7f11d50a3a" /> <section name="parallel" type="System.Configuration.AppSettingsSection, System.Configuration, Version=4.0.0.0, Culture=neutral, PublicKeyToken=b03f5f7f11d50a3a" /> </sectionGroup> <sectionGroup name="environments"> <section name="chrome" type="System.Configuration.AppSettingsSection, System.Configuration, Version=4.0.0.0, Culture=neutral, PublicKeyToken=b03f5f7f11d50a3a" /> <section name="firefox" type="System.Configuration.AppSettingsSection, System.Configuration, Version=4.0.0.0, Culture=neutral, PublicKeyToken=b03f5f7f11d50a3a" /> <section name="safari" type="System.Configuration.AppSettingsSection, System.Configuration, Version=4.0.0.0, Culture=neutral, PublicKeyToken=b03f5f7f11d50a3a" /> <section name="ie" type="System.Configuration.AppSettingsSection, System.Configuration, Version=4.0.0.0, Culture=neutral, PublicKeyToken=b03f5f7f11d50a3a" /> </sectionGroup> <section name="specFlow" type="TechTalk.SpecFlow.Configuration.ConfigurationSectionHandler, TechTalk.SpecFlow" /> </configSections> <appSettings> <add key="username" value="LT_USERNAME" /> <add key="accesskey" value="LT_ACCESS_KEY" /> <add key="server" value="@hub.lambdatest.com" /> </appSettings> <capabilities> <single> <add key="build" value="specflow-LambdaTest-Parallel-2" /> <add key="name" value="single_test" /> <add key="idleTimeout" value="270" /> </single> <parallel> <add key="build" value="specflow-LambdaTest-Parallel-2" /> <add key="name" value="parallel_test" /> <add key="idleTimeout" value="270" /> </parallel> </capabilities> <environments> <chrome> <add key="browserName" value="Chrome" /> <add key="browserVersion" value="78.0" /> <add key="platformName" value="Win10" /> </chrome> <firefox> <add key="browserName" value="Firefox" /> <add key="browserVersion" value="73.0" /> <add key="platformName" value="Win8.1" /> </firefox> <safari> <add key="browserName" value="Safari" /> <add key="browserVersion" value="12.0" /> <add key="platformName" value="macOS Mojave" /> </safari> <ie> <add key="browserName" value="Internet Explorer" /> <add key="browserVersion" value="11.0" /> <add key="platformName" value="Win10" /> </ie> </environments> <startup> <supportedRuntime version="v4.0" sku=".NETFramework,Version=v3.11.0" /> </startup> <specFlow> <language feature="en-us" /> </specFlow> <runtime> <assemblyBinding xmlns="urn:schemas-microsoft-com:asm.v1"> <dependentAssembly> <assemblyIdentity name="Newtonsoft.Json" publicKeyToken="30ad4fe6b2a6aeed" culture="neutral" /> <bindingRedirect oldVersion="0.0.0.0-10.0.0.0" newVersion="10.0.0.0" /> </dependentAssembly> </assemblyBinding> </runtime> </configuration> |
You can also checkout our documentation on Selenium Automation Capabilities to understand more about individual capabilities.
Step 5: Next we need to update the Hooks.cs file. In this file, we will bind all the configurations mentioned in the above steps together and then call a remote Selenium WebDriver instance as per the required capability.
Below is the updated code for the same:
1 2 3 4 5 6 7 8 9 10 11 12 13 14 15 16 17 18 19 20 21 22 23 24 25 26 27 28 29 30 31 32 33 34 35 36 37 38 39 40 41 42 43 44 45 46 47 48 49 50 51 52 53 54 55 56 57 58 59 60 61 62 63 64 65 66 67 68 69 70 71 72 73 74 75 76 77 78 79 80 81 82 83 84 85 86 87 88 89 90 91 92 93 94 95 96 97 98 99 100 101 102 103 104 105 106 107 108 109 110 111 |
using System; using System.Collections.Generic; using System.Linq; using System.Text; using TechTalk.SpecFlow; using System.Configuration; using System.Diagnostics; using OpenQA.Selenium; using OpenQA.Selenium.Remote; using System.Collections.Specialized; using TechTalk.SpecFlow.Tracing; using System.IO; using System.Reflection; namespace SpecFlowLambdaSample { [Binding] public sealed class Hooks { private LambdaTestDriver LTDriver; private string[] tags; private ScenarioContext _scenarioContext; [BeforeScenario] public void BeforeScenario(ScenarioContext ScenarioContext) { _scenarioContext = ScenarioContext; LTDriver = new LambdaTestDriver(ScenarioContext); ScenarioContext["LTDriver"] = LTDriver; } [AfterScenario] public void AfterScenario() { LTDriver.Cleanup(); } } public class LambdaTestDriver { private IWebDriver driver; private string profile; private string environment; private ScenarioContext ScenarioContext; public LambdaTestDriver(ScenarioContext ScenarioContext) { this.ScenarioContext = ScenarioContext; } public IWebDriver Init(string profile, string environment) { NameValueCollection caps = ConfigurationManager.GetSection("capabilities/" + profile) as NameValueCollection; NameValueCollection settings = ConfigurationManager.GetSection("environments/" + environment) as NameValueCollection; Console.WriteLine(caps); DesiredCapabilities capability = new DesiredCapabilities(); Console.WriteLine(capability); Console.WriteLine(profile+environment); foreach (string key in caps.AllKeys) { capability.SetCapability(key, caps[key]); } foreach (string key in settings.AllKeys) { capability.SetCapability(key, settings[key]); } String username = Environment.GetEnvironmentVariable("LT_USERNAME"); if (username == null) { username = ConfigurationManager.AppSettings.Get("username"); } String accesskey = Environment.GetEnvironmentVariable("LT_ACCESS_KEY"); if (accesskey == null) { accesskey = ConfigurationManager.AppSettings.Get("accesskey"); } capability.SetCapability("username", username); capability.SetCapability("accesskey", accesskey); Console.WriteLine(username); Console.WriteLine(accesskey); driver = new RemoteWebDriver(new Uri("http://"+username+":"+accesskey + ConfigurationManager.AppSettings.Get("server") + "/wd/hub/"), capability); Console.WriteLine(driver); return driver; } public void Cleanup() { Console.WriteLine("Test Should stop"); driver.Quit(); } } } |
Step 6: Next we need to update the TodoAppSteps.cs file which contains the sample test that we will be running in SpecFlow testing framework.
Below is the updated code for the same:
1 2 3 4 5 6 7 8 9 10 11 12 13 14 15 16 17 18 19 20 21 22 23 24 25 26 27 28 29 30 31 32 33 34 35 36 37 38 39 40 41 42 43 44 45 46 47 48 49 50 51 52 53 54 55 56 57 58 59 60 61 62 63 64 65 66 67 68 69 70 71 72 73 74 75 76 77 78 79 80 81 82 83 84 85 86 87 88 89 90 91 92 93 94 95 96 97 98 99 100 101 102 103 104 105 106 107 108 |
using System; using System.Collections.Generic; using System.Linq; using System.Text; using OpenQA.Selenium; using OpenQA.Selenium.Chrome; using OpenQA.Selenium.Firefox; using TechTalk.SpecFlow; using NUnit.Framework; using System.Threading.Tasks; using System.Text.RegularExpressions; using OpenQA.Selenium.Support.UI; using OpenQA.Selenium.Interactions; /* For using Remote Selenium WebDriver */ using OpenQA.Selenium.Remote; namespace SpecFlowLambdaSample { [Binding] public sealed class ToDoApp { private IWebDriver _driver; private LambdaTestDriver LTDriver = null; String itemName = "MI"; String test_url = "https://lambdatest.github.io/sample-todo-app/"; // For additional details on SpecFlow step definitions see https://go.specflow.org/doc-stepdef public ToDoApp(ScenarioContext ScenarioContext) { LTDriver = (LambdaTestDriver)ScenarioContext["LTDriver"]; } [Given(@"that I am on the LambdaTest Sample app (.*) and (.*)")] public void GivenThatIAmOnTheLambdaTestSampleAppAnd(string profile, string environment) { _driver = LTDriver.Init(profile, environment); _driver.Url = test_url; _driver.Manage().Window.Maximize(); System.Threading.Thread.Sleep(2000); } [Then(@"select the first item")] public void ThenSelectTheFirstItem() { // Click on First Check box _driver.FindElement(By.Name("li1")).Click(); } [Then(@"select the second item")] public void ThenSelectTheSecondItem() { // Click on Second Check box IWebElement secondCheckBox = _driver.FindElement(By.Name("li2")); secondCheckBox.Click(); } [Then(@"find the text box to enter the new value")] public void ThenFindTheTextBoxToEnterTheNewValue() { // Enter Item name IWebElement textfield = _driver.FindElement(By.Id("sampletodotext")); textfield.SendKeys(itemName); } [Then(@"click the Submit button")] public void ThenClickTheSubmitButton() { // Click on Add button IWebElement addButton = _driver.FindElement(By.Id("addbutton")); addButton.Click(); } [Then(@"verify whether the item is added to the list")] public void ThenVerifyWhetherTheItemIsAddedToTheList() { // Verified Added Item name IWebElement itemtext = _driver.FindElement(By.XPath("/html/body/div/div/div/form/input[1]")); String getText = itemtext.Text; // Check if the newly added item is present or not using // Condition constraint (Boolean) Assert.That((itemName.Contains(getText)), Is.True); /* Perform wait to check the output */ System.Threading.Thread.Sleep(2000); Console.WriteLine("Firefox - Test Passed"); } [Then(@"close the browser instance")] public void ThenCloseTheBrowserInstance() { _driver.Quit(); } } } |
Step 7: Now we have updated all the required files in our solution, which is required to run our first test. All we need to do now is to execute the test.
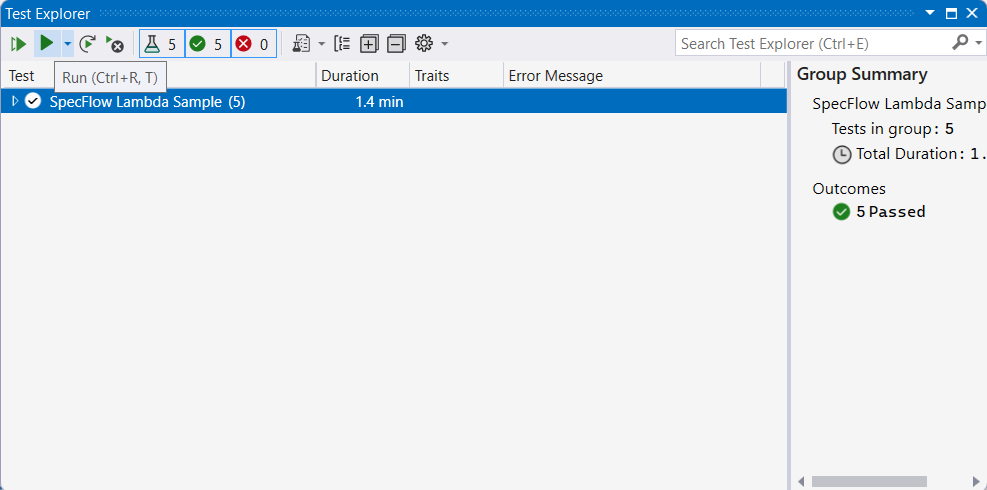
Inorder to execute the tests, open the Test Explorer from Test menu -> Windows -> Test Explorer in Visual Studio.
In the test explorer:
You can see each test getting executed in the Test Explorer, along with their status (pass/fail).
Step 8: Now we have successfully run out first test in SpecFlow testing framework integrated with LambdaTest. Therefore, we can also see the status of our tests in our Automation Dashboard. LambdaTest Dashboard will help you view all your text logs, screenshots and video recording for your entire Selenium tests.
Below is the attached screenshot of the automation dashboard showing the test executed in the above step using Test Explorer.
With LambdaTest, you can even perform cross browser testing on your locally stored web pages with the help of Lambda Tunnel. Lambda Tunnel establishes an SSH(Secure Shell) connection from your local machine to LambdaTest cloud servers. Test your website on local and identify bugs before your customer do it for you. Lambda Tunnel also allows you to perform cross browser testing of your locally hosted web pages through various IP addresses belonging to different parts of the globe. Lambda Tunnel also helps in testing those web-apps or websites that are only permissible inside your specific corporate firewall. Wish to know more about Lambda Tunnel?
Follow our documentation on Lambda Tunnel to know it all. OS specific instructions to download and setup tunnel binary can be found at the following links.
Download the binary file of:
After downloading, open cmd (Command Prompt) / terminal and route the pointer to the same location where you extract the downloaded binary zip file. Then, type the below command and hit Enter to launch Lambda Tunnel.
1 |
LT -user [user's login email] -key [user's access key] |
For example, If you have the following:
Then, the command would be:
1 |
LT -user LoremIpsum@lambdatest.com -key 987zyx987 |
The above command will set up Lambda Tunnel successfully! Now, for performing automation testing using C# with SpecFlow framework, you need to add the below to your capabilities.
1 2 |
DesiredCapabilities capabilities = new DesiredCapabilities(); capabilities.SetCapability("tunnel", true); |
You may also use LambdaTest Capabilities Generator for providing you with the above capability
Tunnel Reference: For a full reference of all tunnel features we support, visit our tunnel page.
Parallel testing can be used to run multiple tests at the same time, thereby reducing the build time and increasing efficiency. In order to run a parallel test, make sure you have written more than one test in the test file. For example, in the TodoAppSteps.cs file, we have added five different tests.
So now to execute these tests in parallel, all we need to do is press the “Run All” button on the top left corner of the Test Explorer.
Below is an instance of the Test Explorer running all the tests written in TodoAppSteps.cs file in parallel:
You can also see this parallel execution in your automation dashboard, as shown below: