How to configure sourcePayload
When you run your tests on HyperExecute, the test scripts are zipped, encrypted and uploaded to our secure servers temporarily for execution through the HyperExecute CLI binary. However, to make this process seamlessly fit in your pipeline you can use the sourcePayload Yaml parameter.
Once you set sourcePayload, your test scripts are directly sourced from your Git provider with the help of secure access tokens and only your HyperExecute YAML file is encrypted and sent through the HyperExecute CLI. Learn more detailed documentation below.
Setting up
You can start by configuring the sourcePayload key in the HyperExecute YAML file. The format is explained below.
sourcePayload:
  platform: git
  link: https://--------
  ref: <your_branch_name>
  accessToken: <your_personal_access_token>
  commit: <optional>
-
platform: The platform on which your repository exists. It should be set to
gitif your repository is deployed on GitHub or GitLab. -
link: The link to your repository that contains the code to be tested.
-
ref: The name of the branch that you want to test.
-
accessToken: Your personal access token (PAT), generated on your Git platform. If you want to know how to generate a PAT for GitHub, go through this section.
Note: You don’t need to use a Personal Access Token if your repository is public.
- commit: If you want to run a specific commit file other than the HEAD commit, then you need to define here the specific commit ID.
As a best practice, you should not use your PAT directly in the YAML file. Instead of that, you can make use of our vault feature and add the PAT to your secrets. To use the vault feature in the HyperExecute YAML file, you can refer the example given below.
sourcePayload:
  platform: git
  link: https://--------
  ref: <your_branch_name>
  accessToken: ${{ .secrets.<GIT_PAT> }}
  commit: <optional>
You can assign a name to your PAT via the HyperExecute vault feature and replace it in place of the
GIT_PATtag in the example given above.
Sample YAML file
A sample HyperExecute YAML file is added below for your reference.
---
version: "0.1"
globalTimeout: 90
testSuiteTimeout: 90
testSuiteStep: 90
runson: win
autosplit: true
retryOnFailure: false
testType: "playwright"
maxRetries: 1
concurrency: 1
pre:
  - npm install
  - npx playwright install
cacheKey: '{{ checksum "package-lock.json" }}'
cacheDirectories:
  - node_modules
testDiscovery:
  type: raw
  mode: remote
  command: grep -lr 'describe' ltblogsearch.test.js
testRunnerCommand: npm test -- $test
sourcePayload:
  platform: git
  link: <your_github_repository>
  ref: <your_branch_name>
  accessToken: <your_PAT>
Generating a Personal Access Token
Details
Generate Personal Access Token on GitHub
You can generate a PAT on GitHub by following the steps below.-
Log in to your GitHub account. You will be redirected to your homepage on GitHub.
-
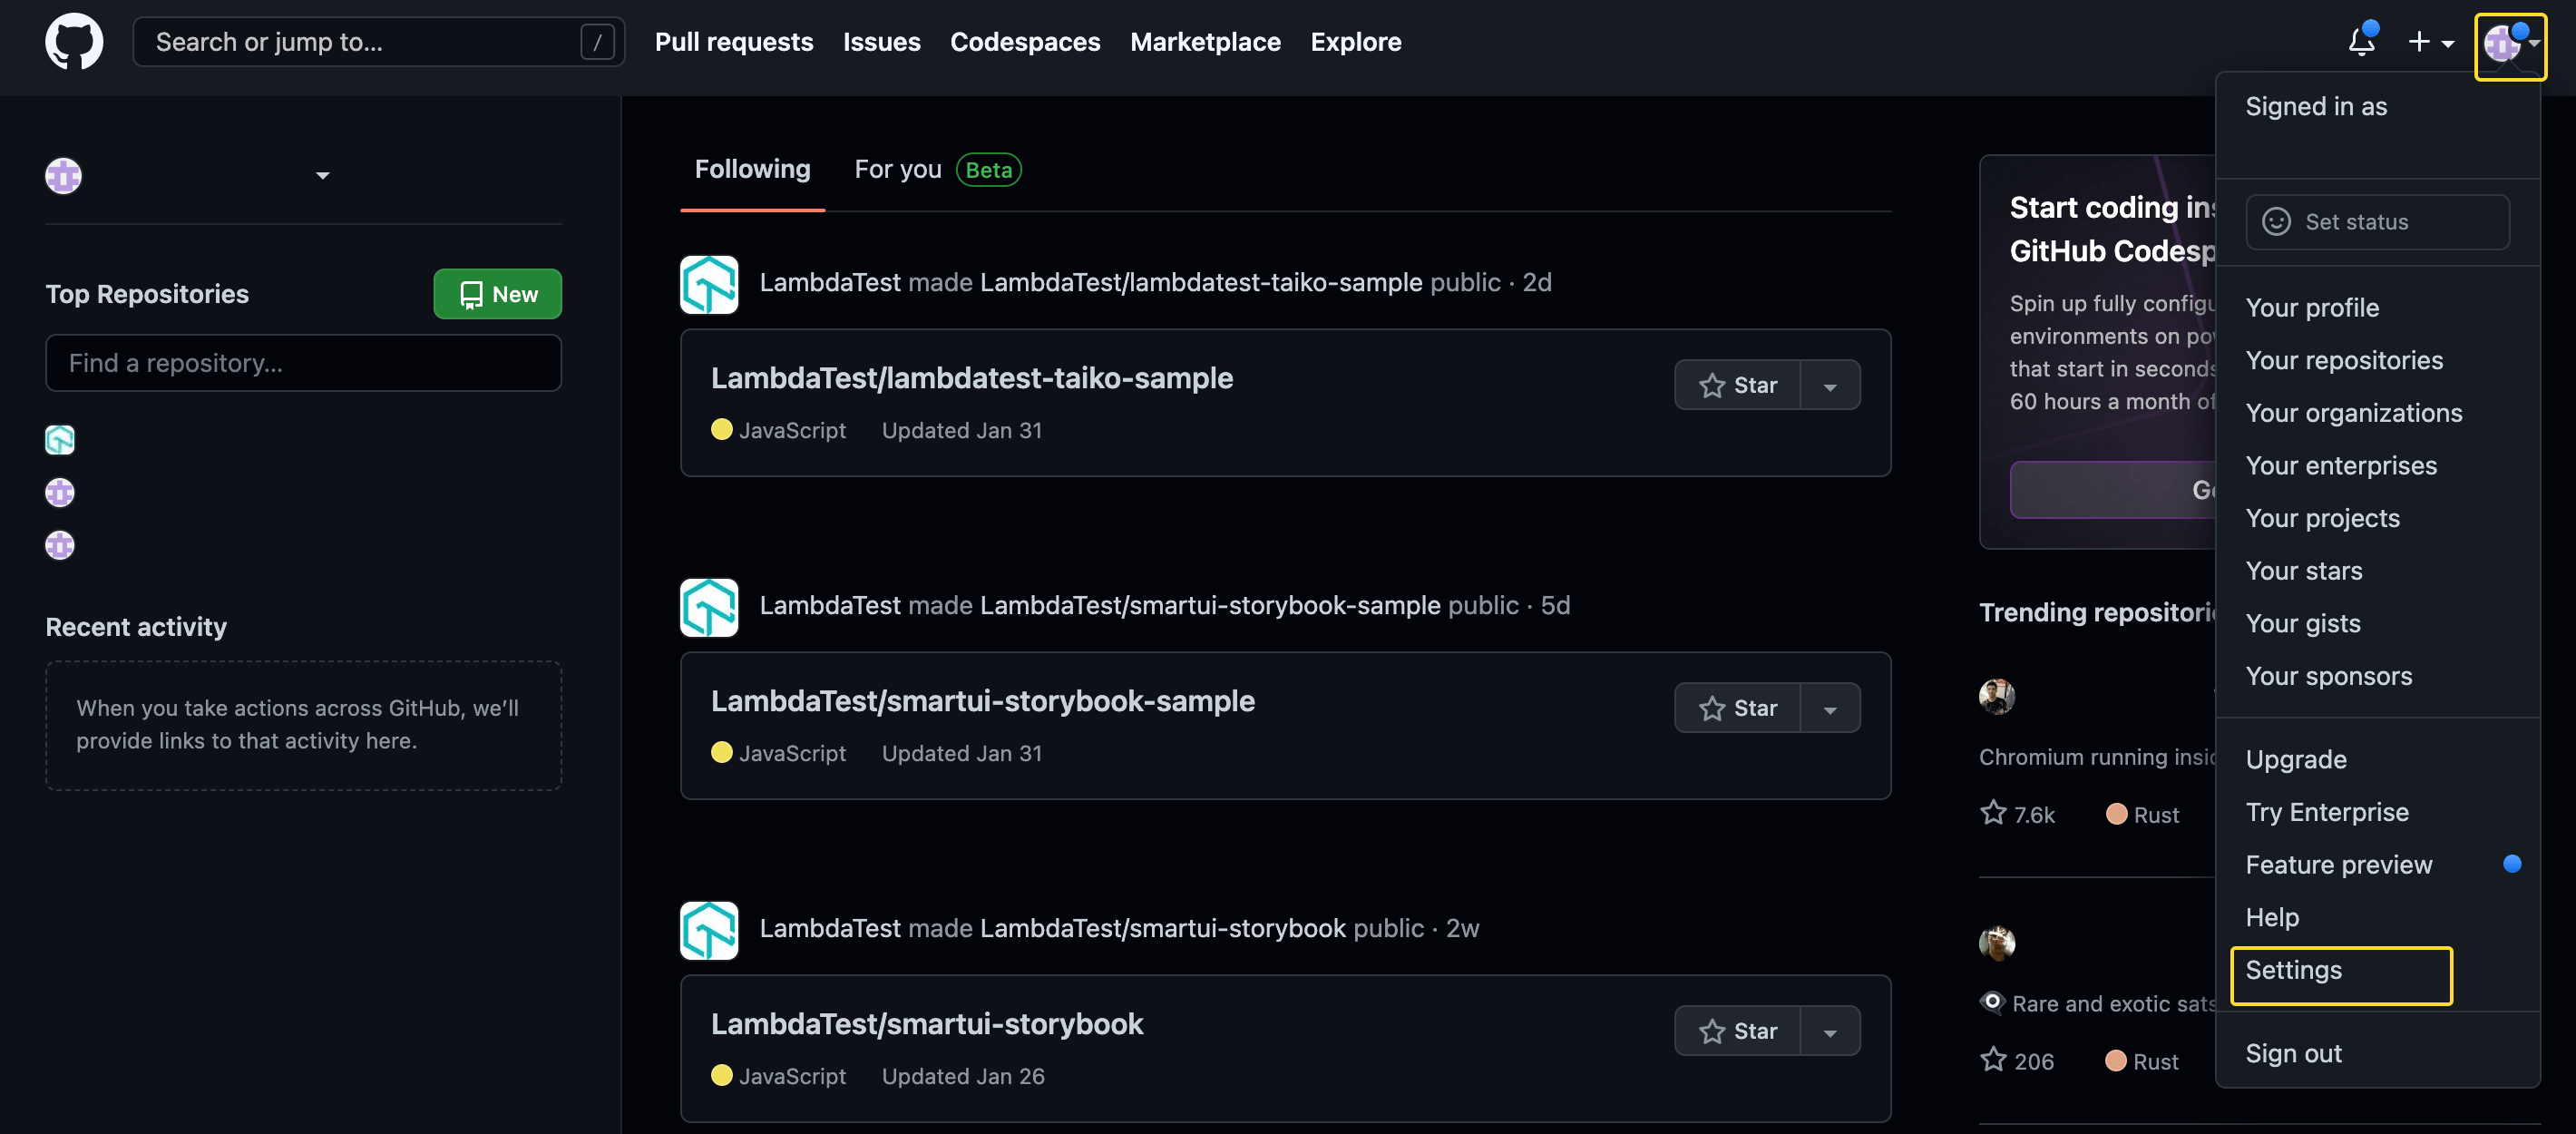
Click on your profile on the top right-hand side corner of your page to access your Settings.
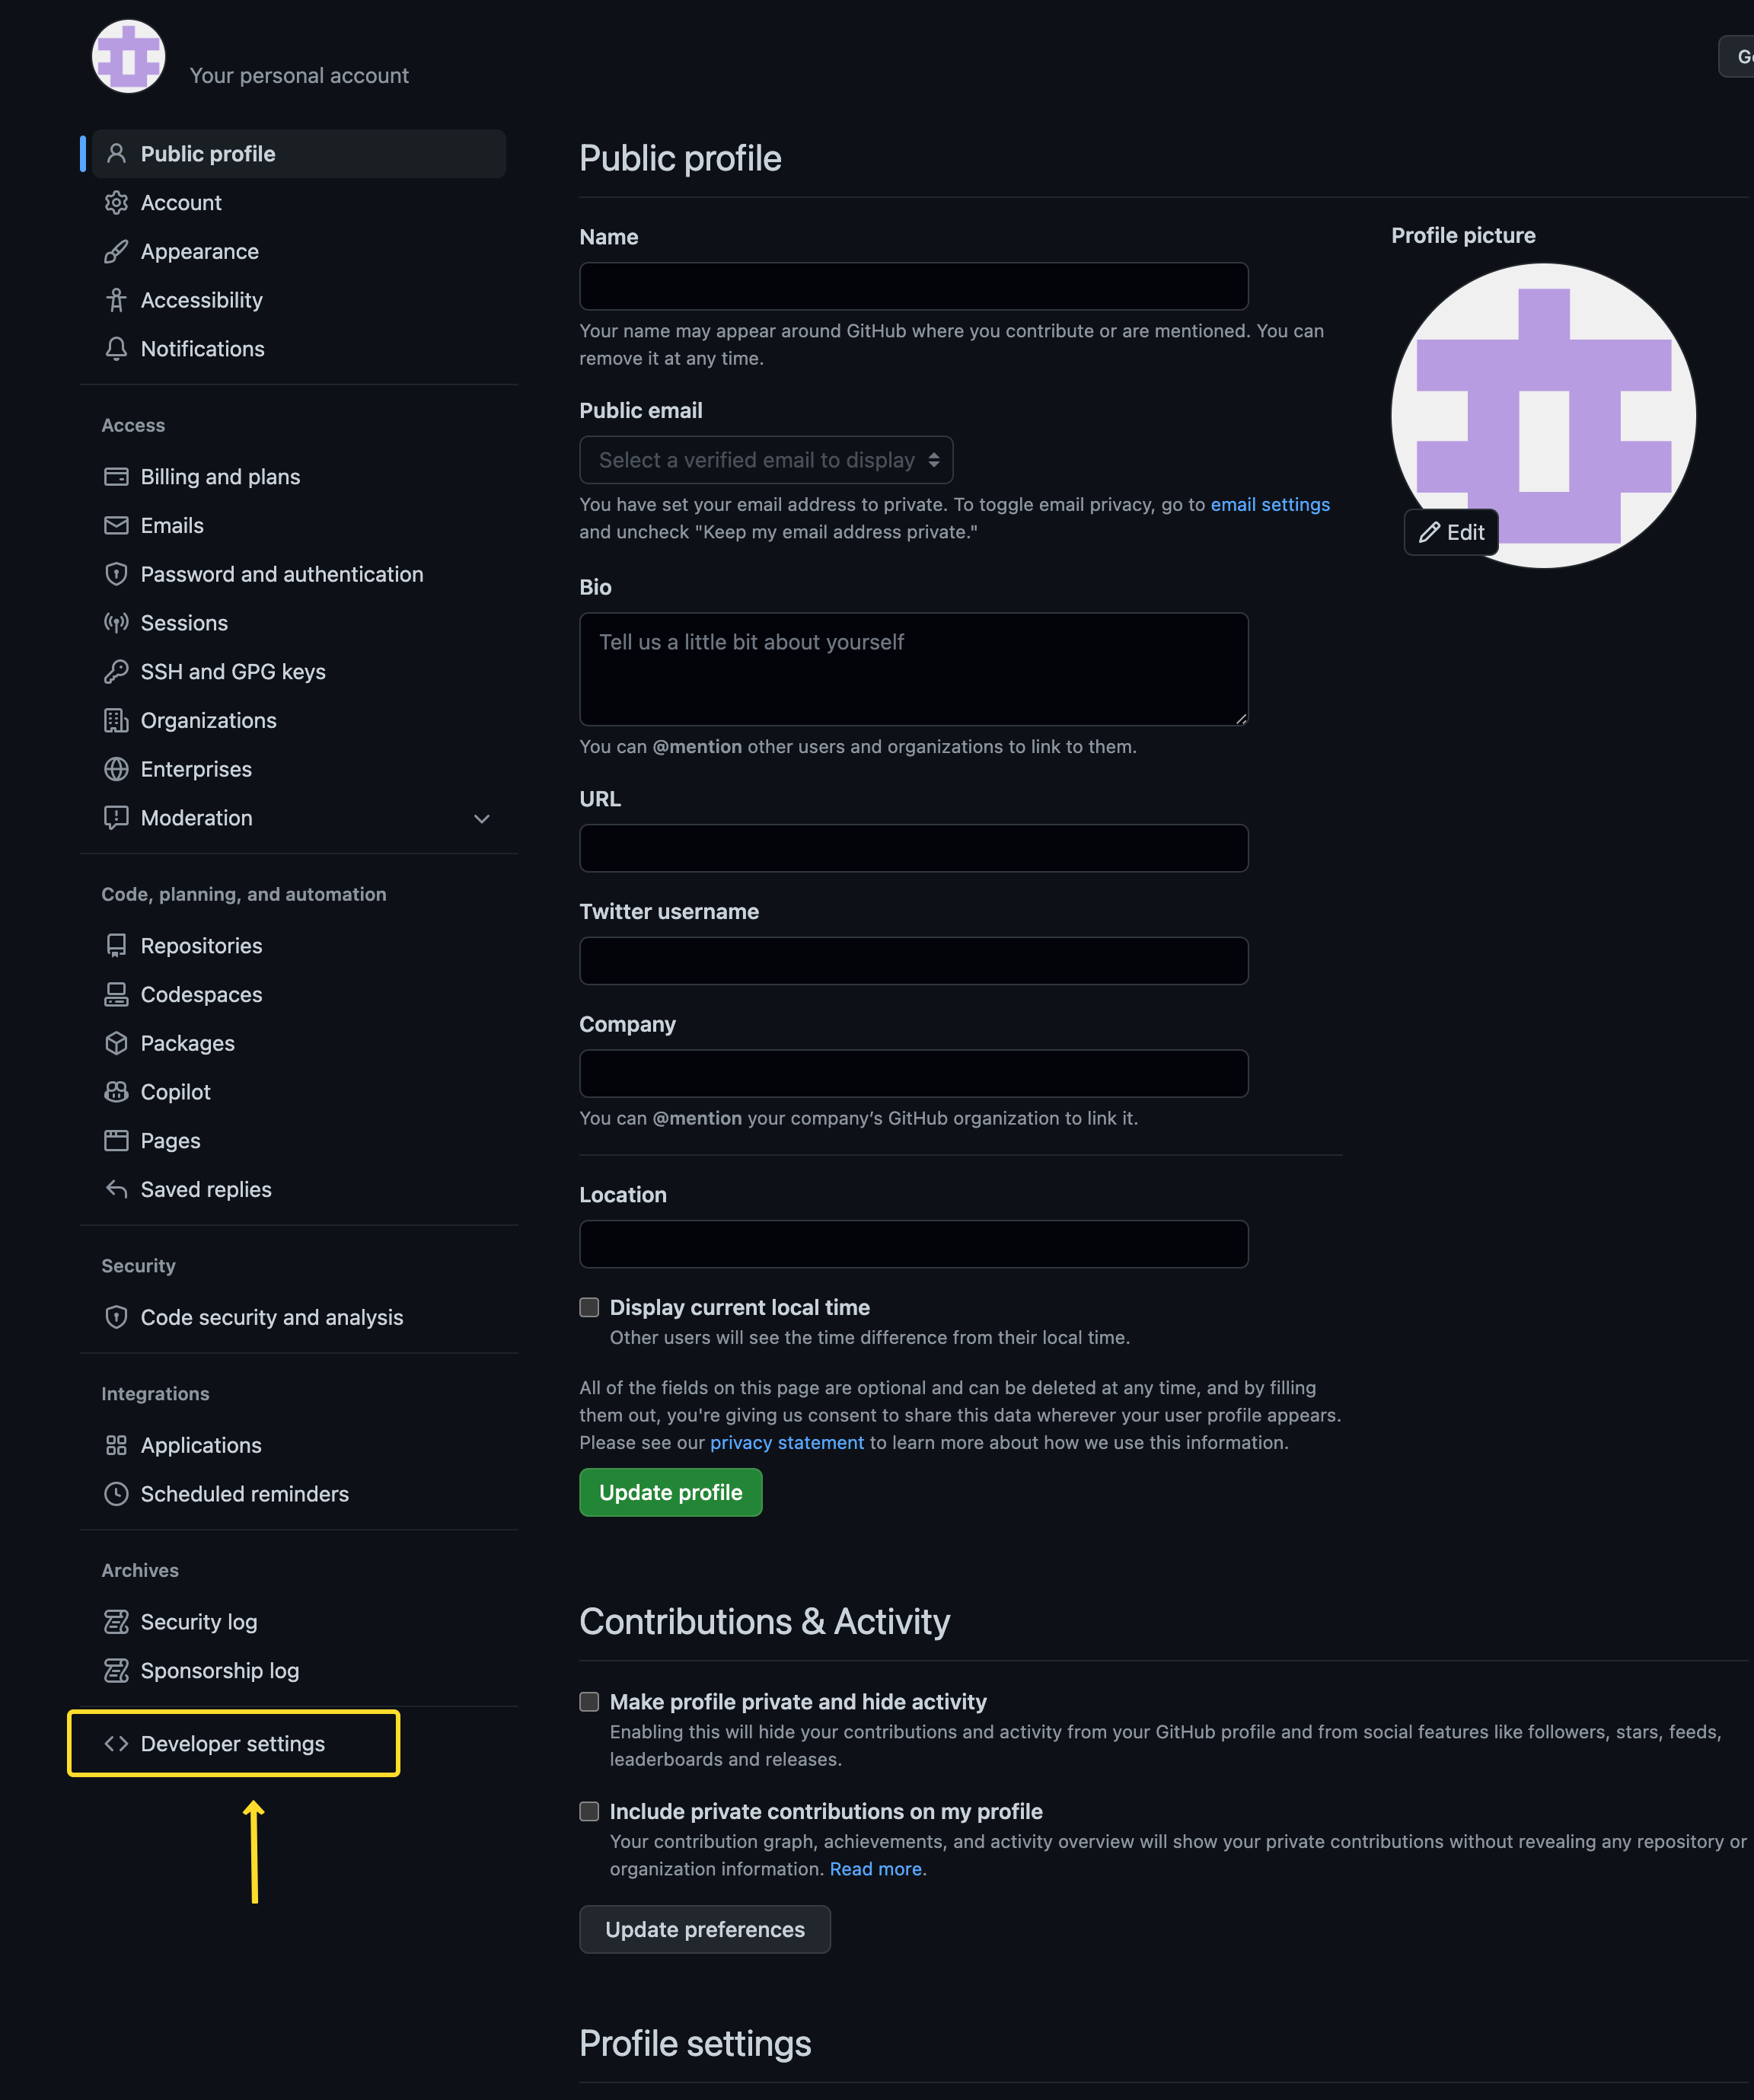
- Go to the bottom of the Settings page and click on Developer settings.
- Click on Tokens (classic) to generate your own Personal Access Token.
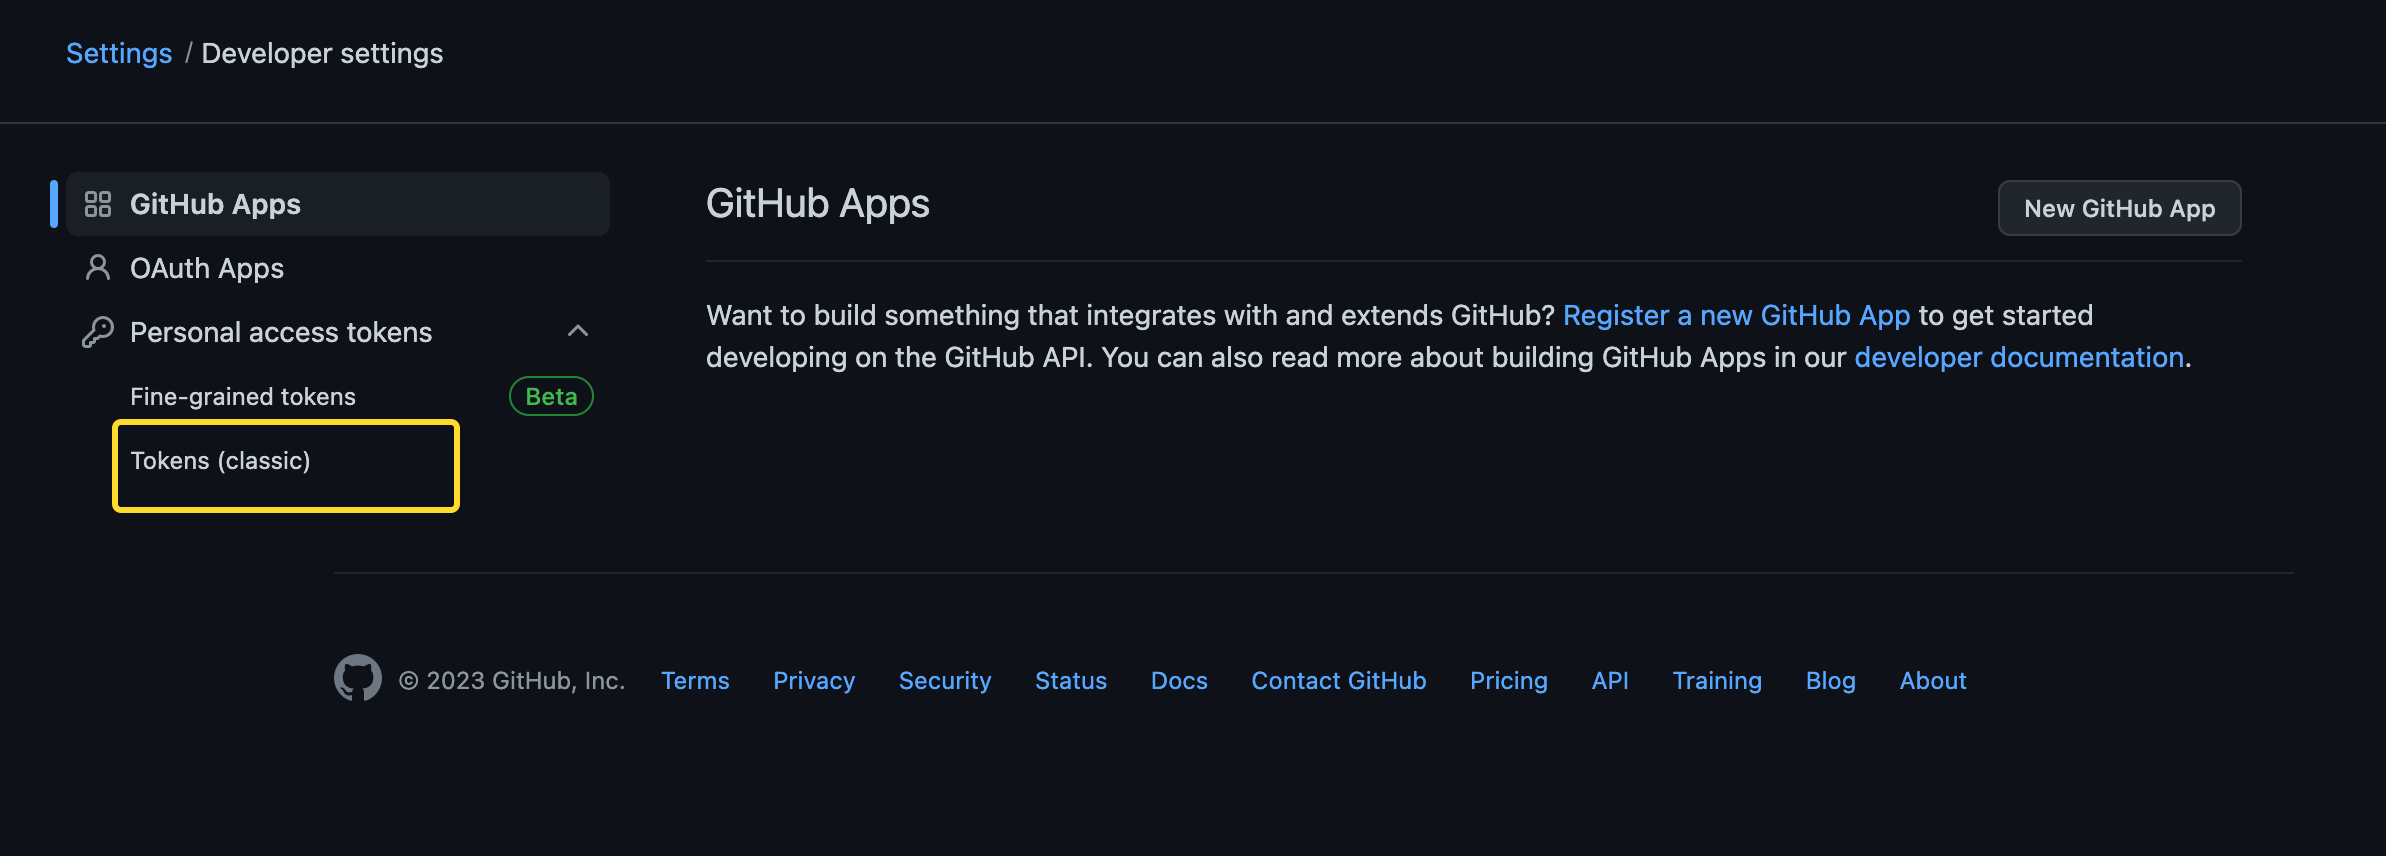
- Click on Generate new token and select the classic or fine-grained version as per your choice.

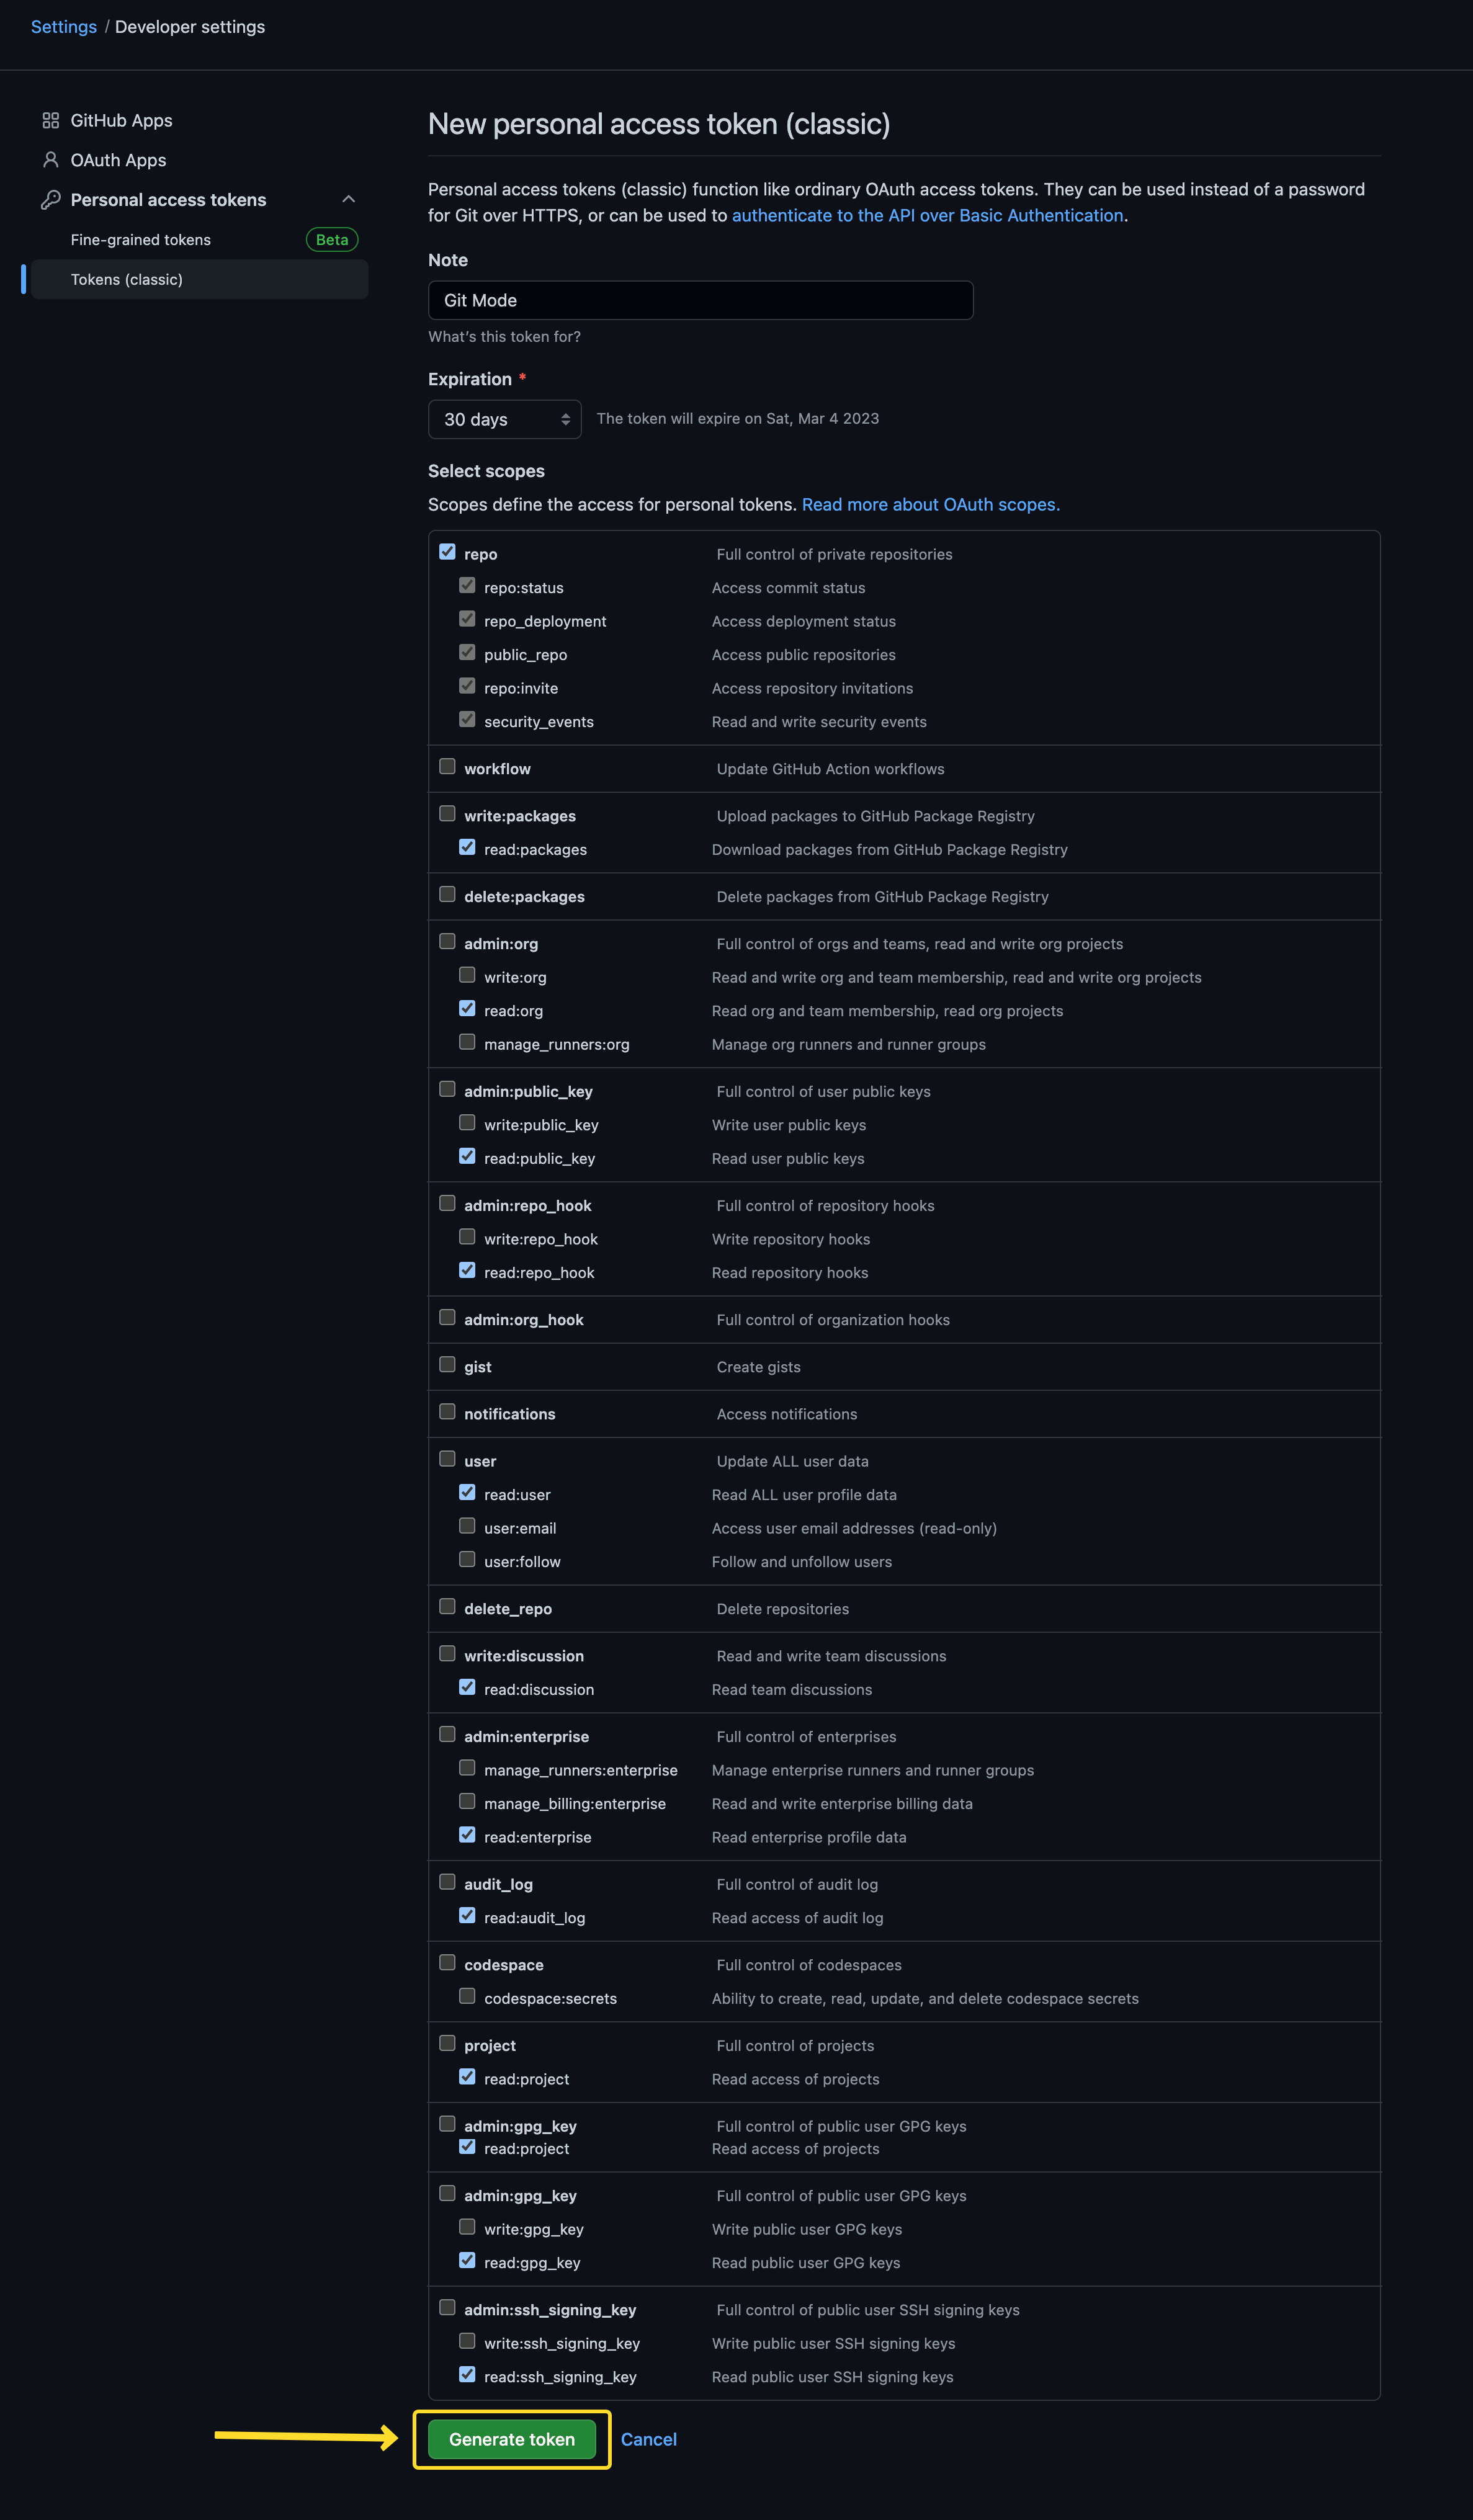
- Proceed to configuring the PAT and click on Generate token to create your Personal Access Token.
Note: While configuring your PAT, ensure that the access is given for all keys under
repo. Moreover, you will also have to give all the accesses forreadkeys.
Generate Personal Access Token on GitLab
- Navigate to GitLab Settings.
- Enter Token name and add Expiration date.
- Select the scopes for the token. Add
read_repositoryaccess to the scope. - Click on Create Personal Access Token.
- Copy and Save your token securely.
Generate Project Access Token on GitLab
- Navigate to the project for which you want to create a token.
- Select Settings from the top menu. Choose Access Tokens from the left sidebar.
- Click on Add new token. Enter a name for the token.
- Select the scopes for the token.
- Select the role for the token, which determines the level of access it has.
- Click on Create project access token.
Generate Repository Access Token on Bitbucket
We need to follow the 2 steps mentioned below:
- Need to create the access token for bitbucket repo
- Need to use bitbucket URL and access token to run the job on HyperExecute
- Create access token for the repository
Please refer to the following link for generating access tokens if your/your client’s repository is private. This access token will allow HyperExecute to directly fetch the test scripts/Provar tests from bitbucket whenever a Job is triggered. https://support.atlassian.com/bitbucket-cloud/docs/create-a-repository-access-token/
- Add the token in Job trigger API payload
In order for HyperExecute to be able to fetch tests from bitbucket, bitbucket-server, or github, the token has to be added in the Job Trigger API. Example given below:
---
sourcePayload:
  platform: git
  link: https://bitbucket.org/<username>/junit-selenium-hyperexecute-sample.git,
  ref: main
  accessToken: ${{ .secrets.BITBUCKET_SERVER_REPO_CLONE_SECRET_KEY }}
  verifySSL: false
  gitProvider: bitbucket
Note: Please make sure yo enter your username while adding the repository URL.
