Deep Dive into HyperExecute YAML
This document contains detailed explanations for all YAML flags, providing an in-depth understanding of each configuration parameter.
Mandatory Parameters
version
The version of HyperExecute YAML being used to run the tests. Currently there are two supported versions are 0.1 and 0.2.
version: 0.1
runson
In this flag, you will define your required Operating System on which you want to run your tests.
Currently we support linux, mac (macOS Monterey), mac13 (macOS Ventura), win (Windows 10) and win11 (Windows 11).
runson: linux # mac, mac13, win, win11
If you want to run a multi OS job, you can use matrix method as shown below
runson: ${matrix.os}
matrix:
  os: [linux, mac, mac13, win, win11]
pre
All actions you need to perform before each test execution, such as installing dependencies. You’ll ideally want to use this parameter to "pre" run simple commands like npm install, yarn install, mvn install etc
pre:
  - npm install
  - mvn install
📘 Refer to globalPre command to perform a common global setup for all your tasks, such as installing dependencies or configuring environments.
AutoSplit Mode Parameters
autosplit
Auto-Split mode automatically splits your scenarios among the concurrent number of tasks and executes them parallelly. This ensures optimal utilization of resources and significantly reduces the overall execution time of your test suite.
For instance, if you have a concurrency of 10 and you want to run 50 tests in total, AutoSplit mode will distribute these 50 tests on 10 VMs in the most efficient manner possible to reduce your overall job execution time.
Note: In
local mode, these commands will be smartly distributed among the VMs using history data, such that each VM (task) gets to run for almost the same amount of time to reduce your totaljobtime.
autosplit: true
📕 Take a closer look at the AutoSplit mode.
concurrency
This indicates the total number of concurrent sessions that can run in parallel for processing your test-cases. Your job will have as many virtual machines (tasks) as you have defined for this flag.
if you are using the AutoSplit strategy then it is mandatory for you to define the concurrency.
concurrency: 10
- After analyzing your test cases and usage patterns, the platform will automatically recommend the optimal concurrency settings tailored to your needs. These recommendations are displayed in the banner on the left-hand side. Learn more here.
- You can see the overall concurrency trends using our analytics widgets.
testDiscovery
This is used to locate or discover relevant tests via class names, filters, file names, etc.
testDiscovery:
  type: raw
  mode: local
  command: grep 'public class' src/test/java/hyperexecute/*.java | awk '{print$3}'
It contains the following attributes:
type
#(Recommended). When we are passing a command to discover tests.
type: raw   #or

#(Advanced). For more advanced use cases.
type: automatic
type: raw
- Purpose: Perform a basic test discovery based on the provided command.
- Functionality: Directly executes the specified command and displays the discovered tests.
- Limitations: Doesn't utilize any built-in logic or advanced discovery capabilities.
- Suitable for: Simple test discovery scenarios where the command directly identifies the desired tests.
type: automatic
- Purpose: Utilize backend logic to discover tests using external tools.
- Functionality: Relies on a backend tool, such as Snooper, to perform test discovery.
- Limitations: Cannot be used directly with a command-based approach.
- Suitable for: Complex test discovery scenarios where advanced logic or external tools are required.
In summary, type:raw is a basic and straightforward approach for discovering tests based on a specified command, while type:automatic provides more flexibility and advanced capabilities by leveraging external tools and backend logic.
mode
This attribute defines where the test discovery occurs and how it is executed. HyperExecute supports two discovery modes: local and remote.
NOTE: The earlier
dynamicdiscovery mode has been deprecated. Useremoteinstead for all new and existing YAML configurations.
#test discovery happens on machine where CLI is running
mode: local  #or

# test discovery happens in designated HyperExecute VMs
mode: remote
mode: local
- Purpose: Test discovery is performed locally on the machine where the CLI is running.
- Use Case: Ideal for small projects or when tests need to be discovered locally.
- Limitations: Requires dependencies installed locally and doesn’t support matrix-based distributions. Debugging logs are generated locally, limiting visibility.
mode: remote
The remote discovery mode addresses the limitations of local modes. Instead of running test discovery on your local machine (local), this mode centralizes the process by using a dedicated remote Virtual Machines.
This setup helps to ease the discovery process and makes it more efficient, especially for complex test setups. Additionally, it fully supports matrix-based testing, which allows you to discover and manage tests across different configurations more effectively.
NOTE :
typeis not required with remote discovery.
Key Features:
-
Centralized Discovery Tasks: Tests are discovered remotely in a Virtual Machines designed for this purpose. Discovery tasks focus solely on identifying the tests without executing them, optimizing the discovery process.
-
Orchestration Support: Once tests are identified, orchestration algorithms ensure they are efficiently distributed across Virtual Machines, reducing idle time and improving resource utilization.
-
Matrix Support: Fully supports matrix configurations, allowing individual test discovery for each matrix combination, particularly useful for YAML 0.2 runners.
-
Optimized Caching: Remote Discovery Mode reduces redundant cache operations by performing them once in the discovery task, and sharing the cache across all Execution Tasks. This speeds up the overall process and minimizes resource wastage.
-
Code Caching: For users cloning their codebase via Git, Remote Discovery caches the code during the discovery task, reducing Git rate limits and accelerating the execution tasks.
command
The command that fetches the list of test scenario that would be further executed using the value passed in testRunnerCommand
command: grep 'public class' src/test/java/hyperexecute/*.java | awk '{print$3}'
- Test orchestration will happen with
mode: localonly. - 📕 Learn how to perform dependent test discovery.
testRunnerCommand
The testRunnerCommand used to run a single test entity in isolation. This entity could be a file, module, feature, or scenario. It is defined in the YAML file and tells the system how to run the test entity.
testRunnerCommand: mvn test -Dcucumber.options="$test" -Dscenario="$test" -DOs="win 10"

# This command runs the test using Maven and passes in the options for Cucumber, the scenario to run, and the operating system to use.
Matrix Mode Parameters
matrix
The matrix mode allows you to run the same set of tests across multiple combinations of environments, configurations, or parameters. This is particularly useful for ensuring that your software works correctly under different conditions, such as various operating systems, browser versions, or dependency files.
runson: ${matrix.os}

matrix:
  os: ["win", "mac", "linux"]
  version: ["latest, dev"]
  browser: ["Chrome", "Firefox"]
  files: ["@File1","@File2"]
exclusionMatrix
The exclusion matrix allows you to omit specific combinations of parameters from being tested. For instance, if Safari on Windows is not a valid combination, you can exclude it using the exclusionMatrix parameter, ensuring that invalid or irrelevant test combinations are skipped.
#runson defines the OS of your test execution node.
runson: ${matrix.os}

matrix:
  # Browser version(s) separated by Comma
  version: ["latest"]
  # OS name sepataed by Coma
  os: ["win", "mac", "linux"]
  # Browser name separated by Comma
  browser: ["Chrome", "Firefox", "Safari"]
  # Test Files separated by Comma
  files: ["@File1","@File2","@File3","@File4"]

exclusionMatrix:
  - os: [win]
    browser: ["Safari"]
    files: ["@File2","@File3"]
combineTasksInMatrixMode
In matrix mode, the concurrency flag is not recognized. Therefore, in order to use the limited concurrencies that come with your license for a matrix-mode job, you need to set combineTasksInMatrixMode to true. This will run the (matrix-multiplied) combinations as scenarios in the number of HyperExecute machines that was specified in concurrency, as opposed to using one machine per matrix combination.
For example, the below-mentioned YAML snippet will generate a total of 8 scenarios, and since the concurrency is set to 2, these 8 scenarios will run in parallel on 2 HyperExecute machines. In each machine (let's say each has 4 scenarios to execute), they will be running sequentially only.
Total Scenarios = [Entries in os List] x [Entries in browser List] x [Entries in Files List]
concurrency: 2
combineTasksInMatrixMode: true

matrix:
   os: ["mac", "linux"]
   browser: ["edge", "brave"]
   files: ["Test1", "Test2"]
testSuites
A command to run the tests that were mentioned in the scenario key for matrix based test execution.
testSuites: - mvn test -Dtest=$files
Hybrid Mode Parameters
parallelism
parallelism defines the number of virtual machines ('tasks') to be spawned in the case of hybrid mode. If you are not defining the parallelism, then you must define operating system-specific parallelism (win, mac, and Linux). If both are defined, then preference will be given to OS-based parallelism.
runson: ${matrix.os}
parallelism: 2

matrix:
 os: [win, mac]
 version: [1, 2, 3]
 browser: [chrome]
In the above example we have total of 3 combinations for each os i.e.
For win:
Version: 1, Browser: Chrome
Version: 2, Browser: Chrome
Version: 3, Browser: Chrome
For mac:
Version: 1, Browser: Chrome
Version: 2, Browser: Chrome
Version: 3, Browser: Chrome
So each combination will run on a parallelism provided in the yaml. Here all combinations will run on a parallelism of 2.
Platform specific parallelism -> macParallelism, winParallelism, and linuxParallelism
If you want to provide different parallelism for macOS, linux and windows. If any of the specific operating system parallelism is not present it will consider the parallelism as the default value.
parallelism: 2
linuxParallelism: 2
winParallelism: 1
macParallelism: 3

matrix:
 os: [win, mac]
 version: [1, 2, 3]
 browser: [chrome]
In the above example linux combinations will run on a parallelism on 2, windows combinations will run on a parallelism on 1, and mac combinations will run on a parallelism defined of 3.
testRunnerCommand
The testRunnerCommand used to run a single test entity in isolation. This entity could be a file, module, feature, or scenario. It is defined in the YAML file and tells the system how to run the test entity.
testRunnerCommand: mvn test -Dcucumber.options="$test" -Dscenario="$test" -DOs="win 10"

# This command runs the test using Maven and passes in the options for Cucumber, the scenario to run, and the operating system to use.
Platform specific testRunnerCommand
In hybrid mode, you can run your tests on multiple operating system using the same yaml. You can provide different testRunnerCommand for macOS, linux and windows.
If any of the specific operating system testRunnerCommand is not present it will consider the testRunnerCommand as the default value.
testRunnerCommand: mvn test -Dcucumber.options="$test" -Dscenario="$test" -DOs="win 10"
linuxTestRunnerCommand: mvn test `-Dcucumber.options="$test"`  `-Dscenario="$test"`   `-DOs="linux"`
winTestRunnerCommand: mvn test `-Dcucumber.options="$test"` `-Dscenario="$test"`  `-DOs="win 10"`
macTestRunnerCommand: mvn test -Dcucumber.options="$test" -Dscenario="$test" -DOs="mac"
Basic Parameters
cacheKey
It is a unique identifier that enables HyperExecute to store and retrieve cached results efficiently. HyperExecute generates a hash value for the files specified in the cacheKey and checks the database to see if an entry with this hash already exists.
If an entry exists and the dependencies haven't changed, HyperExecute reuses the cached directives. If no entry exists, a new one is created. Upon successful job completion, the directives are cached for future use. This process avoids redundant downloads of dependencies, ensuring faster test execution.
cacheKey: '{{ checksum "pom.xml" }}'
If you also use Windows, you can use forward slashes to specify the cache file's path if your file is inside one of the directories, as demonstrated below:
cacheKey: {{ checksum "dir1/dir2/package-lock.json" }}
cacheDirectories
It is used to cache files that do not change frequently, such as dependency files for your tests (e.g., node_modules, .m2). By caching these files, HyperExecute can significantly speed up your test execution time in subsequent runs.
cacheDirectories:
  - .m2
In version 0.2 YAML, the support for caching is by default, you don't have to specify any directories to cache for faster performance. For example, in Maven, we cache the entire .m2 directory in the home folder so that subsequent tasks run faster.
If you add the cacheDirectories and cacheKey keys in your YAML file, then the default caching gets disabled and preference is given your specified cache.
cacheKey: '{{ checksum "pom.xml" }}'
cacheDirectories:
  - .m2
env
This is helpful to set environment variables on the machine and use it in your code or install dependencies to run your test cases.
env:
  USERNAME: abc
  PLATFORM: windows
Special Character Encoding
HyperExecute VMs support special character encoding, ensuring tests with multilingual content and special characters (e.g., ñ, á, é, í, ó, ú, ü, ¿, ¡) execute correctly. You can configure this using the env and pre flags in your YAML file.
env:
  LANG: es_ES.UTF-8
  LC_ALL: es_ES.UTF-8

pre:
  - sudo locale-gen es_ES.UTF-8
  - sudo update-locale LANG=es_ES.UTF-8
If you are using Java-based frameworks, you can also set the encoding via JAVA_TOOL_OPTIONS:
env:
  JAVA_TOOL_OPTIONS: "-Dfile.encoding=UTF-8"
runtime
The runtime flag is used to:
- Download and install the dependent language and framework that is needed to execute your tests.
- You can provide the language and the version you want to be installed.
Current Languages Supported: maven, java, dotnet, node, ruby, android-sdk, katalon and python
📕 Check the supported versions of all the languages along with the respective operating system.
runtime:
  - language: java
    version: "11"
- You can also install gauge and gradle only as an additional frameworks or tools independent of the language defined.
runtime:
  - language: java
    version: 11
    addons:
      - name: "gauge"
        version: "1.4.0"
      - name: "gradle"
        version : "7.0"
- You can also provide multiple languages and their specified versions that you want installed on your machine.
runtime:
  - language: java
    version: '17'
    addons:
      - name: gauge
        version: '1.5.6'
      - name: gradle
        version: '7.6'
  - language: python
    version: '3.10'
  - language: node
    version: '16'
retryOnFailure
The retryOnFailure enables automatic retries for failed test scenarios only when the testRunnerCommand itself fails. When set to true, the system will retry failed commands based on the maxRetries value defined. The default setting is false.
retryOnFailure: true
🔍 Important Behavior Notes:
- Retries are triggered only if the test command fails.
- Retries are not triggered if the command exits successfully but the test results are marked as failed by the user.
✅ Use Case:
This feature helps avoid re-running the entire job to determine if a test failure is due to a genuine issue or a transient problem (e.g., flaky tests, network hiccups). By enabling retryOnFailure, only the failing command is retried, allowing for quicker feedback and more efficient test execution.
If you are using Maven, ensure that the testFailureIgnore flag in your pom.xml is set to false. When testFailureIgnore is set to true, Maven treats test failures as ignored, causing HyperExecute’s retry mechanism to not trigger, even if retryOnFailure is enabled.
<testFailureIgnore>false</testFailureIgnore>
maxRetries
The maxRetries key defines the number of retries allowed for a failed test scenario. It is used in conjunction with the retryOnFailure key. When retryOnFailure is set to true, maxRetries specifies how many times each test will be retried upon failure.
With maxRetries and retryOnFailure, you don't need to rerun the entire job to retry failed test scenarios. Instead, your tests are automatically retried immediately after a failure, allowing you to determine if they pass in subsequent attempts.
You can set a value between 1 and 5 for
maxRetries, indicating the maximum number of retries for your tests.
retryOnFailure: true
maxRetries: 2
post
This parameter is used for executing actions after every test execution, such as printing an output file or uploading a report via a curl API request. It's ideal for performing post-run tasks.
post:
  - echo <some-dir>/output/output.log
  - curl https://www.example.com
📘 Refer to globalPost command to perform a common global setup for all your tasks, such as clean up tasks and or killing the environments.
report
This allows you to generate a consolidated report across the VMs. To use this feature, provide report: true, and the relative path of the data where it is expected to store and generate the reports after your test execution. You can also define the type and frameworkName of the report inside partialReports as shown in below example.
report: true
partialReports:
 location: target/surefire-reports/html
 type: html
 frameworkName: extent
It helps you to view the report on the dashboard itself. You can download the report either from the jobs detail page or you can pass-–download-report flag in the job triggering command from HyperExecute CLI.
If you want to generate multiple reports of different types supported by HyperExecute:
partialReports:
  - location: reports/json
    type: json
    frameworkName: extent-native

  - location: target/surefire-reports
    type: html
    frameworkName: testng
Set defaultReport as false in the framework if you are using YAML version 0.2 and you want to generate a report using partialReports as shown below.
framework:
  name: maven/testng
  defaultReports: false
Regex Support for Dynamic Report Paths
You can now use glob-style wildcards (**) in the location field of partialReports to dynamically match nested folders and custom report paths. This is especially useful when your test reports are generated inside directories that include date stamps, environment names, or other runtime variables.
Example:
partialReports:
  location: reports/**/cucumber/
  # location: target/abc/**/pqr/**/cucumber-reports
  frameworkName: cucumber
  type: json
Ensure that your Testrunner.java file should have the complete path from where partial reports will be added. Example:
plugin = {
    "json:target/abc/mno/pqr/xyz/cucumber-reports/CucumberTestReport.json",
    "json:target/abc/its/pqr/abc/cucumber-reports/CucumberTestReport.json"
}
- 📕 Take a closer look at the HyperExecute Reports
- Understand how you can email the generated report
- How you can generate different types of report based on your requirements
errorCategorizedOnFailureOnly
The errorCategorizedOnFailureOnly flag allows you to control the behavior of error categorization after your job is executed based on the status of your stage. By default, error categorization is applied to each stage, regardless of it's status. This means that error categorization is generated for every stage, whether it succeeds or fails.
When you enable this flag as mentioned below, the error categorization will only be generated for stages that are not passed.
errorCategorizedOnFailureOnly: true
errorCategorizedReport
The errorCategorizedReport flag is used to export a RCA report that has been generated by the failed tests.
errorCategorizedReport:
  enabled: true
Refer to the Error Categorized Report documentation for detailed instructions on generating this RCA report.
jobLabel
The jobLabel YAML key is used to add tags or labels to jobs. This allows you to search your jobs using the labels or tags assigned to them.
Prioritize Your Job Pipeline
To prioritize your jobs, you need to add the required priority to the jobLabel key in the YAML file e.g high, low, and 'medium'. With 'high' priority jobs triggered first, followed by 'medium' priority jobs and finally 'low' priority jobs. The values are case insensitive and the default priority is 'medium'.
You can also use it along with your existing job labels like this:
jobLabel: ['chrome', 'linux', 'low']
Advanced Parameters
mergeArtifacts
It is used to combine the artifacts created under each task to one.
mergeArtifacts: true
uploadArtefacts
It uploads the artifacts generated from running the tests, these artifacts are uploaded, preserved and can be downloaded once the job ends.
uploadArtefacts:

# Will upload your reports from target/site/** to HyperExecute as FinalReport
  - name: FinalReport
    path:
    - target/site/**

  # Will upload your Surefire reports from target/surefire-reports/**to HyperExecute as Surefire Report
  - name: Surefire Report
     path:
     - target/surefire-reports/**
You can use the flag
--download-artifacts-zipto download the single zip file for all the artifacts that are generated.
globalPre
The globalPre flag allows you to define a pre-execution step that runs once before any of your tasks starts. This flag ensures that all necessary setup tasks, such as installing dependencies, configuring environments, or initializing resources, are completed before test execution begins.
Functionality
- Runs before any test execution starts, ensuring the environment is properly configured.
- Executes on a separate machine (VM) or the local machine, based on the test discovery mode selected.
- Useful for setup tasks, such as fetching credentials, initializing databases, or downloading required files.
Limitations
- This feature is supported in YAML version 0.1 and 0.2 only.
remotemode is not supported for XCUI and Espresso framework jobs. Default mode for these frameworks islocal.
globalPre:
  mode: remote #local or remote
  commands:
    - "echo 'Setting up environment'"
    - "apt-get update && apt-get install -y curl"
    - "curl -X POST https://api.example.com/init"
  runson: win
  cache: true
Parameters
| Parameter | Type | Description |
|---|---|---|
| mode | string | Defines where the pre-step commands will be executed. Options: local or remote. Default mode is remote. |
| commands | list | List of shell commands to execute before test execution begins. |
| runson | string | It specifies the operating system on which all the task would run in case of remote mode. By default, it is set to linux. |
| cache | boolean | It is used to cache the payload after all commands have executed. It is useful in cases like: - If you want to made some modification in the payload at runtime by executing some set of commands. - If the payload is fetched from git source. By caching the payload, git rate limiting can be avoided as the payload will only be fetched once per job with cache: true. |
Difference between globalPre and pre flags
| Scenario | globalPre | pre |
|---|---|---|
| Purpose | Global setup (e.g., install dependencies, initialize environment) | Task-specific setup (e.g., prepare test data) |
| Execution Frequency | Executes once per entire test execution | Executes once per task |
| Execution Location | Separate VM or local machine | Inside the task environment |
| Example Usage | apt-get update, docker pull | export ENV=staging |
globalPost
The globalPost flag defines a post-execution step that runs once after all tasks have completed. This step ensures that cleanup tasks, such as removing temporary files, logging results, or notifying external systems, are performed after test execution.
Functionality
- Runs after all test execution is completed, ensuring final cleanup and reporting.
- Executes on a separate machine (VM) or the local machine, based on the mode selected.
- Useful for cleanup tasks, such as deleting test artifacts, summarizing reports, or deallocating cloud resources.
Limitations
- This feature is supported in YAML version 0.1 and 0.2 only.
remotemode is not supported for XCUI and Espresso framework jobs. Default mode for these frameworks islocal.
globalPost:
  mode: remote #local or remote
  commands:
    - "echo 'Cleaning up test environment'"
    - "rm -rf /tmp/test-results"
    - "curl -X POST https://api.example.com/cleanup"
  runson: linux
📘
globalPostcan also download every task's artifacts onto a VM, run custom commands against them, upload the processed output to the dashboard, and email the result. See Download and Process Job Artifacts in Global Post.
Parameters
| Parameter | Type | Description |
|---|---|---|
| mode | string | Defines where the post-step commands will be executed. Options: local or remote. Default mode is remote. |
| commands | list | List of shell commands to execute after test execution completes. |
| runson | string | It specifies the operating system on which all the task would run in case of remote mode. By default, it is set to linux. |
Difference between globalPost and post flags
| Scenario | globalPost | post |
|---|---|---|
| Purpose | Global cleanup (e.g., remove logs, finalize reports) | Task-specific cleanup (e.g., delete temporary files) |
| Execution Frequency | Executes once after all tasks complete | Executes once per task |
| Execution Location | Separate VM or local machine | Inside the task environment |
| Example Usage | rm -rf /logs, curl -X POST … | rm -rf temp/* |
captureScreenRecordingForScenarios
If this key is set to true, it will record whole scenario execution, and then video is accessible from your HyperExecute dashboard. This can be majorly used for non selenium based tests to have the recorded video of the whole scenario.
captureScreenRecordingForScenarios: true
To avoid test failures, ensure the video capability is false before enabling the captureScreenRecordingForScenarios flag in your YAML file. If both video capability and captureScreenRecordingForScenarios flag is set to true simultaneously, the tests will fail. To prevent this conflict, always pass the capability video: false in your tests.
skipArtifactStageIfNoTest
It is used to gracefully handle the scenario stage inside the tasks in which there are no selenium/cdp tests executed. Instead of marking the artifact stage as failed (if artifacts are not found at the defined location, HyperExecute marks it as failed) and hence the task and job as failed, the stage would be marked as skipped and hence task and job as skipped.
skipArtifactStageIfNoTest: true
globalTimeout
The globalTimeout value determines the maximum duration (in minutes) of a Task(VM) . It can be set between 1 and 150 minutes, and has a default value of 90 minutes.
For example, if you set the globalTimeout to 120 minutes, a Task(VM) that exceed this duration will be automatically terminated. If you’re expecting that running all your test-cases despite parallelism is going to take more than 90 mins, set it to an appropriate value, for example, 120. If you have tests that run for longer than the maximum limit of 150 minutes, you need to get in touch with our support team.
globalTimeout: 90
failFast
FailFast feature allows you to stop running your tests in case there is a series of tests failure. failFast flag can be used to abort your job if the number of consecutive test failures for that job(jobID) across multiple tasks equals or exceeds the maxNumberOfTests value.
failFast:
  maxNumberOfTests: 2
In case retryOnFailure flag is enabled in yaml, then there will be multiple retries for a failed test. In that case, only the failure of last retry will be considered to increment the test failure count.
To apply failFast at the scenario level instead of the default test level, set the level: scenario in the YAML configuration.
failFast:
  maxNumberOfTests: 2
  level: scenario
NOTE : You can specify
failFastat either the test level or scenario level, depending on your requirements. Both configurations will work, but can lead to unexpected results, only one should be used at a time.
base
This feature allows you to use one YAML as a base for another YAML file. By inheriting the configurations of the base (or parent) YAML file, you don't need to specify those fields in the inheriting (child) file again. Learn more.
base:
  yamls:
    - ./<baseConfiguration1.yaml>
    - ./<baseConfiguration2.yaml>
sourcePayload
You can use this flag to use to define the source of your test scripts so that the scripts can directly be fetched from your git directly for execution on HyperExecute. Your test code is directly sourced from your Git provider with the help of secure access tokens and only your HyperExecute YAML file is encrypted and uploaded through the HyperExecute CLI. To learn more about how this feature works, go through this page.
sourcePayload:
  platform: git
  link: https://--------
  ref: master
  accessToken: <your_personal_access_token>
  commit: <optional>
hostsOverride
This field allows you to add domain mappings which are required to be added in the local DNS entry represented by the /etc/hosts file. This is required if you want to map a custom domain name to an ip (local or otherwise) so that any requests on this domain name resolves to the provided ip on HyperExecute machines where your tests are running. For instance, suppose for a domain "example.com", global DNS is having the entry which resolves the network call to the public IP address. With hostsOverride flag you can explicitly route the network call to a local IP address, instead of allowing the call to go through a public IP address.
hostsOverride:
  - host: example.com
    ip: 127.0.0.1
  - host: example1.com
    ip: 127.0.0.1
frameworkStatusOnly
Set status of scenario based on framework tests status. For instance, if you run a job where the framework uses lambda hooks to mark the status of tests and you want the status of the scenario to be based on the status of the tests, you need to set frameworkStatusOnly : true in the yaml. This flag will consider the status of the tests and will use this status to mark the status of scenarios giving you the ability to control the status of stages based on test status.
testSuiteTimeout
It is used to set the timeout on all scenario stages in a task. If defined, your complete test suite should get executed within this time. Its max value is 150 minutes. If you want to increase this time beyond the default maximum limit of 150 minutes, you need to contact the support team.
testSuiteTimeout: 30
In the above example, your scenario stage should finish within 30 mins otherwise the task and Job would get marked as timed out after 30 minutes of execution.
testSuiteStep
It is used to timeout individual scenario stages in a task. Each scenario in separate tasks should get completed before this time. If you want to increase this time beyond the default maximum limit of 150 minutes, you need to contact the support team.
testSuiteStep: 15
In the above example, if any of your scenario stages take more than 15 minutes to execute, then it will get timed out .
retryOptions
Regular Expressions provides more granular control over when test retries are triggered. You can achieve this through retryOptions flag.
- You can specify precise error patterns using regular expressions to determine which errors should initiate retries.
- It works seamlessly with Cypress, CDP, and Selenium framework tests.
- It is supported in both YAML 0.1 and 0.2
Configuration:
- Set
retryOnFailure: trueto activate the retry feature. - Indicate the maximum number of retry attempts with
maxRetries: <number>. - Within the
retryOptionssection, create anerrorRegexpsarray to list the regular expressions that represent the errors you want to trigger retries.
retryOnFailure: true
maxRetries: 3
retryOptions:
  errorRegexps: ["org.openqa.selenium.NoSuchElementException"]
preDirectives
This is an advanced version of pre where you can control how your pre commands should be executed in a parallel HyperExecute Task. If both pre and preDirectives flags are provided at the same time, then the precedence is given to the preDirectives flag.
preDirectives currently has the ability to take the following additional inputs:
maxRetries: You can retry the commands that failed in the pre-step by using this directive. The numerical value assigned to this field determines the amount of times you can retry the failed pre commands.commands: The actual commands that needs to run likenpm installormvn installshell: shell to execute the commands under. This is typically helpful if you want to run your pre commands in a specific shell. For example,powershellfor Windows orbashfor Linux and MacOS.workingDirectory: This specifies the location of the directory in which all test discovery and execution commands will run, as well as the location of any files or directories that are created as a result of the command execution.
preDirectives:
    commands: ['mvn -Dmaven.repo.local=./.m2 dependency:resolve', sleep 60]
    maxRetries: 0
    shell: ""
    workingDirectory: ""
postDirectives
This is an advanced version of post where you can control "how" your post commands should be executed in a parallel HyperExecute Executor. If both post and postDirectives flags are provided at the same time, then the precedence is given to the postDirectives flag.
postDirectives currently has the ability to take the following additional inputs:
commands: actual commands that needs to run likeecho <some-dir>/output/output.logshell: shell to execute the commands under. This is typically helpful if you want to run your post commands in a specific shell. For example,powershellfor Windows orbashfor Linux and MacOS. (Coming Soon)workingDirectory: This specifies the location of the directory in which all test discovery and execution commands will run, as well as the location of any files or directories that are created as a result of the command execution.
postDirectives:
    commands: [cat yaml/linux/v1/testng_hyperexecute_autosplit_sample.yaml]
    shell: ""
    workingDirectory: ""
alwaysRunPostSteps
Problem : Test scenarios failing led to the cancellation of post-steps, being unable to upload reports, and other actions that you need to perform after all test executions.
Solution : The alwaysRunPostSteps flag ensures that post-steps execute even if the scenario stage fails.
alwaysRunPostSteps: true
project
This flag is used to set the Name of your Projects which would later allow you to see all jobs of that Project at one place. To know more about Projects click here.
- Once you have created a project, you can pass in your project ID and project name to trigger your job on the same project.
- If you are using Project Level Secrets, you must include the id field in your project configuration.
project:
  name: 'demo-project' #project name
  id: '1abc2345-56de-7890-f1cg-h2ij34k56789' #project id
:::

differentialUpload
When you are working with relatively large codebases, and constantly updating and upgrading your test scripts. Getting them onto the HyperExecute platform for every run might consume extra time.
To overcome this challenge, you can use differentialUpload flag, which is used to minimize the time taken to upload the codebase, especially when there are incremental changes.
This flag optimizes codebase uploads by fetching only the parts of the codebase that have been updated or newly added, significantly reducing upload times.
-
enabled (boolean): Set to true to activate the optimization, and false to maintain the default behavior.
-
ttlHours (integer): Specifies the Time-To-Live (TTL) for the uploaded code. Users can control the duration for which the optimized upload remains active, with valid values ranging from 1 hour to 360 hours.
When you pass the differentialUpload flag, it ensures that whenever you upload the same codebase a second time with less than 75% changes, only the modified or new parts are fetched. The rest is mapped to the previously uploaded version of the codebase. This approach is beneficial in scenarios where network issues or a large codebase contribute to slow upload times.
NOTE: The default value for ttlHours is 60 hours
project:
  name: XYZ Name
differentialUpload:
  enabled: #true/false
  ttlHours: #int value, with possible range of values [1 hour to 360 hours]
If the project flag is not passed then the name for the project will be set to "Default Project".
By activating this feature, you can experience a significant reduction in upload times, enhancing the efficiency of running and debugging multiple jobs on HyperExecute.
linkValidity
The linkValidity flag is used to customize the duration of validity for report and artifact URLs generated after job completion. Currently URLs are inherently valid for 48 hours post-generation but you can tailor the validity period to align with the specific requirements, ensuring you can access the associated resources within the defined timeframe.
Note: If
linkValidityis not defined or 0, then the default link validity to access the artifacts and reports is 2 days. The maximum validity is 60 days.
report: true

partialReports:
  location: target/surefire-reports/html
  type: html
  frameworkName: extent
  email:
    to:
      - johndoe@example.com
    linkValidity: 5
uploadArtefacts:
  - name: ExecutionSnapshots
    path:
      - <path of artifact>
    email:
      to:
        -
      linkValidity: 5
stripParentDirectory
When mergeArtifacts is true, providing this flag will strip the parent directory from all the downloaded artifacts and place the artifacts in the base path.
stripParentDirectory: true
generateArtifactAfterEveryStage
With this flag artifacts will be generated after every stage,without this flag artifacts are generated after every task and avoid any overrides for artifacts of the same name.
generateArtifactAfterEveryStage: true
taskIdentifierInNonConflictingArtifacts
This flag when set to true specifies that the task ID should be included in the non-conflicting artifacts. The non-conflicting artifacts are those artifacts that can be safely shared between tasks. By default, the task ID is not included in the non-conflicting artifacts.
-
When the
taskIdentifierInNonConflictingArtifactsflag is set to true and themergeArtifactsflag is also set to true, the task ID will be appended to all the filenames of artifacts. This is done to ensure that the artifacts can be uniquely identified. -
For example, if you have a task that creates a file called index.html, and the
taskIdentifierInNonConflictingArtifactsflag is set to true, the file will be renamed to index.html.task-id. This ensures that the file can be uniquely identified, even if it is merged with other files called index.html from other tasks.
mergeArtifacts: true
taskIdentifierInNonConflictingArtifacts: true
-
If the
taskIdentifierInNonConflictingArtifactsflag is set to false and themergeArtifactsflag is set to true, the task ID will only be appended to the filename if the filename already exists. This is done to avoid appending the task ID to the filename of an artifact that already exists. -
For example, if you have a task that creates a file called index.html, and the
taskIdentifierInNonConflictingArtifactsflag is set to false, the file will not be renamed. However, if you have another task that also creates a file called index.html, the second task will rename its file to index.html.task-id
mergeArtifacts: true
taskIdentifierInNonConflictingArtifacts: false
smartGrid
If enabled, it will try to reduce the browser setup time [currently only for windows]. Default value is false.
smartGrid: true
After a test is run, it caches the browser name, version, and all the capabilities used for this particular state and test case. When running a test case, it tries to fetch from cache, which browser was used for the next stage in the previous run, and launches that browser in the background. This makes sure that, when the next test is run, the browser session is already running.
If you feel that browser setup time is more than expected, you should enable this feature. However, please note that it will reduce the browser setup time of the next test only if the current test takes enough time to launch the browser for the next test in background.
This would work only for version 0.1 and local discovery mode.
As this is dependent on the previous run of a job, any change in the browser capability or test name or test order might render the cache invalid. And browser setup time reduction might not be visible in this run, rather, it would appear in the next run.
Note : Currently this is available for Windows - edge, firefox, chrome - recent 5 versions. Linux and MAC are not supported currently.
scenarioCommandStatusOnly
When enabled, it will mark the scenario as passed even if no test is associated with it or will mark the status of scenario based on the status of the scenario executed. This can be utilised for advanced use cases where teams want to define status in HyperExecute platform based on there needs of custom frameworks.
There are two scenarios associated with it:
Scenario 1: When Sessions do not open up for certain scenarios:
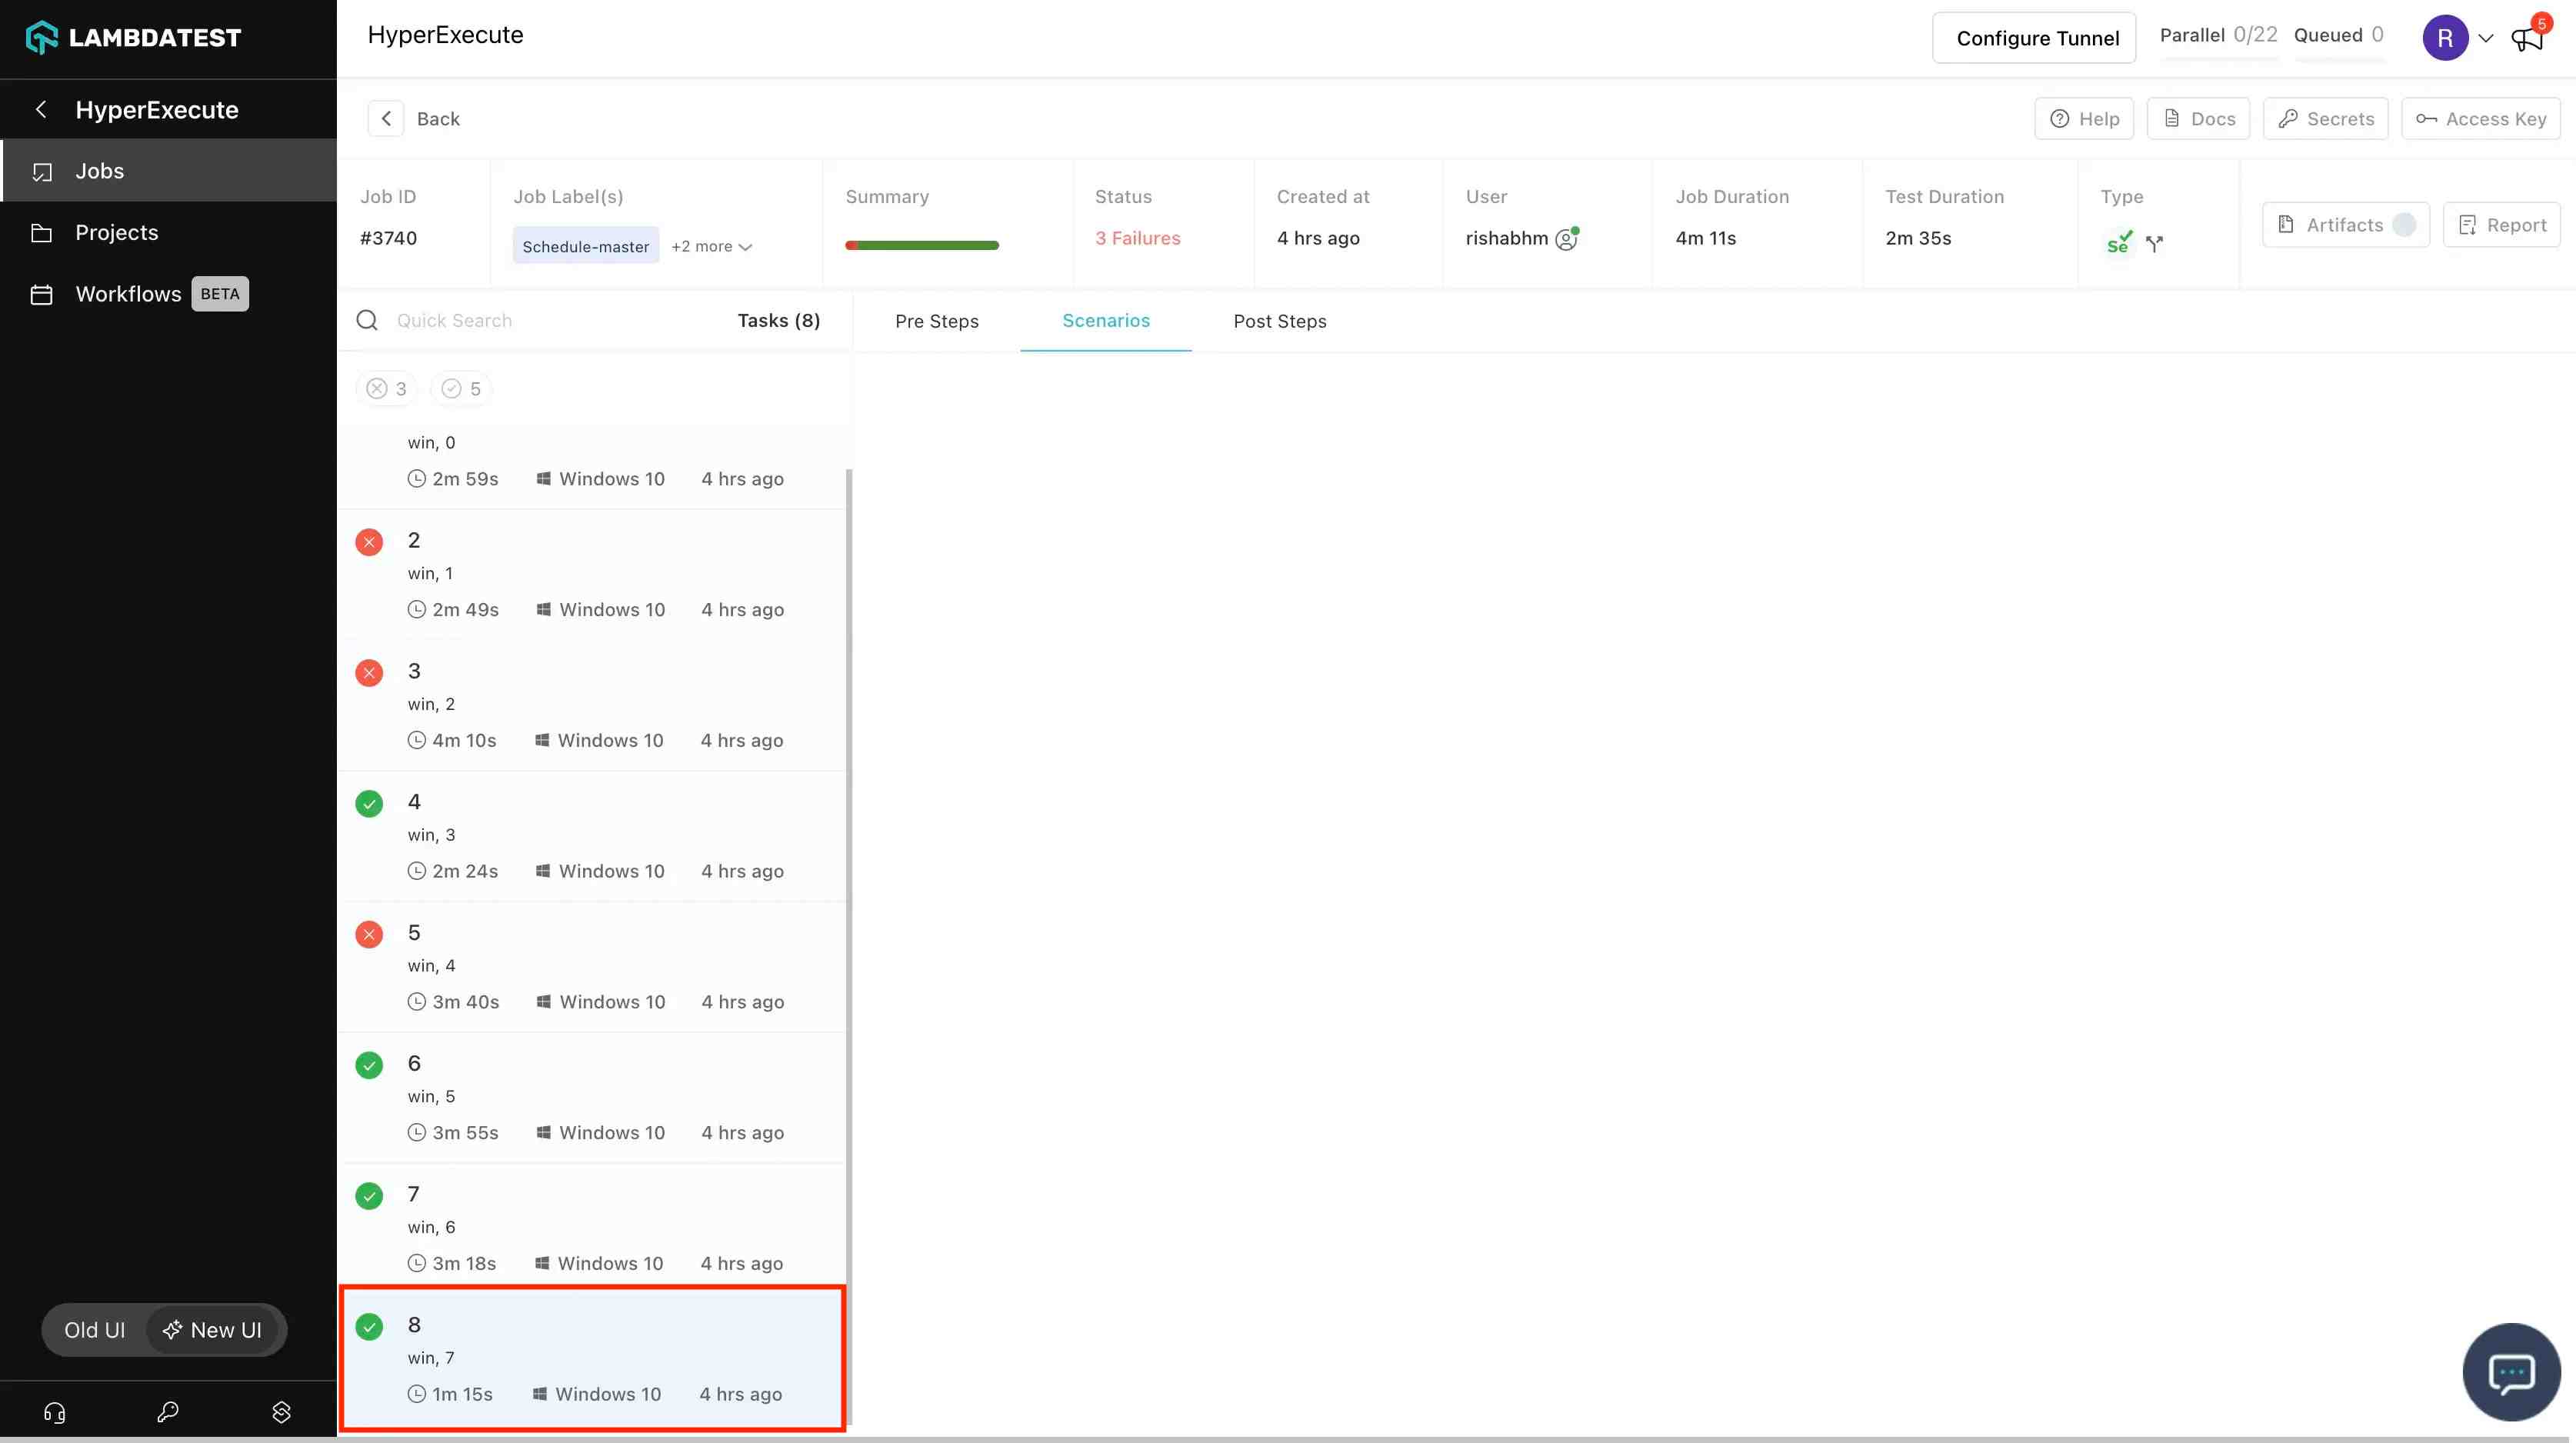
- For certain scenarios that do not open up a session hence no tests are associated with that scenario, because of this the scenario gets marked as skipped and the task as partially completed. Need a way to mark those scenarios as completed/passed instead of skipped and see a green tick instead of a grey tick.
Solution : When scenarioCommandStatusOnly is set true in YAML, it will mark the task as passed even though no test is associated to it. In the given screenshot task 8 is passed even though no test is associated to it.
Scenario 2: When test cases are run n no of times:
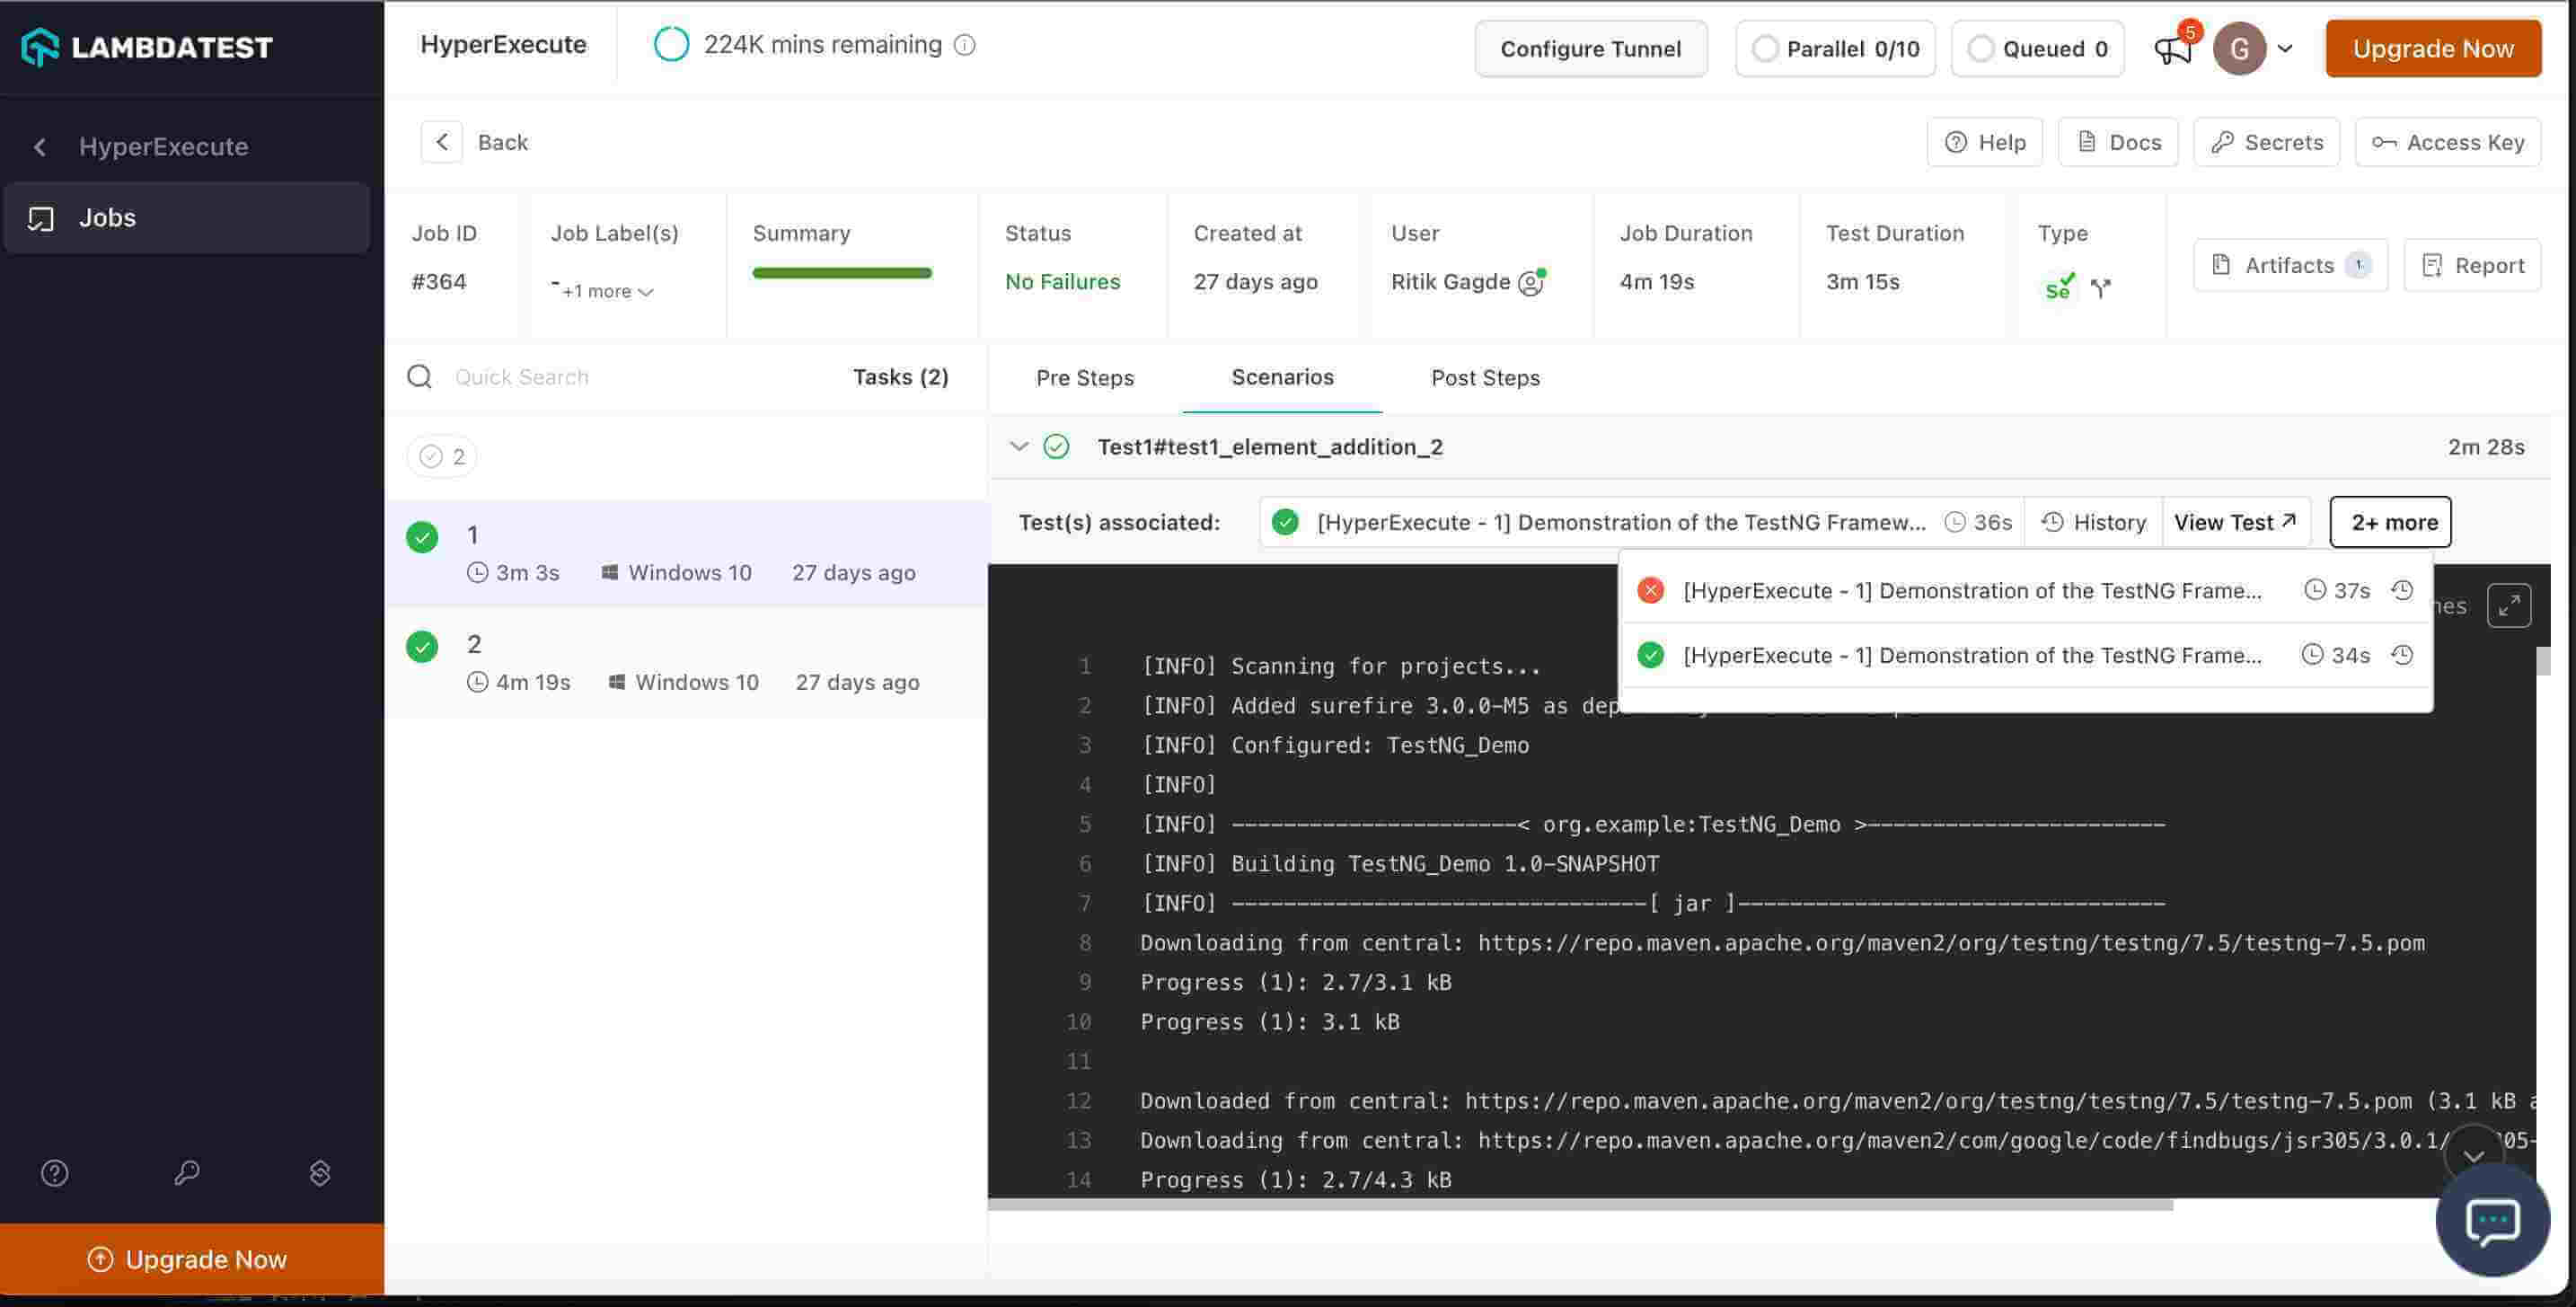
- Some times a user might runs some test cases n no of times inherently due to framework retries etc. Those test cases are considered as separate entries for us, and if one fails, scenario is marked as failed and hence the task and job is marked as fail. Need a way to update status of the task as if a test case first fails and then passes, it should be shown as passing and with green tick. Currently it shows as failed.
Solution : When scenarioCommandStatusOnly is set true in YAML, it will mark the status of scenario as passed.
| Test | Edge Case | Working Case |
|---|---|---|
| Test 1 | Passes | Passes |
| Test 2 | Failed | Failed |
| Test 2 Retry - (Actually Test 3 for us) | Failed | Passes |
| Test 3 | Passes | Passes |
| Final Status of Stage | Failed | Success |
As seen in the screenshot, when one of the tests is marked as failed while the other tests are marked as passed, the overall scenario is marked as passed.
cypress
This option signifies that the test suite is a cypress test suite and should be pass as true in case of cypress suite.
cypress: true
cypressOps
This parameter is used to pass cypress specific options from the CLI. Learn more
Additional options include:
- Dedicated Proxy: This is a boolean parameter to be passed in cypressOps. When enabled user’s traffic will be passed to a dedicated proxy server, this feature has to be enabled from customer support team.
- Network: This is a boolean parameter which when set to true enables network proxy logs for the test.
- GeoLocation: This parameter is used to pass the test traffic through a specific geolocation. Value to be passed here is geolocation code
- FullHar: This flag generates the HAR logs that offer a comprehensive view of your application's network activity during testing.
- reporterConfigFile: If your Cypress project does not have a custom reporter configured,
reporterConfigFilewill automatically enable command logs using the mochawesome reporter by default. - ProjectName: You can define your project name to autocreate your project in the HyperExecute dashboard.
cypressOps:
  Build: "Hyperexecute Cypress Sample Build"
  Tags: ["Hyperexecute","Cypress", "Windows", "Matrix"]
  BuildTags: ["Hyperexecute-Cypress"]
  Network: true
  FullHar: true
  geoLocation: IN
  reporterConfigFile: "reporter_config.json",
  ProjectName: "Cypress_Project"
shell
Shell defines the shell/terminal type on which all of the commands defined under pre, post, testRunnerCommand mentioned in yaml should run. If shell is also defined under PreDirectives then for PreDirectives command that shell would be used.
shell: bash
dataJsonPath
DataJsonPaths helps to distribute data/configs over the VMs. In this you can create a json files and put configurations/data required for your suite as json array inside the file. For example:
[
 {
  "Username": "user1",
  "Password": "pass1"
 },
 {
  "Username": "user2",
  "Password": "pass2"
 }
]
To access the data from the JSON files, there are primarily 2 methods:
1. By reading the JSON file
In the JSON file, we have a data object and not an array of objects, hence you can directly read the data from the file.
{
  "Username": "user1",
  "Password": "pass1"
}
2. Using via env variables
You can use the env variables to access the defined parameters as:
STATIC_DATA_1_<ParameterName>
NOTE:- In the above syntax, 1 represents the file passed in the yaml file and not the data object within the file.
For instance, to access data from file1.json, the syntax would be:
STATIC_DATA_1_Username
Similarly, to access the data from the second file i.e file2.json:
STATIC_DATA_2_Username
dataJsonBuilder
The dataJsonBuilder flag in the HyperExecute YAML file is used to facilitate efficient and distributed test execution by processing JSON data. It reads JSON data from a specified file, applies optional filters, and indexes the JSON objects based on a defined key. This ensures that the data is prepared and distributed according to the testing requirements, optimizing test execution across multiple environments.
dataJsonBuilder:
  path: <path_to_json_file>
  index: <indexing_key>
  filters:
    query: <filter_query>
    attributes:
      - key: <attribute_key>
        values: [<value1>, <value2>, ...]
Configuration
- path (required) : Specifies the path to the JSON file containing the data. Example:
path: data/file/abc.json - index (optional) : Specifies the JSON key on which the indexing is required. Example:
index: username - filters (optional) : Applies filtering on the JSON objects before indexing. Either
queryorattributescan be used, if both are mentioned then theattributeswill have higher precedence.- query: These are used for more complex filtering operations. If both attributes and queries are provided, attributes take precedence. This means that if there’s a conflict, the filter based on attributes will be used. Example:
query: (username == "abc" or username == "bcd") - attributes: These are key-value pairs used for filtering. You can provide a list of attributes with their corresponding values, and the filtering will include only those JSON objects where each specified attribute matches one of the provided values. Attributes are applied with an "AND" logic between different keys and an "OR" logic within the same key. Example:
attributes:
  - key: username
    value: ["abc", "bcd"]
  - key: tags
    values: ["@x", "@y"]
- query: These are used for more complex filtering operations. If both attributes and queries are provided, attributes take precedence. This means that if there’s a conflict, the filter based on attributes will be used. Example:
Working of dataJsonBuilder
-
The input JSON data should follow this format:
sample.json[
{
  "accesskey": "jhscuystc7ewgucu79as8yc9",
  "username": "abc",
  "tags": "@x"
},
{
  "accesskey": "cjdy87328yeiqhd93urd28hh",
  "username": "bcd",
  "tags": "@y"
},
{
  "accesskey": "jhscuystc7ewgucu79as8yc9",
  "username": "abc",
  "tags": "@y"
},
{
"accesskey": "cjdy87328yeiqhd93urd28hh",
"username": "bcd",
"tags": "@a"
}
] -
dataJsonBuilderflag passed in the HyperExecute YAML file:hyperexecute.yamldataJsonBuilder:
path: sample.json
filters:
attributes:
- key: username
values: ["abc", "bcd"]
- key: tags
values: ["@x", "@y"] -
The filtered JSON data will be:
sample.json[
{
"accesskey": "jhscuystc7ewgucu79as8yc9",
"username": "abc",
"tags": "@x"
},
{
"accesskey": "cjdy87328yeiqhd93urd28hh",
"username": "bcd",
"tags": "@y"
},
{
"accesskey": "jhscuystc7ewgucu79as8yc9",
"username": "abc",
"tags": "@y"
}
]
The objects with usernames "abc" and "bcd" and tags "@x" and "@y" are selected as they meet the criteria defined by the attributes filter.
Indexing and Test Case Distribution:
After filtering, the JSON data is indexed to distribute test cases. Here’s how the distribution works:
- VM Allocation: Each filtered JSON object corresponds to a separate VM. If the filtered JSON contains 3 objects, 3 VMs are allocated.
- Test Case Distribution: Test cases are then distributed across these VMs. For each VM, test cases are distributed based on the
usernamepresent in the filtered JSON objects. All test cases related to the sameusernameare assigned to the VMs containing thatusername.
So as per the above filtered JSON data:
-
VM1 will receive all test cases related to
username: "abc"{
"accesskey": "jhscuystc7ewgucu79as8yc9",
"username": "abc",
"tags": "@x"
} -
VM2 will receive all test cases related to
username: "bcd".{
"accesskey": "cjdy87328yeiqhd93urd28hh",
"username": "bcd",
"tags": "@y"
} -
VM3 will handle the JSON object:
{
"accesskey": "jhscuystc7ewgucu79as8yc9",
"username": "abc",
"tags": "@y"
}
Test cases related to username: "abc" will be split between VM1 and VM3, while test cases related to username: "bcd" will be handled by VM2.
Use Cases
-
Filtering and Indexing : When both filtering and indexing are required, filters are applied first, followed by indexing of the filtered results.
dataJsonBuilder:
  path: data/file/abc.json
  index: username
  filters:
    #either query or attributes can be used, if both are mentioned then the attributes will have higher precedence.
    query: (username == "abc" or username == "bcd")
    attributes:
      - key: username
values: ["abc", "bcd"] -
Only Filtering : If only filtering is required without indexing, omit the index key. In this case, no indexing will occur, and each JSON object will be distributed in a round-robin manner among parallel executions.
dataJsonBuilder:
  path: data/file/abc.json
  filters:
query: (username == "abc" or username == "bcd") -
Only Indexing : If only indexing is required without filtering, omit the filters section.
dataJsonBuilder:
  path: data/file/abc.json
  index: username
You can access the data on the machines using environment variables: ${STATIC_DATA_1_username} - for the username key
strict
If strict is set to true in yaml then the variables used in yaml must be present in either vars or environment variables on the user machine. If not present then only a warning is displayed. But in case of strict: true, the execution will throw an error.
cacheTestURL
It enables you to cache static test files in the browser.
cacheTestURL: true
In case your test, loads some URLs which can be cached but the server or browser’s configuration prevents these static files from being cached in the browser, you can enable cacheTestURL in these cases.
For instance,
if your test loads jquery static library multiple times and for some reason it is getting downloaded each time. Enable cacheTestURL to cache it. It will decrease file load time from the second time onwards.
Note: These cached resources are not yet shared across VMs. So, each VM has its own copy of cache.
afterAll
This flag is deprecated, instead use
globalPost
It is used to run commands after the job has finished. Currently only local directive is allowed, means that all the commands would be run on the same host on which HyperExecute CLI was run. Running commands in afterAll on HyperExecute VMs(remote commands) is not yet supported. Users will have access to all the artifacts when these commands would be run.
afterAll:
 local:
   commands:
   - stitch-artifacts.sh artifacts-directory
For instance you want to further process the artifacts and create a custom PDF. You can use afterAll for this purpose wherein custom commands can be invoked. Other use cases can be in case you :
- Want to run some commands after the job is finished.
- Want to run these commands from the same host from which hyperexecute-cli is run.
beforeAll
This flag is deprecated, instead use
globalPre
BeforeAll is used for running pre operations like discovery and payload_update. It can be executed either on local system or on hyperexecute beforeAll VM.
beforeAll:
  location: local/remote
  type: discovery/update_payload
  local:
    commands:
pip install -r requirements.txt
We can choose to run on local/remote(on HYP Vms) from the location command. Type can be either discovery/update_payload (type of operation to be performed) and commands will have all the commands that needs to be run for that operation.
afterEachScenario
The afterEachScenario flag is used to define tasks that should be executed after each test scenario. This can be particularly useful for cleanup activities, such as clearing cookies, resetting databases, or capturing logs, ensuring that each test scenario starts with a clean state. This flag allows you to specify a list of commands or scripts that will run sequentially after the completion of each scenario. This ensures that any necessary teardown steps are consistently applied, maintaining the integrity and isolation of your test scenarios.
afterEachScenario:
  - echo "Running a script"
  - pwsh run.test
buildConfig
This is used to manage hyperlink behavior based on test status. Here's a breakdown of the parameters within buildConfig:
-
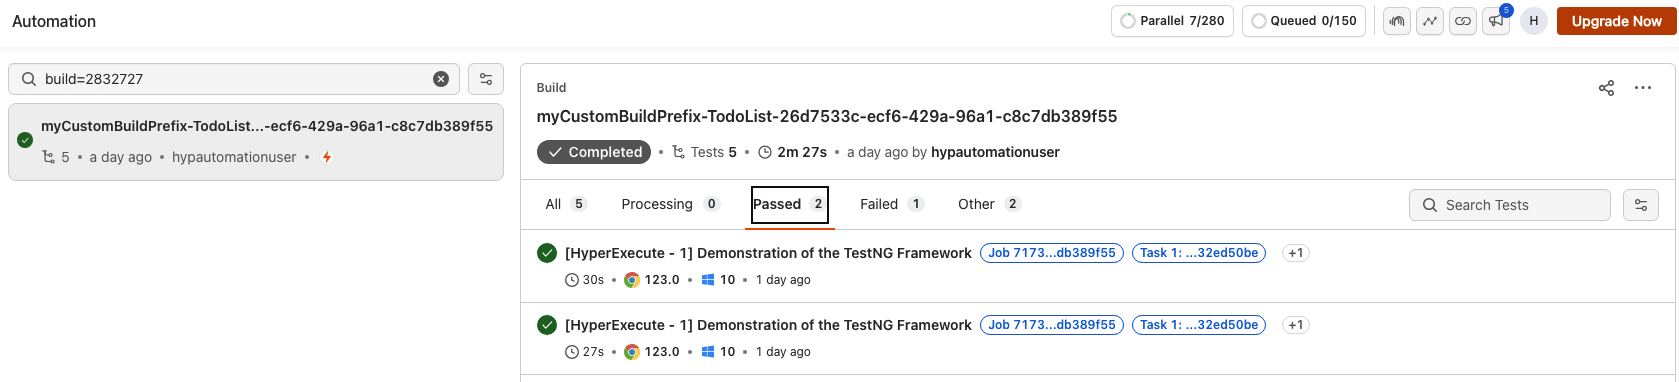
buildPrefix: This parameter sets a custom prefix for dynamically generated build names. The format employs ${name} as a placeholder, which will be replaced with a specific value during configuration. -
buildName: This parameter allows you to define a specific name for the build. Similar to buildPrefix, ${name} acts as a placeholder for a custom value.
buildConfig:
  buildPrefix: myCustomBuildPrefix-${name}
  buildName : "name=${name}"
The value for
${name}in the above command can be passed through the vars command either by the CLI as mentioned below or through YAML.
If you prefer to set buildPrefix and buildName values through the command-line interface (CLI), the following commands can be used:
To set buildPrefix:
--labels buildPrefix --vars "name=xyz"
To set buildName:
--labels buildName --vars "name=xyz"
These commands utilize --labels to specify the parameter being configured and --vars "name=xyz" to define the value to be replaced for ${name}.
Key Pointers
-
Build Configuration Handling:
If
buildConfigis not provided, then thebuild_idcolumn within the job table remains empty. When you specify thebuildConfig, it populates thebuild_idcolumn with the corresponding value. -
Build Configuration Precedence:
When both
buildConfigand thebuildcapability are defined,buildConfigtakes priority. -
Priority of Build Naming Parameters:
If both
buildConfig.buildNameandbuildConfig.buildPrefixare specified, preference is given tobuildPrefix. -
Association with Build Name:
Defining
buildNameassociates test results with the designated name, enabling organized tracking and management. -
Dynamic Build Creation:
Specifying
buildPrefixresults in the creation of a new build for each executed job. The build name format follows buildPrefix-{jobID} to ensure uniqueness. -
Compatibility of Build Naming Variables:
Both
buildPrefixandbuildNameare compatible with vars and can be used together or independently based on your requirements.
captureCSVResult
By enabling the boolean yaml directive captureCSVResult, you can get the statistics of the time taken by Selenium Commands run across the job. It will gather the time taken by the Selenium commands, calculate the aggregated info for the statistics like Average, 95, 99 percentiles etc and publish it in the form of a separate artifact.
captureCSVResult: true
Below mentioned custom Lambda hooks are also required to be added in the Selenium script: lambda-start-timer=<some_label> lambda-end-timer=<some_label> These custom lambda hooks are basically used to track the amount of time taken by the Selenium command.
Above performance stats artifact would be of the CSV format with headers as Label, Average, Min, Max, Median, P95, P99. Here is a brief information about these headers:
- Label: Identifier passed in the custom lambda hook to identify the Selenium command
- Average: Average time taken by the Selenium command across the whole job
- Min: Minimum time taken by the Selenium command across the whole job
- Max: Maximum time taken by the Selenium command across the whole job
- Median: Median of the time taken by the Selenium command across the whole job
- P95: 95th percentile of the time taken by the Selenium command across the whole job
- P99: 99th percentile of the time taken by the Selenium command across the whole job
Here is the sample code showing how we can use the above mentioned Lambda hooks:
((JavascriptExecutor) driver).executeScript("lambda-start-timer=t1");

  /* Add 5 items in the list */
  Integer item_count = 15;
  for (int count = 1; count <= item_count; count++)
  {
      /* Enter the text box for entering the new item */
      elem_new_item.click();
      elem_new_item.sendKeys("Adding a new item " + count + Keys.ENTER);
      Thread.sleep(2000);
  }
  Object t1 =  ((JavascriptExecutor) driver).executeScript("lambda-end-timer=t1");
  System.out.println(t1);
Note: t1 will denote the time taken by each selenium command between start and end.
matrixEnvPrefix
When we run a job in matrix mode, we set the keys with their resolved value as env variables in the scenario being run. The keys are not prefixed and hence, in some cases, we had found out that some variables like "os" can affect your test runs (for example in dotnet build commands). So, if one has an os key in matrix, it may affect dotnet build command if one doesn’t set the matrixEnvPrefix: true in yaml to have the "os" key of matrix available to us as `HE_ENV_os
dynamicAllocation
When we set dynamicAllocation true, the test cases are distributed among parallels at the runtime. This is valid in case of local test discovery. In this case, the parallels are utilised in the most optimised manner.
dynamicAllocation: true
collectLocalGitData
It is a default flag which captures the git information of your repository that you have used to trigger the job in HyperExecute which are later utilized in AI-based Root Cause Analysis (RCA) generation. In order to turn off the collection of any git information after executing your HyperExecute jobs, you can define the value false.
collectLocalGitData: false,
background
This feature allows you to run long-running Application Server tasks like "running a webapp" or a "my-sql database server" in the background.
To enable this feature from the YAML file you can use either of the below mentioned methods:
1. Using backgroundDirectives
backgroundDirectives:
  shell: bash
  commands:
    - name: YOUR_SERVICE_NAME
      command: npx static-server
    - name: Database
      command: mysql-server
It contains the following attributes:
-
The
shellproperty defines the terminal it should use to run the background service. -
The
commandproperty specifies the command to be executed in the background. -
The **
name**property specifies the name of your Background Service.
2. Using background
background:
  - npx static-server
  - mysql-server
To learn more about it, refer to the Background Service page.
vars
This method allows you to name your variables. This will make the process of modifying the YAML file easier. You can use these variables in the YAML file as ${your_variable_name}. Below example shows how to use vars keyword and how to use the variables define under it at other places in yaml.
vars:
 test: e2e
 framework: net5.0
 runtime: win-x64
 testPath: ${test}\bin\build\${framework}\${runtime}
preDirectives:
 Commands:
  - echo ${framework}
You can also use the vars method using the CLI.
tunnel
Indicates whether to enable a tunnel for accessing your applications which are locally hosted or behind a firewall. The cli will launch a tunnel as sub process if tunnel is set to true
tunnel: true
tunnelOpts
The options to use when running the tunnel.
| Options | Type | Description |
|---|---|---|
args | List of strings | The arguments to pass to your tunnel. For a list of arguments checkout our tunnel flags |
preOnly | Boolean | Should the tunnel be enabled for only the pre step. Default false. |
postOnly | Boolean | Should the tunnel be enabled for only the post step. Default false. |
global | Boolean | Should the tunnel be enabled for all the steps? Default true. |
systemProxy | Boolean | Should the tunnel be OS system wide? Default false. |
checkTunnelOnFailure | Boolean | Check tunnel on failure adds a check on our system to check the tunnel connection if a test fails and the tunnel is set to true. This option will retry the test 2 times if tunnel connection is flaky. |
--expose | This flag takes arguments in the form of service_name:host_name_host_port. When you trigger a test, there are environment variables exposed in the machine with the variable name :- 1. service_name_PROXY_HOST 2. service_name_PROXY_PORT |
tunnel: true
tunnelOpts:
	args:
	 - "--verbose"
tunnel: true
tunnelOpts:
	preOnly: true
  #------OR------
	postOnly: true
  #------OR------
	global: true
  #------OR------
	systemProxy: true
pre:
  - echo %LT_PROXY_PORT%
  - echo %LT_PROXY_HOST%
  - echo %MYSQL_PROXY_HOST%
  - echo %MYSQL_PROXY_PORT%

tunnel: true
tunnelOpts:
  args:
    - "--expose mysql:localhost:3306"
tunnelNames
Specify the list of already running tunnel names which you want to use for accessing your applications which are locally hosted or behind a firewall.
tunnelNames: ["lambdatest_tunnel"]
testRunnerExecutor
When utilizing the testRunnerCommand to execute a job on a Windows Virtual Machine, the default behavior is to run the command in PowerShell. However, in situations where test names include special characters, you may encounter an error like below.
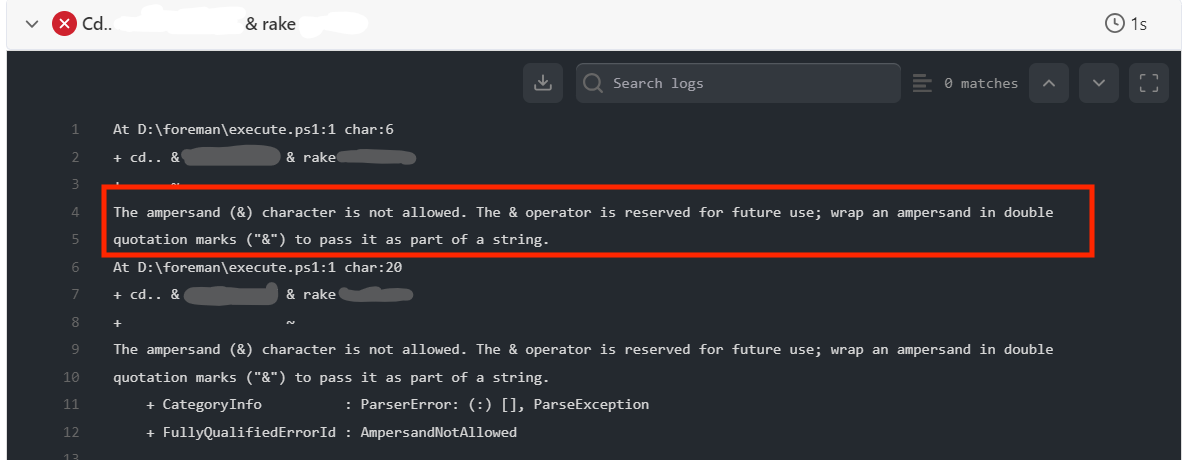
To address this, it is necessary to include this specific flag to switch the test execution from powershell to the command line as intended.
testRunnerExecutor: bat
workingDirectory
The working directory specifies the location of the directory in which all test discovery and execution commands will run, as well as the location of any files or directories that are created as a result of the command execution. If the workingDirectory option is not specified, then the working directory will be the directory where the YAML file is located.
framework:
  name: maven/testng
  discoveryType: method
  workingDirectory: src/main
  flags:
    - "-Dplatname=win"
syncStart
By default, parallel tasks in autosplit or matrix mode begin execution as soon as the VM is allocated. However, in certain situations (e.g., benchmarking or comparative analysis), you may want all VMs to start tasks at the same time.
To support this, HyperExecute provides the syncStart directive in the job YAML.
execution:
  syncStart: true
- When
syncStartis enabled, the job ensures that all VMs are allocated and ready before starting scenario execution i.e. tests. - The system waits for up to 15 minutes for all required VMs to become available.
- If all VMs are allocated within this window → tasks start together.
- If some VMs are still pending after 15 minutes → the job proceeds with the allocated VMs.
This feature is supported only in
autosplitandmatrixmode and not in hybrid mode
