Integrate qTest with HyperExecute
qTest is a comprehensive test management tool designed for Project Management, Bug Tracking, and Test Management. It embraces a centralized test management approach, facilitating seamless communication and accelerating task development across QA teams and stakeholders.
This document details the seamless integration between HyperExecute and qTest, enabling you to run your automated tests on a variety of devices and real devices provided by TestMu AI.
Prerequisites
- You must have Python 3.6, Apache Maven, and Git installed on your local machine.
- Download and extract the agentctl-[version]-mac-x64-full.tgz file to a desired installation directory.
- Login to qTest Manager as an administrator and access the Resources page.
- Expand the APIs and SDK sections.

- Navigate to the agentctl directory and start the host by running the following command:
./agentctl start
-
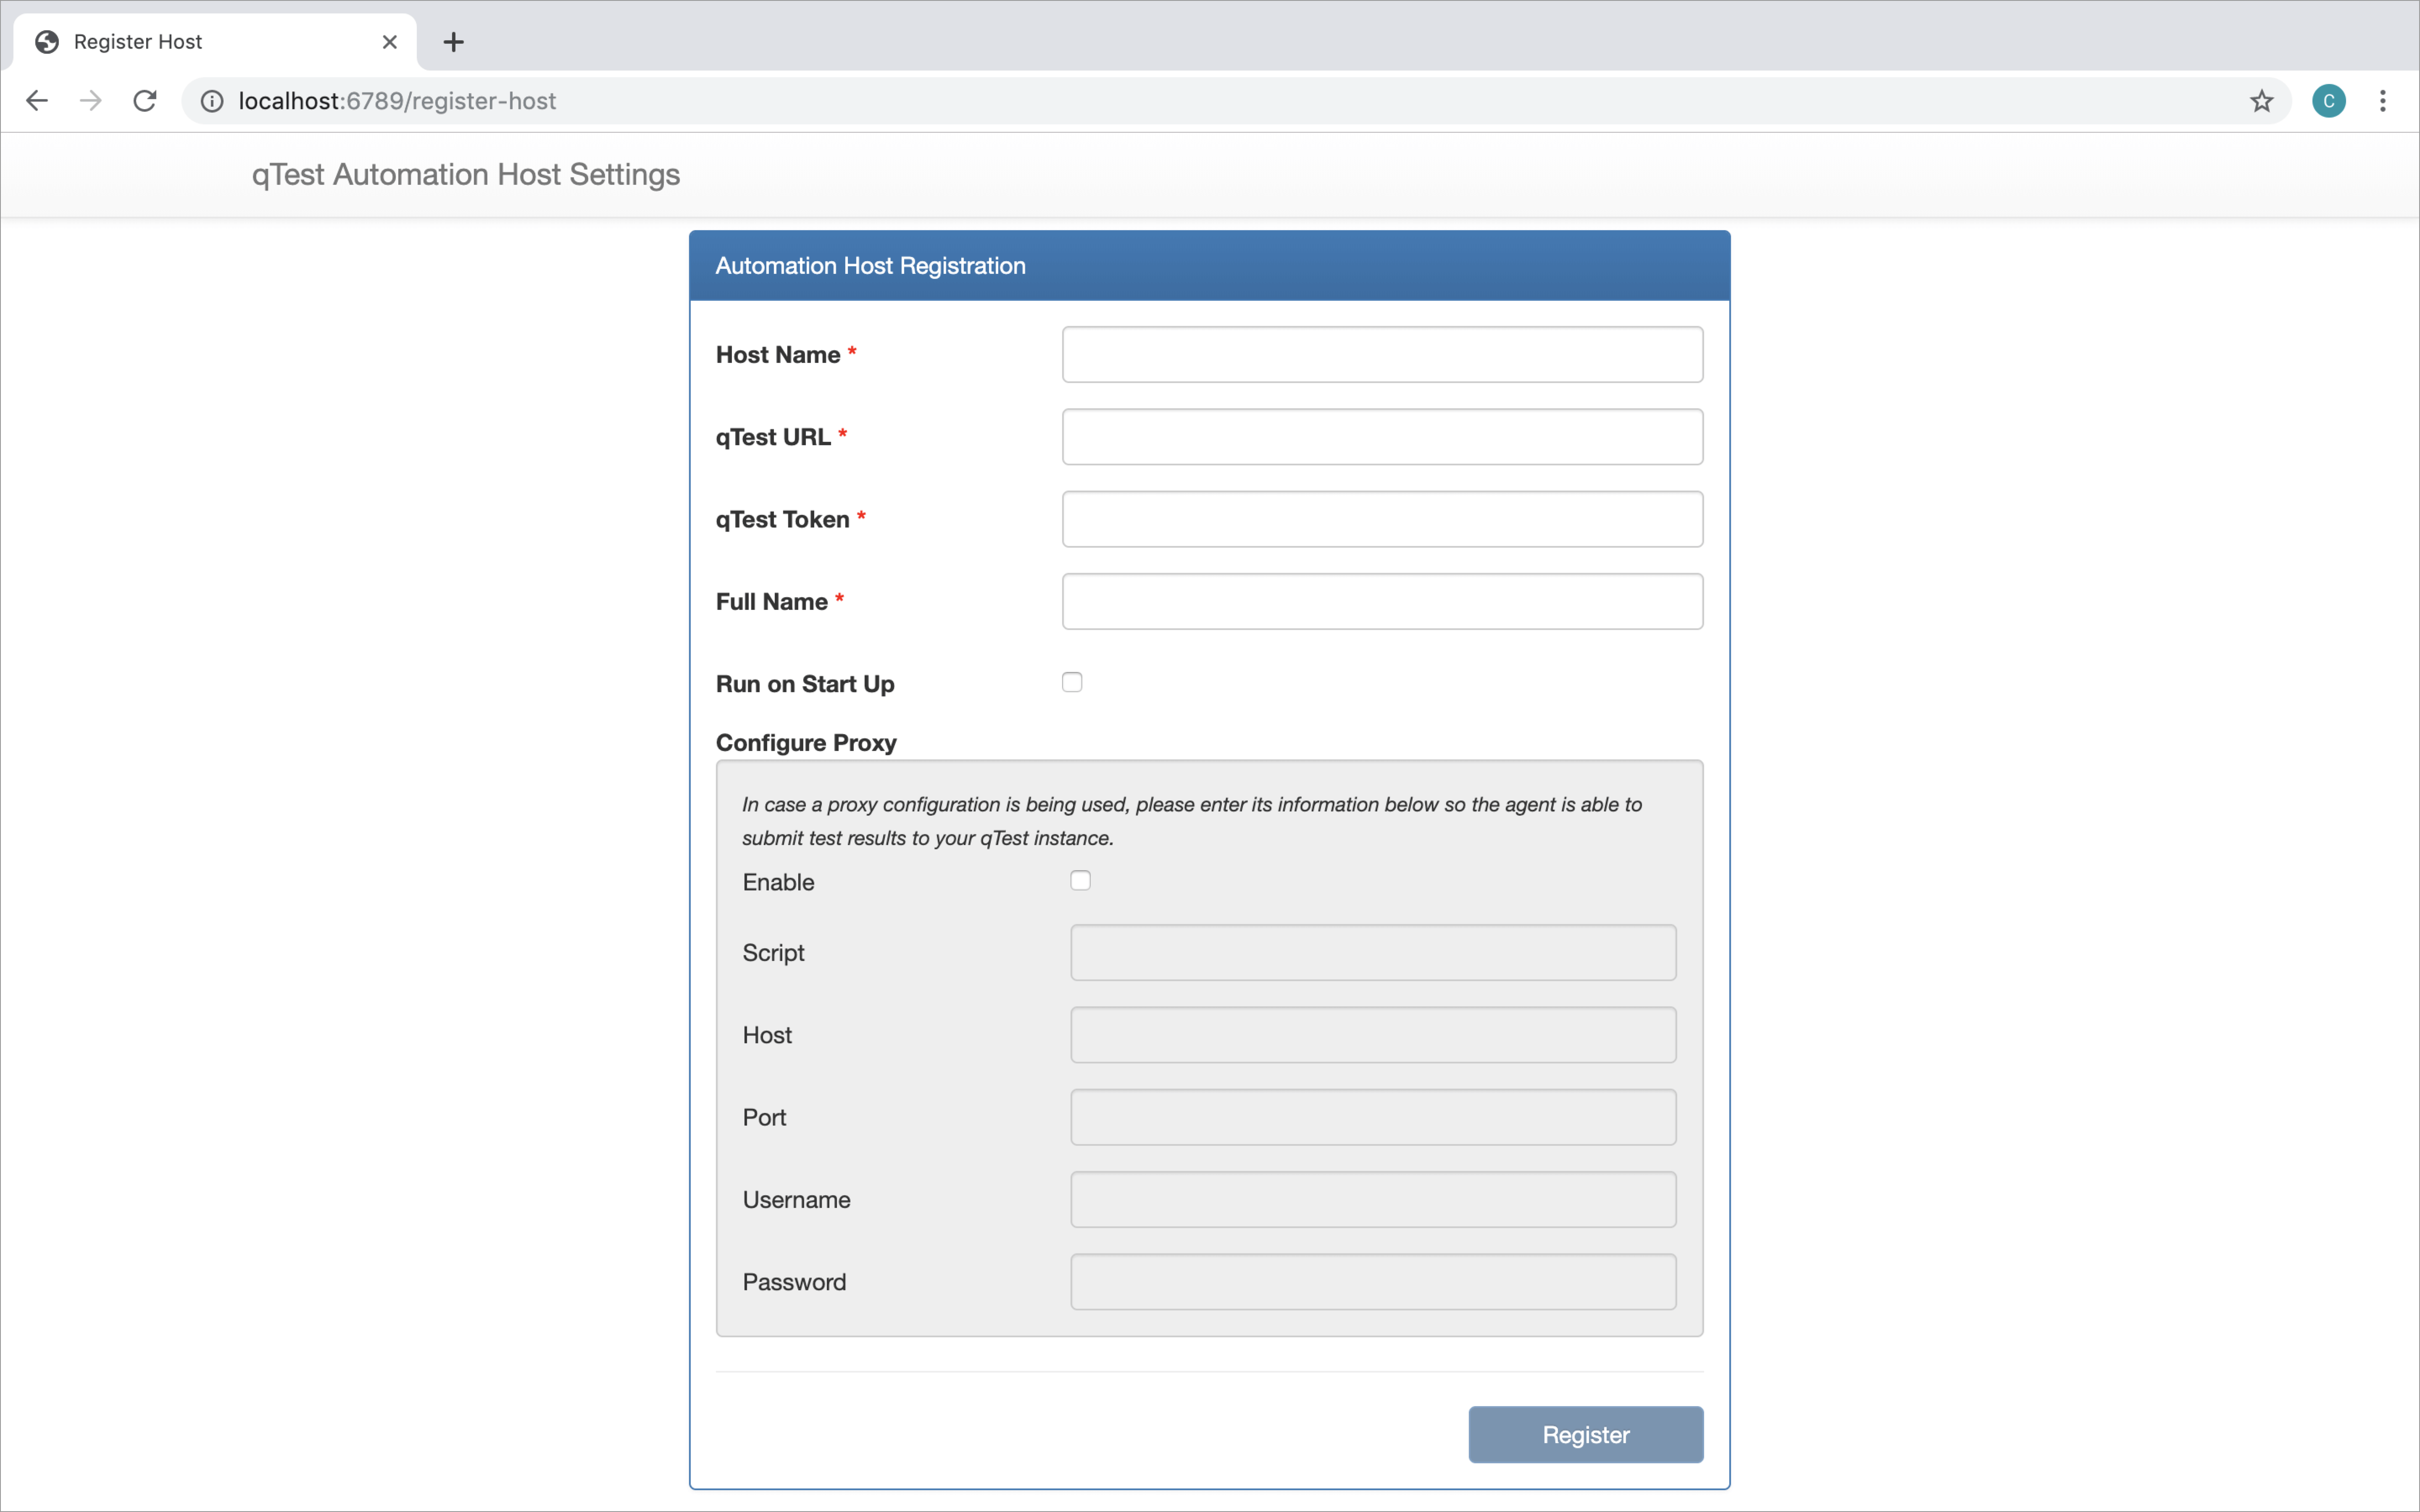
Visit
http://localhost:6789, add your details and click on the Register button.- Host Name : You have to enter any name that will be assigned as the host name.
- qTest URL : Enter the URL of your qTest Manager page. For e.g.
https://aman.qtestnet.com - qTest Token : Enter the Token you have copied in the above step.
- Full Name : Mention your name here.
Step 1: Setup your Shell Agent
- This repository is used to pull tests from GitHub, run an Apache Maven build of JUnit tests, parse the results, and automatically upload the test results to qTest Manager.
Download or Clone the code for the Shell Script Automation Host Feature from the TestMu AI GitHub repository to run the tests on the HyperExecute.
 View on GitHub
- You can use your own project to configure and test it. For demo purposes, we are using the sample repository.
Download or Clone the code sample for the JUnit framework from the TestMu AI GitHub repository to run the tests on the HyperExecute.
View on GitHubDownload the HyperExecute CLI
The CLI is used for triggering the tests on HyperExecute. It is recommend to download the CLI binary on the host system and keep it in the root directory of the suite to perform the tests on HyperExecute.
You can download the CLI for your desired platform from the below mentioned links:
NOTE : In case of macOS, if you get a permission denied warning while executing CLI, simply run
chmod u+x ./hyperexecuteto allow permission. In case you get a security popup, allow it from your System Preferences → Security & Privacy → General tab.
Step 2: Update the Configuration Files
-
Go to the
conf.jsonfile and make the following changes:- git_url : The shell script uses the url to clone a repository and send pull requests every time it runs if -g input is used.
- local_repository : The folder containing the test cases. The shell script will use this to know where to run the maven build. Make sure to place this folder in the same directory as the the python and shell scripts.
- qtest_api_token : The token used to authorize the connection to qTest Manager.
- qtest_url : The personal url that is used to access QASymphony API.
{
  "git_url": "<YOUR_PROJECT_GItHUB_URL>",
  "local_repository": "<RELATIVE_PATH_OF_THE_PROJECT>",
  "qtest_api_token": "<TOKEN_ACQUIRED_IN_PREREQUISITES>",
  "qtest_url": "<YOUR_QTEST_URL>"
}
- If you are macOS user, go to the
run.shfile or if you are a windows user go to therun.batfile and instead ofmvncommand, you need to pass the below mentioned command:
./hyperexecute --user undefined --key undefined --config RELATIVE_PATH_OF_YOUR_YAML_FILE
Refer the documentation to understand how to get your Username and Access key.
Step 3: Setup the Automation
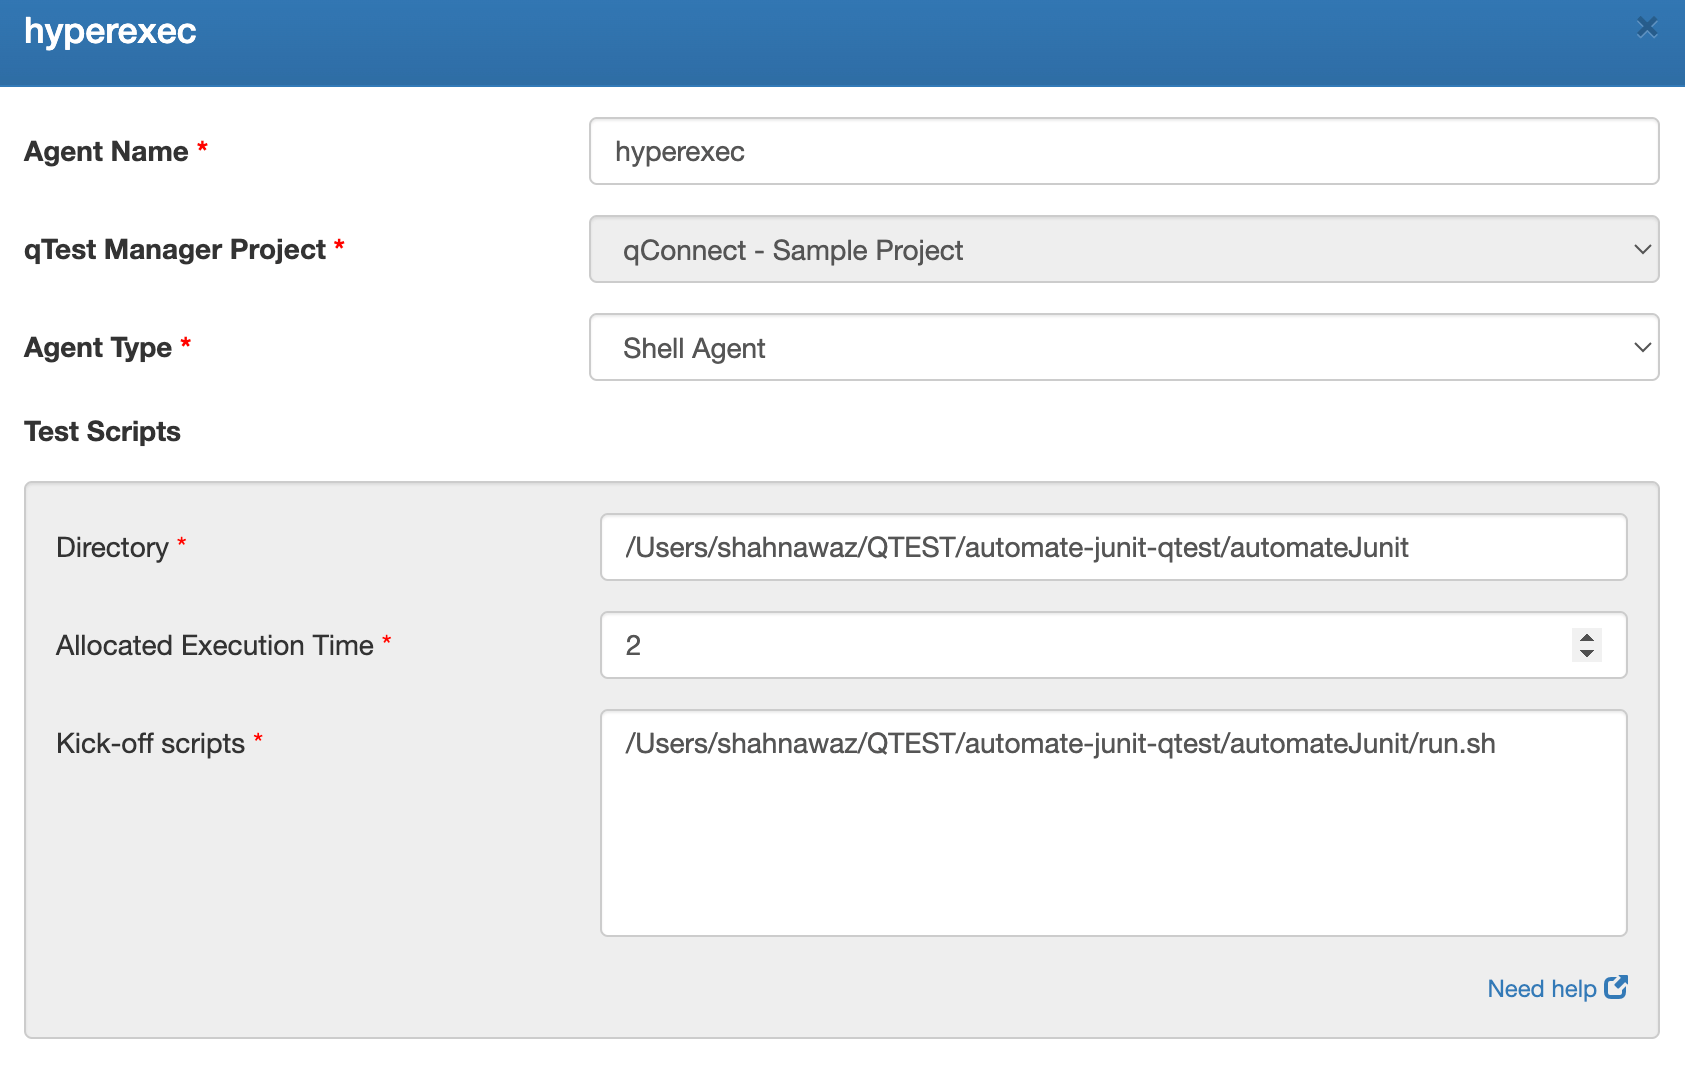
- Navigate to your Automation Host
http://localhost:6789/homeand click on the Add button to add a new agent.

-
A popup will appear to create an agent, fillup the following details:
- Agent Name : You can give any name to your agent.
- qTest Manager Project : Choose your project inside which you want to create this build.
- Agent Type : Choose Shell Agent as your agent type.
- Directory : Path of the directory containing your scripts and shell agent.
- Allocated Execution Time : Amount of time you expect the script to take to execute in minutes
- Kick-off scripts : The file path to your shell script. This shell scripts takes in two inputs, one for using git and the second for updating your current test cycle.
Step 4: Execute the Shell Script
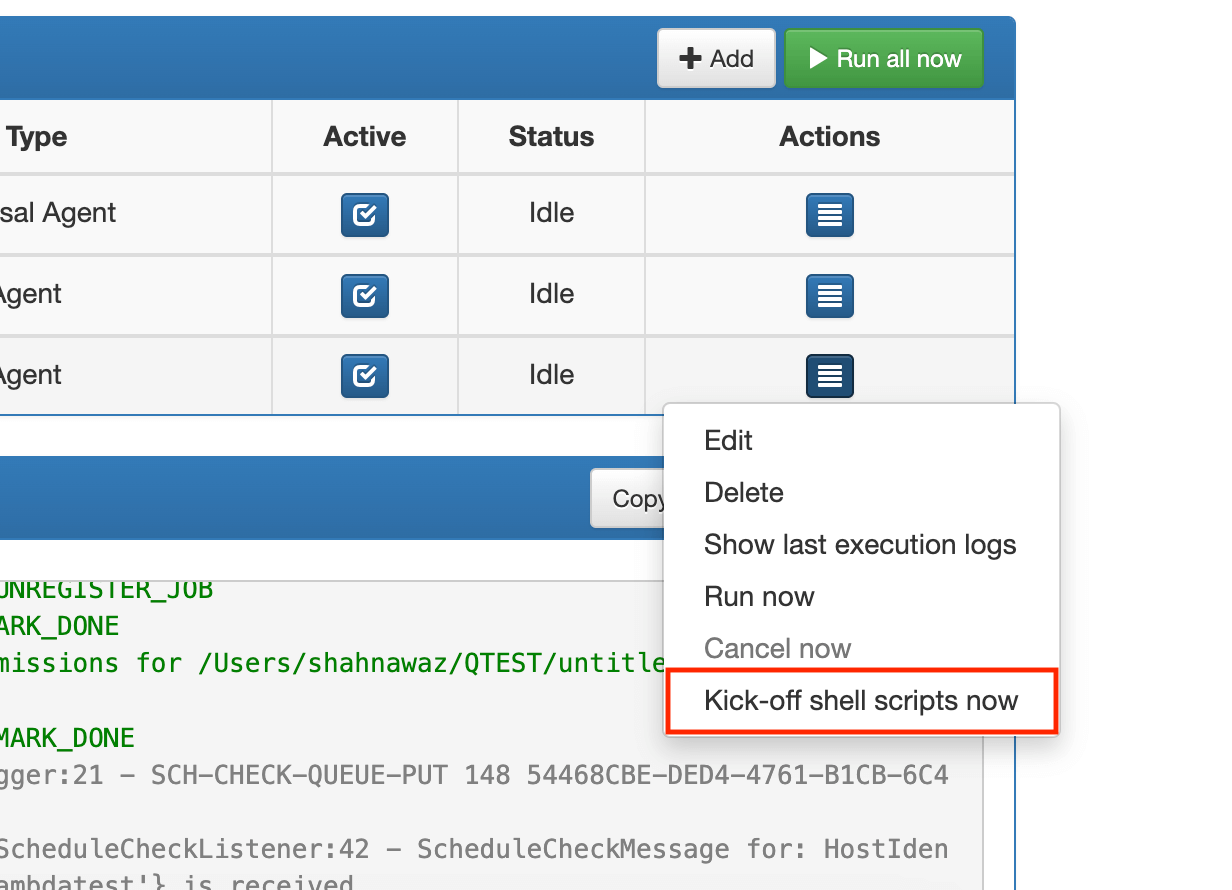
- Click on the Actions button > Kick-off shell scripts now button to start the shell script. This will upload all of the tests cases to qTest.
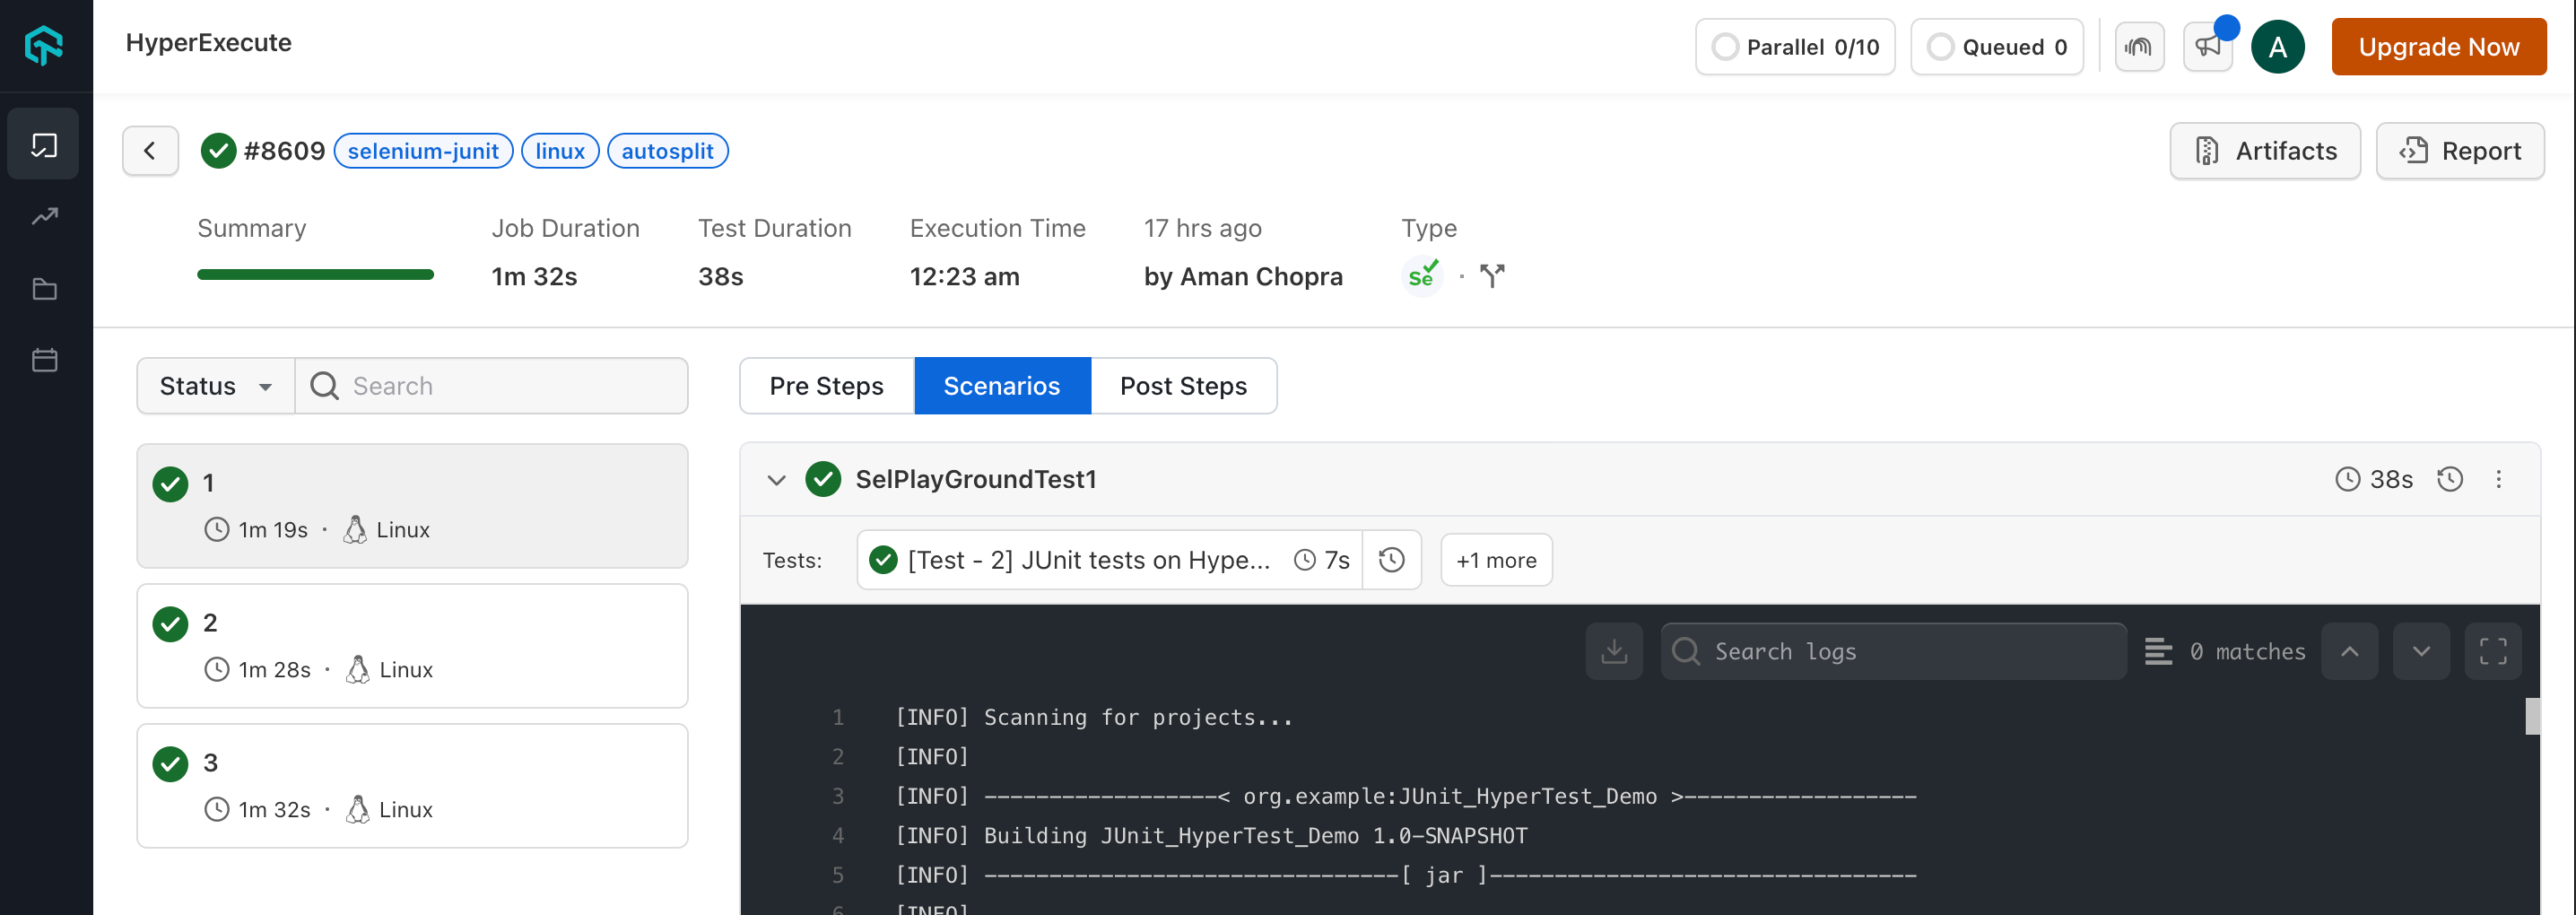
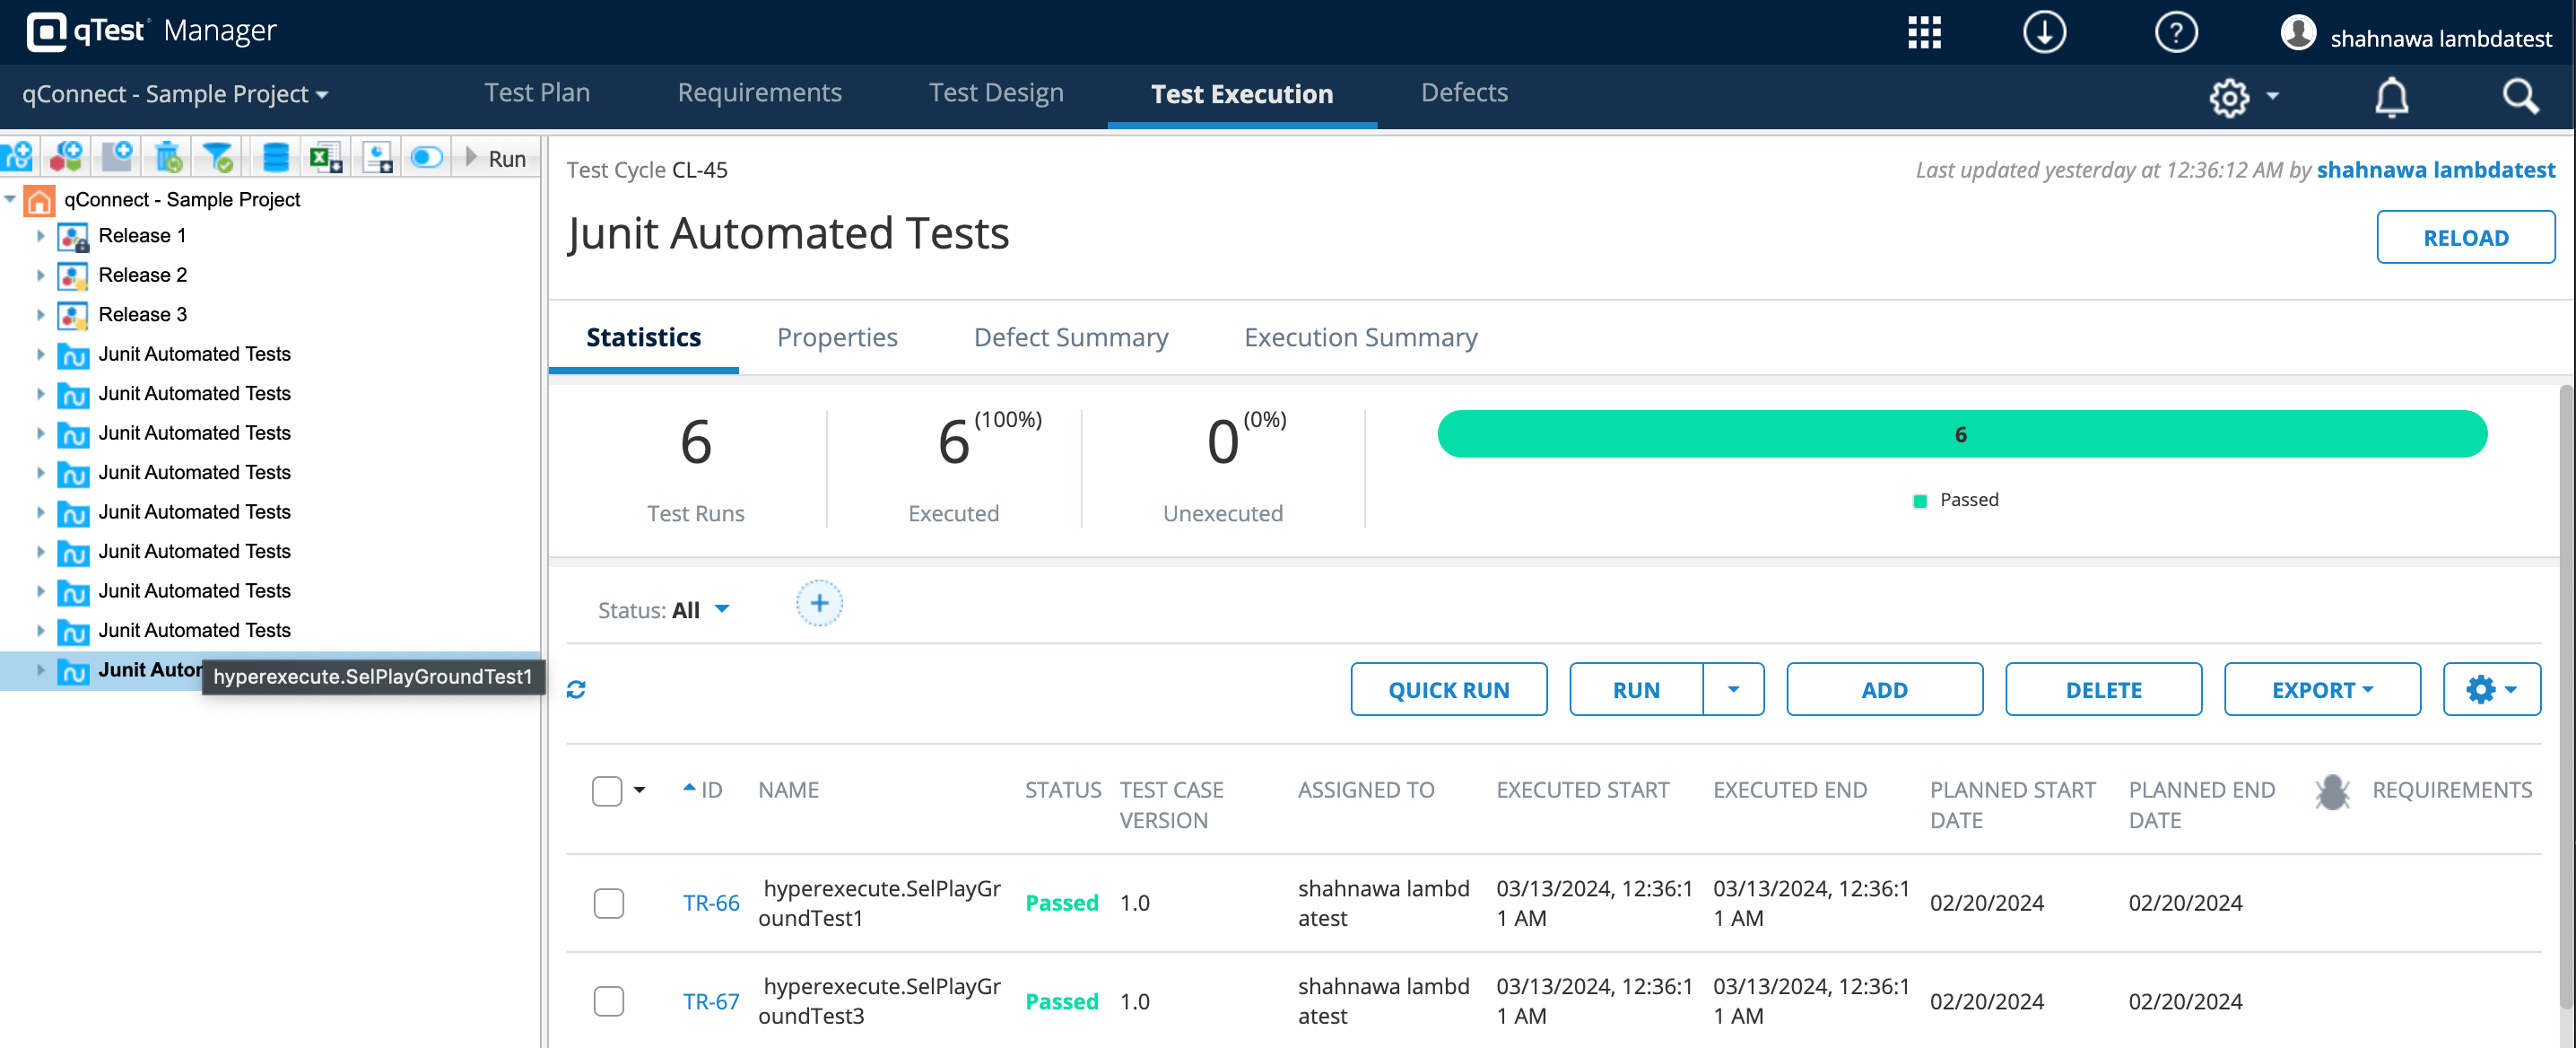
Step 5: Monitor Your Tests
- Login into qTest Manager, go to the Test Execution tab, and there should be a test cycle under your project called Junit Automated Tests
- Click on the test cycle and it should show all of the tests that were run through the maven build and their statuses.
- Visit the HyperExecute Dashboard and check your Job status.