SmartUI Testing in HyperExecute using Playwright
This documentation will guide you step-by-step to execute the SmartUI tests on the HyperExecute platform using Playwright.
Prerequisites
- Your TestMu AI Username and Access key
- HyperExecute CLI in order to initiate a test execution Job .
- Setup the Environment Variable
- HyperExecute YAML file which contains all the necessary instructions.
- To run SmartUI tests, you need to have a Baseline Image and a Comparison Image. A baseline image is the reference image with which you want to compare. You can either upload this image from your computer or take a screenshot from your browser.
After creating the project, you will get your PROJECT_TOKEN. You need to keep this project token safe as it will be used in the further steps below.
Step 1: Configure Your Test Suite
You can use your own project to configure and test it. For demo purposes, we are using the sample repository.
Download or Clone the code sample for the Playwright JavaScript from the TestMu AI GitHub repository to run the tests on the HyperExecute.
 View on GitHub
If you are using your own project, make sure you update the CDP endpoint in your tests file.
By setting up the CDP endpoint, you establish the communication channel between your tests and the browser nodes, enabling effective test distribution and execution.
wsEndpoint: `wss://cdp.lambdatest.com/playwright?capabilities=${encodeURIComponent(JSON.stringify(capabilities))}`
Configure the desired capabilities based on your test requirements. For example:
const capabilities = {
  'browserName': 'Chrome', // Browsers allowed: `Chrome`, `MicrosoftEdge`, `pw-chromium`, `pw-firefox` and `pw-webkit`
  'browserVersion': 'latest',
  'LT:Options': {
    'platform': process.env.HYPEREXECUTE_PLATFORM,
    'build': 'Playwright SmartUI Build',
    'name': 'Playwright SmartUI Test',
    'user': process.env.LT_USERNAME,
    'accessKey': process.env.LT_ACCESS_KEY,
    'network': true,
    'video': true,
    'console': true,
    'smartUIProjectName': process.env.SMARTUI_PROJECT || 'SmartUI-PW',
    'smartUIBaseline': true
  }
}
You can also use dev and beta browser versions. To generate capabilities for your test requirements, you can use our inbuilt 🔗 Capabilities Generator.
Step 2: Setup the CLI in your Test Suite
After cloning / downloading the sample repo, you need to setup the CLI and the environment variables.
Download the HyperExecute CLI
The CLI is used for triggering the tests on HyperExecute. It is recommend to download the CLI binary on the host system and keep it in the root directory of the suite to perform the tests on HyperExecute.
You can download the CLI for your desired platform from the below mentioned links:
Setup Environment Variable
Now, you need to export your environment variables LT_USERNAME and LT_ACCESS_KEY that are available in the TestMu AI Profile page.
Run the below mentioned commands in your terminal to setup the CLI and the environment variables.
- Linux / MacOS
- Windows
export LT_USERNAME="undefined"
export LT_ACCESS_KEY="undefined"
set LT_USERNAME="undefined"
set LT_ACCESS_KEY="undefined"
Step 3: Configure YAML in your Test Suite
Configure your YAML file as per your use cases using key value pairs.
In this sample YAML file, we have mentioned:
- version of the YAML file
- Timeouts for executing your project
- Pre command
- and other necessary YAML Parameters
---
version: 0.1
globalTimeout: 150
testSuiteTimeout: 150
testSuiteStep: 150

runson: win

retryOnFailure: true
maxRetries: 1

concurrency: 1

env:
  CACHE_DIR: m2_cache_dir

# Dependency caching for Windows
cacheKey: '{{ checksum "pom.xml" }}'
cacheDirectories:
  - ${CACHE_DIR}

matrix:
  classname: ["pw-smartui.js"]

pre:
  # install playwright version to be used.
  - npm install playwright@1.42.0 --save-exact

testSuites:
  - node hooks/pw-smartui.js

jobLabel: ['HYP', 'Playwright' 'SmartUI']
Step 4: Execute your Test Suite
NOTE : In case of MacOS, if you get a permission denied warning while executing CLI, simply run
chmod u+x ./hyperexecuteto allow permission. In case you get a security popup, allow it from your System Preferences → Security & Privacy → General tab.
Run the below command in your terminal at the root folder of the project:
./hyperexecute --config RELATIVE_PATH_OF_YOUR_YAML_FILE
OR use this command if you have not exported your username and access key in the step 3.
./hyperexecute --user undefined --key undefined --config RELATIVE_PATH_OF_YOUR_YAML_FILE
Step 5: Monitor the Test Execution
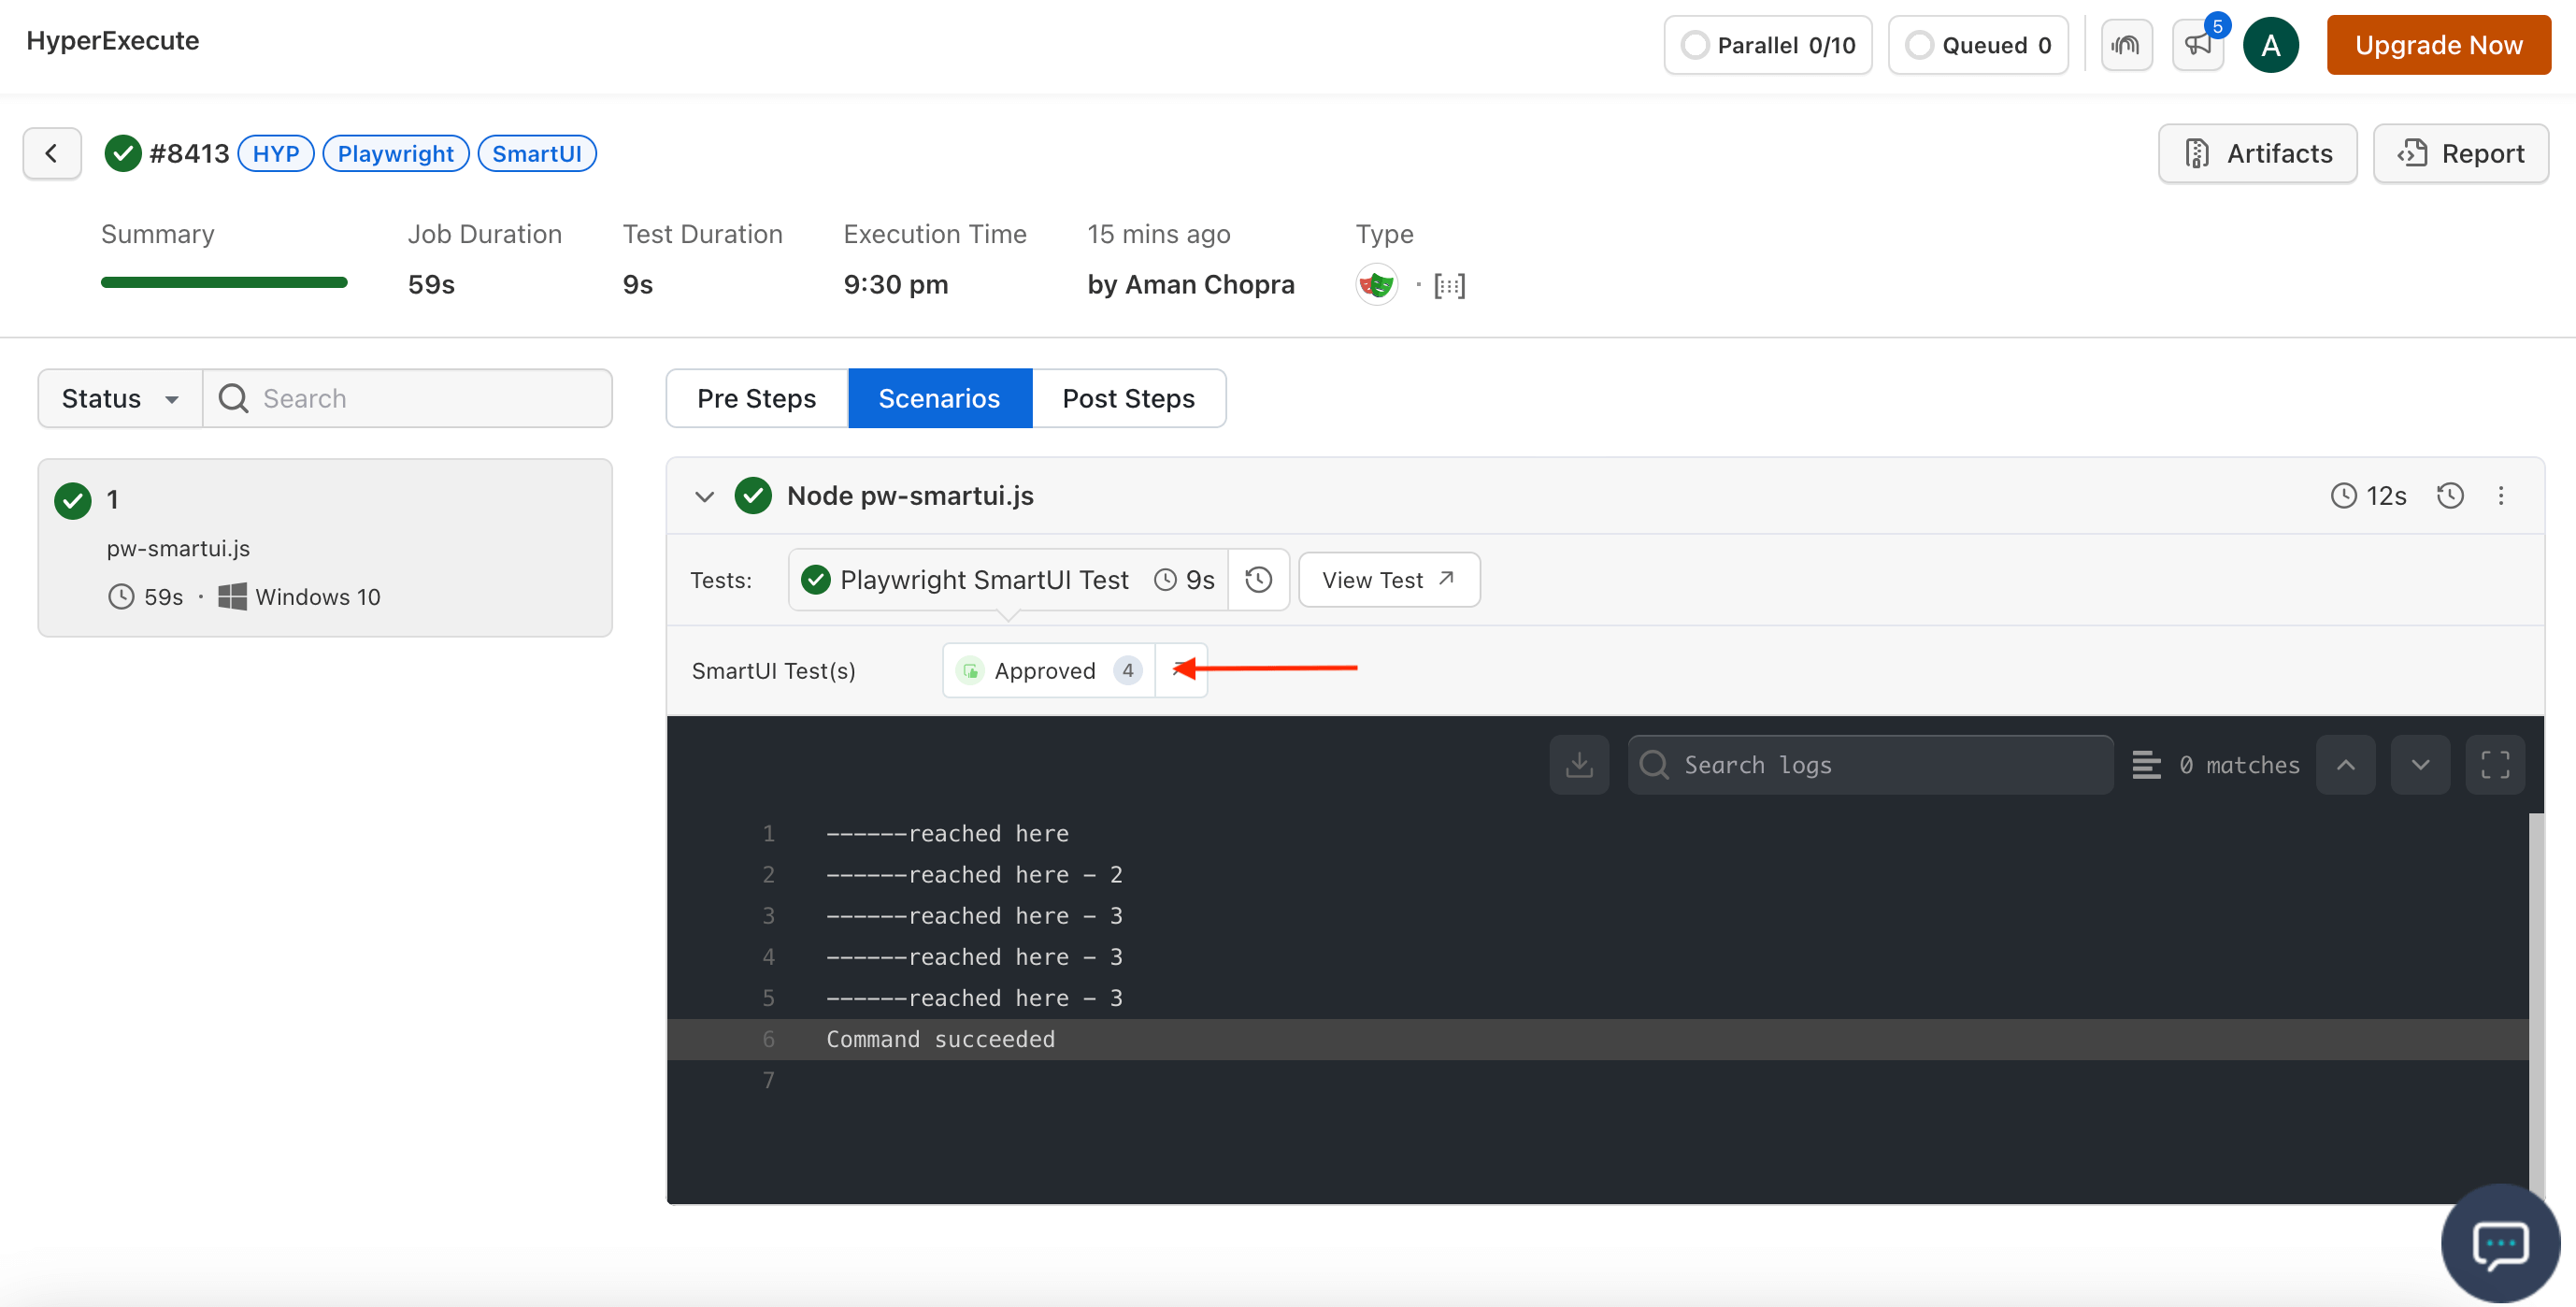
- Visit the HyperExecute Dashboard and check your Job status. Click on the Approved button.

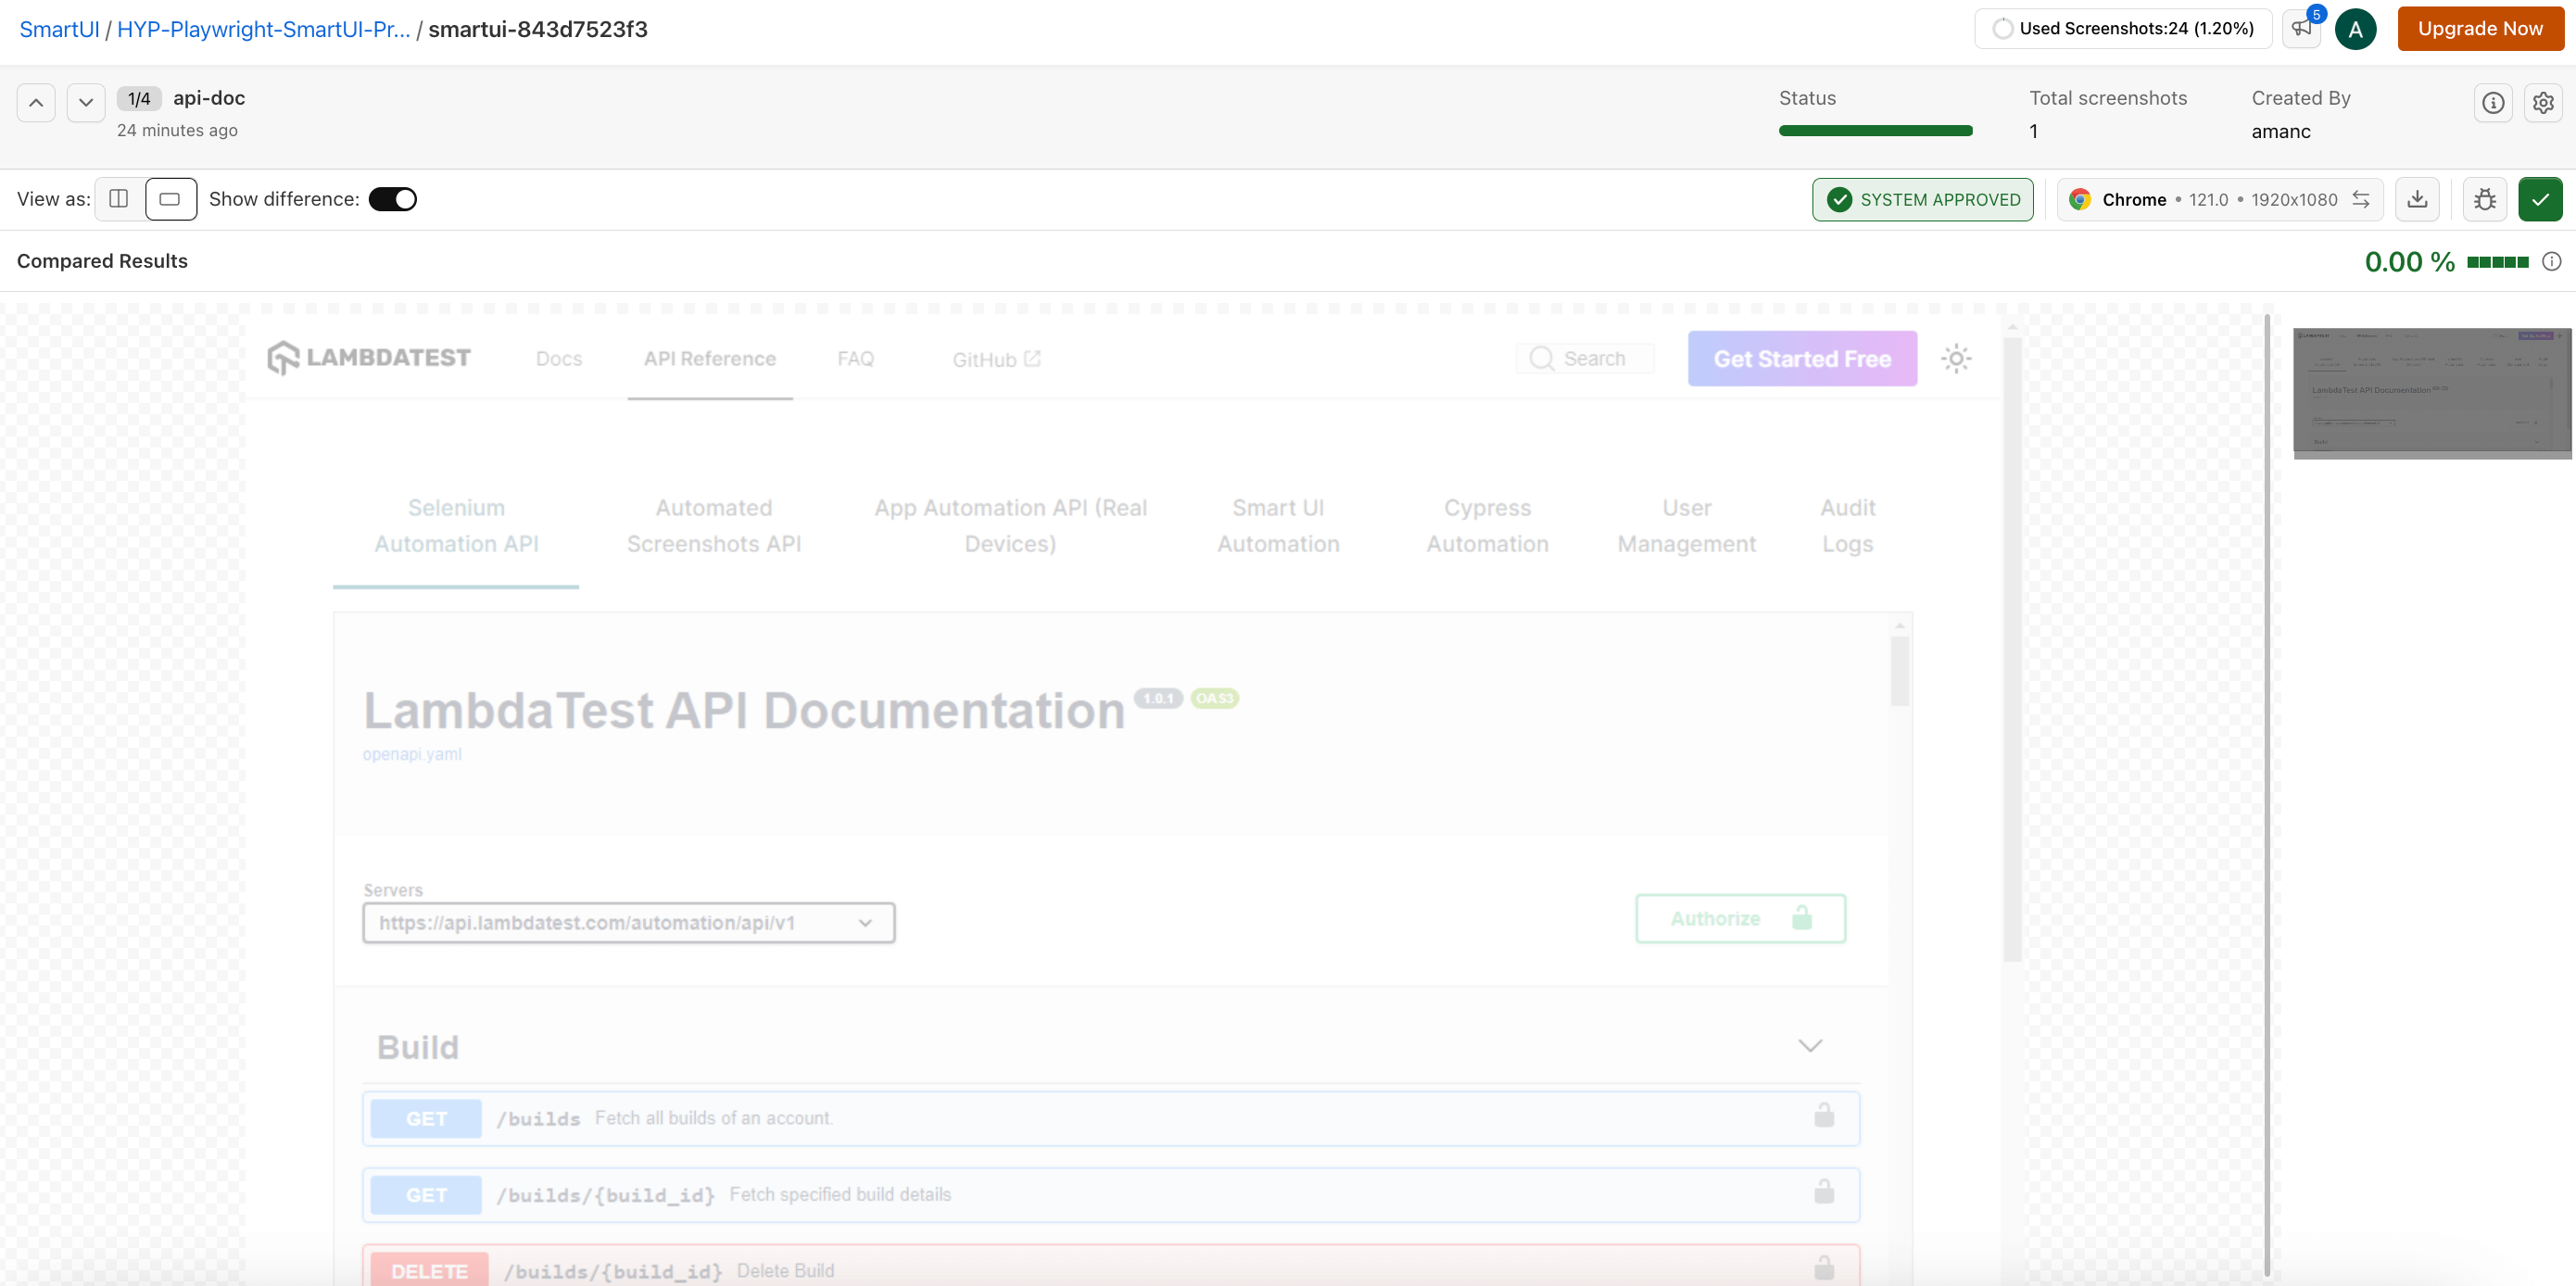
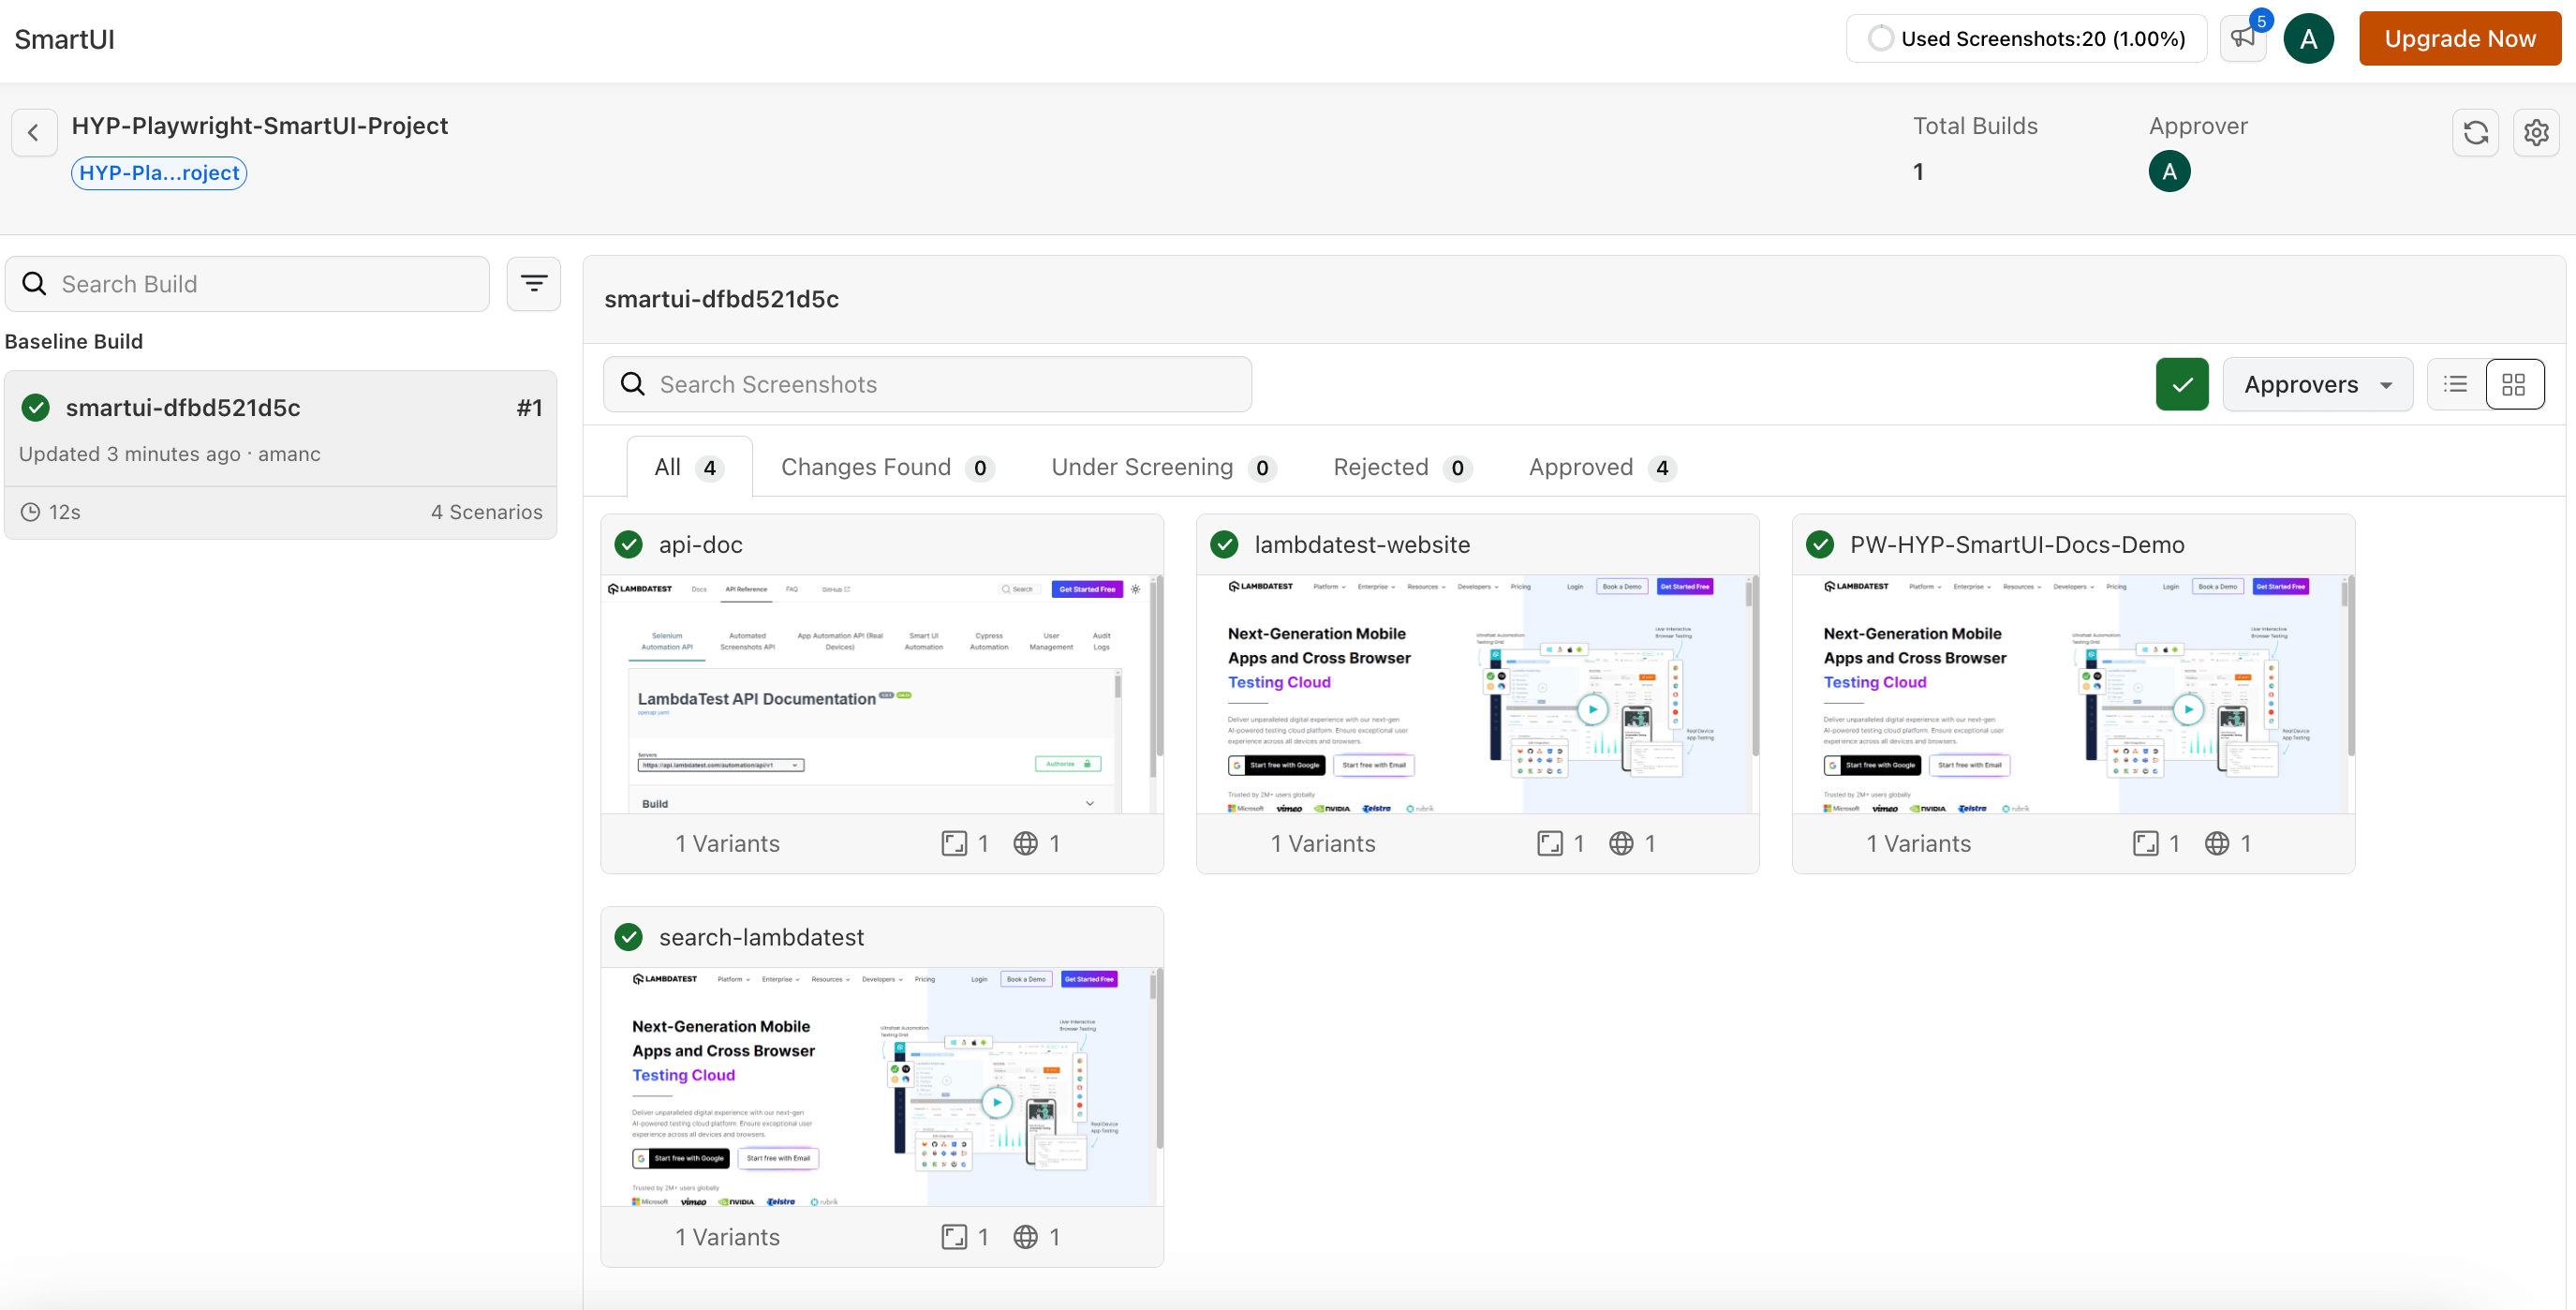
- This will redirect you the SmartUI dashboard where you can see all the images you have pushed for the testing.
-
Now you can make the changes in the UI as per your requirement and trigger the Job once again.
-
Again click on the Apprved button again.
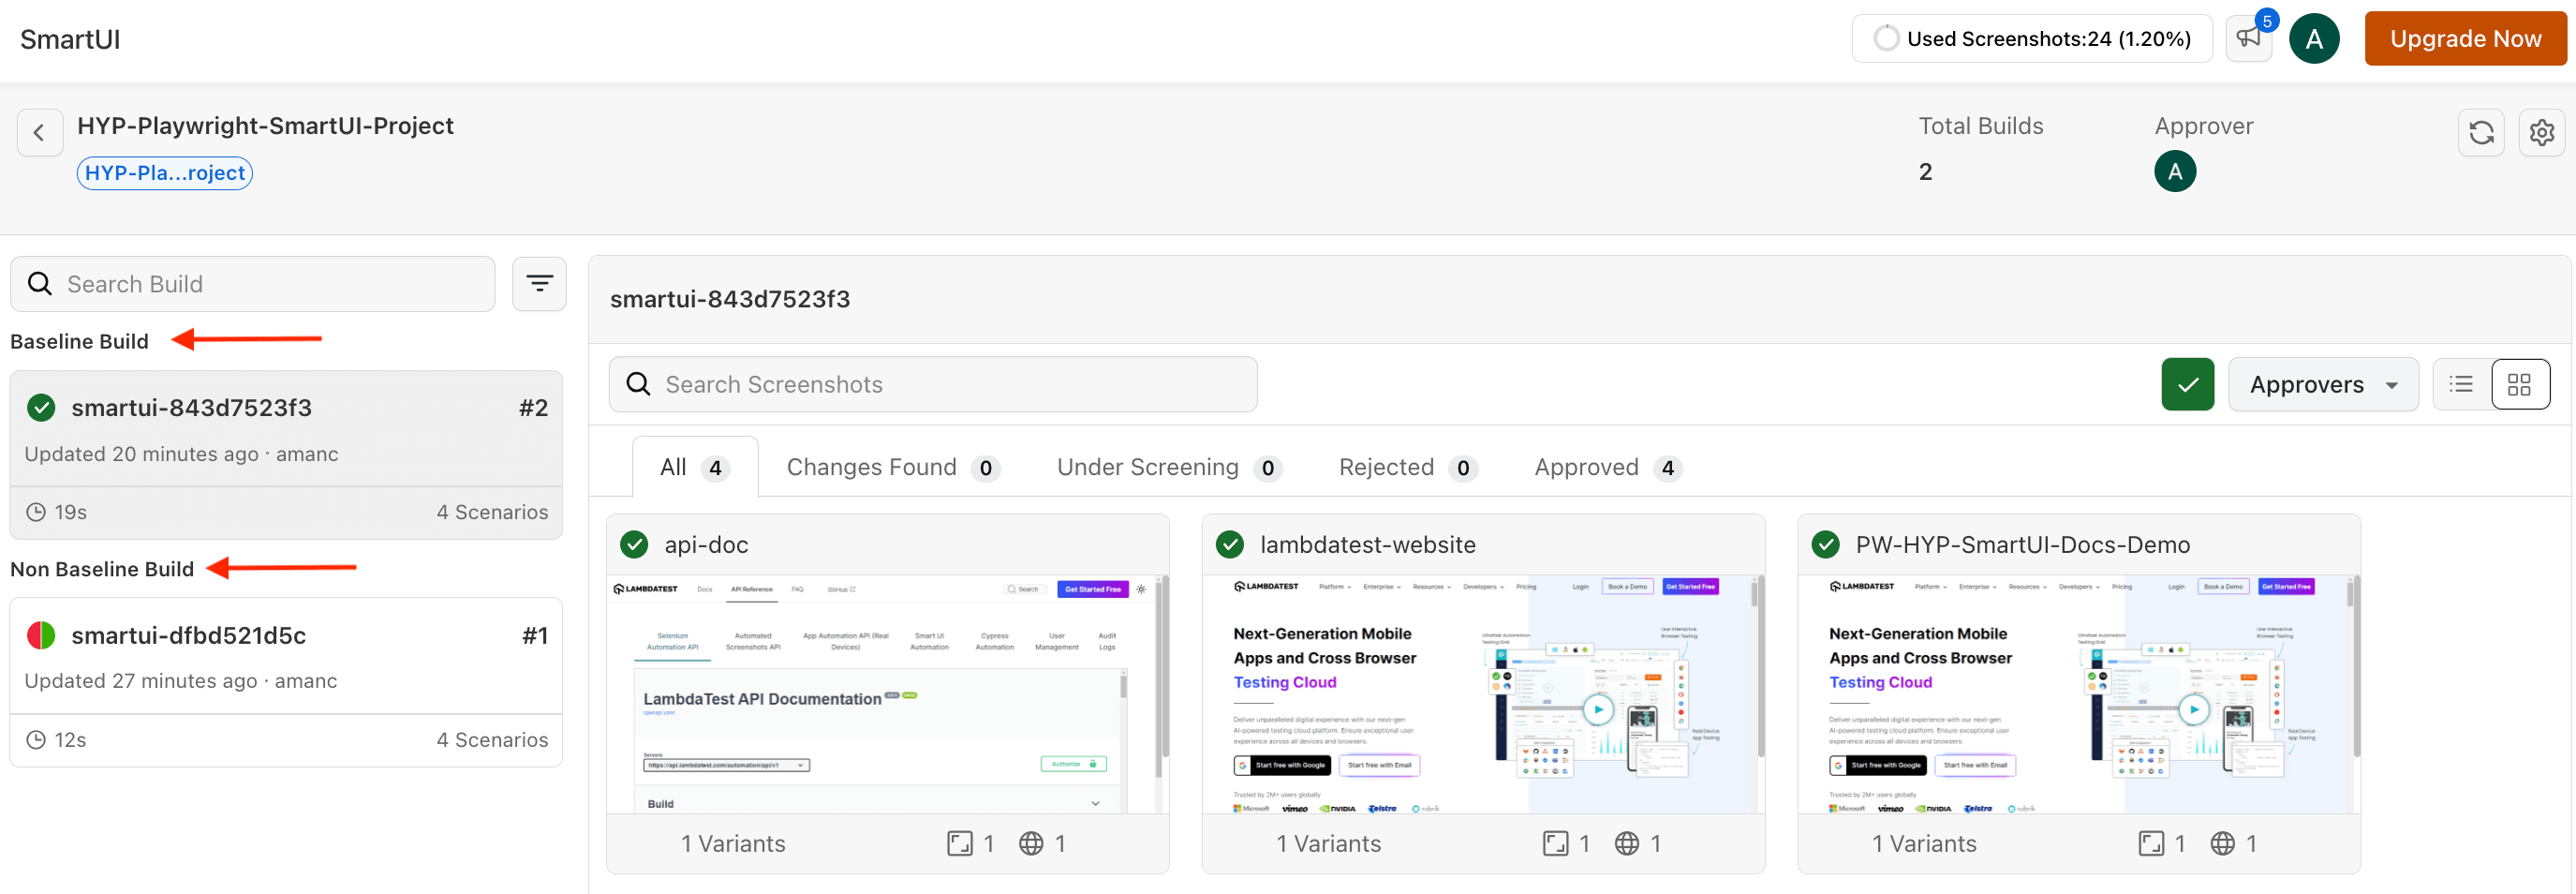
- Now, you will find two builds in your dashboard. One will be the Baseline Build and the other one will be the Non Baseline Build
-
Open any screenshot from the Non Baseline Build, and you can see the comparison between the two screenshots, i.e. the Baseline Image and the Non Baseline Image.
-
You can now approve or reject the changes directly from the dashboard as well.