Drone CI Integration with TestMu AI
Drone CI is one of the most popular modern open-source CI/CD tools. It not only provides a continuous integration with your projects but also provides a distributed CI/CD pipeline, which is not possible with some other tools like Jenkins. So Drone is the first choice for many teams as it is a purely distributed, cloud-native, DevOps friendly, team-oriented, and highly scalable open-source CI/CD tool.
TestMu AI now integrates with Drone CI to boost your go-to-market delivery. You can perform automated cross-browser testing with TestMu AI to ensure seamless code render through an online Selenium grid. TestMu AI provides 3000+ real browsers running through machines, on the cloud. You can perform automation testing in parallel with TestMu AI’s Selenium grid which in turn can help you to drastically trim down your test cycles.
Prerequisites For Integrating Drone CI With Our Online Selenium Grid
In order to perform your tests with TestMu AI, you would need the below things to be already set up:
-
You need to get a VPN setup from TestMu AI as Drone is not publicly accessible. Please contact our customer support or mail us at support@testmuai.com.
-
Some Global Dependencies, such as:
-
A Git or GitHub repository on which you want to activate the CI pipeline
-
You need to download and install node.js and node package manager or npm. Use the below command to install node.js with homebrew.
$ brew install node- If already installed, update it to the latest version, using the below command.
-
For this article, we have cloned and used this Github repository.
- You also need your TestMu AI authentication credentials, which includes your TestMu AI username, and access key. These will be set up as the Secrets for configuring the pipeline. To get your Username and Access Key, go to your TestMu AI automation dashboard and click on the "key" icon left to the help button, on the top right corner.

Activating A Github Repository For CI/CD
To activate and integrate your Github repository with Drone CI on TestMu AI, you need to first setup your VPN port and activate it, since Drone is not publicly accessible. Once the VPN is activated, here is the stepwise illustration of how to activate your git repo for CI/CD:
Step 1: Enter URL https://drone.lambdatest.io/ on any browser.

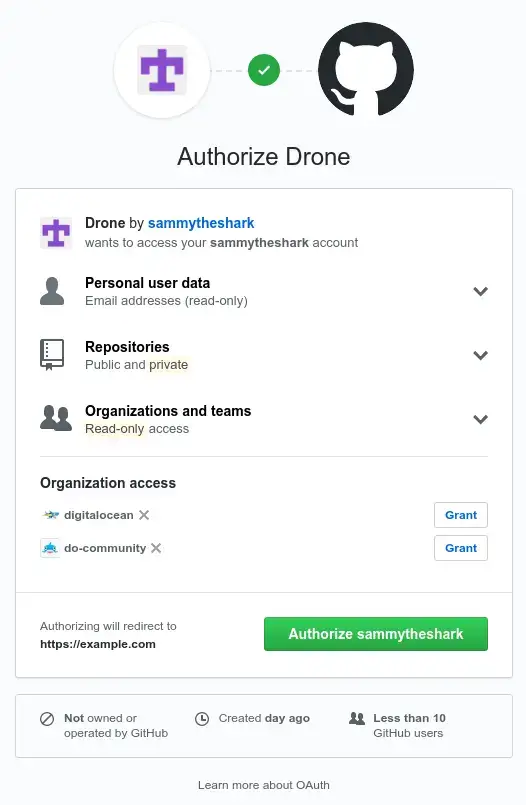
Step 2: Authorize your GitHub account to access drone.
Step 3: Click on the Sync button to sync all the repositories.

Step 4: You will see the repository which you want to use after the sync is completed.

Step 5: You need to activate the repository for which you want to integrate Drone CI, by clicking on the Activate button.

You may not be able to activate it for CI/CD. (This is because the drone admin user is robot-lt and this user should be the admin of the repository to activate it for CI/CD). You can try by clicking on the repository and then clicking on the "Activate Repository" button.

After clicking on "Activate Repository," it might happen that the repository is not activated and states that "There was a problem"

To resolve this error, kindly add the robot-lt user as admin of the repository and authorize it to make it activated or ask the owner of the repository to make it active.
Step 6: After enabling your repository, the Settings tab will appear. Check the Trusted checkbox in the Project Settings row (this might not occur if the OAuth is already trusted) and select the Private radio button in the Project visibility row and enter the name of your YAML configuration file (in which pipelines will be defined) in the text box in Configuration row. Here we have entered the ".drone.yml" file name, as we are integrating Drone CI.

Step 7: Add the Secrets that are required to execute the Drone CI. These secrets are sensitive information for the repository, such as passwords, tokens, keys, etc. You can add your own secrets in the repository secrets on the Drone server by using the drone-cli. Also, you can add these secrets from drone UI in the Settings as shown below.

(Note: Do not forget to check this allow pull request checkbox if you have any build step to be executed on the pull request.)
Congratulations!! Now you have successfully activated your repository for CI/CD.
Running Tests Using Drone CI with TestMu AI
Now we will see an example in which we will be creating a TestMu AI Tunnel and install node in it. For this, make a YAML configuration file as see shown below:
kind: pipeline
name: Build

trigger:
  event:
  - push

steps:
- name: Tunnel
  image: lambdatest/tunnel
  environment:
    PASSWORD:
      from_secret: LT_ACCESS_KEY
    USERNAME:
      from_secret: LT_USERNAME
  commands:
  - ls
  - apt-get update && \
  - apt-get upgrade -y && \
  - apt-get install -y wget unzip
  - wget https://downloads.lambdatest.com/tunnel/alpha/linux/64bit/LT_Linux.zip && \
  - unzip LT_Linux.zip && \
  - rm LT_Linux.zip && \
  - chmod +x /LT
  - ls
  - /LT -user $USERNAME -key $PASSWORD &

- name: Test
  image: node
  environment:
    PASSWORD:
      from_secret: LT_ACCESS_KEY
    USERNAME:
      from_secret: LT_USERNAME
  commands:
  - export LT_USERNAME=$USERNAME
  - export LT_ACCESS_KEY=$PASSWORD
  - npm install
Let’s try to understand what’s written in this YAML file by deconstructing it into multiple steps.
- First of all, we are defining what type of pipeline is this.
kind: pipeline
name: Build
We are making a docker pipeline so here the type defined will be docker. (Note: To make another type of pipeline you may check drone official documentation and steps will be almost similar.) We will also give a name to our pipeline. Here, we have given the name "Build".
- Now we are defining when this pipeline should be executed.
trigger:
  event:
  - push
Here the pipeline will be triggered when the event will be a push event received through the webhook. This can be changed to pull events, commit events, etc as well. (Note: To see the full list of ways and events to restrict over pipeline execution kindly refer to official documentation)
- Now we will be defining the pipeline steps by using the steps key in the YAML file. steps: Under this, our steps will be listed
Step I:
- name: Tunnel
  image: lambdatest/tunnel
  environment:
    PASSWORD:
      from_secret: LT_ACCESS_KEY
    USERNAME:
      from_secret: LT_USERNAME
  commands:
  - ls
  - apt-get update && \
  - apt-get upgrade -y && \
  - apt-get install -y wget unzip
  - wget https://downloads.lambdatest.com/tunnel/alpha/linux/64bit/LT_Linux.zip && \
  - unzip LT_Linux.zip && \
  - rm LT_Linux.zip && \
  - chmod +x /LT
  - ls
  - /LT -user $USERNAME -key $PASSWORD &
Here we are giving a name to our step, i.e. "Tunnel". Image is used for builder containers and commands are the steps to be executed to connect to the TestMu AI Tunnel, build our source code, and make it executable. Here the LT_ACCESS_KEY and LT_USERNAME are fetched from Secrets.
Step II:
- name: SampleTest
  image: node
  environment:
    PASSWORD:
      from_secret: LT_ACCESS_KEY
    USERNAME:
      from_secret: LT_USERNAME
  commands:
  - export LT_USERNAME=$USERNAME
  - export LT_ACCESS_KEY=$PASSWORD
  - npm install
In this step, we are just installing node on our TestMu AI Tunnel.
Similarly, we can also write a Test to deploy our executable formed in the build step to s3 using the s3 plugin. (To see the full list of supported plugins and their documentation refer to this link.)
- name: upload
  image: plugins/s3
  settings:
    bucket: lambda-devops-use-only
    region: us-east-1
    access_key:
      from_secret: aws_access_key_id
    secret_key:
      from_secret: aws_secret_access_key
    source: mobile-node-remote-client
    target: /magicleap/LMRC/latest/
    acl: public-read
Here AWS credentials are fetched through the secrets.
Now push your code and enjoy the CI/CD pipeline.
Execution Of The Drone CI Pipeline
Below is the step-by-step execution of the Drone CI pipeline.
- Edit the ".drone.yml" and add the code as discussed above.

- Once the edit is complete, click on "Commit Changes" to save and commit the changes made. Drone CI is activated as soon as this step is done since we have used "push event" for triggering the Drone CI.


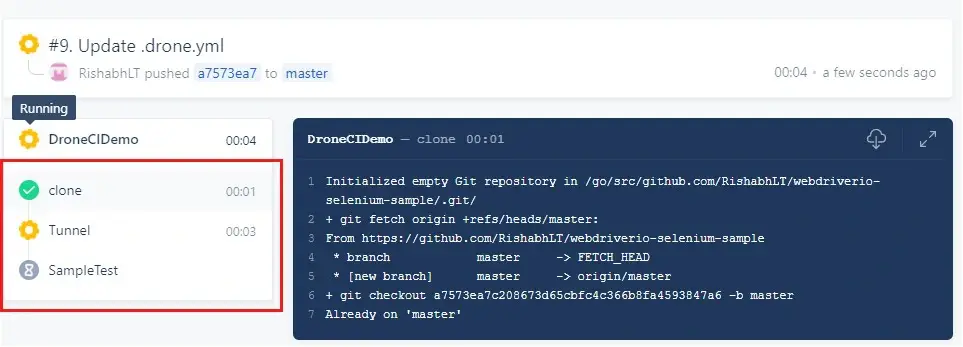
- As soon as the Drone CI is triggered (through push event in this case), a new activity can be seen in the "ACTIVITY FEED" tab. The current status of this activity will be "running" or "executing".

-
The series of execution of steps includes cloning, followed by the provided tests in the .drone.yml file. For example, we have provided two tests by name "Tunnel" and "SampleTest". Hence the series of steps to be executed will be:
- Clone
- Tunnel
- SampleTest
Drone provides functionality of default clone in its workspace, and we are using the same. If you want to restrict the default clone in the pipeline and want to use your custom clone then you can add below-mentioned YAML snippet to restrict the clone.
clone:
    disable:  true
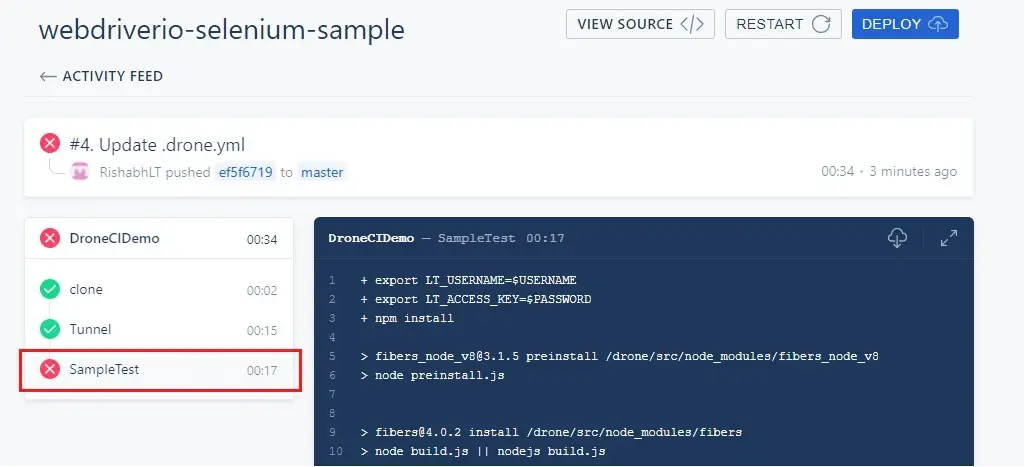
- Now based on the tests in the .drone.yml file, this activity can pass or fail. If passed, a green tick will appear on the left of the activity name. Else if failed, a red cross will appear instead, as shown below.

- You can view the status and details about each activity by clicking on it. After opening an activity, you can click on any of the passed or failed test cases to view the log. For example, in the below image, we have clicked on the failed test "SampleTest" and its log has appeared on its right.
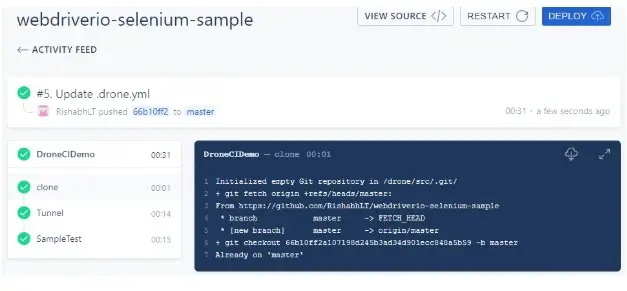
- A successful activity will have a green tick on its left in the ACTIVITY FEED as well on the left of each step and tests.
Parallel Testing
Parallel Testing is one of the most demanding features of TestMu AI Selenium Grid. By parallel testing, you can run more than one test case, simultaneously. This means that Parallel testing would allow you to execute numerous automation test cases altogether. So you execute a single test scenario across different browsers or could run different test scenarios across the same browser but with different browser versions. This would significantly trim down the time taken on your cross-browser testing activities. For running test in parallel, add the below command when you update the pipeline’s yaml file, i.e. .drone.yml file.
npm test

Deploy your code in a reliable manner at scale using Drone CI integration with TestMu AI, and ensure it looks robust across every browser to provide a seamless user experience to all your visitors. Happy Testing!
