Scale Your Automation Testing with AI
Run end-to-end parallel tests & reduce test execution time by 5x
Generate tests scripts using natural language with KaneAI
Accelerate your testing process with Autoheal, SmartWait & RCA
- Selenium Python
- Home
- /
- Learning Hub
- /
- Python Locust
Python Locust Load Testing: A Complete Guide to Simulate User Traffic
Master Python Locust load testing to simulate user traffic, identify bottlenecks, and scale your app performance locally and in the cloud.
Last Modified on: November 28, 2025
- Share:
Load testing lets you measure how your application performs under varying levels of traffic, ensuring it stays reliable during peak usage. With Python Locust, you can identify performance bottlenecks, optimize resources, and validate your app’s reliability during traffic spikes, interacting with your system in a realistic way.
It helps identify performance bottlenecks, optimize resource usage, and ensure your application can handle real-world traffic spikes efficiently, whether you’re integrating it into a CI/CD pipeline or following a traditional testing approach.
Overview
Why Choose Locust For Load Testing?
Open-source Python tool enabling realistic user simulations, continuous performance testing, and customizable workflows for scalable, automated load validation.
- Ease of Use: Write Python-based load tests quickly without learning new languages, enabling fast adoption and simple test creation.
- Modularity: Define and reuse discrete user behavior functions to simulate complex workflows, improving maintainability and test organization.
- Web-Based User Interface (UI): Monitor and control tests in real time, modify user load, or run fully headless for automated pipelines.
- Scalability: Efficiently simulate thousands of concurrent users across multiple machines using gevent or async tasks with minimal system resources.
- Flexible and Extensible: Integrate Python libraries, plugins, or custom logic into tasks, with hooks for setup, teardown, and event handling.
- Support for Local and Live Testing: Target both development and production environments easily by switching host URLs for accurate performance insights.
What Are the Steps to Write a Python Locust Test?
Follow setup, script creation, and task definition to simulate realistic user traffic and measure application performance accurately.
- Create Virtual Environment: Isolate Python dependencies to prevent conflicts and manage packages specifically for your Locust load testing project.
- Activate Environment: Enable the virtual environment so all installed packages and Python commands execute in the proper context.
- Install Locust: Install Locust in your environment to write and execute Python-based load testing scripts efficiently.
- Verify Installation: Confirm Locust is installed by checking the version, ensuring readiness for running load test scripts successfully.
- Create locustfile.py: Name your test script locustfile.py to allow automatic detection by Locust during execution.
- Run the Locust Test: Start Locust from your project folder to launch the server and begin executing load simulations.
- Open UI: Access the Locust web interface to configure tests, monitor user activity, and visualize performance metrics in real time.
- Configure Test: Set number of users, spawn rate, host URL, and runtime to tailor load test parameters effectively.
- Start Test: Launch the simulation to generate user load and collect performance data for your application under test.
What Are Common Troubleshooting Tips for Python Locust Errors?
- Locustfile Not Detected: Always verify script placement in the correct directory and use the proper -f flag when needed.
- Import Errors or Missing Dependencies: Reinstall packages cleanly in a virtual environment to eliminate conflicts causing unexpected import failures.
- No Requests Are Being Sent: Ensure proper class inheritance and confirm task decorators aren’t nested inside conditional blocks.
- Missing Tasks: Regularly review task names, class methods, and weight settings to prevent accidental overwrites or inactive tasks.
- Connection Errors or Timeouts: Test connectivity using curl or ping before running Locust to confirm server availability and responsiveness.
- Authentication Issues: Confirm login flow is properly scripted and tokens or cookies persist correctly throughout simulated user sessions.
- Unexpected 404 or 500 Errors: Validate API endpoints using Postman or curl before integrating them into Locust performance tests.
- Results Not Showing in Dashboard: Clear browser cache or restart the Locust process when metrics fail to update in the dashboard.
How Can I Integrate Python Locust Tests With CI/CD Pipelines?
You can integrate Locust into CI/CD pipelines (Jenkins, GitHub Actions, GitLab CI, etc.) by running tests in headless mode. In this setup, you use CLI commands (locust -f locustfile.py --headless) and configure environment variables for target URLs, number of users, and spawn rate.
Test results can be exported in CSV or HTML for reporting. Integrating Locust ensures automated performance verification on every deployment, helping detect regressions early and maintain consistent application performance.
Why Choose Locust For Load Testing?
Locust is an open-source load testing tool that enables you to simulate heavy user traffic and test an application's behavior at scale with minimal configuration.
Its task-based design makes it modular, flexible, and developer-friendly for performing load testing
Let's take a closer look at why developers choose Locust.
- Ease of Use: Locust test scripts are written in pure Python, making them accessible for most developers without needing to learn a proprietary scripting language. Getting started with Locust requires minimal setup. A basic load test can be written in just a few lines of code.
- Modularity: Locust has a task-based structure that allows you to define user behavior as discrete Python functions, which can be mixed and matched to simulate complex workflows. These tasks can be reused across different test scenarios, reducing duplication and improving maintainability. The logic can also be separated for different user types, endpoints, or workflows, making test suites easy to organize and update.
- Web-Based User Interface (UI): Locust comes with a built-in web UI for real-time monitoring, debugging, and test orchestration. You can start, stop, and modify the number of simulated users on the fly, directly from the UI. Running tests fully headless is also supported, which is useful in CI/CD pipelines.
- Scalability: Locust enables users to distribute load tests across multiple machines and simulate many users simultaneously. It primarily uses gevent with greenlets for concurrency, though modern versions also support async Python tasks. This allows it to efficiently handle large numbers of simulated users with minimal resource consumption. Locust can be run in distributed environments or cloud setups for large-scale testing.
- Flexible and Extensible: Since tests are written in Python, you can use any Python library or logic within your tasks, including authentication, data generation, community plugins, or custom assertions. Locust provides hooks for setup, teardown, and custom event handling, allowing you to tailor the test lifecycle to your needs.
- Support for Local and Live Testing: Locust supports both local and live testing, allowing you to target your development server (e.g., http://localhost:8000) or a deployed application by changing the host URL. This flexibility makes it simple to test your app’s performance in any environment, from initial development to production.
Note: Run web performance tests at scale across 3000+ browsers and OS combinations. Try LambdaTest Now!
Setting Up Your First Python Locust Test
With Python Locust, you can quickly set up load testing and simulate realistic user traffic and accurately measure your application’s performance from the start.
Setting up your first Locust test involves preparing your environment, installing the necessary tools, and organizing your test scripts.
To get started, follow these essential steps to set up your environment and install Locust.
- Create Virtual Environment: Set up an isolated Python environment to manage dependencies cleanly.
python -m venv loadtest
loadtest\scripts\activatepip install locustlocust --versionThe above command should return the Locust version if the installation was successful.
Once installed, create a new locustfile.py file in your project folder.
Note: Locust, by default, looks for a file named locustfile.py in your project directory when you run the locust command.
Ensure you name the test file exactly as locustfile.py, as this ensures Locust picks up the correct test file during execution. If your load test script bears a different name, you should specify it with the -f flag when running the locust execution command.
How to Write Your First Python Locust Test?
Locust tests are written in Python, letting you use any library or module. Its flexible, pluggable architecture allows easy extension without GUI limitations.
This gives you full control to design realistic user scenarios, simulate complex workflows, and scale your load tests exactly how you need for effective web performance testing.
To get started with writing your first Python Locust test, let’s consider a test scenario where you simulate load-testing the home, registration, login, and product pages of the LambdaTest eCommerce Playground.
The following Locust script simulates users' visits to the above pages:
from locust import HttpUser, between, task

class WebsiteUser(HttpUser):
    host = "https://ecommerce-playground.lambdatest.io"
    wait_time = between(1, 3)

    def on_start(self):
        # Load the homepage
        self.client.get(
            "/",
            name="Home Page",
        )

    # Load the shop category page
    @task(3)
    def visit_shop(self):
        self.client.get(
            "/index.php?route=product/category&path=20",
            name="Shop Page",
        )

    # Load the registration page
    @task(2)
    def registration_page(self):
        self.client.get(
            "/index.php?route=account/register",
            name="Register Page",
        )

    # Load the login page
    @task(2)
    def login_page(self):
        self.client.get(
            "/index.php?route=account/login",
            name="Login Page",
        )
Code Walkthrough:
- Import Libraries: Imports required Locust modules to enable load testing functionality in your script.
- Define WebsiteUser Class: Creates a simulated user by inheriting from HttpUser, defining user behavior.
- Specify Host URL: Sets the base URL of the website under test; use localhost for local applications.
- Set Wait Time: Uses between(1, 3) to make users wait randomly 1–3 seconds before performing the next task.
- on_start Method: Defines actions executed at the start of each simulated user session, starting from the homepage.
- Define Tasks: Organizes user actions into separate functions to simulate realistic workflows.
- @task Decorator and Weight: Marks methods as tasks and assigns probability; a higher weight means more frequent execution.
- Shop Task: Simulates a user visiting the shop category with a higher likelihood of being executed.
- Registration Task: Simulates a visit to the registration page, executed less frequently than the shop task.
- Login Task: Simulates a visit to the login page with its assigned weight, completing the user workflow.
Test Execution:
- Run the Locust Test: Open the command line to your load testing project root folder and run the following command:
locustlocust -f test.py
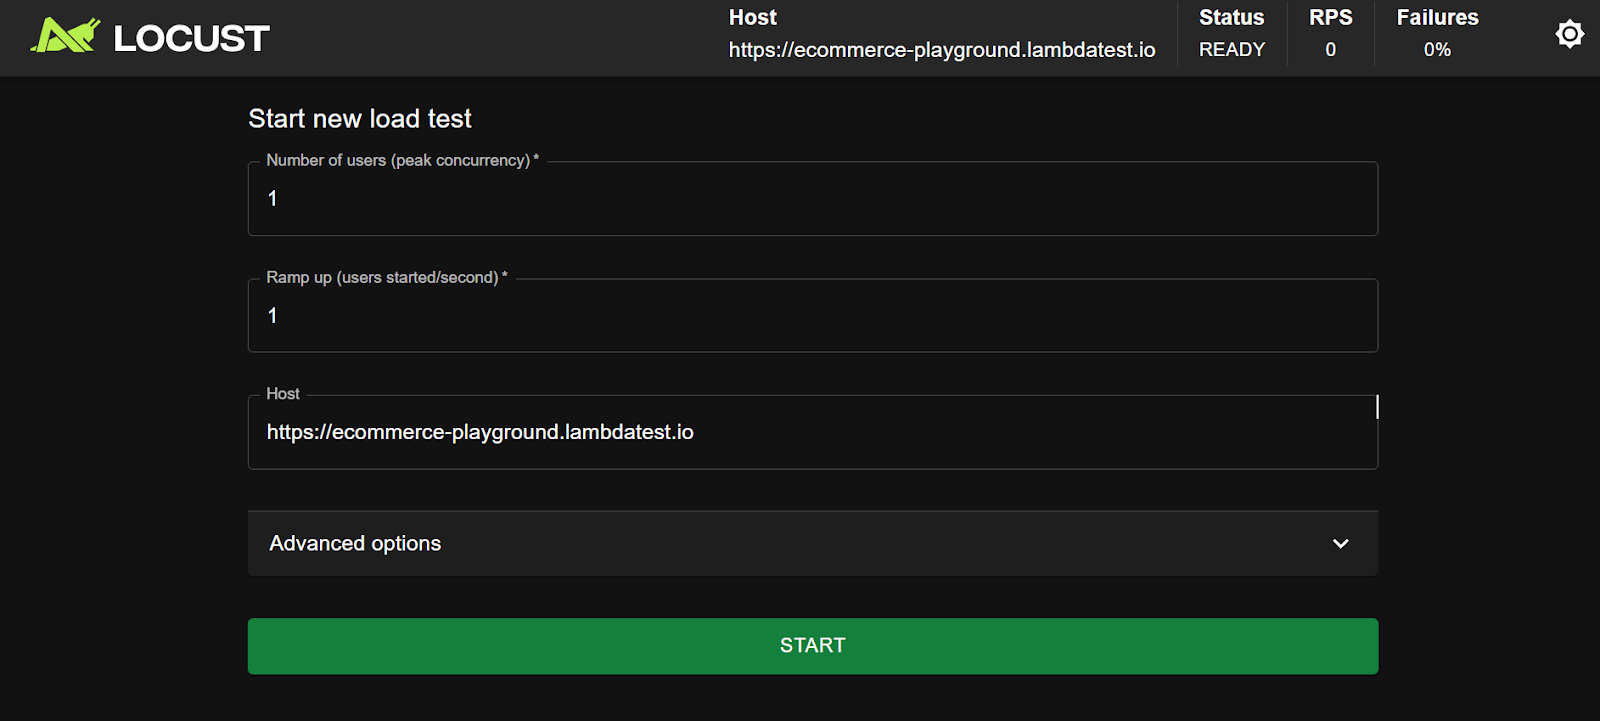
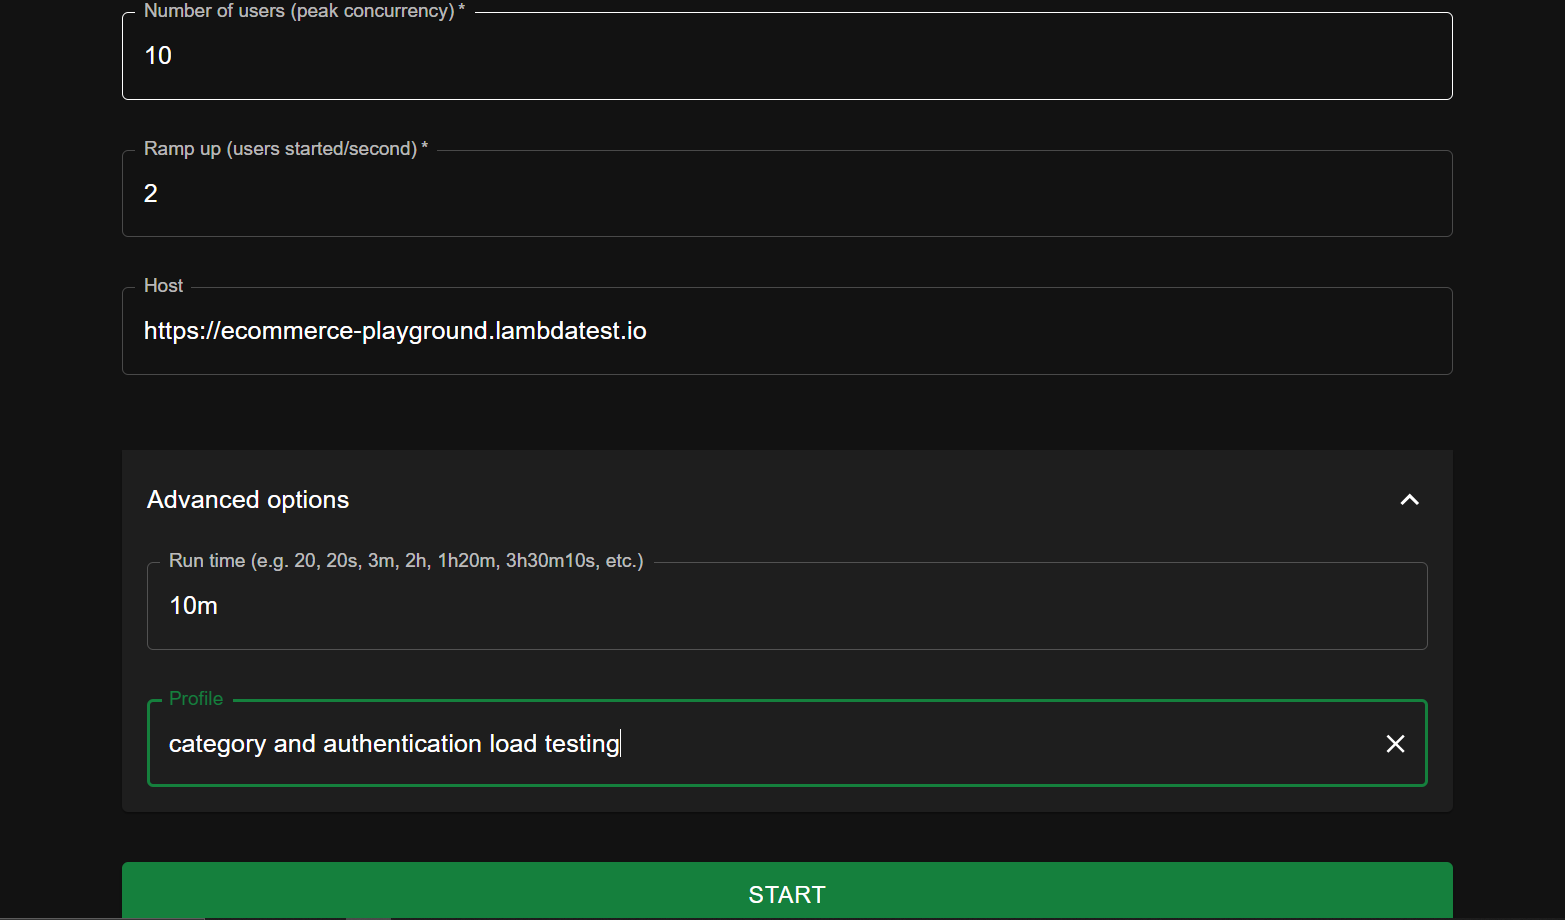
Let's quickly explain each field.
- Number of users (peak concurrency): Defines how many simulated users Locust should spawn during the test. For example, if set to 10, Locust will simulate 10 concurrent users hitting your system.
- Ramp up: Controls the spawn rate, which defines the rate at which new users are added until the target number of users is reached. For instance, if you set 2 users/second and the target number of users is 10, it will take 5 seconds for all users to be spawned.
- Host: Defines the base URL of the website under test as specified in your test script. You can also enter this URL manually if you've not previously included it explicitly in your test code.
- Advanced options:
- Run time: Defines how long a load test runs for. For example, you can set a test to run for 10 minutes.
- Profile: Lets you name each test so you can reuse preset configurations.
- Start: Click Start to begin the load test.
How to Analyze Python Locust Load Test Results?
After running a Python Locust load test, analyze key metrics like requests, response times, failures, and payload sizes to assess system performance under load.
By examining these results, you can identify bottlenecks, pinpoint slow-loading pages, and compare how different endpoints perform. For instance, pages with larger payloads or complex workflows typically show higher latency, while lightweight pages respond faster.
Using this data, you can optimize your application, balance server resources, and improve the overall user experience.
STATISTICS
The first part is the STATISTICS tab, with a table showing the request type, task name, request count, number of failed requests, percentile, request time information, page payload, and more.
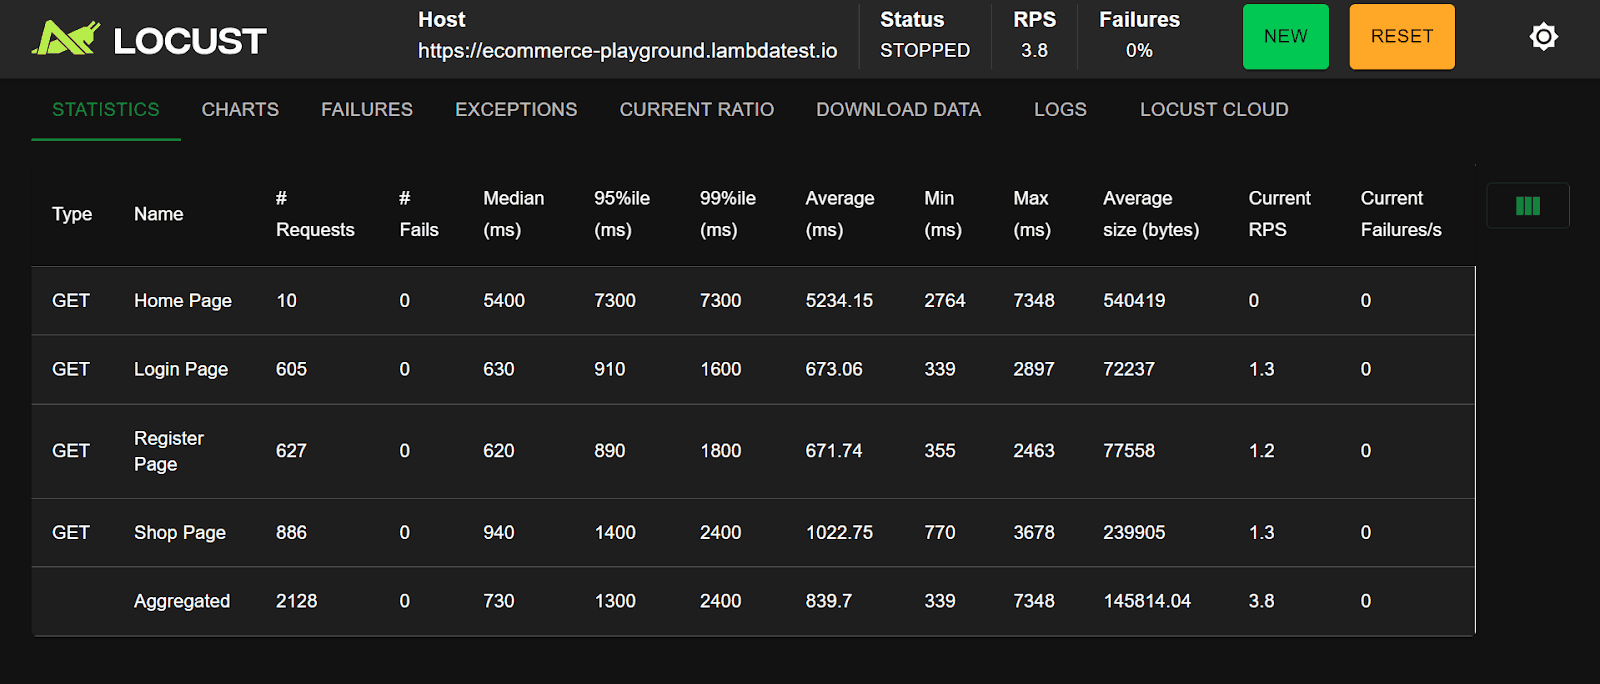
Let's quickly interpret this result.
- Test Completion: The test completed successfully with no failures.
- High Latency Pages: The Home and Shop pages recorded the highest average latencies of 5234.15 ms and 1022.75 ms, respectively, which aligns with their relatively large payload sizes of 540,419 bytes and 239,905 bytes.
- Low Latency Pages: The Login and Registration pages had the lowest payloads and latencies, at 72,237 bytes and 77,558 bytes, with average response times of 673.06 ms and 671.74 ms, respectively.
After understanding the key metrics in the STATISTICS table, there are other tabs that help review what the load test can reveal.
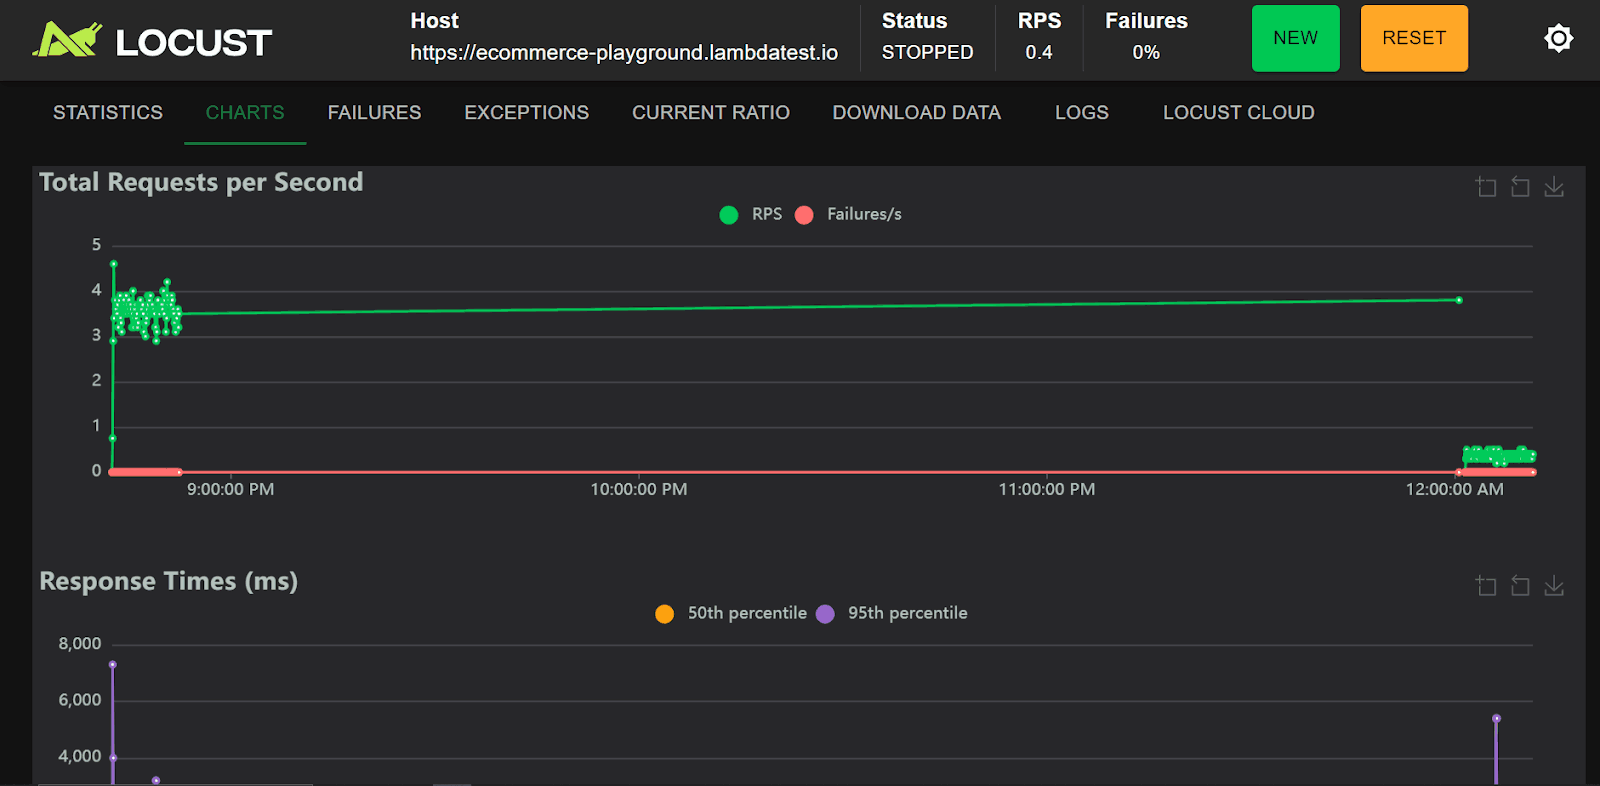
CHARTS
The CHARTS tab provides real-time visualizations of test metrics, including requests per second (RPS), average and percentile response times, failure ratios, and the number of active users over time.
FAILURES
The FAILURES tab lists all failed requests during the test, showing the request type, endpoint, error message, number of occurrences, and failure ratio. This helps identify bottlenecks, broken endpoints, or instability under load.

EXCEPTIONS
The EXCEPTIONS tab points you to unhandled Python exceptions that occurred during test execution, along with the stack trace and number of occurrences. While the FAILURES tab highlights issues with the website under test, the Exceptions tab enables you to debug issues in your test scripts rather than the system under test.

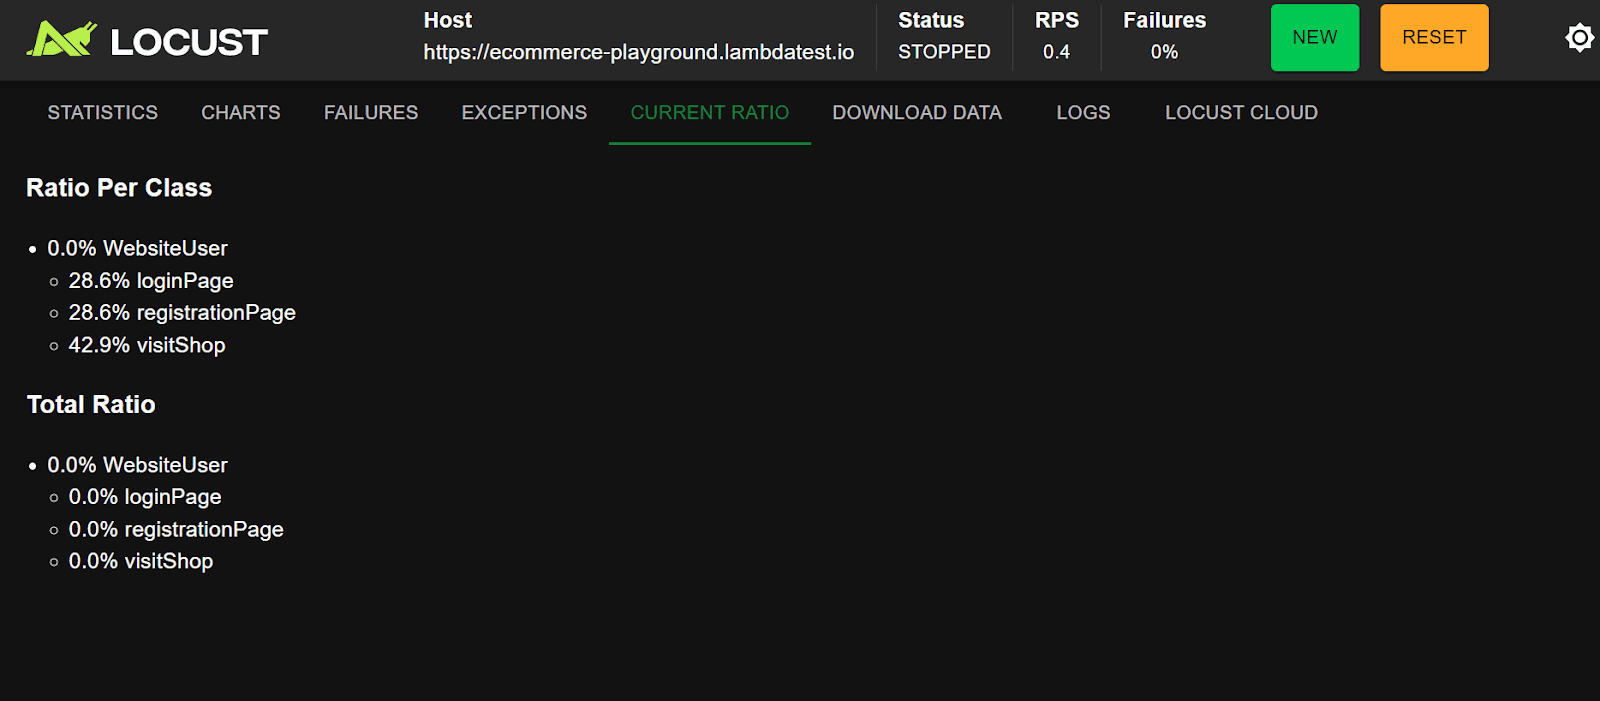
CURRENT RATIO
The CURRENT RATIO tab displays how Locust distributes executed actions across different tasks or classes. In the example above, 28.6% of the tasks were logins, another 28.6% were registrations, and 42.9% were visits to the shop page.
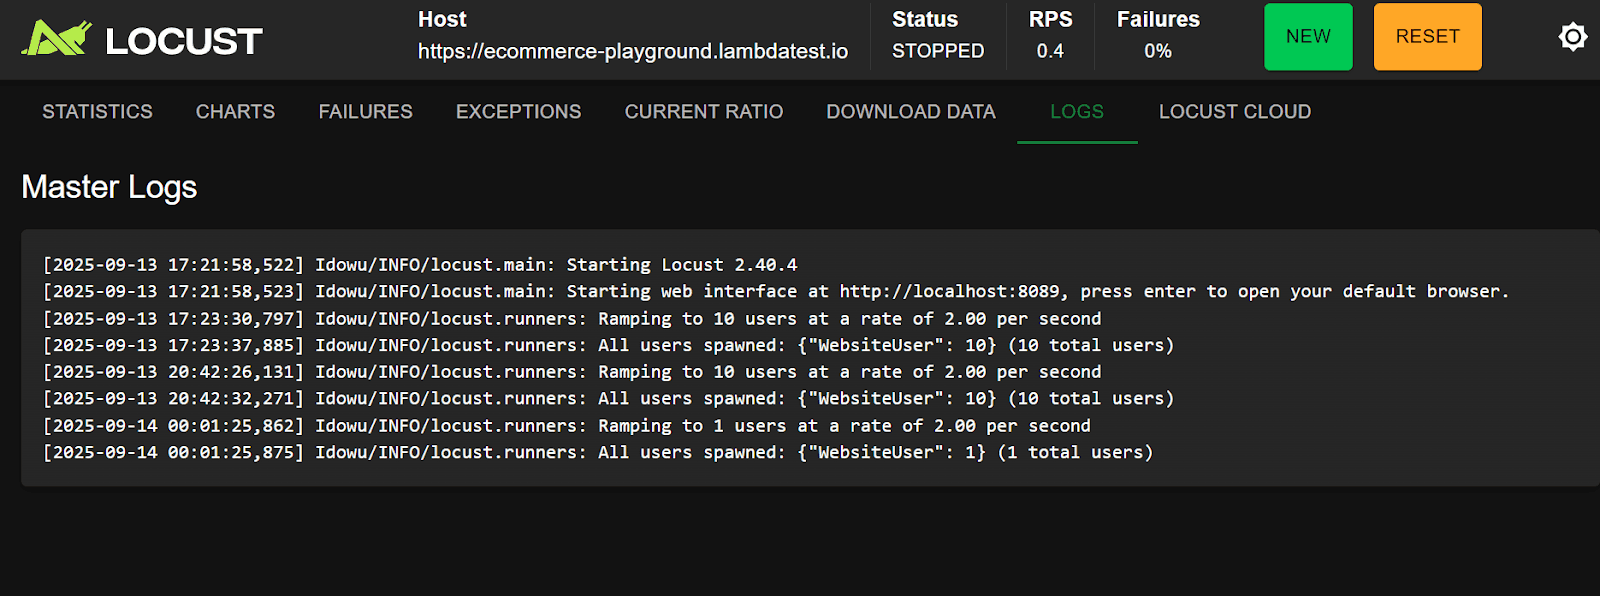
LOGS
The LOGS tab displays runtime messages about the load test, such as when users are spawned, tasks start running, requests are sent, and any errors or warnings encountered.
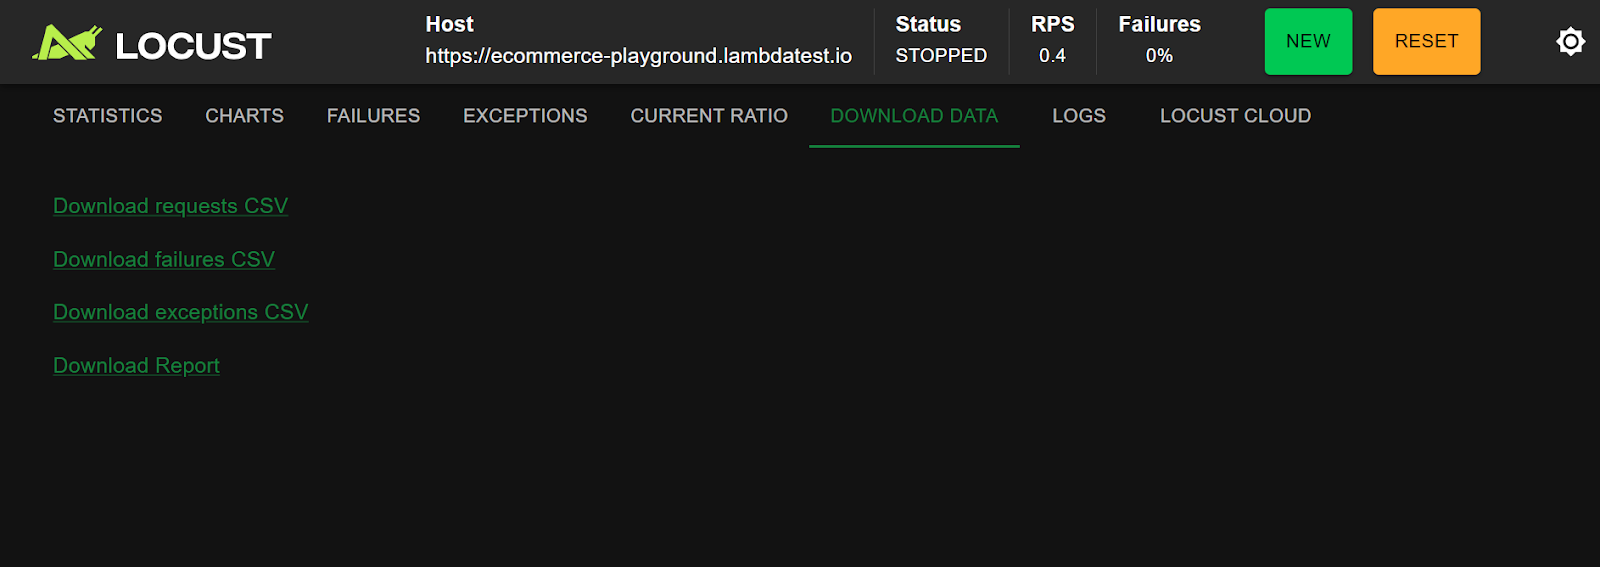
DOWNLOAD DATA
You can download various load test data from the DOWNLOAD DATA tab. Locust provides CSV data for the executed requests, failures, exceptions, and report overview.
Exporting and Reporting
To export and share your load test results, go to the Download Data tab and select from the available files. However, the most useful file for sharing in this section is the Report HTML file (Download Report), as it consolidates charts, stats, and metrics into a single document.
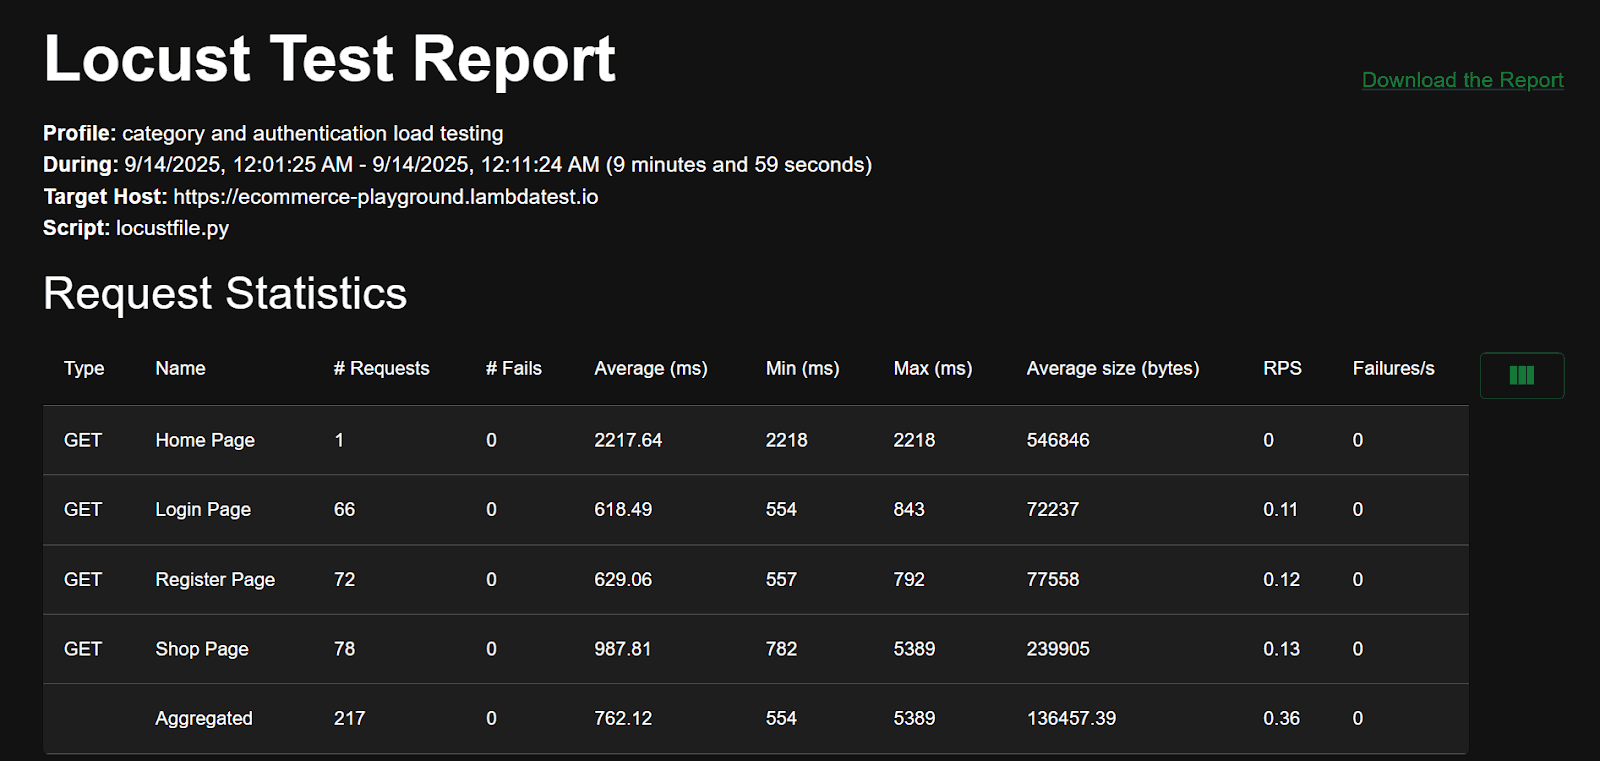
Here's a sample HTML report that contains request stats, charts, time metrics, and more:
Click Download the Report to download this HTML file locally.
Scaling Beyond Local Load Testing
Locust helps simulate user behavior and test small to moderate traffic locally. For thousands of users or tests across multiple browsers, devices, and regions, a local setup may become impractical. Managing distributed execution, scaling infrastructure, and ensuring reliability under peak loads can quickly get complex.
Moreover, Locust lacks a built-in HTTP(S) recorder, which could be challenging when you are writing test scripts for complex workflows. Tools like JMeter help overcome this challenge by allowing you to record browser actions and generate test scripts without having the need to write code from scratch.
When used with platforms like LambdaTest HyperExecute, it provides a practical solution, allowing you to run JMeter tests and generate load stably from multiple regions with fully managed environments.
HyperExecute is built for speed and efficiency, running automated tests on Windows, macOS, and Linux containers, with pre-installed support for popular frameworks and languages like Selenium, Cypress, Playwright, Java, Node.js, Python, and more.
Its AI-native reporting, real-time console, and automated test orchestration help teams focus on insights and optimization rather than setup.
By leveraging HyperExecute, you can:
- Performance Testing Made Easy: Run JMeter test plans without managing separate infrastructure.
- Scalable Load Generation: Robust, stable, and on-demand infrastructure for high-scale tests.
- Multi-Region Load: Generate traffic from multiple regions to mimic real-world users.
- Comprehensive KPIs: Access all test metrics, load details, response times, and errors within the portal.
- Deep Insights: Drill down into performance stats and error analysis effortlessly.
To get started, follow this support documentation on JMeter performance testing with HyperExecute.
Troubleshooting Python Locust Errors
Even the best-written Locust scripts can run into issues during execution. Common problems include missing files, dependency errors, failed requests, or unexpected server responses.
Here are some common errors and how you can identify and fix them:
- Locustfile Not Detected: Ensure your test script is named locustfile.py or that you specify the correct filename with the -f flag when running Locust. The file must be in the directory from which you launch Locust.
- Import Errors or Missing Dependencies: If you see import errors, double-check that all required libraries (like locust, requests, or any custom dependencies) are installed in your environment. Use pip install locust to install or update Locust.
- No Requests Are Being Sent: Check that your tasks are decorated with @task and that your user class inherits from HttpUser. Make sure you've started a real test, not just launching the web UI.
- Missing Tasks: Avoid accidentally naming multiple methods with the same name or overwriting tasks. Also, confirm that task weights are set correctly and that tasks are not being skipped due to logic errors.
- Connection Errors or Timeouts: Verify the target server is running and accessible from your test machine. If testing locally, check your server’s address and port. For HTTPS endpoints, make sure SSL certificates are valid, or set self.client.verify = False in the on_start method.
- Authentication Issues: If your app requires login, ensure your Locust script handles authentication properly. Use the on_start method for login steps, and check that session cookies or tokens are being managed correctly.
- Unexpected 404 or 500 Errors: Double-check your endpoint URLs, request methods (GET vs POST), and request data. Avoid typos or missing parameters that can lead to errors.
- Results Not Showing in Dashboard: Make sure your tasks are returning responses and not raising exceptions. Also, confirm that your browser is not caching an old dashboard.
Best Practices for Python Locust Load Testing
Best practices ensure your Python Locust load testing is accurate, reliable, and reflective of real-world user behavior.
Following these guidelines helps you identify performance bottlenecks early and maintain a smooth, scalable application experience.
- Test Safely: Always run load tests using reliable load testing tools in a test or staging environment instead of production. This ensures you can generate high user loads safely and measure system performance accurately.
- Test Continuously: Conduct performance testing regularly throughout development. Continuous testing helps identify bottlenecks early as new features are added or changes occur.
- Set Clear Goals: Define precise objectives for each load test, such as maximum supported users, critical flow performance, or system recovery under stress. Clear goals help interpret results and prioritize fixes.
- Make it Realistic: Simulate real user behavior, including pauses between actions and varying task frequency, for accurate performance testing insights.
- Start with a User Baseline: Begin load testing with a realistic baseline of users rather than zero. Gradually ramping up from typical activity helps generate meaningful results.
- Start Small and Increase Gradually: Increase user load incrementally to observe system behavior under growing traffic. This controlled approach ensures effective performance testing without sudden crashes.
- Automate When You Can: Integrate load testing tools into your CI/CD pipeline to ensure continuous monitoring of system performance and early detection of slowdowns.
- Use Realistic Data: Include diverse user accounts and input data to uncover edge-case issues during performance testing. Clean up test data afterward to maintain a stable environment.
- Use Proxies to Simulate Location-Bound Responses: For globally distributed users, proxies help simulate traffic from different regions, giving accurate performance testing of latency and content delivery.
- Document and Communicate: Keep detailed records of load testing scenarios and results. Sharing insights helps the team track improvements and focus on critical performance areas.
- Monitor and Review: Track response times, error rates, and server resource usage. Combining dashboard metrics with logs provides a complete view for accurate performance testing analysis.
Conclusion
Locust is a powerful task-based load testing tool in Python, allowing you to simulate multiple users with simple, readable code. To get the most value, design your tests around critical user activities and run them continuously to track performance trends. Strong load testing with Locust not only validates system stability but also drives business decisions by revealing how your application performs under real-world conditions.
Citations
- Comprehensive Review of Load Testing Tools: https://www.irjet.net/archives/V7/i5/IRJET-V7I5651.pdf
- Locut GitHub: https://github.com/locustio/locust
- Locust Installation:https://docs.locust.io/en/stable/installation.html
Frequently Asked Questions (FAQs)
Did you find this page helpful?

Start your journey with LambdaTest
Get 100 minutes of automation test minutes FREE!!


