
A Complete Guide For Your First TestNG Automation Script
Deeksha Agarwal
Posted On: March 30, 2018
![]() 50538 Views
50538 Views
![]() 6 Min Read
6 Min Read
The love of Automation testers, TestNG, is a Java testing framework that can be used to drive Selenium Automation script.
When it comes to automation, no one can compete with Selenium.
If you are planning to dive into the field of automation testing, TestNG can be your topmost choice.
For a beginner, it becomes hard to understand the point from where he needs to start.
If you are preparing for an interview you can learn more through TestNG interview questions.
So, in this blog, we have come up with a step by step method to assist you in getting started with your first automation test script.
For this, you need to set up an Test Automation environment for selenium with Eclipse first and then go ahead with the script. Let’s do it.
Open your browser in the next tab and get started for your first automation test script in TestNG. All you need is just 20 minutes.
Watch this video to learn how to set up and use TestNG with Selenium to automate your testing process. We will also introduce the TestNG Priority method, which allows you to write easy-to-read and maintainable tests.
Setting Up The Environment
Step 1: First of all, download java8 or jdk1.8 and install it in your system.
You can use the link to download java8.
http://www.oracle.com/technetwork/java/javase/downloads/jdk8-downloads-2133151.html
After installing java8, set up the path.
To do so, Go to Start→ Computer→ Right click → properties→ Advanced system settings → Environment variable→ New→ After clicking on that you need to enter variable name and variable path.
You’ll see the following screen in the ‘Environment variable’ window.
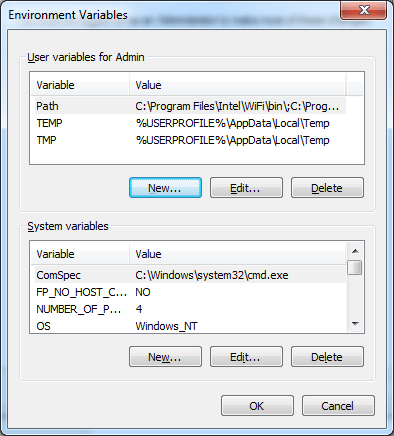
Once you click on New, you’ll see the following window. Enter ‘Path’ as the variable name. And Enter the path where your jdk has been installed in the variable path
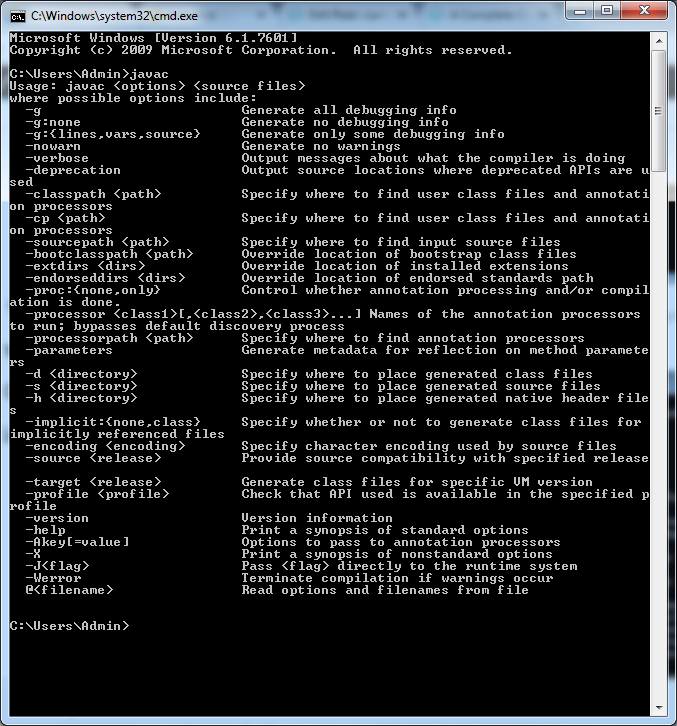
Let’s validate if this is properly installed or not.

To do so, open cmd window and type ‘javac’.
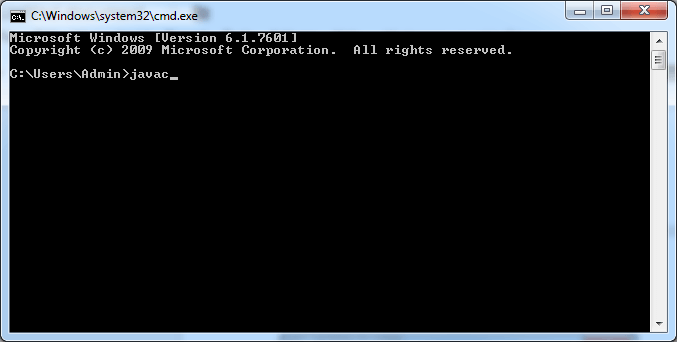
You’ll see a window with all the details of jdk. If you get it, then it is properly installed, if not, then try again.
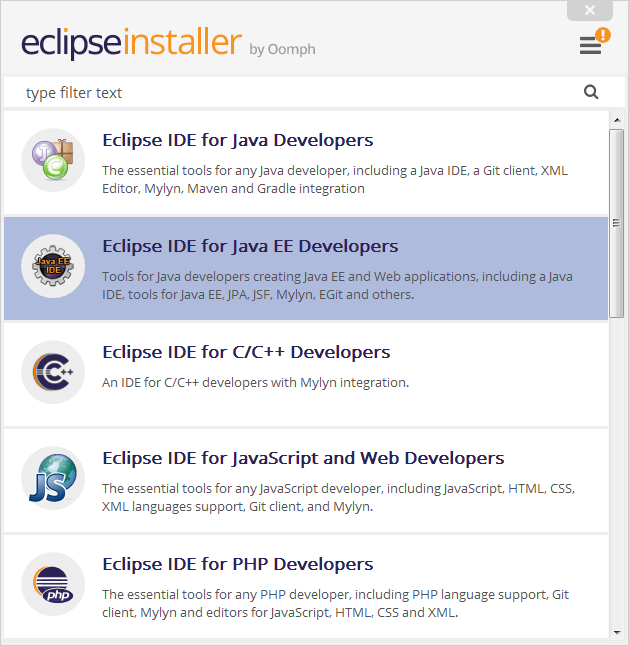
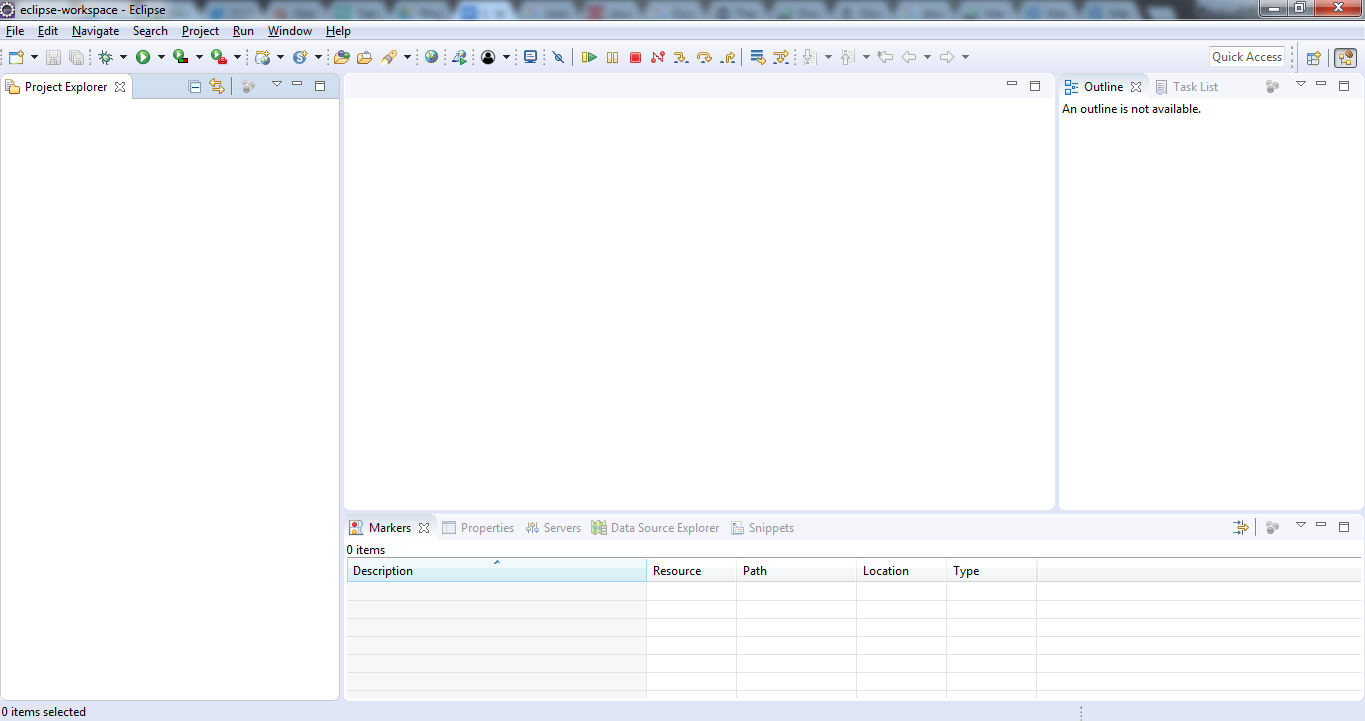
Step 2: Download Eclipse and Run
You can use this link to download Eclipse.
https://www.eclipse.org/downloads/packages/eclipse-ide-java-developers/keplersr1
Select Eclipse IDE for Java EE Developers and install it.
Once you install it, an eclipse IDE window will open for writing the script and it will look like this.
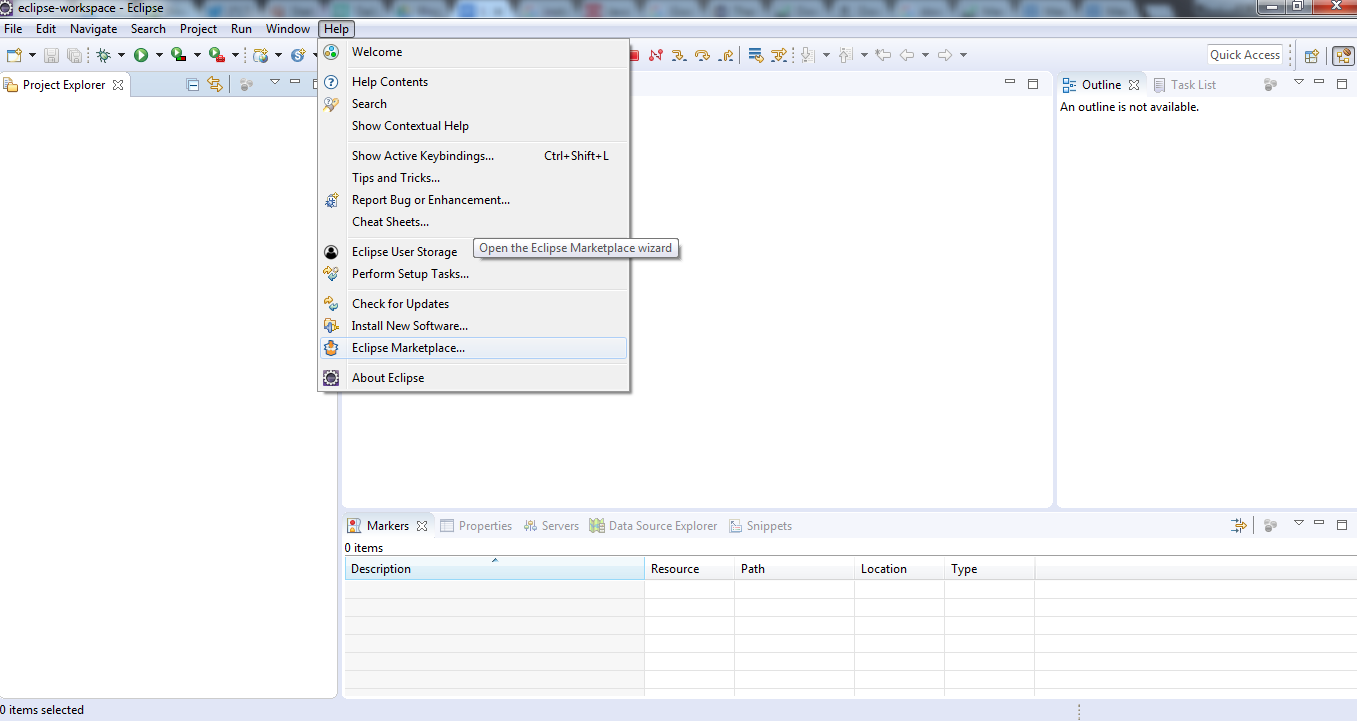
Step 3: Download TestNG from Eclipse Marketplace
For this, Go to Help→ Eclipse Marketplace
Click ‘install’ on TestNG for Eclipse.
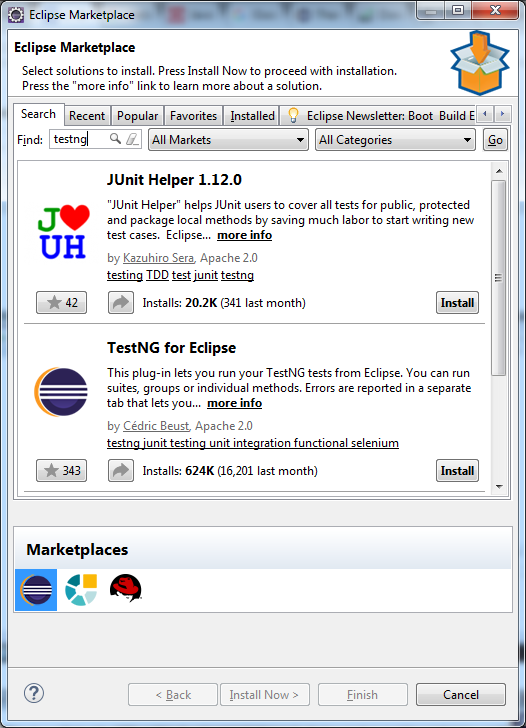
And finish the process.
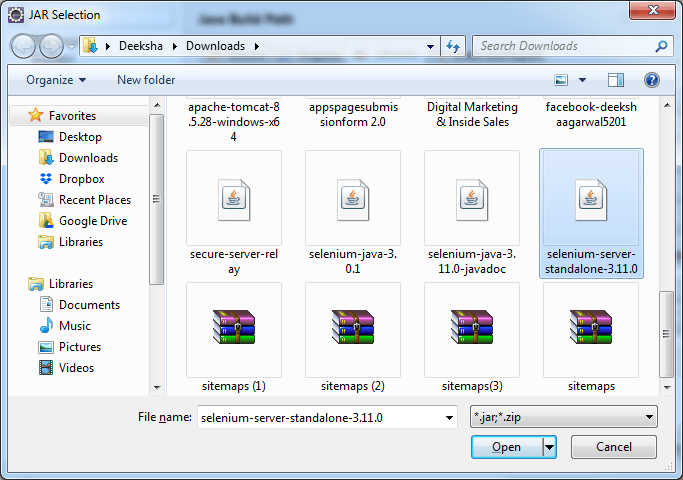
Step 4: Download Selenium 3.11.0
You can use this link to download: https://www.seleniumhq.org/download/
Step 5: Download Selenium dependency files
Download selenium dependency files for jdk 3.11.0.
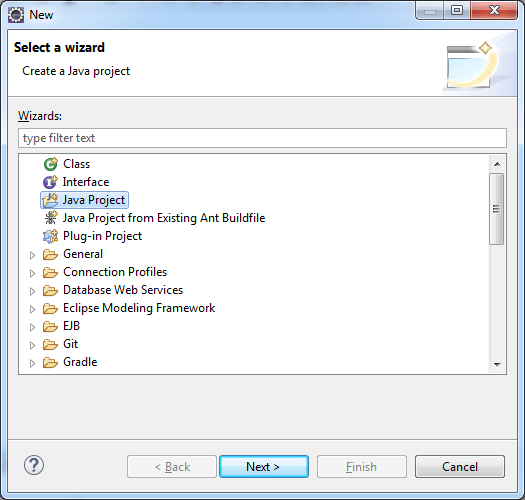
Step 6: Create the project
Create a Java project
To create it, go to file→ New→ Other
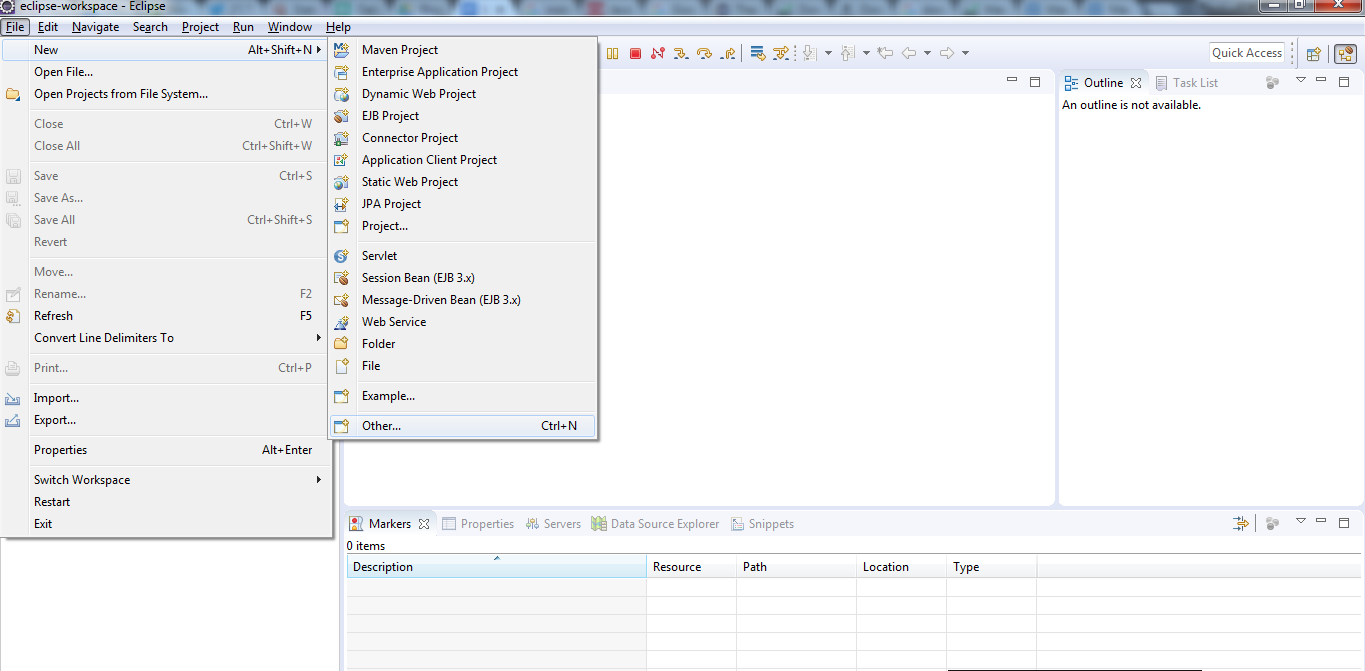
Select create a Java Project
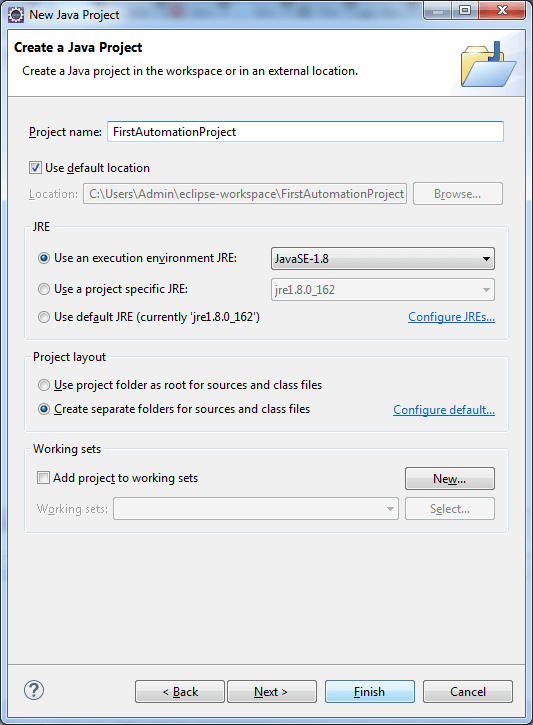
Enter your project name, I am entering ‘FirstAutomationProject’.
Note: Do not enter spaces in the name of the project
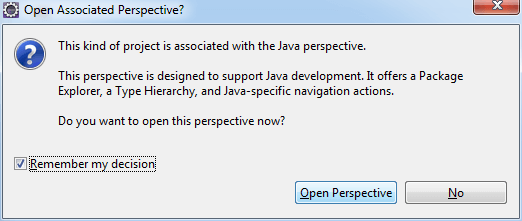
Click Open Perspective
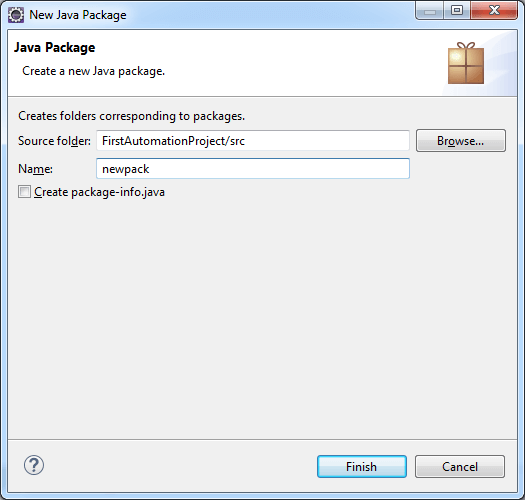
You’ll see that a new Java Project is created at the left side. Now, Click on ‘FirstAutomationProject’. You’ll see src file. Right click on it. Select new→ Other→ Create a new Java Package.
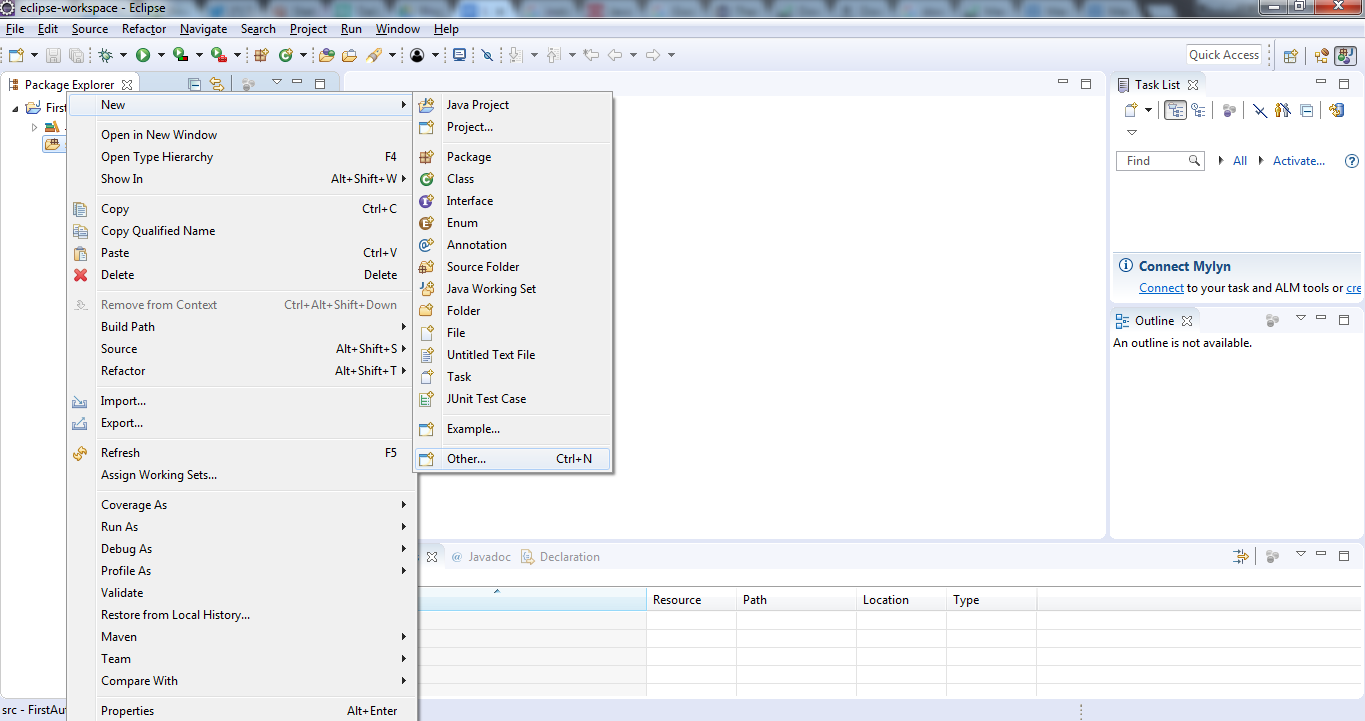
Click Finish.

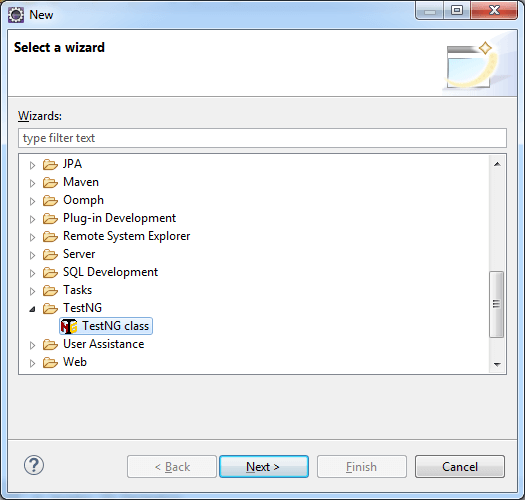
Step 7: Create a new TestNG class.
Create a new TestNG class under the package newpack. Right click newpack–> New –> Other
Check @BeforeTest and @AfterTest. Once you click on Finish, you’re all set to write your automation script.
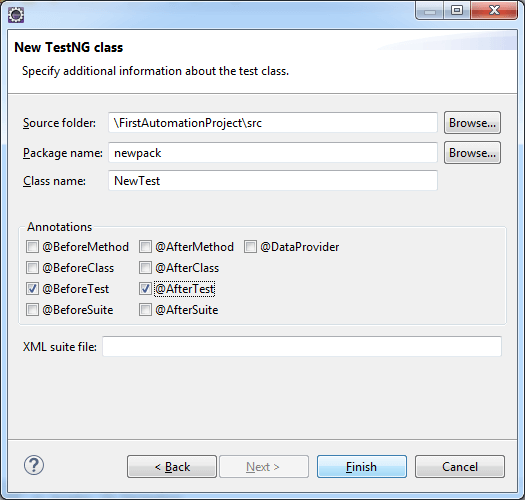
A template TestNG code will open up like this.
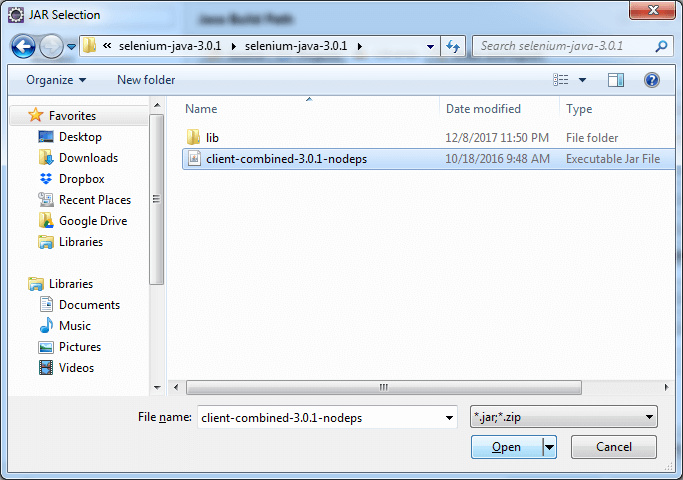
Step 8: Import Selenium Jar Files in dependency files
Right click on FirstAutomationTest→ Import. Click on’ Add external Jar’ and add the Jar dependency files that you’ve downloaded above.
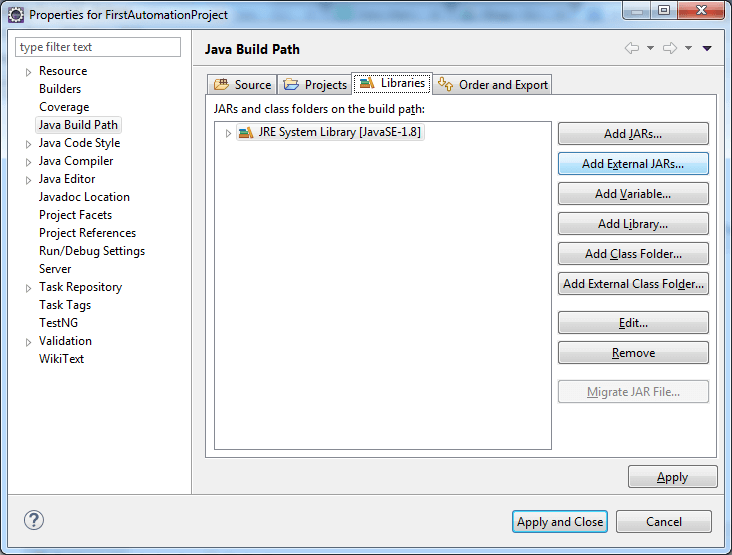
Select the .jar file that you’ve downloaded above.
Similarly, import the dependency files that you’ve downloaded from the link provided above.
Import lib files from the zip extracted dependency files.
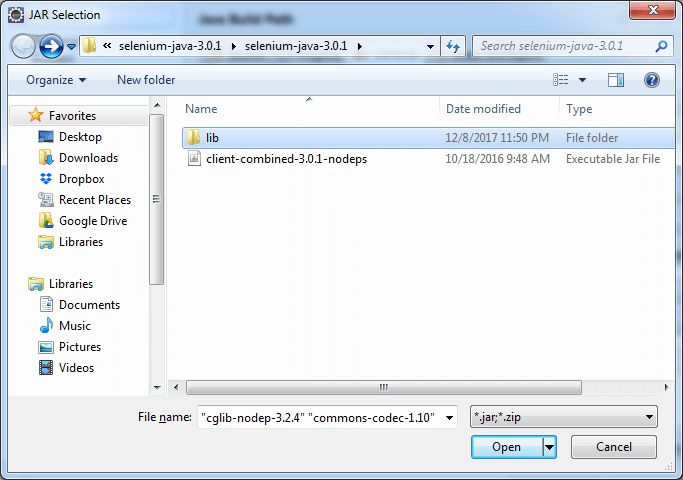
Select all the files in the lib folder.
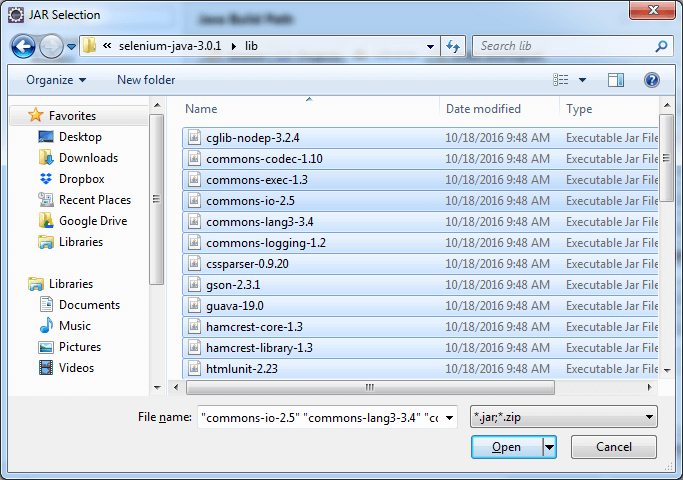
Once you import all the files, you’re all set to write the code.
Writing The Code
On the eclipse window that you’re seeing now, write the following code.
We are writing a code in order to verify the title of webpage.
CODE(self explanatory):
|
1 2 3 4 5 6 7 8 9 10 11 12 13 14 15 16 17 18 19 20 21 22 23 24 25 26 27 28 29 30 31 32 33 34 35 36 37 38 39 40 41 42 43 44 45 |
package newpack; import org.openqa.selenium.WebDriver; import org.openqa.selenium.chrome.ChromeDriver; import org.testng.annotations.Test; //comment the above line and uncomment below line to use Chrome //import org.openqa.selenium.chrome.ChromeDriver; public class NewTest { WebDriver driver; @Test public void FirstTest() { // declaration and instantiation of objects/variables System.setProperty("webdriver.chrome.driver","C:\\Users\\Admin\\Downloads\\chromedriver_win32\\chromedriver.exe"); driver = new ChromeDriver(); //comment the above 2 lines and uncomment below 2 lines to use Chrome //System.setProperty("webdriver.chrome.driver","G:\\chromedriver.exe"); //WebDriver driver = new ChromeDriver(); String baseUrl = "https://www.lambdatest.com/"; String expectedTitle = "LambdaTest - Perform all your tests on cloud"; String actualTitle = ""; // launch Chrome and direct it to the Base URL driver.get(baseUrl); // get the actual value of the title actualTitle = driver.getTitle(); /* * compare the actual title of the page with the expected one and print * the result as "Passed" or "Failed" */ if (actualTitle.contentEquals(expectedTitle)){ System.out.println("Test Passed!"); } else { System.out.println("Test Failed"); } //close Fire fox driver.close(); } } |
After writing the code, save it and right click on ‘New Test.java’ → Run as→ TestNG Test.
Once you click on it, you’ll see a chrome browser window opening the website that you’ve entered in your code to test. And it will automatically close as soon as the test is completed and in the output section below, you’ll see ‘Test Passed’ as the status of your test on the console below.
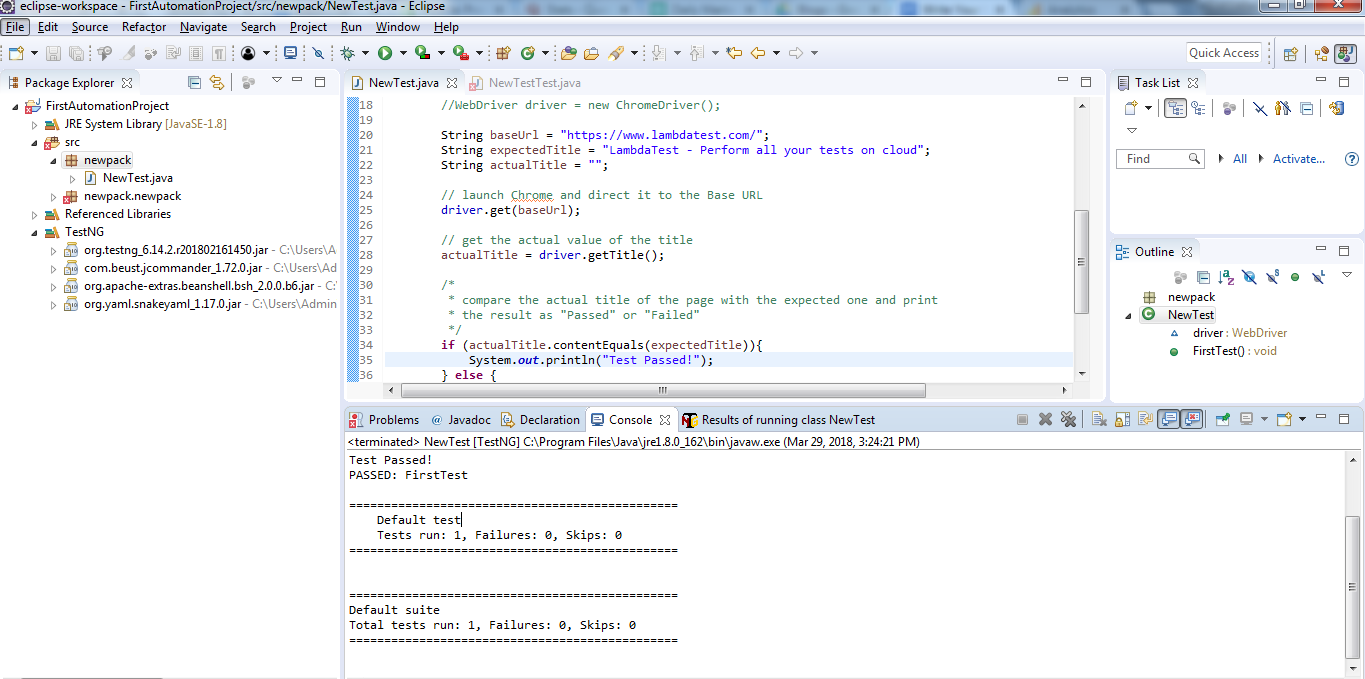
With this, you have run your first automation test in TestNG using a local webdriver.
To verify the title of a given webpage matches the one already specified.
With TestNG certification, you can challenge your skills in performing automated testing with TestNG and take your career to the next level.
Here’s a short glimpse of the TestNG certification from LambdaTest:
Executing Cross Browser Automation Testing With TestNG & Selenium Using Remote WebDriver At LambdaTest
So far, you have noticed how to run a TestNG script using a local webdriver. That is all easy and quick, however, using a local webdriver for performing automation testing with selenium will not provide you with a variety of browsers to test your website or web app on! You can only perform your testing on the browsers that are installed in your local machine. Considering the abundance of browsers on the internet, it could be nearly impossible to have your website test over every web browser through your local machine. This is where cloud testing plays a crucial part. LambdaTest is a cloud-based cross browser testing tool which offers you to run your Selenium scripts using a remote webdriver. This remote webdriver would allow you to perform your test on over 3000+ browsers and browser versions supported by LambdaTest Selenium grid. LambdaTest also allows you to perform a test on your locally hosted web apps or web pages through an SSH tunnel. This way you don’t need to install an excessive number of browsers on your OS for higher coverage of test results.
Executing A Single Instance In LambdaTest Using TestNG
A couple changes in your code is all that you would need for running your Selenium test script on LambdaTest Selenium grid. Here we will take a look at a different example to help you demonstrate the LambdaTest Selenium grid.
We will be running a script of a simple To Do list app. In this list, our code will be marking 2 items as done, add a list item and will display the total count of pending items.
You can find the below code on our GitHub repository as well.
|
1 2 3 4 5 6 7 8 9 10 11 12 13 14 15 16 17 18 19 20 21 22 23 24 25 26 27 28 29 30 31 32 33 34 35 36 37 38 39 40 41 42 43 44 45 46 47 48 49 50 51 52 53 54 55 56 57 58 59 60 61 62 63 64 65 66 67 68 69 70 71 72 |
import org.openqa.selenium.By; import org.openqa.selenium.Platform; import org.openqa.selenium.WebDriver; import org.openqa.selenium.remote.DesiredCapabilities; import org.openqa.selenium.remote.RemoteWebDriver; import org.testng.Assert; import org.testng.annotations.AfterClass; import org.testng.annotations.BeforeClass; import org.testng.annotations.Test; import java.net.MalformedURLException; import java.net.URL; public class TestNGTodo{ public String username = "YOUR_USERNAME"; public String authkey = "YOUR_ACCESS_KEY"; public static RemoteWebDriver driver = null; public String gridURL = "@hub.lambdatest.com/wd/hub"; boolean status = false; @BeforeClass public void setUp() throws Exception { DesiredCapabilities capabilities = new DesiredCapabilities(); capabilities.setCapability("browserName", "chrome"); capabilities.setCapability("version", "70.0"); capabilities.setCapability("platform", "win10"); // If this cap isn't specified, it will just get the any available one capabilities.setCapability("build", "LambdaTestSampleApp"); capabilities.setCapability("name", "LambdaTestJavaSample"); capabilities.setCapability("network", true); // To enable network logs capabilities.setCapability("visual", true); // To enable step by step screenshot capabilities.setCapability("video", true); // To enable video recording capabilities.setCapability("console", true); // To capture console logs try { driver = new RemoteWebDriver(new URL("https://" + username + ":" + authkey + gridURL), capabilities); } catch (MalformedURLException e) { System.out.println("Invalid grid URL"); } catch (Exception e) { System.out.println(e.getMessage()); } } @Test public void testSimple() throws Exception { try { //Change it to production page driver.get("https://4dvanceboy.github.io/lambdatest/lambdasampleapp.html"); //Let's mark done first two items in the list. driver.findElement(By.name("li1")).click(); driver.findElement(By.name("li2")).click(); // Let's add an item in the list. driver.findElement(By.id("sampletodotext")).sendKeys("Yey, Let's add it to list"); driver.findElement(By.id("addbutton")).click(); // Let's check that the item we added is added in the list. String enteredText = driver.findElementByXPath("/html/body/div/div/div/ul/li[6]/span").getText(); if (enteredText.equals("Yey, Let's add it to list")) { status = true; } } catch (Exception e) { System.out.println(e.getMessage()); } } @AfterClass public void tearDown() throws Exception { if (driver != null) { ((JavascriptExecutor) driver).executeScript("lambda-status=" + status); driver.quit(); } } } |
If you look at the configurations selected for running the test. They are our desired capabilities and the code provided for those capabilities is fetched from LambdaTest Capabilities Generator.
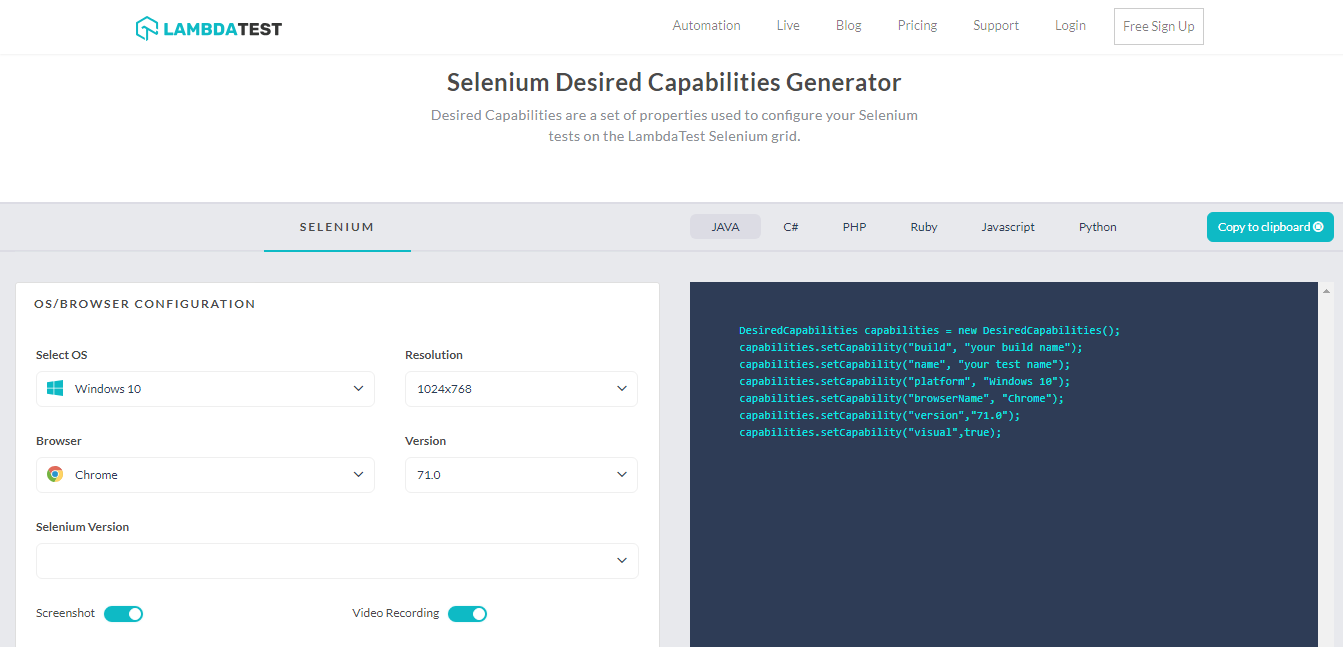
The button which says Copy to clipboard will help you to copy all the code based on your selections in just a single click.
That’s all you need for running your first automation test script using Selenium with TestNG at LambdaTest.
Executing Cross Browser Parallel Testing With TestNG Using LambdaTest
Now let us execute a single test on multiple configurations. Yes, we are talking about parallel test execution.
In order to execute parallel testing, you must generate a testng.xml file along with a test case which would make use of the below parameters:
org.testng.annotations.Parameters
Here is an example of parallel testing with the TestNG annotations parameter.
|
1 2 3 4 5 6 7 8 9 10 11 12 13 14 15 16 17 18 19 20 21 22 23 24 25 26 27 28 29 30 31 32 33 34 35 36 37 38 39 40 41 42 43 44 45 46 47 48 49 50 51 52 53 54 55 56 57 58 59 60 61 62 63 64 65 66 67 68 69 70 71 72 73 74 |
import org.openqa.selenium.By; import org.openqa.selenium.Platform; import org.openqa.selenium.WebDriver; import org.openqa.selenium.remote.DesiredCapabilities; import org.openqa.selenium.remote.RemoteWebDriver; import org.testng.Assert; import org.testng.annotations.AfterClass; import org.testng.annotations.BeforeClass; import org.testng.annotations.Test; import java.net.MalformedURLException; import java.net.URL; public class TestNGTodo { public String username = "YOUR_USERNAME"; public String authkey = "YOUR_ACCESS_KEY"; public static RemoteWebDriver driver = null; public String gridURL = "@hub.lambdatest.com/wd/hub"; boolean status = false; @BeforeClass @org.testng.annotations.Parameters(value={"browser","version","platform"}) public void setUp() throws Exception { DesiredCapabilities capabilities = new DesiredCapabilities(); capabilities.setCapability("browserName", "chrome"); capabilities.setCapability("version", "70.0"); capabilities.setCapability("platform", "win10"); // If this cap isn't specified, it will just get the any available one capabilities.setCapability("build", "LambdaTestSampleApp"); capabilities.setCapability("name", "LambdaTestJavaSample"); capabilities.setCapability("network", true); // To enable network logs capabilities.setCapability("visual", true); // To enable step by step screenshot capabilities.setCapability("video", true); // To enable video recording capabilities.setCapability("console", true); // To capture console logs try { driver = new RemoteWebDriver(new URL("https://" + username + ":" + authkey + gridURL), capabilities); } catch (MalformedURLException e) { System.out.println("Invalid grid URL"); } catch (Exception e) { System.out.println(e.getMessage()); } } @Test public void testSimple() throws Exception { try { //Change it to production page driver.get("https://4dvanceboy.github.io/lambdatest/lambdasampleapp.html"); //Let's mark done first two items in the list. driver.findElement(By.name("li1")).click(); driver.findElement(By.name("li2")).click(); // Let's add an item in the list. driver.findElement(By.id("sampletodotext")).sendKeys("Yey, Let's add it to list"); driver.findElement(By.id("addbutton")).click(); // Let's check that the item we added is added in the list. String enteredText = driver.findElementByXPath("/html/body/div/div/div/ul/li[6]/span").getText(); if (enteredText.equals("Yey, Let's add it to list")) { status = true; } } catch (Exception e) { System.out.println(e.getMessage()); } } @AfterClass public void tearDown() throws Exception { if (driver != null) { ((JavascriptExecutor) driver).executeScript("lambda-status=" + status); driver.quit(); } } } |
Now let us generate a tesng.xml file where we will be declaring basic test configurations such as browser, browser version, OS etc.
|
1 2 3 4 5 6 7 8 9 10 11 12 13 14 15 16 17 18 19 20 21 22 23 24 25 26 27 28 29 30 31 |
<?xml version="1.0" encoding="UTF-8"?> <!DOCTYPE suite SYSTEM "http://testng.org/testng-1.0.dtd"> <suite thread-count="3" name="LambaTestSuite" parallel="tests"> <test name="WIN8TEST"> <parameter name="browser" value="firefox"/> <parameter name="version" value="62.0"/> <parameter name="platform" value="WIN8"/> <classes> <class name="lambdatest.TestNGTodo "/> </classes> </test> <!-- Test --> <test name="WIN10TEST"> <parameter name="browser" value="chrome"/> <parameter name="version" value="70.0"/> <parameter name="platform" value="WIN10"/> <classes> <class name="lambdatest.TestNGTodo "/> </classes> </test> <!-- Test --> <test name="MACTEST"> <parameter name="browser" value="safari"/> <parameter name="version" value="11.0"/> <parameter name="platform" value="macos 10.13"/> <classes> <class name="lambdatest.TestNGTodo"/> </classes> </test> <!-- Test --> </suite> |
Kudos! That is all you need for successfully executing parallel automated tests using Selenium with TestNG on LambdaTest.
Nothing matches the feel you get after doing something new. So, feeling good after executing your first automation script? Let us know your experience in the comment section below.


Author’s Profile
Deeksha Agarwal
Deeksha Agarwal is in Product Growth at LambdaTest and is also a passionate tech blogger and product evangelist.
Blogs: 40
Got Questions? Drop them on LambdaTest Community. Visit now


