How to Handle Playwright Timeouts
Inimfon Willie
Posted On: August 28, 2025
19 Min


Handling Playwright timeouts is crucial to ensure tests run reliably and do not fail due to slow-loading pages or elements. It helps identify real issues instead of false negatives caused by temporary delays. Proper timeout management improves test stability, making automation more predictable. Additionally, it allows customization for different scenarios, balancing speed with accuracy in testing workflows.
Overview
Playwright uses timeouts to control how long it should wait for actions, events, or conditions before throwing an error. They help ensure tests fail quickly when something goes wrong rather than hanging indefinitely.
Types of Timeouts in Playwright
- Global Timeout: The top-level timeout that limits the duration of the entire test run. If reached, all tests stop immediately.
- Test Timeout: Sets the maximum time a single test (including hooks and fixtures) can run. Per-test overrides are allowed, but the global test timeout always wins.
- Hooks Timeout: Controls how long beforeAll, afterAll, beforeEach, and afterEach hooks can take. Defaults to the test timeout but can be overridden with testInfo.setTimeout().
- Fixture Timeout: Defines how long a fixture’s setup is allowed to run inside use(). If it exceeds the limit, the test fails.
- Action Timeout: Applies to user actions like click(), fill(), or check(). Can be set globally or per action. Overrides the test timeout for that specific action.
- Expect Timeout: Controls how long Playwright retries an expect() assertion before failing. Defaults to 5 seconds.
- Navigation Timeout: Applies to navigation methods such as page.goto() and page.waitForNavigation(). Can be configured separately from action timeouts.
How to Configure Playwright Timeouts
You can configure timeouts in Playwright globally or at a more granular level.
For example, set a default timeout for all actions with page.setDefaultTimeout(), or adjust navigation-specific waits with page.setDefaultNavigationTimeout().
Example: page.setDefaultTimeout(5000) // sets 5 seconds for actions
TABLE OF CONTENTS
- What Is a Timeout in Playwright?
- Why Use Playwright Timeouts?
- Types of Playwright Timeout
- How to Test Playwright Timeouts?
- How to Test Playwright Timeouts With LambdaTest?
- Changing Timeout Settings in Playwright
- Best Practices for Managing Playwright Timeouts
- Common Timeout Errors and Troubleshooting
- Frequently Asked Questions (FAQs)
Chapters
- What Is Playwright
- Installing Playwright
- Playwright Futuristic Features
- Performing Playwright Testing
- Playwright Reporting
- Playwright Inspector
- Playwright Inputs and Buttons
- Playwright Functions and Selectors
- Playwright Alerts and Dropdowns
- Playwright Frames and Windows
- Playwright iFrames
- Playwright Locators
- Playwright Date Pickers
- Playwright Assertions
- Playwright Page Object Model
- Scrolling to an Element in Playwright
- Playwright click() Method
- Playwright Wait for Navigation Methods
- Playwright Timeouts
- Playwright Projects
- Playwright Tags
- Playwright Docker
- Playwright Visual Regression Testing
- Playwright for Web Scraping
- Playwright JavaScript
- Playwright TypeScript
- Playwright Python
- Playwright Component Testing
- Playwright API Testing
- Playwright Headless Testing
- Playwright Proxy
- Playwright Sharding
- Auto Heal in Playwright
- Playwright With AI
- Best Playwright GitHub Repositories
What Is a Timeout in Playwright?
In Playwright, a timeout is the maximum amount of time the framework (Playwright) will wait for a particular action or event to complete before it considers the operation failed and throws an error.
For example, when testing a login form, after submitting the user credentials, Playwright waits for the authentication response or a specific element, like a dashboard or welcome message, to appear.
If the server takes too long to respond and the expected element doesn’t show up within the set timeout, Playwright throws a timeout error.
Why Use Playwright Timeouts?
Timeouts are what separate flaky tests from reliable ones. They help your automation handle real-world delays whether that’s a slow network, a delayed DOM update, or an API that takes a few seconds too long to respond.
Prevent Hanging Test Runs
Without timeouts, a test might keep waiting if something goes wrong. Maybe an API fails, the test runner just waits. It also takes time, consumes memory, and never ends.
Playwright overcome this with built-in default timeouts for tests, actions, and assertions. These ensure that tests automatically fail after the default time elapses, even if you didn’t set a specific timeout.
Example:
|
1 2 |
await expect(page.getByRole('button', {name:'Checkout'})) .toBeVisible({timeout: 10000}); |
If the button doesn’t show up within 10 seconds, the test fails immediately. If you don’t specify a timeout, Playwright uses its default value, so there are no infinite waits or wasted resources.
Handle Slow Loading Components
Not all slowness is a bug. Some components like animated dropdowns or sections powered by external APIs take longer to appear. A test that assumes instant visibility often fails for the wrong reasons.
Timeouts give elements room to load, failing only when they truly don’t show up.
Example:
|
1 2 |
await expect(page.locator('#mz-product-tab-37217979-0')) .toBeVisible({timeout: 15000}); |
Here, the test allows up to 15 seconds for the element to become visible. This protects your test from false failures caused by normal delays, while still failing fast if something genuinely breaks.
Faster Feedback on Failures
No one should wait five minutes to discover that a login flow is broken. Proper timeouts give you faster feedback when something goes wrong.
Example:
|
1 2 |
await expect(page.locator('.dashboard')) .toBeVisible({timeout: 8000}); |
The test waits up to 8 seconds for the dashboard to load. If it doesn’t appear, that’s likely a real issue: slow authentication, blocked API calls, or database lag.
Instead of long waits, you get quick, actionable feedback.
 Note
NoteRun your Playwright timeout tests across 50+ real browsers. Try LambdaTest Today!
Types of Playwright Timeout
Timeouts in Playwright control how long things are allowed to wait. Some wait for pages to load. Others wait for elements to show up or actions to complete.
Here are the main types of timeouts in Playwright:
Global Timeout
It is the top-level timeout. It sets the maximum time for the entire test run. If this is hit, all tests are stopped immediately, no matter what their individual timeouts are.
Example:
|
1 2 3 4 5 6 |
import { defineConfig } from '@playwright/test'; // playwright.config.ts export default defineConfig({ globalTimeout: 60*60*1000, // 1 hour }); |
Test Timeout
It sets the maximum time a single test (including hooks and fixtures) can run.
- Per-action or per-navigation timeouts can override it.
- But the overall test timeout always wins. If it’s hit, the test fails.
Global test timeout in config:
|
1 2 3 |
export default defineConfig({ timeout: 30*1000, // 30 seconds per test }); |
Per-test timeout:
|
1 2 3 |
test('slow test', async () => { test.setTimeout(60*1000); // 1 minute for this test only }); |
Hooks Timeout
It controls how long beforeAll, afterAll, beforeEach, and afterEach hooks can run.
- Defaults to the test timeout.
- Can be overridden using testInfo.setTimeout() inside the hook.
Example:
|
1 2 3 4 5 6 7 8 9 10 11 12 13 14 15 16 17 18 |
test.describe('Product Management', () => { test.beforeEach(async ({ page, database }) => { testInfo.setTimeout(20000); // 20s await database.cleanupTestData(); await page.goto('/admin/products'); await expect(page.locator('[data-testid="products-table"]')).toBeVisible(); }); test.afterEach(async ({ page }) => { testInfo.setTimeout(10000); // 10s if (test.info().status === 'failed') { await page.screenshot({ path: `test-results/failure-${test.info().title.replace(/\s/g, '-')}.png`, fullPage: true, }); } }); }); |
Fixture Timeout
It controls how long a fixture’s setup can take. If setup inside use() exceeds the timeout, the test fails.
Example with custom fixtures:
|
1 2 3 4 5 6 7 8 9 10 11 12 13 14 15 16 17 18 |
// Define fixture type type UserFixture = { username: string; password: string; }; // Extend base test const test = base.extend<UserFixture>({ username: [async ({}, use) => { const username = 'testuser'; await use(username); }, { timeout: 30_000 }], password: [async ({}, use) => { const password = 'testpass123'; await use(password); }, { timeout: 30_000 }], }); |
Here, both fixtures have a 30-second setup timeout.
Action Timeout
It sets the maximum time for user actions like click(), fill(), or check().
- Default: no timeout.
- Overrides test timeout for that action only.
Global config:
|
1 2 3 4 5 6 7 |
import { defineConfig } from '@playwright/test'; export default defineConfig({ use: { actionTimeout: 60*1000, // 1 minute }, }); |
Per-action timeout:
|
1 2 |
await page.getByRole('link', { name: 'My Account' }) .click({ timeout: 10000 }); |
Here, the click waits up to 10 seconds. Other actions follow the global/test timeout.
Expect Timeout
It controls how long Playwright retries expect() assertions before failing.
- Default: 5 seconds
- Retries automatically until timeout is hit.
Global config:
|
1 2 3 4 5 6 7 |
import { defineConfig } from '@playwright/test'; export default defineConfig({ expect: { timeout: 10000, // 10 seconds }, }); |
Per-assertion override:
|
1 2 |
await expect(page.locator('h1')) .toHaveText('My Account', { timeout: 10000 }); |
Navigation Timeout
It controls how long Playwright waits for page navigation events (e.g. page.goto(), page.waitForNavigation()).
- Affects page load delays due to network or server response times.
- Throws a timeout error if exceeded.
Global config:
|
1 2 3 4 5 6 7 |
import { defineConfig } from '@playwright/test'; export default defineConfig({ use: { navigationTimeout: 10000, // 10 seconds }, }); |
Per-navigation override:
|
1 |
await page.goto('https://lambdatest.com', { timeout: 15000 }); |
Here, Playwright waits up to 15 seconds for the page to load.
How to Test Playwright Timeouts?
In automation testing with Playwright, validating timeout scenarios is essential for building resilient test scripts that mirror real user behavior.
Progress bars often trigger timeout issues in tests. They appear during uploads, submissions, or background processing, and tests must wait until they complete.
This demonstration covers three strategies:
- Timeout failure demonstration.
- Progressive timeout strategy.
- Retry mechanism for flaky tests.
All examples use the Jquery Download Progress-Bar Demo of LambdaTest Selenium Playground.
Prerequisites
Make sure you have the following installed before starting:
- Node.js: v20.17.0 or above.
- npm: v10.8.2 or above.
- Playwright: v1.52.0 or above.
- Clone this Playwright Timeout Handling GitHub repository to access all code samples and configurations.
Project Structure
Organize your project like this for clarity and maintainability:
|
1 2 3 4 5 6 7 8 9 10 |
playwright-timeout/ ├── tests/ │ ├── progress-bar.spec.ts │ ├── dynamic-content.spec.ts │ ├── hover-interactions.spec.ts │ └── network-conditions.spec.ts ├── lambdatest-setup.ts ├── playwright.config.ts ├── package.json └── .env |
Timeout Failure
This test shows what happens when you set an unrealistic timeout. The progress bar never finishes in the given 1000ms, so the test fails as expected.
|
1 2 3 4 5 6 7 8 9 10 11 |
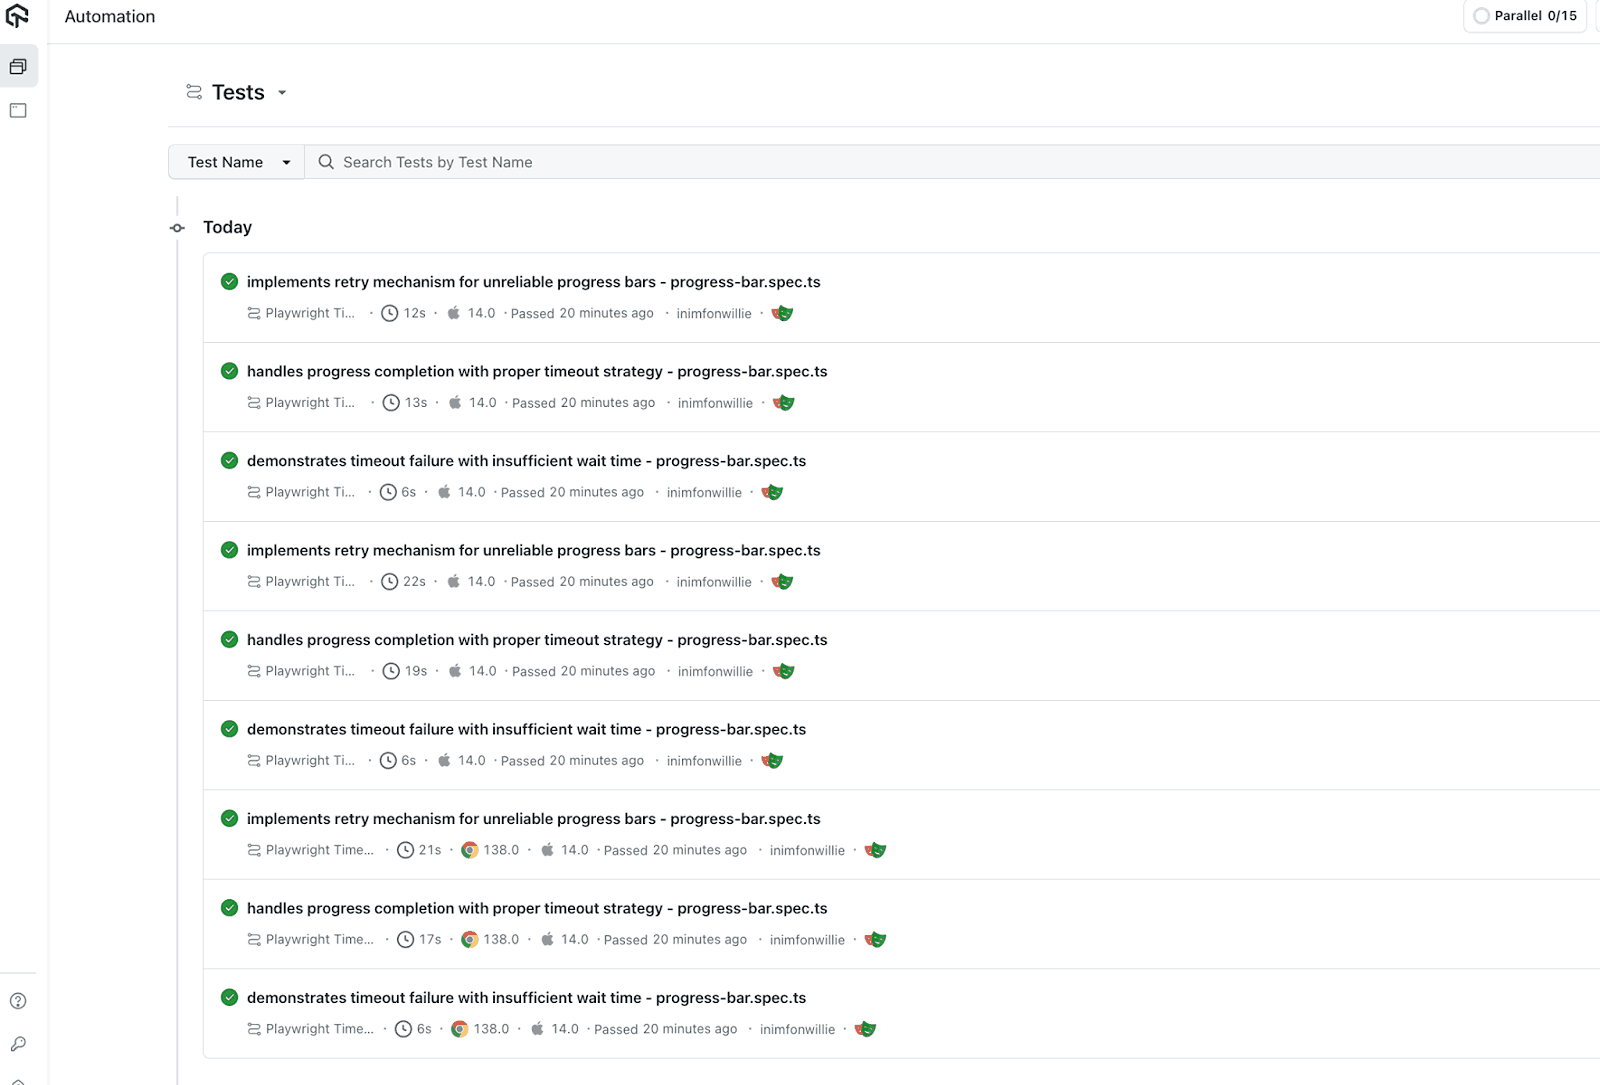
test('demonstrates timeout failure with insufficient wait time', async ({ page }) => { await page.click('#downloadButton'); // Intentionally fails to show poor timeout handling await expect(async () => { await expect(page.locator('.progress-label')) .toHaveText('Complete!', { timeout: 1000 }); }).rejects.toThrow(/Timed out/); console.log("Timeout failure successfully demonstrated"); }); |

Progressive Timeout Strategy
This test uses staged timeouts to handle delayed UI updates without false positives.
|
1 2 3 4 5 6 7 8 9 10 11 12 13 14 15 16 17 18 19 |
test('handles progress completion with proper timeout strategy', async ({ page }) => { const startTime = Date.now(); await page.click('#downloadButton'); // Step 1: Wait for progress bar to appear await expect(page.locator('#progressbar')).toBeVisible({ timeout: 10000 }); console.log('Progress bar appeared, waiting for completion...'); // Step 2: Wait for completion with extended timeout await expect(page.locator('.progress-label')) .toHaveText('Complete!', { timeout: 30000 }); const duration = Date.now() - startTime; console.log(`Progress completed in ${duration}ms`); // Step 3: Final verification await expect(page.locator('.progress-label')).toHaveText('Complete!'); }); |
Retry Mechanism for Flaky Progress Bars
Some UIs are inconsistent, so retries can help stabilize test runs.
|
1 2 3 4 5 6 7 8 9 10 11 12 13 14 15 16 17 18 19 20 21 22 23 24 25 26 27 |
test.describe.configure({ retries: 2 }); test.describe("Retry: Progress Bar Flake Handler", () => { const PROGRESS_URL = "https://www.lambdatest.com/selenium-playground/jquery-download-progress-bar-demo"; test.beforeEach(async ({ page }) => { await page.goto(PROGRESS_URL, { waitUntil: "domcontentloaded", timeout: 60000, }); }); test("implements retry mechanism for unreliable progress bars", async ({ page }, testInfo) => { if (testInfo.retry > 0) { console.log(`Retrying test (Attempt #${testInfo.retry})`); await page.reload({ waitUntil: "domcontentloaded" }); } await page.click("#downloadButton"); await expect(page.locator(".progress-label")).toHaveText("Complete!", { timeout: 30000, }); console.log("Progress completed successfully"); }); }); |
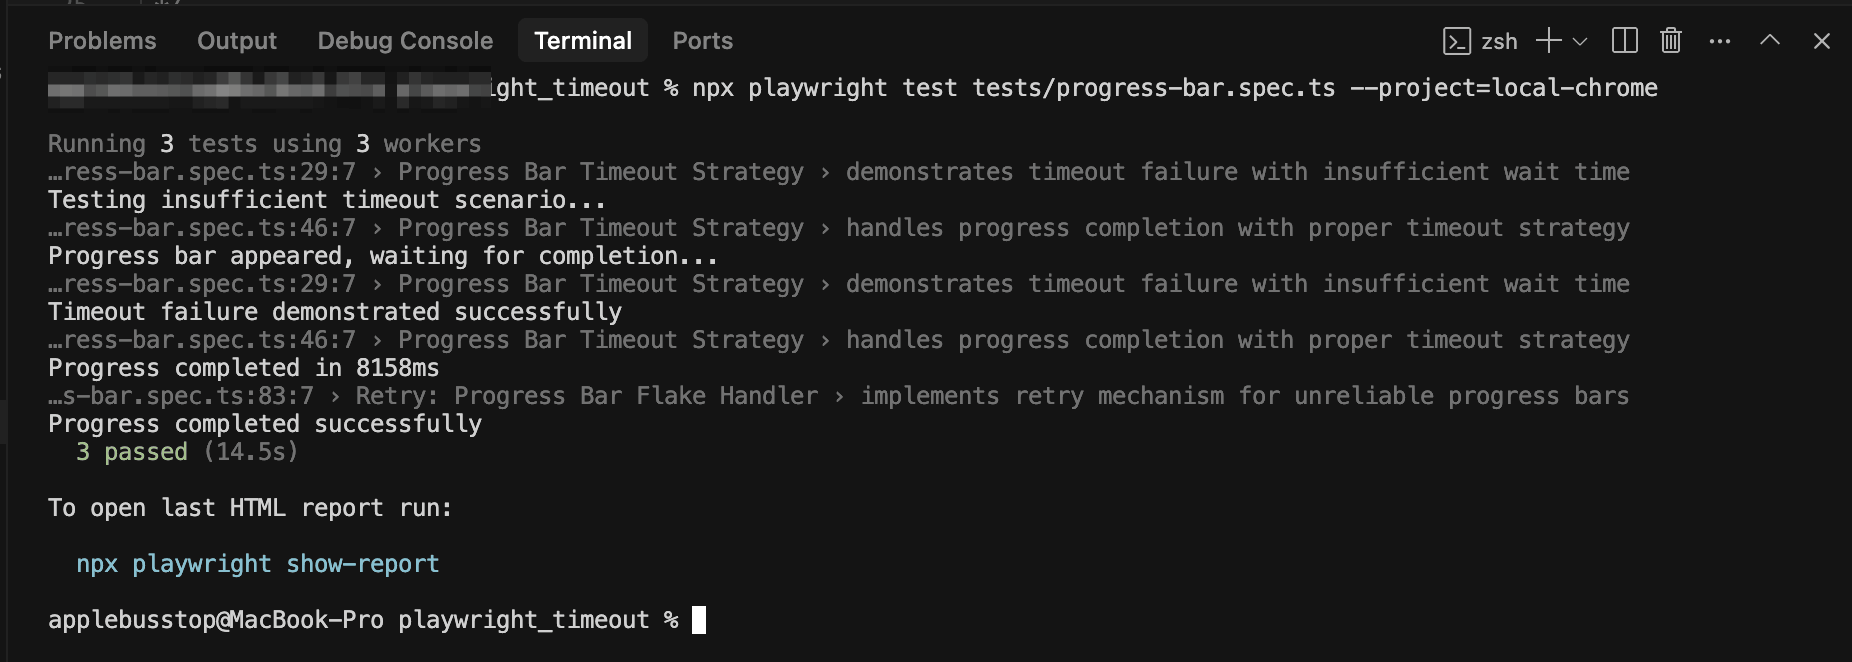
Test Execution:
Run the test on using the below command:
|
1 |
npx playwright test tests/progress-bar.spec.ts --project=local-chrome |
This command produces terminal output and an HTML report for detailed results.
How to Test Playwright Timeouts With LambdaTest?
Once your tests run locally, you can scale them to the cloud using LambdaTest. Running on LambdaTest Playwright automation cloud lets you validate Playwright timeout across multiple browsers, operating systems, and real-world network conditions.
The only difference is that your configuration must include LambdaTest Username and Access Key and Playwright automation capabilities so tests can run in the cloud. To get started, check out this guide on Playwright testing with LambdaTest.
To get your LambdaTest credentials, go to Account Settings, then click on Password & Security. You can generate capabilities from the LambdaTest Automation Capabilities Generator.
To run tests on the LambdaTest platform, you can follow the steps below:
Step 1: Create a .env file in your project root:
|
1 2 |
LT_USERNAME=your-username LT_ACCESS_KEY=your-access-key |
Step 2: Update the playwright.config.ts file by importing dotenv and load env vars:
|
1 2 3 4 5 6 7 8 9 10 11 |
import dotenv from 'dotenv'; import path from 'path'; dotenv.config({ path: path.resolve(__dirname, '.env') }); const LT_USERNAME = process.env.LT_USERNAME; const LT_ACCESS_KEY = process.env.LT_ACCESS_KEY; if (!LT_USERNAME || !LT_ACCESS_KEY) { console.error('Error: LambdaTest credentials not found.'); process.exit(1); } |
Now modify the playwright.config.ts file for running tests on LambdaTest:
|
1 2 3 4 5 6 7 8 9 10 11 12 13 |
export default defineConfig({ forbidOnly: !!process.env.CI, retries: process.env.CI ? 2 : 0, use: { baseURL: 'https://www.lambdatest.com/selenium-playground', trace: 'on-first-retry', }, projects: [ { name: "chrome:latest:macOS Sonoma@lambdatest" }, { name: "pw-firefox:latest:macOS Sonoma@lambdatest" }, { name: "pw-webkit:latest:macOS Sonoma@lambdatest" }, ], }); |
Step 3: Add the lambdatest-setup.ts file and define capabilities for different conditions:
|
1 2 3 4 5 6 7 8 9 10 11 12 13 14 15 |
export const baseCapabilities = { browserName: "Chrome", browserVersion: "latest", "LT:Options": { platform: "Windows 11", build: "Playwright Sample Build", name: "Playwright Sample Test", user: process.env.LT_USERNAME, accessKey: process.env.LT_ACCESS_KEY, video: true, console: true, resolution: "1920x1080", visual: true, }, }; |
Test Execution:
Run the below command to execute the test:
|
1 |
npx playwright test tests/progress-bar.spec.ts |
Changing Timeout Settings in Playwright
Timeouts let you control how long Playwright waits before failing. You can adjust them globally, per test, per action, or even per environment, depending on your needs.
Change Global Timeout
If you want a timeout that applies to all tests, set globalTimeout in your playwright.config.ts file:
|
1 2 3 4 5 6 |
// playwright.config.ts import { defineConfig } from '@playwright/test'; export default defineConfig({ globalTimeout: 6 * 1000, // 6 seconds }); |
Any test that runs longer than 6 seconds will fail automatically.
Change Timeout for a Single Test
If one of your tests takes longer (like login, checkout, or file upload), increase the limit using the test.setTimeout():
|
1 2 3 4 |
test('user registration', async ({ page }) => { test.setTimeout(30000); // 30 seconds // test steps... }); |
This way, you only extend the timeout for this test, not the whole suite.
Change Timeout for an Action
If one specific step takes longer (like a payment or API-heavy workflow), override the timeout just for that action:
|
1 2 3 4 5 |
// Normal clicks use default timeout await page.click('text=Reviews'); // Give the payment step extra time await page.click('button:has-text("Pay Now")', { timeout: 45000 }); |
You don’t slow down other actions, just the one that needs more time.
Change Timeout for an Assertion
If you’re waiting for a page change or element to appear, set a custom timeout on the assertion:
|
1 2 3 4 5 |
// Allow 20s for redirect await expect(page).toHaveURL(/.*account\/success/, { timeout: 20000 }); // Allow 15s for success message await expect(page.locator('h1')).toBeVisible({ timeout: 15000 }); |
Each check gets the time it really needs, nothing more.
Change Timeouts Per Environment
You can also give different environments their own timeout rules inside your config:
|
1 2 3 4 5 |
projects: [ { name: 'local-dev', use: { actionTimeout: 5000, navigationTimeout: 10000 } }, { name: 'staging', use: { actionTimeout: 10000, navigationTimeout: 20000 } }, { name: 'production',use: { actionTimeout: 20000, navigationTimeout: 45000 } } ] |
This way, your tests behave realistically whether you’re running locally, in staging, or in production.
Best Practices for Managing Playwright Timeouts
Timeouts can make tests fail if elements or responses take longer than expected. Following these practices will keep your playwright test stable, fast, and less prone to errors.
- Use Auto-Waiting Features: Playwright automatically waits for elements to be ready before performing any action on them, reducing the need for hard-coded delays. Relying on this auto-awaiting will make your tests more stable and faster.
- Use Web-First Assertions: Using Playwright assertions like toBeVisible() or toHaveText() will wait and retry until the expected state or condition is met, provided the timeout hasn’t run out. They reflect what a real user actually sees and help prevent false failure. So, prioritize using them in your test instead of hard waits.
- Set Appropriate Timeouts: When you’re testing on a slow Internet connection, adjust your timeouts to avoid unnecessary false failures. You can set global timeout or local ones on specific actions, giving Playwright enough time to handle slower responses.
- Use locator.waitFor When Necessary: When working with dynamically loaded content, explicitly wait for a specific state, such as visible or attached. Doing this will prevent flaky test failures when the element renders late or isn’t in the expected state. Avoid using fixed delays like waitForTimeOut().
- Use Optimized Locators and Prefer User-Facing Attributes: Prioritize using unique attributes like data-test-id or other user-facing identifiers instead of XPath or generic CSS selectors. These optimized Playwright locators or unique attributes will help Playwright to find elements faster, thereby reducing the risk of timeout errors and flaky tests.
Common Timeout Errors and Troubleshooting
Your test may occasionally take longer than anticipated when using Playwright, which could result in timeout problems. Fixes for these issues vary depending on their kind. These are the typical ones, along with their go-to solutions.
- Page Load Timeout: This type of error happens when the page you’re navigating to takes more than the default time to load, usually because of a slow network.
- Locator Timeout: This occurs if Playwright can’t find or interact with an element within the given time. This could be a result of delayed rendering, or the element is hidden during an animation.
- Assertion Timeout: Assertion timeouts happen when assertions like expect(page.locator(‘#status’)).toHaveText(‘Success’) do not resolve within the allocated or default timeout. This error is commonly caused by dynamic content when they do not appear as expected or when there’s a delay in rendering.
- Network Request Timeout: API calls can take too long if the server is slow or if there’s a connection issue. To handle this, set longer timeouts with page.setDefaultTimeout() after checking how long the request normally takes.
To resolve, check your URL first; it might be wrong. Then, you can increase your timeout for that specific navigation, for example, use page.goto(‘https://www.example.com’, {timeout: 60000}) or set global ones with page.setDefaultNavigationTimeout(60000).
For single-page apps, use page.waitForLoadState(‘domcontentloaded’) instead of the default ‘load’ to avoid waiting for images or other heavy media files.
To fix, ensure the element is visible before interaction with the locator.waitFor({ state: “visible” }) or expect(locator).toBeVisible().
You can also reduce locator timeout issues by using unique attributes like data-test-id or specific CSS selectors so Playwright can find elements faster, for example: await page.locator(‘[data-test-id=”submit-button”]’).click();
To troubleshoot in this situation, you can add an explicit wait, such as a locator.waitFor() before the assertion. You can also increase the assertion timeout using {timeout: <time>} when the content is consistently slow.
You can also use a page.waitForResponse() for important API calls or even mock slow responses with page.route() so tests don’t depend on actual server speed.
Conclusion
Handling timeouts properly can make a big difference in how stable your Playwright tests are. One of my test cases for this blog kept failing just because an image loaded a bit late. After adjusting the timeout in steps, first for loading, then for visibility, it finally passed. That small fix saved me a lot of time and headaches.
When you’re working with different speeds, animations, or network conditions, things don’t always behave the same way. That’s where platforms like LambdaTest come in handy. It lets you run your Playwright tests across real browsers and networks, so you can spot these issues early and fix them with confidence.
If you are working with Playwright proxy, it’s important to configure timeout settings carefully. Proxies can introduce additional latency, and adjusting timeouts ensures your tests remain stable and don’t fail due to delayed responses.
Frequently Asked Questions (FAQs)
Why do Playwright tests timeout at 30000ms when the element is visible?
This happens because Playwright checks if the element is fully actionable, not just visible. Animations, overlays, or layout shifts can block interactions even when you see the element. The timeout occurs until conditions stabilize and the element is truly ready.
How do I increase the timeout for only one specific action in Playwright?
Instead of changing global settings, you can pass a custom timeout option directly to that action. For example: await page.click(‘#submit’, { timeout: 10000 });. This approach avoids affecting unrelated actions, keeping other steps fast and consistent.
Why is my locator.waitFor() timing out even after I set page.setDefaultTimeout()?
The setDefaultTimeout() call defines a general timeout, but certain waits like locator.waitFor() only honor it when no explicit timeout is specified. If another method provides a stricter wait condition, it can override the default, causing unexpected timeouts.
How can I disable timeouts in Playwright for debugging purposes?
You can set timeout: 0 for any action to disable timeouts entirely. Another option is using the CLI with –timeout=0 while running tests. This flexibility helps debug long or complex steps without unnecessary failures interrupting your work.
Why does Playwright’s navigation timeout differ from other action timeouts?
Navigation involves page loads, redirects, and network responses, which often take longer than element actions. Playwright provides setDefaultNavigationTimeout() specifically for these cases. Separating navigation timeouts prevents tests from failing prematurely on slow networks while keeping element interactions responsive.
What is the difference between action timeout and expect timeout in Playwright?
Action timeouts apply to direct interactions like click(), type(), or fill(). Expect timeouts apply to assertions such as await expect(locator).toBeVisible(). Confusing the two leads to flaky results, since assertions often require longer stabilization than direct interactions.
Why does Playwright still timeout after increasing the global timeout in config?
Global timeouts in the playwright.config.ts file apply only to the overall test duration. Each individual action still follows its own timeout rules unless explicitly overridden. Increasing the global timeout alone won’t extend waits for locators, assertions, or navigation without customization.
How can I detect which step in my test exceeded the timeout?
Enable tracing with npx playwright show-trace trace.zip to view exactly where the timeout occurred. The trace highlights the failing step, whether it was navigation, element waiting, or assertion. This visibility helps diagnose root causes and streamline debugging efficiently.
Does Playwright retry on timeouts automatically?
Playwright does not automatically retry failed actions. However, you can configure test-level retries in the runner to rerun entire tests after a timeout. This is helpful for flaky infrastructure but should complement, not replace, fixing timing reliability issues directly.
Why does Playwright sometimes wait the full timeout even if the condition is impossible to meet?
Playwright optimistically waits until the timeout expires unless a hard failure occurs, such as a detached element. If conditions cannot be satisfied, it doesn’t abort early by default. Explicit checks or custom error handling are required for faster failure feedback.
Citations
- Playwright Timeouts: https://playwright.dev/docs/test-timeouts
Author
Inimfon is a Software Engineer with 5+ years of experience building robust and scalable applications across web and mobile platforms. He is skilled in Node.js, TypeScript, Flutter/Dart, and Go, delivering high-performance backend services and feature-rich mobile apps. Inimfon has a proven track record in API design, database management, and automated testing using tools like Playwright, ensuring reliable and maintainable software.
Blogs: 1