How To Find Broken Images Using Selenium WebDriver?
Himanshu Sheth
Posted On: February 17, 2021
![]() 139770 Views
139770 Views
![]() 21 Min Read
21 Min Read
A web product’s user experience is one of the key elements that help in user acquisition and user retention. Though immense focus should be given to the design & development of new product features, a continuous watch should be kept on the overall user experience. Like 404 pages (or dead links), broken images on a website (or web app) could also irk the end-users. Manual inspection and removal of broken images is not a feasible and scalable approach. Instead of using third-party tools to inspect broken images, you should leverage Selenium automation testing and see how to find broken images using Selenium WebDriver on your website.
In this part of the Selenium Tutorial, we look at how to find broken images on websites using Selenium WebDriver. From an end-user’s perspective, even a single broken image on a page could be an experience dampener – a prime reason to find broken images on websites. You can check out what WebDriver is, its features, how it works, best practices, and more in this WebDriver tutorial. If you are preparing for an interview you can learn more through Selenium interview questions.
By the end of this blog, you would be able to find broken images using Selenium WebDriver with Python, Java, C#, and PHP.
Starting your journey with Selenium WebDriver? Check out this step-by-step guide to perform Automation testing using Selenium WebDriver.
TABLE OF CONTENT
What are Broken Images in Web Testing?
Broken image is a link/image that does not show up as a picture, clicking upon which takes the end-user to a defunct picture. The user encounters a 404 Error when clicked on the broken image. This error means that there is an issue with the image URL, and the image is not loaded properly (due to various reasons).
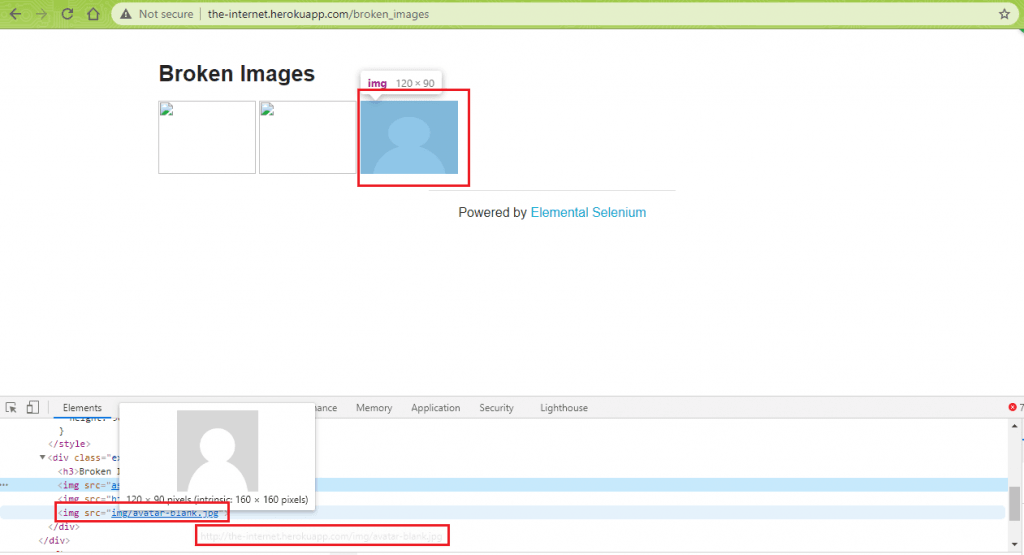
Shown below is an example of broken images on a website:
From an end-user experience and retention point of view, fixing broken images should be considered equally important as fixing broken links on websites. Selenium WebDriver can be used to find broken images on websites. The internal logic for locating broken images might vary based on how the images are fetched from the server.
Here are two ways in which images are read from the server:
- Absolute Path – As the name indicates, the website uses the absolute path (or complete path) in the ‘src’ attribute that specifies the path to the intended image. The <img> tag in HTML creates a holding space for the referenced image.
Shown below is an example of usage of an absolute path in the ‘src’ attribute of the <img> tag:
The image shown above is fetched from an absolute location (i.e., the HostName is used in the <src> attribute):
- Relative Path – On many websites, a relative image on a path is placed in the
attribute. The relative path is always relative to the root of the document (i.e., website/web app). For example, in <img src=”assets/img/image.jpg” alt=”some text”>; the path of image.jpg is relative to the root. If the website URL is https://www.someexample.com, the relative path of the image (image.jpg) will equate to https://www.someexample.com/assets/img/image.jpg
Here is a sample usage of relative path in the <src> attribute of the <img> tag:
You would be curious to know what leads to broken images on a website. Let’s look at the ‘why part’ of broken images?
Major reasons for Broken images on a webpage
Here are some of the prominent reasons that lead to broken images (i.e., file not found or 404 error for images) on a website (or web apps):
- Incorrect Image Format – In case you have uploaded the image in a .jpg format, but the image is identified as a .png format in the code, it leads to an error when the image is getting displayed. It is necessary to ensure that the image formats coincide when uploading to the server and referring to the same in the code.
- Incorrect Image URL – When rendering the specified image, the browser reads the image location from the <src> attribute in the <img> tag. If a wrong image path or incorrect filename is mentioned in the <src> attribute, it leads to issues in displaying the image (and 404 errors).
- Deleted Image file – The HTML code link could be referring to a file that is either wrongly spelled in the code or no longer exist on the server.
- Site relocation – After relocating the site from one provider to another, a thorough check should be conducted to verify whether all the site assets are available and accessible on the new server.
- 301 redirection – During a website redesign activity, 301 redirects should be done for the site content and the images used on the site. Along with the redirection of URLs, utmost attention should be given to the redirection of the images that reside in those URLs.
- Unavailability of the server – In scenarios where the server does not give a response within a certain time-frame, images would fail to appear on the site.
Like broken links, attention should be given to ensure that your web product is free from broken images.
Why should you check for broken images?
Here are the two major reasons for checking for broken images on websites:
- Broken images on a website hamper the end-user experience, which could negatively impact the growth of the product.
- Images are an essential part of the content marketing strategy. However, broken images could create SEO issues. Images with missing ALT tags and broken internal images are problematic from an SEO point of view and should be looked into on a high priority.
How to Find Broken Images Using Selenium WebDriver?
When a user visits a website, the user request is sent to the website’s server, which processes the request. In response to the browser’s request, the server sends a three-digit code referred to as the HTTP Status Code to the browser.
Some of the commonly used classes of HTTP Status Codes are 1xx, 2xx, 3xx, 4xx, and 5xx.
To find broken images using the Selenium WebDriver, we would be using the 4xx class of status code, indicating that the particular page or the complete website is not reachable. The status code of class 2xx (particularly 200) suggests that the request sent by the web browser was successful, and the appropriate response was sent to the browser.
When an image is not available on the server, a response code 404 (Page Not Found) is sent to the web browser. You can refer to our earlier blog for detailed information on HTTP Status Codes and Status Codes presented on the detection of broken links/images.
Irrespective of the programming language being used to detect broken images, the basic principles remain the same. Here are some of the steps that can be followed to find broken images on websites:
- Use the <img> tag to collect details of the images present on the page.
- For each <img> tag, get the attribute <src> from the tag.
- Convert the path obtained from the <src> attribute to an ‘Absolute Path.’ Conversion to absolute path might not be required for Selenium Java, Selenium C#, and Selenium Python. Converting the ‘relative path’ of the image(s) to ‘absolute path’ is a must when Selenium PHP is used.
- Send an HTTP request to the image link obtained from step(3) and capture the response code received in response to the request.
- Based on the response code sent by the server, you should validate whether the image is broken. Response code 200 (i.e., HttpStatusCode.OK) means that the image is available on the server.
- Validate whether the link is broken or not based on the response code sent by the server.
- Repeat steps (2-6) for every image present on the page.
The naturalWidth attribute returns the original width of the image, and it is zero for a broken image. For Selenium with Java, you could also check if the naturalWidth attribute of the image is zero or not.
In this Selenium Tutorial, we demonstrate how to find broken images using Selenium WebDriver in Java, Python, C#, and PHP. The tests are run on the latest version of the Chrome Browser on the Windows 10 platform. The execution is carried out on the cloud-based Selenium Grid provided by LambdaTest.
To get started with LambdaTest, you should create an account on the website and note the user-name & access-key from the profile section on LambdaTest. The browser capabilities are generated using LambdaTest Capabilities Generator.
Here is the test scenario to find broken images on the website:
Test Scenario
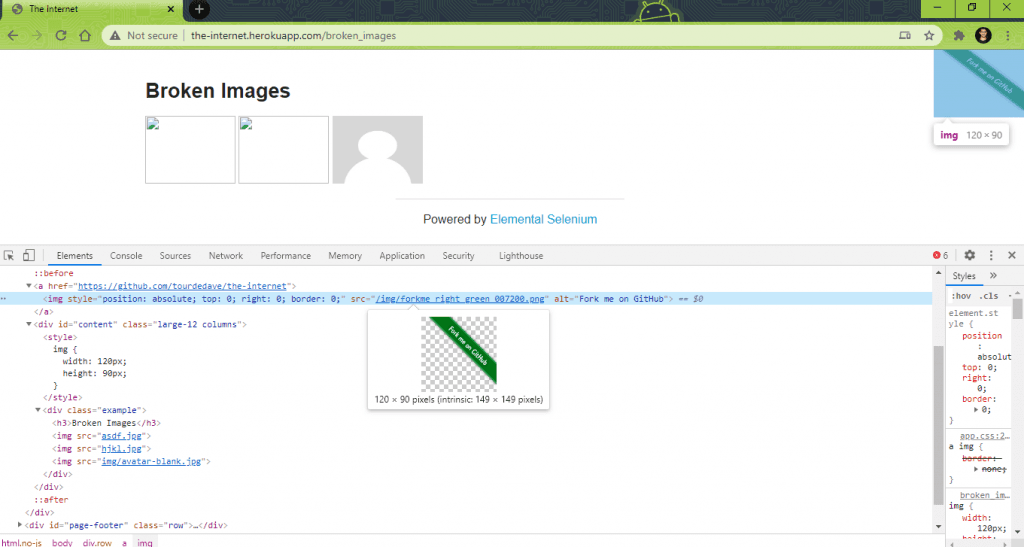
- Go to https://the-internet.herokuapp.com/broken_images on Chrome (latest)
- Read the details about the images present on the page
- Send HTTP request for each image
- Check the response code of the HTTP request. If the response code is 200, the image is not broken; else, the image is broken.
- Print whether the image is broken or not on the terminal
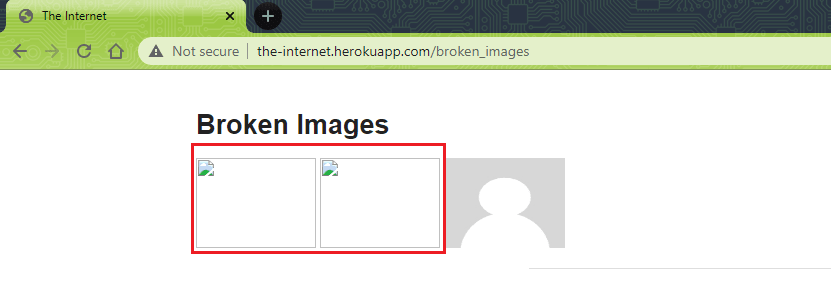
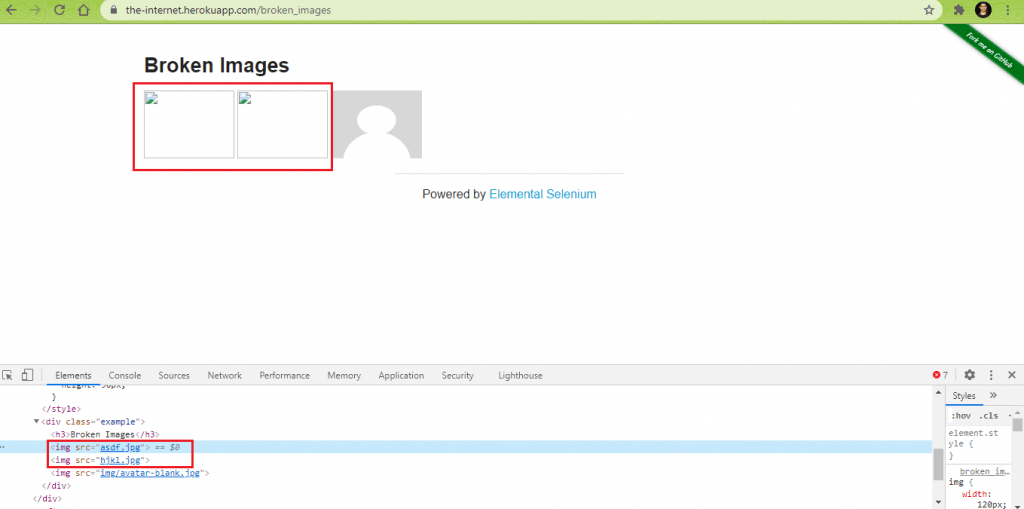
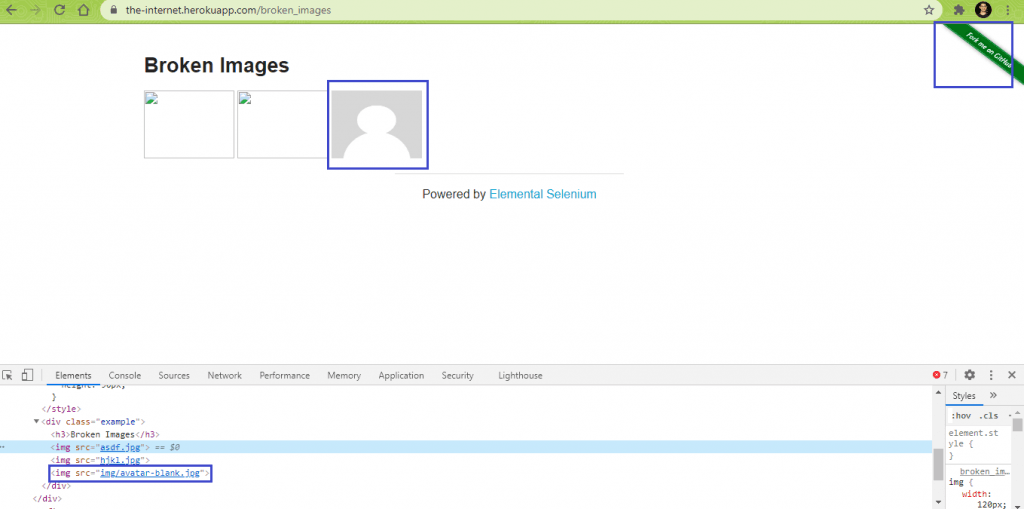
The URL under test https://the-internet.herokuapp.com/broken_images has two broken images and two proper images.
Shown below are the two broken images on the website:
Here are the two proper (or not broken) images on the website:
How to find Broken Images using Selenium Java?
FileName – pom.xml
Implementation
|
1 2 3 4 5 6 7 8 9 10 11 12 13 14 15 16 17 18 19 20 21 22 23 24 25 26 27 28 29 30 31 32 33 34 35 36 37 38 39 40 41 42 43 44 45 46 47 48 49 50 51 52 53 54 55 56 57 58 59 60 61 62 63 64 65 66 |
<?xml version="1.0" encoding="UTF-8"?> <project xmlns="http://maven.apache.org/POM/4.0.0" xmlns:xsi="http://www.w3.org/2001/XMLSchema-instance" xsi:schemaLocation="http://maven.apache.org/POM/4.0.0 http://maven.apache.org/xsd/maven-4.0.0.xsd"> <modelVersion>4.0.0</modelVersion> <groupId>org.brokenimages</groupId> <artifactId>BrokenImages</artifactId> <version>1.0-SNAPSHOT</version> <dependencies> <dependency> <groupId>org.testng</groupId> <artifactId>testng</artifactId> <version>6.9.10</version> <scope>test</scope> </dependency> <dependency> <groupId>org.slf4j</groupId> <artifactId>slf4j-nop</artifactId> <version>1.7.28</version> <scope>test</scope> </dependency> <dependency> <groupId>org.seleniumhq.selenium</groupId> <artifactId>selenium-java</artifactId> <version>4.0.0-alpha-7</version> </dependency> <dependency> <groupId>org.seleniumhq.selenium</groupId> <artifactId>selenium-remote-driver</artifactId> <version>4.0.0-alpha-7</version> </dependency> <dependency> <groupId>org.seleniumhq.selenium</groupId> <artifactId>selenium-chrome-driver</artifactId> <version>4.0.0-alpha-7</version> </dependency> <dependency> <groupId>org.apache.httpcomponents</groupId> <artifactId>httpclient</artifactId> <version>4.5.13</version> </dependency> </dependencies> <build> <defaultGoal>install</defaultGoal> <plugins> <plugin> <artifactId>maven-compiler-plugin</artifactId> <version>3.0</version> <configuration> <source>1.8</source> <target>1.8</target> </configuration> </plugin> <plugin> <groupId>org.apache.maven.plugins</groupId> <artifactId>maven-compiler-plugin</artifactId> <configuration> <source>11</source> <target>11</target> </configuration> </plugin> </plugins> </build> </project> |
FileName – testng.xml
|
1 2 3 4 5 6 7 8 9 10 |
<?xml version="1.0" encoding="UTF-8"?> <!DOCTYPE suite SYSTEM "http://testng.org/testng-1.0.dtd"> <suite name="Broken Images Detection Demo"> <test verbose="2" preserve-order="true" name="Detect broken images in Selenium WebDriver"> <classes> <class name="brokenimages.test_brokenimages"> </class> </classes> </test> </suite> |
FileName – test_brokenimages.java
|
1 2 3 4 5 6 7 8 9 10 11 12 13 14 15 16 17 18 19 20 21 22 23 24 25 26 27 28 29 30 31 32 33 34 35 36 37 38 39 40 41 42 43 44 45 46 47 48 49 50 51 52 53 54 55 56 57 58 59 60 61 62 63 64 65 66 67 68 69 70 71 72 73 74 75 76 77 78 79 80 81 82 83 84 85 86 87 88 89 90 91 92 93 94 95 96 97 98 99 100 101 102 103 104 105 106 107 108 109 110 111 112 113 114 115 116 117 118 119 120 121 122 123 124 125 126 127 128 129 130 131 132 133 134 |
package brokenimages; import java.io.IOException; import java.net.MalformedURLException; import java.util.List; import org.apache.http.HttpResponse; import org.apache.http.client.HttpClient; import org.apache.http.client.methods.HttpGet; import org.apache.http.impl.client.HttpClientBuilder; import org.openqa.selenium.By; import java.net.URL; import org.openqa.selenium.JavascriptExecutor; import org.openqa.selenium.WebDriver; import org.openqa.selenium.WebElement; import org.openqa.selenium.remote.DesiredCapabilities; import org.openqa.selenium.remote.RemoteWebDriver; import org.testng.annotations.AfterClass; import org.testng.annotations.BeforeClass; import org.testng.annotations.Test; public class test_brokenimages { /* protected static ChromeDriver driver; */ WebDriver driver = null; String URL = "https://the-internet.herokuapp.com/broken_images"; public static String status = "passed"; String username = "user-name"; String access_key = "access-key"; @BeforeClass public void testSetUp() throws MalformedURLException { DesiredCapabilities capabilities = new DesiredCapabilities(); capabilities.setCapability("build", "[Java] Finding broken images on a webpage using Selenium"); capabilities.setCapability("name", "[Java] Finding broken images on a webpage using Selenium"); capabilities.setCapability("platform", "Windows 10"); capabilities.setCapability("browserName", "Chrome"); capabilities.setCapability("version","latest"); capabilities.setCapability("tunnel",false); capabilities.setCapability("network",true); capabilities.setCapability("console",true); capabilities.setCapability("visual",true); driver = new RemoteWebDriver(new URL("http://" + username + ":" + access_key + "@hub.lambdatest.com/wd/hub"), capabilities); System.out.println("Started session"); } @Test(description="Approach 1: Find broken images on a web page using Selenium WebDriver", enabled=true) protected void test_selenium_broken_images_appr_1() { Integer iBrokenImageCount = 0; driver.navigate().to(URL); driver.manage().window().maximize(); try { iBrokenImageCount = 0; List<WebElement> image_list = driver.findElements(By.tagName("img")); /* Print the total number of images on the page */ System.out.println("The page under test has " + image_list.size() + " images"); for (WebElement img : image_list) { if (img != null) { HttpClient client = HttpClientBuilder.create().build(); HttpGet request = new HttpGet(img.getAttribute("src")); HttpResponse response = client.execute(request); /* For valid images, the HttpStatus will be 200 */ if (response.getStatusLine().getStatusCode() != 200) { System.out.println(img.getAttribute("outerHTML") + " is broken."); iBrokenImageCount++; } } } } catch (Exception e) { e.printStackTrace(); status = "failed"; System.out.println(e.getMessage()); } status = "passed"; System.out.println("The page " + URL + " has " + iBrokenImageCount + " broken images"); } @Test(description="Approach 2: Find broken images on a web page using Selenium WebDriver", enabled = true) protected void test_selenium_broken_images_appr_2() { Integer iBrokenImageCount = 0; driver.navigate().to(URL); driver.manage().window().maximize(); try { iBrokenImageCount = 0; List<WebElement> image_list = driver.findElements(By.tagName("img")); /* Print the total number of images on the page */ System.out.println("The page under test has " + image_list.size() + " images"); for (WebElement img : image_list) { if (img != null) { if (img.getAttribute("naturalWidth").equals("0")) { System.out.println(img.getAttribute("outerHTML") + " is broken."); iBrokenImageCount++; } } } } catch (Exception e) { e.printStackTrace(); status = "failed"; System.out.println(e.getMessage()); } status = "passed"; System.out.println("The page " + URL + " has " + iBrokenImageCount + " broken images"); } @AfterClass public void tearDown() { if (driver != null) { ((JavascriptExecutor) driver).executeScript("lambda-status=" + status); driver.quit(); } } } |
Code Walkthrough [Approach – 1]
1. Import the required packages
The Apache HttpClient library is used for handling the HTTP requests. To use the latest version of HttpClient library, the dependency for the library is added to the Maven Build file (pom.xml).
|
1 2 3 4 5 |
<dependency> <groupId>org.apache.httpcomponents</groupId> <artifactId>httpclient</artifactId> <version>4.5.13</version> </dependency> |
To find the broken images on the page under test, the HttpClient library is used for checking the status codes of the images present on the page. The necessary packages are imported so that its methods can be used in the implementation.
|
1 2 3 4 |
import org.apache.http.HttpResponse; import org.apache.http.client.HttpClient; import org.apache.http.client.methods.HttpGet; import org.apache.http.impl.client.HttpClientBuilder; |
2. Find all the images on the page
The findElements method in Selenium is used for fetching the details of all the images present on the page. The images are located using the tagName ‘ img.’
The images are placed in a list, which will be further iterated to find broken images on the page.
|
1 2 |
List<WebElement> image_list = driver.findElements(By.tagName("img")); System.out.println("The page under test has " + image_list.size() + " images"); |
3. Create a new instance of HttpClient
The HttpClient class offers an API that primarily consists of three core classes – HttpClient, HttpRequest, and HttpResponse. HttpResponse describes the result of an HttpRequest call. For reading the response body, we create a new instance of HttpClient and request the objects. The new instance of the class is created with the build() method of HttpClientBuilder class.
|
1 |
HttpClient client = HttpClientBuilder.create().build(); |
4. Create a new instance of HttpGet
CloseableHttpClient provides the execute method for sending and receiving the data. The execute method uses the parameter of type HttpUriRequest, which has many sub-classes, including HttpGet and HttpPost.
We first create a new HttpGet object with the HttpUriRequest set to path retrieved by reading the src attribute in the WebElement img.
|
1 |
HttpGet request = new HttpGet(img.getAttribute("src")); |
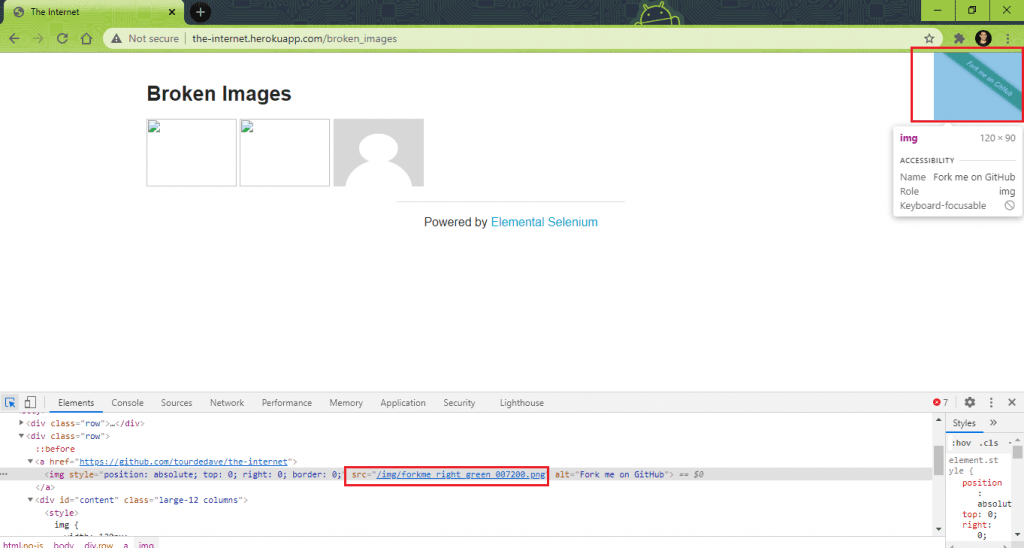
For example – getAttribute(“src”) for the image “Fork me on GitHub” will return /img/forkme_right_green_007200.png.
5. Retrieve the response object
The execute method executes the HTTP request using the default context. It returns the response body (i.e. HttpResponse).
|
1 |
HttpResponse response = client.execute(request); |
6. Read the Status Code
The getStatusLine method of the HttpResponse class obtains the status line of the response [obtained from step(5)]. The getStatusCode method returns the HttpStatus in an integer format. Response Code 200 (SC_OK) means that the HTTP request was executed successfully.
|
1 2 3 4 5 |
if (response.getStatusLine().getStatusCode() != 200) { System.out.println(img.getAttribute("outerHTML") + " is broken."); iBrokenImageCount++; } |
If HttpStatus is 200, the concerned image is not broken, whereas HttpStatus for a broken image is 404. Steps (3) thru’ (6) are repeated for all the WebElement entries in the image list. The outerHTML attribute for the broken images is printed for reference on the terminal.
Code Walkthrough [Approach – 2]
1. Find all the images on the page
Similar to Step(2) in Approach – 1, the findElements method in Selenium is used to fetch the details of images present on the image. The tagName img is used with the findElements method to achieve the same.
|
1 |
List< WebElement > image_list = driver.findElements(By.tagName("img")); |
2. Read the naturalWidth attribute
The naturalWidth attribute of the WebElements identified in Step(1) is read. For broken images, naturalWidth will be zero whereas it is non-zero for normal images.
|
1 2 3 4 5 |
if (img.getAttribute("naturalWidth").equals("0")) { System.out.println(img.getAttribute("outerHTML") + " is broken."); iBrokenImageCount++; } |
Step (2) is repeated for all the WebElements in the list image_list, which was obtained in Step (1). The variable iBrokenImageCount indicates the number of broken images on the page.
Execution
Shown below are the execution snapshots of Approach – 1 and Approach – 2. As expected, we see that there are two broken images on the webpage under test.


How to find Broken Images using Selenium Python?
Implementation
FileName – test_brokenimages.py
|
1 2 3 4 5 6 7 8 9 10 11 12 13 14 15 16 17 18 19 20 21 22 23 24 25 26 27 28 29 30 31 32 33 34 35 36 37 38 39 40 41 42 43 44 45 46 47 48 49 |
import requests import urllib3 import pytest from requests.exceptions import MissingSchema, InvalidSchema, InvalidURL from selenium import webdriver from selenium.webdriver.common.by import By from selenium.webdriver.support.ui import WebDriverWait from selenium.webdriver.support import expected_conditions as EC from selenium.webdriver.common.keys import Keys capabilities = { "build": "[Python] Finding broken images on a webpage using Selenium", "name": "[Python] Finding broken images on a webpage using Selenium", "platform": "Windows 10", "browserName": "Chrome", "version": "latest" } user_name = "user-name" app_key = "access-key" URL = "https://the-internet.herokuapp.com/broken_images" iBrokenImageCount = 0 urllib3.disable_warnings(urllib3.exceptions.InsecureRequestWarning) remote_url = "http://" + user_name + ":" + app_key + "@hub.lambdatest.com/wd/hub" driver = webdriver.Remote(command_executor=remote_url, desired_capabilities=capabilities) driver.maximize_window() driver.get(URL) image_list = driver.find_elements(By.TAG_NAME, "img") print('Total number of images on '+ URL + ' are ' + str(len(image_list))) for img in image_list: try: response = requests.get(img.get_attribute('src'), stream=True) if (response.status_code != 200): print(img.get_attribute('outerHTML') + " is broken.") iBrokenImageCount = (iBrokenImageCount + 1) except requests.exceptions.MissingSchema: print("Encountered MissingSchema Exception") except requests.exceptions.InvalidSchema: print("Encountered InvalidSchema Exception") except: print("Encountered Some other Exception") driver.quit() print('The page ' + URL + ' has ' + str(iBrokenImageCount) + ' broken images') |
Code Walkthrough
1. Import Modules
The requests module is imported so that we can send HTTP requests to the target URL. In case the requests module is not installed on the dev machine, run the command pip install requests to install the same.
|
1 2 3 |
import requests import urllib3 from requests.exceptions import MissingSchema, InvalidSchema, InvalidURL |
2. Fetch details about the images present on the page
WebElements with the ‘img’ tag are read using the find_elements method in Selenium.
|
1 |
image_list = driver.find_elements(By.TAG_NAME, "img") |
3. Send an HTTP request
The get() method in the requests module sends a GET request to the URL passed to it. The src attribute in the img tag contains the location of the image on the server. It is passed to the requests.get() method. Stream in the get() method is set to true, so the response to the HTTP request is immediately downloaded.
|
1 |
response = requests.get(img.get_attribute('src'), stream=True) |
In return, we get requests.Response() object that contains the server’s response to the HTTP request.
4. Read the Status Code from the Response object
The status_code property in requests.Response() object indicates the status of the HTTP request. HTTP Status Code of 200 means that the image is not broken whereas the image is broken if the Status Code is 404.
|
1 2 3 |
if (response.status_code != 200): print(img.get_attribute('outerHTML') + " is broken.") iBrokenImageCount = (iBrokenImageCount + 1) |
Repeat steps (3) through (4) for all the WebElement entries in the list (i.e., image_list).
Execution
We run the file by triggering the command python <file_name.py> on the terminal. As shown below, two broken images were found on the page under test.

How to find Broken Images using Selenium C#?
Implementation
FileName – BrokenImageTest.cs
|
1 2 3 4 5 6 7 8 9 10 11 12 13 14 15 16 17 18 19 20 21 22 23 24 25 26 27 28 29 30 31 32 33 34 35 36 37 38 39 40 41 42 43 44 45 46 47 48 49 50 51 52 53 54 55 56 57 58 59 60 61 62 63 64 65 66 67 68 69 70 71 72 73 74 75 76 77 78 79 80 81 82 83 84 85 86 87 88 89 90 91 92 93 94 95 96 97 98 99 100 101 102 103 104 105 |
using OpenQA.Selenium; using OpenQA.Selenium.Remote; using OpenQA.Selenium.Chrome; using NUnit.Framework; using System.Threading; using System.Collections.Generic; using System.Linq; using System.Net; using OpenQA.Selenium.Remote; using System; using System.Threading; using System.Net.Http; using System.Threading.Tasks; namespace TestBrokenImages { [TestFixture("chrome", "latest", "Windows 10")] public class TestBrokenImages { private String browser; private String version; private String os; IWebDriver driver; public TestBrokenImages(String browser, String version, String os) { this.browser = browser; this.version = version; this.os = os; } [SetUp] public void Init() { String username = "user-name"; String accesskey = "access-key"; String gridURL = "@hub.lambdatest.com/wd/hub"; DesiredCapabilities capabilities = new DesiredCapabilities(); capabilities.SetCapability("user", username); capabilities.SetCapability("accessKey", accesskey); capabilities.SetCapability("browserName", browser); capabilities.SetCapability("version", version); capabilities.SetCapability("platform", os); capabilities.SetCapability("build", "[C#] Finding broken images on a webpage using Selenium"); capabilities.SetCapability("name", "[C#] Finding broken images on a webpage using Selenium"); driver = new RemoteWebDriver(new Uri("https://" + username + ":" + accesskey + gridURL), capabilities, TimeSpan.FromSeconds(600)); System.Threading.Thread.Sleep(2000); } [Test] public async Task LT_Broken_Images_Test() { int broken_images = 0; String test_url = "https://the-internet.herokuapp.com/broken_images"; driver.Url = test_url; using var client = new HttpClient(); var image_list = driver.FindElements(By.TagName("img")); /* Loop through all the images */ foreach (var img in image_list) { try { /* Get the URI */ HttpResponseMessage response = await client.GetAsync(img.GetAttribute("src")); /* Reference - https://docs.microsoft.com/en-us/dotnet/api/system.net.httpwebresponse.statuscode?view=netcore-3.1 */ if (response.StatusCode == HttpStatusCode.OK) { System.Console.WriteLine("Image at the link " + img.GetAttribute("src") + " is OK, status is " + response.StatusCode); } else { System.Console.WriteLine("Image at the link " + img.GetAttribute("src") + " is Broken, status is " + response.StatusCode); broken_images++; } } catch (Exception ex) { if ((ex is ArgumentNullException) || (ex is NotSupportedException)) { System.Console.WriteLine("Exception occured\n"); } } } /* Perform wait to check the output */ System.Threading.Thread.Sleep(2000); Console.WriteLine("\nThe page " + test_url + " has " + broken_images + " broken images"); } [TearDown] public void Cleanup() { if (driver != null) driver.Quit(); } } } |
Code Walkthrough
We have used the NUnit framework for demonstration. You can check out our earlier blog on NUnit Test automation with Selenium C# to get started with the NUnit framework.
1. Include HttpClient namespace
The HttpClient class provides the base class used for sending HTTP requests and receiving the corresponding response from the resource identified by URI.
It is recommended to use HttpClient instead of HttpWebRequest (of the System.Net.HttpWebRequest namespace) for detecting broken images using Selenium WebDriver.
|
1 2 |
using System.Net.Http; using System.Threading.Tasks; |
2. Create a method that returns an async task
The GetAsync method is used for sending a GET request to the specified URI as an asynchronous operation.
|
1 2 3 |
[Test] public async Task LT_Broken_Images_Test() { |
3. Create an instance of HttpClient
An instance of the HttpClient is created. The methods offered by HttpClient class will be further used for fetching the details of images present on the page under test.
|
1 |
using var client = new HttpClient(); |
4. Read the images present on the page
The details of the images present on the page are fetched by locating the WebElements with TagName ‘img’ property.
|
1 |
var image_list = driver.FindElements(By.TagName("img")); |
The findElements method returns a list that is iterated to check the broken images on the page.
5. Iterate through the image list to check for broken images
The GetAsync method in HttpClient class sends an async GETrequest to the corresponding URI. The value of the anchor’s ‘src’ attribute collected using the GetAttribute method is passed in the GetAsync method.
|
1 2 3 4 5 6 |
foreach (var img in image_list) { try { /* Get the URI */ HttpResponseMessage response=await client.GetAsync(img.GetAttribute("src")); |
6. Read the HttpStatus Code
On completion of the Async operation in Step(5), HttpResponseMessage is returned. The response includes the data and status code. Response code HttpStatusCode.OK (i.e., 200) indicates that the image was located on the server, and it was read successfully. We keep a counter of the number of broken images on the page.
|
1 2 3 4 5 6 7 8 9 |
if (response.StatusCode == HttpStatusCode.OK) { System.Console.WriteLine("Image at the link " + img.GetAttribute("src") + " is OK, status is "+ response.StatusCode); } else { System.Console.WriteLine("Image at the link " + img.GetAttribute("src") + " is Broken, status is "+ response.StatusCode); broken_images++; } |
The exceptions NotSupportedException and ArgumentNullException are handled as part of exception handling.
|
1 2 3 4 5 6 7 |
catch (Exception ex) { if ((ex is ArgumentNullException) || (ex is NotSupportedException)) { System.Console.WriteLine("Exception occured\n"); } } |
Execution
Here is the execution snapshot, which indicates that two broken images were present on the page under test.


How to find Broken Images using Selenium PHP?
Implementation
FileName – composer.json
|
1 2 3 4 5 6 7 8 |
{ "require":{ "php":">=7.1", "phpunit/phpunit":"^9", "phpunit/phpunit-selenium": "*", "php-webdriver/webdriver":"*" } } |
FileName – tests\BrokenImageTest.php
|
1 2 3 4 5 6 7 8 9 10 11 12 13 14 15 16 17 18 19 20 21 22 23 24 25 26 27 28 29 30 31 32 33 34 35 36 37 38 39 40 41 42 43 44 45 46 47 48 49 50 51 52 53 54 55 56 57 58 59 60 61 62 63 64 65 66 67 68 69 70 71 72 73 74 75 76 77 78 79 80 81 82 83 84 85 86 87 88 89 90 91 92 93 94 95 96 97 98 99 100 101 102 103 104 105 106 107 108 109 110 111 112 113 114 115 116 117 118 119 120 121 122 123 124 125 126 127 128 129 130 131 132 133 134 135 |
<?php require 'vendor/autoload.php'; use PHPUnit\Framework\TestCase; use Facebook\WebDriver\Remote\DesiredCapabilities; use Facebook\WebDriver\Remote\RemoteWebDriver; use Facebook\WebDriver\WebDriverBy; $GLOBALS['LT_USERNAME'] = "user-name"; # accessKey: AccessKey can be generated from automation dashboard or profile section $GLOBALS['LT_APPKEY'] = "access-key"; class BrokenImageTest extends TestCase { protected $webDriver; public function build_browser_capabilities(){ /* $capabilities = DesiredCapabilities::chrome(); */ $capabilities = array( "build" => "[PHP] Finding broken images on a webpage using Selenium", "name" => "[PHP] Finding broken images on a webpage using Selenium", "platform" => "macOS High Sierra", "browserName" => "MicrosoftEdge", "version" => "latest" ); return $capabilities; } public function setUp(): void { $capabilities = $this->build_browser_capabilities(); /* Download the Selenium Server 3.141.59 from https://selenium-release.storage.googleapis.com/3.141/selenium-server-standalone-3.141.59.jar */ $url = "https://". $GLOBALS['LT_USERNAME'] .":" . $GLOBALS['LT_APPKEY'] ."@hub.lambdatest.com/wd/hub"; $this->webDriver = RemoteWebDriver::create($url, $capabilities); } public function tearDown(): void { $this->webDriver->quit(); } /* * @test */ public function test_searchbrokenimages() { $test_url = "https://the-internet.herokuapp.com/broken_images"; # For site with absolute path # $test_url = "https://www.lambdatest.com/blog"; # End - For site with absolute path $base_url = "https://the-internet.herokuapp.com/"; $driver = $this->webDriver; $driver->get($test_url); $this->assertEquals("The Internet", $driver->getTitle()); # For site with absolute path # $this->assertEquals("LambdaTest | A Cross Browser Testing Blog", $driver->getTitle()); # End - For site with absolute path $driver->manage()->window()->maximize(); $iBrokenImageCount = 0; /* file_get_contents is used to get the page's HTML source */ $html = file_get_contents($test_url); /* Instantiate the DOMDocument class */ $htmlDom = new DOMDocument; /* The HTML of the page is parsed using DOMDocument::loadHTML */ @$htmlDom->loadHTML($html); /* Extract the links from the page */ $image_list = $htmlDom->getElementsByTagName('img'); /* The DOMNodeList object is traversed to check for its validity */ foreach($image_list as $img) { $img_path = $img->getAttribute('src'); # Convert relative path to absolute path $search_path = "/" . $img_path; $abs_path = relative2absolute($search_path, $base_url); # When absolute path is used for fetching the images # For site with absolute path # $abs_path = $img_path; # For site with absolute path $response = @get_headers($abs_path); if (preg_match("|200|", $response[0])) { print($abs_path . " is not broken\n"); } else { print($abs_path . " is broken\n"); $iBrokenImageCount = $iBrokenImageCount + 1; } } print("\nThe page " . $test_url . " has " . $iBrokenImageCount . " broken images"); } } ?> <?php function relative2absolute($rel_path, $base_path) { /* return if already absolute URL */ if (parse_url($rel_path, PHP_URL_SCHEME) != '') return $rel_path; /* queries and anchors */ if ($rel_path[0]=='#' || $rel_path[0]=='?') return $base_path.$rel_path; /* parse base URL and convert to local variables: $scheme, $host, $path */ extract(parse_url($base_path)); /* remove non-directory element from path */ $new_path = preg_replace('#/[^/]*$#', '', $base_path); /* destroy path if relative url points to root */ if ($rel_path[0] == '/') $new_path = ''; /* dirty absolute URL */ $abs_path = "$host$new_path/$rel_path"; /* replace '//' or '/./' or '/foo/../' with '/' */ $repl = array('#(/\.?/)#', '#/(?!\.\.)[^/]+/\.\./#'); for($counter=1; $counter>0; $abs_path=preg_replace($repl, '/', $abs_path, -1, $counter)) {} /* absolute URL is ready! */ return $scheme.'://'.$abs_path; } ?> |
Code Walkthrough
To find broken images with Selenium PHP, we would be using the PHPUnit framework with Selenium. Refer to our detailed Selenium PHP tutorial for a quick recap on Selenium with PHPUnit.
Run the command composer require on the terminal for installing the packages mentioned in composer.json.
Here is the overall walkthrough of the source code:
1. Read the page source
HTML source of the page under test (i.e. https://the-internet.herokuapp.com/) is read using the file_get_contents function in PHP. HTML source is read in a local String variable $html.
|
1 |
$html = file_get_contents($test_url); |
2. Instantiate the DOMDocument class
The entire HTML document is represented in the DOMDocument class. It also serves as the root of the source tree.
|
1 |
$htmlDom = new DOMDocument; |
3. Parse HTML source of the page
DOMDocument::loadHTML() function in PHP parses the HTML source available in the String variable $html. The function returns a DOMDocument object when executed successfully.
|
1 |
@$htmlDom->loadHTML($html); |
4. Extract the Images using ‘img’ tag
Entries in the <img> HTML tag are read using the getElementsByTagName method of the DOMDocument class. As we are looking for broken images, search is based on the <img> tag from the parsed HTML source.
|
1 |
$image_list = $htmlDom->getElementsByTagName('img'); |
5. Read the entries enclosed in ‘src’ attribute
The values of the ‘src’ attribute are read from the <img> entries extracted in Step(4).
|
1 |
$img_path = $img->getAttribute('src'); |
For example – The ‘src’ attribute in <img src=”img/avatar-blank.jpg”> is “img/avatar-blank.jpg”.
6. Convert the relative path to absolute path
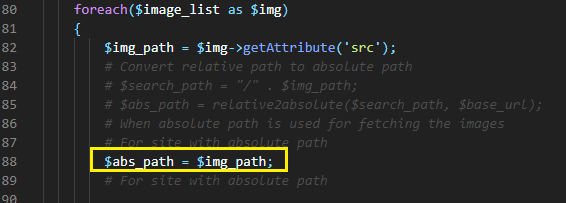
This step is only applicable if the ‘src’ attribute in the <img> tag returns a relative path from the root of the document.
In the case of http://the-internet.herokuapp.com/broken_images, the images are read using the relative path.
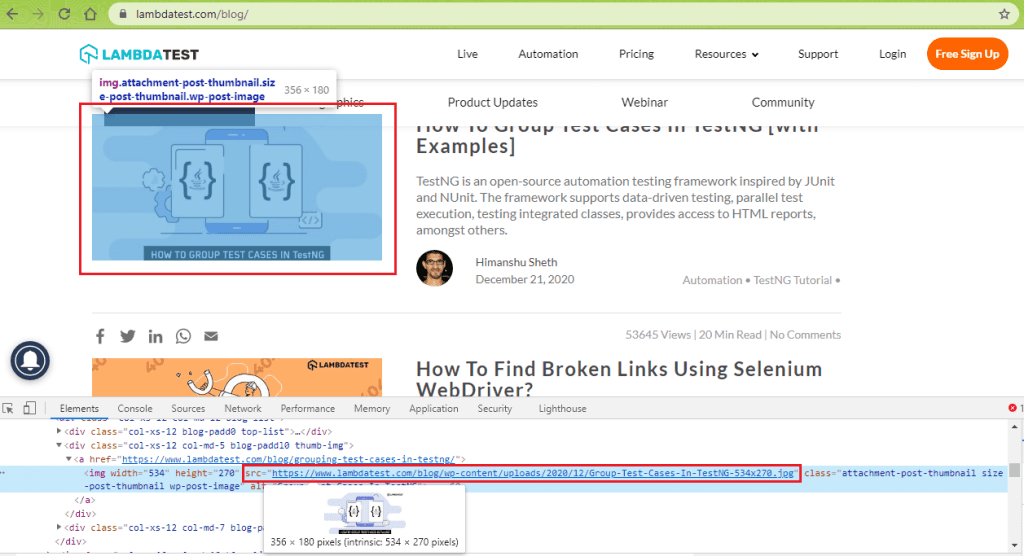
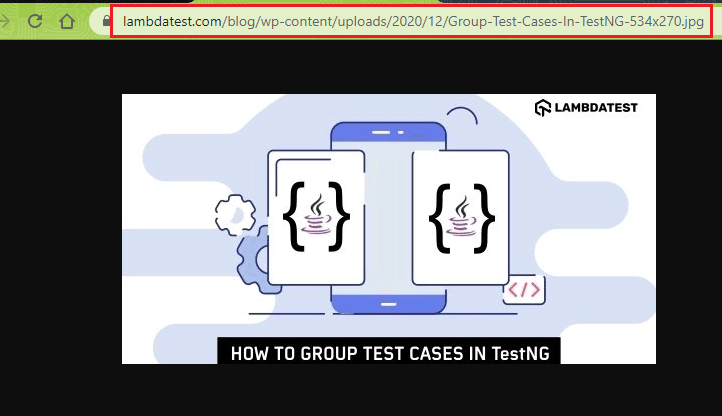
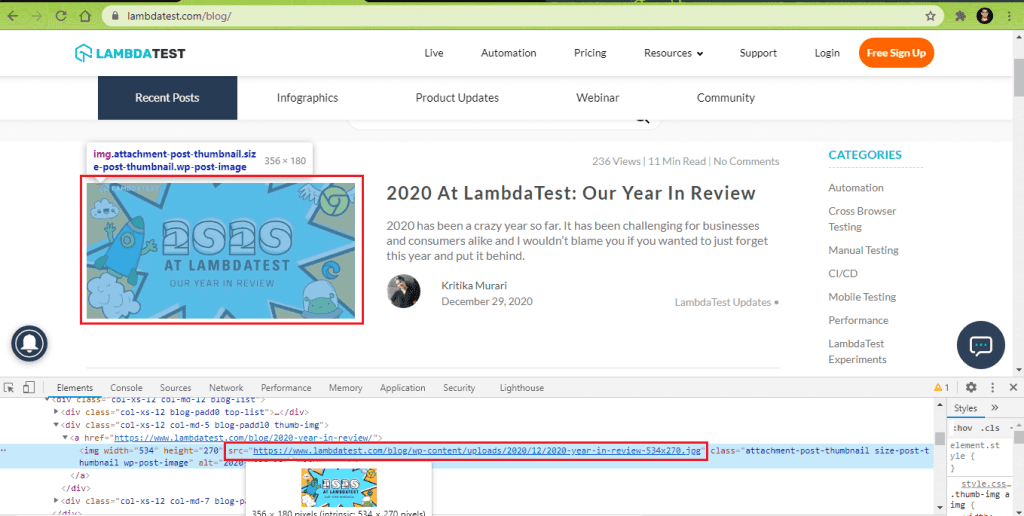
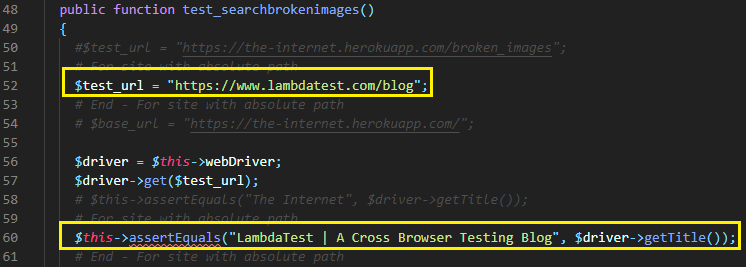
Take the LambdaTest blog case, the images in the blogs are read using the absolute path of the images on the server. Shown below is an example of how the absolute path of the image is used in the ‘src’ attribute of the <img> tag:
We created a new function relative2absolute() that takes the following arguments – relative path obtained from the <src> attribute and root document of the URL under test.
|
1 2 3 4 5 6 7 8 9 10 11 12 13 14 15 16 17 18 |
<?php function relative2absolute($rel_path, $base_path) { /* return if already absolute URL */ if (parse_url($rel_path, PHP_URL_SCHEME) != '') return $rel_path; /* queries and anchors */ if ($rel_path[0]=='#' || $rel_path[0]=='?') return $base_path.$rel_path; /* parse base URL and convert to local variables: $scheme, $host, $path */ extract(parse_url($base_path)); ............................................. ............................................. ............................................. } |
Relative Path (Sample)
For http://the-internet.herokuapp.com/broken_images, the relative path would equate to /$img_path. If the $img_path is img/avatar-blank.jpg; the final relative path used by the relative2absolute function would be /img/avatar-blank.jpg The base URL is set to https://the-internet.herokuapp.com/
|
1 2 3 4 5 6 7 8 9 10 |
$test_url = "https://the-internet.herokuapp.com/broken_images"; .......................................................... .......................................................... .......................................................... # Convert relative path to absolute path $search_path = "/" . $img_path; $abs_path = relative2absolute($search_path, $base_url); |
Absolute path (Sample)
If an absolute path is used in the <src> attribute, the absolute path and the relative path would be the same. In such a scenario, Step (6) becomes optional.
|
1 2 3 4 5 6 7 |
$test_url = "https://www.lambdatest.com/blog"; .......................................................... .......................................................... .......................................................... $img_path = $img->getAttribute('src'); $abs_path = $img_path; |
We came up with the relative2absolute function with support from the StackOverflow Community ☺.
7. Convert the relative path to absolute path
The get_headers() function is used to fetch all the headers sent by the server in response to the HTTP request. For a broken image, the HTTP status code is 404, whereas the status code is 200 if the image is present on the server.
The preg_match() function in PHP does a case-insensitive search for “200” (HTTP Status Code if the request is completed successfully) in the response code. The local variable iBrokenImageCount is incremented when a broken image is present on the page.
|
1 2 3 4 5 6 7 8 9 10 |
$response = @get_headers($abs_path); if (preg_match("|200|", $response[0])) { print($abs_path . " is not broken\n"); } else { print($abs_path . " is broken\n"); $iBrokenImageCount = $iBrokenImageCount + 1; } |
Execution
To run the test that is using the PHPUnit framework, run the following command from the root folder:
|
1 |
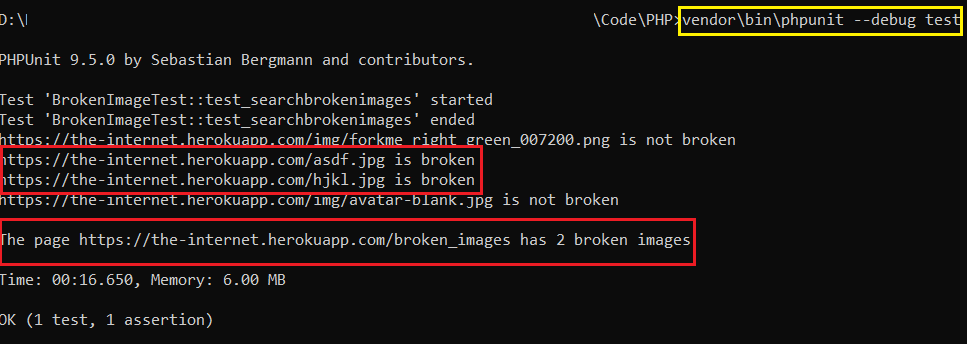
vendor\bin\phpunit --debug test |
When the test is run against https://the-internet.herokuapp.com/broken_images, it shows that the page has two broken images.
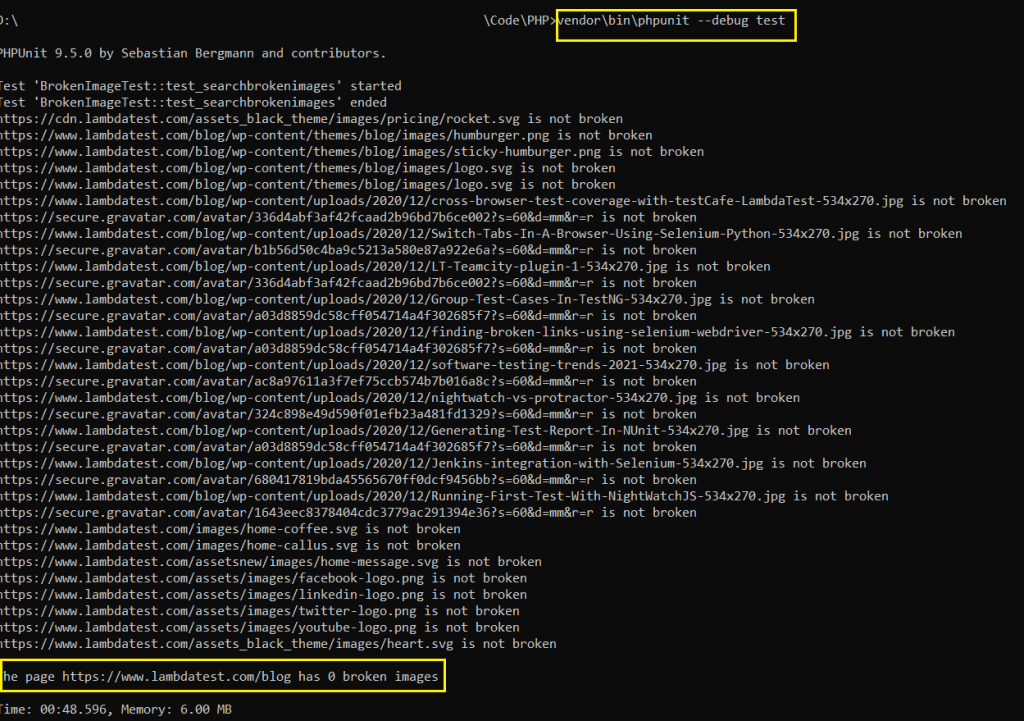
We executed the same test against the LambdaTest blog after doing the minimal changes in the code under the ‘For a site with absolute path’ comment.
The site uses the absolute path in <src> attribute of img tag. As seen below, there are zero broken images on the LambdaTest blog.
That’s all folks
Like broken links on web pages, broken images could also hinder the overall user experience. It also creates a negative impact on the search rankings, thereby hampering your SEO efforts. Instead of relying on third-party tools where you are putting the privacy & data at stake, you should find broken images using Selenium WebDriver. In this Selenium tutorial, we had a look at how to find broken images using Selenium WebDriver with Java, Python, C#, and PHP languages.
What strategy do you follow for finding broken images on webpage(s)? Do leave your thoughts in the comments section…
Happy Testing ☺
Frequently Asked Questions
How do I find an image in selenium?
To get the source of an image using Selenium WebDriver, we can take the help of XPath. If the <img> tag is in the webpage and has a source attribute, then we can use the getAttribute() method of that HTML element to get the source of the image.
How do you find hidden elements in selenium?
If a form element has an ID that is the same as another form element, you can use XPath to find the specific hidden element. For example, if you are using Chrome developer tools, you may notice that some hidden object elements have a type=”hidden” attribute. This means that there is likely only one instance of this particular hidden object on the page, making it simpler to target and grab with an XPath expression.
How do I get all the links in selenium?
- Navigate to the web page from which you want to get the link.
- Get list of WebElements with tagname ‘a’ using driver.findElements()-
List <WebElement> allLinks = driver.findElements(By.tagName(“a”)). - Use for-each loop to traverse through the list.
- Print the link text using getText() along with its address using getAttribute(“href”)
System.out.println(link.getText() + ” – ” + link.getAttribute(“href”));


Author’s Profile
Himanshu Sheth
Himanshu Sheth is a seasoned technologist and blogger with more than 15+ years of diverse working experience. He currently works as the 'Lead Developer Evangelist' and 'Senior Manager [Technical Content Marketing]' at LambdaTest. He is very active with the startup community in Bengaluru (and down South) and loves interacting with passionate founders on his personal blog (which he has been maintaining since last 15+ years).
Blogs: 129
Got Questions? Drop them on LambdaTest Community. Visit now