
Parameterization In TestNG – DataProvider and TestNG XML (With Examples)
Himanshu Sheth
Posted On: December 5, 2019
![]() 112773 Views
112773 Views
![]() 15 Min Read
15 Min Read
This article is a part of our Content Hub. For more in-depth resources, check out our content hub on A Detailed TestNG Tutorial.
Test automation, or automation testing as it’s called popularly, is not as easy as it sounds. All permutations and combinations of all possible user interactions have to be considered and based on that you would have to create a test script to validate your web application over numerous browsers + OS combination. This is where Parameterization plays a pivotal role in Selenium. In this TestNG tutorial, I will show you how to perform parameterization in TestNG for Selenium automation testing If you’re interested in advancing your TestNG skills further, do check out our comprehensive guide to TestNG interview questions answers for more insights..
- Why Do We Parameterize?
- How Do We Perform Parameterization?
- Parameterization using @Parameters Annotation & XML file
- Parameterization For Automated Browser Testing
- Parameterization For An Online Selenium Grid
- Things to consider
- Parameterization Using Data Providers
- Example 1 – Using Method Parameter in TestNG
- Example 2 – Using ITestContext Parameter in TestNG
Why Do We Parameterize?
In the real world for web UI testing, we expect our website or web application to work correctly with varied inputs and it is practically not possible to validate our scenarios with just a single data set. So we ensure that our application is functioning as expected when exposed to different data sets or different combinations for browsers and OS. Multiple test combinations mean multiple input values.
Now, you cannot hardcode test values every time in your test automation scripts, otherwise making one change will require you to edit many test automation scripts. That’s where Parameterization in TestNG or any other comes into the picture and the reason why we parameterize our Selenium automation testing scripts is to provide different data sets to our web application at runtime.
How Do We Perform Parameterization? And Why Use TestNG?
If your application involves inputting different types of user interactions, then Parameterization is the way to go. We can parameterize our automation scripts as per the framework being used for example Parameterization in TestNG framework for Selenium automation testing. We can consider using excel files to fetch data sets and subsequently use it in our automation scripts but as we enhance our automation suite, it becomes necessary to use more robust test automation frameworks like TestNG to cover a wide category of tests in a more powerful manner. In this post, we will be focussing mainly on Parameterization in TestNG, what ways can it be achieved in TestNG and how do we go about writing these parameters in our Selenium automation testing scripts. Let us first begin with understanding the different types of Parameterization in TestNG and how can we achieve the same.
Watch this video to learn how to perform parameterization in TestNG for Selenium automation testing.
Types of Parameterization in TestNG
So primarily we can achieve parameterization in TestNG in two ways.
- Using “Parameters annotation” and TestNG XML file.
- Using “DataProvider annotation”.
With TestNG certification, you can challenge your skills in performing automated testing with TestNG and take your career to the next level.
Here’s a short glimpse of the TestNG certification from LambdaTest:
Parameterization In TestNG Using @Parameters Annotation & XML file
Let us first see the simple syntax of writing parameter annotation in our class:
@Parameter({“parameter name”})
Note that we can use more than one parameter as well in our annotation which can be written as below: @Parameters({“param1”,”param2”,”param3”})
As of now, Parameters have been scoped to only Suite or Test tag in testng.xml file. If the same parameter value is passed in both Suite and Test, the priority is given to parameter value passed in the Test tag.
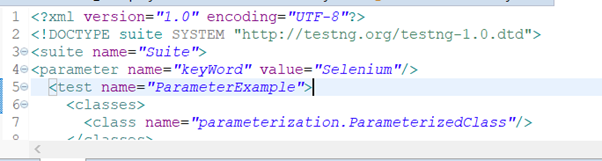
Before we go ahead with examples of parameterization, we need to understand what good would be using Parameterization in TestNG do to our Selenium automation testing activities. Consider a scenario of searching for certain keywords in a search engine like Google. We would have to write the same lines of code for each keyword to get different results and that is not a feasible approach. This is where Parameterization in TestNG or any other test automation framework for Selenium comes into the picture. Using Parameterization in TestNG, you can pass these keywords as different parameters in a testng.xml and add @parameters annotation in the Selenium automation testing suite. Let us see it by example.
Scenario: Open google.com in your browser and search 3 keywords separately
To complete this scenario, here are the detailed steps that our script has to perform:
- Launch the browser and open www.google.com
- Add the first keyword as input in the search box and hit search.
- Verify the input value on UI to be same as from test data.
- Repeat the above two steps for the other 2 keywords.
Below code shows how we can do it without parameterization in TestNG annotations.
In order to pass the other 2 keywords, we’ll have to write the same piece of code again with different keyword values for the string ‘keyWord’, which would result in a lengthy and repetitive code. And, in the future, if you have to test for more values of keywords, you would have to write more tests.
Let us now simplify our problem bypassing these keywords as parameters in our testng.xml and adding @parameters annotation in our test.
Java Code:
Here is the TestNG.xml that will be used to perform parameterization in TestNG for Selenium automation testing.
You can now run this test to check that our parameter value is being passed to our test method and hence desired results are obtained. You can run this by following the steps below:
Watch this video to learn how TestNG has become one of the most robust test automation frameworks and all you need to know to get started with TestNG in Selenium.
Step 1: Right-click on the testng.xml file in the project explorer and click on Run as:
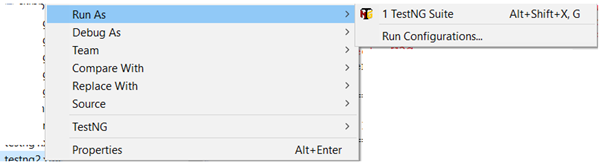
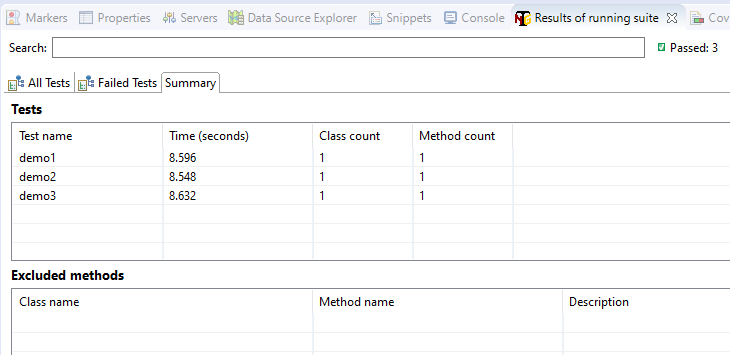
Step 2: Select Run as TestNG Suite and you can see the emailable report or summary to view the results.
So the next time we have to run the same test for different test value, instead of copy pasting the same piece of code in multiple files, we just have to edit the .xml file, included more values and run the suite. That’s it. That is how effective and time saving your test automation can become by leveraging parameterization in TestNG.

Would Parameterization In TestNG Help Us With Automated Browser Testing?
By far in this TestNG tutorial for parameterization, you may have realized the importance of Parameters with the example explained in the previous section. Now, you may already be thinking of a way to incorporate parameterization in TestNG scripts for automated browser testing. Let me help you kickstart that with a very common scenario where we need to execute our tests on multiple browsers, let us see how we can leverage parameters to perform automated browser testing.
Scenario: Printing a specific browser value by passing the browser name as a parameter.
Java Code:
Testng.xml:
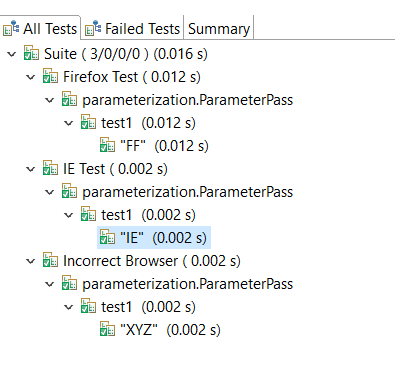
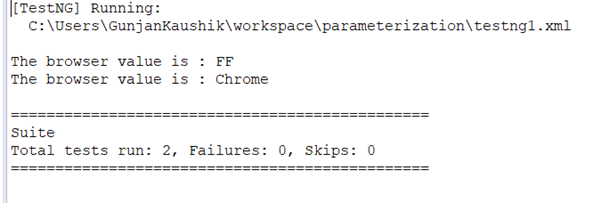
On running the above testng xml, you’ll see the below output in console:
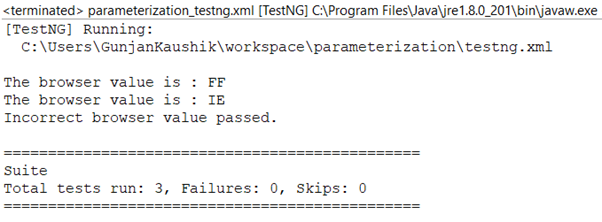
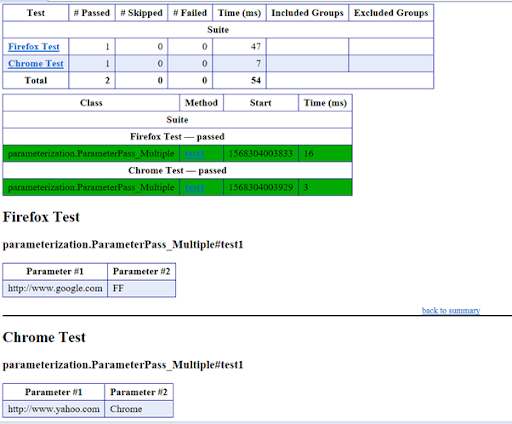
If you go by the detailed results, you’ll see that the parameter values passed in the XML is also printed in the test results summary:
The emailable report shows the different parameters passed to the different tests hence making it easier to consolidate the results:

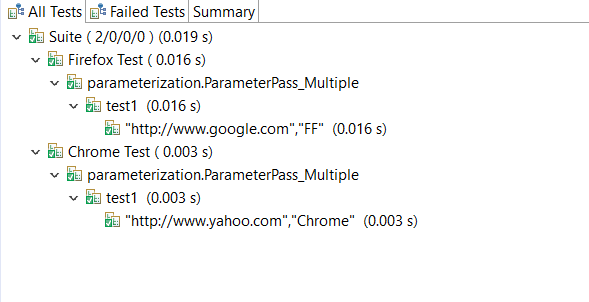
Let us now try passing 2 parameters to our test to understand how we can leverage combinations of parameters for Selenium automation testing. Make note that whatever number of parameters you pass to your test, you need to accept the same number of parameters in your test method that too in correct sequence.
Scenario: Printing a specific browser & URL value by passing the browser name as well as the URL as a parameter.
Now on running the above xml below output is generated which prints both the parameters that were passed:
Email Report:
Parameterization In TestNG For An Online Selenium Grid
Parameterization is a neat way to build yourself a neat Test Driven Testing framework using TestNG. It’s up to you how you want to leverage different types of parameterization in TestNG or even both at the same time if the use case requires it.
The next question to answer would be, whether parameterization in TestNG works with an online Selenium Grid of 3000+ real browsers, offered by LambdaTest?
Yes, it does! In fact, parameterization in TestNG or any other framework is considered as one of the best ways to run tests in parallel on multiple different test environments, especially if you have to regularly change the test environments to test on.
For example, let’s take a scenario where you have a test that you want to run on multiple test environments to ensure that the webpage is cross browser compatible. It’s a typical example of automated cross browser testing that is now a primary requirement for nearly every organization that generates any business through the web.
To run the test on LambdaTest Selenium Grid, you need to define the desired capabilities object, that instructs our online Selenium Grid about which environments you need to run your test on. To achieve this, you can parameterize the values for the desired capabilities object. For example, consider the following code. It’s a simple script that opens up a todo list and performs some actions. This same script is being run at multiple environments by parameterizing the desired capabilities environment values in XML file.
Did you notice how I used the thread-count and parallel value in the Suite tag for Selenium automation testing?
This above script will run the same test class on 3 different environments and the best part, they would be run in parallel. That means that all three tests would execute at the same time cutting down your test execution time by multiple folds. Thanks to Selenium Grid for allowing us to leverage parallel testing with Selenium.
Things to consider
After attending this TestNG tutorial, this far, you must be feeling confident and maybe a little thrilled about using Parameters into your next project for Selenium automation testing but hold your horses for a little while. There are a few points that have to be taken care of while using @Parameters annotation.
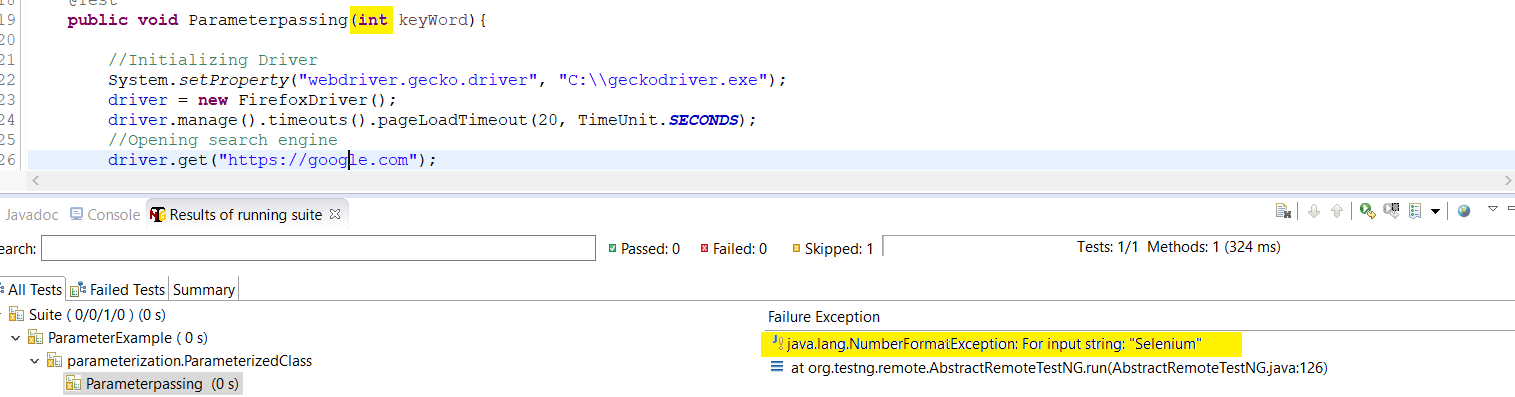
⟶ If you try to typecast the parameter value in testng.xml to a corresponding test method parameter, an error would be thrown. Example, if you have given the method parameter as an integer, but you pass a String value in the TestNG.xml, you’ll get an exception as below:
Testng.xml:
⟶ Use of @Optional annotation
If the parameter that we defined in our method is not present in testng.xml then a testNG exception would come up and our test would skip. To overcome this situation, we can use @Optional annotation. Let us first have a look at the syntax for this:
|
1 2 3 |
@Parameter(“browser”) @Test public void paramCheck(@Optional(“OptionalParameter”) String val) { …. } |
Let us understand this in-depth with an example in this TestNG tutorial.
Java Code:
Testng.xml:
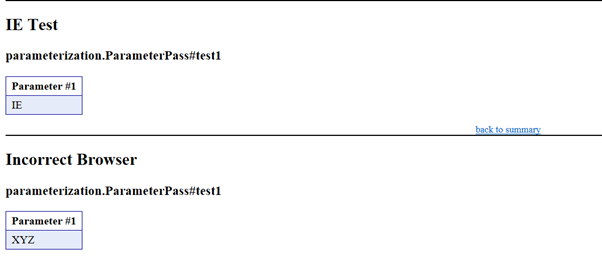
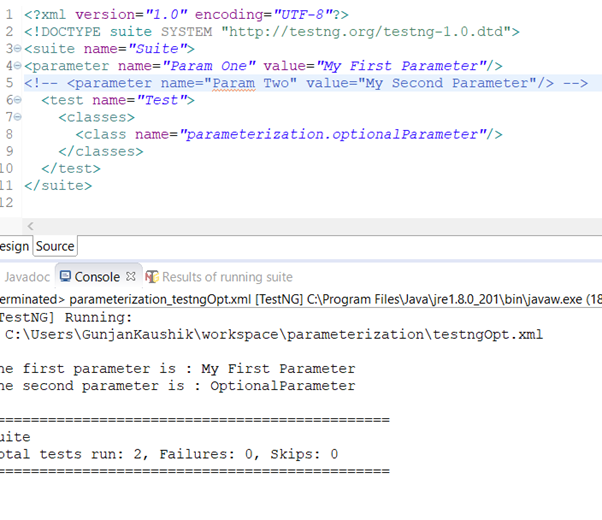
On running the above testng.xml, we’ll get simple results wherein the first and second parameter will be displayed since both have been explicitly declared in the XML. The same is shown in the below output images.

Let us now comment on the second parameter from the xml and see how the @Optional Annotation works:
New testng.xml:
On running this new XML we see that the Optional parameter in TestNG was declared in the test method being printed now and no exception is thrown anywhere:
⟶ There may be scenarios where you need to test multiple values of a parameter using testng.xml. @Parameters annotation doesn’t serve the purpose. We can have a number of parameters, but each of these can have a single value, making our code reusable. It serves more like a configuration file for our project. For you to use multiple values for a parameter Data Providers comes to the rescue.
The next section of this TestNG tutorial will talk more about Data Providers and their usage in Selenium automation testing.
Parameterization In TestNG Using Data Providers
In the section above, we have seen how can we use the @Parameters annotation in our framework to get various results. Now, as we proceed we will come across cases where we will have to use test scripts against multiple sets of data. We might need huge data sets to be used in a single execution. This type of testing is also called Data Driven Testing which can be achieved conveniently by @DataProvider annotation in our TestNG framework.
Let us now first see the syntax for @DataProvider annotation.
|
1 2 |
@DataProvider(name=”testData”) public Object[ ][ ] TestDataFeed(){ |
You need to note two points before we start using it for parameterization in TestNG, first, @DataProvider has only one attribute, ‘name’. Second, it is optional and in case you do not specify it , then the name would be the same as the corresponding method name.
This Data Provider returns a 2-Dimensional array object.
Let us try to understand this with a simple example where we try to pass the monument and city name using data provider. You can further use this example as a base to login to Gmail or Facebook using different email ID and passwords.
Scenario: Open google.com in your browser and search 3 keyword combinations separately.
Following would be the steps to get this executed:
- Launch the browser to open www.google.com
- Search the first keyword combination.
- Get the page title.
- Repeat the steps above, i.e. 2 & 3 for the other 2 keywords combination.
Java Code:
To run the above code we use below TestNG.xml and run our test the same like we have been doing in the examples above:
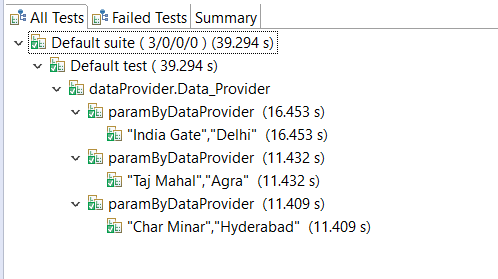
We’d receive the output like below which summarizes the data providers passed and the corresponding results:
Emailable report:
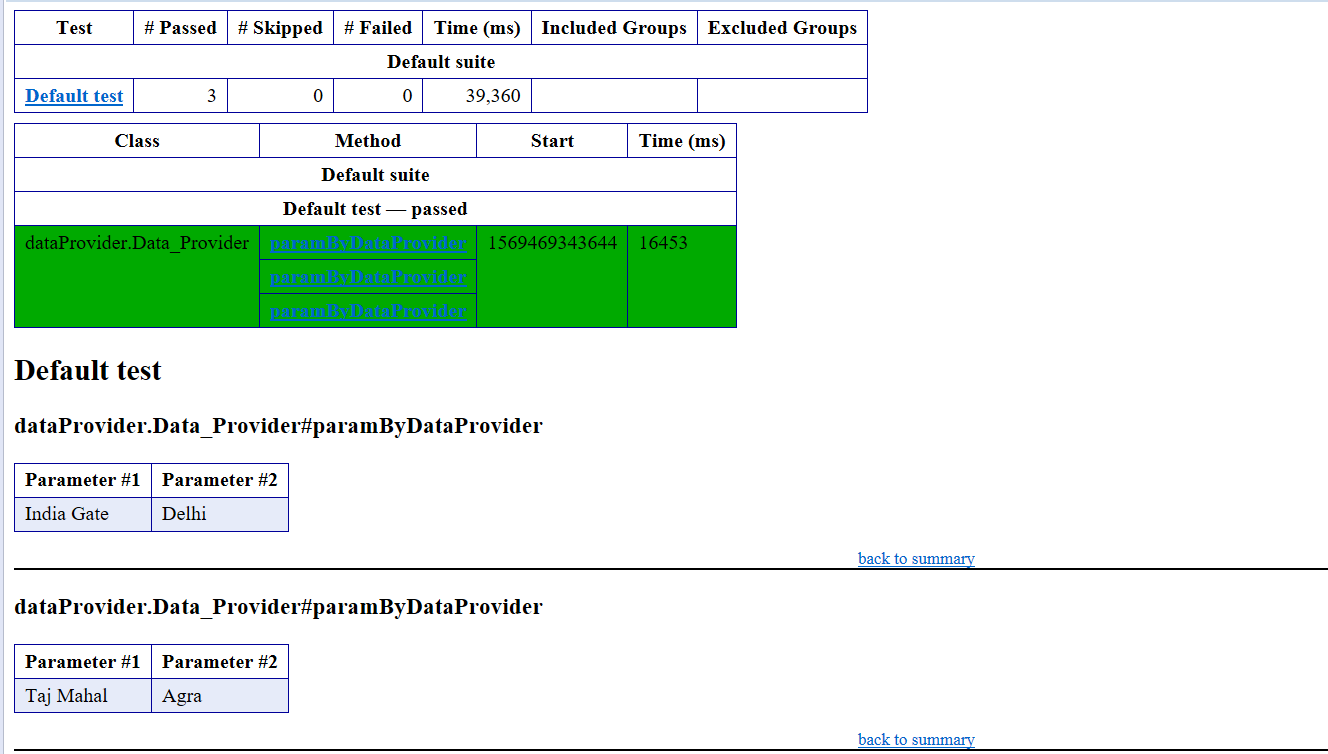

In the example above, we tried with data providers being invoked from the same class. You can also invoke data providers from another class by simply making the data provider method static and providing the data provider class in the test method annotation. Let’s see the same example by creating a different class for our data provider.
Java Code for Data Provider Class:
Java Code for the Class from where Data Provider is called:
TestNG.xml to run the above code:
On running you can see for yourself that we receive the same results as we did before. To understand a bit more about the various conditions that we might face in our automation it is important to understand a few more examples of using the Data Provider annotation with parameters viz Method and ITestContext.
Example 1 – Using Method Parameter in TestNG
What if we want the same data provider to work differently for different methods like in a case where we test different data sets for different test methods, we will use method parameters in TestNG. Let us see through an example that will follow the steps below:
- Check if method name is domesticMonuments
- If it is then return one set of value
- If not then another set of value
Java Code:
Testng.XML to run the above code:
The results on running the xml would be like below, wherein you will be able to see the details of the data providers used.

Example 2 – Using ITestContext Parameter in TestNG
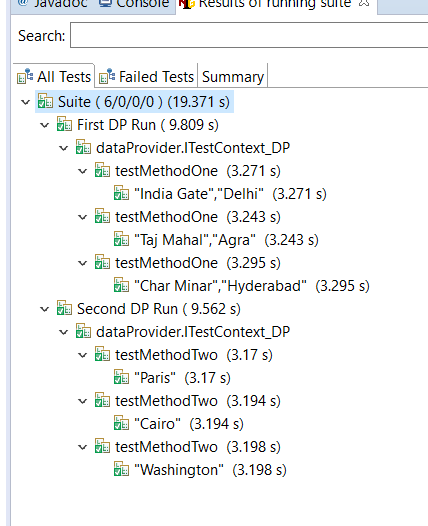
Suppose my test methods are assigned to different groups and I need to use different test data for different groups. In such a scenario we can use ITestContext parameter with our Data Provider annotation. Let us see an example of the same.
Java Code:
To call this testNG class, you can use below xml which would run the two test sets based on different groups.
Testng.xml:
Running the above xml would yield results like below:
Conclusion
Parameterization in TestNG allows you to perform data-driven testing in a more efficient manner. By declaring parameters, you won’t have to write multiple test automation scripts for different test inputs of a single test suite, making it easier for you to maintain your test automation code. I hope this TestNG tutorial has helped you to leverage your Selenium automation testing scripts. Parameterization in TestNG for your Selenium automation testing scripts can be done using either the DataProvider or the Parameter annotation with TestNG.xml. We talked about parameterizing in both ways with examples, in great-detail. We realized that DataProvider further offers 2 parameters i.e. Method & ITestContext. You can now fire up your test automation scripts using parameterization in TestNG for your next project. Let me know your thoughts about this TestNG tutorial in the comment section below. In case you have any doubts or queries feel free to post them as well. Cheers and happy testing!


Author’s Profile
Himanshu Sheth
Himanshu Sheth is a seasoned technologist and blogger with more than 15+ years of diverse working experience. He currently works as the 'Lead Developer Evangelist' and 'Senior Manager [Technical Content Marketing]' at LambdaTest. He is very active with the startup community in Bengaluru (and down South) and loves interacting with passionate founders on his personal blog (which he has been maintaining since last 15+ years).
Blogs: 128
Got Questions? Drop them on LambdaTest Community. Visit now


