Testing your Website using Apache Test Environment
Harshit Paul
Posted On: August 28, 2018
6 Min


Launched in 1995, Apache Web Server has been the subject of discussion regarding the most popular web server on the internet. The name in itself is said to have rewritten history. Apache was derived from a very well known Native American Indian Tribe who were feared and respected for their superior skills related to warfare strategy and everlasting durability.
What is Apache Web Server?
The most widely used open-source, cross-platform web server meant for hosting one or more HTTP-based websites. It is free to download and is considered to be a reliable platform by the majority of internet consumers on a global scale. By Nov 2013, it was responsible for running 67% of all web servers around the globe. Though right now that popularity is steadily decreasing.
Apache is developed and maintained by an open community of developers under the auspices of Apache Software Foundation. Its official website→ httpd.apache.org
The software is available for the below mentioned OS:
- Unix
- FreeBSD
- Linux
- Solaris
- Novell Netware
- OS X
- Microsoft Windows
- OS/2
- TPF
- OpenVMS
- eComStation
Key Features:
- Supports numerous programming languages.
- Provides an authentication mechanism for user log in.
- Facilitates Database Support.
- Supports Server Side Scripting.
With the gradual passage of time the popularity of Apache has been slowly fading. The major reason behind that is Nginx.
When discussing web servers like Apache, it’s beneficial to also understand the various operating systems they support. Knowing how different OS platforms interact with web servers can be crucial for optimizing performance and troubleshooting issues. You can read this operating system interview questions which answers 100+ questions that can help you get deeper understanding of OSs.
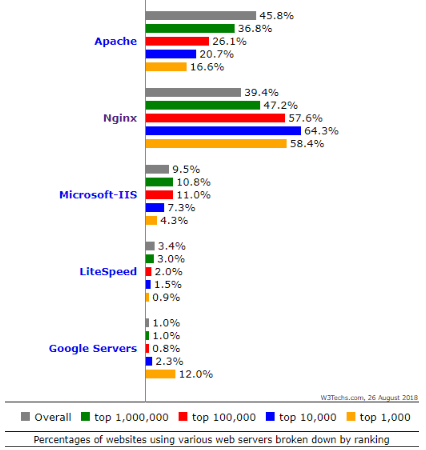
According to the above statistics presented by W3Techs.com it is notable that Nginx has developed an eminent place in the WWW.
Some popular sites using Nginx are:
- WordPress.com
- Pinterest.com
- 360.cn
- Twitch.tv
- Mail.ru
- Csdn.net
Wondering about which web server are you using?
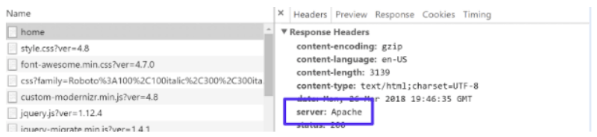
The answer to that lies on your website’s HTTP header. Although, it is not always visible.
You may view the website’s HTTP header by using the Network tab inside the Chrome Dev Tools or you can also go for tools like a Pingdom, GTmetrix, etc.
This method is not feasible if you are using Cloudflare or any other similar service provider.
Fixated on using Apache? Then first setup local apache environment.
Service providers like XAMPP, LAMP, WAMP have made it all too easy to deploy an Apache web server for hosting your locally stored website.
Step 1 → Download XAMPP → https://www.apachefriends.org/download.html
Step 2 → Start the installation and provide a directory for the same.
Installation may take up a couple minutes. This is how it would look like once the setup is complete. Click Finish.

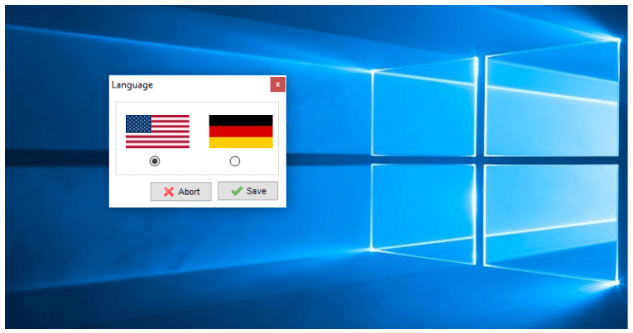
Step 3 → You will get a window for selecting a language. Hit Save on your preferred one.
Step 4 → After selecting a language, XAMPP would open up. You need to hit Start on Apache and that’s it! You will have Apache running.
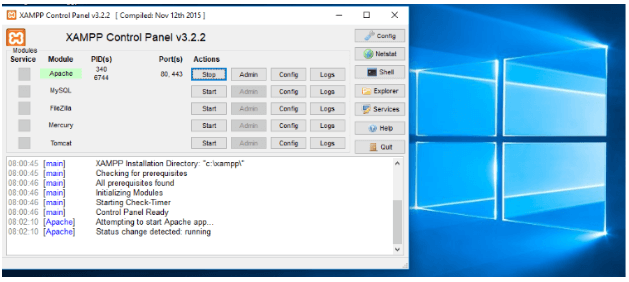
Step 5 → Go to your browser and type http://127.0.0.1 or http://localhost:80 to verify Apache web server hosting by XAMPP by visiting dashboard.

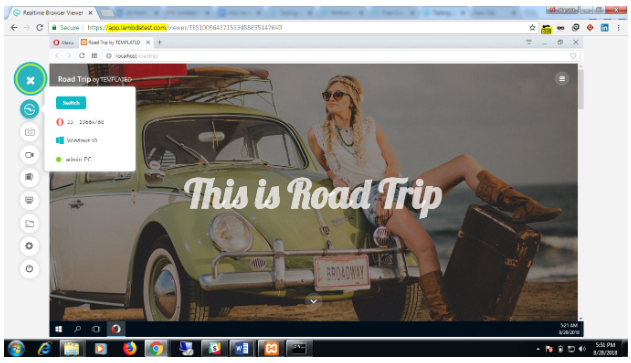
Local Hosting a Website through XAMPP
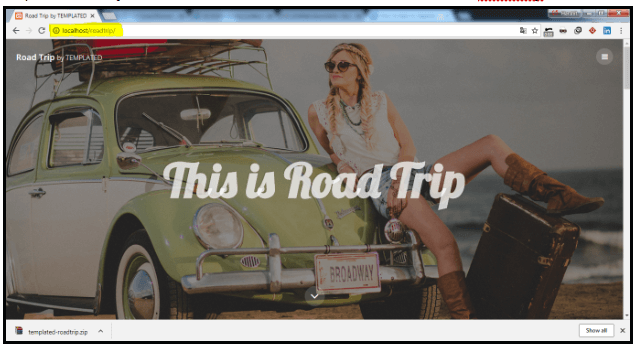
I will be demonstrating this with the help of Roadside template.
Step 1 → Head to the Roadside template’s link and download it.

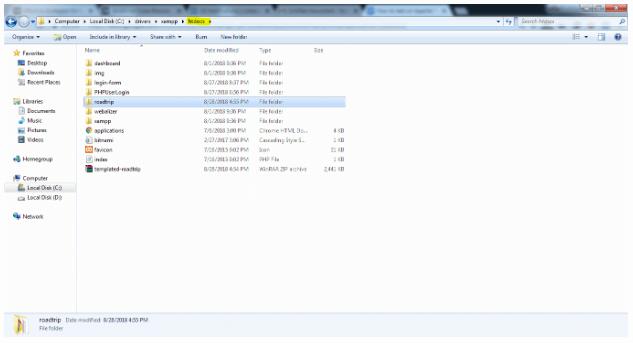
Step 2 → Extract the download folder into XAMPP(root directory) → htdocs
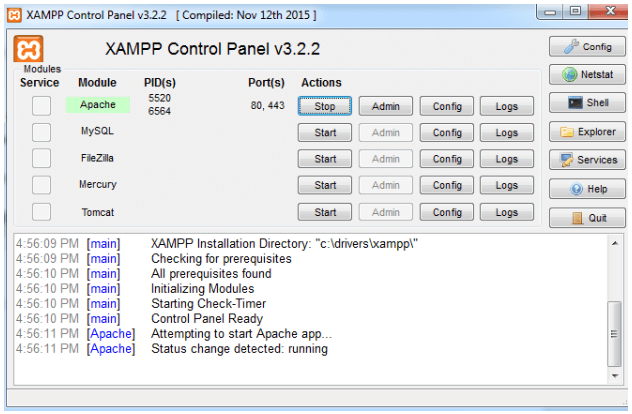
Step 3 → Run Apache on XAMPP.
Step 4 → Go to your browser and enter in the URL → localhost/roadtrip.
Note the reason I am mentioning roadtrip after localhost is because that is how I named the template’s folder in my htdocs. If you have come up with some other name say “roadtrip-template” then your URL would be → localhost/roadtrip-template.
Now that your website is hosted you can go on ahead and make changes into its source code using any text editor. Notepad++ and Sublime Text are my personal favourite.
To check a back-end functionality of your website then you will have to start MySQL along with Apache under XAMPP Control Panel.
If you are not willing to use XAMPP then you can download and install Apache from Apache Lounge.
Step 1 – Once you are on the website, then download either 32-bit or 64-bit depending upon your windows server setting.
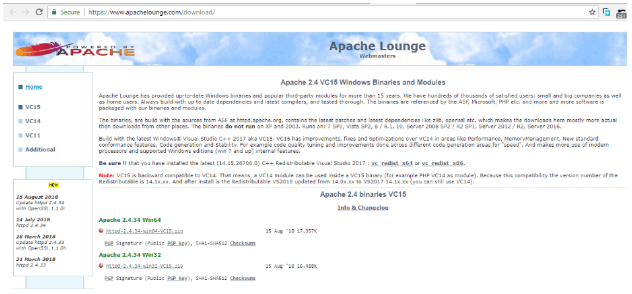
I will be using a Apache 2.4.34 Win64 for this tutorial.
Step 2 – Extract the downloaded zip file. Extract it in the location of your server.
Step 3 – Configuring Apache
- Locate the “httpd.conf” file and open it in any standard text editor.
- If you extracted Apache at any other directory than the default C:\Apache24 then you ought to update the configuration file accordingly.
ServerRoot C:/Apache24→ServerRoot D:/Apache
DocumentRoot C:/Apache24/htdocs→DocumentRoot D:/Apache/htdocs
Directory C:/Apache24/htdocs>→Directory D:/Apache/htdocs
ScriptAlias /cgi-bin/ C:/Apache24/cgi-bin/→ScriptAlias /cgi-bin/ D:/Apache/cgi-bin/ - You would also need make the following modification in the configuration file.
Options Indexes FollowSymLinks→Options Indexes FollowSymLinks ExecCGI- Remove the # symbol at the start of this line to uncomment:
AddHandler cgi-script .cgi - Also add the line,
AddHandler cgi-script .pl - At the End of File you must add this line
ScriptInterpreterSource Registry
Step 4 – Launch Apache by going into the extracted directory. → Apache → Bin → Open Powershell here or Open Command Prompt here(Shift + Right click)
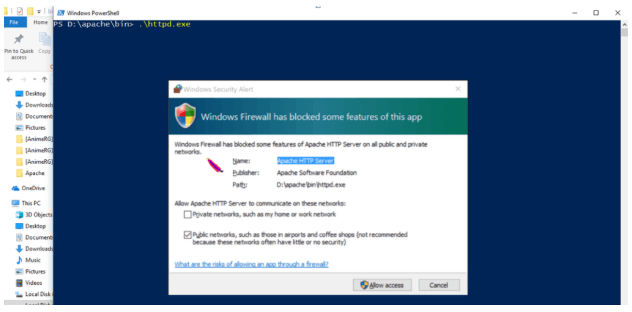
Step 5 – Test if your Apache is running by typing http://127.0.0.1. You should get the below mentioned response:

Test Your Locally Hosted Websites and Webapps using LambdaTest
If you are looking for something simpler than XAMPP to serve your purpose of testing on Apache test environment, then let me inform you about LambdaTest.
LambdaTest provides you a feature to test your local page testing using the tunnel hosted through LambdaTest cloud servers. You can perform testing on simple and plain HTML, CSS, Python, PHP, etc. similar web files that are stored on your local system.
Performing a real-time interactive cross browser testing is not only easy but is also helpful in figuring out whether the new feature is supported through multiple browsers prior launching it into your Production environment.
We have a Step-by-Step guide related to Tunnel configuration for Testing Locally Hosted Websites and Webapps.
If you notice I was able to setup this template in Lambda Tunnel under 50 seconds/ a minute. I could also check how the template would appear on a different browser in a different OS.
Become an Insider and try Lambda Tunnel for free by registering to our website.
Author
Harshit Paul is the Director of Product Marketing at LambdaTest with over 7 years of experience in product and growth marketing. He also worked for 2 years as a certified Salesforce developer at Wipro Technologies. He has authored 80+ technical articles for LambdaTest, covering testing and automation. Harshit has led go-to-market campaigns, managed Google and Bing Ads with profitable ROAS, and hosted webinars on Software Testing, Automation Testing, Selenium, Browser Compatibility, DevOps, and Continuous Testing. He has also contributed across SEO, social media, performance marketing, partner marketing, and content strategy, while working on blogs, newsletters, web pages, certifications, case studies, and support documentation. Harshit graduated in Computer Programming from Vivekananda Institute of Professional Studies.
Blogs: 78