Get True Cross Browser Test Coverage With TestCafe & LambdaTest
Kritika Murari
Posted On: December 24, 2020
14 Min


We successfully hosted a webinar in collaboration with DevExpress on 2nd December 2020. The host, Mudit Singh- Director of Product & Growth at LambdaTest, got together with Paul Usher from DevExpress. Paul is the Technical Evangelist at DevExpress, the team responsible for creating TestCafe. We had a full-house during the webinar, and people have been reaching out to us for a more detailed blog around the webinar. Your wish is our command, and we will be diving deep into TestCafe and its integration with LambdaTest in this blog.
Starting your journey with TestCafe Testing? Check out how you can test your TestCafe test scripts on LambdaTest’s online cloud.
Overview
TestCafe is an open-source JavaScript-based testing framework that simplifies web automation without requiring WebDrivers or browser plugins.
Why Choose TestCafe?
TestCafe provides a modern, lightweight approach to browser automation testing by eliminating setup complexities and compatibility issues.
- No Third-Party Dependencies: Runs directly on browsers without WebDrivers or external plugins.
- Cross-Browser Compatibility: Supports testing on major browsers and platforms including Windows, macOS, and Linux.
- Simple Yet Powerful: Built on modern JavaScript and TypeScript, allowing quick setup, concurrent tests, and advanced scenarios like multi-window and cross-origin testing.
How LambdaTest & TestCafe Integrate For Better Browser Coverage?
LambdaTest enhances TestCafe’s capabilities by offering cloud-based access to real browsers for faster and broader testing.
- Easy Integration: Install the TestCafe LambdaTest npm plugin and set environment variables for authentication.
- Cloud Execution: Run tests using LambdaTest’s Selenium Grid with commands specifying browser, version, and OS combinations.
- Scalable Configuration: Define test capabilities using LambdaTest’s Capabilities Generator or configuration files for seamless automation across multiple environments.
How to perform Parallel Testing On LambdaTest Cloud?
Parallel testing enables running multiple tests simultaneously across different browser-OS setups, reducing test time and resource load.
- Set Up Parallel Tests: Use the testcafe command with multiple browser aliases (e.g., Chrome, Safari, Edge).
- Run Concurrent Sessions: Execute tests simultaneously on various environments to boost speed and coverage.
- Monitor in Real-Time: View live test sessions and video recordings on the LambdaTest dashboard for debugging and validation.
Let’s get started!
Chapters
Importance Of End-To-End Testing
On principle, most developers often lean towards unit testing or test-driven development (TDD) to help ensure the quality of code. But when it comes to testing web applications, it is essential to consider a user’s viewpoint. We need to get into a user’s mindset and test our apps the way a user will interact with those apps. As simple as it sounds, this behavior can never be predicted to precision and thus calls for a more flexible testing approach.
Now your testing team can do this manually over and over, but it can get very monotonous, frustrating, and demoralizing for the entire team. And it gets even more challenging for the team when we start looking at multiple browser configurations, numerous systems, and regressions tests. The good news is that automated UI testing can help go a long way in simplifying this workload.
Introduction To TestCafe
Traditional software-based products required special WebDrivers or browser plugins. While it was easy to get a hold of these drivers or plugins, they often created additional problems due to browser limitations, browser versions, or product compatibilities. This is precisely what the DevExpress team wanted to change. They tried to introduce a brand-new approach to testing, a practice that would transcend these issues. This was how TestCafe saw the light of the day.
TestCafe is an open-source, cross-browser platform designed to automate web testing for small and large teams alike. The idea behind TestCafe was to resolve some of the most common challenges developers and testers were facing with testing tools like Selenium. Some of the challenges were-
- Hard to set up test environments.
- Hard to deal with waits.
- Compatibility issues.
- No inbuilt reporting features.
- Inaccuracy while dealing with handling dynamic web elements.
- Hard to handle iframes and pop-ups.
There was a lot of room for improvement in the world of test automation, and TestCafe was built to fill that gap. In the next sections, we will understand how TestCafe helped overcome these challenges.
Why Choose TestCafe?
Now that you know what TestCafe is all about, it is time to determine whether TestCafe is the right choice for you. There are several ways in which TestCafe changed the test automation game and made it easier for people to get acquainted with Selenium automation. Let us dive deeper into the best features of TestCafe-
1. Intuitive & Easy-to-Use-
TestCafe has a simple one-minute installation, with no extra hassles involved. It can be utilized by hardcore developers or testers and people who may only have limited knowledge of JavaScript, TypeScript, etc.
2. No Third-Party Installation Required-
It is easy-to-setup and does not require the use of cumbersome browser plugins or software for running TestCafe. There is simply no need to have Selenium set up in your system before you get started with automated web testing using TestCafe.
3. Latest JavaScript Syntax-
TestCafe is JavaScript-based, and it utilizes the latest available syntax of JavaScript and TypeScript. This makes it so much easier to get started with TestCafe without the steep learning curve.
4. Cross-Browser & Powerful-
TestCafe is compatible with a plethora of browsers and browser versions entirely out of the box, and no plugins are needed here. This includes mobile browsers and multiple platforms ranging from macOS, Windows to Linux as well. TestCafe is also capable of handling powerful technologies like waits.
5. Simple To Advanced Test Scenarios-
With TestCafe, you can perform a variety of test scenarios from multiple window testing to cross-origin testing. You can throw mock requests as well as do client-side injections. It provides full support for iframes, and you can also run concurrent tests.
6. Free & Open Source-
TestCafe is licensed under MIT, and it is completely free to use. Presently, it has over 8.7k stars on GitHub and clocks over 1 million downloads per month via npm.
Getting Started With TestCafe
Before we run our first automation test with TestCafe, let us get to know it a little better. There are two significant components of TestCafe-
- TestCafe Engine- an open-source framework
- TestCafe Studio- a commercial IDE that allows easy-to-use video recording while serving as a powerful code editor.
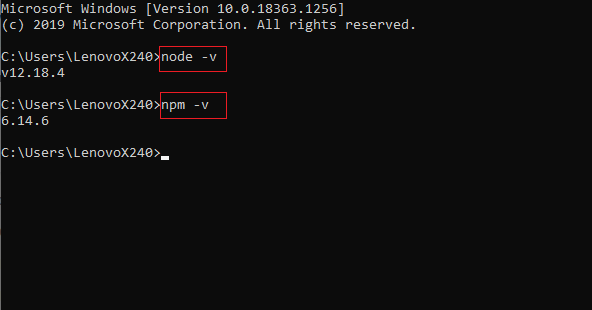
In this blog, we will be focusing only on the TestCafe Engine. The only prerequisite for getting started with TestCafe is the pre-installation of node.js (a JavaScript runtime environment) and the npm (node package manager).
You can check whether you have these already installed in your system by running the commands node -v and npm -v. If your system is already equipped with node.js and npm (like mine), you will see an output like this (this is for Windows.)
Note: We recommend installing the LTS version, although TestCafe will run on both versions.
When it comes to installing TestCafe, you can do it globally or locally for your own projects.
Global installation is required to run TestCafe in the command line from any location. On the other hand, Local deployment should be preferred for continuous integration systems, Node.js applications, and other scenarios where the global installation is not required. TestCafe supports npx, yarn run & npm scripts.
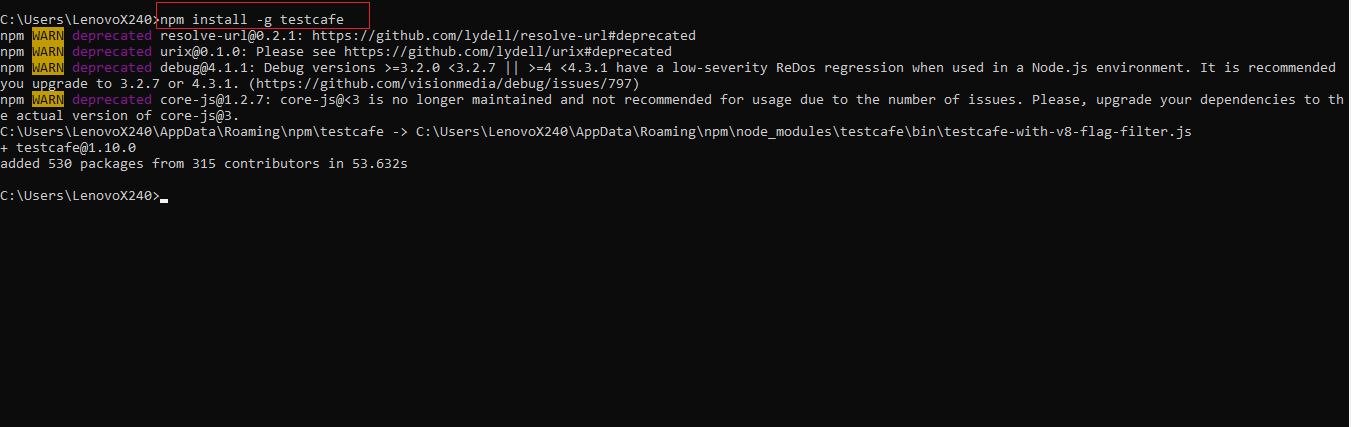
For Global Installation-
You need to run the following command for installing TestCafe globally-
npm install -g testcafe
For Local Installation-
The following command installs TestCafe into your project directory and saves it on the dependencies list-
npm install --save-dev testcafe
We will be installing it globally since we want to execute the testcafe command from our custom application.
Now that TestCafe is successfully installed in your system, you can start using it directly from your command line by calling testcafe, stating your browser name and your code file-
|
1 |
testcafe <browser> tests/ |
TestCafe will start running and you will see something like this on your screen-
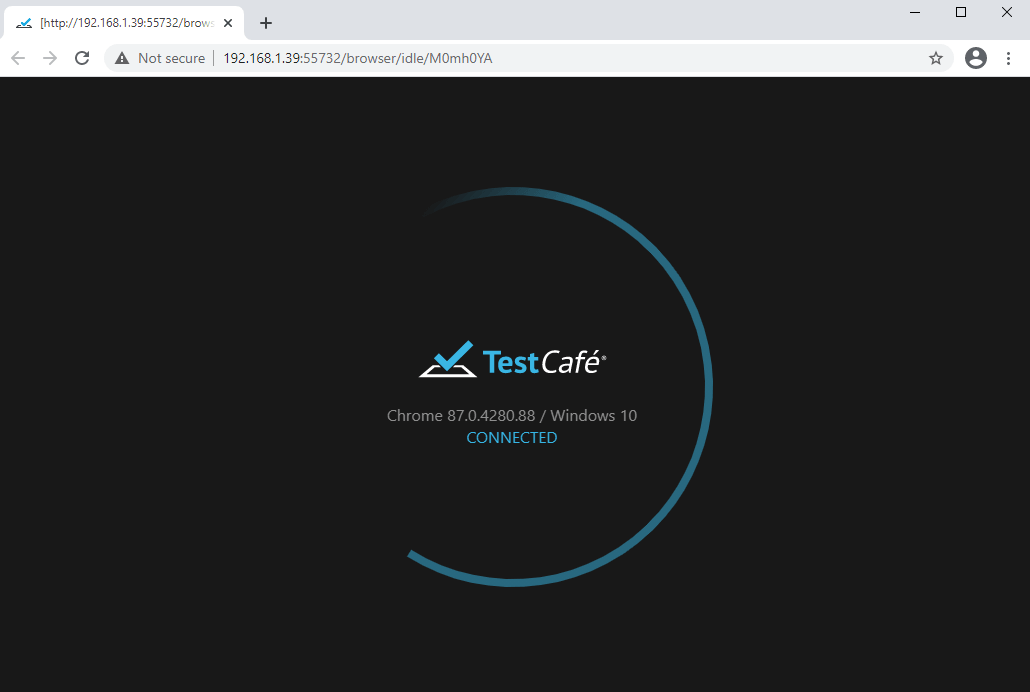
Note: If you are installing TestCafe on Mac Catalina or any version above, you will be prompted to allow screen recording within the security options. This is required if you want to use screenshots or video recording.
Hurrah, you are now ready to run your first automation test with TestCafe!
Running Your First Automation Test With TestCafe
It is time to run our first automation test with TestCafe. Note that TestCafe allows you to write tests using TypeScript or JavaScript. For this blog, we will be using Visual Studio Code to run through all the different aspects of TestCafe. To get started, we will run a simple example to make sure TestCafe is running perfectly. In the next sections, we will move on to a more typical scenario of someone testing a web application from scratch. We will also be refactoring the different elements and functionalities of TestCafe.
In TestCafe, all tests are organized into categories called fixtures. So when we create a new JavaScript or TypeScript file, we are going to place our fixtures inside there. Then we will be creating our test within that particular fixture.
Note: You can choose to have a single file and many fixtures inside it. As a best practice, we recommend creating one fixture per file.
Step 1: To create a test, create a new .js or .ts file. This file must have a special structure – tests must be organized into fixtures.
Step 2: Import the testcafe module.
import { Selector } from 'testcafe';
Step 3: Declare a fixture using the fixture function.
fixture Getting Started
Let us look at a basic example to ensure that TestCafe is working properly in your system. This is the page we are using for running the sample test.
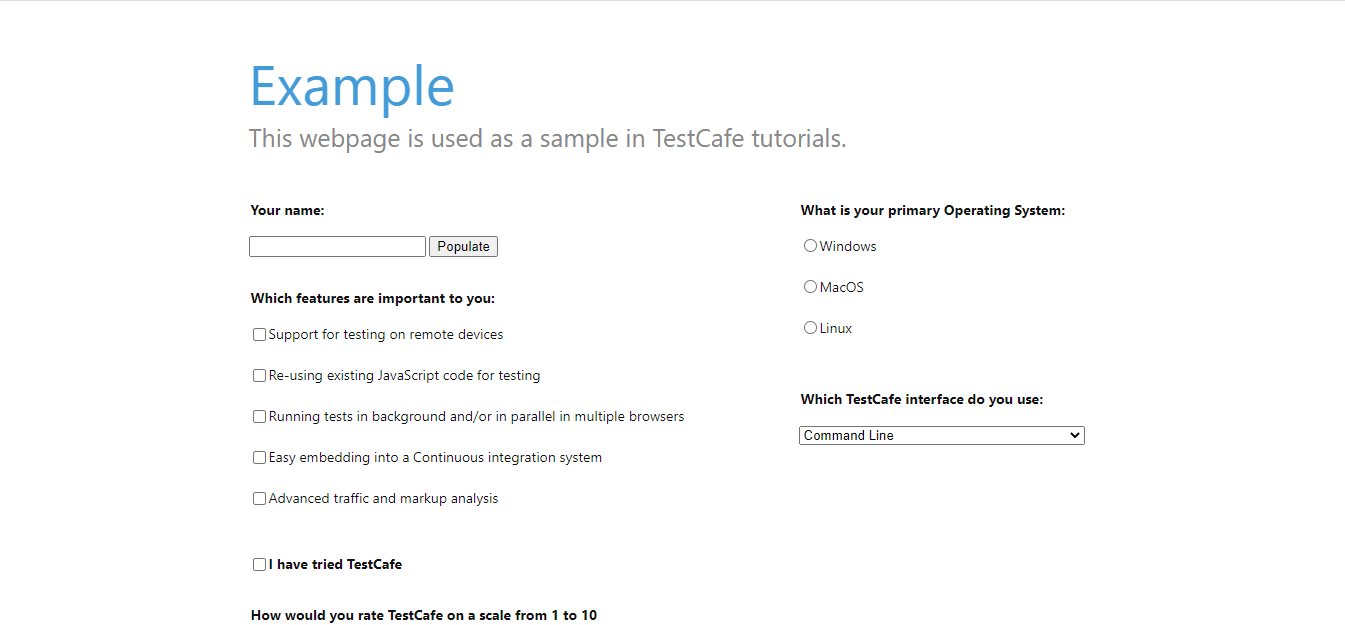
Here’s the sample test that you can run-
|
1 2 3 4 5 6 7 8 9 10 11 12 13 14 15 16 17 18 19 20 21 22 23 24 25 26 27 28 29 30 31 32 |
import { Selector } from “testcafe”; fixture(“TestCafe Example”) .page “http://devexpress.github.io/testcafe/example”; test(“Fill out and submit form”, async t => { // Fill out the “Your name” field. await t.typeText(“#developer-name”, “John Doe”); // Select the first three checkboxes under the “Which features are // important to you” section. await t .click(“#remote-testing”) .click(“#reusing-js-code”) .click(“#background-parallel-testing”); // Select the MacOS option in the “What is your primary Operating // System” section. await t.click(“#macOS”) // Select the JavaScript API option under the dropdown list in the // “Which TestCafe interface do you use” section. const preferredInterface = Selector(“#preferred-interface”); await t.click(preferredInterface) .click(preferredInterface.find(“option”).withText(“JavaScript API”)); // Verify that the Submit button is enabled. Const submitButton = Selector(“#submit-button”); await t.expect(submitButton.hasAttribute(“disabled”)).notOk(); }); |
Code Breakdown-
To perform user actions, TestCafe provides several actions: click, hover, typeText, setFilesToUpload, etc. They can be called in a chain.
All test actions are implemented as async functions of the test controller object t. This object is used to access the test run API. To wait for actions to complete, use the await keyword when calling these actions or action chains.
TestCafe also allows you to observe the page state. For this purpose, it offers special kinds of functions that will execute your code on the client. For eg, Selector is used to get direct access to DOM elements. You call these functions as regular async functions, i.e., you can obtain their results and use parameters to pass data to them.
Output-
Once you run the test, you will see that TestCafe is loading that page and running that test (as you can see below). You will also be able to see the status of the test at the bottom of the page.

Once the test has run successfully, TestCafe will automatically return the result.
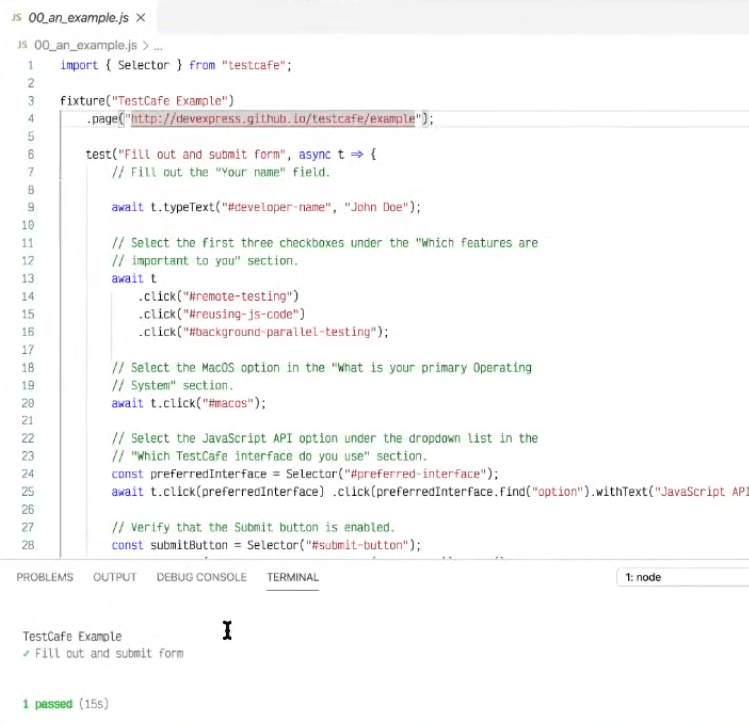
Congratulations, you have successfully run your first automated test on TestCafe!
How LambdaTest & TestCafe Integrate For Better Browser Coverage?
TestCafe offers a power-packed performance in terms of test automation. As you have already seen above, it packs in a plethora of functionalities that can actually be used to scale your test cases to a whole new level.
- How do you scale up your test cases?
- How do you improve your browser coverage?
- How do you implement continuous integration testing against multiple browser configurations and operating systems?
The answer is simple- employ a cloud-based solution, aka LambdaTest. It allows you to perform cross browser testing on 3000+ browsers and operating systems using a cloud Selenium Grid.
To make things easier for you, LambdaTest provides a plugin for easy integration of TestCafe and LambdaTest. In order to install the npm plugin for TestCafe integration, there are a set of prerequisites to fulfill.
Step 1: Make sure you have your TestCafe Credentials.
- For Linux/Mac:
- For Windows:
|
1 2 |
$ export LT_USERNAME= {your lambdatest username} $ export LT_ACCESS_KEY= {your lambdatest access_key} |
|
1 2 |
$ set LT_USERNAME= {your lambdatest username} $ set LT_ACCESS_KEY= {your lambdatest access_key} |
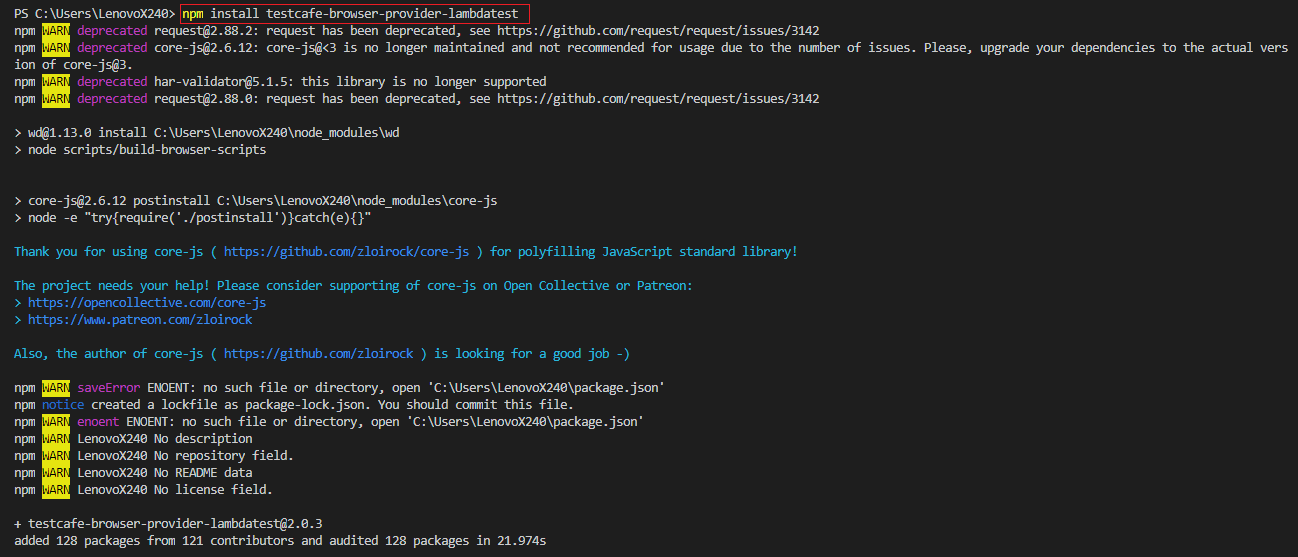
Step 2: Use the below command for installing the npm plugin to integrate LambdaTest with TestCafe.
|
1 |
$ npm install testcafe-browser-provider-lambdatest |
Step 3: Before using this plugin, save your LambdaTest username and access key to the environment variables LT_USERNAME and LT_ACCESS_KEY. You can use the following command to set these variables-
|
1 2 |
$ set LT_USERNAME=*insert your username* $ set LT_ACCESS_KEY=*insert your accesskey* |
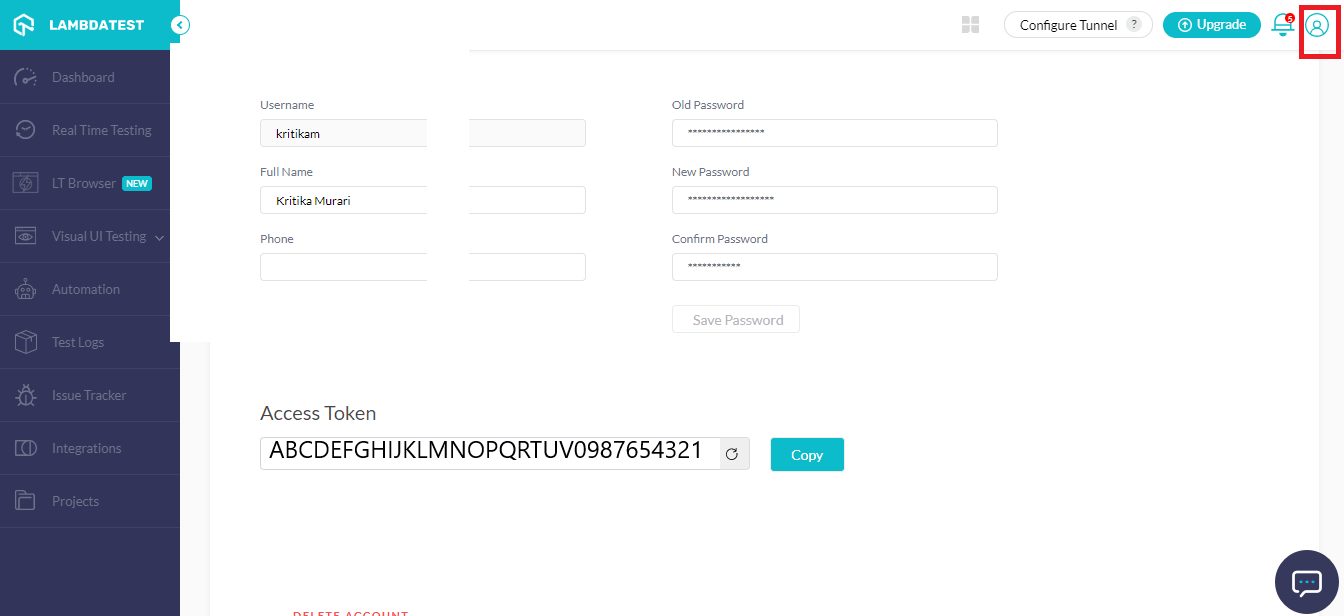
You can find the username and access key in the Profile section (top right corner) of your LambdaTest account. If you haven’t registered yet, you can do it for free here.
Step 4: In this step, we will connect with the LambdaTest platform.
- To acknowledge all available browsers aliases offered by LambdaTest Selenium Grid, type the below command:
- To execute the test from cmd/terminal by declaring the browsers and operating systems to test:
- If you are using API, then you need to declare the aliases inside your browser() method:
|
1 |
$ testcafe -b lambdatest |
|
1 |
$ testcafe "lambdatest:Chrome@86.0:MacOS Catalina" test.js |
|
1 2 3 4 5 |
testCafe .createRunner() .src('path/to/test/file.js') .browsers('lambdatest:Chrome@86.0:MacOS Catalina') .run(); |
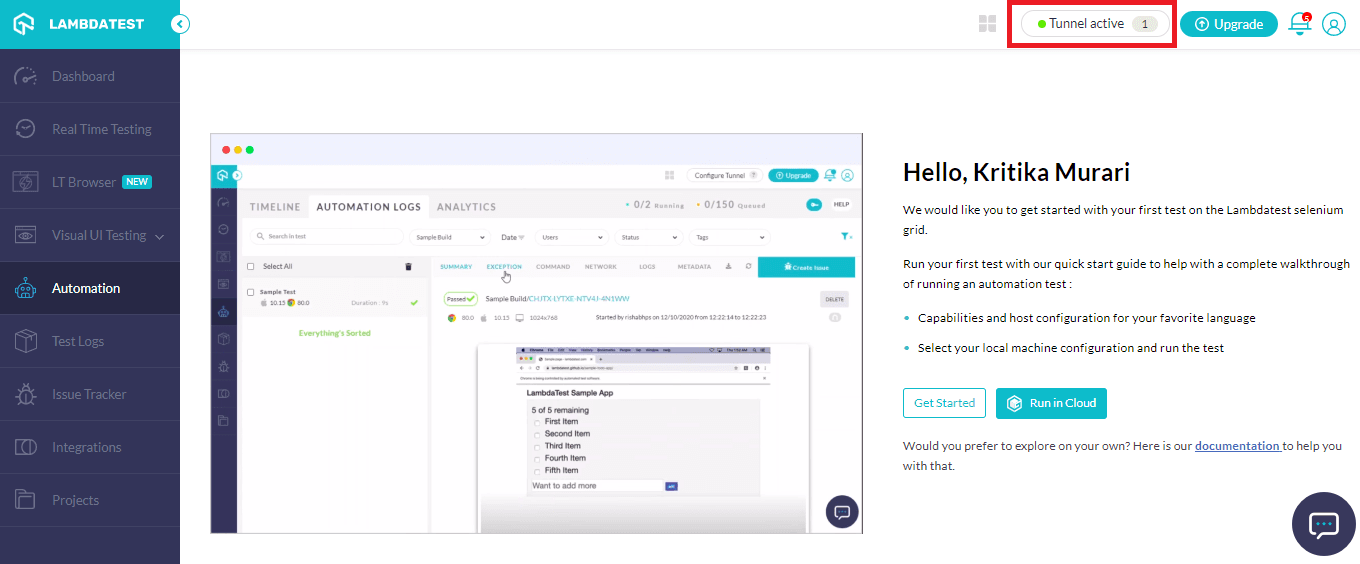
Based on your requirement, you can choose the command of your choice and run it on VS Code. Once you do that, you will notice that a tunnel has been established on the LambdaTest platform. This tunnel will allow you to run tests over a cloud Selenium Grid, providing an easy way to scale up your browser coverage.
In case you wish to make some additional configurations to your automation test scripts, you can refer to our official npm plugin documentation.
Step 5: Create a test.js file to execute the test cases. Now let us run a test script to see how the integration works. This script implements a number of functionalities on https://devexpress.github.io/testcafe/example/ page and check how it goes.
|
1 2 3 4 5 6 7 8 9 10 11 12 13 14 15 16 17 18 19 20 21 22 23 24 25 26 27 28 29 30 31 32 33 34 35 36 37 38 39 40 41 42 43 44 45 46 47 48 49 50 51 52 53 54 55 56 57 58 59 60 61 62 63 64 65 66 67 68 69 70 71 72 73 74 75 76 77 78 79 80 81 82 83 84 85 86 87 88 89 90 91 92 93 94 95 96 97 98 99 100 101 102 103 104 105 106 |
import Page from './page-model'; fixture `A set of examples that illustrate how to use TestCafe API` .page `https://devexpress.github.io/testcafe/example/`; // Page model const page = new Page(); // Tests test('Text typing basics', async t => { await t .typeText(page.nameInput, 'Peter') // Type name .typeText(page.nameInput, 'Paker', { replace: true }) // Replace with last name .typeText(page.nameInput, 'r', { caretPos: 2 }) // Correct last name .expect(page.nameInput.value).eql('Parker'); // Check result }); test('Click an array of labels and then check their states', async t => { for (const feature of page.featureList) { await t .click(feature.label) .expect(feature.checkbox.checked).ok(); } }); test('Dealing with text using keyboard', async t => { await t .typeText(page.nameInput, 'Peter Parker') // Type name .click(page.nameInput, { caretPos: 5 }) // Move caret position .pressKey('backspace') // Erase a character .expect(page.nameInput.value).eql('Pete Parker') // Check result .pressKey('home right . delete delete delete') // Pick even shorter form for name .expect(page.nameInput.value).eql('P. Parker'); // Check result }); test('Moving the slider', async t => { const initialOffset = await page.slider.handle.offsetLeft; await t .click(page.triedTestCafeCheckbox) .dragToElement(page.slider.handle, page.slider.tick.withText('9')) .expect(page.slider.handle.offsetLeft).gt(initialOffset); }); test('Dealing with text using selection', async t => { await t .typeText(page.nameInput, 'Test Cafe') .selectText(page.nameInput, 7, 1) .pressKey('delete') .expect(page.nameInput.value).eql('Tfe'); // Check result }); test('Handle native confirmation dialog', async t => { await t .setNativeDialogHandler(() => true) .click(page.populateButton); const dialogHistory = await t.getNativeDialogHistory(); await t.expect(dialogHistory[0].text).eql('Reset information before proceeding?'); await t .click(page.submitButton) .expect(page.results.innerText).contains('Peter Parker'); }); test('Pick option from select', async t => { await t .click(page.interfaceSelect) .click(page.interfaceSelectOption.withText('Both')) .expect(page.interfaceSelect.value).eql('Both'); }); test('Filling a form', async t => { // Fill some basic fields await t .typeText(page.nameInput, 'Bruce Wayne') .click(page.macOSRadioButton) .click(page.triedTestCafeCheckbox); // Let's leave a comment... await t .typeText(page.commentsTextArea, "It's...") .wait(500) .typeText(page.commentsTextArea, '\ngood'); // I guess, I've changed my mind await t .wait(500) .selectTextAreaContent(page.commentsTextArea, 1, 0) .pressKey('delete') .typeText(page.commentsTextArea, 'awesome!!!'); // Let's submit our form await t .wait(500) .click(page.submitButton) .expect(page.results.innerText).contains('Bruce Wayne'); }); |
To define your desired set of browser & operating system combinations, you can use LambdaTest Capabilities Generator to specify your desired configurations with the help of a config.JSON file (as shown below.)
|
1 2 3 4 5 6 7 8 9 10 11 12 13 14 15 16 17 18 19 20 21 22 23 24 25 26 |
{ “Chrome@86.0:Windows 10”: { “network”: true, “visual”: true, “resolution”: “1280x1024”, “build”: “My TestCafe Build Webinar” }, “Chrome@85.0:Windows 10”: { “network”: true, “visual”: true, “resolution”: “1280x1024”, “build”: “My TestCafe Build Webinar” }, “Chrome@86.0:MacOS Catalina”: { “network”: true, “visual”: true, “resolution”: “1280x1024”, “build”: “My TestCafe Build Webinar” }, “Chrome@85.0:MacOS Catalina”: { “network”: true, “visual”: true, “resolution”: “1280x1024”, “build”: “My TestCafe Build Webinar” } } |
You can even skip this step entirely and use a quick utility offered by LambdaTest. You can use the following command with TestCafe to create a combined list of all the available browsers (with all possible combinations available) in the form of a simple text file and choose your desired combination-
|
1 |
testcafe - b lambdatest >combination.txt |
Output-
As soon as you run the script above, the test will be reflected on the LambdaTest platform as well. You can also find these sample tests at the LambdaTest TestCafe GitHub repository.
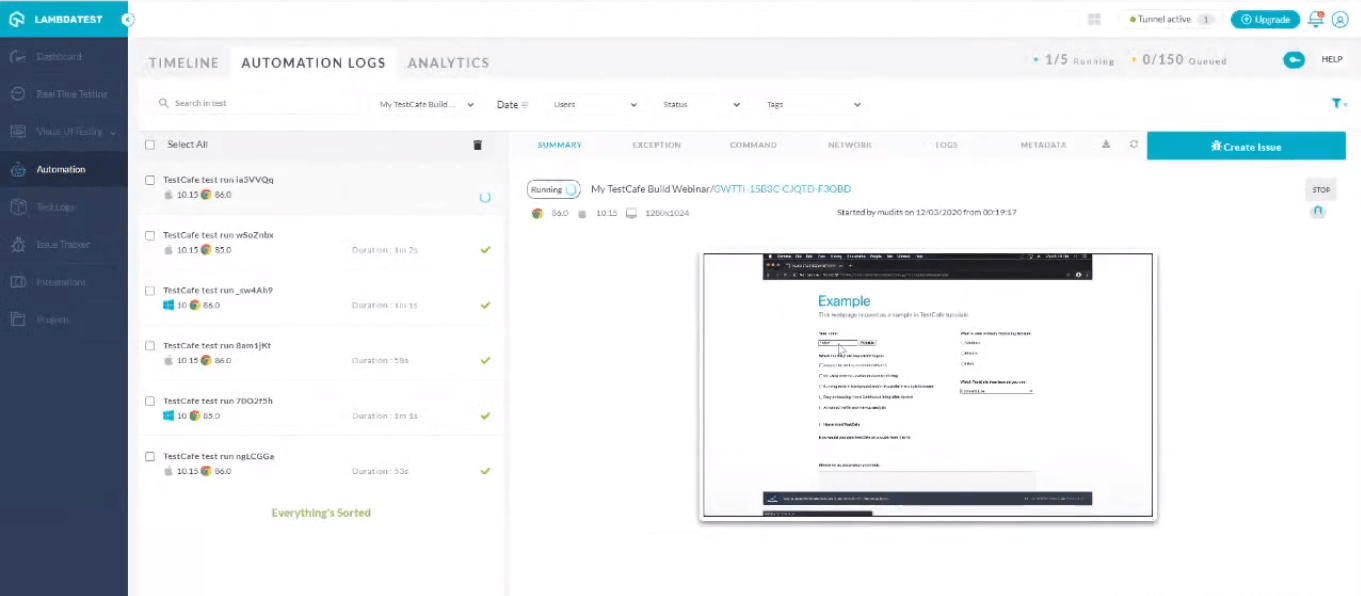
You can even check your test’s live execution by clicking on the video recording on the LambdaTest dashboard. The best part is that you can check your web app’s performance across a wide range of browser & operating systems.
Parallel Testing On LambdaTest Cloud
Additionally, you can also run multiple tests in parallel to save up your time and resources. This is another great feature offered by LambdaTest; it helps save up a lot of time and effort as you can simply run multiple test scripts or even the same test script on different browsers or operating systems at the same time.
You can use the following command for executing parallel tests:
|
1 |
$ testcafe "lambdatest:Chrome@86.0:MacOS Catalina","lambdatest:@86.0:MacOS Catalina" test.js |
Wrapping Up!
It is simply not possible to have all the available browsers, browser versions, or operating systems at hand all the time. When it comes to scaling up your testing environment, you either have to set up the entire infrastructure by spending a huge chunk of money, or you have the option to go the cloud way. While TestCafe provides an excellent set of functionalities for automated web testing, LambdaTest allows you to use those functionalities across various browsers, versions, and operating systems. This is the most optimum way of getting true cross browser test coverage and scaling up your existing test environments!
For further you can also read about code coverage vs test coverage.
Happy testing!

Author
A technophile and bibliophile at heart, Kritika loves to experiment with different aspects of Digital Marketing. When not working, you will either find her sketching or backpacking.
Blogs: 30