How WebdriverIO Uses Selenium Locators – A WebdriverIO Tutorial With Examples
Ramit Dhamija
Posted On: January 13, 2020
19 Min


In any automation testing framework, finding elements is the most crucial step for stable test execution. WebDriverIO offers advanced Selenium locators and selector strategies that simplify element identification compared to traditional frameworks. Earlier, each locator required a specific By method, but WebdriverIO eliminates this need by intelligently detecting the locator type automatically. By the end of this Webdriver tutorial, you’ll understand how WebDriverIO transforms Selenium’s locator strategy, making it easier, faster, and more efficient to use.
As noted in the official documentation, WebdriverIO refers to locators as Selectors. If you’ve worked with Selenium Locators in Java, these Selectors work the same way in WebdriverIO. For simplicity, we’ll use the term Selenium locators throughout this tutorial. New to CSS Selectors? Explore this Ultimate CSS Selector cheat sheet to enhance your web design skills, and check out our WebdriverIO interview questions to prepare for your next interview.
Overview
What are Selenium Locators In WebdriverIO?
Selenium locators are commands that tell the WebDriver how to find elements in the DOM. WebDriverIO supports the same core Selenium locator strategies and maps each selector in your script to the correct findElement or findElements call. It extends Selenium’s power with simpler syntax using $, $$, custom$, and react$, allowing you to locate elements by ID, name, CSS, XPath, or even React component structure, without manually specifying the locator type.
What Are the Common Selenium Locators in WebDriverIO?
Here are the commonly used locator types in WebDriverIO:
- CSS Query Selector: Select elements using CSS rules; $(‘css selector’) is the most common and flexible method for identifying UI components.
- Link Text: $(‘=anchorText’) locates anchor (<a>) elements whose visible text exactly matches the given string.
- XPath: Use absolute (/…) or relative (//…) XPath via $(‘//xpath’) when working with dynamic or nested DOM structures.
- ID: $(‘#id’) finds elements by unique id attributes; it’s the fastest and most stable locator type when available.
- Name: $(‘name=value’) identifies form fields or elements based on their name attribute.
- Tag Name: $(‘tag name’) targets elements by their HTML tag, such as $(‘button’) or $(‘input’).
- Chain Selectors: Combine $().$().$() calls to navigate from parent to child nodes for more precise selection.
- React Selectors: react$(‘ComponentName’) locates React components directly, ideal for testing modern web applications.
How To Find A Web Element In Browser?
Follow these steps to locate a web element in your browser:
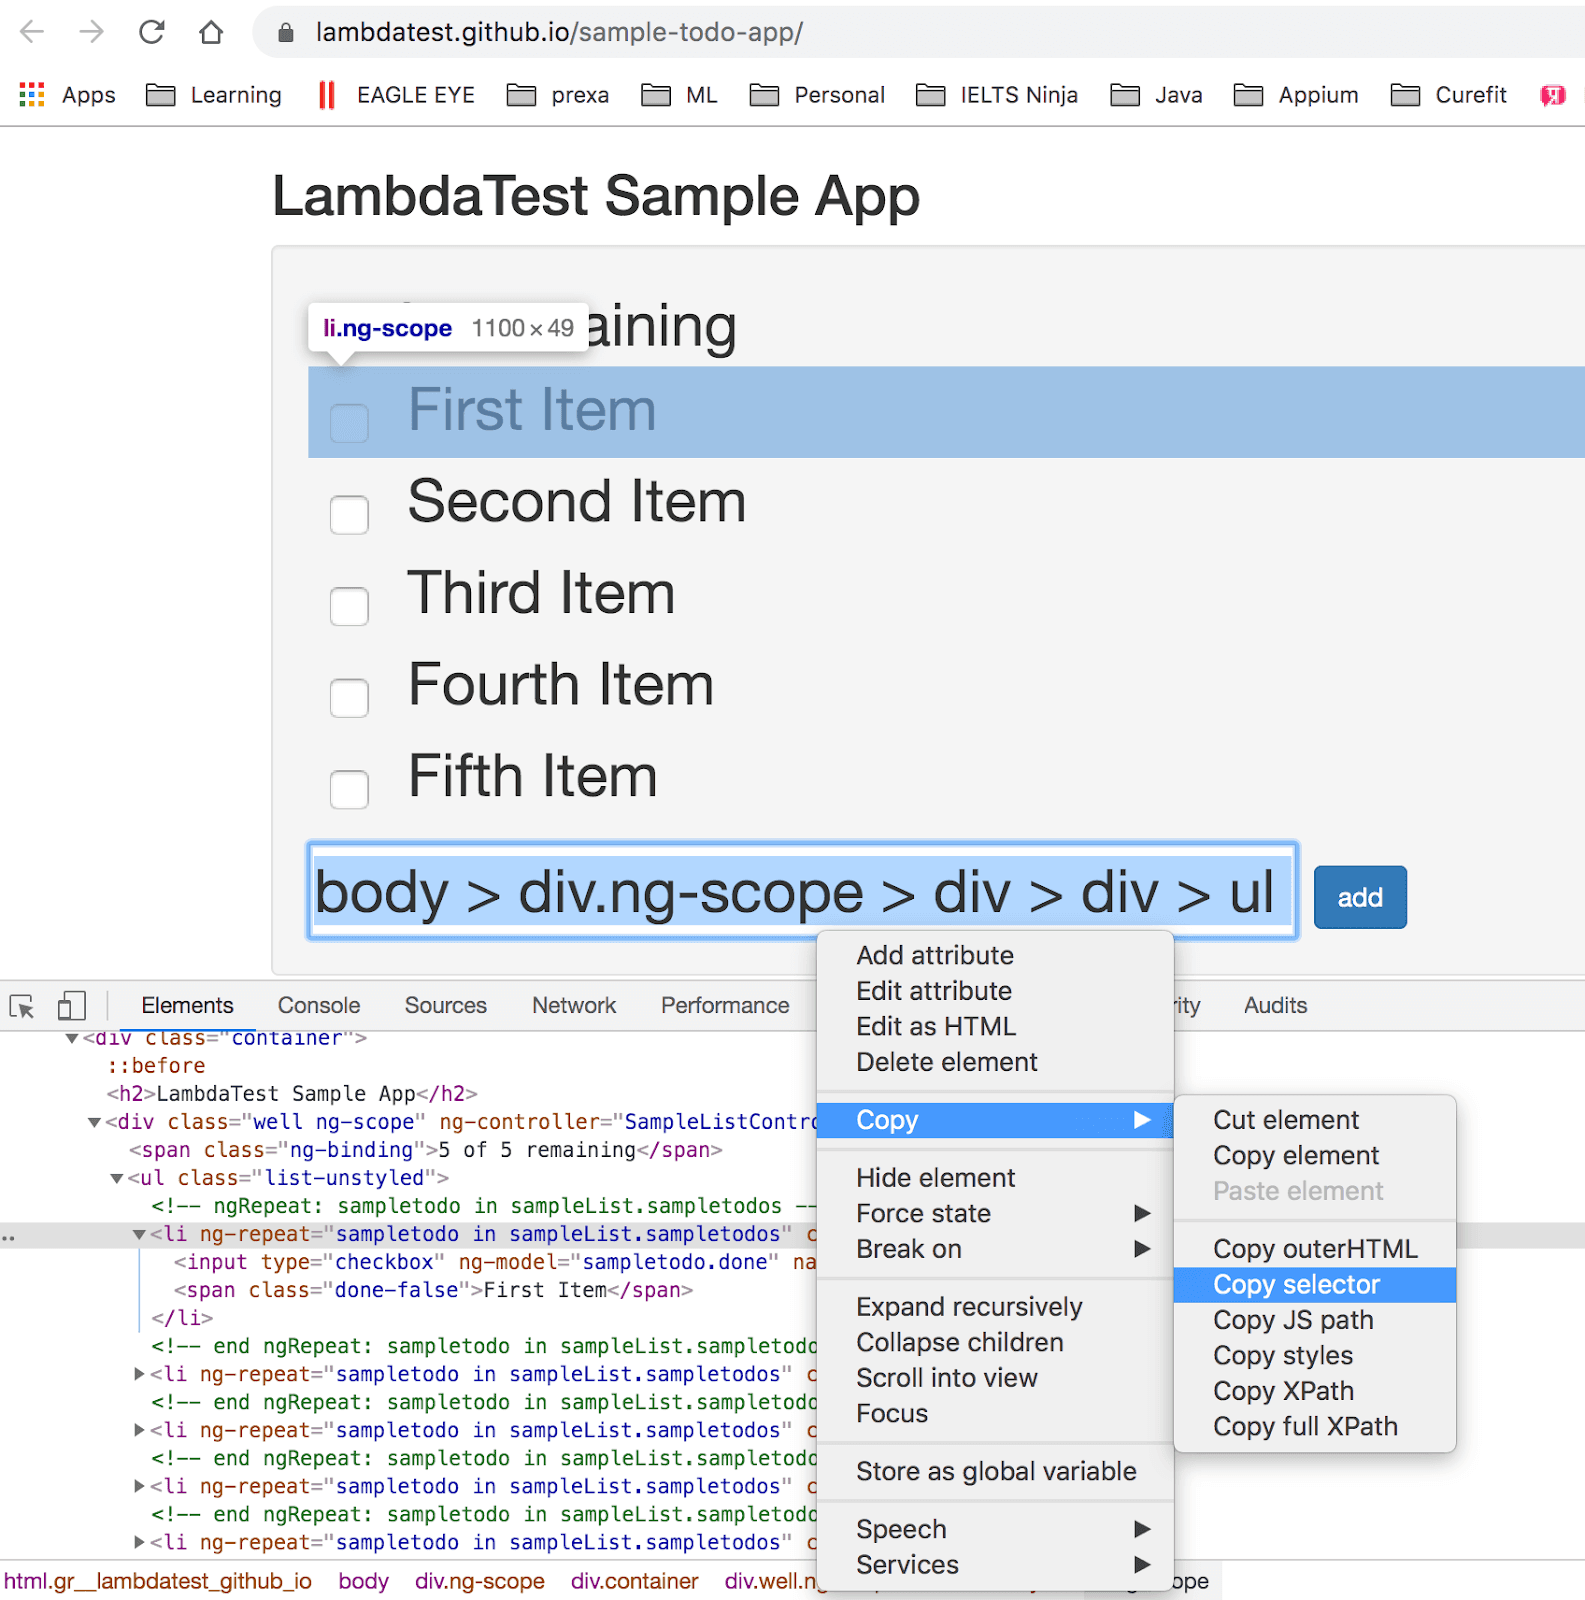
- Open Developer Tools: Press F12 (Windows) or Option+Command+I (Mac), or right-click → Inspect to open browser devtools.
- Use the Elements tab: Explore the page’s HTML under the Elements tab to identify the DOM node you want to locate.
- Activate the element picker: Click the inspect icon in DevTools, hover over or click the desired element to highlight its source node.
- Copy a selector: Right-click the highlighted node and copy its CSS selector or XPath or note unique attributes like id, name, or visible text to create stable locators for $ or $$ in WebDriverIO.
Chapters
- Getting Started With WebdriverIO
- WebdriverIO Browser Commands
- Using WebdriverIO Locators
- Handling Alerts and Overlays in WebdriverIO
- Handling WebdriverIO Dropdowns
- Using WebdriverIO Deep Selectors
- Cross Browser Testing With WebdriverIO
- Generating HTML Reports With WebdriverIO
- Monkey Testing With WebdriverIO
What are Selenium Locators In WebdriverIO?
Before we start off this WebdriverIO tutorial for Selenium locators/selectors, let us quickly understand what they are used for. Selenium locators are utilized to find elements on a web page through a Selenium WebDriver when a test automation script is executed. The Selector is a command in Selenium. Selenium library reads this command from the script, convert into an HTTP request and interact with Web browsers lastly, perform actions based on the command.
Read More: WebdriverIO Tutorial With Examples For Selenium Testing
Selenium Locator Strategies
When you get hands-on Selenium automation testing using WebdriverIO, you should be aware of the correct strategy that works for locating unique elements on a web page. Finding elements by ID, Name and relative XPath would be the first choice to find a unique element from the website. If you could not find any of these ways then it is advisable to choose other types of the Selenium locators/ selector.
If you have performed Selenium automation testing with Java, you may have used findElement() and findElements() method to find the selector from DOM. However, WebdriverIO offers a unique way of Selenium testing with WebDriverIO. With WebdriverIO, you don’t have to mention the Selenium locator’s strategy as it will automatically understand which types of locator strategy should be used. We will look into each Selenium Locator in this WebdriverIO tutorial. Before we jump into practical demonstration, make sure to note down the below methods for finding elements in WebDriverIO:
$(): Single dollar sign used to find single web element
$$(): Double dollar sign used to find multiple web elements
Apart from these two methods, WebDriverIO Support other methods which are,
custom$(): used to find a custom strategy for a single web element
custom$(): used to find a custom strategy for multiples web elements
react$(): used to find single React component by their given name and it gets filter by props and state
react$$(): used to find multiples React components by their given name and it gets filter by props and state
Note: react$ and react$$ command only works with applications using React v16.x
You can take this certification as proof of expertise in the field of test automation with JavaScript to empower yourself and boost your career.
Here’s a short glimpse of the Selenium JavaScript 101 certification from LambdaTest:
How To Find A Web Element In Browser?
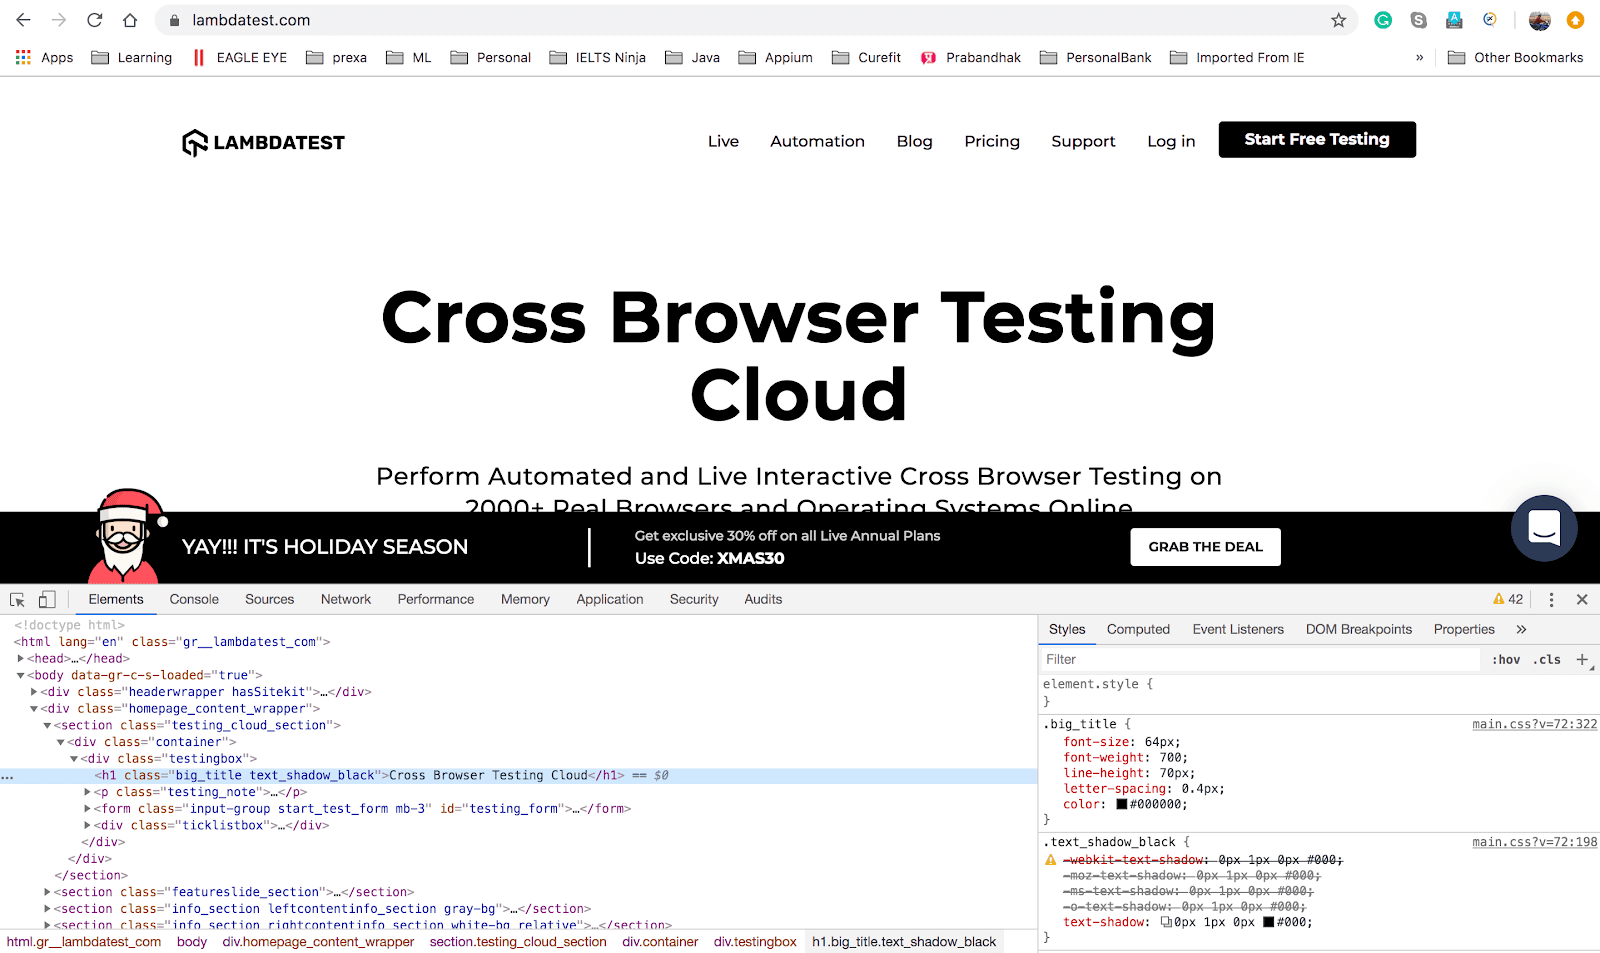
To find a web element in the browser, User has to go to the browser’s developer tools by pressing F12 in windows and option+command+i in Mac Operating System or right-clicking on a website and select inspect option.
Browser Developer Tools
When you open the developer tool, you can see HTML tags under the “Elements” tab. This HTML tab calls DOM elements. To find particular Web Elements, select the selector icon( before the Elements tab) and hover over the element you wish to find in the DOM.
Top 16 Tips To Use Chrome Dev Tools For Cross Browser Testing
List Of Selenium Locators In WebDriverIO
Now that you have a good understanding of Selenium Locators, let us see the different types of Selenium Locators in this WebdriverIO tutorial. The following are the supported selectors by the WebdriverIO.
- CSS Query Selector
- Link Text
- Partial Link Text
- Element with certain text
- Tag Name
- Name
- xPath
- ID
- JS Function
- Chain Selectors
- React Selectors
- Custom Selector
Using $, $$, Custom$, Custom$$, react$ and react$$ methods the user can find the elements and perform desired operations. Let’s deep dive at each one of these Selenium Locators in this WebdriverIO tutorial for Selenium automation testing with examples of a sample DOM.

CSS Query Selector
The first locator in this WebdriverIO tutorial for Selenium automation testing is the CSS Query selector, which is used to find the element from DOM.
How can you find CSS Query?
Go to developer tools and find the element and right click on Selected element in the DOM and copy CSS selector option.
Syntax: $(‘CSS Query’);
Example:
Output:
When you run the above script, you can find the console log and observed that WebdriverIO converted into findElement method with CSS selector strategy
Remember, Sometimes using CSS query selector could result in locating multiple elements as a CSS sheet used for the whole website. Now, let us head to the next Selenium locator in this WebdriverIO tutorial.
Link Text
A website is made up of different types of components e.g textbox, links, drop-down, etc. Even a single web page can have numerous links over it. Selecting a particular link for your Selenium automation testing script could become challenging. This is where Link Text as a Selenium Locators for WebdriverIO comes into play. If you want to find any hyperlink then use this link text selector strategy.
Syntax: $(‘=anchorText’);
Here, = equal to sign is used to find anchor element with ‘specific text’.
Example:
When you run the above automation testing script, you can find the console log. If you notice the logs you will observe that WebdriverIO has automatically detected the findElement method with link text strategy.
Output:
Be careful about the elements being selected by this Selenium Locator in WebdriverIO as it might lead to multiple anchors with the same link text. Now that we know of Link text, let us now head to the Partial link text locator in this WebdriverIO tutorial.
Partial Link Text
Partial link text is similar to link text but the only difference is that this helps when the starting few characters of a link are fixed and the rest are dynamic.
Syntax: $(‘=anchorMatchedText’);
*= start equal to sign is used to find an anchor element with the matched text’.
|
1 |
$("=Automa") |
Example:
When you run the above script, you can find the console log and observe that WebdriverIO converted into findElement method with partial link text strategy.
Output:
Element With Certain Text
In HTML every tag is known as an element and few elements have the direct text and few elements wrapped around other tags. If you want to find the element which has a certain or partial text then this selector is preferred to use.
While Selenium automation testing using Java, you would use XPath with normalize-space() method to find text along with HTML tag if you want to find HTML tag with some text but WebdriverIO uses the method below.
Syntax:
|
1 2 |
$(‘elementTag=certain text’); used for fixed text $(‘elementTag*=partial text’); used for partial text |
This selector takes help from = (equal to) and *= (start equal to) sign.
For instance, to find Cross Browser Testing Cloud from below H1 tag, using this command $(“h1=Cross Browser Testing Cloud”)
< h1 class="big_title text_shadow_black __web-inspector-hide-shortcut__">Cross Browser Testing Cloud< /h1>
The same thing will work for class and ID attribute of the elements. For example:
$(‘#id=certain text’); used for fixed text
$(‘#id*=certain text’); used for partial text
$(‘.classname=certain text’); used for fixed text
$(‘.classname*=partial text’); used for partial text
Here, # is used when you want to find elements by ID and . (dot) used for the class name.
Example:
When you run the above script, you can find the console log and observe that WebdriverIO converted into findElement method with “normalize-space()” and “contains()”.
Output:
Now, let us have a look at the Tag Name locator in this WebdriverIO tutorial for Selenium automation testing.
Tag Name
We use the tag name selector to find the element using any HTML tag. This is a very rarely used Selenium locator. However, this is very important if you are dealing with tables or calendar elements. While Selenium automation testing, you can pass the Tag Name as either of < tag > or < tag />.
Syntax:
|
1 2 |
$(‘<tag>’); $(‘<tag />’); |
Example:
Here is the output when the above Selenium automation testing script is executed in WebdriverIO.
Output:
Name
This Selenium locator is similar to the ID Locator in Selenium. Sometimes a web developer gives a name to the HTML node. If a node has a name attribute then it is preferred to incorporate the Name locator in Selenium automation testing. The name selector has to be within square brackets with the name attribute.
Syntax:
|
1 |
$(‘[<name attribute>]’) |
Example:
Output:
XPath
An extremely pivotal Selenium locator of this WebdriverIO tutorial. In WebDriverIO also, you can write absolute XPath and relative XPath. Absolute XPath starts with / slash and relative starts with // slash. This is a very strong and frequently used selector/ locator for identifying elements through Selenium automation testing.
Following special characters are used while writing XPath.
. – Dot means selection starts from the current node
* – Star means select any node
/ – Single slash means starts with the root node and used for absolute XPath
// – Double slash means to search the node using relative XPath
[ ] – square bracket used for index and also used for searching XPath by passing attribute and it’s value
@ – used for identify for HTML attribute in XPath
Syntax for Absolute XPath:
|
1 |
$(‘<starts with /body>’); |
Syntax for Relative XPath:
|
1 |
$(‘<starts with .//>’); |
Example:
When you run the above script, you can find the console log. Observe that WebdriverIO converted into findElement method with “XPath”.
Output:
ID
Another crucial Selenium Locator of this WebdriverIO tutorial. The ID is an extremely powerful selector to find an element from DOM. This is always a unique element in the DOM. One more important thing is that, if you want to speed up your automation execution then this is a must use Locator for Selenium automation testing. The ID directly gets a search from DOM whereas XPath scan the documents based on a relative or absolute path which is a time-consuming method.
# sign used to find elements using ID.
Syntax:
|
1 |
$(#<idname>); |
Example:
Now, here you should observe this output log. When you run the above script, you can see ID selector internally converted into css selector and finding the element.
Output:
Now, we have covered the usual Selenium locators in WebdriverIO. Next, we look at the advanced Selenium Locators/ Selectors in this WebdriverIO tutorial.
Chain Selectors
Sometimes it gets difficult to find an element that has no ID, name and tables rows and cells, in such a case, this chain selector helps you to get your unique element. There is no specific symbol given for this but you just call $().$() until you find the desired element by period (.) sign.
Note: Chain Selector/Locator uses the parent-child concept. So the Next chain element should fall under the parent chain selector.
Syntax:
|
1 |
$(selector).$(selector).$(selector) |
Example:
When the script gets executed, each element starts finding element one by one until it reaches the final element. Firstly it uses findElement() and then calls findElementFromElement().
Output:
JS Function
WebdriverIO supports JS selector/locator to find the elements using a JavaScript.
Syntax:
|
1 |
$(function() {return <JS script>}) |
Example:
Web Elements stored in the variable and then JS functions call with help if $(). It converted internally executeScript().
Output:
React Selector
React is another one of the advanced locators in WebdriverIO which has been provided to create custom react components for mobile apps. WebDriverIO has provided a feature that you can directly find an element using the react$() method.
react$$() method helps to find an array of WebDriverIO elements.
Syntax:
|
1 |
react$(‘ReactComponent’); |
Let’s understand by below React Native Example:
In the above example, ‘RootComponent’ is a react component and when it renders within HTML element with id=’root’.
This RootComponent can be found by react$() and below is the example:
|
1 |
const rootComponent = browser.react$(‘RootComponent’); |
Custom Selector
One of the most convenient Selenium locators/ selectors in WebdriverIO which comes handy when facing complex scenarios for Selenium automation testing. The Custom selector allows you to use a customized strategy declared by using browser.addLocatorStrategy.
custom$$() method helps to find an array of WebDriverIO elements.
Syntax:
|
1 |
browser.custom$(strategyName, strategyArguments) |
Example:
With the help of addLocatorStrategy(), we have created ‘emailById’ custom selector for the email ID field and we can use emailById selector using the custom$() method. Internally, WebDriverIO converts custom$() into executeScript() and finds the element.
Note: In this WebdriverIO tutorial, we have discussed single $() which helps to deal with a single element. All these selectors can be used with $$() for the array of WebDriverIO.
Conclusion
WebDriverIO is one of the top JavaScript testing frameworks and when you look at the variety it offers for you to locate elements in a web page, you would be sure to make a note of it for your upcoming projects. It has a very unique selector choice including react$ and custom$ selectors. WebDriverIO has single way to find the element but has different signs for selector e.g * , *=, .(period) and # different. I am sure that this WebdriverIO tutorial will help you to take your knowledge on test automation to the next step. Happy testing! 🙂
Frequently Asked Questions (FAQs)
Does WebdriverIO use Selenium?
Yes, WebdriverIO works on top of Selenium’s WebDriver protocol to automate browsers just like Selenium does. It connects with browser drivers such as ChromeDriver or GeckoDriver to execute automation commands. The main difference is that WebdriverIO offers a modern, JavaScript-friendly interface that’s easier to write, read, and maintain for test automation projects.
How to use XPath in WebdriverIO?
You can use XPath in WebdriverIO by simply passing your XPath expression inside the $() function. For example:
|
1 |
$("//button[@id='submit']") |
WebdriverIO automatically recognizes the syntax as XPath and locates the element accordingly. This approach makes finding deeply nested or dynamic elements fast and straightforward without additional setup.
What are Selenium locators used for?
Selenium locators are used to identify and access web elements like buttons, links, and input fields during automated testing. They guide automation tools like WebdriverIO to interact precisely with elements on a webpage. In short, locators are the foundation of every action in a test from clicking to entering text or validating page content.
What is the difference between WebDriver and WebdriverIO?
WebDriver is a protocol that defines how browsers should be automated, while WebdriverIO is a testing framework built on top of it. Think of WebDriver as the engine and WebdriverIO as the smart driver controlling it with added flexibility and simplicity. WebdriverIO provides advanced utilities, clean syntax, and built-in waits that make testing faster and more developer-friendly.
How does WebdriverIO simplify Selenium locator usage?
WebdriverIO simplifies the process by automatically detecting which locator strategy you’re using whether it’s CSS, XPath, or another type. This means you don’t have to declare locator types manually, reducing code complexity and errors. It keeps scripts clean, readable, and easy to debug while still offering full control when needed.
Can I use Selenium commands in WebdriverIO?
Yes, you can use all standard Selenium commands in WebdriverIO because it’s built on the same WebDriver protocol. Commands like findElement, click, or sendKeys can be written in WebdriverIO’s modern JavaScript syntax. This allows testers familiar with Selenium to transition easily while gaining access to new features like async/await and custom commands.
Which locator strategy is best to use in WebdriverIO?
Using ID or Name locators is usually the best choice because they’re unique, fast, and reduce the risk of duplicate matches. When those aren’t available, CSS selectors are a reliable option for most modern web pages. XPath should be used for complex or dynamic elements that can’t be targeted with simple selectors.
Author
Ramit Dhamija is a DevOps Engineer with 6+ years of experience in software testing, Java-based test automation, and cloud infrastructure. At LambdaTest, he contributed to automation frameworks that enhanced cross-browser testing reliability. Skilled in Java, Selenium, Kubernetes, and AWS, he also holds certifications including CKA and ISTQB. Ramit earned his MCA in Computer Science from Birla Institute of Technology, Mesra, and specializes in bridging QA practices with modern DevOps pipelines.
Blogs: 10