Build An Automated Testing Pipeline With GitLab CI/CD & Selenium Grid
Harshit Paul
Posted On: March 4, 2020
![]() 83114 Views
83114 Views
![]() 23 Min Read
23 Min Read
CI/CD has been gaining a lot of attraction & is probably one of the most talked topics for the novices in DevOps. With the availability of CI/CD tools available in the market, configuring and operating a CI/CD pipeline has become a lot easier than what it was 5-6 years ago. Back then there were no containers and the only CI/CD tool that dominated the sphere was Jenkins. Jenkins provided you with a task runner, so you could define your jobs to run either sequentially or in parallel.
Today, the scenario is different. We have numerous CI/CD tools available in the market which provides us with added features and functionality in comparison to Jenkins. One such renowned CI/CD tool is GitLab CI and that is precisely what we will be covering in this article.
In this article, we will configure a CI/CD pipeline with GitLab CI/CD and execute Selenium testing over it through LambdaTest, an online Selenium Grid of 3000+ real browsers.
Integrate and automate your Selenium test suites with GitLab CI on LambdaTest.
TABLE OF CONTENT
Basics of CI/CD
CI/CD is a collection of best practices followed to ensure that you are delivering product updates to your web-application on a consistent and reliable basis. Your web-application is bound to grow with every sprint that is taken into a new release cycle. Initially, you may have a small team responsible for code changes in your web-application. In such cases, you wouldn’t mind doing everything directly, you build the code, you test it yourself and deploy it to the production.
However, as your team grows there will be a lot of interaction points and the probability of error increases as you try to migrate all of the code changes from one staging environment to another. This is where the CI/CD pipeline plays a pivotal role.
Any successful business running online is highly-dependent on how their CI/CD pipelines are configured. In one of the articles which explained the growth and scalability of Uber, said that:
Uber is now in 400 cities and 70 countries. They have over 6000 employees, 2000 of whom are engineers. Only a year and a half ago there were just 200 engineers. Those engineers have produced over 1000 microservices that are stored in over 8000 git repositories.
If you observe how fast a business can grow, then you can imagine the challenges Uber might have to come across to coordinate with 10x engineers down the road, in just a year and a half, had they not incorporated a CI/CD pipeline. In today’s world, it would be extremely hard to imagine a web application that is scalable on the terms of speed and consistency without following CI/CD best practices. Now, what are CI and CD? CI refers to Continuous Integration & CD implies Continuous Delivery. Combining both ones can achieve Continuous Deployment. Let us look at what they actually mean.!
What Is Continuous Integration?
In traditional SDLC models, developers would migrate new features into an environment one-by-one in isolation. This created issues when you have multiple developers working over multiple features. Continuous Integration is a practice which ensures that developers are able to commit numerous changes to the main branch of your web-application through a shared repository, in a systematic manner. By leveraging the practice of Continuous Integration, your developers can integrate code around hotfixes, product enhancement, etc. into a shared repository, multiple times a day. That way, your overall go-to-market launch can accelerate, allowing you to be agile.
If you have given edit access for GitHub repository to developers in your team then you only need to ensure that the developers are following best practices, code styling and most importantly the test cases are not failing. As long as these requirements are fulfilled, you shouldn’t disallow anybody to check in your code. This would help your company to scale continuously.
What Is Continuous Delivery?
Coming to continuous delivery, it only happens after CI is performed. As the name suggests, the practice Continuous Delivery ensures that you have an automatic pipeline configured to deploy code changes from one staging environment to another.
Continuous Delivery includes all the steps necessary to make your software deployable. This includes running comprehensive tests, quality assurance using testing tools, execution of builds, code signing, documentation and deployment to pre-prod or user acceptance environments.
Don’t confuse Continuous Delivery with Continuous Deployment !!
Think of Continuous Delivery as everything except the deployment. You prepare deployment but you don’t actually deploy it to the production servers. You leave it to human intervention steps that will actually ensure when and where to deploy. Continuous Delivery is suitable for teams where Continuous Deployment is not required. However, Continuous Deployment is a practice which can only be implemented if you have a well defined migration system set up which makes it infeasible for organizations with less employees on-board. Which brings us to our next questions.!
What Is Continuous Deployment?
Continuous Deployment actually follows up with Continuous Delivery. It is an extension of Continuous Delivery. It takes Continuous Delivery a step further to a stage where the deployment for the new release of version on the production is conducted automatically.
The only requirement for Continuously Deployment is that the process, the checks and the tests set up, guarantee a crash-free experience. Now, since it’s a completely automated system it’s imperative that you guys spend more time developing very strict test cases because here you don’t have any chance for manually reviewing your the migration, once it’s gone, it’s gone.!
Which is why Continuous deployment isn’t feasible for all companies. Continuous Deployment should have the strictest rules possible before deploying the code because of the process being fully automated system without any human intervention.
Being the last step in the chain of automated pipeline production, it’s imperative that the checks and tests at this level are the strictest and anything less than a 100% should be rejected, without any leeway.
In spite of all the benefits that comes with Continuous Deployment, a team should validate the requirements and only adopt Continuous Deployment if the development environment, production sensitivity, and the test system allows seamless adoption.
Keep in mind, if the systems in the place are not mature enough then the deployment might prove to be a catastrophic one for any team. Which is why most teams go with continuous delivery only and there’s no harm in that. It totally depends on what are you building and how critical is that and like there’s no hard and fast rule that you should actually use continuous deployment.
What Is GitLab CI/CD?
Gitlab has an excellent CI/CD offering for projects hosted on Gitlab as well as other git providers. Using GitLab CI/CD you can incorporate all of the three stages that we discussed i.e. Continuous integration, Continuous delivery and Continuous Deployment.
What makes GitLab CI/CD powerful is the fact that it allows you to host your Git repository to any of the other Git providers such as GitHub, and you can still harness it’s CI/CD system. You don’t even have to change your Git provider in order to use get Gitlab CI/CD. The only requirement to run CI/CD is the presence of a special GitLab CI YAML configuration file. GitLab CI YAML file contains all the instructions and data required to run different CI/CD pipelines.
There are plenty of customization options available to shape the pipelines according to custom needs.
Another key thing to note is that .gitlab-ci.yml is version-controlled and placed in the repository. This allows even the old versions of your repository to build successfully, making it easier for your team to adopt the CI practice. Reason being, if the GitLab CI YAML is placed in the repository itself, it means you have now put the logic of CI/CD into your repository. Making you free from the worries that your CI/CD system might fail and you might lose your data. Now, wherever a code lives, your CI/CD is present there, making it simpler to shift from one hosting environment to the another, as long as it suppose the same pipeline.That way, your team can easily make use of CI branches as special different pipelines and jobs and you have a single source of truth for all CI CD pipelines.
What Are GitLab CI/CD Environment Variables?
Env variables are dynamic-named values that can be used to make CI/CD pipelines completely dynamic and parameterized. In general it’s always the best practice to keep removing hard coded values and use environment variables to make the jobs portable and provider agnostic.
Specifically Gitlab has a huge list of predefined variables that can aid to build robust and flexible CI/CD pipelines. The link can be used to view the complete list.
The most commonly used and important variables comprise of:
- CI_COMMIT_REF_NAME
- CI_COMMIT_BRANCH
- CI_COMMIT_TAG
- CI_EXTERNAL_PULL_REQUEST_IID
- including others
These variables allow to shape pipelines according to different git branches and IMO this provides great flexibility in differentiating jobs based on the environments. To know more, you can have a look at the GitLab official documentation for environment variables.
It is always better to use as many environment variables as possible to make your jobs customizable and flexible.
This GitLab Tutorial for beginners and professionals will help you learn how to use GitLab, one of the most popular CI/CD tools used in DevOps.
What Are GitLab Cached Dependencies?
Every CI/CD job requires some kind of building phase where the est target is built using 3rd party dependencies. Depending on the stack, these dependencies are fetches using plugin managers, module importers, etc. The common pain point in building with 3rd party modules across all the languages is that it takes a lot of time to fetch dependencies from 3rd party sources and compile them. Imagine doing this process over a hundred times a day for multiple projects and calculate the time and resource wastage it incurs. Not a pleasant picture, right?
If there was a way to cache these built dependencies and use these cached dependencies for multiple pipelines, it would make CI build much faster and reduce bandwidth wastage and will unclog the CI pipelines so that same Infra can be used for much more builds.GitLab’s Cached Dependencies allow you to exactly do this straight out of .gitlab-ci.yaml file.
It’s as simple as setting a cache dictionary in yaml file and key attribute. Just ensure you use the same key in all the jobs where cached directory is required. Common practice to ensure cache between branches is to use git bases environment variables as cache key. For example, CI_COMMIT_BRANCH can help you utilize cache whenever a job is run for a branch.
Gitlab CI/CD provides powerful primitives to invalidate cache. This can be done either via UI or by clearing the cache key.
An extension: You can optionally fetch dependencies and build them only package manifest file changes. This is superior to using cache always. For example, only fetching node js dependencies whenever package.json changes.
How To Trigger A CI/CD Pipeline?
GitLab CI/CD allows you to trigger your pipeline using following ways:
- Git Based Triggers
- Webhooks/ Crons
- Manual Intervention
Git Based Triggers – Easiest way to trigger CI/CD is to perform any git based operation such as pushing in a branch, merging pull request or creating a tag for which handers are mentioned in gitlab.yaml file. This is the most frequently used and most convenient method to trigger CI/CD.
Webhooks provide a convenient method to trigger CI /CD on demand by making an HTTP post call to specialized urls. This is very useful for event based triggering where webhook can be called whenever a required event occurs
- For eg, you can setup a cron to run nightly builds on Gitlab by just hitting curl request on webhook url at the desired interval.
- Any other event can be used as long as webhook can be hit in response to the event.
Gitlab has a provision where manual intervention by authorized users can be requested to continue the next steps of the job. IN the gitlab.yaml you can mention a part of the pipeline to run only after somebody with access in the team can resume the job from UI.
- This feature enables constructing continuous delivery pipelines that we have discussed already. Everything except deployment can be automated and only after the manual intervention, the deployment can take place.
Exclusive Parameters For GitLab CI/CD: Only & Except
Only and Except are two parameters that set a job policy to limit when jobs are created. These constructs are the nut and screw of gitlab CI/CD pipeline that allow customization and conditional execution of jobs to shape it according to your own needs.
- ‘Only’ specifies the names of branches and tags for which the job will trigger.
- ‘Except’ specifies the names of branches and tags for which the job will not trigger.
Only and except are inclusive in nature and allow the use of regular expressions. This is a really interesting feature and makes any kind of customization possible by playing over strings.
Only and Except allow to specify a repository path to filter jobs for forks. Some of the interesting values that only and except take are:
- branches
- tags
- merge_requests
This follows from the precondition that Gitlab CI/CD is supported for git based application.If you use multiple keys under only or except, the keys will be evaluated as a single conjoined expression. That is:
- only: means “include this job if all of the conditions match”.
- except: means “exclude this job if any of the conditions match”.
With only, individual keys are logically joined by an AND:
except is implemented as a negation of this complete expression:
This means the keys are treated as if joined by an OR. This relationship could be described as:
There is a huge list of attributes that can be used by only and except conditions. I really recommend that you check out those values.
Integrate and automate your Selenium test suites with GitLab CI on LambdaTest.
Executing Selenium Testing Scripts For GitLab CI/CD
Let’s apply what we learned here.! The project that we’ll be using today for this GitLab CI/CD tutorial is the HourGlass 2018 which is a MERN(Mongo Express React & Nodejs) stack application. It’s a simple time management application using the best practices available at that time. Unfortunately in the JS world, those best practices change every month Some of these might have been updated but most of these are still relevant and this is a full production scale and production style development repository, with all the best practices available.
Testing web-application URL: hourglass.surge.sh
Cloning The GitHub Repository
Make sure you clone the HourGlass GitHub repository to your GitLab CI instance. After cloning, route to the master branch and check the GitLab YAML file.
Configuring CI/CD Pipeline In GitLab CI
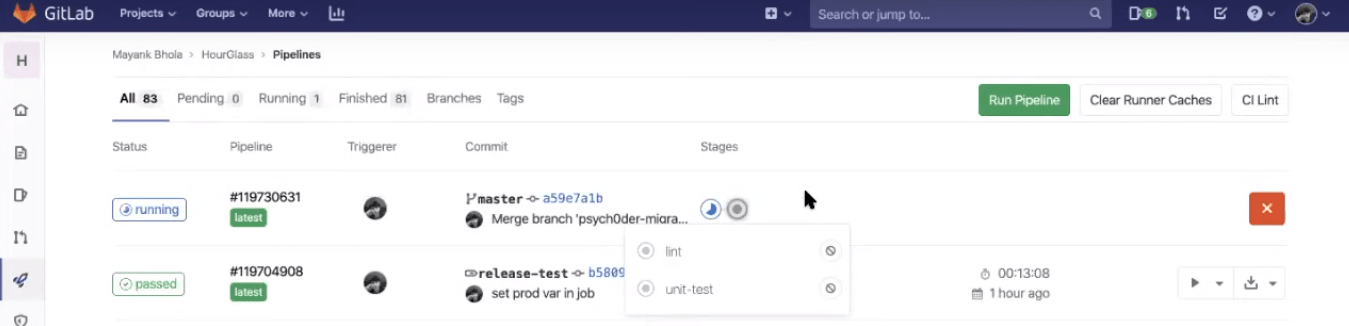
In order to trigger our CI/CD pipeline, we will need to edit the README.md file. We can make these changes directly through Web IDE. We can go ahead and add a sample comment and hit the commit. Make sure to perform the change in the master branch.
Once you commit the code, you can jump into the CI/CD section over GitLab and notice the job executed successfully. You can find the following in running state:
- Build-client
- Linting
- Unit test
Now, raise a pull/merge request to the production branch. For the demo, we’ve kept the production branch as the main branch of the Git repository and not the master. Now, we need to merge from master to prod.
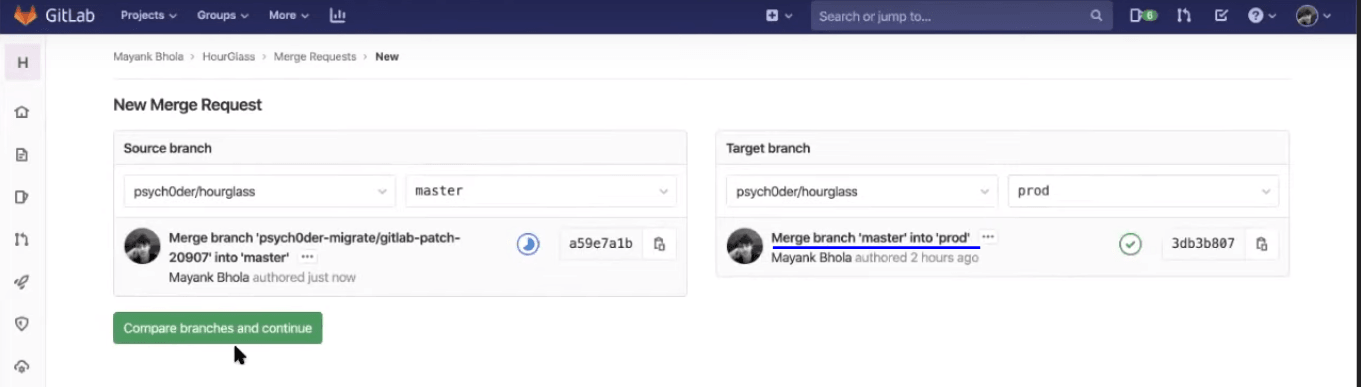
Note: By default, before you submit the merge request, you will find the checkbox ticked to “delete source branch when merge request is accepted”. Deselect that checkbox.
GitLab CI/CD won’t perform a merge unless pipeline succeeds. Which means it won’t pass the changes until your test scripts are done executing themselves. That is a great feature to help you pass a stable release. Also, you don’t have to wait for the test scripts to be completed so you could perform a merge. All you need to do is click on the button to “Merge when pipeline succeeds” and the GitLab CI will take care of the merging post your test-script execution.
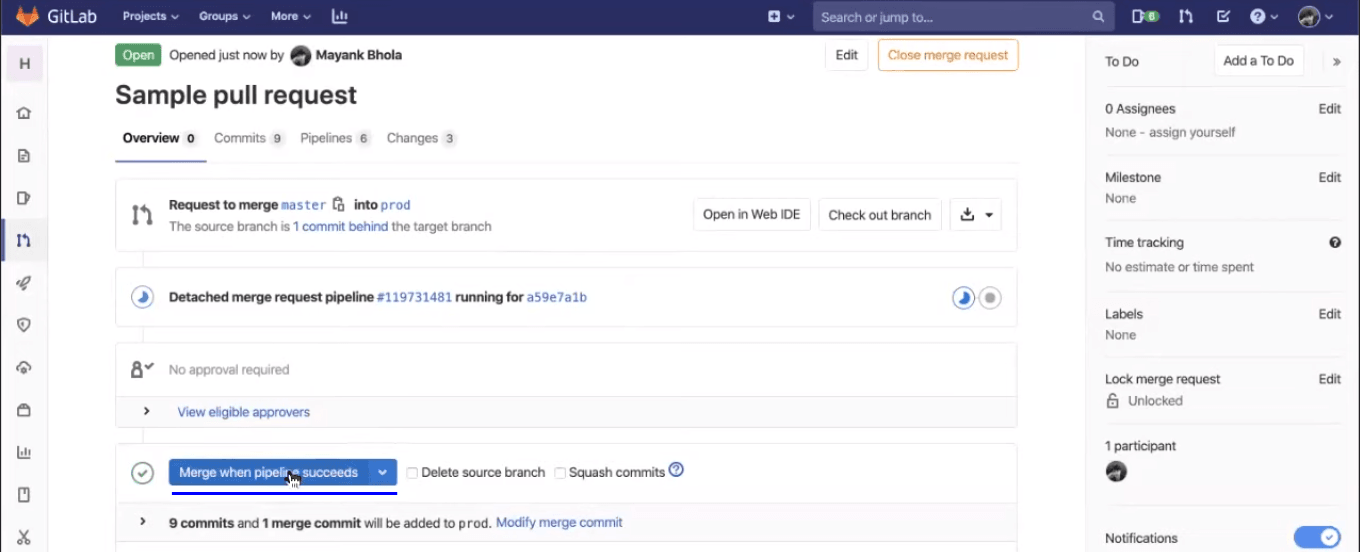
All the jobs by default will be executed in parallel, unless you specify them otherwise. This greatly reduces the overall time consumed by the CI process. You can see which builds are being passed and what jobs are running after you hit the merge request.
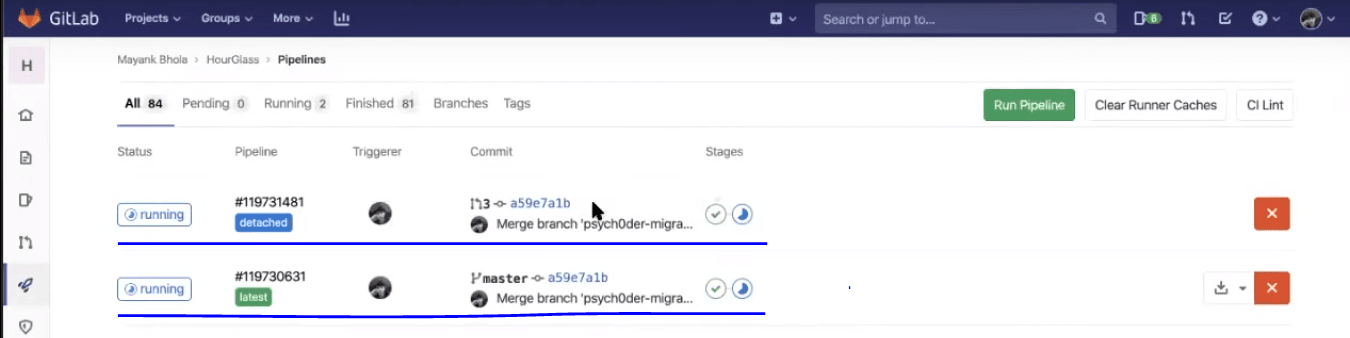
Now, you may notice that an integration test would be running in the detached pipeline, along with the previously discussed jobs in the latest pipeline i.e. Linting, and unit testing.
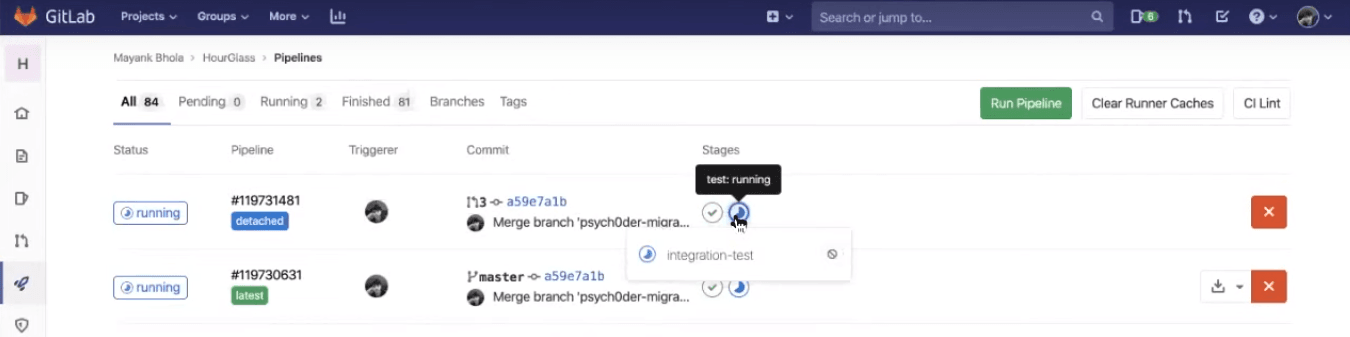
Integration testing will ensure that your back-end and front-end are in goodsynch and that your APIs are responding well.
Creating Tag For A Release
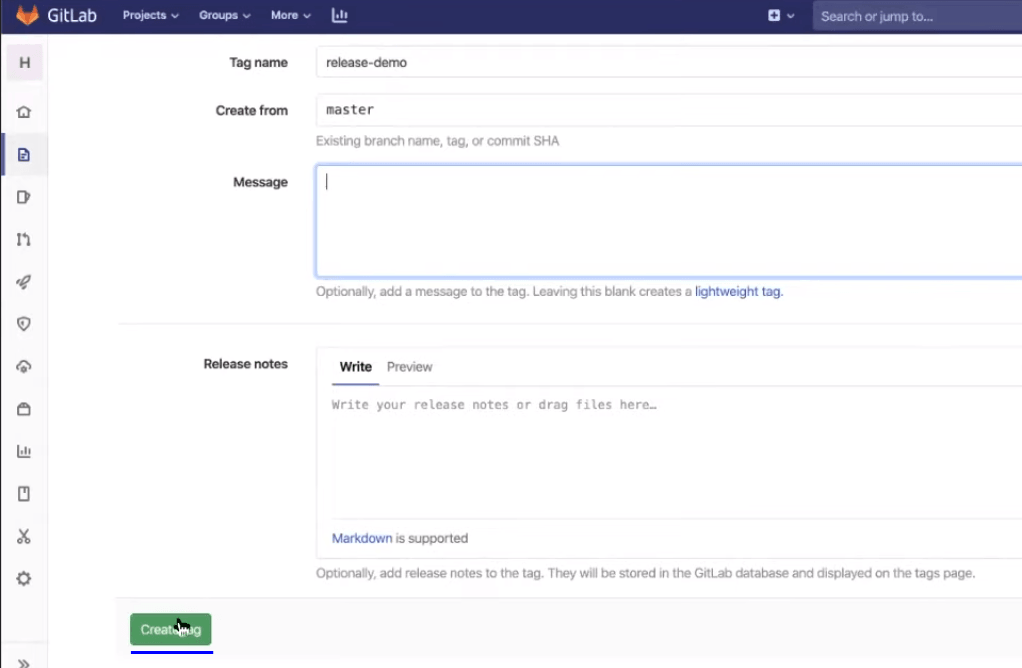
To create a release, we will first need to generate a tag through GitLab CI/CD.
Git tags are extremely useful if you want to bookmark some important changes. Now, create a new release from the master branch. You can add any message over there to help you remember what this main release contains or maybe you can add some build release checkpoints as well. Then you can create the tag:
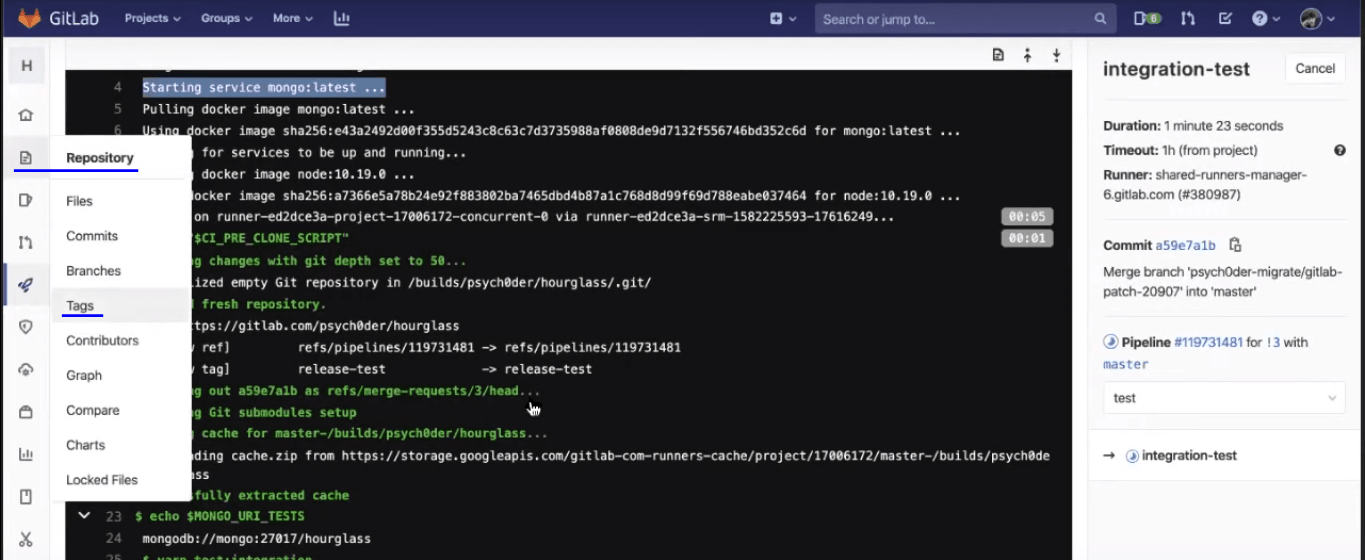
As soon as the tag is created, a process will begin to execute. Now, you can straightforward go to see CICD and notice the new pipeline on the top created, in response to the tag creation event.
In this pipeline you can notice that there are 4 stages. The first one is making sure that all the dependencies are installed. This is crucial as you are now creating the final build and you don’t want any confusions, bugs, warnings, to be ignored in that.
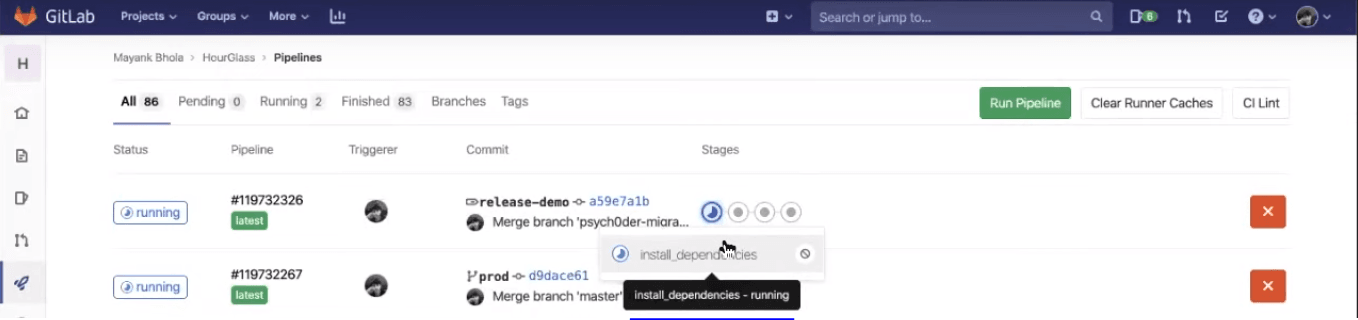
Next stage is where the build-client is being established.
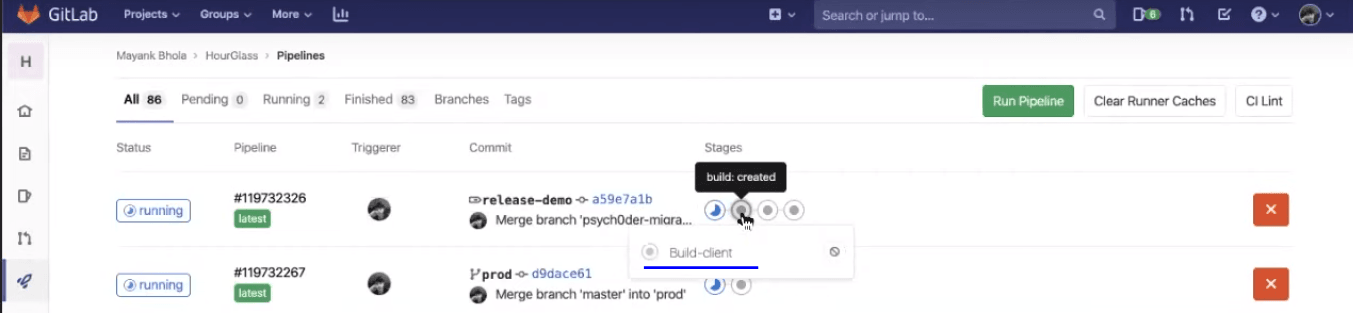
Third, you can notice three kinds of tests that would be running i.e. unit test cases, linting, and then end-to-end test. End-to-end testing is where you will be incorporating your Selenium testing scripts to perform cross browser testing. You will then have those test scripts executed over an online Selenium Grid offered by LambdaTest.
At last, when Selenium testing scripts would be passed and the pipeline will move onto the next stage where the deployment over the backend & frontend stage will take place.
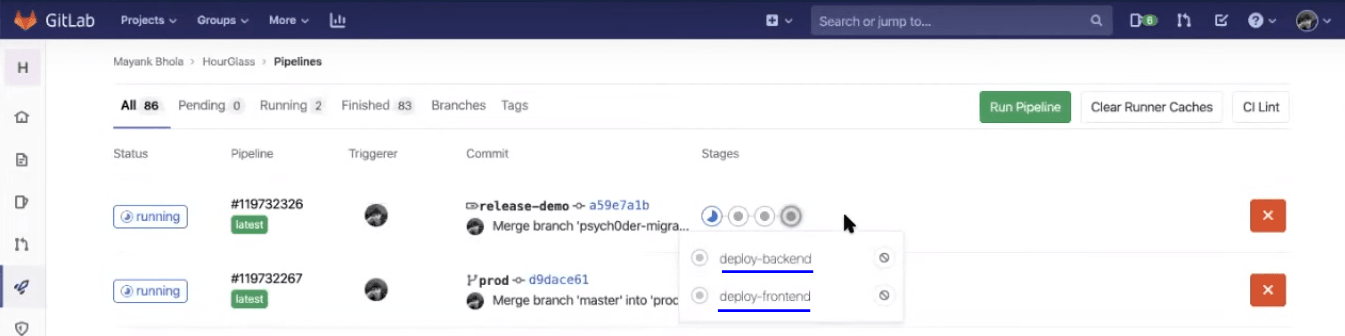
Note: These stages are manually triggered. You will find a play button once the pipeline goes to that stage.

That is it..! Now, once you hit the play button. You can deploy the changes to respective environments. You can go ahead and validate your Selenium testing scripts over the LambdaTest Automation Dashboard.
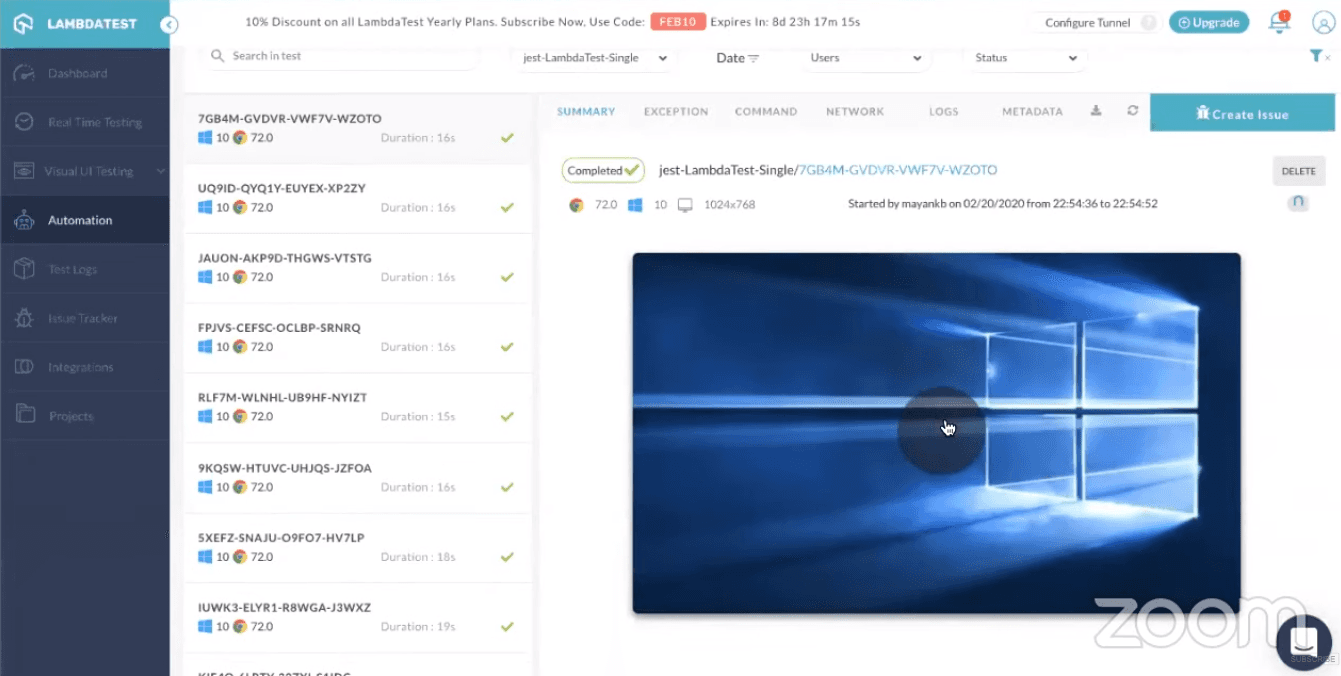
So as you can see in the recorded video of your Selenium testing. This is the same HourGlass application that we have been trying to deploy. Do note, the web-application would be accessible over the localhost using 127.0.0.1:5000. This is the step, where you are running a static server to host your frontend file and separate backend server. Later, you can run an end-to-end testing using LambdaTest Tunnel.

Continuous Testing Using LambdaTest Selenium Grid
As you noticed, we ran our script over an online Selenium Grid of LambdaTest. What was the need? Well, doing so can help you quickly and automatically validate your code changes into the staging environment where they are being migrated to through your CI/CD pipeline. That way, you are continuously integrating the code for new features, continuously deploying them from one staging environment to another, and now, you are able to continuously test those code changes too. So every time a code is committed to a branch for which you have your Selenium testing scripts ready, that piece of code will be validated for browser compatibility testing. Allowing you to accelerate the test cycles with the help of continuous testing.
How To Implement Continuous Testing In DevOps Like A Pro?
Now, let’s ponder a little about how we ran Selenium testing over a locally hosted web-application through LambdaTest. Here is the Selenium testing script used for the Jest framework to perform automated browser testing.
Code Walkthrough
There are some tunnel arguments that we are using here to work up the LambdaTest Tunnel. There is an npm package that is released by LambdaTest to setup tunnel automatically.
|
1 |
const lambdaTunnel = require('@lambdatest/node-tunnel'); |
What we have done here is before every test we are setting up a new WebDriver and this driver is aimed at the public URL of LambdaTest Selenium Grid Hub. We are using the username and access key provided by the LambdaTest account.
|
1 2 3 4 5 6 |
const tunnelArguments = { user: process.env.LT_USERNAME || Your_LambdaTest_Username', key: process.env.LT_ACCESS_KEY || 'Your_LambdaTest_Access_Key', }; |
Then you provide all the capabilities such as you want to use the LambdaTest Tunnel over a specific browser, browser version, operating system, with video recording etc.
We are constructing the URL using the environment variables i.e. your LambdaTest Username and Access Key.
|
1 2 3 |
.usingServer( 'https://' + username + ':' + accessKey + '@hub.lambdatest.com/wd/hub' ) |
Once the remote WebDriver for online Selenium Grid is setup, we are awaiting for the signup page to load.
|
1 2 |
await driver.get(`http://127.0.0.1:5000/signup`); // https://hourglass.surge.sh/signup }, 20000); |
The below piece of code will ensure that tunnel instances will start first and only after that will your Selenium testing script will be executed.
|
1 |
const istunnelStarted = await tunnelInstance.start(tunnelArguments); |
Best Practice: After you are done with all the test cases, make sure you delete the tunnel instance. This will help save your concurrency limit available over the LambdaTest Selenium Grid. There is a limited amount of tunnel that you can run per count, depending upon the LambdaTest pricing you opt for and if you leave a tunnel in running state, even after your tests are executed. It won’t allow you to use the tunnel in other test cases so it’s best practise to close a tunnel after your testing has been completed.
|
1 2 3 4 |
afterAll(async () => { await driver.quit(); await tunnelInstance.stop(); }, 15000); |
Monitoring Logs
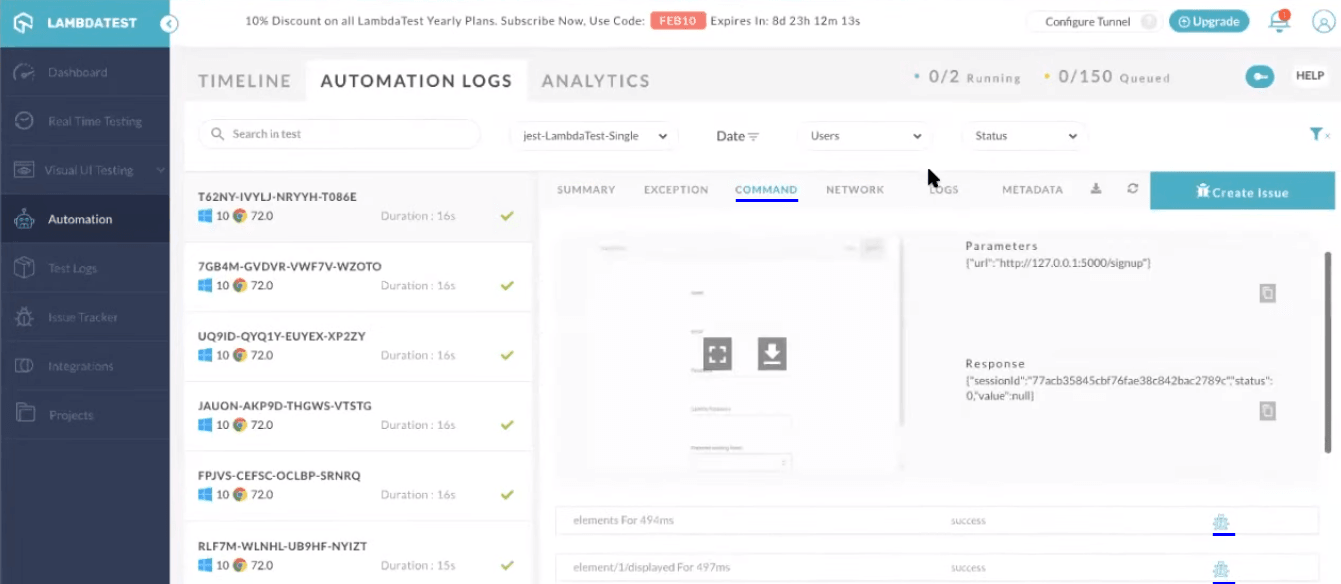
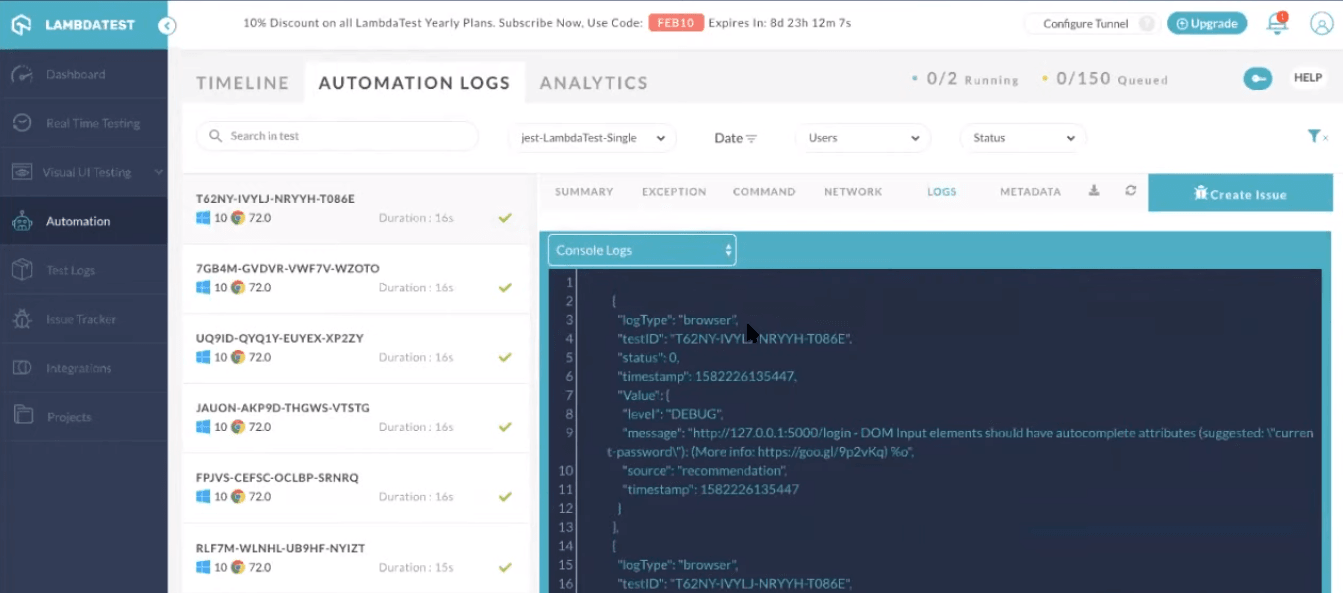
LambdaTest provides you with an intuitive interface for analyzing the results of Selenium testing scripts. You can get a variety of logs such as network logs, command logs, raw Selenium logs, metadata. You can also record a video of the entire script execution, along with command-by-command screenshots. You may notice that the test has been successfully triggered over the online Selenium Grid of LambdaTest.
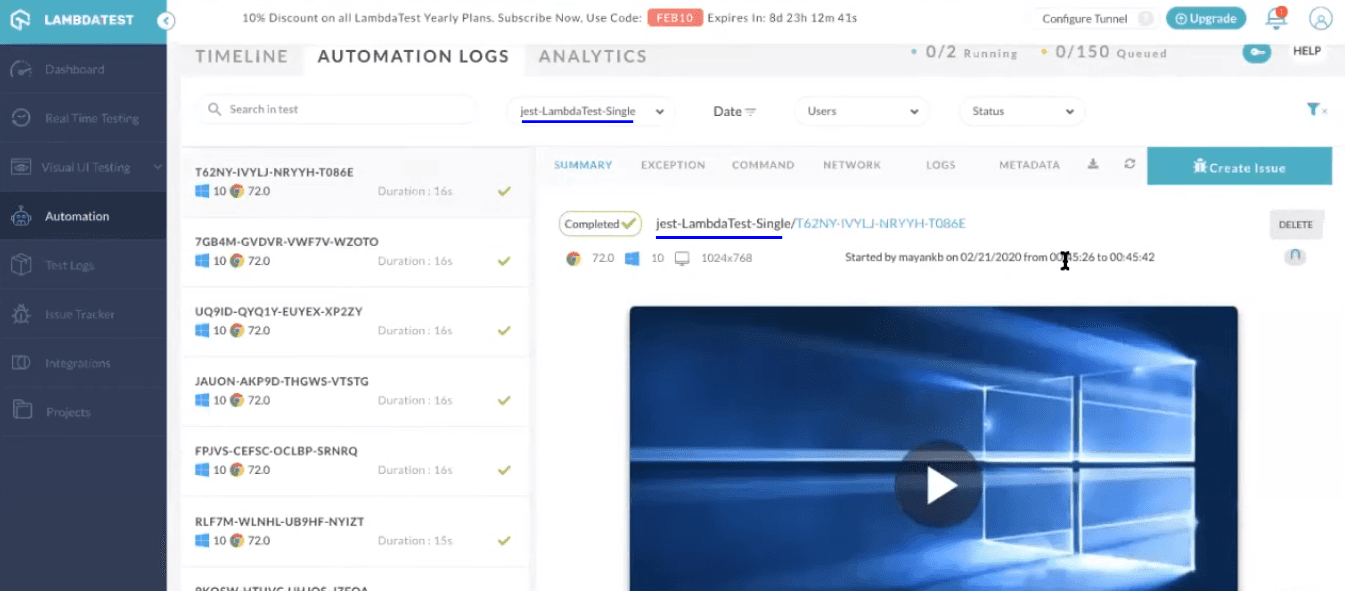
You can visit different types of tab in the automation dashboard to figure out what went wrong while debugging your scripts. Here is how the logs are provided.
Selenium Logs

Command Logs
Console Logs
Eventually, what GitLab CI will deploy the backend on Heroku and the front end on Surge. So after opening the URL you can see frontend is deployed on Serge and my backend is deployed on Heroku and this is done automatically by the GitLab CI/CD pipeline.
Now, let’s quickly note down some of the best practices that you need to keep in mind for CI/CD before we wrap this GitLab CI/CD tutorial.
Best Practices For CI/CD
Now, that you’ve had a fair-share of knowledge around leveraging GitLab CI pipelines for Selenium testing. I suggest you make notes of these best practices for CI/CD to build better web-applications, faster.
Build Fast and Test Faster
The success of CI/CD systems depends on the execution speed. If CI cycles take a huge amount of time for each commit, developers will find alternate and faster bypasses to get their code integrated quickly. This often involves pathways which skip tests in favour of optimistic updates. This can cause havoc on production. I think I don’t even need to mention the consequences of integrating untested code.
CI/CD Environments Should Be Secured
Often ignored, but It is very crucial to protect your CI/CD environment. It is one the most sensitive pieces of infrastructure to protect as it contains access to your codebase, highly sensitive data and various environments. Furthermore, it is one of the most used systems in a large and high frequency development team. Any outages on CI/CD can cause tremendous loss of productivity and financial losses in the worst cases.
CI/CD Should Be The Only Way To Deploy To The Production
CI/CD pipelines are as successful as the last person using them. All of the effort in developing CI/CD fails if it is not adopted by the team. CI/CD should be the strictly only way to deploy to the prod. In fact rollbacks should be deployed via the same pipeline.
Always Keep Rollback Options In CI/CD Pipelines
Ability to rollback a change shouldn’t involve complex procedures. It should be as simple as possible to rollback a change. It’s always better to rollback changes at 3 AM rather than debugging them on production.
Fail Early
You should run your fastest test early in the pipeline. The idea is to reject the build if it fails any test. Rejecting early saves a lot of time make the turnaround time really small.
Run Tests Locally Before Committing To The CI/CD Pipeline
CI starts on your local development system. All basic CI tests should first run on your local system as it is fast, saves time and conservers CI/CD infra on platform for more critical and later stage pipelines.
Tests Should Run In Ephemeral Environment
In order to provide consistent results for CI/CD pipelines it is important that tests run in a fresh state every time. Ephemeral environments are a necessity for making testing idempotent. Containers are a suitable environment as they make it easy to provide a fresh environment.
Decouple Deployment and Release
As mentioned in the continuous delivery introduction, decoupling deployment from release process makes release process purely marketing and strategy team decision. This has huge benefits in terms of flexibility and speed.
Wrapping Up
Kudos!! You have now successfully executed Selenium testing to perform all kinds of checks before the release got deployed. GitLab CI prepared the release process for you and it took away all the hassle from doing those last minute checks, by allowing you to integrate with an online Selenium Grid of 3000+ real browsers, ensuring a seamless UI for your web-application.
This is how we can actually build a robust CI/CD pipeline for your company or team there. If you are still confused, you can check out our webinar “Ensure A Robust CI/CD Pipeline With GitLab CI & LambdaTest”. Don’t worry we used the same code in the webinar too !!
If you still have any questions, feel free to post them in the comment section below. Happy testing! 🙂


Author’s Profile
Harshit Paul
Harshit works as a product growth specialist at LambdaTest. He is also an experienced IT professional, who loves to share his thoughts about the latest tech trends as an enthusiast tech blogger.
Blogs: 79
Got Questions? Drop them on LambdaTest Community. Visit now