
A Complete Guide To CSS Cascade Layers
Tahera Alam
Posted On: June 15, 2023
![]() 193484 Views
193484 Views
![]() 32 Min Read
32 Min Read
“Design is not just what it looks like and feels like. Design is how it works,” – Steve Jobs.
These words perfectly capture the essence of creating captivating websites that not only appear visually appealing but also function seamlessly. When it comes to designing complex websites with multiple sources of style, CSS Cascade Layers play a vital role in creating a balance between how things look and how they work.
When designing websites with multiple sources of style, the complexity of managing styles can escalate rapidly. As the number of stylesheets increases, it becomes increasingly challenging to ensure consistency and avoid conflicts in the styling rules applied to various elements. This is where CSS Cascade Layers come in, providing an elegant solution to the problem of conflicting style rules by establishing a clear order of priority.
In this blog on CSS Cascade Layers, we will cover the concept of CSS Cascade, the key steps in the Cascade process, and delve into creating CSS Cascade Layers. We’ll explore named and anonymous layers, Nested Cascade Layers and use media and feature queries for conditional styling. By the end of this blog, you’ll gain a thorough understanding of CSS Cascade Layers and how they can improve your stylesheet organization and maintenance.
Are you new to CSS? Here is our ultimate CSS Cheat Sheet.
So, let’s get started!
TABLE OF CONTENTS
What is CSS Cascade?
Before we dive into the CSS Cascade Layers, let’s take a moment to grasp the concept of CSS Cascade. Understanding Cascade before CSS Cascade Layers is crucial because layers are built upon the concept of the Cascade.
The CSS Cascade refers to the process of determining how conflicting styles are resolved and applied to elements on a web page. To determine the values assigned to each property for every element, the user agent follows a series of defined steps. Let’s briefly go over these steps.
Key steps of the CSS Cascade Process
The Cascade process is an important part of CSS because it determines how styles are applied to different elements on a webpage. Understanding the key steps of the CSS Cascade process is essential for creating effective and efficient stylesheets.
- Relevance: The CSS Cascade process begins by gathering all the applicable style rules from various sources, including user-defined styles, author stylesheets, and browser defaults. In this step, the user agent (browser) identifies all the style declarations that match the selectors for each element. For example, if we have an h1 tag on our page, the user agent will find all style declarations that match the h1 selector.
- Importance: In this step, the CSS Cascade prioritizes rules based on whether they are normal or important, with the latter having the !important flag set. Important styles take precedence over normal styles.
- Origin: In this step, the CSS Cascade sorts the style rules based on their source — author, user, or user-agent(browser).
- Layers: After sorting the styles based on origin, the CSS Cascade organizes the styles within each origin based on the CSS Cascade Layer. There are six layers for normal declarations ordered from the first layer created to the last, followed by normal unlayered styles. For important styles, the layer order is inverted, with important unlayered styles having the lowest precedence.
- Specificity: Sorts declarations by specificity for conflicting styles in the origin layer that have precedence.
- Order of appearance: Finally, if multiple selectors within a single origin layer have the same specificity, the property value from the last declared selector with the highest specificity takes precedence. It’s important to note that order of appearance becomes relevant only when competing declarations in the origin of precedence have the same specificity. Let’s look at an example:
HTML:
|
1 2 3 4 5 6 7 8 9 |
<div class="card"> <h1 class="title">FREE ONLINE CONFERENCE</h1> <h2 class="subtitle">Testμ Conference</h2> <p class="description"> Join the free online conference to decode the future of testing! </p> <p class="date">22 - 24 August, 2023</p> <a href="#" class="button">Register for Free</a> </div> |
CSS:
|
1 2 3 4 5 6 7 8 |
/* targets <div> element with the class "card" that is a descendent of <body> */ body .card { background-color: lightgreen; } /*targets the <div> element with the class "card"*/ div.card { background-color: #f5f5f5; } |
See the Pen
order of appearance LambdaTest demo by Tahera Alam (@alam_tahera)
on CodePen.
In this example, we have two selectors that target the div element with the class .card. The first selector, body. card, selects the card, and sets its background color to light green. The second selector, div.card also selects the same element and sets its background color to #f5f5f5.
Now, here’s the interesting part. As we have two selectors with the same specificity, the order in which they appear becomes relevant. Since the second selector (div.card) appears last, it takes precedence over the previous one(body .card), resulting in the card’s background color being #f5f5f5 instead of light green.
At each step, only the declarations that are still relevant proceed to the next step. If there is only one declaration remaining, it becomes the final style, and the subsequent steps become irrelevant.
Origin and Cascade
In CSS, there are three types of origins for styles:
- user-agent stylesheets (styles provided by the browser by default)
- user stylesheets (additional styles the user may have set)
- author stylesheets (styles written by the developer)
These origins determine the source of the styles and their importance. The Cascade organizes these styles into six buckets based on origin and importance.
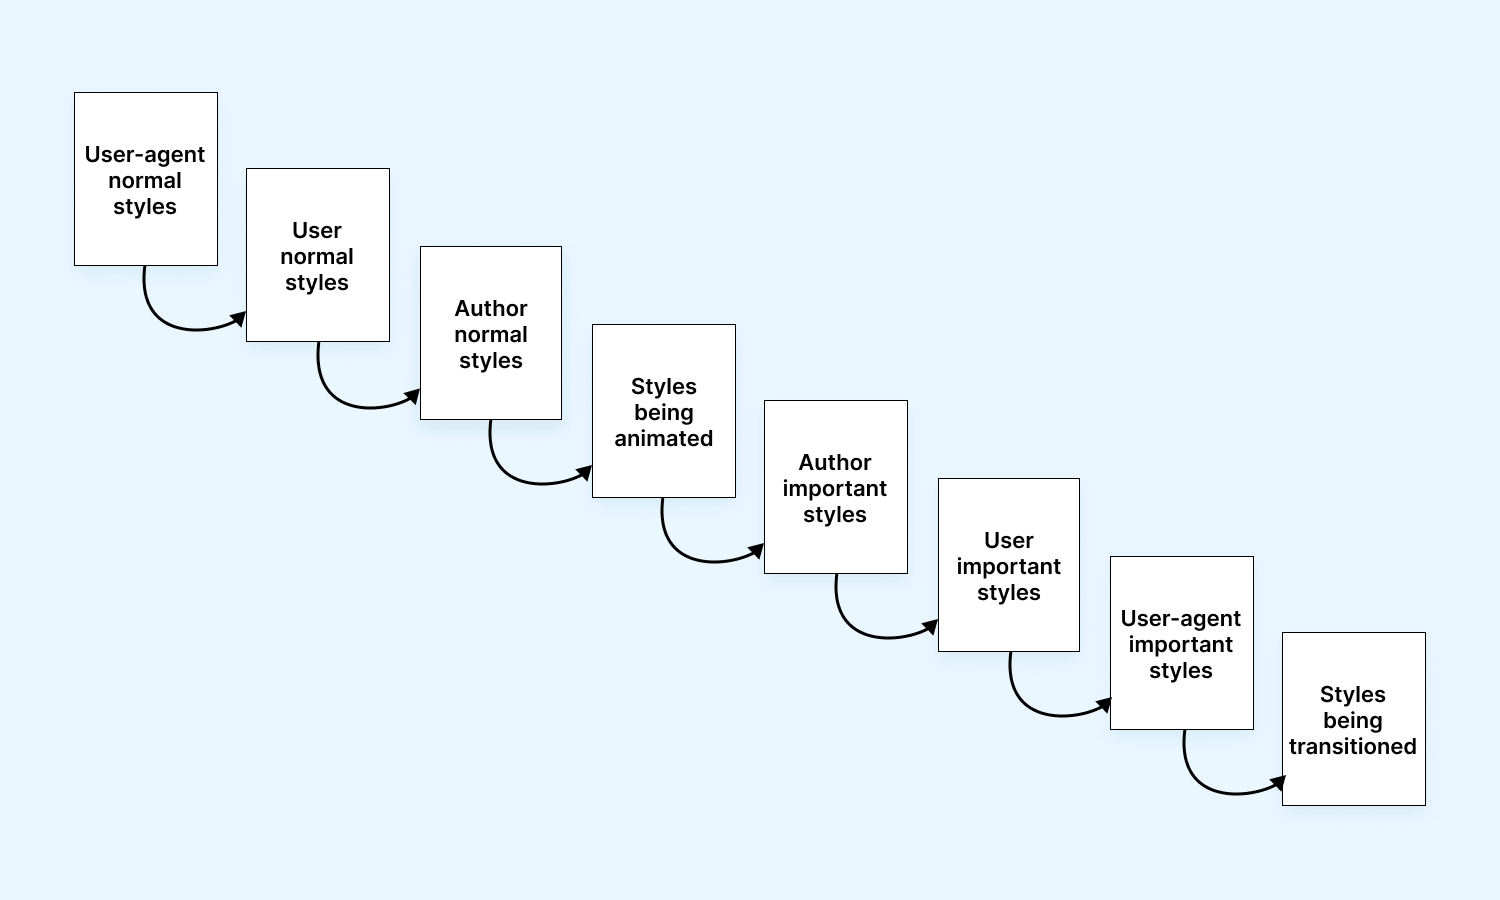
There are eight levels of precedence in the CSS Cascade. They start with the lowest precedence, which includes normal user-agent styles, and go up to the highest precedence, which includes styles being transitioned. The order of precedence is as follows:
- User-agent normal styles
- User normal styles
- Author normal styles
- Styles being animated
- Author important styles
- User important styles
- User-agent important styles
- Styles being transitioned
The user-agent refers to the browser itself, the user is the visitor to the website, and the author is the developer. User-agent normal styles have the lowest precedence, while user-agent important styles have the highest precedence.
Origin and Specificity
Multiple origins provide style declarations for the same element. So for each property, the declaration that wins is the one from the origin with the highest precedence. Precedence is determined by the weight assigned to each origin, which can be either normal or important. Declarations with important weight have higher precedence than those with normal weight. So, the value that gets applied is the one from the origin with the highest precedence.
We now know that the value from the origin with the highest precedence gets applied. And if that winning origin has more than one property declaration for the same element, this is where specificity comes into play. For those competing property values, the selector’s specificity is compared, and since every selector has a specificity value associated with it, the one with the highest value wins. Note that specificity weight is never compared between selectors from different origins.
Let’s take a look at an example to understand this better.
HTML:
|
1 2 3 4 5 6 |
<div class="container"> <button>This button has the user agent styles applied.</button> <button classname="btn"> This button has the author styles applied. </button> </div> |
CSS:
|
1 2 3 4 5 6 7 8 9 10 |
button:nth-of-type(2) { background-color: #007bff; color: #fff; border: none; padding: 10px 20px; font-size: 16px; font-weight: bold; cursor: pointer; border-radius: 5px; } |
See the Pen
origin-specificty-demo by Tahera Alam (@alam_tahera)
on CodePen.
In the above example, we have two buttons. The first button doesn’t have any styles applied by the author, so only the user-agent styles (styles provided by the browser) are applied. Additionally, if you have any personal user styles set, they would be applied as well.
The second button, despite having a selector in the author stylesheet with a specificity of 0-0-0 (indicating lowest specificity), applies some styles from the author stylesheet. This seems surprising because we know that styles with higher specificity override styles with lower specificity.
The author styles “win” in this case because when there are conflicting styles from different origins, the CSS Cascade gives precedence to the origin with higher precedence, regardless of the specificity of the styles within that origin.
In our case, the author styles have higher precedence over the user-agent styles. So, even though the specificity of the selector in the author stylesheet is low, the author styles still take precedence over the user-agent styles because of their origin and the CSS Cascade’s priority rules. Origin precedence always wins over selector specificity.
Now that we have a solid grasp of the CSS Cascade process and its steps, let’s dive into the concept of cascade layers.
What are CSS Cascade Layers?
Cascade Layers in CSS provide a means of establishing a hierarchical structure for applying styles to elements on a web page. Similar to how we have six levels of priority based on origin and importance, CSS Cascade Layers allow us to create sub-origin levels of priority within any of those origins. To provide a quick recap, those six levels of priority are:
- User-agent normal styles
- User normal styles
- Author normal styles
- Styles being animated
- Author important styles
- User important styles
With CSS Cascade Layers, we can define sub-levels of priority within any of these origin buckets.
Within each of these origin buckets, multiple CSS Cascade Layers can exist. The order in which these layers are created is crucial because it determines their precedence within their respective origin. This precedence order determines styles that will be prioritized over others during the styling process.
As the order in which layers are created holds great significance, let’s take a moment to understand the precedence order for different origins before we dive into the creation of CSS Cascade Layers.
In normal origin buckets, the sorting of layers follows a simple rule: the styles in the first layer created have the highest precedence, followed by the styles in subsequent layers. On the other hand, unlayered normal styles, which are not assigned to any specific layer, find themselves at the bottom of the priority list, having the lowest precedence.
However, things work differently when it comes to important styles. Unlayered important styles are grouped into a special layer that takes precedence over all non-transitioning normal styles. While these unlayered important styles have less precedence than important styles in specific layers, they still take precedence over normal styles.
Additionally, the order in which layers are declared also plays a role. Important styles in earlier declared layers have higher precedence than important styles in later declared layers within the same origin. This ensures that the most recently declared important styles will be able to follow earlier ones.
Below is a demonstration of the layer order with !important styles:
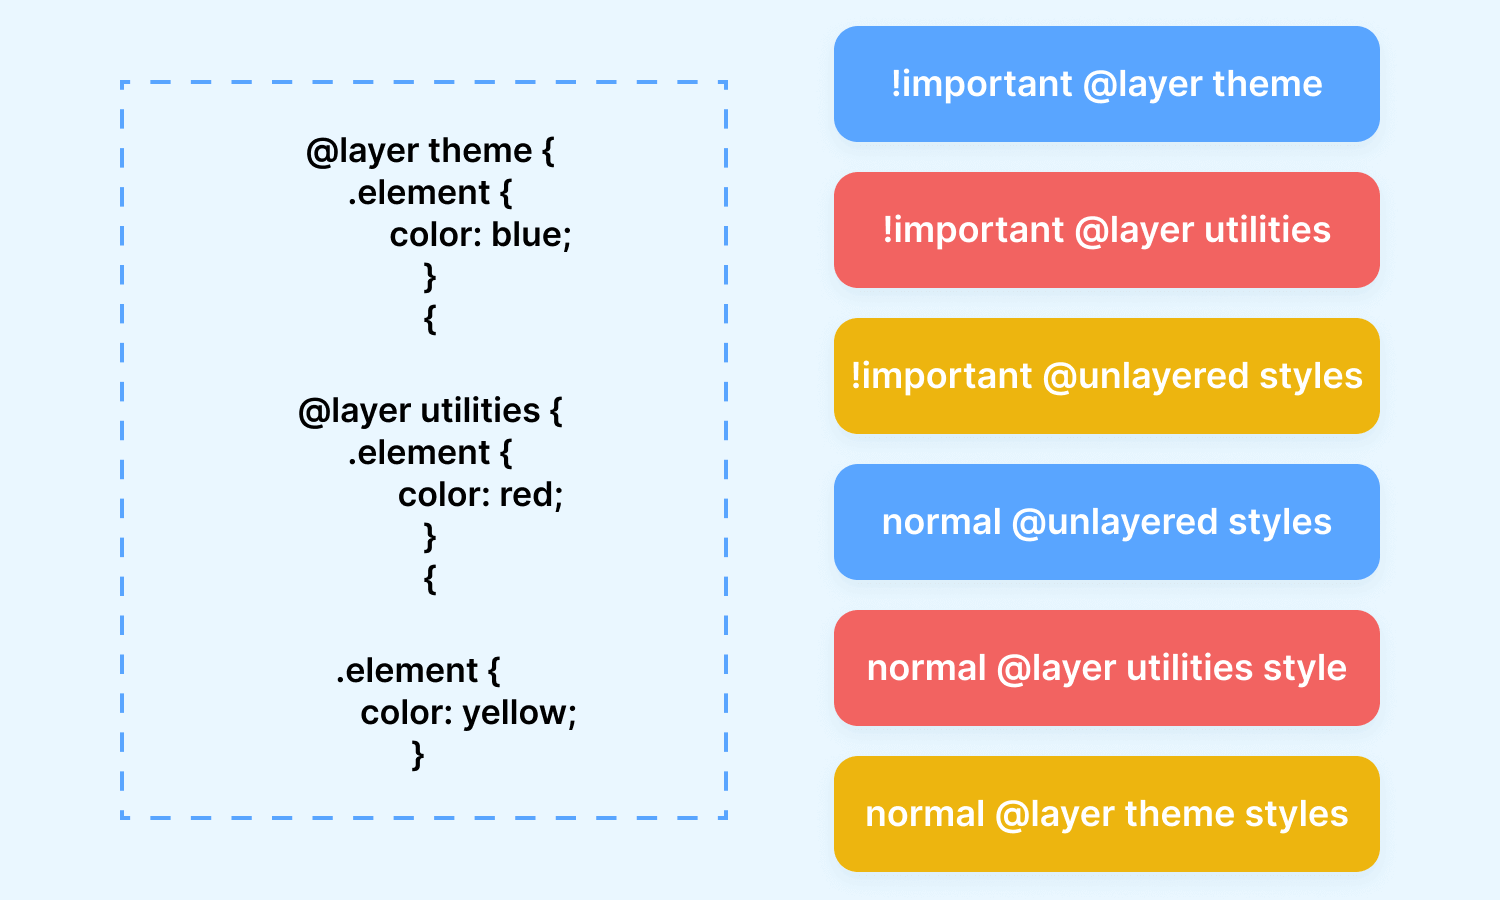
In the above illustration, we have two layers, namely @theme, and @utilities, followed by an unlayered style block. In this case, the !important style in the @theme layer has the highest precedence, followed by !important styles in the @utilities layer. Next is the !important unlayered styles which get higher precedence than normal unlayered styles. Lastly, we have the normal @layer style followed by the normal @theme style, which gets the lowest precedence.
For the rest of this tutorial, we will mainly discuss CSS Cascade Layers in the author stylesheet, but it’s important to remember that cascade layers can also exist in user and user-agent stylesheets.
How to create CSS Cascade Layers?
There are different ways to create layers in CSS. Let’s first take a look at the different methods briefly and then we will elaborate on each of them.
- The @layer statement: By using the @layer at-rule followed by one or more layer names, you can create named layers without assigning any styles to them.
- The @layer block: With this approach, you can enclose a block of styles within the @layer at-rule. All the styles within the block will be added to a specific named or unnamed layer. This allows you to group related styles within a layer, enhancing code readability and organization.
- The @import rule: By utilizing the @import at-rule with the layer keyword or the layer() function, you can import the contents of an external file into a designated layer.
Each method creates a layer, but only if a layer with the specified name hasn’t been created yet. If you don’t provide a layer name in the @layer at-rule or @import with layer(), a new unnamed layer is automatically created.
The @layer statement rule for named layers
The @layer statement rule allows you to create named layers and establish the order of precedence when multiple CSS Cascade Layers are present.
The order of layers is defined by the sequence in which they are declared. One way to establish a layer order is by using @layer followed by the names of one or more layers without assigning any styles initially. For instance, using the @layer statement with the following syntax declares three layers in the order specified:
- theme
- layout and
- utilities
|
1 |
@layer theme, layout, utilities; |
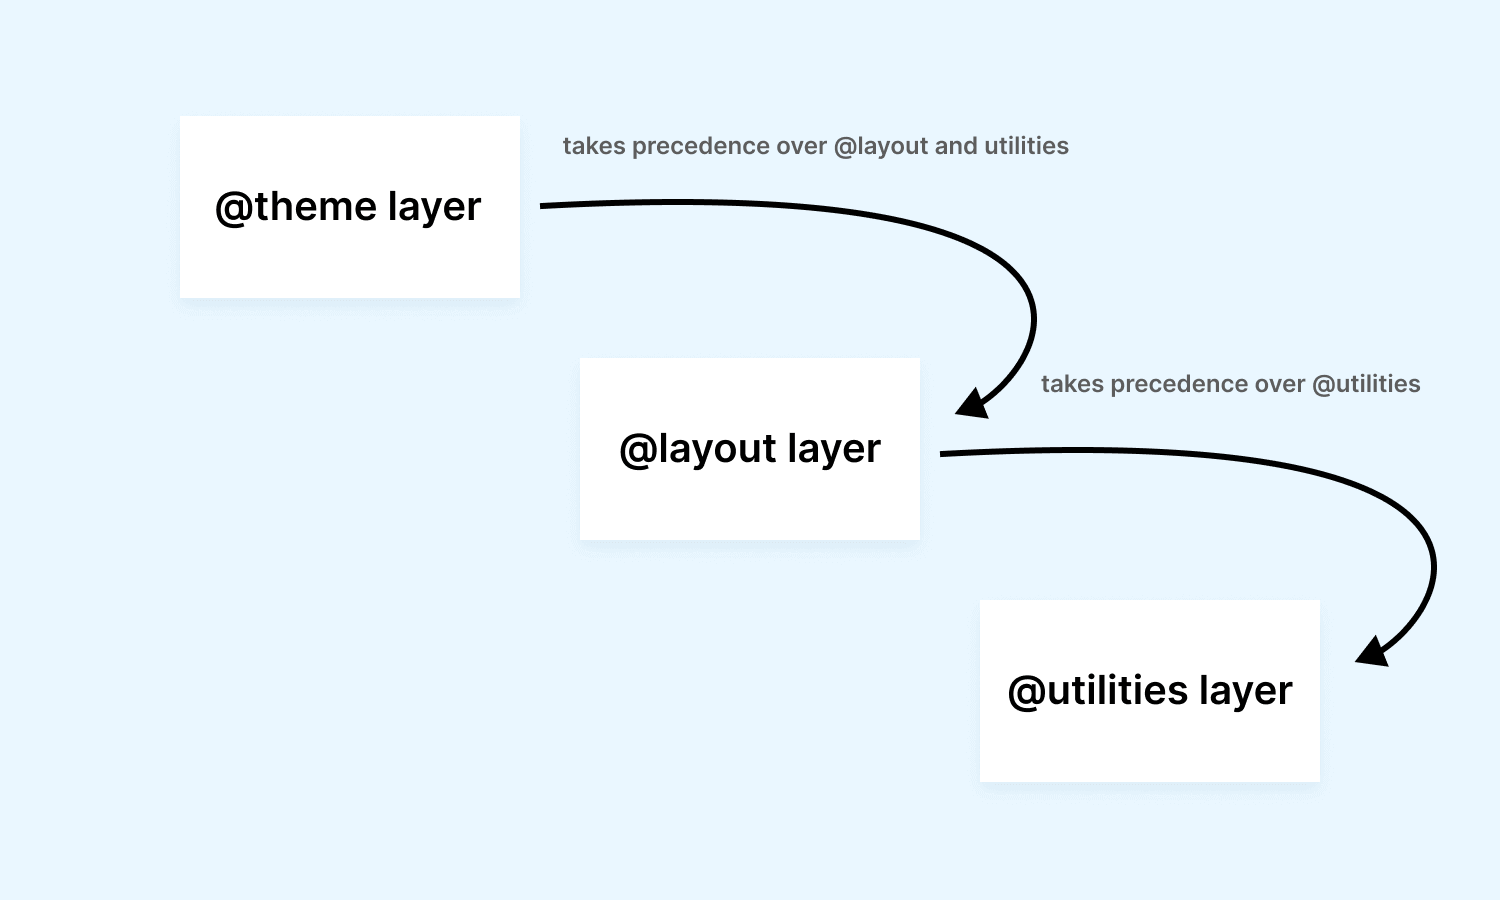
It’s common practice to place the @layer declaration as the first line of your CSS. For instance, if the above declaration is the first line of your CSS, then the layer order will be theme, layout, and utilities. This means the theme layer will take precedence over the layout layer, and both the theme and layout layers will take precedence over the utility layer.
If some layers already exist before this declaration, the new layers will be added to the end of the existing layer list as long as there are no conflicting layer names. However, if a layer with the same name already exists, the @layer statement will create only the remaining new layers. For instance, if “layout” is an existing layer, only “theme” and “utilities” will be created. In this case, the final layer order will be layout, theme, and utilities.
The @layer block at-rule for named and anonymous layers
The @layer block at-rule is a powerful feature for creating both named and anonymous layers in CSS. With this rule, we can group and organize our styles within a block and assign them to specific layers.
Before we learn how to create named and anonymous layers with @layer block, let’s look at some great cases where we can utilize the @layer block:
- Component-based styling: When building a complex web application with reusable components, the @layer rule can be used to define a layer for each component. This allows for clear separation and encapsulation of styles, making it easier to maintain and modify individual components without affecting the rest of the styles.
- Theming: @layer can be used to define layers for different themes or variations of a website or application. By assigning styles to specific layers, you can easily switch between themes or apply styles selectively based on the active theme.
- Performance optimization: By grouping related styles together in @layer blocks, you can leverage CSS preprocessors or build tools to include only the required styles selectively. This can reduce the size of the CSS output and improve performance by minimizing unused styles.
Let’s explore how to create named and anonymous types of layers with some examples.
Creating Named Layers
To create a named layer, simply enclose your styles within a @layer block, followed by the desired layer name. For example:
|
1 2 3 4 |
@layer myLayer { /* Styles specific to the 'myLayer' named layer */ /* ... */ } |
The identifier after the @layer acts as the layer name, and the styles within the at-rule are added to that layer. If the specified layer name doesn’t exist, a new layer will be created. However, if a layer with the same name already exists, the styles will be added to that existing layer. Here’s another example:
|
1 2 3 4 5 6 7 8 9 10 11 12 13 14 15 16 |
/* Creating a named layer: 'header' */ @layer header { h1 { font-size: 24px; color: #333; } } /* Adding styles to the existing 'header' layer */ @layer header { h2 { font-size: 18px; color: #666; } } |
In the above example, we first create a named layer called “header” and assign styles to it. Then, we append additional styles to the same header layer. Reusing the layer name doesn’t create a new layer; it adds styles to the existing layer.
Named layers are useful when you want to categorize and organize styles that are specifically related to a certain section or component of your website. They provide a structured approach to managing styles and make it easier to understand and maintain your codebase.
Creating Anonymous Layers
If you want to create an anonymous layer, simply use the @layer block at-rule without specifying a name. You can only add styles to an unnamed layer during its creation.
Here’s an example:
|
1 2 3 4 5 6 |
/* Creating an unnamed, anonymous layer */ @layer { p { margin: 0; } } |
In the above example, we create an unnamed, anonymous layer and add styles to it. Please note that anonymous layers cannot be referenced or have additional styles added to them once created.
Anonymous layers provide flexibility when you want to group styles without assigning them to a specific name. They can be useful for organizing styles that don’t necessarily belong to a named layer but still need to be grouped together.
An Implicit Layer of unlayered styles
As mentioned earlier, this concept refers to the combination of all unlayered styles.
This is not an explicitly created layer but a layer that CSS Cascade creates automatically, combining all the unlayered styles.
Styles declared outside of any layer are combined into an implicit layer. This implicit layer contains unlayered styles and takes precedence over normal layered declarations. It’s always positioned at the end of the layer stack. Let’s take a look at an example.
|
1 2 3 4 5 6 7 8 9 10 11 |
/* Unlayered styles */ body { background-color: #f5f5f5; color: #333; } /* Creating an unnamed, anonymous layer */ @layer { p { margin: 0; } } |
In the example above, we have unlayered styles (body styles) declared outside of any @layer block. These styles form an implicit layer, which will take precedence over normal layered declarations, even if they have a lower specificity or appear earlier in the code.
Additional considerations
It’s important to note that the order in which layers are created determines their stacking order. Once layers are declared, their order cannot be changed. Additionally, subsequent use of @layer with no layer name creates additional unnamed layers; it does not append styles to a previously existing unnamed layer.
Let’s look at an example to demonstrate how layer order affects the styles:
HTML:
|
1 2 3 4 5 6 7 8 9 |
<div class="testimonial-card"> <p class="testimonial-text"> <a href="https://www.lambdatest.com/">@lambdatesting</a> is fantastic. Cross browser and device testing frustration is minimized. You can't get rid of clients that need ie11 nor can you own every device but LambdaTest bridges that gap. </p> <p class="testimonial-author">- Mat Gargano</p> </div> |
CSS:
|
1 2 3 4 5 6 7 8 9 10 11 12 13 14 15 16 17 18 19 20 21 22 23 24 25 26 27 28 29 30 31 32 33 34 35 36 37 38 39 40 41 42 43 44 45 46 47 48 49 50 |
@layer page { .testimonial-card { background-color: #ffffff; padding: 20px; border-radius: 5px; text-align: center; width: 400px; margin: 0 auto; box-shadow: 0px 3px 8px rgba(0, 0, 0, 0.24); line-height: 24px; } .testimonial-text { font-size: 18px; margin-bottom: 15px; } .testimonial-author { font-size: 16px; font-weight: bold; color: #333333; } } @layer site { .testimonial-card { background-color: #f5f5f5; padding: 20px; border-radius: 5px; text-align: center; width: 400px; margin: 0 auto; box-shadow: 0px 3px 8px rgba(0, 0, 0, 0.24); line-height: 24px; } .testimonial-text { font-size: 18px; margin-bottom: 15px; } .testimonial-author { font-size: 16px; font-weight: bold; color: #333333; } } /* This has no effect */ @layer site, page; |
See the Pen
layer-order-demo by Tahera Alam (@alam_tahera)
on CodePen.
In the above example, we created two layers and defined the styles for the page layer and the site layer using the @layer rule. The styles for the page layer are defined first, followed by the styles for the site layer.
Notice the background-color property of the card in both layers; it is the only property that is different in both layers. In the page layer, we set it to #ffffff, and in the site layer, we set it to #f5f5f5. The last line, @layer site, page; doesn’t do anything in this context. Since the layers site and page were already created and named in the previous @layer rules, declaring them again on the last line doesn’t have any effect. This line is redundant because the layers are already defined.
Now, if you were to move the last line, @layer site, page; to the first line of the code, the background color of the card changes from #f5f5f5 to #ffffff. This is because when you move the line to the beginning, you are declaring the layers’ site and page before defining the styles for each layer. This change in order affects the cascading behavior of the styles.
The cascading behavior of styles follows a “last-declared, first-applied” order. So, when you move the @layer site, page; line to the beginning, the styles defined in the site layer will take precedence over the styles defined in the page layer. This means that the h1 heading will be underlined and have a green color because the styles from the site layer will take precedence over the styles from the page layer.
Importing style sheets into named and anonymous layers with @import
The @import rule is a powerful feature that allows you to bring in external style sheets and incorporate them into both named and anonymous layers. This capability enhances your ability to organize and manage your styles effectively.
To import style sheets using @import, it’s important to note that the @import statement should be placed before any CSS styles or <style> blocks. However, it can be preceded by an @layer at-rule, which allows you to create layers without immediately assigning styles to them.
Let’s look at some simplified examples to understand better how @import can be used with named and anonymous layers.
Importing into Named Layers
We can import a style sheet into a named layer to group related styles together. Here’s an example:
|
1 |
@import url("button-styles.css") layer(buttons); |
In the above example, we import the “button-styles.css” file into a named layer called “buttons.” By doing so, we bring in the styles defined in the imported file and associate them specifically with the “buttons” layer.
Importing into Anonymous Layers
If you want to import styles without assigning them to a named layer, you can use an anonymous layer. Consider the following example:
|
1 |
@import url("common-styles.css") layer(); |
In this example, we import the styles from “common-styles.css” into an anonymous layer. This allows the imported styles to be accessible and applied throughout your CSS codebase without being tied to a specific named layer.
Combining Imports in a Single Layer
You can import multiple CSS files into a single layer, making it convenient to manage related styles together. Let’s say we have separate style sheets for comments and social media icons. By importing both files into the “social” layer, we keep the styles for comments and social media icons organized and easily maintainable within a single layer.
|
1 2 |
@import url("comments.css") layer(social); @import url("sm-icons.css") layer(social); |
Conditional imports with media and feature queries
The @import rule can be a powerful tool when combined with CSS media queries and feature queries, allowing us to import styles based on specific conditions. Media queries are a fundamental component of responsive web design. According to a survey, in the first quarter of 2021, mobile devices alone generated 54.8 percent of global website traffic. This report clearly highlights the importance of a responsive website.
CSS Media Queries in one shot 🔥 pic.twitter.com/I2d2rAJk5w
— Adarsh Gupta⚡ (@Adarsh____gupta) March 14, 2022
However, making a responsive website is not that straightforward. There are multiple involved in it and one such crucial step is responsiveness test on multiple view ports. To test that, you can leverage LT Browser 2.0 by LambdaTest that makes it easier to test a websites’ responsiveness by providing 50+ pre-installed viewports with multiple screen resolutions. Additionally, LT Browser 2.0 also offers a number of sophisticated developer tools that you can leverage.
For further information on LT Browser 2.0, you can check out our tutorial. Feel free to go through the tutorial provided below for LT Browser 2.0.
Catch up on the latest testing tutorials around Selenium automation, Cypress testing, and more. Subscribe to the LambdaTest YouTube Channel for quick updates.
Now that we understand the importance of media queries, let’s see how we can use @import with media queries to import a style conditionally.
Let’s take a look at an example:
|
1 2 |
@import url("mobile-styles.css") layer(responsive) screen and (max-width: 768px) and (hover: none); @import url("desktop-styles.css") layer(responsive) screen and (min-width: 769px) and (hover: hover); |
In the above example, we are importing style sheets into a named layer called “responsive” based on different screen widths. The first line imports “mobile-styles.css” into the “responsive” layer when the screen width is 768 pixels or less, and the device does not support hover interactions, targeting mobile devices. The second line imports “desktop-styles.css” into the same “responsive” layer when the screen width is 769 pixels or more, and the device supports hover interactions.
By utilizing media queries and feature queries within @import, we can dynamically load stylesheets that respond to specific device conditions, such as different screen sizes, orientations, or supported features. This flexibility allows us to create styles optimized for the features and specifications of the user’s device.
 Note
NoteWhat are Nested Cascade Layers?
Nested CSS Cascade Layers allow you to create layers within a named or anonymous layer, providing a hierarchical structure for your styles. This concept is similar to nesting elements within HTML or nesting selectors in CSS, but with CSS Cascade Layers, you can nest entire layers.
Each CSS Cascade Layer, including an anonymous one, can contain nested layers. When a layer is imported into another layer, the imported layer becomes a nested layer. Let’s take a look at the benefits of nested CSS Cascade Layers.
Benefits of Nested Cascade Layers
- Enhanced style organization: Nested Cascade Layers bring an additional level of organization to our styles. By creating layers within layers, we can group related styles, making it easier to find and manage specific sets of styles. This hierarchical structure promotes a more intuitive and structured approach to CSS code.
- Improved style scope: Nested CSS Cascade Layers provide a clear scoping mechanism for your styles. Styles defined within a nested layer have a narrower scope, limiting their impact to specific elements or components. This prevents unintended style conflicts and allows for more targeted styling, resulting in cleaner and more maintainable code.
- Reusability and modularity: By nesting Cascade Layers, you can encapsulate styles within specific contexts or components. This promotes reusability, as you can easily reuse layers with their associated styles in different parts of your project. It also enhances modularity, allowing you to isolate and manage styles for individual components or sections of your application.
Creating Nested Cascade Layers
We can create nested cascade layers using the same methods as regular layers. The @layer at-rule is used, followed by the names of one or more layers, utilizing dot notation to indicate nesting. Multiple dots and layer names signify multiple levels of nesting. Let’s see how it works:
|
1 2 3 4 5 6 7 8 9 10 11 12 13 |
@layer page { /* Styles for the overall page layer */ @layer header { /* Styles for the nested header layer within the page */ } @layer main-content { /* Styles for the nested main-content layer within the page */ } } |
In this example, we have a named layer called “page,” and within it, we create two nested layers: “header” and “main-content.” Each nested layer can have its own specific set of styles, ensuring a logical separation and hierarchy within the overarching page layer.
In addition to creating nested layers using the @layer at-rule, we can also achieve nesting through the @import rule. Let’s take a look at an example:
|
1 2 |
@import url("components.css") layer(components); @import url("components-narrow.css") layer(components.narrow); |
In this case, the first line imports the “components.css” file into the “components” layer. If the imported file contains any layers, they become nested layers within the “components” layer.
The second line imports the “components-narrow.css” file into the “narrow” layer, which is a sub-layer of the “components” layer. This way, the nested “components.narrow” layer is created within the “components” layer, allowing you to further organize and customize your styles based on different contexts or screen sizes.
Nested CSS Cascade Layers also offer the flexibility to target individual elements or components within these nested layers. Once you have established named nested layers within your cascade layers, you can apply styles exclusively to those layers using CSS’s dot notation. Let’s look at an example of how you can add styles to named nested layers:
|
1 2 3 4 5 |
@layer example.layout { main { width: 80vw; } } |
Given an example, we have a named nested layer called “layout” within the parent layer “example.” By using the @layer at-rule followed by the dot notation (example.layout), we create and target the specific nested layer.
Within the nested layer, we further target elements using selectors, such as main, in this case. Here, we set the width of the main element to 80vw, indicating that it should occupy 80% of the viewport width. This level of customization allows you to tailor the appearance and layout of elements within the named nested layer to align with your design requirements seamlessly.
Determining precedence based on the order of layers
When dealing with cascading style sheets, it’s important to recognize that the order of layers directly affects the order of precedence. It is the primary factor in determining the order of precedence. In the previous sections, we briefly touched upon the significance of layer order and how it affects precedence, but let’s dive deeper into this topic to gain a better understanding.
The precedence order of Regular Cascade Layers
In the context of the regular CSS Cascade Layers, let’s consider the below example:
|
1 2 3 |
@import url(A.css) layer(layerOne); @import url(B.css) layer(layerTwo); @import url(C.css); |
Here we create two named layers, “layerOne” and “layerTwo,” along with one unnamed layer. Let’s assume that the files A.css, B.css, and C.css do not contain additional layers. In that case, the following list shows how styles are sorted according to their precedence, from lowest (1) to highest (10):
- Normal styles in “layerOne” (A.css)
- Normal styles in “layerTwo” (B.css)
- Normal styles in the unlayered sheet (C.css)
- Inline normal styles
- Animating styles
- Unlayered important styles (C.css)
- Important styles in “layerTwo” (B.css)
- Important styles in “layerOne” (A.css)
- Inline important styles
- Transitioning styles
Normal styles declared within layers get the lowest priority and are sorted based on the order of layer creation. That means normal styles within the first created layer have the lowest priority, while normal styles in the last created layer have the highest priority. So, in our case, normal styles declared within “layerOne” will be overridden by any subsequent stylings in the list if conflicts arise.
Moving on, we have styles that are declared outside of any layers. These are the styles present in C.css, which were not imported into a specific layer. These unlayered styles take precedence over any conflicting styles from the “layerOne” and “layerTwo” named layers. It’s worth noting that normal styles declared outside of a layer always have higher precedence than normal-importance(styles that don’t have !important) styles within named layers.
Next, we have inline styles, declared using the style attribute, take precedence over normal styles found in both unlayered and layered style sheets (“layerOne” – A.css, “layerTwo” – B.css, and C.css).
Animating styles hold higher precedence than all normal styles, including inline normal styles. Now, we have important styles, denoted by property values with the !important flag, taking precedence over the previously mentioned styles. They are sorted in reverse order of normal styles. Important styles declared outside of a layer have less precedence than those declared within a layer.
Within layers, important styles are also sorted based on the order of layer creation. For important styles, the last created layer possesses the lowest precedence, while the first created layer has the highest precedence among the declared layers.
Inline important styles, once again, have higher precedence than important styles declared elsewhere.
Lastly, we have transitioning styles which hold the highest precedence. When a normal property value is being transitioned, it takes precedence over all other property value declarations, even overriding inline important styles. However, it’s important to note that this precedence applies only during the transition process.
The precedence order of Nested Cascade Layers
The precedence order for nested CSS Cascade Layers is similar to that of regular CSS Cascade Layers; the only difference is that they are nested within layers. Let’s break down the precedence rules for nested layers:
Non-nested styles
Styles defined outside of any nested layers take precedence over all other styles. These styles have the highest specificity and affect the entire document unless overridden by more specific styles. Let’s look at an example.
|
1 2 3 4 5 6 7 8 9 |
:root { --theme: red; } /* Later in the stylesheet */ :root { --theme: blue; } |
In this example, the later rule overrides the earlier rule, and the value of the —theme will be blue because it is defined in the last non-nested layer.
Normal nested styles
Within a parent layer, styles defined in nested layers follow the order in which they are created. If multiple nested layers define conflicting styles for the same element, the style defined in the last-created nested layer takes precedence. Here’s an example:
|
1 2 3 4 5 6 7 8 9 10 11 12 13 14 15 |
@layer components { :root { --theme: red; font-family: serif !important; } } /* Later in the stylesheet */ @layer components.narrow { :root { --theme: blue; font-family: sans-serif !important; } } |
If the components.narrow layer is active, the value of the –theme will be blue, and the font-family will be sans-serif because the nested layer defined later takes precedence over the non-nested layer.
Important styles
When an important style is applied within a nested layer, it takes precedence over non-nested styles. In this case, the specificity order is reversed, and the important style within the nested layer overrides non-nested styles. Let’s look at an example:
|
1 2 3 4 5 6 7 8 9 10 11 12 13 14 15 |
@layer components { :root { --theme: red; font-family: serif !important; } } /* Later in the stylesheet */ @layer components.narrow { :root { --theme: blue !important; font-family: sans-serif; } } |
In this example, even though the font-family is specified in the nested layer, the –theme variable will have the value of blue because it is marked as !important. The important style within the nested layer takes precedence over the non-nested layer.
Specificity weight within nested layers
The specificity weight between nested layers does not directly affect the precedence order. Instead, conflicting styles within a nested layer are resolved based on the normal specificity rules. The style with the highest specificity, including selector specificity and inline styles, takes precedence within that nested layer. Here’s an example:
|
1 2 3 4 5 6 7 8 9 10 11 12 13 14 15 |
@layer components { :root { --theme: red; font-family: serif !important; } } /* Later in the stylesheet */ @layer components.narrow { :root { --theme: blue; font-family: sans-serif !important; } } |
Assuming the components.narrow layer is active, and both rules have the same specificity. In this case, the later rule defined within the nested layer takes precedence, so the value of the –theme will be blue.
To summarize, non-nested styles have the highest precedence, followed by normal nested styles in the order of their creation. Important styles within nested layers override non-nested styles. The specificity weight between nested layers does not impact the precedence, but it matters for conflicting styles within a nested layer.
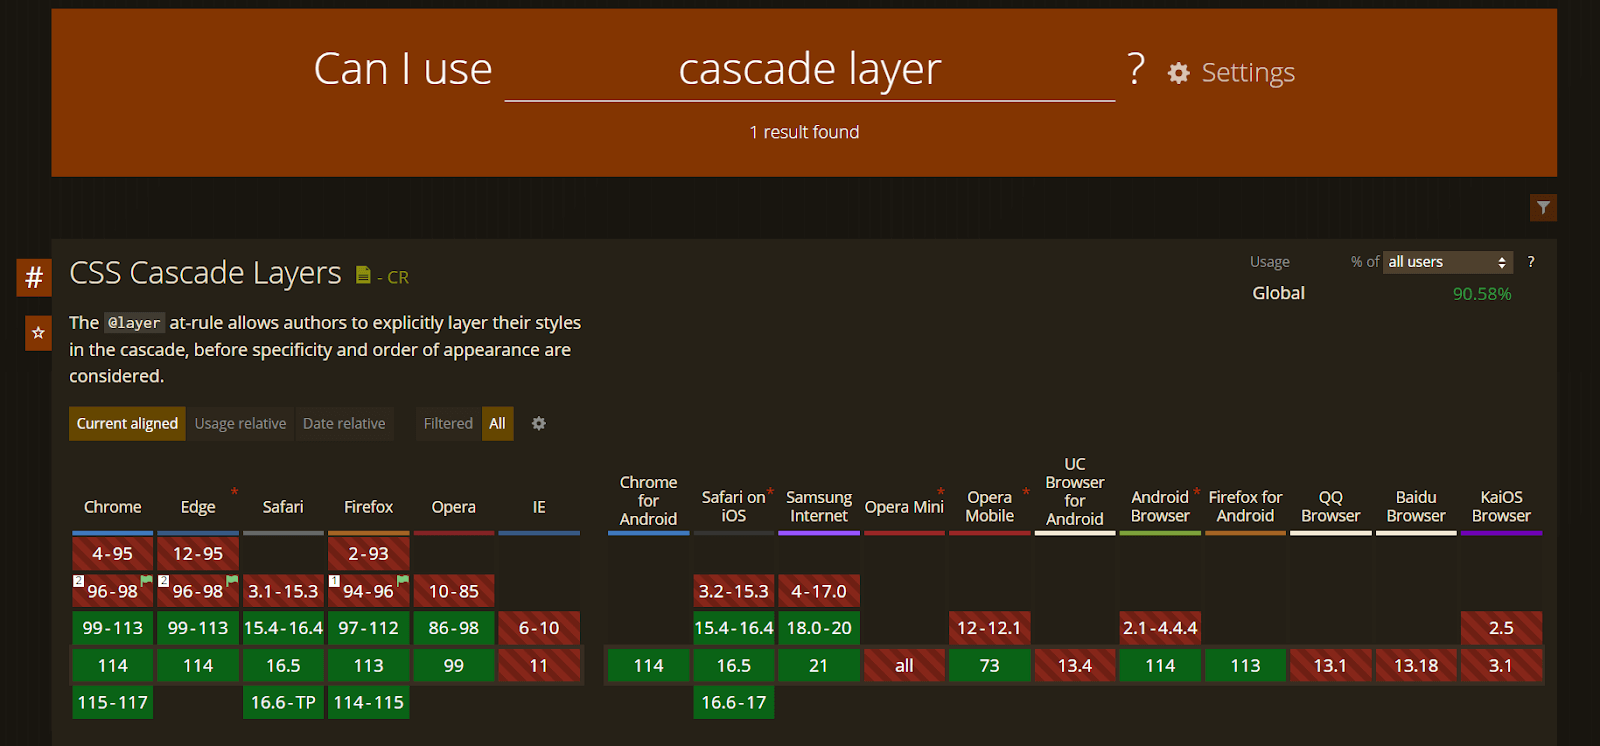
Browser support for CSS Cascade Layers
The support for CSS Cascade Layers varies across different browsers. In Chrome, versions 4 to 95 do not have native support for CSS Cascade Layers. However, starting from version 96 to 98, you can enable support by using the —enable-blink-features=CSSCascadeLayers runtime flag. It’s worth noting that Chrome provides full support for CSS Cascade Layers starting from version 99.
In Firefox, CSS Cascade Layer support is not available in versions 2-93. However, starting from version 94, you can enable CSS Cascade Layer support by using the layout.css.cascade-layers.enabled feature flag in about:config. From version 97 onwards, they are fully supported.
The below illustration provides a detailed overview of the browser support for CSS Cascade Layers:
Ensuring consistent rendering and functionality across different web browsers is of utmost importance in web development. Similar to all CSS properties, when it comes to cascade layers, browser support, and fallbacks play a crucial role in achieving this goal. By testing browser compatibility and providing appropriate fallback options, you can effectively address potential rendering and functionality issues, resulting in a robust and reliable web experience.
To test browser compatibility, you can use a unified digital experience testing platform like LambdaTest that offers an online browser farm of numerous real browsers and operating systems combinations to test your websites and web apps. It lets you perform tests at scale to detect cross browser issues and fix them so that your website or web app works seamlessly across different browsers & OS combinations.
Using LambdaTest’s Real Time Browser Testing feature, you can perform cross browser testing across different browser and OS combinations.
You can also Subscribe to the LambdaTest YouTube Channel and stay updated with the latest tutorials around automated browser testing, Selenium testing, Cypress E2E testing, CI/CD, and more.
Wrapping up
Congratulations on making it here!! You’re a great learner!
In this blog on CSS Cascade Layers, we have covered the concept of cascade along with its steps. We then learned CSS Cascade Layers and the various methods of creating them. Additionally, we explored nested cascade layers and the advantages they provide, followed by a way of creating them. Finally, we learned how to determine the precedence of layers based on their order.
CSS Cascade Layers are extremely important when working with large codebases with multiple stylesheets from different third parties. They allow us to keep things modular and maintainable by eliminating conflicts and establishing a clear order of priority. By understanding the key steps of the cascade process and learning how to create cascade layers effectively, you now possess a powerful set of tools to manage and easily control stylesheets.
Remember, design is not just about appearance but also about how it works. Cascade Layers allow you to strike that balance, ensuring that your designs captivate and engage users while functioning flawlessly. I hope this guide has been helpful to you in understanding CSS Cascade Layers and how they help us manage stylesheets effectively.
So, go forth and create websites that utilize the power of CSS Cascade Layers.
Until next time, happy styling!
Frequently Asked Questions (FAQs)
What are cascade layers in CSS?
Web developers can prioritize specific CSS sections by using CSS Cascade Layers, which are explicit specificity containers that offer easier and more control over the CSS declarations.
What are the four components of the cascade CSS?
- Relevance.
- Origin and importance.
- Specificity.
- Order of appearance


Author’s Profile
Tahera Alam
Tahera is a front-end developer who loves developing seamless frontends and efficient backends. She has skills in React, JavaScript, Nextjs, Tailwind, MongoDB, Solidity, and more. She loves to learn new technologies and finds writing about them to be a great way to share knowledge with others. In her free time, she enjoys reading thrillers and engaging with the tech community on Twitter.
Blogs: 11
Got Questions? Drop them on LambdaTest Community. Visit now


