XML And HTML Report In PyUnit For Test Automation
Himanshu Sheth
Posted On: August 20, 2019
![]() 118273 Views
118273 Views
![]() 13 Min Read
13 Min Read
Irrespective of the test framework being used, one aspect that would be of interest to the various stakeholders in the project e.g. developers, testers, project managers, etc. would be the output of the test results. Keeping a track of the progression of test suites/test cases and their corresponding results can be a daunting task. The task can become more complex in the later stages of the project since the product would have undergone various levels of testing.
Automation Reports is an ideal way through which you can track progress, improve the readability of the test output thereby minimizing the amount of time required in the maintenance of the test data (& results). We have already covered importance & advantages of test reports refer to our blog on report generation in pytest.
In this article, I will be talking about generating HTML reports in PyUnit (also known as unittest), a popular test Python testing framework that is widely used to execute unit testing of a Selenium Python test suite.
If you’re new to Selenium and wondering what it is then we recommend checking out our guide – What is Selenium?
Read More: Run Your First Automation Script Using PyUnit For Selenium Python Test Suite
PyUnit HTML Report Generation Using HTMLTestRunner
To generate PyUnit HTML reports that have in-depth information about the tests in the HTML format, execution results, etc.; you can make use of HtmlTestRunner module in Python.
There are different ways in which reports can be generated in the HTML format; however, HtmlTestRunner is widely used by the developer community. To install HtmlTestRunner module, you need to execute the following command in your terminal:
|
1 |
pip install html-testRunner |
The entire purpose of HtmlTest runner is to save the output of your automation test execution in html file to make it much easier to interpret.
Below is a snapshot of the HtmlTestRunner module installation.

We make use of the Eclipse IDE for development purpose and the same can be downloaded from here. You also have the option of using the Community version of the PyCharm IDE which can be downloaded from here
Now that you have installed HtmlTestRunner, let’s have a look at the test suite used for generating PyUnit HTML reports. The testsuite contains two test cases.
a. Google Search where the search term is ‘LambdaTest’.
b. Wikipedia Search where the search term is ‘Steve Jobs’.
Test Case A – Google Search where the search term is ‘LambdaTest’
The filename is GoogleTest.py and the compiled Python file (GoogleTest) would be imported in the file where the TestSuite is created. For more information on the setUp() and tearDown() methods, please have a look at the earlier articles that have covered PyUnit/unittest in more detail.
Filename – GoogleTest.py (Compiled Python File – GoogleTest)
|
1 2 3 4 5 6 7 8 9 10 11 12 13 14 15 16 17 18 19 20 21 22 23 24 25 26 27 |
import unittest from selenium import webdriver import time from time import sleep class GoogleSeachTest(unittest.TestCase): def setUp(self): self.driver = webdriver.Firefox() def test_GoogleSearch(self): driver_firefox = self.driver driver_firefox.maximize_window() driver_firefox.get('http://www.google.com') # Perform search operation elem = driver_firefox.find_element_by_name("q") elem.send_keys("Lambdatest") elem.submit() sleep(10) def tearDown(self): # Close the browser. self.driver.close() if __name__ == '__main__': unittest.main() |
Test Case B – Wikipedia Search where the search term is ‘Steve Jobs’
The filename is WikiTest.py and the compiled Python file (WikiTest) would be imported in the file where the TestSuite is created.
Filename – WikiTest.py (Compiled Python File – WikiTest)
|
1 2 3 4 5 6 7 8 9 10 11 12 13 14 15 16 17 18 19 20 21 22 23 24 25 26 27 28 29 30 31 |
import unittest from selenium import webdriver import time from time import sleep class WikipediaSeachTest(unittest.TestCase): def setUp(self): self.driver = webdriver.Firefox() def test_WikipediaSearch(self): driver_firefox = self.driver driver_firefox.maximize_window() # Perform search operation driver_firefox.get('http://en.wikipedia.org') driver_firefox.find_element_by_id('searchInput').clear() driver_firefox.find_element_by_id('searchInput').send_keys('Steve Jobs') sleep(10) driver_firefox.find_element_by_id('searchButton').click() sleep(10) def tearDown(self): # Close the browser. self.driver.close() if __name__ == '__main__': unittest.main() |
|
1 |
Compiling Test Case A & B For Generating PyUnit HTML Reports |
For compiling the files, you can make use of the command:
|
1 2 |
python GoogleTest.py python WikiTest.py |
We make use of the compiled Python code (GoogleTest and WikiTest) to create a testsuite that has these two test cases. We make use of the HtmlTestRunner module to create PyUnit HTML report that contains details about the tests along with the execution results.
Filename – test_html_runner_search.py
|
1 2 3 4 5 6 7 8 9 10 11 12 13 14 15 16 17 18 19 20 21 22 23 24 25 26 27 28 29 30 31 32 33 34 35 36 37 |
import unittest import GoogleTest import WikiTest import os # Import the HTMLTestRunner Module import HtmlTestRunner # Get the Present Working Directory since that is the place where the report # would be stored current_directory = os.getcwd() class HTML_TestRunner_TestSuite(unittest.TestCase): def test_GoogleWiki_Search(self): # Create a TestSuite comprising the two test cases consolidated_test = unittest.TestSuite() # Add the test cases to the Test Suite consolidated_test.addTests([ unittest.defaultTestLoader.loadTestsFromTestCase(GoogleTest.GoogleSeachTest), unittest.defaultTestLoader.loadTestsFromTestCase(WikiTest.WikipediaSeachTest) ]) output_file = open(current_directory + "\HTML_Test_Runner_ReportTest.html", "w") html_runner = HtmlTestRunner.HTMLTestRunner( stream=output_file, report_title='HTML Reporting using PyUnit', descriptions='HTML Reporting using PyUnit & HTMLTestRunner' ) html_runner.run(consolidated_test) if __name__ == '__main__': unittest.main() |
As seen in the implementation above, we make use of the HTMLTestRunner method which is implemented in the HtmlTestRunner module (HtmlTestRunner.HTMLTestRunner). For the purpose of testing, we have passed three arguments to the HTMLTestRunner method:
For more details about the HTMLTestRunner method, you can refer to runner.py that can be found in the location where HtmlTestRunner module is installed (< Installation Path >\…\venv\Lib\site-packages\runner.py).
|
1 2 3 4 5 6 7 8 9 10 11 12 13 14 15 16 |
class HTMLTestRunner(TextTestRunner): """" A test runner class that output the results. """ time_format = "%Y-%m-%d_%H-%M-%S" def __init__(self, output="./reports/", verbosity=2, stream=sys.stderr, descriptions=True, failfast=False, buffer=False, report_title=None, report_name=None, template=None, resultclass=None, add_timestamp=True, open_in_browser=False, combine_reports=False, template_args=None): self.verbosity = verbosity self.output = output self.encoding = UTF8 TextTestRunner.__init__(self, stream, descriptions, verbosity, failfast=failfast, buffer=buffer) |
Below is the execution snapshot of test_html_runner_search.py

The report location & report name is passed as an argument to the HTMLTestRunner() method. Below is the content for the PyUnit HTML report (HTML_Test_Runner_ReportTest.html). The report contains information about the two tests that were executed as a part of the testsuite, their execution results and time taken for completion.
|
1 2 3 4 |
Running tests... ---------------------------------------------------------------------- test_GoogleSearch (GoogleTest.GoogleSeachTest) ... OK (18.393839)s test_WikipediaSearch (WikiTest.WikipediaSeachTest) ... OK (32.298229)s Ran 2 tests in 0:00:50 OK Generating HTML reports... reports\TestResults_GoogleTest.GoogleSeachTest_2019-05-31_17-48-20.html reports\TestResults_WikiTest.WikipediaSeachTest_2019-05-31_17-48-20.html |
Apart from the consolidated report shown above, there would be individual reports that would be located in the < output-folder >\reports\ folder

|
1 |
TestResults_GoogleTest.GoogleSeachTest_2019-05-31_xxxx.html |

|
1 |
TestResults_WikiTest.WikipediaSeachTest_2019-05-31_xxxx.html |

For more details about formatting the report, you can visit the following link.
PyUnit XML Report Generation Using XMLTestRunner
Apart from html-testrunner, you can also make use of xmlrunner in case you want to generate a PyUnit XML report. In order to use xmlrunner, you need to install the module using the following command.
|
1 |
pip install xmlrunner |
Once the module is installed, you need to perform minimal changes in the HTML report-based implementation. We will be using the similar test cases as we used for PyUnit HTML reports, the code snippet is below:
|
1 2 3 4 5 6 7 8 9 10 11 12 13 14 15 16 17 18 19 20 21 22 23 24 25 26 27 28 29 |
import unittest import GoogleTest import WikiTest import os # Import the xmlrunner Module import xmlrunner # Get the Present Working Directory since that is the place where the report # would be stored current_directory = os.getcwd() …………………………………… …………………………………… output_file = open(current_directory + "\XML_Test_Runner_ReportTest", "w") testRunner = xmlrunner.XMLTestRunner(output=output_file) testRunner.run(consolidated_test) …………………………………… …………………………………… if __name__ == '__main__': unittest.main() |
Scope Of PyUnit HTML Reports/ XML Reports For Automated Cross Browser Testing
Now that we know how to generate a PyUnit HTML report, or PyUnit XML report, we need to understand the scope of implementation based on the automated cross browser testing needs of your project. How practical is this approach and is it going to hamper your productivity as you perform Selenium? Let’s find out.
Not So Scalable Approach
HtmlTestRunner in conjunction with Selenium & PyUnit (unittest) can be used to a good extent to test the features of a web product. However, the approach may not be scalable if the testing is performed on a project/product at a large scale.
Maintenance Is Going To Be A Hassle
Maintenance of the test reports would be a strenuous task and its complexity will multiply with the growing scale of the project.
What If You Are Using An Automated Cross Browser Testing Cloud For Selenium Script Execution?
With the increasing number of web browsers, operating systems, devices; performing testing on these different combinations has become essential to ensure premium end-user experience. You can improve your existing infrastructure to perform automated cross browser testing but the approach may neither be scalable, not economical. So a good idea would be to empower yourself with automated cross browser testing on cloud. You can increase the throughput from your test team by making use of parallel test execution in Selenium on a cloud-based testing infrastructure.
Read More: Parallel Testing In Selenium WebDriver With Python Using PyUnit/unittest
LambdaTest is a browser compatibility testing tool on cloud that supports 2,000+ real browsers & browser versions for both mobile, and desktop. LambdaTest offers a Selenium Grid with zero-downtime, so you don’t have to worry about maintenance. All you would need is a LambdaTest account, internet connectivity, and your desired capabilities to invoke a test automation script on Selenium Grid offered by LambdaTest. You would also get the benefits of LambdaTest integrations to third party tools for CI/CD, project management, codeless automation and more.
Automation testing with Selenium Grid offered by LambdaTest also allows you to extract your test reports from our cloud servers to your preferred storage, without logging into LambdaTest.
Meaning, you can execute your tests are written using PyUnit & Selenium with reports generated using popular modules like HtmlTestRunner or xmlrunner on our Selenium Grid.
Sharing & maintaining test reports becomes easy with LambdaTest Selenium API, and you also get the convenience to perform browser compatibility testing on your locally hosted web pages, at scale.
Run The Existing Test Suite On LambdaTest Selenium Grid
The first task is to port the existing implementation (WikiTest.py and GoogleTest.py) to LambdaTest Selenium Grid. The only change that is done in the implementation is porting from local webdriver to remote webdriver; the capabilities are generated using the Lambdatest Capability Generator. Shown below is the code ported to LambdaTest Selenium Grid.
Filename – WikiTest.py (Ported to Lambdatest Grid, Compiled Python File – WikiTest)
|
1 2 3 4 5 6 7 8 9 10 11 12 13 14 15 16 17 18 19 20 21 22 23 24 25 26 27 28 29 30 31 32 33 34 35 36 37 38 39 40 41 42 43 44 45 46 |
import unittest from selenium import webdriver import time from time import sleep import warnings import urllib3 #Set capabilities for testing on Firefox ff_caps = { "build" : "Testing reporting on Lambdatest using PyUnit (Wikipedia-1)", "name" : "Testing reporting on Lambdatest using PyUnit (Wikipedia-1)", "platform" : "Windows 10", "browserName" : "Firefox", "version" : "64.0", } # Obtain details from https://accounts.lambdatest.com/profile user_name = "your-user-name" app_key = "app-key-generated-during-account-creation" class WikipediaSeachTest(unittest.TestCase): def setUp(self): global remote_url urllib3.disable_warnings(urllib3.exceptions.InsecureRequestWarning) remote_url = "https://" + user_name + ":" + app_key + "@hub.lambdatest.com/wd/hub" def test_GoogleSearch(self): driver_firefox = webdriver.Remote(command_executor=remote_url, desired_capabilities=ff_caps) self.driver = driver_firefox driver_firefox.maximize_window() # Perform search operation driver_firefox.get('http://en.wikipedia.org') driver_firefox.find_element_by_id('searchInput').clear() driver_firefox.find_element_by_id('searchInput').send_keys('Steve Jobs') driver_firefox.find_element_by_id('searchButton').click() def tearDown(self): # Close the browser. self.driver.close() self.driver.quit() if __name__ == '__main__': unittest.main() |
Filename – GoogleTest.py (Ported to Lambdatest Grid, Compiled Python File – GoogleTest)
|
1 2 3 4 5 6 7 8 9 10 11 12 13 14 15 16 17 18 19 20 21 22 23 24 25 26 27 28 29 30 31 32 33 34 35 36 37 38 39 40 41 42 43 44 45 |
import unittest from selenium import webdriver import time from time import sleep import warnings import urllib3 #Set capabilities for testing on Firefox ff_caps = { "build" : "Testing reporting on Lambdatest using PyUnit (Google)", "name" : "Testing reporting on Lambdatest using PyUnit (Google)", "platform" : "Windows 10", "browserName" : "Firefox", "version" : "64.0", } # Obtain details from https://accounts.lambdatest.com/profile user_name = "your-user-name" app_key = "app-key-generated-during-account-creation" class GoogleSeachTest(unittest.TestCase): def setUp(self): global remote_url urllib3.disable_warnings(urllib3.exceptions.InsecureRequestWarning) remote_url = "https://" + user_name + ":" + app_key + "@hub.lambdatest.com/wd/hub" def test_GoogleSearch(self): driver_firefox = webdriver.Remote(command_executor=remote_url, desired_capabilities=ff_caps) self.driver = driver_firefox driver_firefox.maximize_window() driver_firefox.get('http://www.google.com') # Perform search operation elem = driver_firefox.find_element_by_name("q") elem.send_keys("Lambdatest") elem.submit() def tearDown(self): # Close the browser. self.driver.close() self.driver.quit() if __name__ == '__main__': unittest.main() |
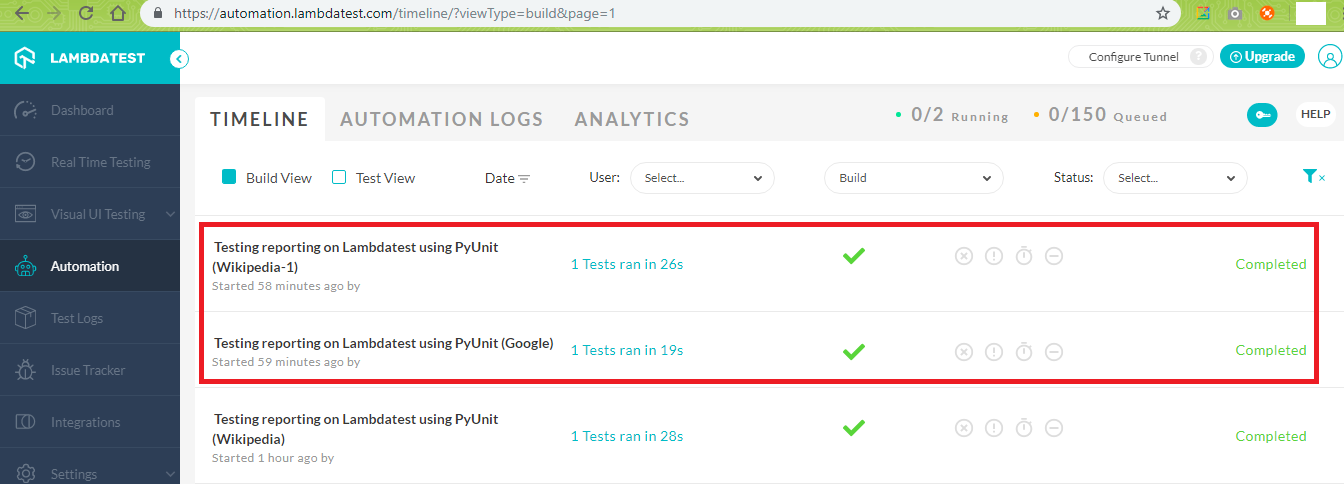
The implementation of test_html_runner_search.py remains the same since it only contains the testsuite for execution (i.e. it is only a placeholder). Below is the screenshot of the Execution Status of these tests on the LambdaTest cloud.
Using LambdaTest Selenium API For Extracting PyUnit Test Reports
LambdaTest has provided APIs through which developers & testers can manage test builds, track test status, fetch logs for tests performed over a period of time, modify build related information, etc. The output of the API is in JSON (JavaScript Object Notation) format, it contains detailed information about the test environment (browser, operating system, device, etc.) along with the execution results.
In order to make use of the LambdaTest APIs, you need to login to https://www.lambdatest.com/support/docs/api-doc/ using your user-name and access-token. You can get user-name & access-token by visiting your profile section.
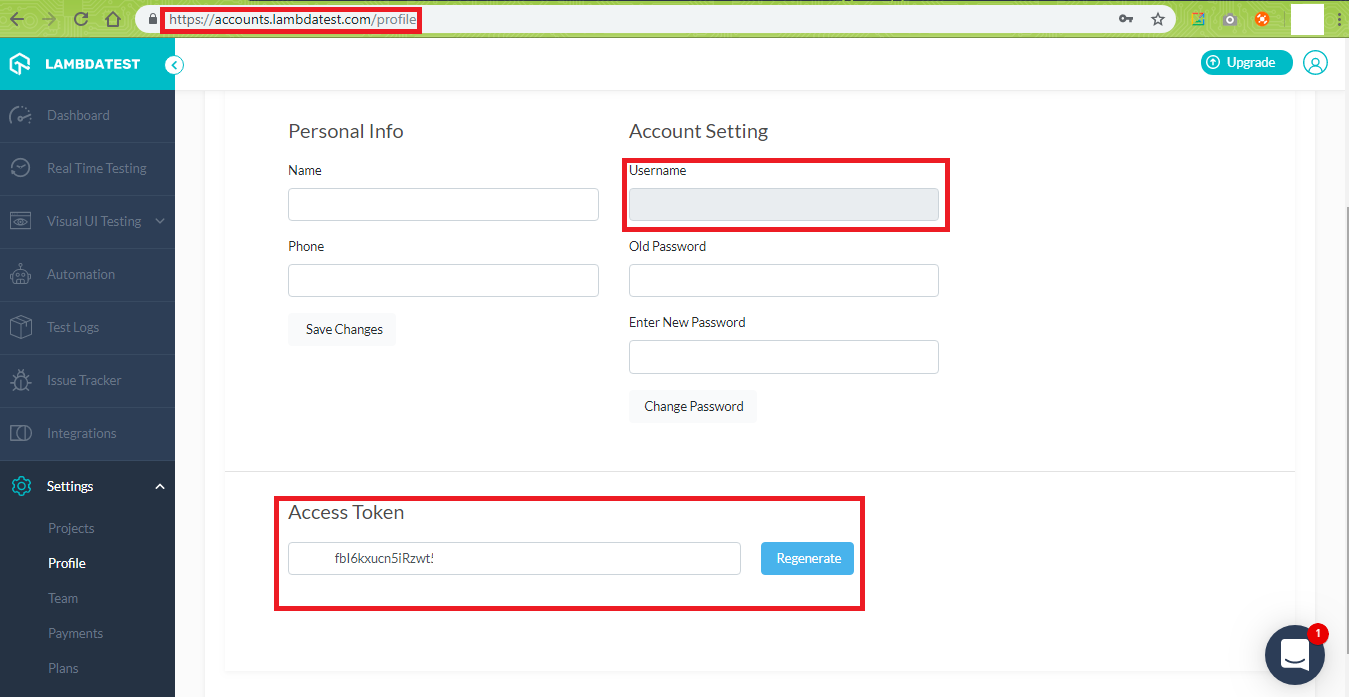
You should authorize the LambdaTest API using these credentials in order to trigger GET, POST requests using the APIs. The test automation timeline will have history of the tests that you have performed so far.
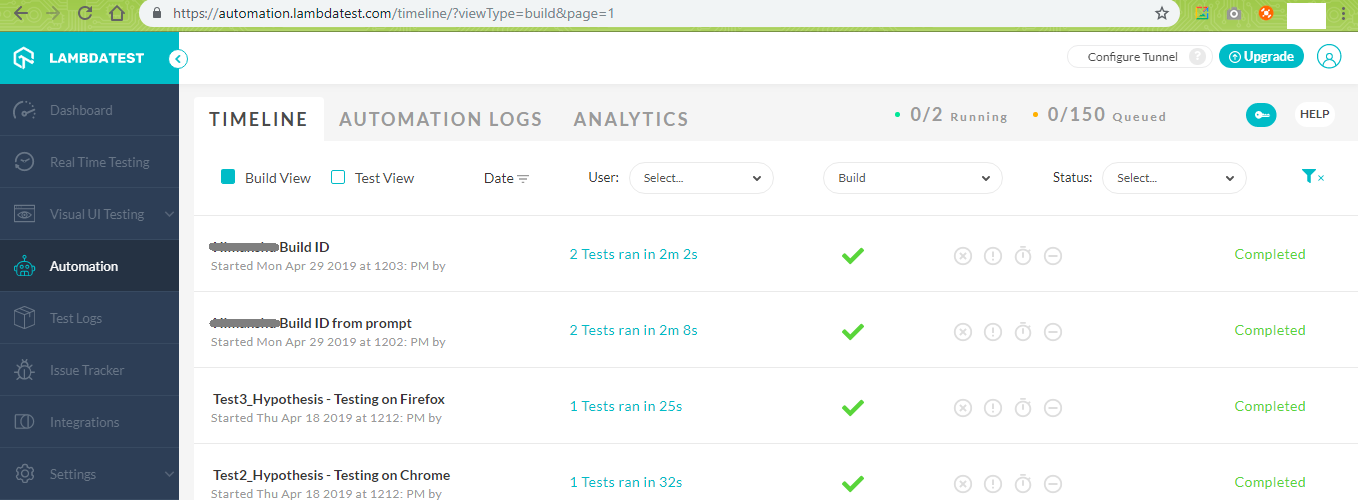
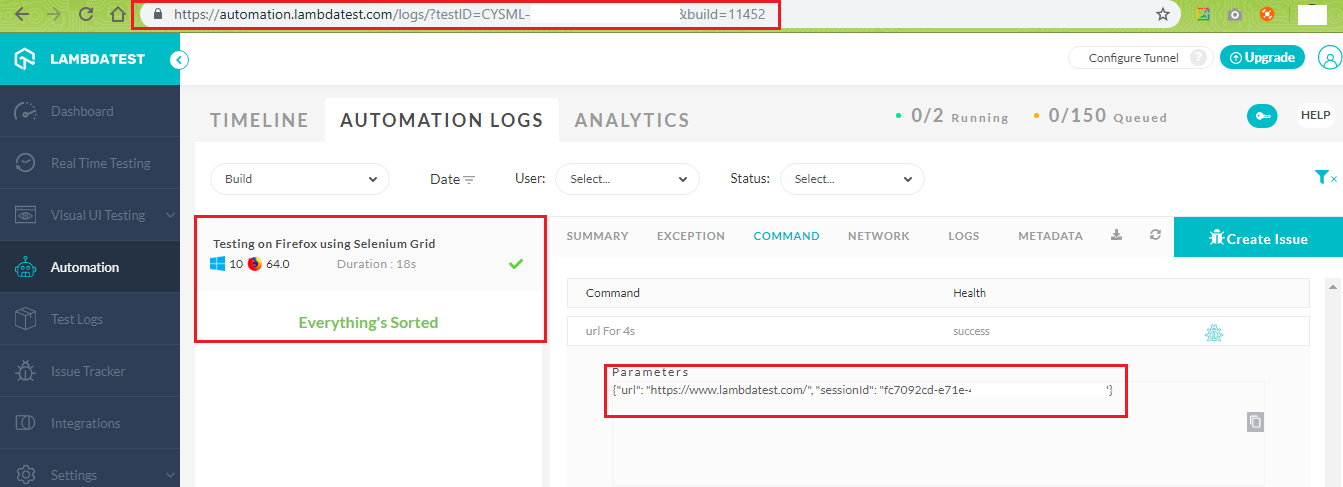
Every test execution will be associated with a unique testID, buildid, and sessionId. The URL for test execution has the format https://automation.lambdatest.com/logs/?testID={test-id}&build={build-id}.
The sessionId details can be found by visiting the Command tab for that particular testID & buildID, sample is shown below:
LambdaTest Build & Session API Demonstration
API that can be used for detailed reporting:
|
1 |
https://api.lambdatest.com/automation/api/v1/ |
You need to append the necessary end-point to the end of the API and issue a GET/POST to get the results.
Endpoints can be builds, sessions, tunnels, platforms.
For example, you can make use of /tunnels i.e.
|
1 |
https://api.lambdatest.com/automation/api/v1/tunnels |
to fetch the running tunnels used for testing locally hosted web pages through your account.
When you initiate a test request, a session-id is assigned to that test session. Using LambdaTest Selenium API, you can get detailed information at the test session level using the
|
1 |
https://api.lambdatest.com/automation/api/v1/sessions |
Extracting Build Details Using LambdaTest Selenium API
For demonstration, we extract details of the tests that have status – completed, error, and timeout and we limit the search for first 20 tests. To get started, you need to authorize those APIs to fetch build, session, tunnel & other related information from your account. Login to https://www.lambdatest.com/support/docs/api-doc/ with your user-name & session-key.

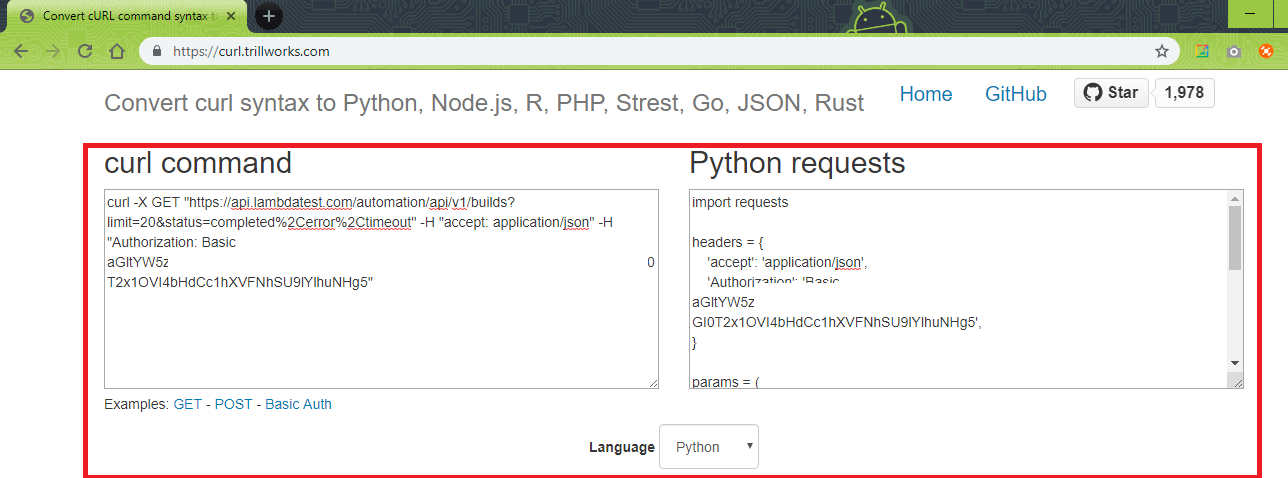
Since you require information about the builds that match the execution state (completed, error, timeout), you have to fill those requirements in the Builds section in https://www.lambdatest.com/support/docs/api-doc/#/Build/builds Below is the screenshot of the command in execution. You also get the CURL API which can be used in your code for fetching the same information programmatically.
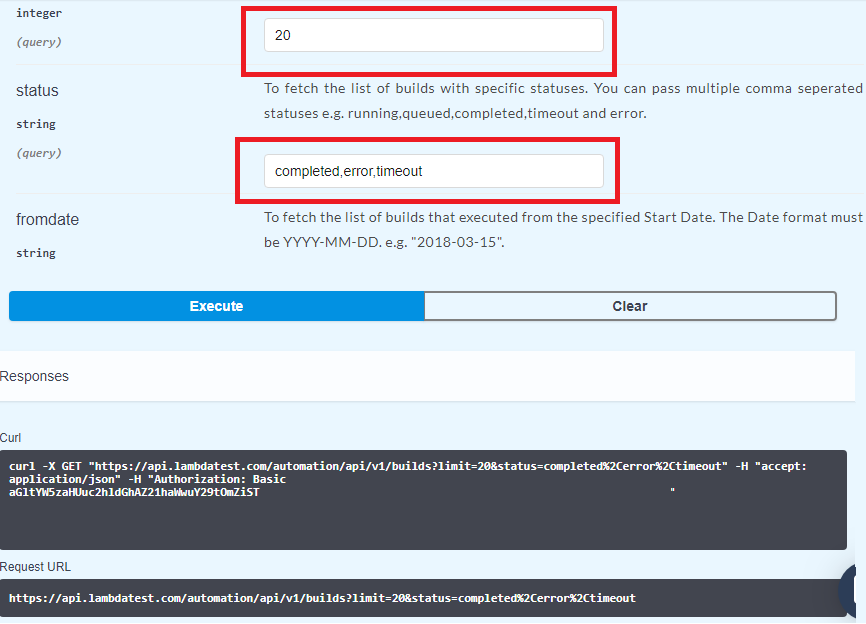
The response code can be 200 (OK), 400 (Session Invalid), and 401 (Authentication Failed). Since we are using Python, we convert the CURL response into Python code using the converter located in https://curl.trillworks.com/. You can use other tools or websites that can offer similar functionality (for free), for our demonstration we are making use of the above-mentioned website.
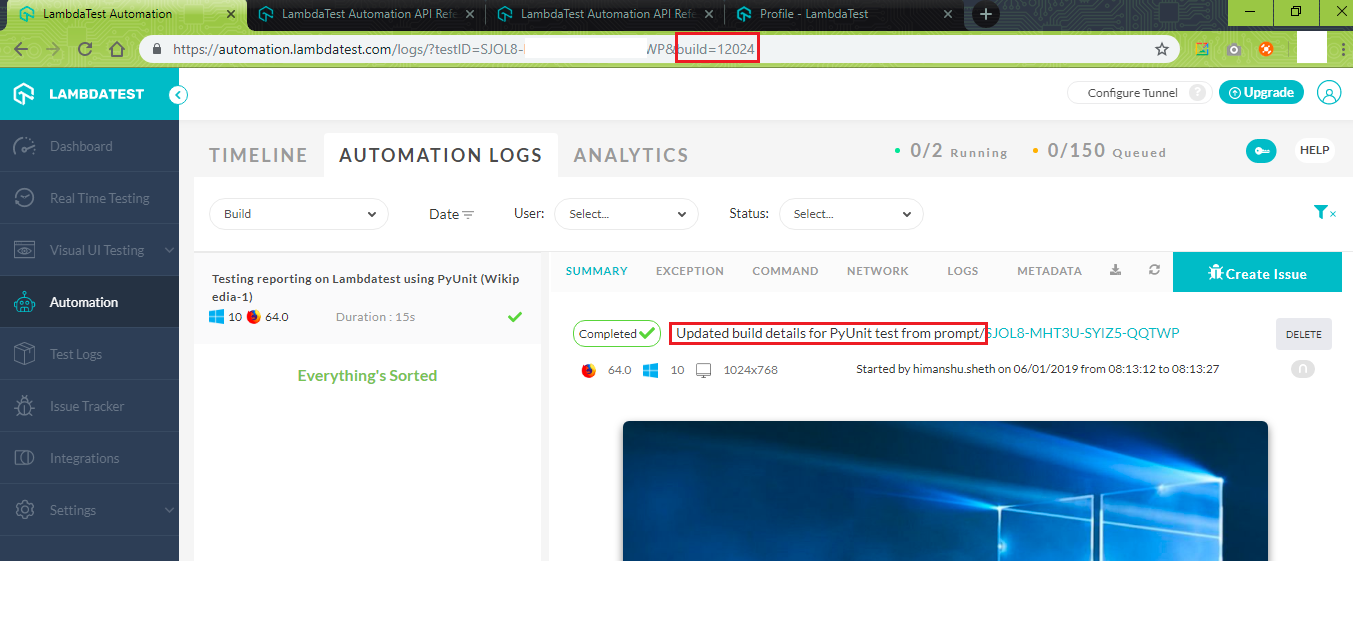
We extract details of the first 20 builds that matches status-completed, timeout, error. Once we have extracted the details, we update the build headline for the buildID = 12024. We make use of:
|
1 |
https://api.lambdatest.com/automation/api/v1/builds/{Build_ID} |
In our example, the build ID would be 12024. Below is the code which demonstrates the LambdaTest API integration:
|
1 2 3 4 5 6 7 8 9 10 11 12 13 14 15 16 17 18 19 20 21 22 23 24 25 26 27 28 29 30 31 32 33 34 35 36 37 38 39 40 41 42 43 44 45 46 |
# Requirements # Fetch first 20 builds which have status as completed, error, timeout # Once the details are out, change the Build Title of the build_id 12024 # Refer https://www.lambdatest.com/support/docs/api-doc/#/Build/builds for more information import requests import json # Equivalent Python code from https://curl.trillworks.com/ headers = { 'accept': 'application/json', 'Authorization': 'Basic aGltYW5zaHUuc2hldGhAZ21haWGI0T2x1OVI4bHdCc1hXVFNhSU9lYlhuNHg5', } params = ( ('limit', '20'), ('status', 'completed,error,timeout'), ) # Updated build information for build 12024 headers_updated_build = { 'accept': 'application/json', 'Authorization': 'Basic aGltYW5zaHUuc2hldGhAZ21haWGI0T2x1OVI4bHdCc1hXVFNhSU9lYlhuNHg5', 'Content-Type': 'application/json', } data_updated_build = '{"name":"Updated build details for PyUnit test from prompt"}' response = requests.get('https://api.lambdatest.com/automation/api/v1/builds', headers=headers, params=params) print(response) json_arr = response.json() # Print the build_id matching our requirements and Change build title of build_id 12024 for loop_var in range(20): build_id = ((json_arr['data'][loop_var])['build_id']) test_status = ((json_arr['data'][loop_var])['status_ind']) if build_id == 12024: response_updated_build = requests.patch('https://api.lambdatest.com/automation/api/v1/builds/12024', headers=headers_updated_build, data=data_updated_build) print(response_updated_build) print ((build_id), (test_status)) |
As seen in the screenshot, the Build headline for BuildID = 12024 is updated.
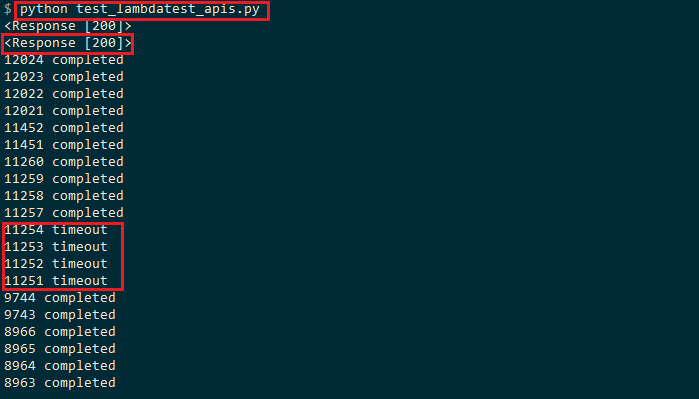
We execute the code using the normal Python command, the response of the execution is 200 (OK).
Extracting Tunnel Information Of Locally Hosted Web Pages
One of the primary advantages of moving the web testing and automated cross browser testing to LambdaTest Selenium Grid is the flexibility to test locally hosted & privately hosted pages using the LambdaTest Tunnel. LambdaTest Tunnel establishes an SSH(Secure Shell) connection between your local machine & LambdaTest cloud servers. To configure the LambdaTest Tunnel for different operating systems, please visit
In order to make use of the Tunnel APIs, you need to visit: https://www.lambdatest.com/support/docs/api-doc/#/tunnel/get_tunnels
The Tunnel API does not accept any parameters and successful execution fetches details about the different tunnels running in your account. In the implementation shown below, we can see that there were two tunnels that were in use by the user and once the tunnel usage was complete, the tunnel instance was removed & the session was closed.
|
1 2 3 4 5 6 7 8 9 10 11 12 13 |
import requests import json headers = { 'accept': 'application/json', 'Authorization': 'Basic aGltYW5zaHUuc2hldGhAZ21haWwuY2lYlhuNHg5', } response = requests.get('https://api.lambdatest.com/automation/api/v1/tunnels', headers=headers) print(response) json_arr = response.json() print(json_arr) |

You can also stop an already running tunnel instance using the corresponding LambdaTest API
|
1 |
https://api.lambdatest.com/automation/api/v1/tunnels/{tunnel-ID} |
For a complete list of operations that can be performed on Builds, Sessions, Tunnels, and Platforms; please visit the LambdaTest API Page.
Conclusion
Testing is an integral part of any product/project and its effectiveness can be enhanced by making use of powerful reporting tools. Reports are used to keep track of the testing activities (results, test scenarios, etc.) and using the right tool can improve the overall testing process.
Cross browser testing should be performed for web products since it helps in providing consistent behavior and performance across different combinations of web browsers, operating systems, and devices. Choosing the right cross browser testing platform that has API support and powerful report generation features can reduce the overall effort spent on test related activities of your product.
LambdaTest serves the purpose of helping you perform automated cross browser testing on cloud with a maintenance-free Selenium Grid offering 3000+ real browsers, along with integrations to numerous CI/CD tools, and RESTful Selenium API for extracting HTML reports in PyUnit and every other test automation framework that offers compatibility with Selenium. Go sign up for free, if you haven’t already!
Got Questions? Drop them on LambdaTest Community. Visit now


