How To Handle Multiple Windows In Selenium Python
Eugene Kwaka
Posted On: October 20, 2022
![]() 265056 Views
265056 Views
![]() 20 Min Read
20 Min Read
Automating testing is a crucial step in the development pipeline of a software product. In an agile development environment, where there is continuous development, deployment, and maintenance of software products, automation testing ensures that the end software products delivered are error-free.
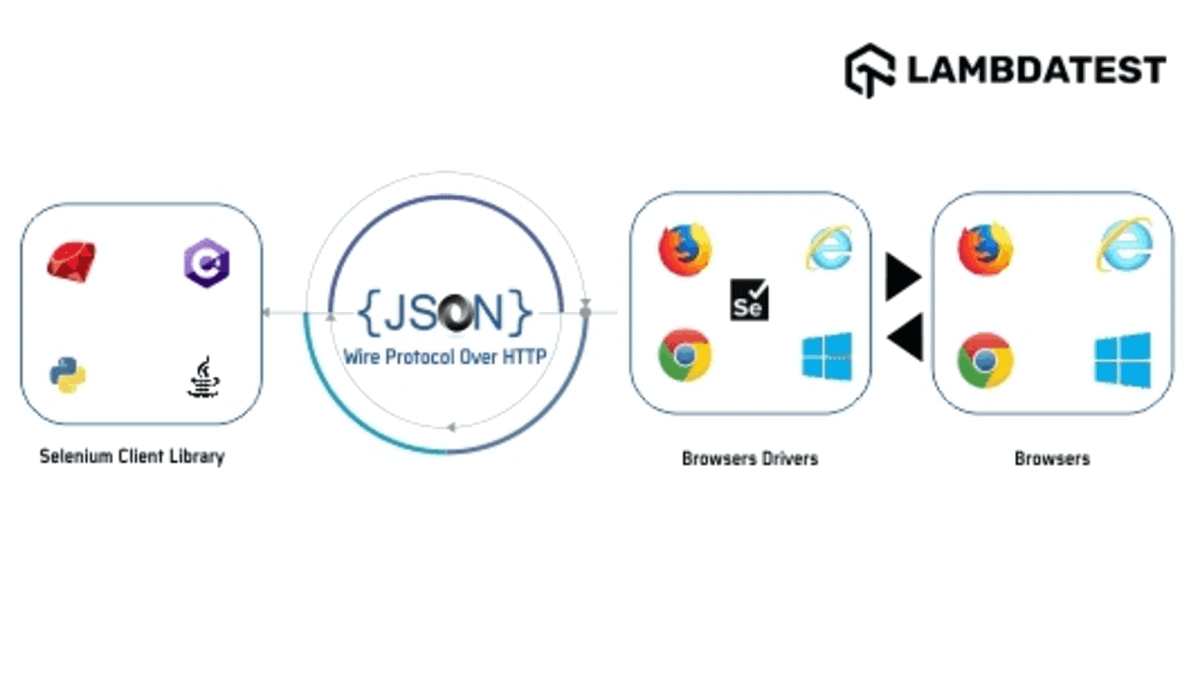
In the world of automation, Selenium is one of the most widely used open-source automation testing frameworks to execute automated web browser tests on websites. Selenium can run automated tests on various browsers (e.g., Chrome, Firefox, Edge, etc.). The test automation scripts can be devised using popular frameworks offered by languages like C#, Java, JavaScript, Python, and more.
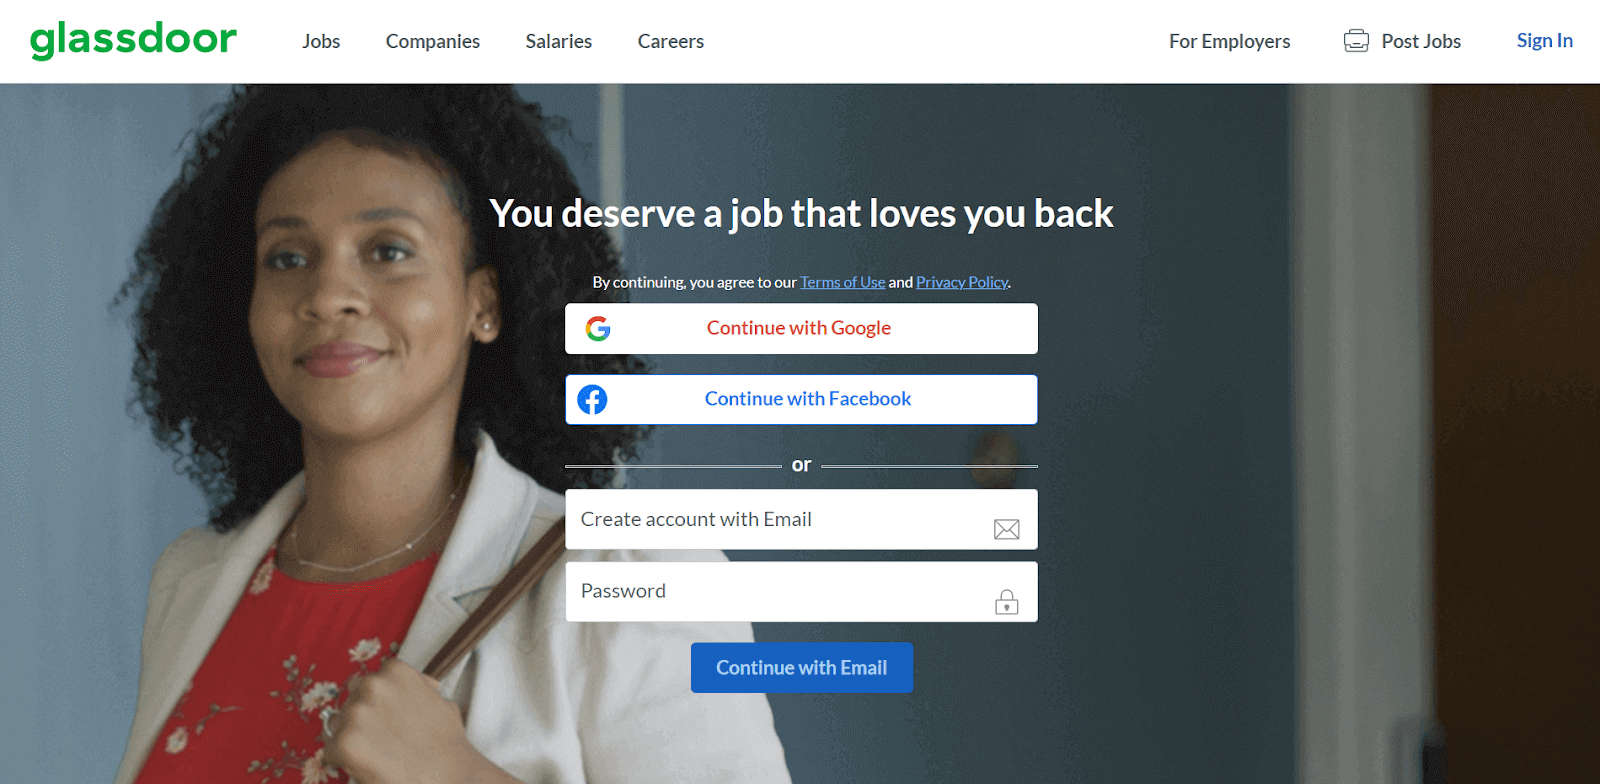
The automated test cases you perform using Selenium might lead you to instances where it is necessary to handle multiple windows while working with a web application. This situation may arise as a result of clicking a button on the website that opens up a URL to a new tab or a new window. For example, the job search platform Glassdoor opens a new window when you click the buttons to sign in using your Google account or Facebook account.
Click on the “Continue with Facebook” button to sign in.
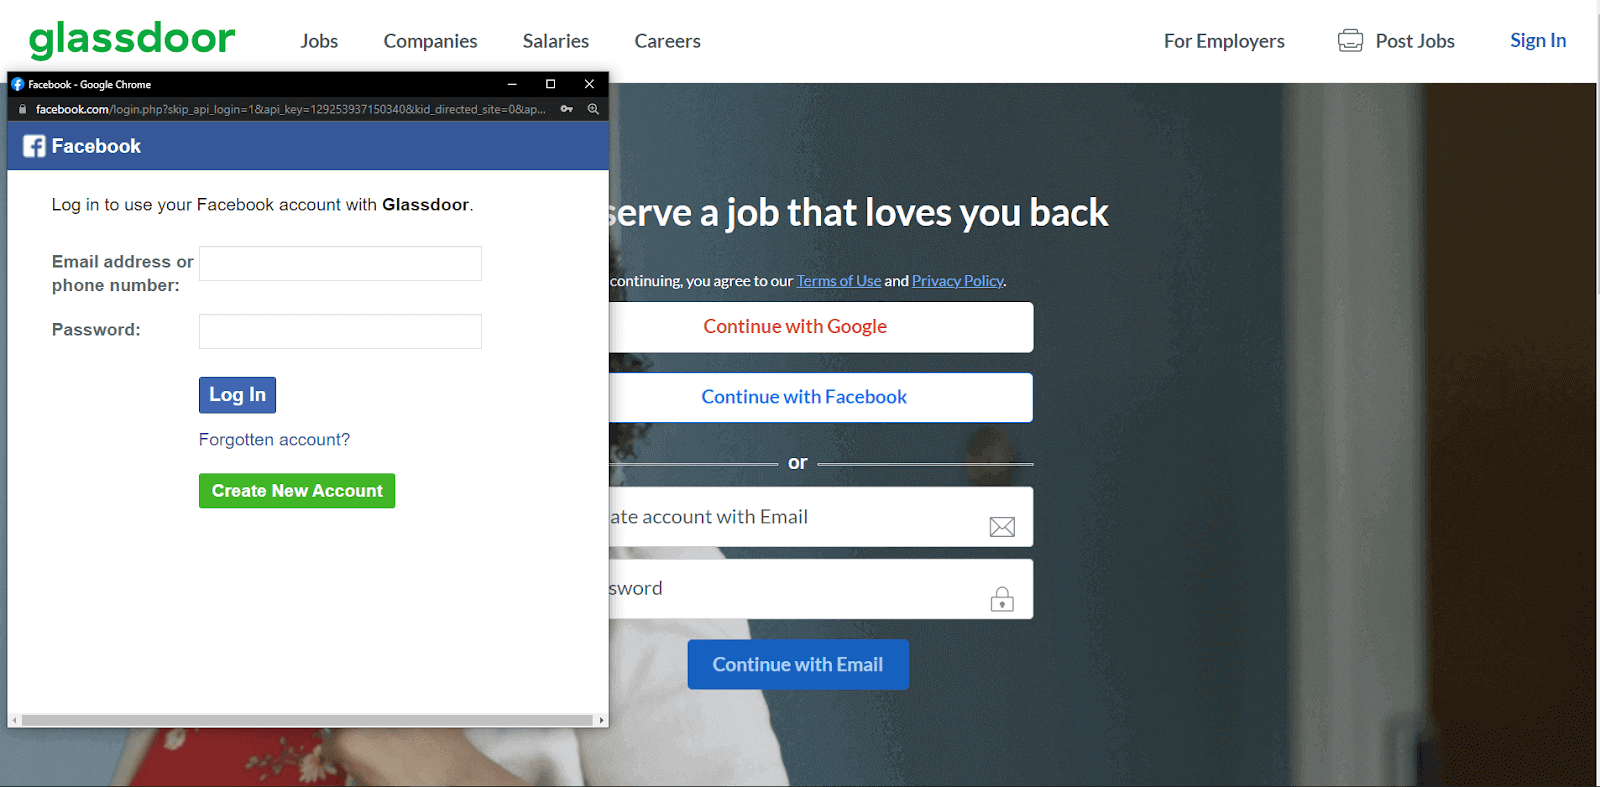
A Facebook webpage window will pop up to prompt you to sign in.
As a result, the user might need to access the open browser window to move forward.
As a QA tester, running a test case might require you to complete some operations in a newly opened browser window or tab before going back to the original window or tab to finish the rest of the tasks.
In this blog on how to handle multiple windows in Selenium Python, we will discuss the basics of browser windows and how to handle multiple windows in Selenium Python. By the end of the blog, you will be able to handle multiple windows when they arise when executing test cases. If you’re looking to improve your Selenium interview skills, check out our curated list of Selenium interview questions and answers.
TABLE OF CONTENTS
What is a Browser Window in Selenium?
The browser window, often called the main or parent window, represents the homepage or the currently open web page a user sees when opening a browser. When a Selenium automation script runs, it typically starts with the parent window. Initiating a Selenium WebDriver session involves opening a window that is initially controlled by the WebDriver.
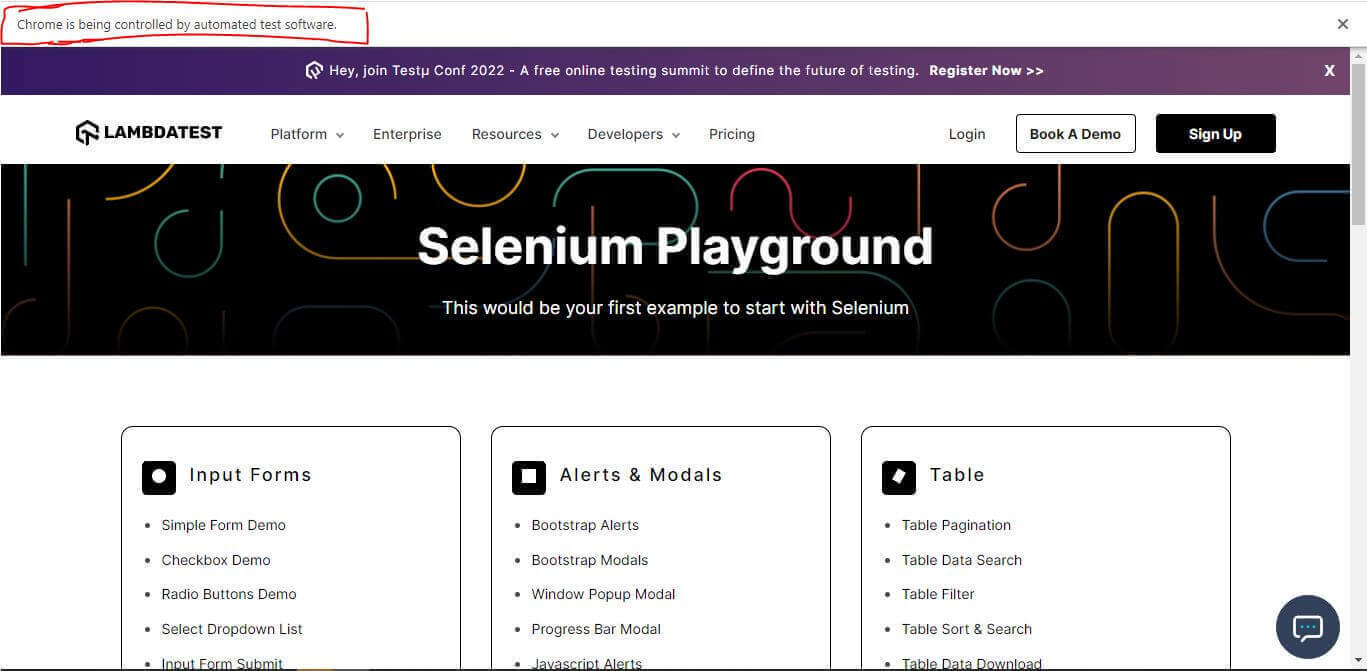
To have a view of what a parent window looks like, here is a window of the LambdaTest Selenium Playground website.
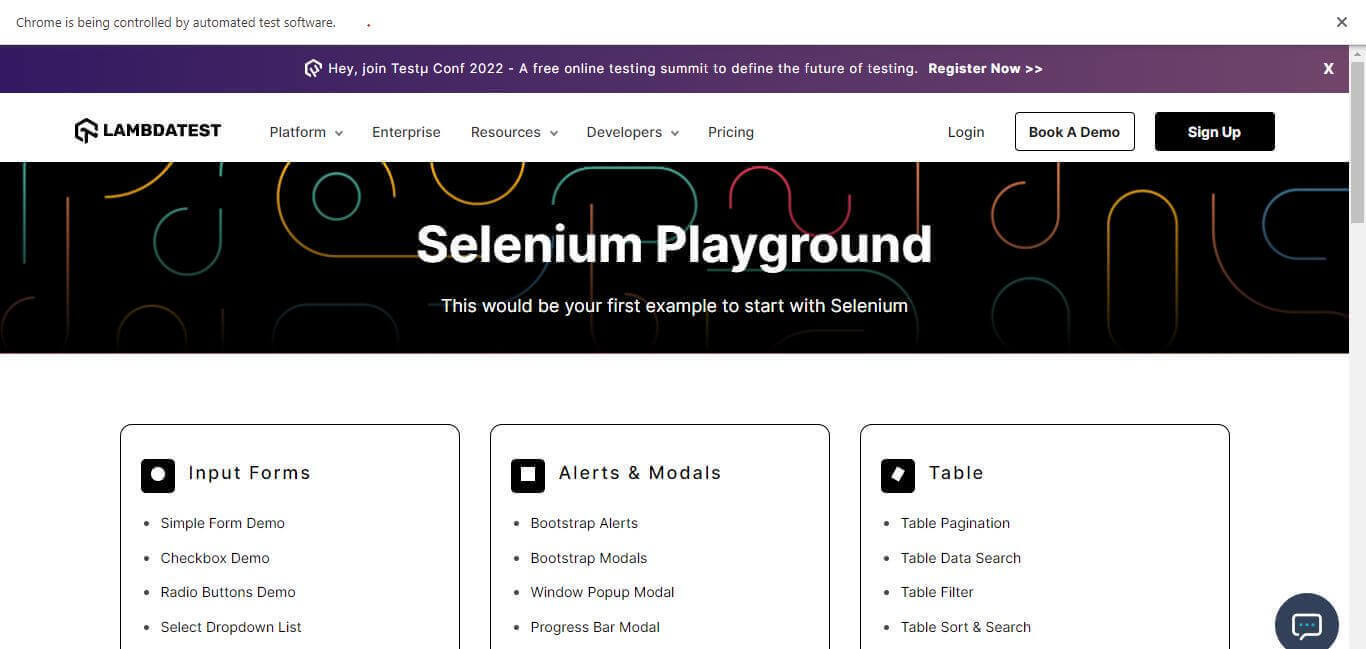
Selenium WebDriver always keeps the context of the parent window when navigating to a defined URL that opens a new window. The child window will be within the context of the parent window. This enables navigating back and forth between the windows once you are done with the operations you were handling in the newly opened child window.
This was all about the browser window in Selenium. In the next section of this blog on how to handle multiple windows in Selenium Python, we will learn more about child windows in Selenium.
What is a Child Window in Selenium?
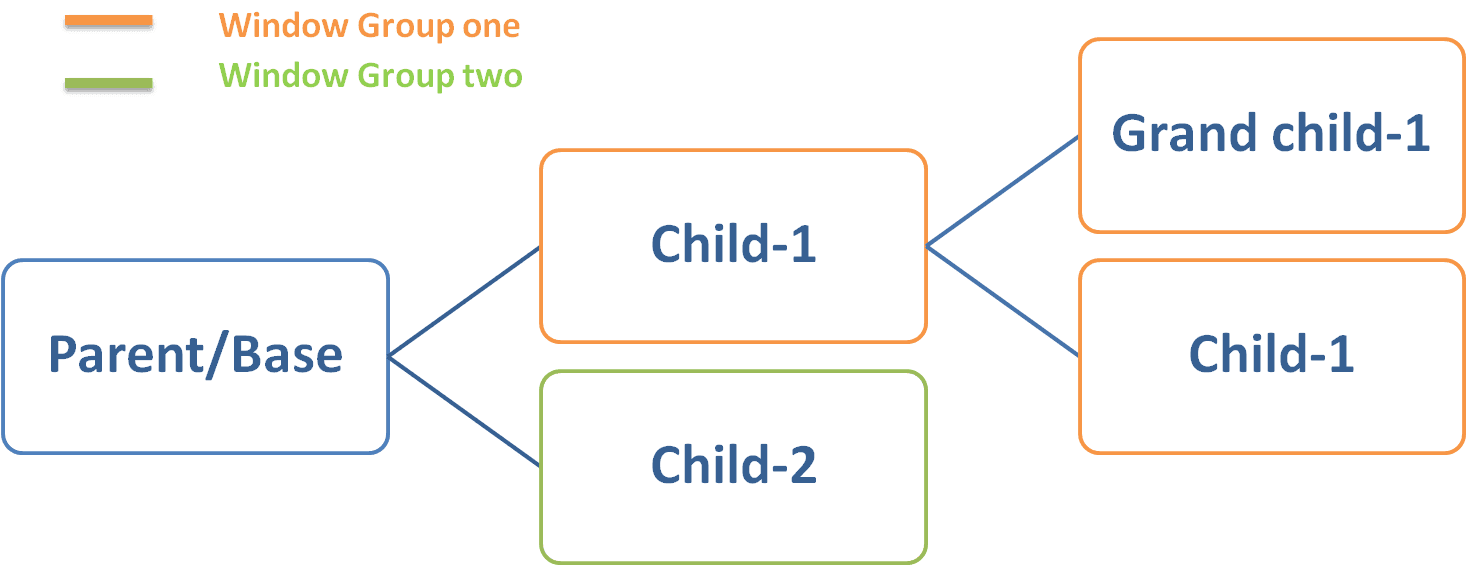
When we click on a button or URL link in the parent window, and the action opens another window(s) within the main window, the new window(s) is called a child window. The new window(s) or tab(s) opened are called children of the parent window and have unique window handles.
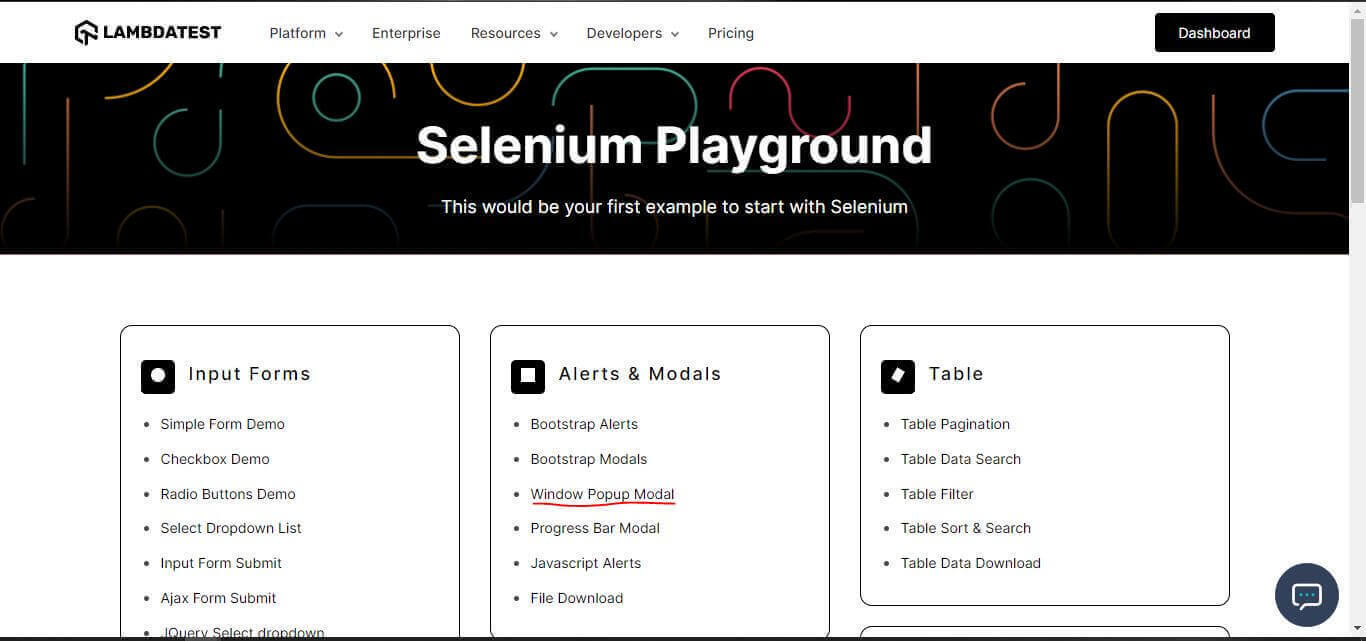
To demonstrate the handling of child windows, let’s use the LambdaTest Selenium Playground we mentioned earlier:
- Click on the Windows Popup Modal link in the main window.
- Click on the buttons in the Single Window Popup Modal to open a single child window.
- Click on the Multiple Window Popup buttons to open multiple child browser windows. The first button opens two child windows, while the “Follow All” button opens three child windows.
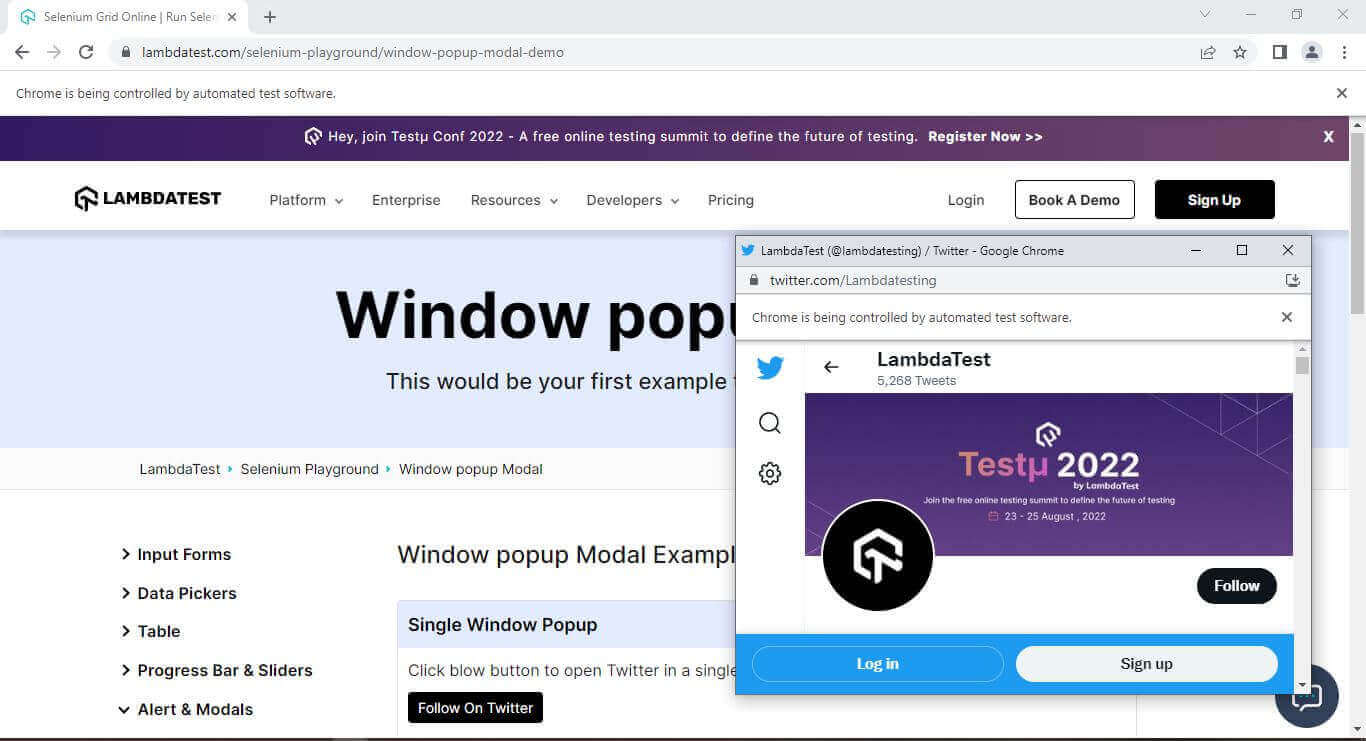
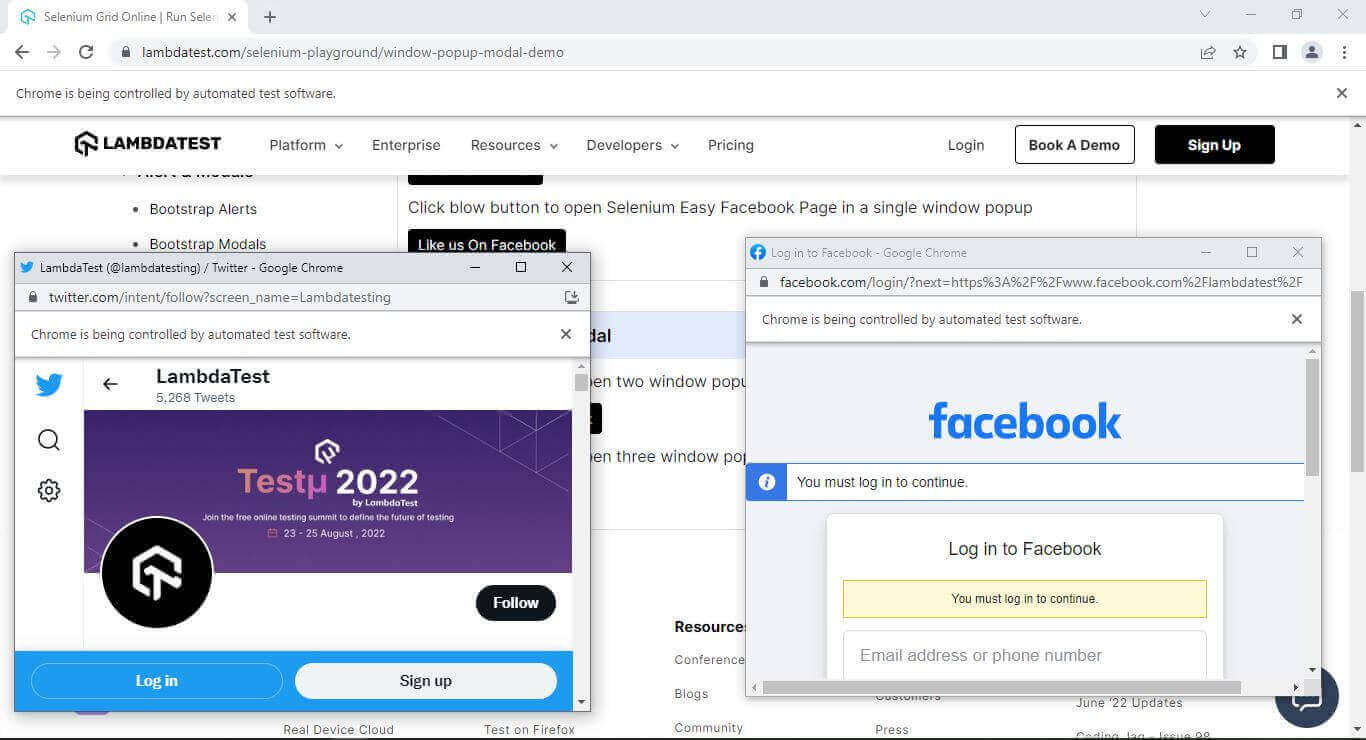
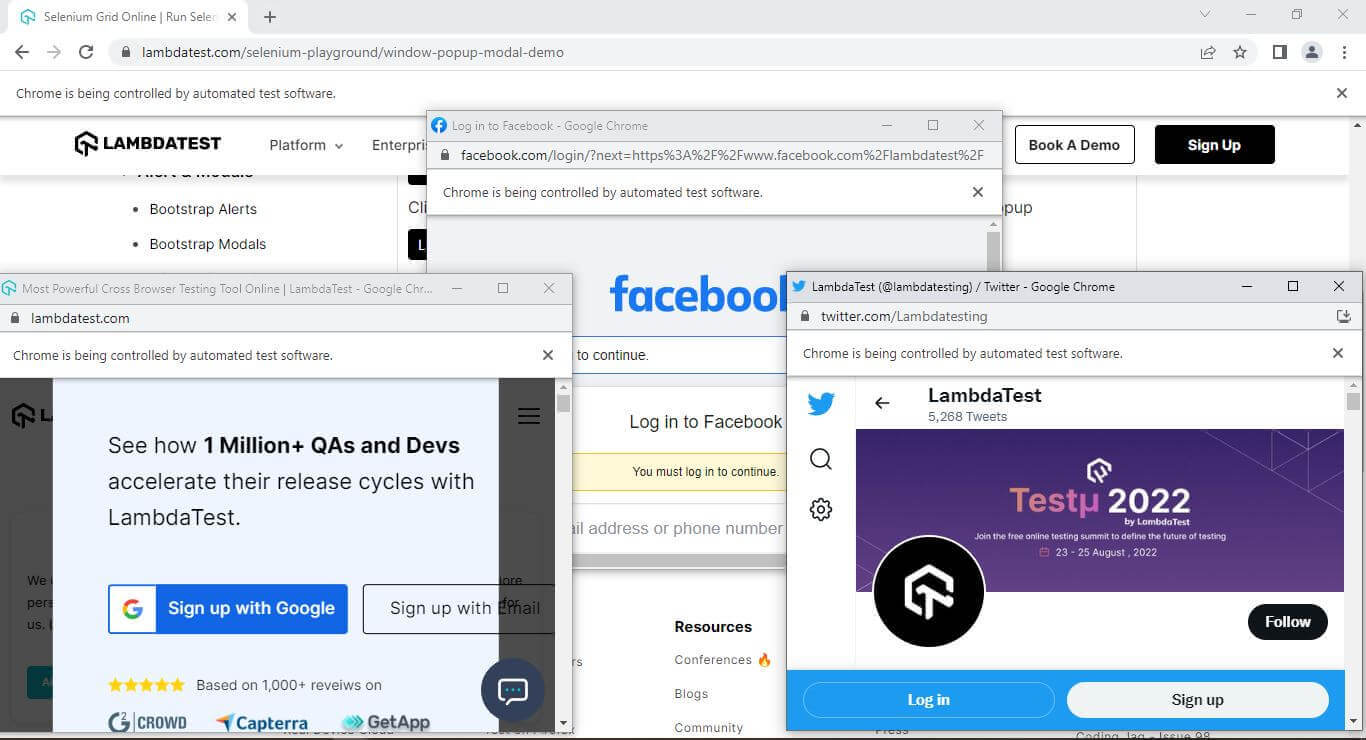
The current page you are on is the main window, while the windows (Facebook, Twitter, and LambdaTest web pages) open by clicking the buttons are the child windows.
It is possible to open a single window or multiple child windows from a single main window. It is also important to note that a child window may or may not contain a URL link.
While conducting a test case on the above scenario manually, it is simple to examine the behavior of the child windows because of their visibility in the context of the parent window. However, this is not the case when using Selenium to automate the test case because we need to change the WebDriver’s context from the parent window to the child window to perform actions on it.
What is a Window Handle in Selenium Python?
Since we have discussed the concept of windows in Selenium in the above section of this blog on how to handle multiple windows in Selenium Python, let us move on to learning how to control multiple windows.
Multiple windows are brought up by scenarios in which a web application navigates to or opens multiple browser windows. Selenium provides the option to handle multiple windows with window handles.
The Selenium WebDriver does not distinguish between windows and tabs. It handles both using window handles. Whenever a window is opened, it contains a distinct ID that returns a string value, making it unique and persisting for the entire session.
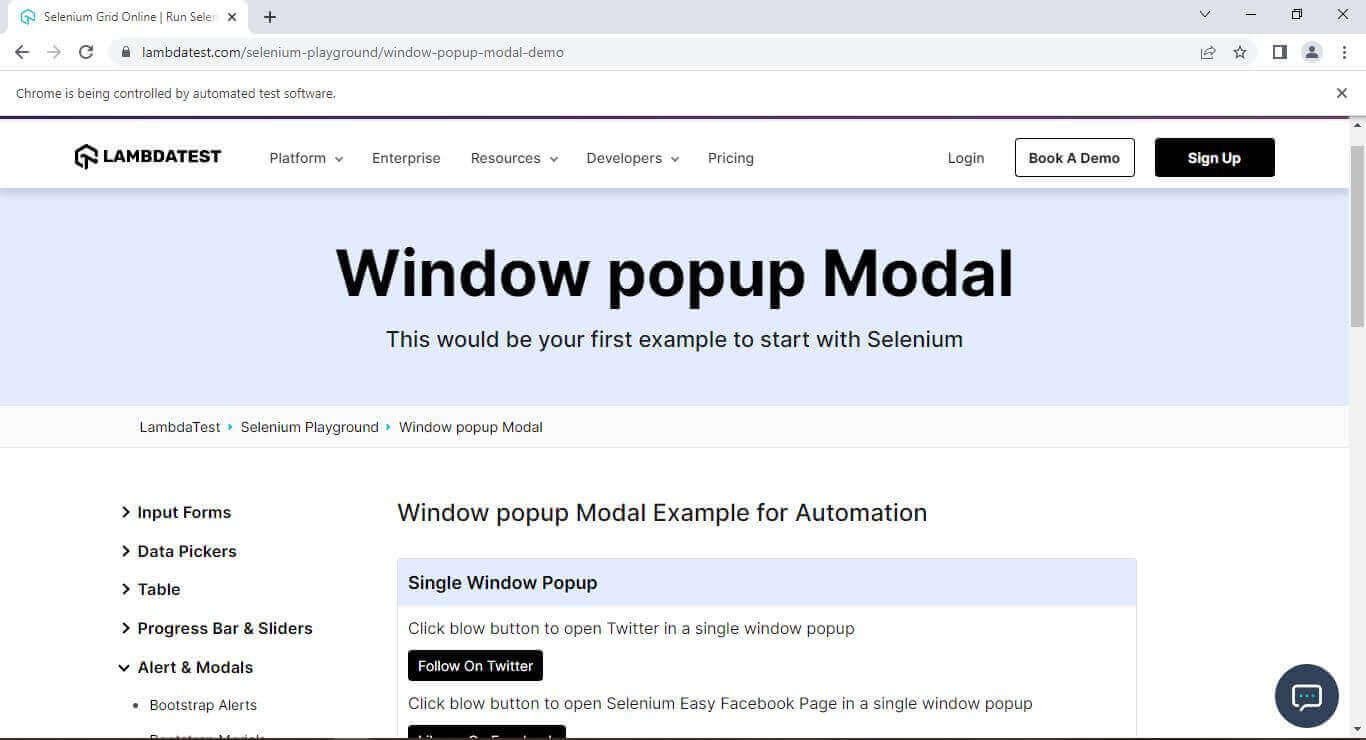
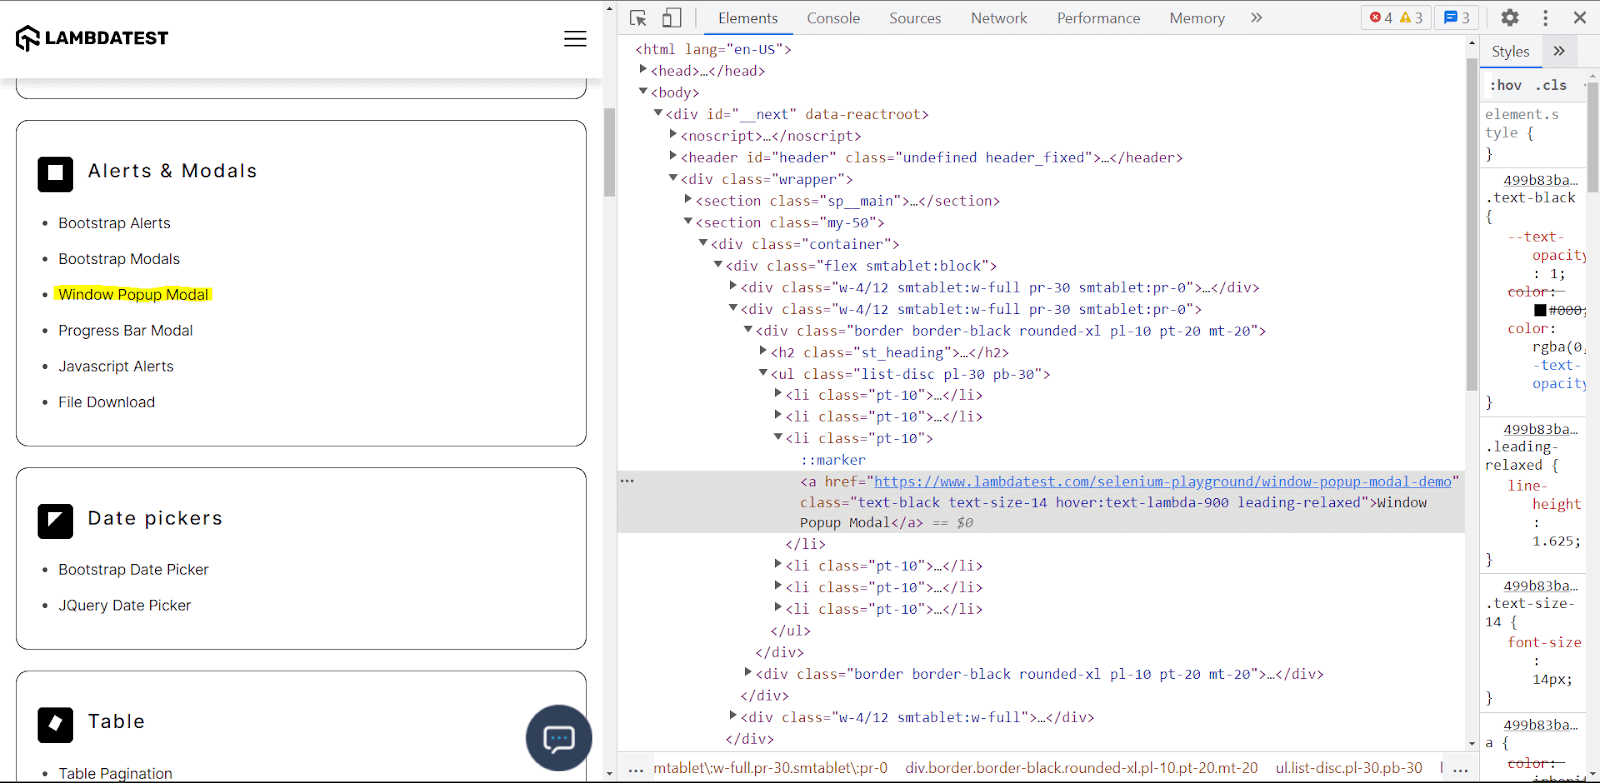
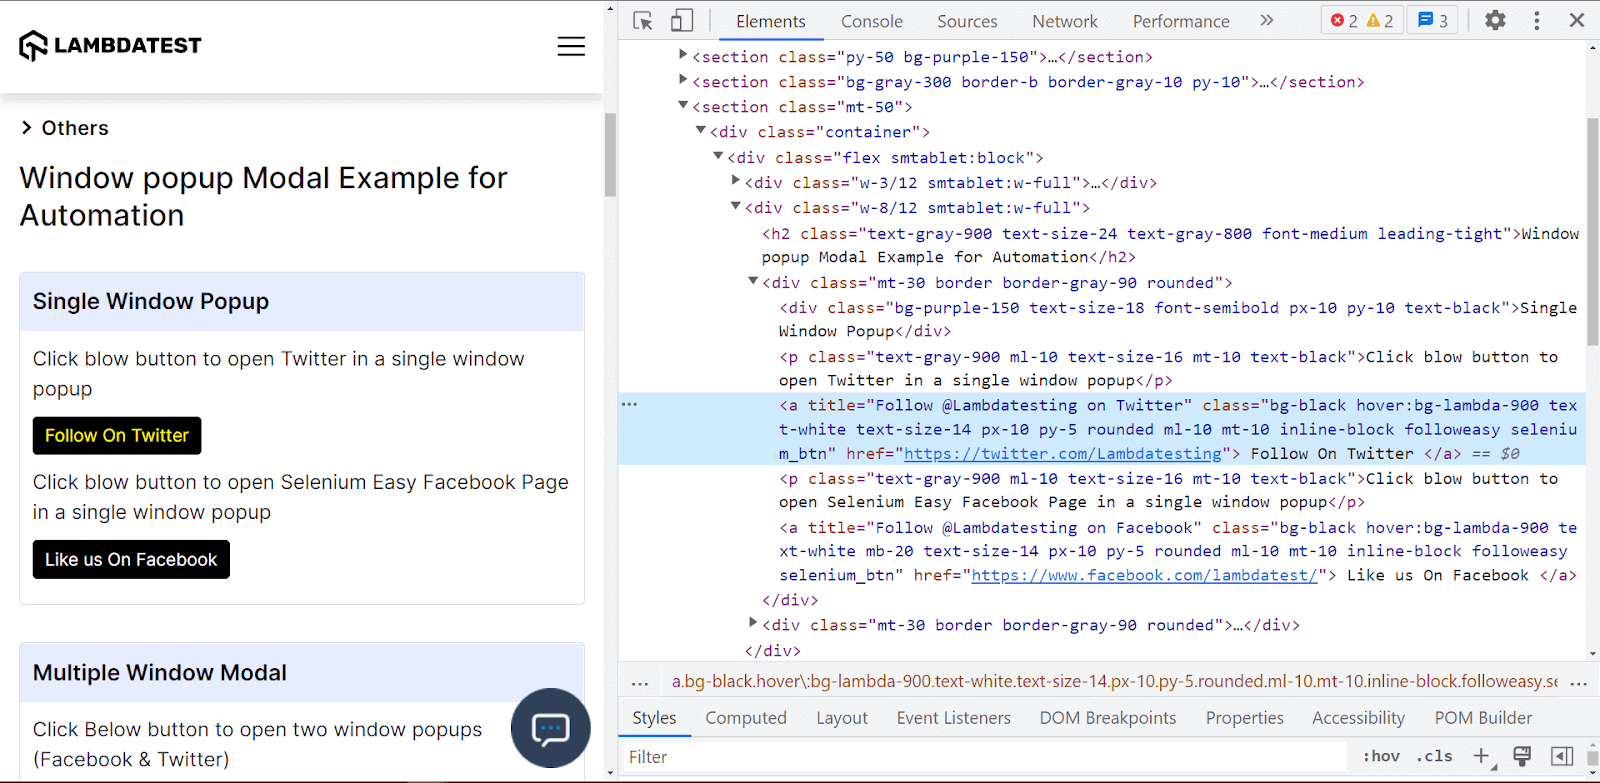
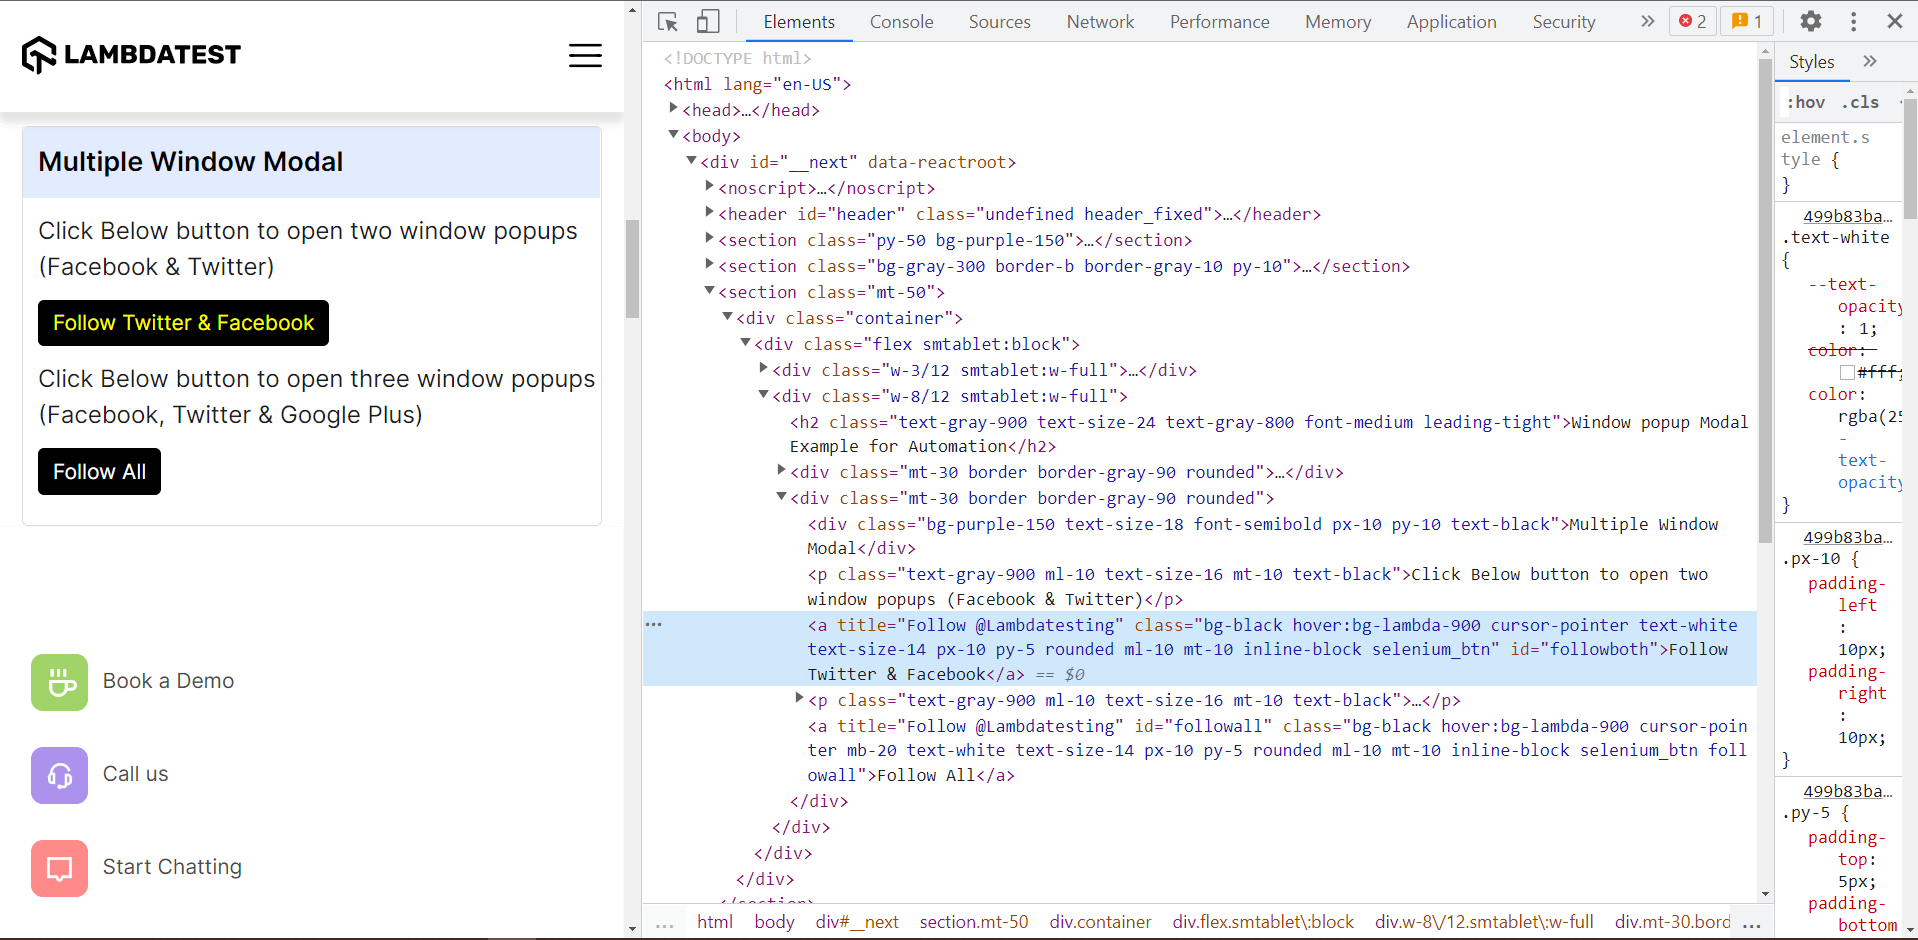
Using the Window Popup Modal Demo page from the LambdaTest Selenium Playground website, we can see the IDs of the main browser window and the child window, as shown below.

How to handle multiple windows in Selenium Python?
We can handle the occurrence of child windows or tabs when running test cases using Selenium Python. When a parent window opens a child window, the WebDriver only controls one window at a time in the running session.
The WebDriver controls the main window, and any actions in a test script will be executed in the currently active window.
The Selenium Python WebDriver provides the following methods to handle multiple windows.
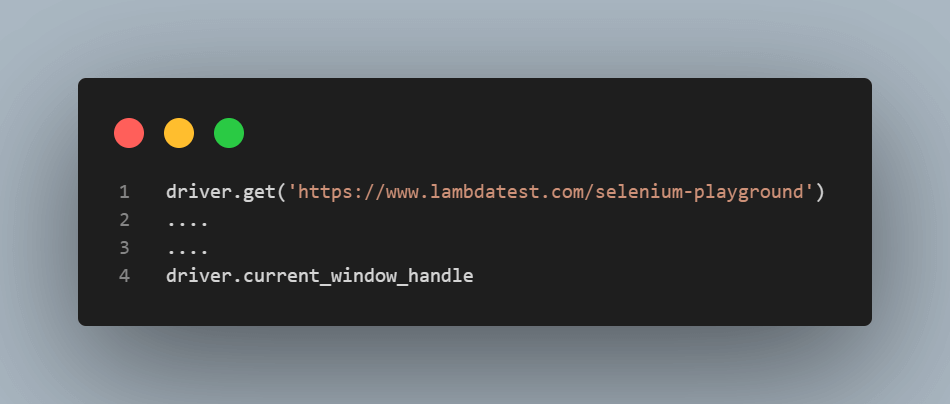
current_window_handle()
This method collects the unique window handle ID of the browser window that is currently active.
Syntax: driver.current_window_handle
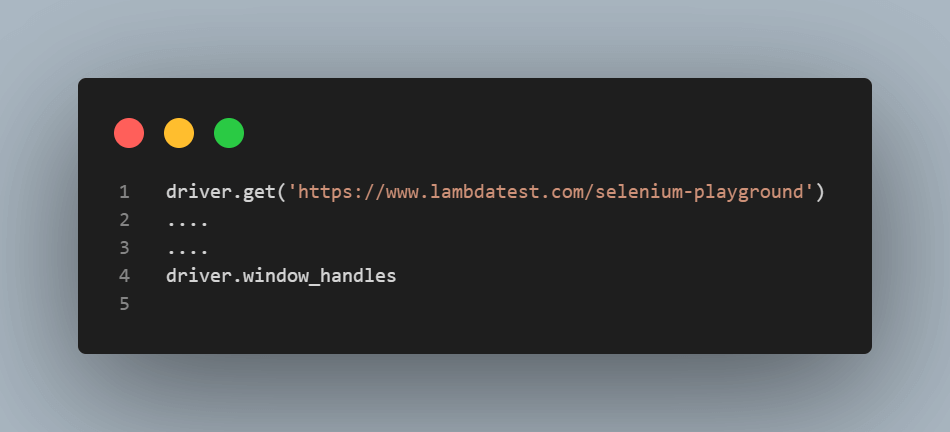
window_handles()
This method returns the IDs of all the windows that have been opened by the WebDriver in the current session. It stores the window IDs to be used for switching windows.
Syntax: driver.window_handles
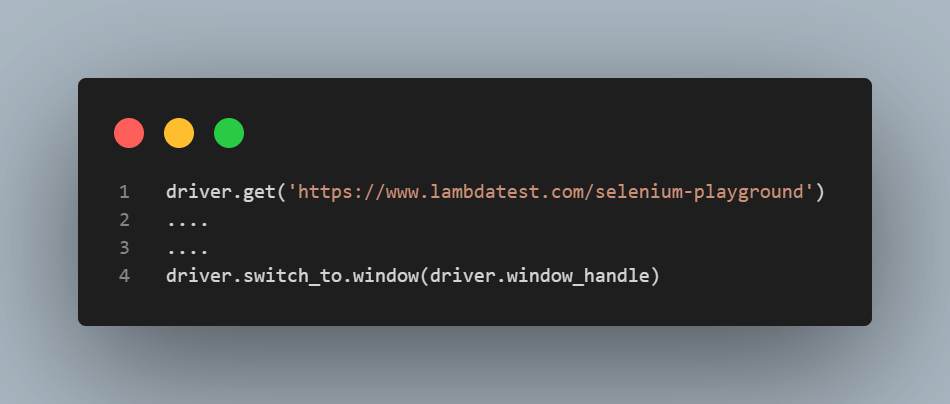
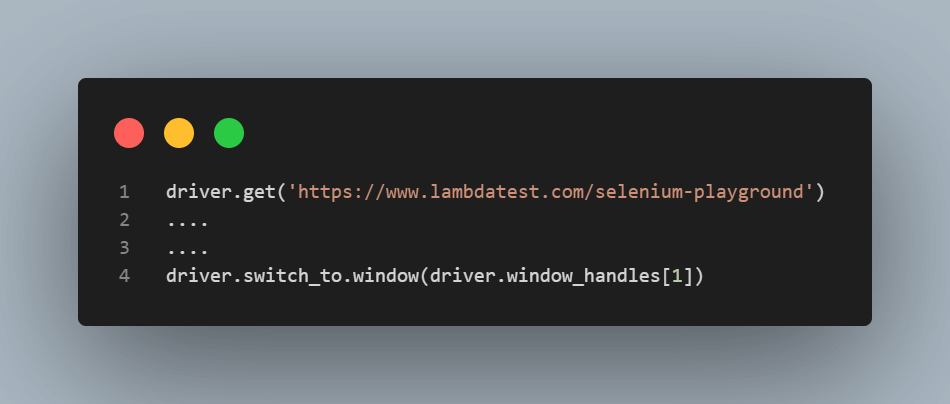
switch_to.window()
This method switches the WebDriver’s focus from the currently open browser window to the intended browser window. The targeted window’s id is passed as the argument to shift the WebDriver’s control to the new window.
Syntax:
Option 1: driver.switch_to.window(
Option 2: driver.switch_to.window(
Automate your Python tests in seconds. Try LambdaTest Now!
Now, let’s deep dive into it with a practical demonstration on how to handle multiple windows in Selenium Python.
Demonstration: How to handle multiple windows in Selenium Python?
Now that we have looked at the different methods available in Selenium Python to handle multiple windows, this section on how to handle multiple windows in Selenium Python looks at how to execute these Selenium tests on a cloud Selenium Grid.
The best approach to fully utilizing Python automation testing and achieving the intended results quickly is to use a cloud-based Selenium Grid. We can automate multiple window handling in Selenium Python using a cloud-based Selenium Grid platform like LambdaTest.
LambdaTest enables you to perform automated cross browser testing at scale using a Selenium IDE cloud. The platform offers an online browser farm of 3000+ real web browsers running on various operating systems to ensure that enterprises develop more high-quality software applications faster.
You can also Subscribe to the LambdaTest YouTube Channel and stay updated with the latest tutorials around automated browser testing, Selenium testing, Cypress E2E testing, CI/CD, and more.
Project Setup
To get started writing tests for Python web automation, we need to have Python and Selenium installed on the client machine. If you are unfamiliar with Selenium using Python, you can check out this detailed blog on getting started with Selenium Python.
There are many different Python testing frameworks available for Selenium testing, including PyUnit (unittest), pytest, Behave, Robot, Lettuce, Nose2, and Testify. You can learn more about these Selenium Python testing frameworks in detail in this blog post on the best Python testing frameworks.
In this blog on how to handle multiple windows in Selenium Python, however, we will use the pytest testing framework. Pytest is an open-source Python web automation framework mainly used for unit testing and is scalable by supporting automation tests for functions, APIs, and unit tests.
This detailed Selenium pytest tutorial can teach you more about how to configure and begin using the pytest Framework to perform automated tests in Selenium Python.
We use VS Code(Visual Studio ) IDE to write and run the Selenium Python automation scripts for our test case project. Apart from VS Code, there are other IDEs available such as Atom, PyCharm, and Sublime Text that can be used to write the test scripts as well.
The package manager we use is PIP, the default package manager for Python. It comes preinstalled when you install Python (version 3.4 and above). Pip allows you to install and manage additional packages that aren’t included in the Python standard library. These packages are built specially to be used for different development frameworks, utilities, and modules.
The test case project’s demonstration will be run on a Windows operating system. In addition, steps on how to set up the project on a macOS have also been included.
- To use Pip to manage our project’s dependencies, let us first look at the version currently available in the command-line terminals
- Create a directory that will hold the test project.
- Move into the project folder you have just created.
- Create a virtual environment (venv) that will hold the specific dependencies used by the test project. The creation of a venv is crucial because we do not want to combine the global dependencies provided by Python with the particular libraries we need to run the project’s test cases. We install the virtual environment library on Windows to help create the venv using the following command.
- Run the below-mentioned command on the terminal to activate the virtual environment.
- Activate the virtual environment so we can install the required libraries to run our test project.
- We install the following library dependencies in our test project’s venv to run the Selenium Python tests:
Windows: pip –version

macOS: pip –version
![]()
![]()
Windows:
![]()
macOS: sudo pip install virtualenv
Windows:
![]()
macOS: virtualenv multiplewindowstest
![]()
macOS: source multiplewindowstest/bin/activate
- selenium (v 4.1.2)
- flake8 (v 4.0.1)
- pytest (v 7.1.2)
- pytest-xdist (v 2.5.0)
- autopep8 (v 1.6.0)
The autopep8 library enforces the PEP 8 style manual on the Python code to ensure it is in the correct format, while flake8 is a library that tests the Python code for errors that are against the PEP 8 style guide.
The pytest-xdist plugin is an extension of pytest that introduces a new test execution mode that enables us to perform parallel Selenium Python tests.
- To install the dependencies described above, write the command below in the terminal as follows.
- Create a “requirements.txt” file that contains all the installed project dependencies in the root folder.
Syntax – pip install [library name]
pip freeze > requirements.txt
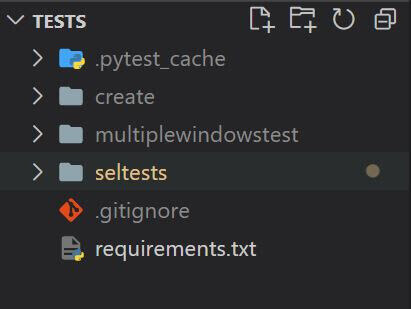
Let’s create a folder called “seltests” in the project’s root directory to house the test scripts.
Before running the tests, please set the environment variables LT_USERNAME & LT_ACCESS_KEY from the terminal. The account details are available on the LambdaTest Profile page.
For macOS:
- export LT_USERNAME=LT_USERNAME
- export LT_ACCESS_KEY=LT_ACCESS_KEY
For Linux:
- export LT_USERNAME=LT_USERNAME
- export LT_ACCESS_KEY=LT_ACCESS_KEY
For Windows:
- set LT_USERNAME=LT_USERNAME
- set LT_ACCESS_KEY=LT_ACCESS_KEY
Run Python test scripts across 3000+ devices & browsers. Try LambdaTest Now!
In the next sections of this blog on how to handle multiple windows in Selenium Python, we will look into the following use cases while handling windows in Selenium Python:
- Handling a single child window in Selenium Python
- Handling multiple child windows in Selenium Python
- Switching back to a parent window from a child window in Selenium Python
Handling a single child window in Selenium Python
Let us look at how to implement window handling on a single child window in the following test case scenario.
Test Case:
- Navigate to the URL link https://www.lambdatest.com/selenium-playground/.
- Click on the “Window Popup Modal” link.
- In the new webpage, click on the “Follow on Twitter” button to open a child window.
- Switch to the child window opened.
- Print the window handle id of the child window.
Implementation (Test Case on the Chrome Browser):

Code Execution:
To run the test scripts, type the following command in the terminal.
|
1 |
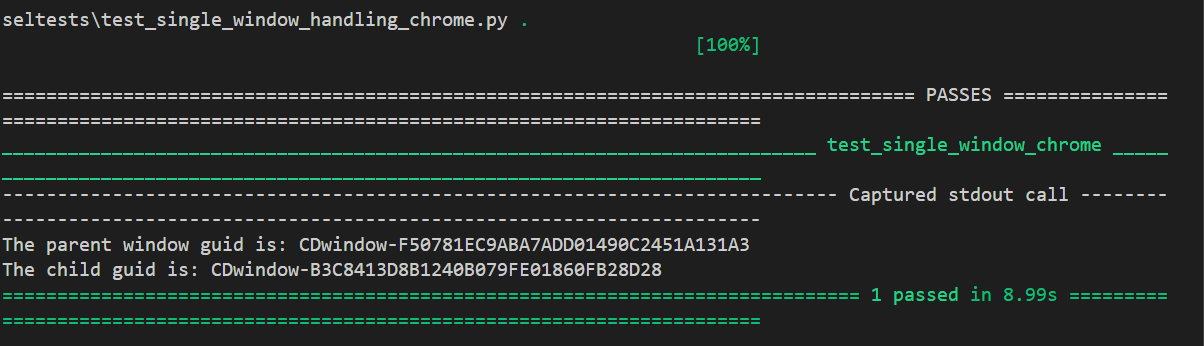
python -m pytest seltests/test_single_window_handling_chrome.py |
Once the test is executed, the output in the terminal will display the GUIDS of the parent and child windows, as shown below.
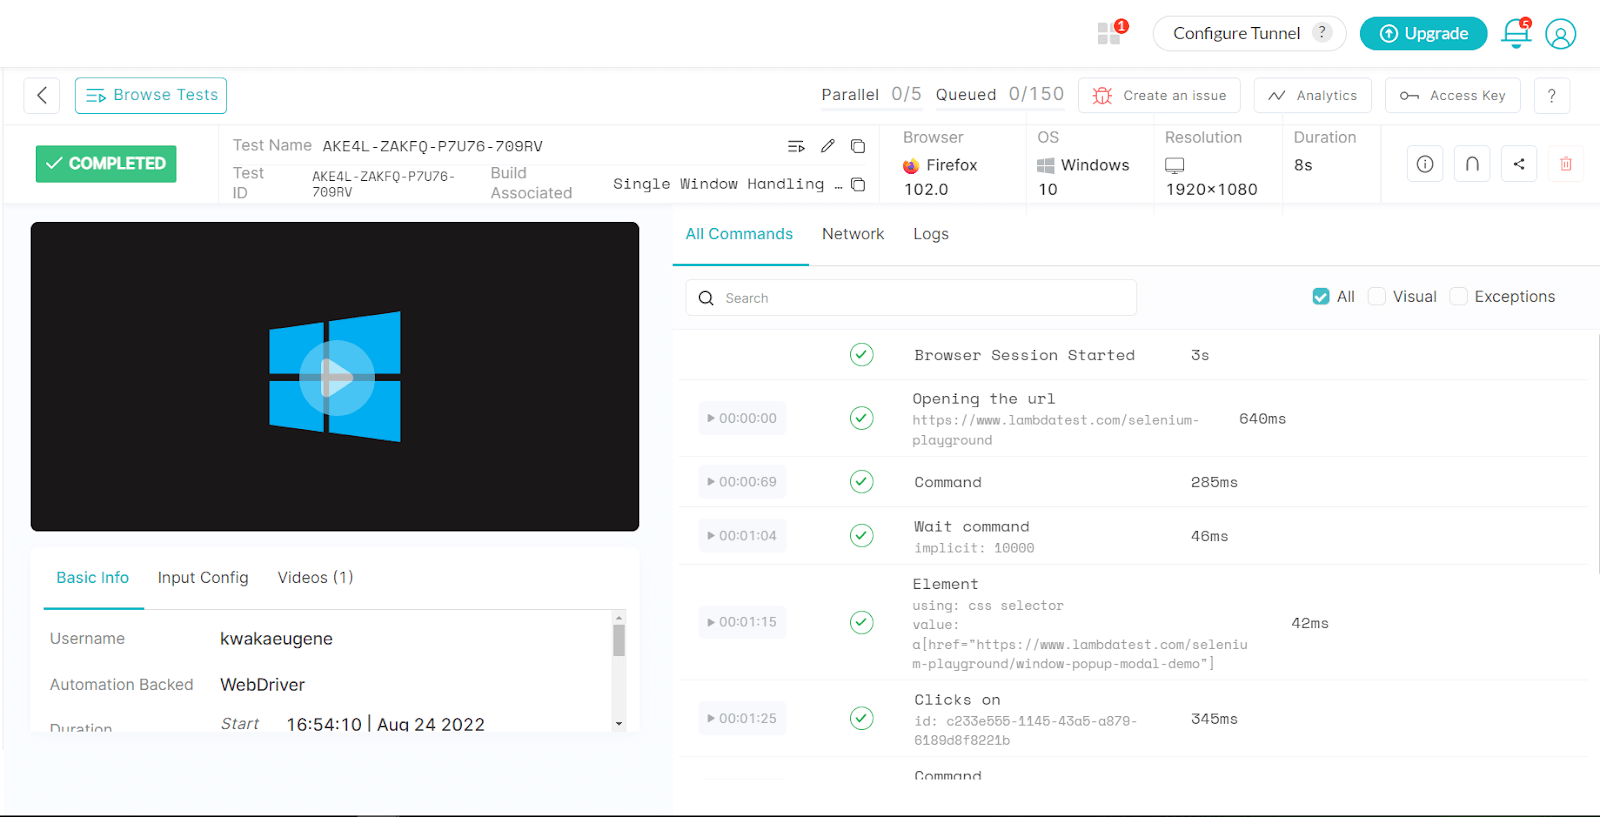
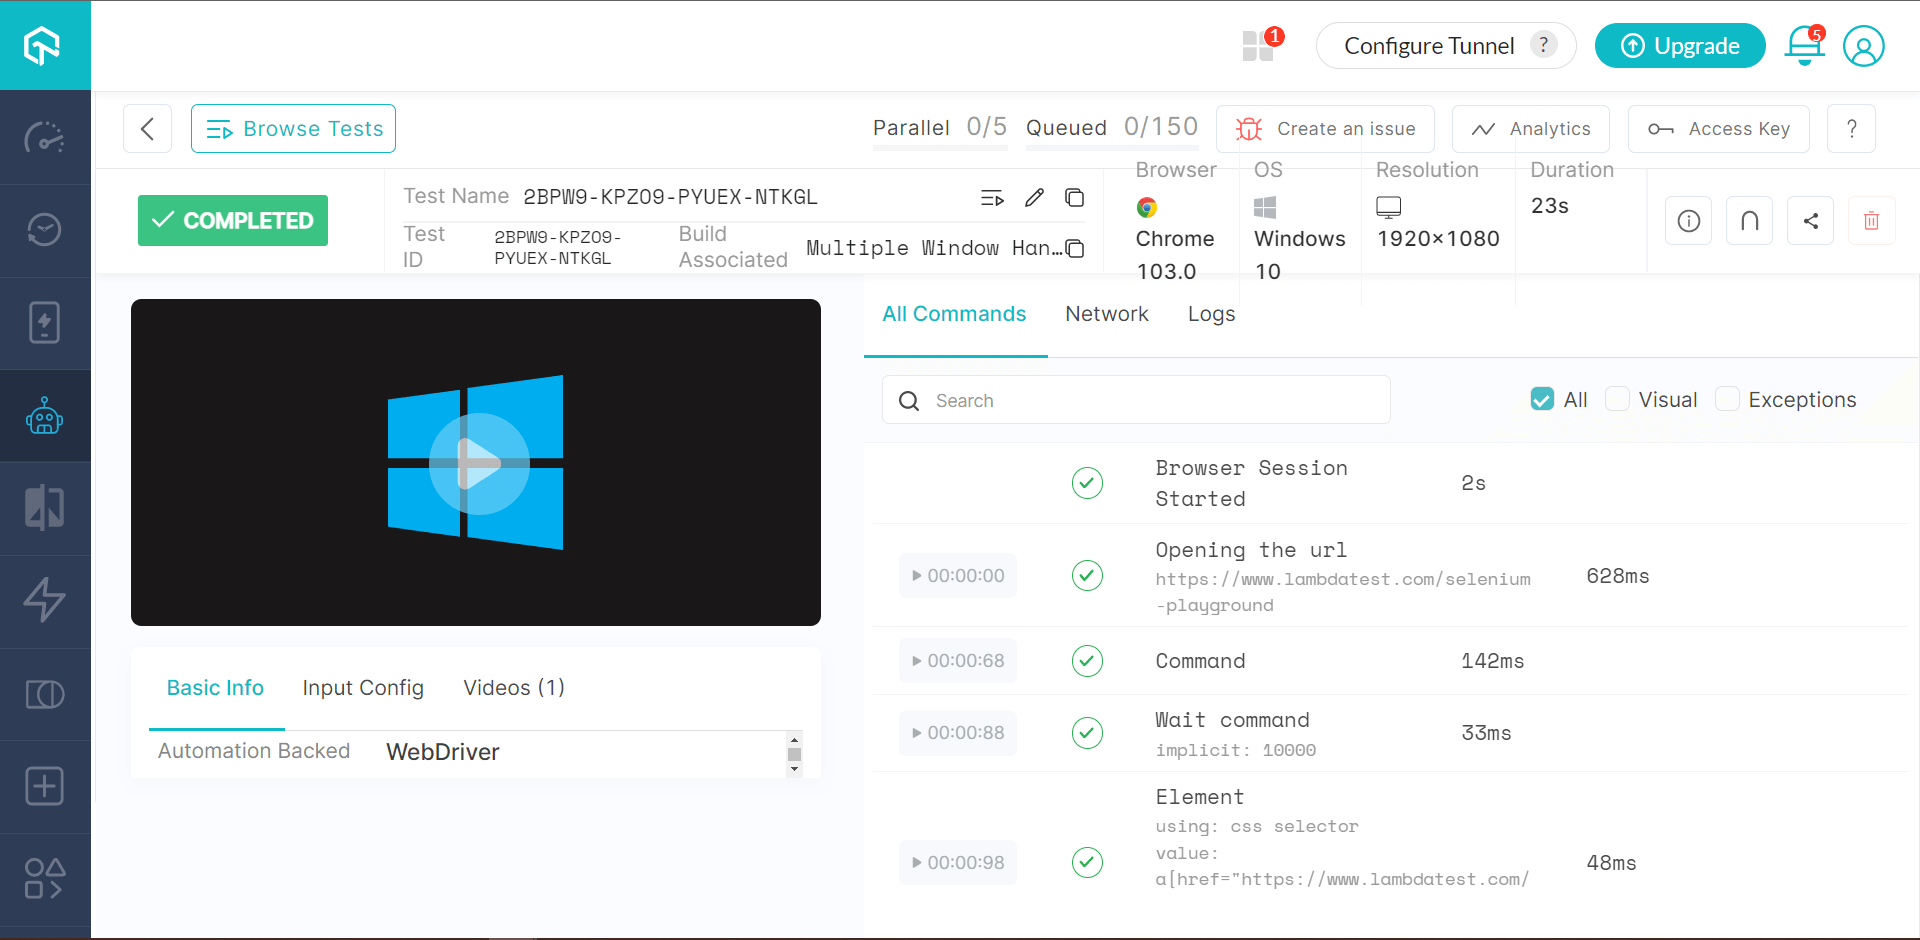
After the test execution is completed, you can view the results and logs in the Build section of the LambdaTest Automation Dashboard.
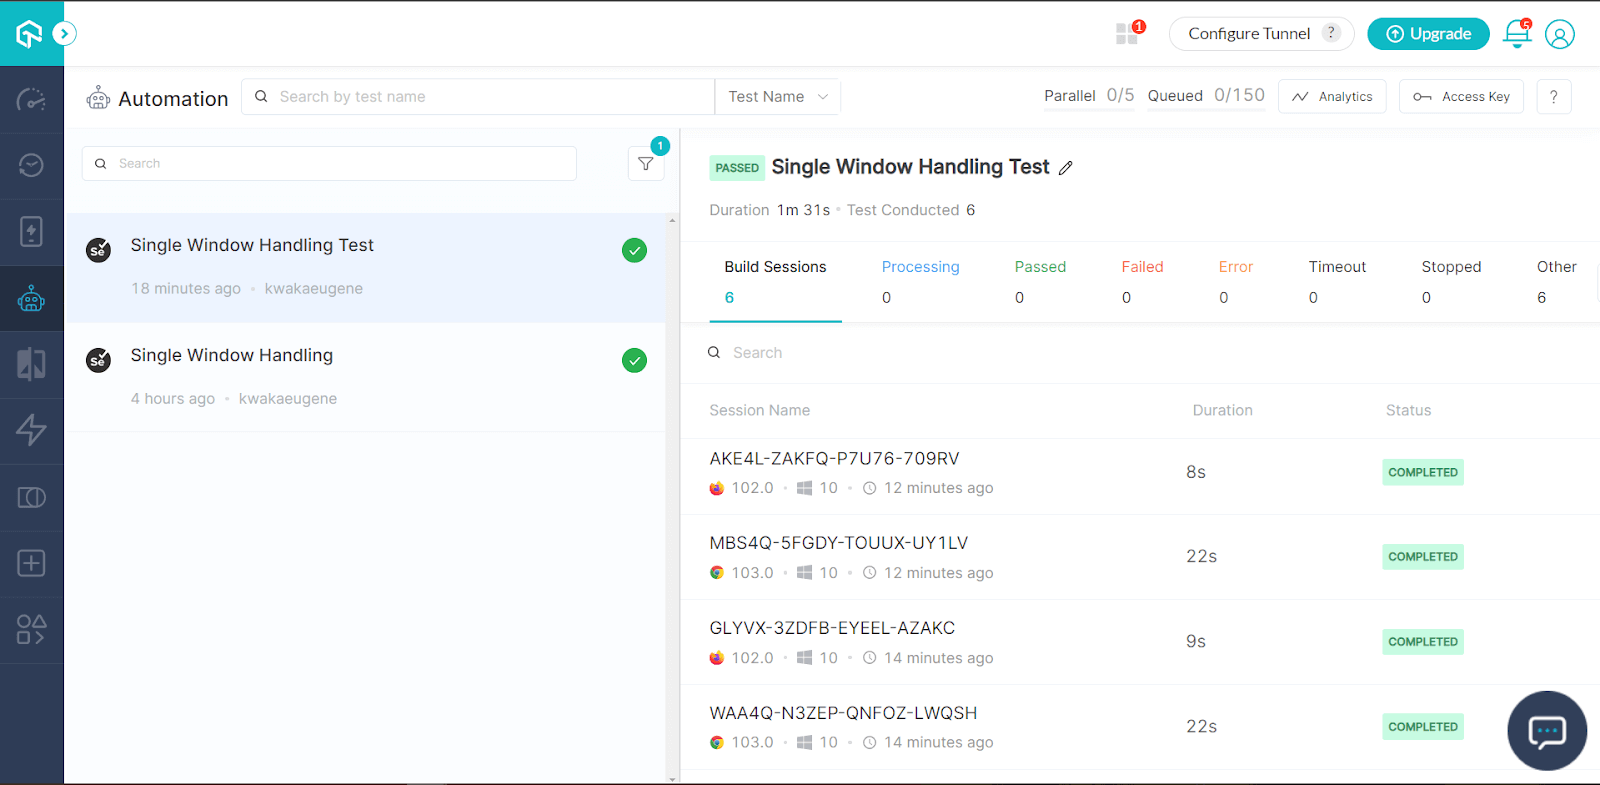
You can view a test recording and logs of the tests executed.
Code Walkthrough:
Now, let us go through the code we have written in detail.
Step 1: Here, we import the important Selenium Python libraries that will enable us to perform our test. These include pytest, WebDriver, By, BrowserOptions, WebDriverWait, and expected_conditions.
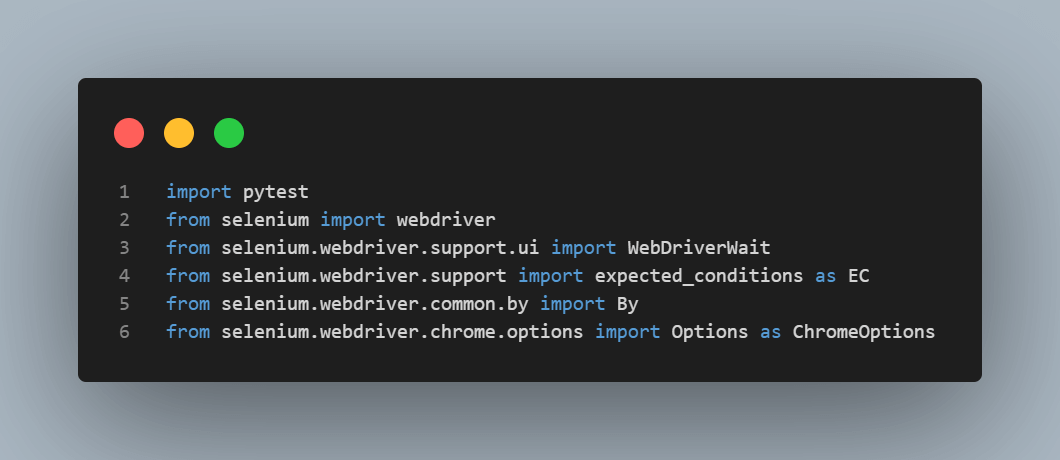
We import pytest, as it is Selenium Python’s primary unit testing tool. The imported Selenium WebDriver is a web framework that automates cross browser tests.
The By query is used to locate specific web elements using the find_element() method. The explicit wait time implements the WebDriverWait class combined with the expected_conditions class to define the wait for a certain condition to be executed before proceeding to the next part of the code.
Lastly, the Options class customizes the specified browser driver sessions. For this instance, we are using the ChromeOptions classes.
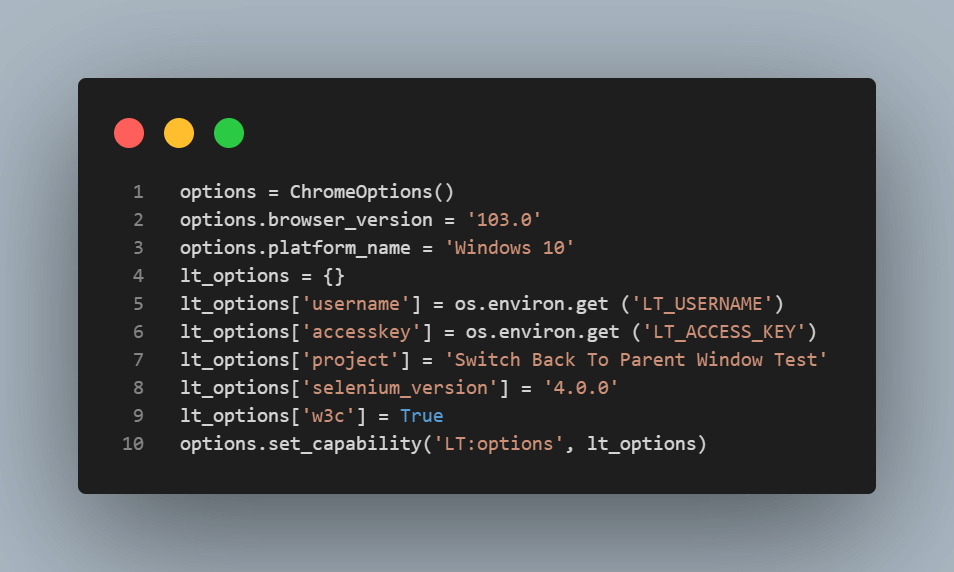
Step 2: We generate options using the LambdaTest Automation Capabilities Generator according to the browser we use to run the automated tests. We create an instance of the Options class, set the conditions, and pass it to the driver constructor.
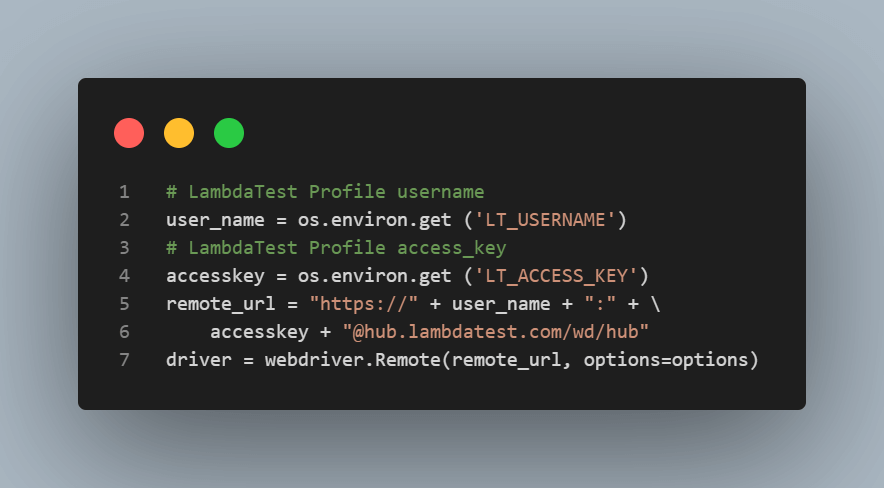
Step 3: We set the username and accesskey provided in the LambdaTest Profile page to a remote_url variable that connects us to the Remote Selenium Grid (@hub.lambdatest.com/wd/hub). We then use the remote_url and options to instantiate the corresponding web browser (Chrome).
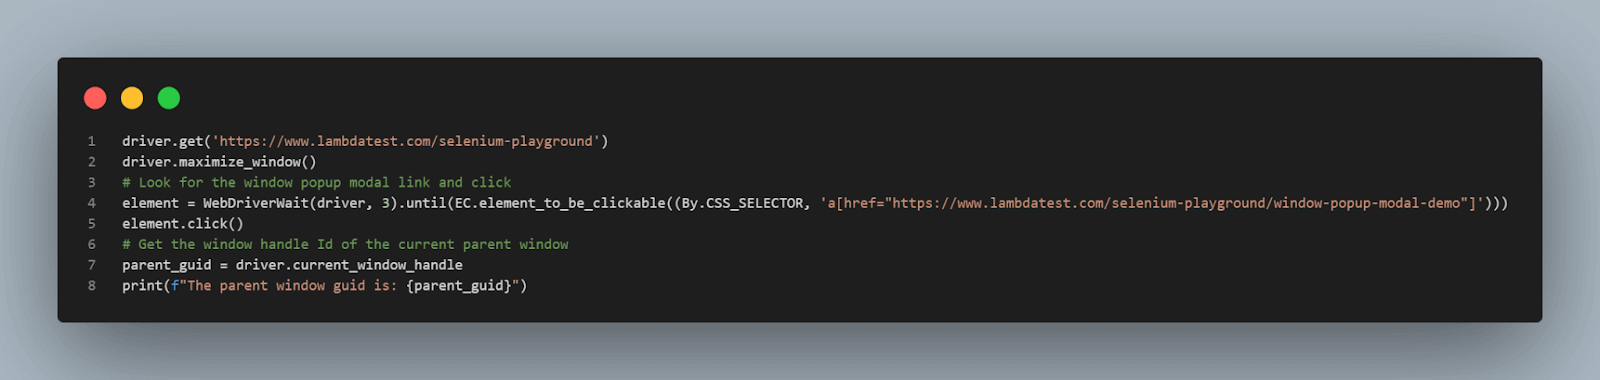
Step 4: We open the LambdaTest Playground website, then maximize the browser window to locate the web element with the link to the Window Popup Demo Page.
Right-click the “Windows Popup Modal” link and click inspect to open the browser inspect tool. The web element is located using its href tag.
We use the driver. current_window_handle method to obtain the parent window’s unique id and store it as a string.
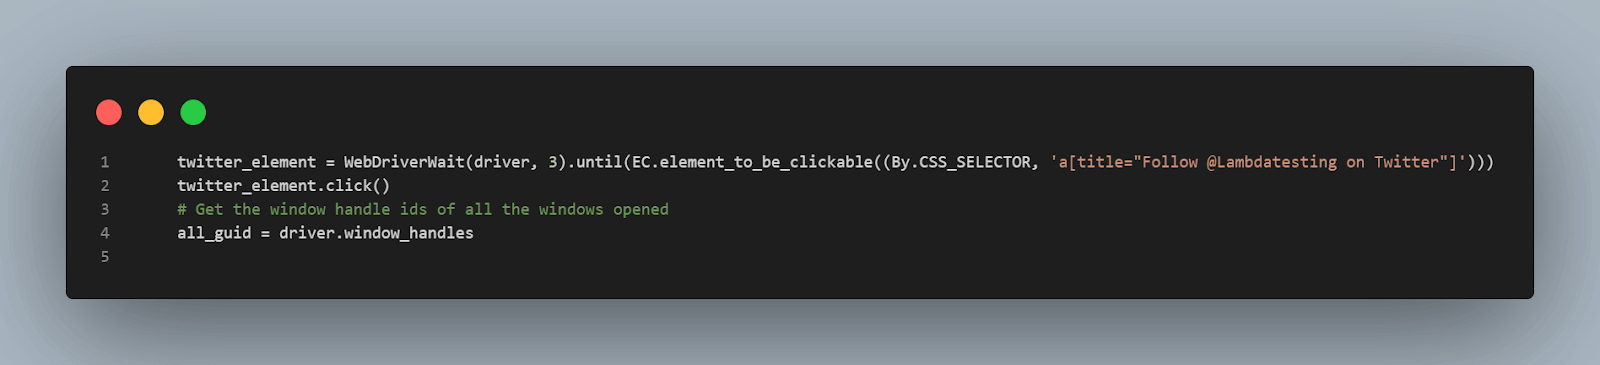
Step 5: We then locate the web element with the button “Follow on Twitter” using its title and click on it to open a child window.
We store the window handles of the opened windows in a variable called all_guid.
Step 6: We then switch to the child window using the driver.switch_to.window(guid) method. The code iterates through the stored window handles, and if it comes across the parent window handle, it skips over it and switches to the child window. Then the child window’s ID is printed.
The driver.close() method closes the currently active child window and will quit the driver session if the child window is the only active window.
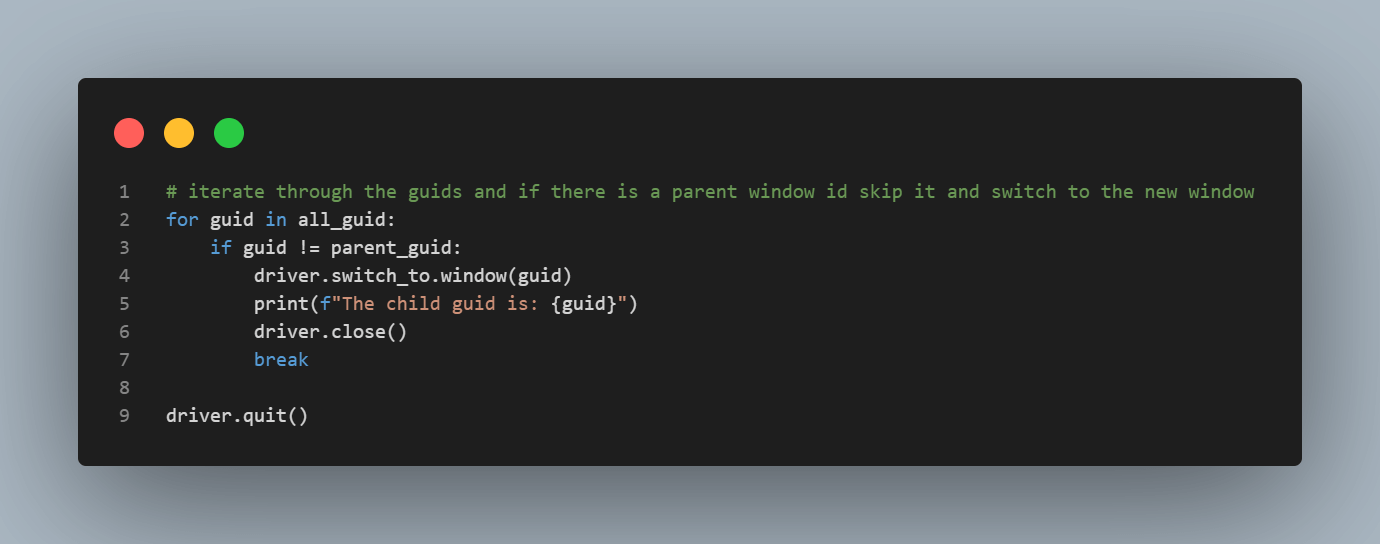
We then close the browser session using the driverquit() method in Selenium.
Handling multiple child windows in Selenium Python
In the above section of this blog on how to handle multiple windows in Selenium Python, we have looked at how to handle a single child window in Selenium using Python. Let us go through how to implement window handling of multiple child windows in the scenarios below.
Test Case (Switch Window by Page Title)
- Navigate to the URL https://www.lambdatest.com/selenium-playground/.
- Click on the “Window Popup Modal’ link.
- In the new webpage, click on the “Follow Twitter & Facebook” button to open the child windows.
- Switch to each open child window using the page titles.
- Print the page title of each of the child windows.
- Close the browser session.
Code Execution:
We execute the test scripts in the terminal using the following command.
|
1 |
python -m pytest seltests/test_multiple_windows_handling_chrome.py |
The test runs successfully in the terminal and displays the following output, as shown below.

We can view the test script’s results in the LambdaTest Builds section.
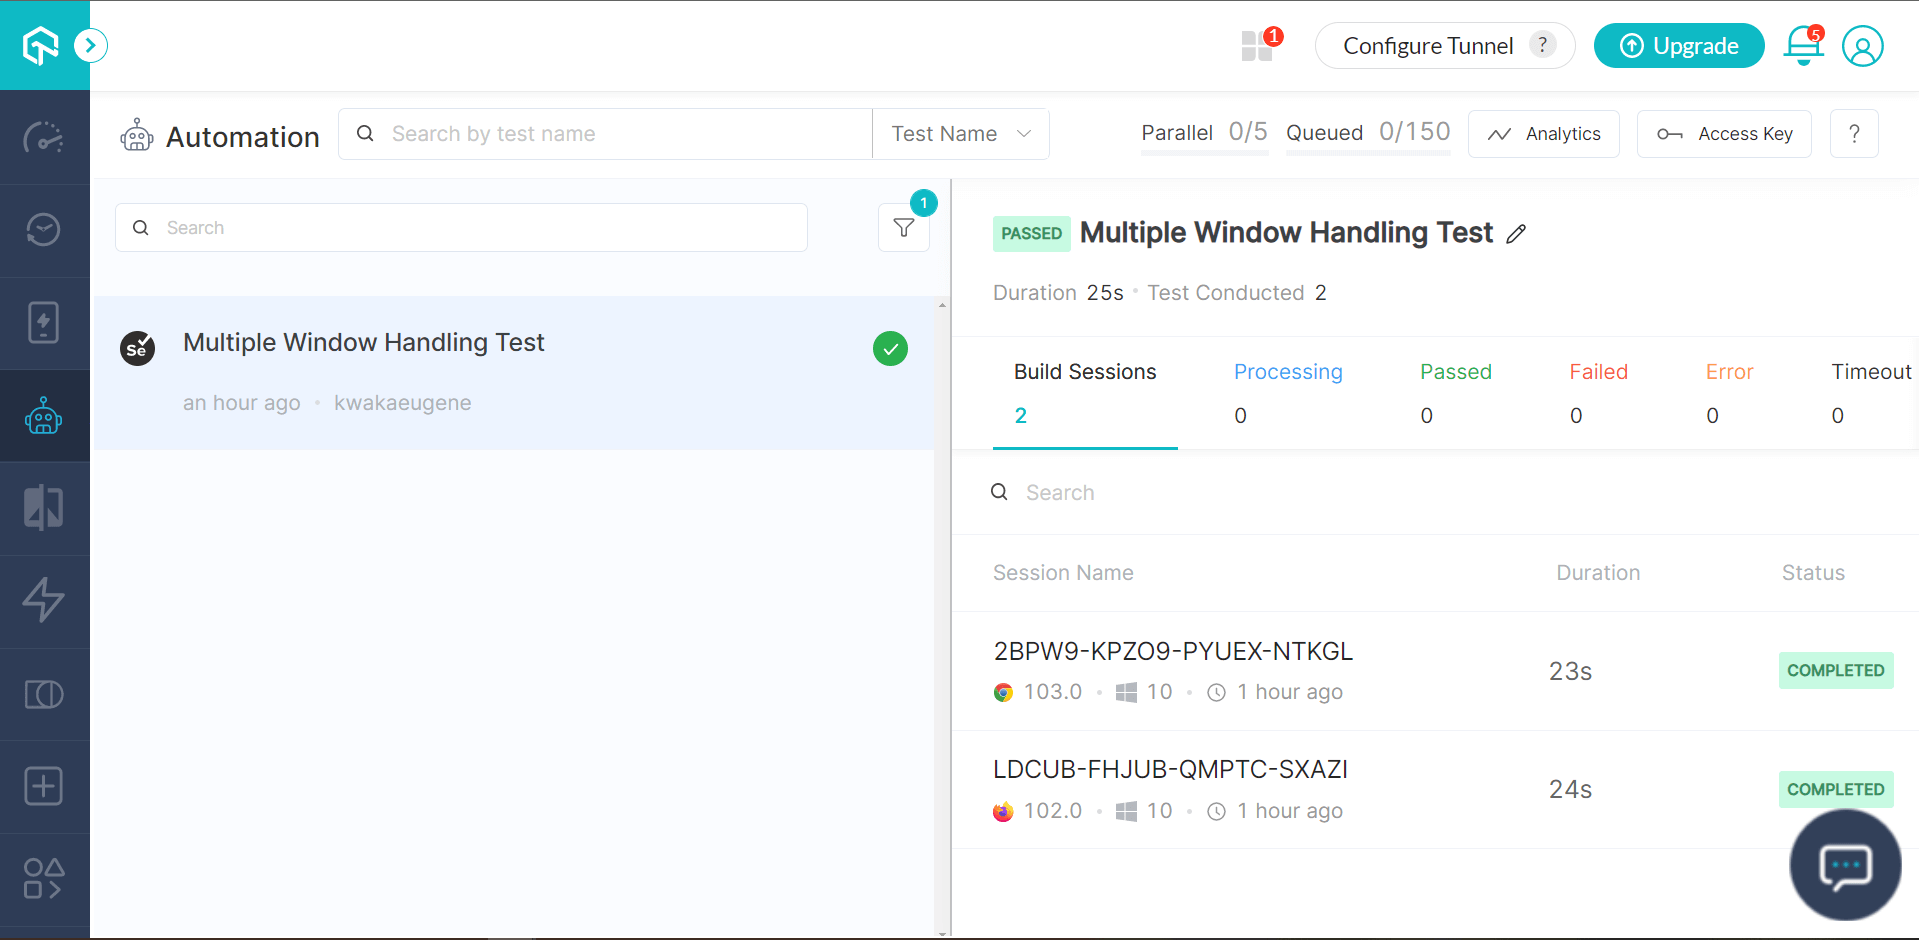
The test’s logs and recordings are also displayed.
Code Walkthrough:
The code written for implementing multiple child window handling in Selenium using Python is similar to that written for handling a single child window. Nonetheless, the difference comes when iterating through the window handles, as we show the distinction between the child windows based on their respective page titles.
In the “Window Popup Modal” page, we locate the “Follow Twitter & Facebook” button using its ID in the inspect tool. We click the button, which will then open up two child windows.
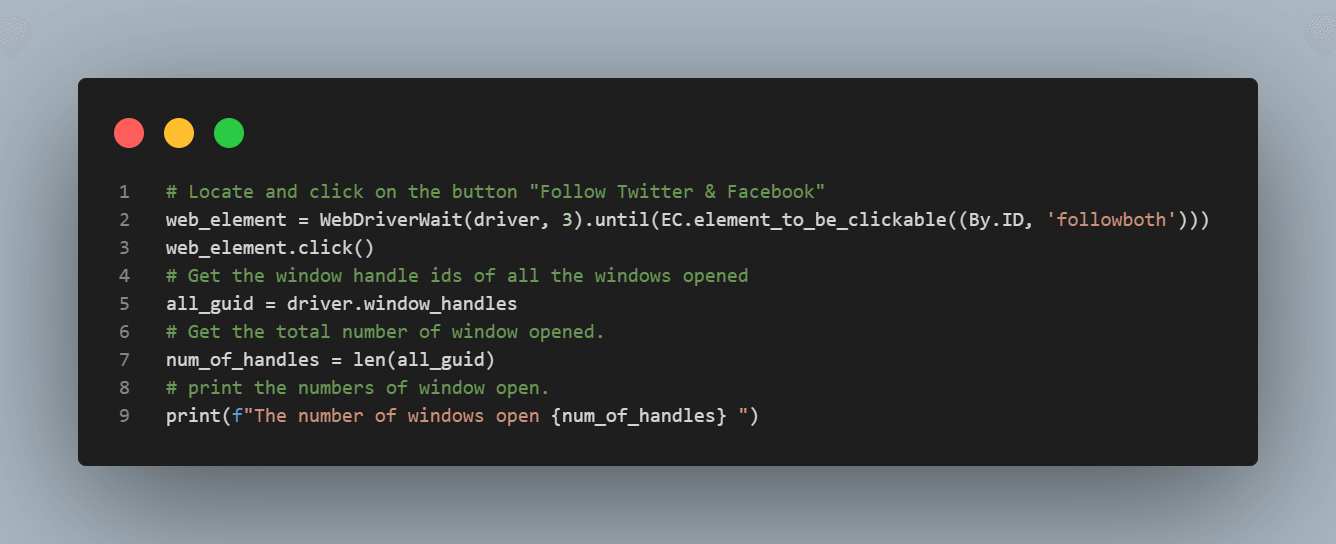
The window handles of the currently open windows are stored in a variable called all_guid, and the total number of open windows is captured in the variable num_of_handles.
The code iterates through all the window handles stored, identifies the child window handles, and switches to the child windows. The code checks the page title of the child window and prints it. The child windows are then closed using the driver.close() method.
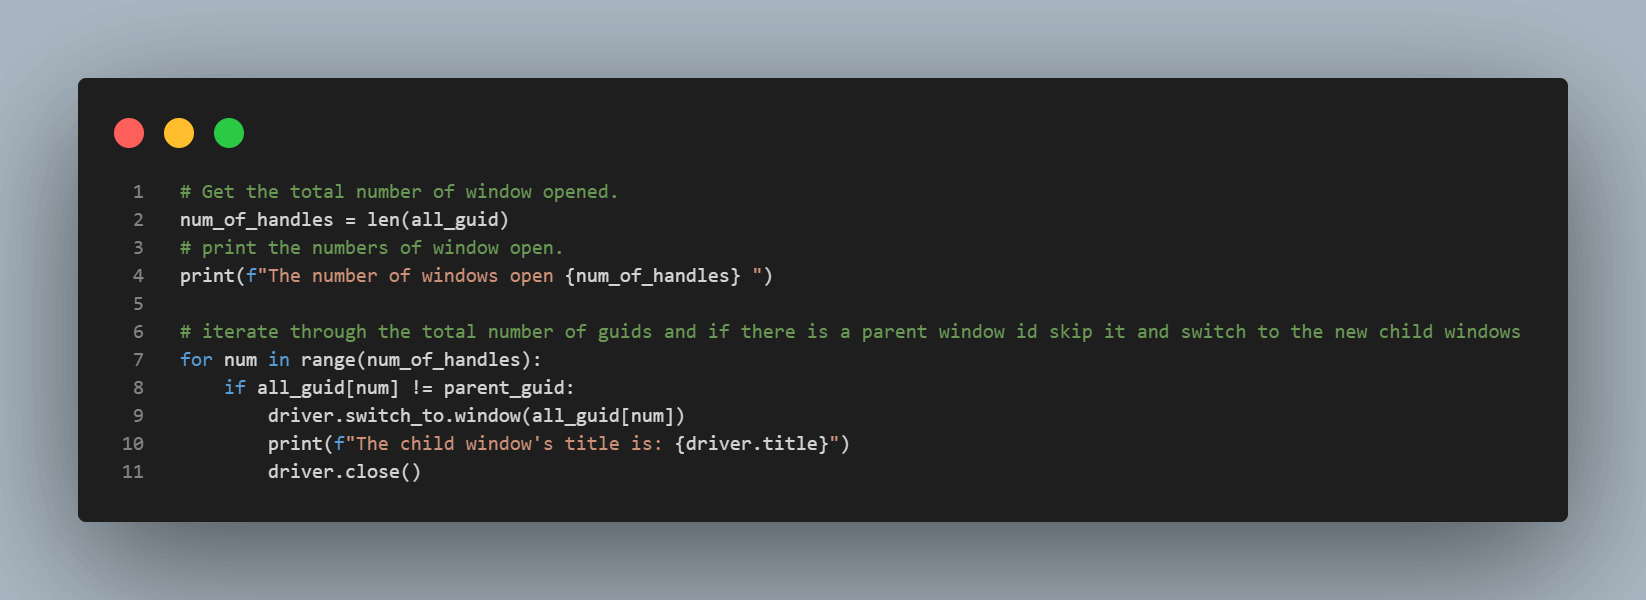
The driver session is then finally closed using the quit() method.
Switching back to a parent window from a child window in Selenium Python
Let us look at a scenario where we want to switch back to the parent window from the child window after we have completed some operations. This means we must change the WebDriver’s control to the main window.
We will implement the scenario discussed in the above section of this blog on how to handle multiple windows in Selenium Python to demonstrate switching back to the parent window.
Code Execution:
We run the test script in the terminal using the following command.
|
1 |
python -m pytest seltests/test_switch_to_parent_window_chrome.py |
The test script will execute successfully in the terminal and display the following output.

We can view the test results in the LambdaTest Builds dashboard.
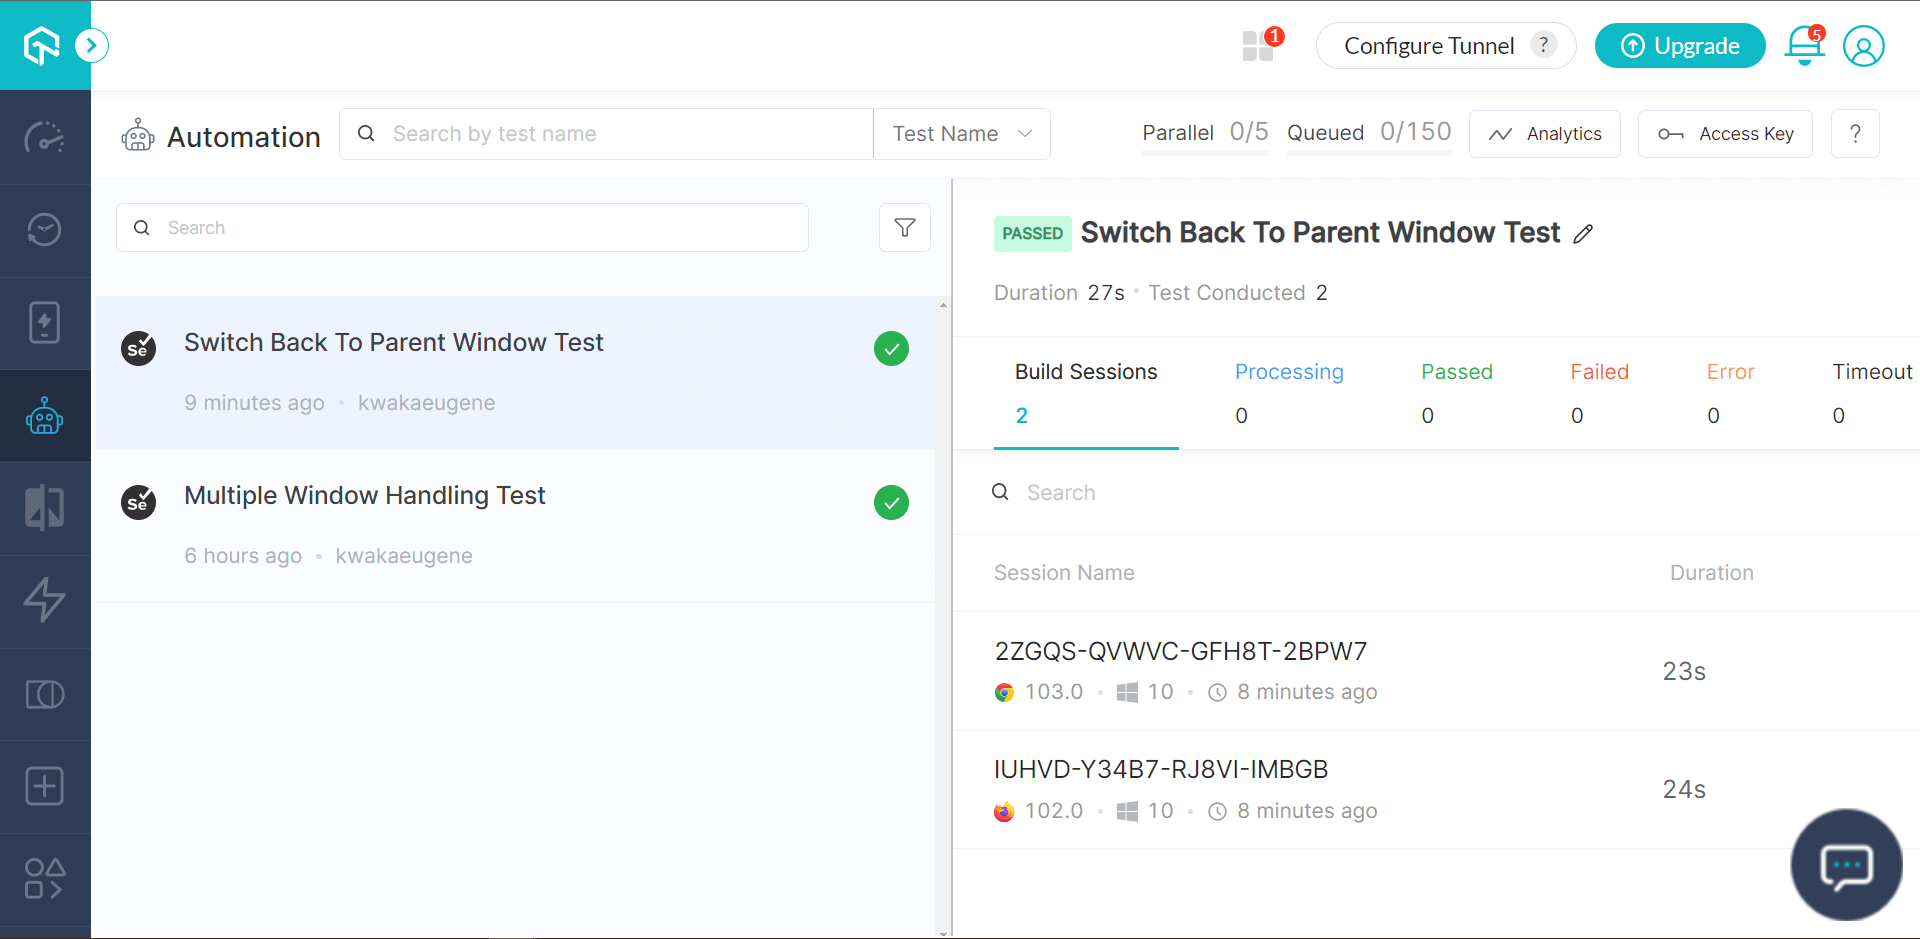
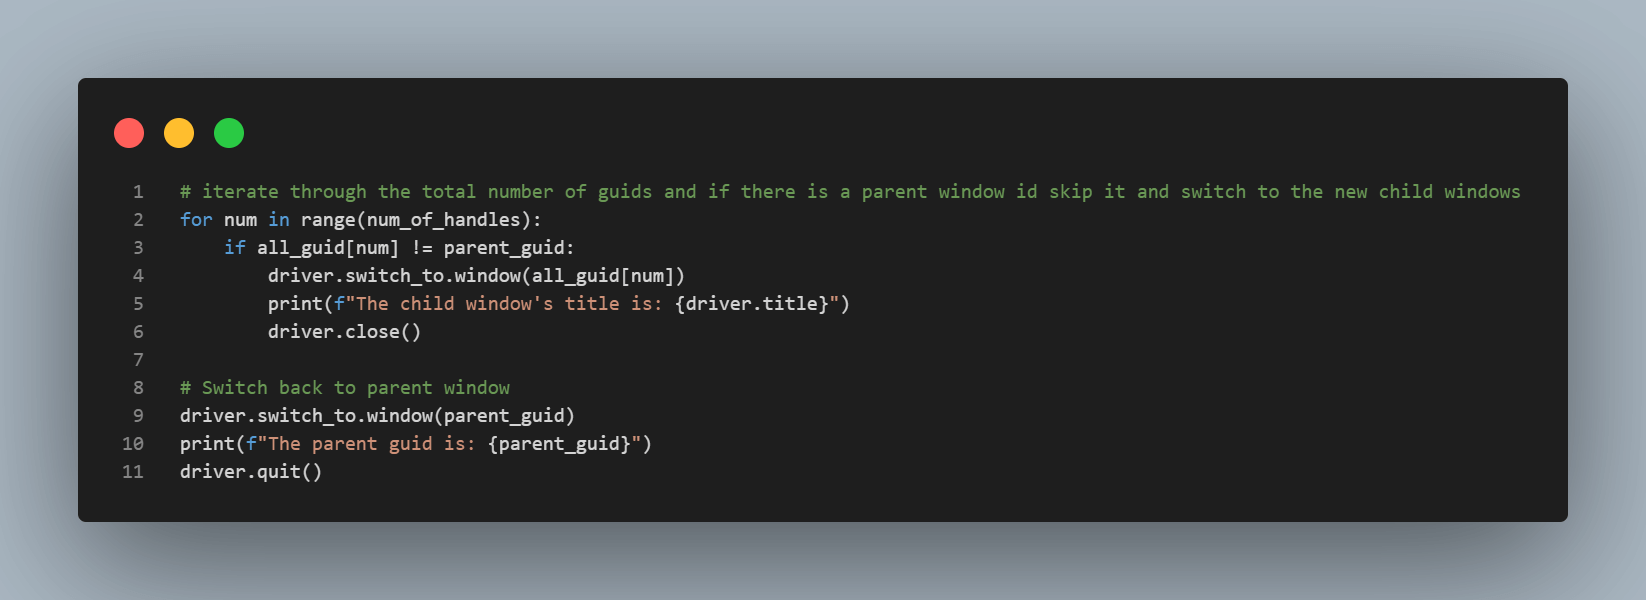
Code Walkthrough:
In the test script, after navigating through the child windows and performing the operations we specified in the scenario before, the open child windows are closed. We then switch back to the parent window using the switch_to.window(parent_guid) method with the parent_guid variable as the method’s argument. We then print the parent window’s handle.
The driver session is finally closed using the driver.quit() method.
If you are a Python programmer looking to take your career to the next level, you can go with the Selenium Python 101 certification from LambdaTest.

Conclusion
In this Selenium Python tutorial, we have covered in detail what windows are and how to handle multiple windows when they occur in testing using Selenium Python. We have looked at the two types of windows—the parent window and the child window. We have written test scripts that implement window handling for a single child window and multiple child windows. We have also looked at how to switch back to the parent window after completing operations on the child windows.Also, the visual testing tool Selenium can help you to find elusive bugs in the webpage.
I hope this blog on how to handle multiple windows in Selenium Python will help you while performing test automation.
Frequently Asked Questions (FAQs)
How do I switch between windows in Python?
window_handles is a list of the window ids. It stores all the information about the open windows in python. The syntax for storing a window id is as follows
window_handles = [Window1, Window2, Window3]
It can be used to switch between different windows by using switch_to method. The syntax for switching between windows is as follows:
Window1 = sys.switch_to(Window2)
To switch between two windows, we need to store the id of the first window and then use it when we want to switch to another window.
What is the difference between getWindowHandles () and getWindowHandle ()?
The getWindowHandles and getWindowHandle methods can be used to handle child windows. The getWindowHandles method stores all the opened window handles in the Set data structure. The getWindowHandle method is used to store the window handle of the browser window in focus.


Author’s Profile
Eugene Kwaka
I am a Software Developer with a background in Python(Django) and a tech enthusiast who loves writing and researching different topics on emerging trends in technology. I am keen on Software Testing, Backend Software Development, and best practices. I love tooling around and getting my hands dirty by building and learning new projects. If I’m not coding, you’ll find me traveling, listening to music, or trying different foods.
Blogs: 3
Got Questions? Drop them on LambdaTest Community. Visit now