How To Take Screenshot In Selenium Java?
Tanay Kumar Deo
Posted On: April 5, 2024
11 Min


Selenium is an open-source automation tool widely used for testing web applications. It enables developers to create scripts that automate browser activities, evaluate expected results, and ensure application functionality.
When working with automated tests with Selenium, we frequently need to capture a screenshot of the web page or a portion of a web page. This can be useful, especially when debugging test failures or ensuring our application behavior is consistent across browsers.
In this article, we’re going to deep dive into Selenium Screenshots. We will learn about the different ways to capture screenshots in Selenium. If you are preparing for an interview you can learn more through Selenium interview questions.
TABLE OF CONTENTS
- Why Take Screenshot in Selenium?
- How To Take Screenshot in Selenium?
- Simple Program To Capture A Screenshot In Selenium WebDriver
- How To Take Multiple Screenshot in Selenium?
- How To Capture Selenium Screenshot using Cloud Based Grid
- Capture Automated Screenshots Without Selenium Scripts
- Capture Screenshots Behind Login
- Conclusion
- Frequently Asked Questions (FAQs)
Why Take Screenshot in Selenium?
In Selenium testing, screenshots serve as crucial elements for various purposes. They provide visual evidence of the web application’s state, aid in debugging, support visual regression testing, and facilitate test results and bug reporting documentation. Mentioned below are a few importance of taking screenshots in Selenium:
- Debugging Support: Screenshots are instrumental in identifying layout issues, rendering errors, or other anomalies within the application. By visually inspecting screenshots, testers can pinpoint and address potential problems efficiently.
- Visual Regression Testing: Screenshots are indispensable for conducting visual regression tests. By comparing screenshots taken before and after changes to the application, testers can detect any unintended visual alterations or regressions introduced by the modifications.
- Documentation of Test Results: Screenshots serve as tangible evidence of test outcomes. They enhance test documentation by visualizing encountered issues, making it easier for developers and stakeholders to comprehend the test results.
- Bug Reporting: Screenshots simplify the process of reporting bugs. They offer a clear visual representation of encountered issues, enabling developers to quickly understand and address reported bugs.
How To Take Screenshot in Selenium?
To achieve seamless screenshot capture in Selenium, leverage the TakesScreenshot() method. This instructs WebDriver to snapshot and store within the Selenium testing script. The foundation lies in smart typecasting and effective file handling, ensuring precise storage at your designated location.
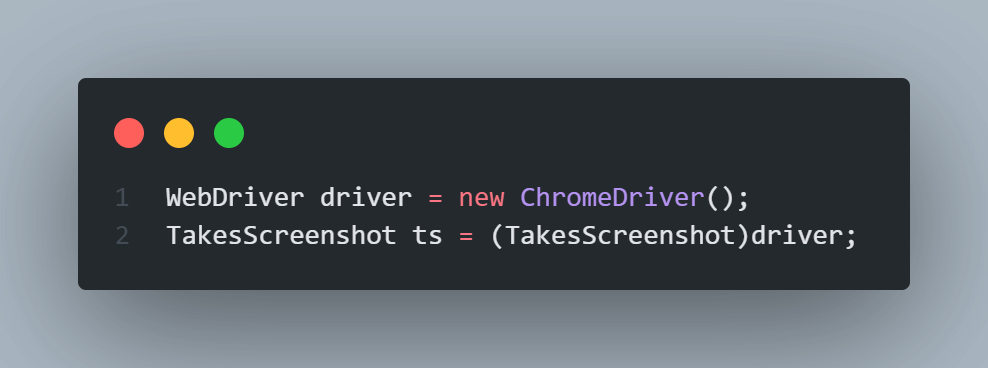
While automating a web application, we can use an interface TakesScreenshot which signals the WebDriver to take a screenshot during test execution. The TakesScreenshot interface is extended by the WebElement interface (an interface extends another interface) and the browser driver classes such as FirefoxDriver, ChromeDriver, OperaDriver, etc implement the same interface (a class implements an interface).
RemoteWebDriver() class implements interfaces like WebDriver(), TakesScreenshot() etc
and to access these methods we have to downcast the driver object.
|
1 2 |
WebDriver driver = new ChromeDriver(); TakesScreenshot ts = (TakesScreenshot)driver; |
The method getScreenshotAs() in the interface TakesScreenshot helps in capturing the screenshots and storing it in a specified path. We have another interface OutputType, which is used to specify the output format of the screenshot such as FILE, BYTES, etc.
|
1 2 |
File file = ts.getScreenshotAs(OutputType.FILE); FileUtils.copyFile(file,new File ("./ScreenShot_Folder/Test1_Login.png")); |
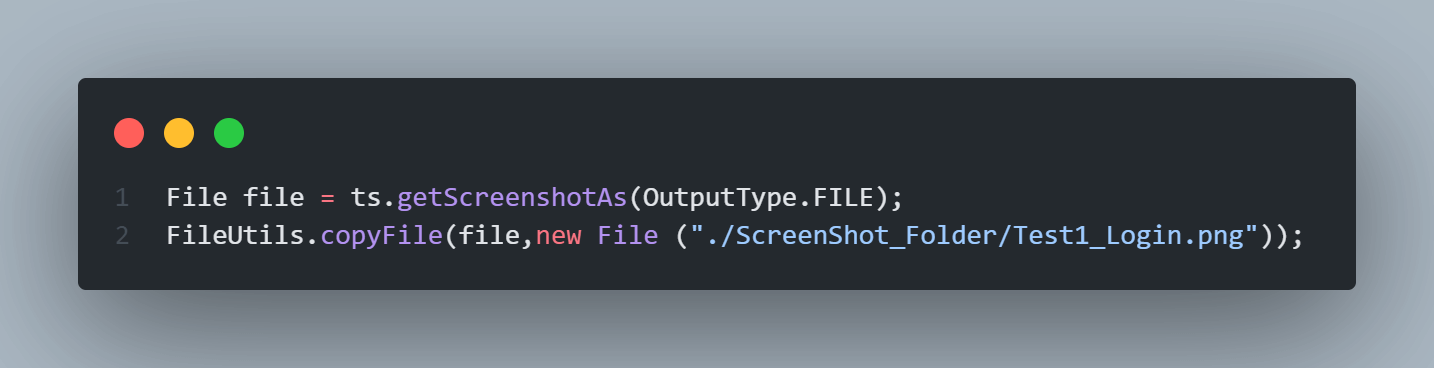
In the above destination path “./” indicates the current directory and we can specify the subfolder to hold the screenshots taken and the name in which the screenshots have to be saved. As per the above line, the screenshot taken would be stored in ScreenShot_Folder subfolder inside the current working directory in the name of Test1_Login.png file. If the given subfolder doesn’t exist, then on first-time execution of the script the folder gets automatically created.
Simple Program To Capture A Screenshot In Selenium WebDriver
Now we will explore an example to capture a screenshot and store it in our local directory using Selenium and Java. For our example, we will open LambdaTest’s playground website (https://ecommerce-playground.lambdatest.io/) in the Firefox browser.
Code:
|
1 2 3 4 5 6 7 8 9 10 11 12 13 14 15 16 17 18 19 20 21 22 23 24 25 26 27 28 29 30 31 32 33 34 |
import java.io.File; import java.io.IOException; import org.openqa.selenium.OutputType; import org.openqa.selenium.TakesScreenshot; import org.openqa.selenium.WebDriver; import org.openqa.selenium.firefox.FirefoxDriver; public class Main { public static void main(String[] args) { // Initialize the FireFox WebDriver using Selenium Manager WebDriver driver = new FirefoxDriver(); // Open the plaground webside in a browser session driver.get("https://ecommerce-playground.lambdatest.io/"); // Initialize an instance to the TakeScreenshot class TakesScreenshot ts = (TakesScreenshot)driver; // Capture screenshot as output type FILE File file = ts.getScreenshotAs(OutputType.FILE); try { //save the screenshot taken in destination path FileUtils.copyFile(file, new File("./ScreenShot_Folder/ecommerce_plaground.png")); // Print the title after screenshot capture String title = driver.getTitle(); System.out.println("Captured Screenshot for: " +title); } catch (IOException e) { // Catch any unexpected errors e.printStackTrace(); } // Close the driver driver.quit(); } |
This Java code utilizes Selenium WebDriver to automate web browser actions. It opens a website, captures a screenshot, and saves it to a specified directory. It initializes a Firefox WebDriver instance, navigates to a webpage, takes a screenshot, saves it with a filename “ecommerce_plaground.png” and prints the webpage title, and closes the browser.
Captured Screenshot:

How To Take Multiple Screenshot in Selenium?
Now let’s take an advanced example to capture multiple screenshots and save them in Selenium. In this example, we will open multiple URLs in the Firefox browser and capture screenshots for each of them one by one.
Code:
|
1 2 3 4 5 6 7 8 9 10 11 12 13 14 15 16 17 18 19 20 21 22 23 24 25 26 27 28 29 30 31 32 33 34 35 36 37 38 39 40 41 42 43 44 45 46 47 48 49 50 51 52 53 54 55 56 57 58 59 60 61 62 63 64 65 66 67 68 69 70 71 72 73 74 75 76 77 78 79 80 81 82 83 84 85 86 87 88 89 90 91 92 93 94 95 96 97 98 99 100 101 102 103 104 105 106 107 108 109 110 111 112 113 114 115 116 117 118 119 120 121 122 123 124 125 126 |
import org.openqa.selenium.WebDriver; import org.openqa.selenium.firefox.FirefoxDriver; import java.io.File; import java.util.Iterator; import java.util.Set; import org.openqa.selenium.JavascriptExecutor; import org.openqa.selenium.OutputType; import org.openqa.selenium.TakesScreenshot; public class CaptureAllTapsScreenshots { // Global declaration for chrome driver private static WebDriver driver; // Function to open multiple tab private static void openMultipleTabsAndCaptureScreenshots(String[] urls) throws InterruptedException { // Finding no. of urls int listLength = urls.length; // Creating a JavascriptExecutor reference. JavascriptExecutor js = (JavascriptExecutor) driver; // LAst open tab name String last = driver.getWindowHandle(); // Iterating over all url to open new tab for(int i=0; i<listLength ; i++) { // Javascript command to open url in new tab String link = "window.open('" + urls[i] + "', '_blank')"; js.executeScript(link); // Get all open tabs Set<String> allTabs = driver.getWindowHandles(); // find Last open tab in allTabs Iterator<String> iterator = allTabs.iterator(); while(iterator.hasNext()){ last = iterator.next(); } // Initialize an instance to the TakeScreenshot class TakesScreenshot ts = (TakesScreenshot)driver; // Capture screenshot as output type FILE File file = ts.getScreenshotAs(OutputType.FILE); //save the screenshot taken in destination path FileUtils.copyFile(file, new File("./ScreenShot_Folder/screenshot" + i +".png")); // Switch to new tab driver.switchTo().window(last); // Print page title System.out.println("New Tab = " + driver.getTitle()); // Add time delay for proper loading Thread.sleep(1000); } } // Function to close all tab except the Current tab private static void closeMultipleTabs() throws InterruptedException { // Get all open tabs Set<String> allTabs = driver.getWindowHandles(); // Get Current tab String currentTab = driver.getWindowHandle(); Iterator<String> iterator = allTabs.iterator(); while(iterator.hasNext()) { // Condition to check if the selected tab is not current tab String selectedTab = iterator.next(); if(!selectedTab.equals(currentTab)) { // Switch to new tab driver.switchTo().window(selectedTab); // Print title of tabs to be closed System.out.println("Closing Tab = "+driver.getTitle()); // Close the selected tab driver.close(); // Time delay Thread.sleep(1000); } } } public static void main(String[] args) { // No need for setProperty as ChromeDriver() will auto install // required browser driver for firefox using Selenium Manager driver = new FirefoxDriver(); // Initializing urls to open in new tab String[] urlList = new String[3]; urlList[0] = "https://ecommerce-playground.lambdatest.io/"; urlList[1] = "https://ecommerce-playground.lambdatest.io/index.php?route=product/special"; urlList[2] = "https://ecommerce-playground.lambdatest.io/index.php?route=extension/maza/blog/home"; // Surround with try catch block to handle exception try { // Calling function to open new tab and capture screenshots using Selenium openMultipleTabsAndCaptureScreenshots(urlList); // Print Current Tab name System.out.println("Current Tab = "+driver.getTitle()); Thread.sleep(2000); // Calling function to close all tabs closeMultipleTabs(); } catch (InterruptedException e) { // Catch block to handle exception e.printStackTrace(); } // Quit the current browser session driver.quit(); } } |
This Java code utilizes Selenium WebDriver to open multiple tabs, capture screenshots of each tab, and then close all tabs except the current one. It initializes a FirefoxDriver instance, defines URLs to open in new tabs, opens each URL in a new tab, captures screenshots, and closes the extra tabs. The code demonstrates handling multiple tabs using Selenium WebDriver in Java, along with capturing and saving screenshots for each tab. Additionally, it ensures the current tab remains active after the process. Finally, it quits the browser session.
You can refer to the below video tutorial on How To Take Screenshots In Selenium testing.
You can also boost your Selenium automation process with KaneAI by LambdaTest—a GenAI native software testing assistant that empowers teams to create, debug, and refine tests using natural language. Designed specifically for high-speed quality engineering teams, it seamlessly integrates with LambdaTest’s suite of tools for test execution, orchestration, and analysis.
How To Capture Selenium Screenshot using Cloud Based Grid
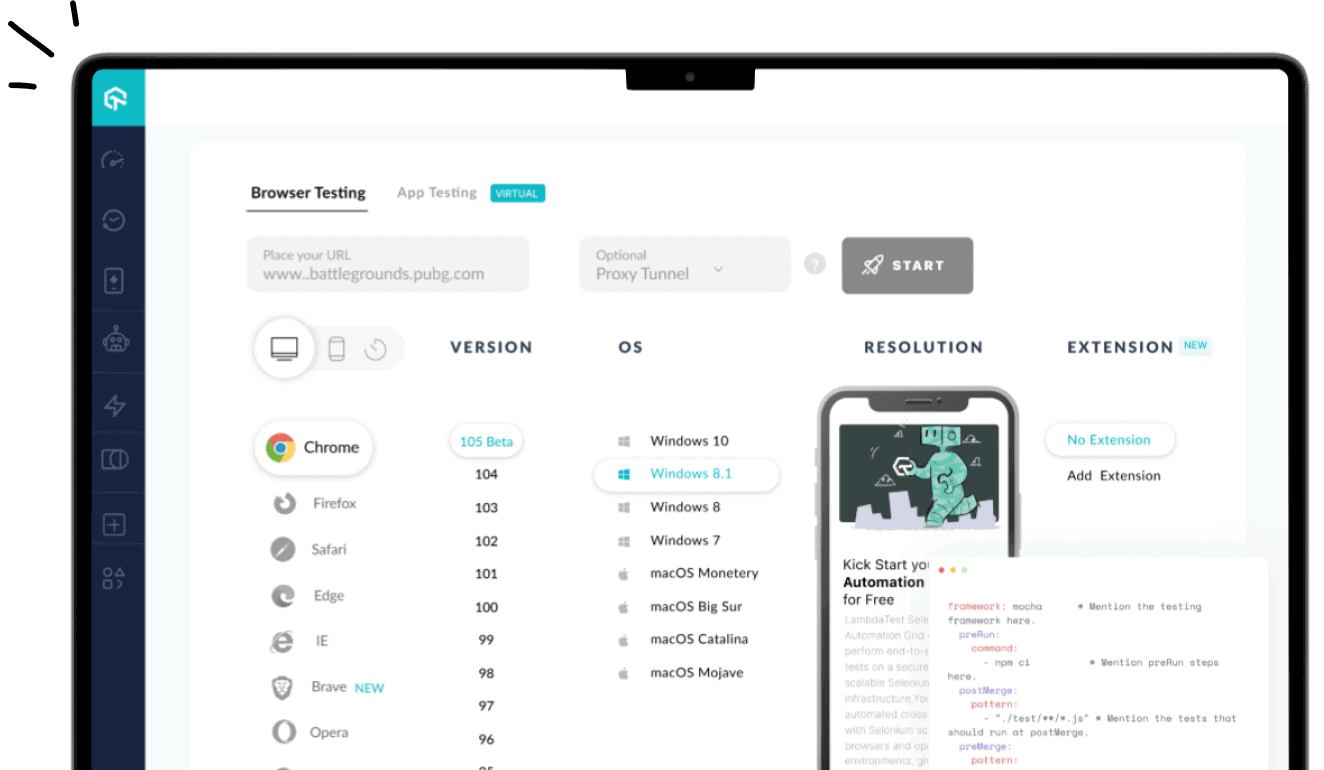
The easiest way to capture screenshots in Selenium is by using a cloud based Selenium grid like LambdaTest that supports 3000+ real browsers for desktop and mobile.
At LambdaTest, we want to make the Selenium testing experience as convenient as possible. This is why we provide a toggle button in our Selenium Desired Capabilities Generator.
This button when turned on will add a capability called ‘visual’ in the desired capabilities class and set its value as true.
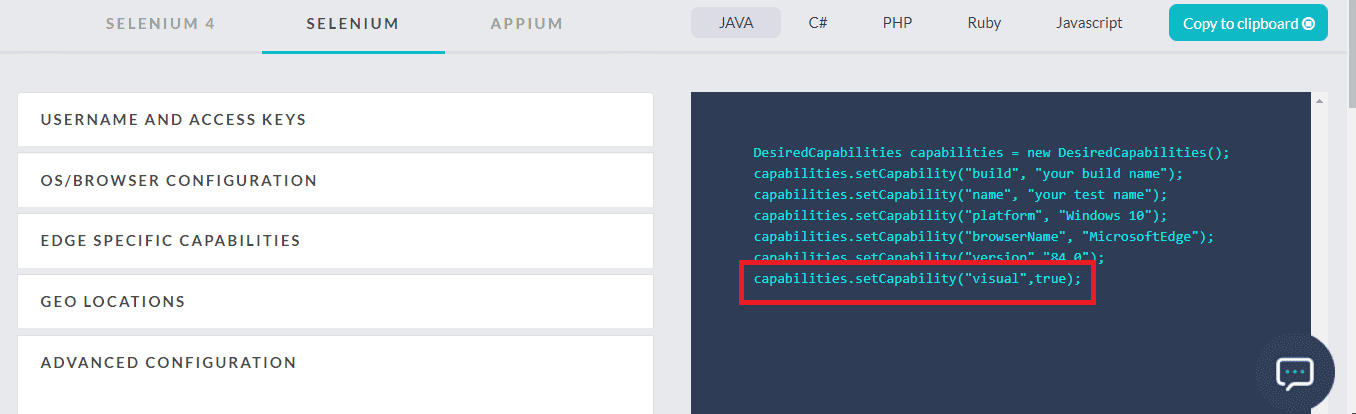
If you pass this capability in your Desired Capabilities class while running your Selenium testing script on LambdaTest Selenium Grid then we will generate step by step screenshots for you Selenium automation script.
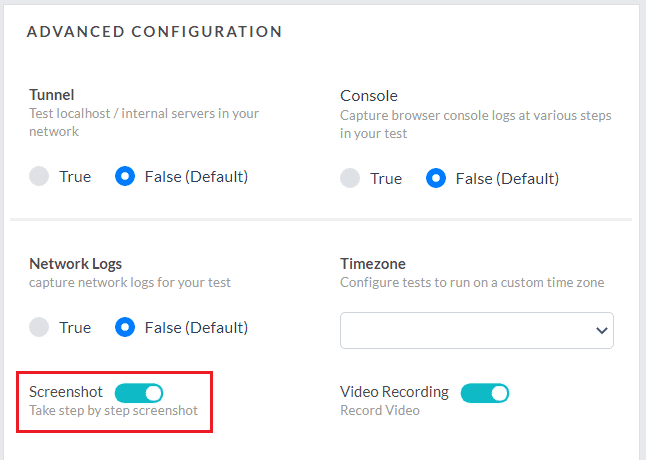
You can find these step by step screenshots on the Automation dashboard, by going to Automation Logs – > Metadata.
In the Metadata tab, you will find the button to Download All screenshots.
Porting your Selenium testing scripts to LambdaTest is easy. All you need to do is specify your LambdaTest username and access key as the environment variables to route your Selenium tests on a Remote WebDriver. Refer to our documentation on TestNG with Selenium.
We also offer RESTful API for capturing Selenium Screenshots for automated browser testing.
Capture Automated Screenshots Without Selenium Scripts
We also offer a feature called Screenshot testing which allows you to capture full page screenshots of your website across 25 different browsers and operating systems. The tests can be executed either in Desktop or Mobile browsers.
You can create full page screenshots without writing any Selenium script in simply two steps.
Step 1: Once logged in, click Visual UI Testing > Screenshot.
Step 2: Enter the URL of the website you want to test, select the browsers and hit the capture button.
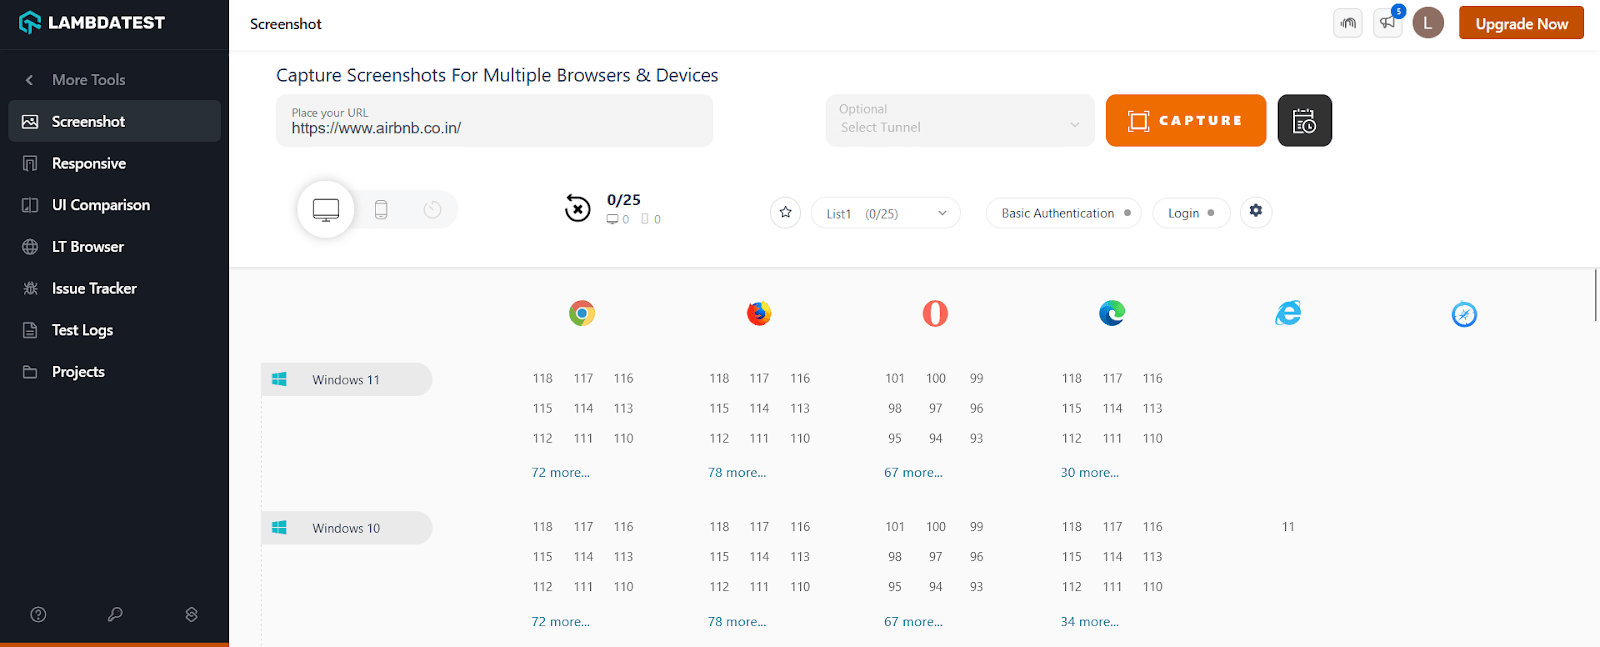
This will automatically generate screenshots of your web application on your selected browsers and operating systems.
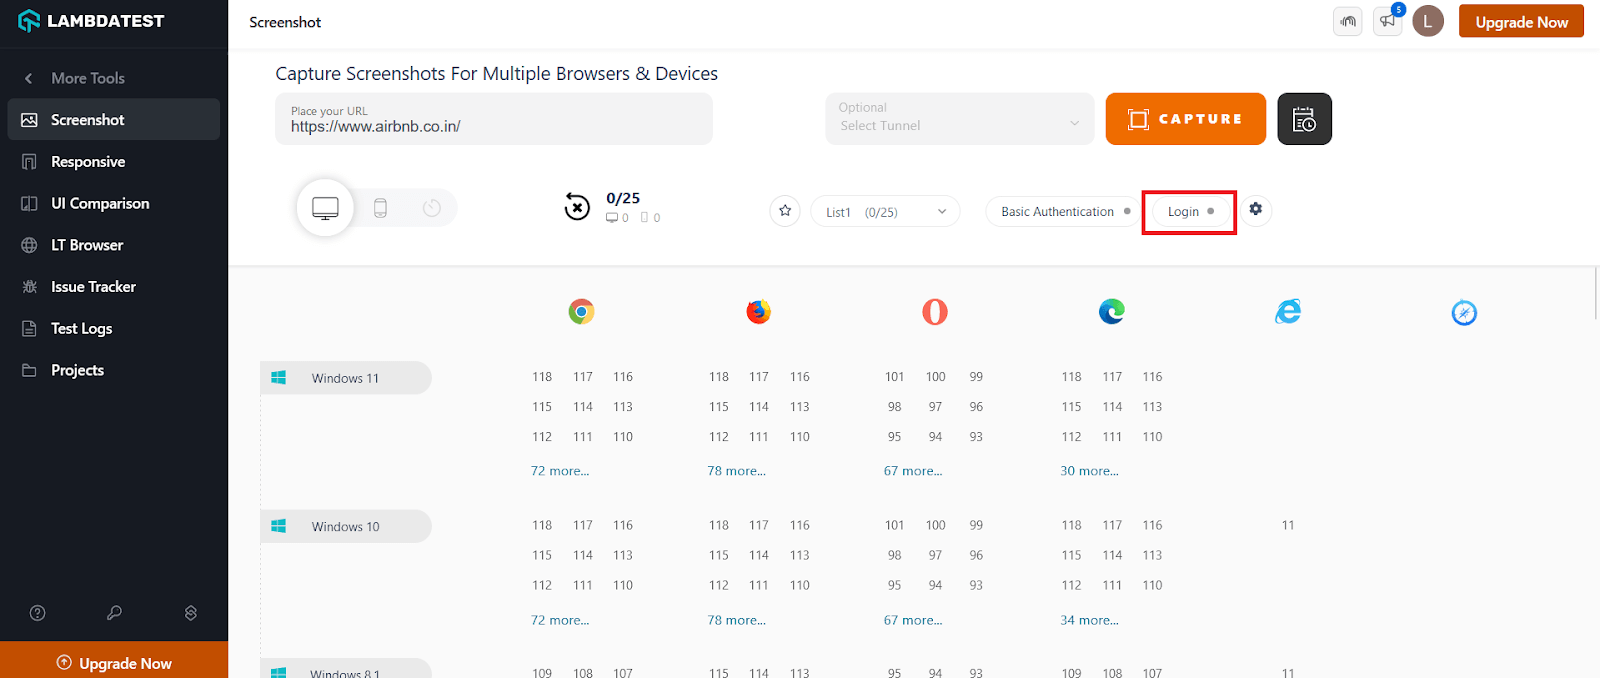
Capture Screenshots Behind Login
Step 1: To capture a screenshot behind login functionality, click the Login button and create a New Login profile.
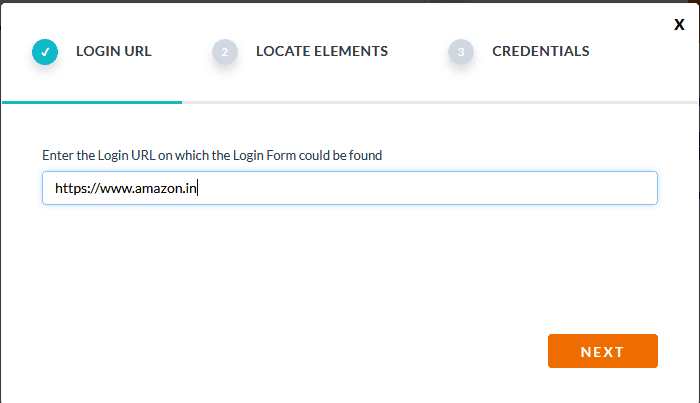
Step 2: Enter the URL of the webpage and click Next.
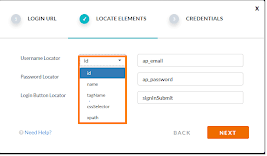
Step 3: Enter the locators of the username, password, and login button fields. Click Next.
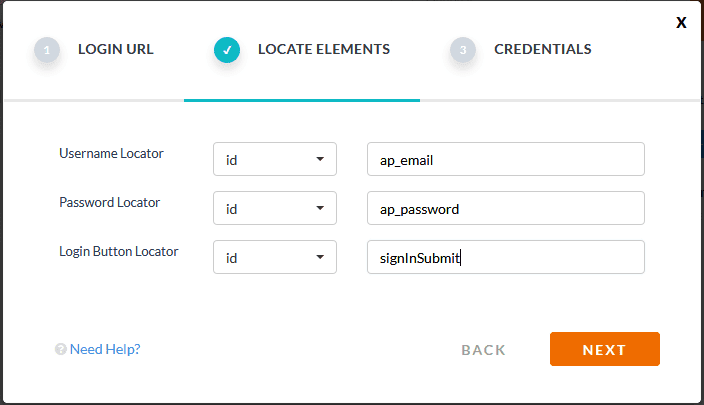
You can select any of the locators as shown below:
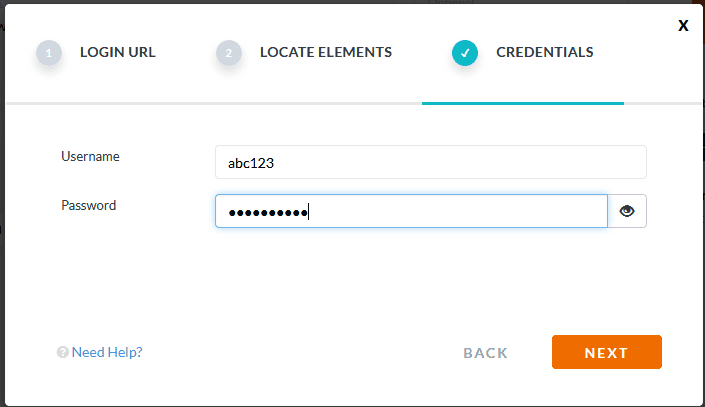
Step 4: Enter a valid username and password and click Next.
Step 5: Save the Login Profile
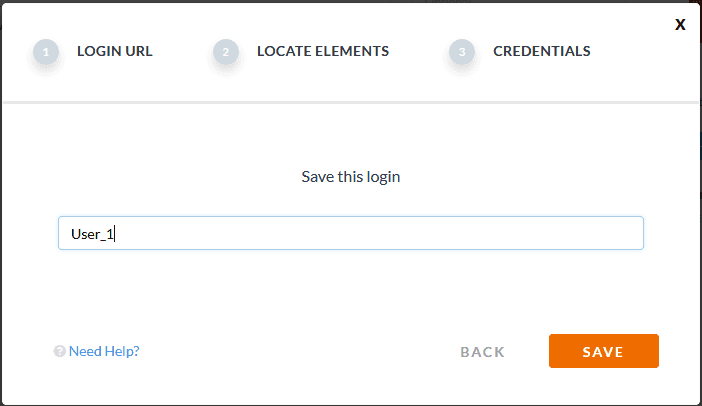
Step 6: Once saved, a profile would be created.
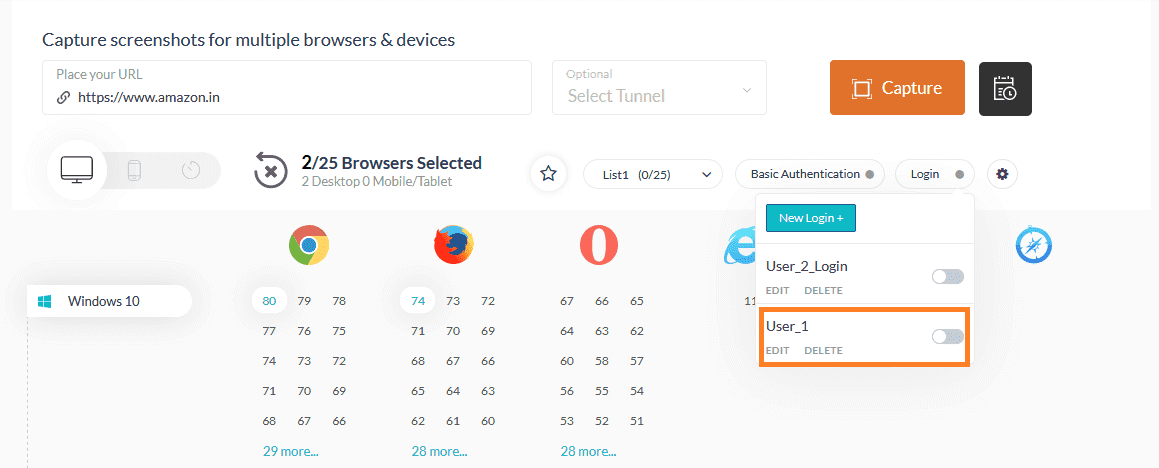
For capturing a screenshot for the same webpage with the same credentials you can just toggle the user profile.
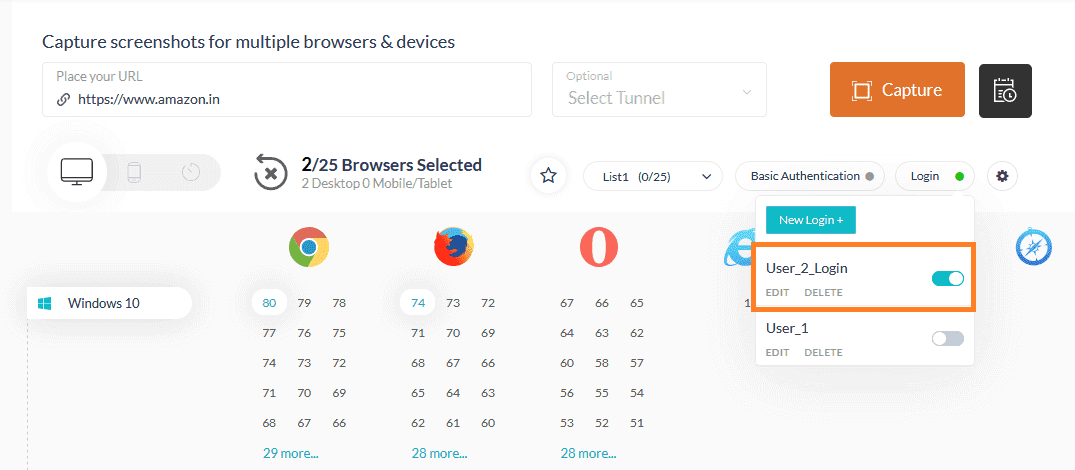
Step 7 : Select the browsers and the platform to execute the test and click Capture.
Once the test is executed in different browsers and platforms, the Selenium screenshots would be captured and displayed.
The screenshots can also be downloaded and verified.
Also Read: 12 Must-Try Features Of Automated Screenshot Testing On LambdaTest.
Conclusion
Selenium screenshots empower efficient test automation. They provide visual proof of application states, aiding in debugging, regression testing, and documenting results. Selenium’s robust features allow capturing screenshots throughout test execution, ensuring comprehensive coverage.
Selenium offers flexibility. Capture entire pages or specific elements. Whether for assertions, exceptions, or UI checks, Selenium streamlines the process. Advanced features like capturing failed test screenshots, taking multiples, and integrating with cloud solutions further enhance capabilities.
Frequently Asked Questions (FAQs)
Why are screenshots important in Selenium testing?
Screenshots are crucial in Selenium testing as they provide visual evidence of application states, aiding in debugging, regression testing, and documentation. They simplify bug reporting by offering tangible proof of encountered issues.
When should I capture screenshots in Selenium?
Capture screenshots in Selenium when encountering assertion failures, exceptions, page navigation issues, UI verification, or timeouts. Screenshots help in pinpointing the cause of failures and understanding application behavior.
How can I capture screenshots in Selenium using Java?
You can capture screenshots in Selenium using Java by utilizing the TakesScreenshot interface. This involves initializing a WebDriver instance, navigating to a webpage, and using the getScreenshotAs() method to capture screenshots in desired formats.
Can I capture multiple screenshots in Selenium using Java?
Yes, you can capture multiple screenshots in Selenium using Java. Iterate over a list of URLs, open them in separate tabs/windows, and capture screenshots for each page.
How do I capture a screenshot for a specific element in Selenium?
To capture a screenshot for a specific element in Selenium, locate the desired WebElement and use WebDriver methods to capture and crop the screenshot to include only the element’s portion.
Is it possible to capture screenshots for failed test cases in Selenium?
Yes, you can capture screenshots for failed test cases in Selenium. Utilize TestNG listeners or similar mechanisms to capture screenshots when test cases fail, aiding in debugging.
What is the easiest way to capture Selenium screenshots?
The easiest way to capture Selenium screenshots is by using cloud-based Selenium Grid solutions like LambdaTest, offering automated screenshot capture across various browsers and OS.
Author
Tanay kumar deo is a skilled software developer, Upcoming SDET at GlobalLogic (A Hitachi group company). With expertise in Android and web development, he is always eager to expand his skill set and take on new challenges. Whether developing software or sharing his knowledge with others, he is driven by a desire to make a positive impact on the world around him. In addition to his technical abilities, Tanay also possesses excellent blogging and writing skills, which allow him to effectively communicate his ideas and insights to a wider audience.
Blogs: 16