12 Must Try Features of Automated Screenshot Testing on LambdaTest
Harshit Paul
Posted On: February 19, 2019
![]() 31292 Views
31292 Views
![]() 2 Min Read
2 Min Read
Coping up with the pace of Agile methodology could be strenuous. Narrow release windows with frequent on-demand changes based on client’s feedback may consume your bandwidth more than your expectations. Especially, when we refer to UI specific changes. In UI changes, the time and bandwidth utilized in testing, turn out to be a lot more than the development effort. Wondering why?
Well, your website may look and behave differently from one browser to another, as every browser possesses a unique rendering engine. The rendering engine helps to relay the web browser on how a website needs to be displayed.
That means you only need to test website on different browsers, right? Wrong! You would have to keep in mind about the browser versions, OS and device as well.
According to Wikipedia, if you look at Google Chrome alone, they have come up with 40+ browser versions of Chrome from 2013-2018. Imagine the picture with Mozilla Firefox, Safari, IE, Edge, Opera, Yandex and many more modern web browsers in it. So for a website to pass through a UI change with flying colours, it needs to be evaluated on hundreds of browser, OS and device combinations, at least.
May look like a lot to handle! However, this is where LambdaTest steps in. LambdaTest offers a cloud-based, cross browser testing cloud to ensure browser compatibility of a website across 2000+ browsers and browser versions running on real machines.
Let me tell you about one of our primary service called Screenshot testing. Automated Screenshot testing helps you to quickly perform browser compatibility testing by capturing full-page automated screenshots of your website across 25 browsers, OS, device combination in a single test session. This helps you to test your responsive website in a jiffy. I will be highlighting you the top 10 features you can’t miss out in Screenshot Testing on LambdaTest. Without further ado, here we go!
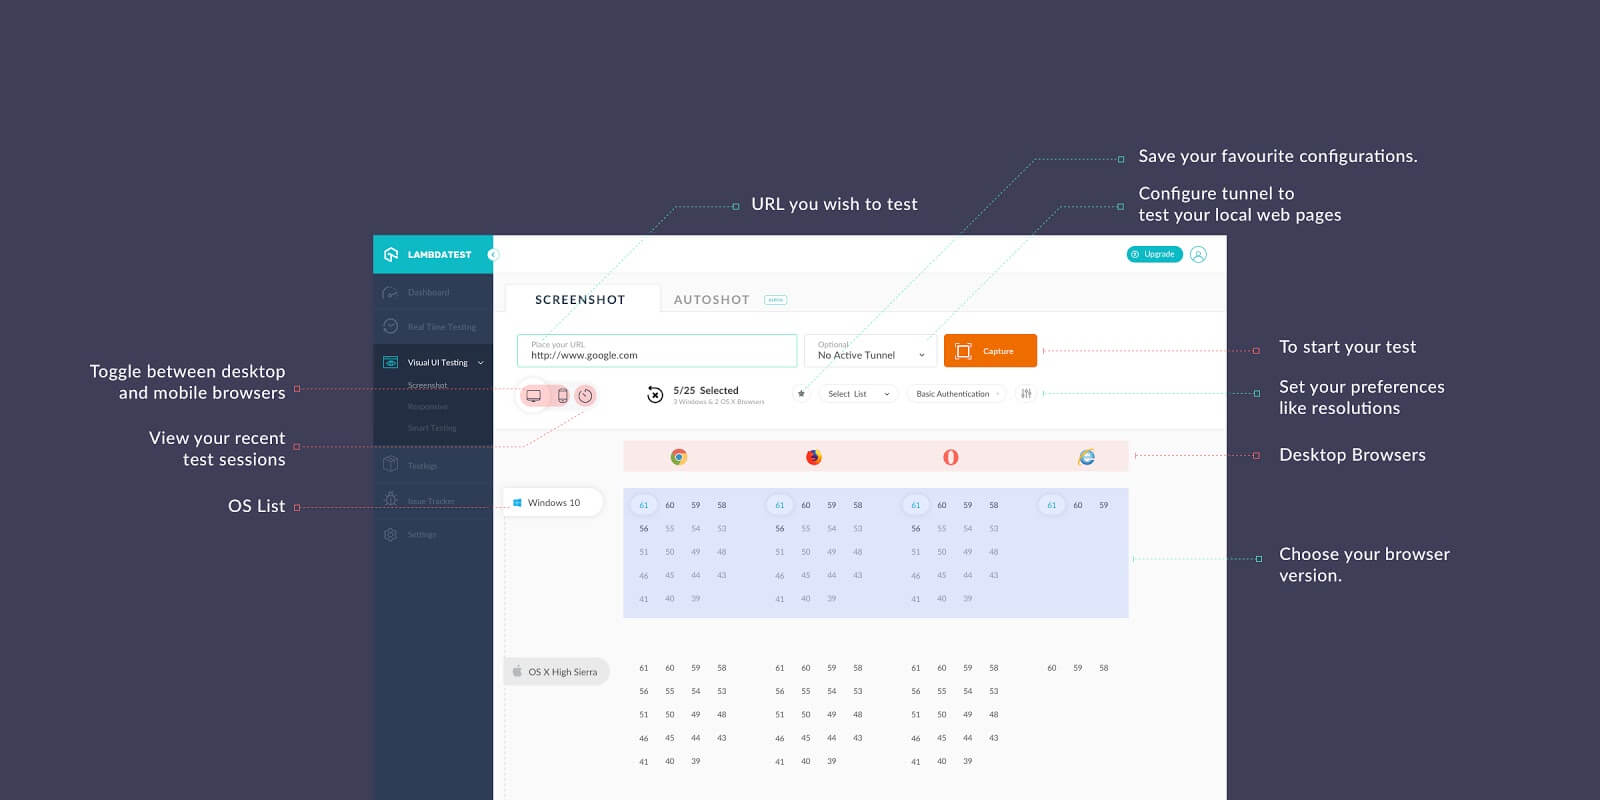
1. Testing Locally Hosted Websites
LambdaTest offers a tunnel to establish an SSH(Secure Shell) connection between your machine to our cloud servers. With LambdaTest Tunnel, you can perform cross browser testing of your website even before you go live.
To perform cross browser testing on your locally hosted website or web app, you need to configure the LambdaTest Tunnel. You can do so by using the Configure Tunnel button highlighted in the below image.
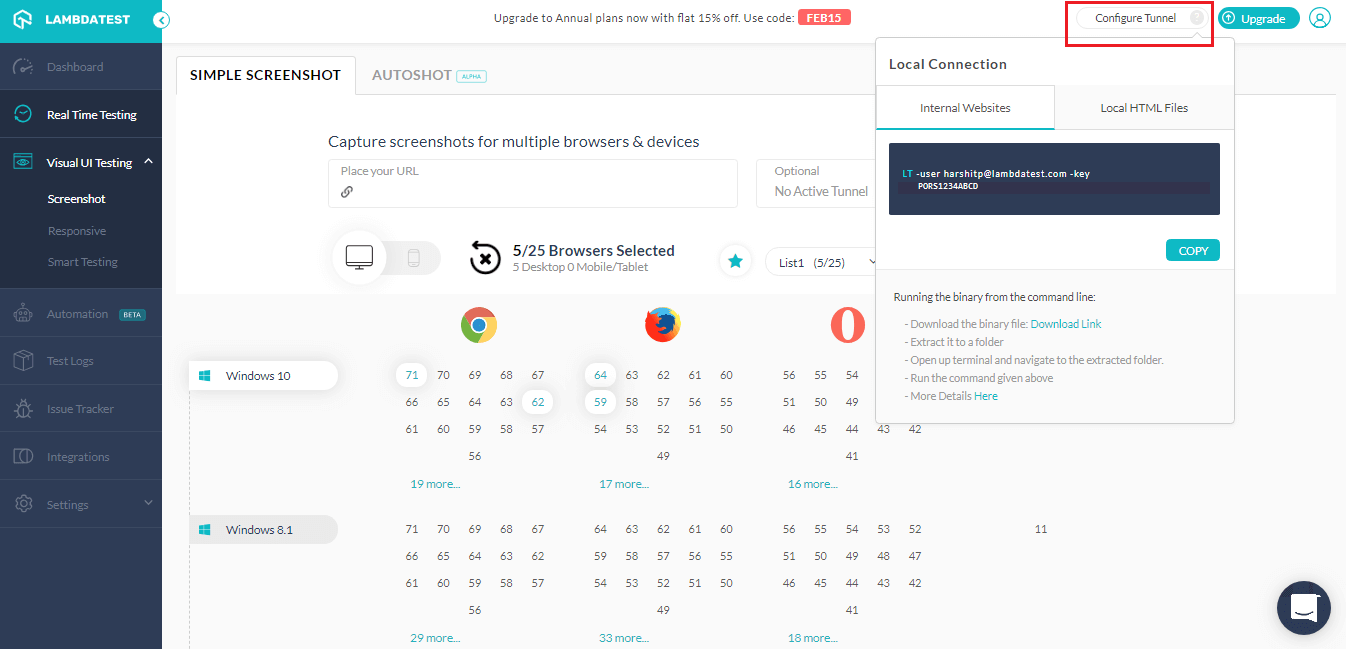
The string used for configuring tunnel goes with the below syntax:
|
1 |
LT -user {username} -key {access key} |
For more information refer to our documentation on LambdaTest Tunnel.
2. In-Built Image Editor
So you have captured automated screenshot in bulk to monitor any cross browser compatibility issue. What happens when you encounter one? Well, our in-built image editor tool would help to highlight any UI deviation in the captured screenshots.
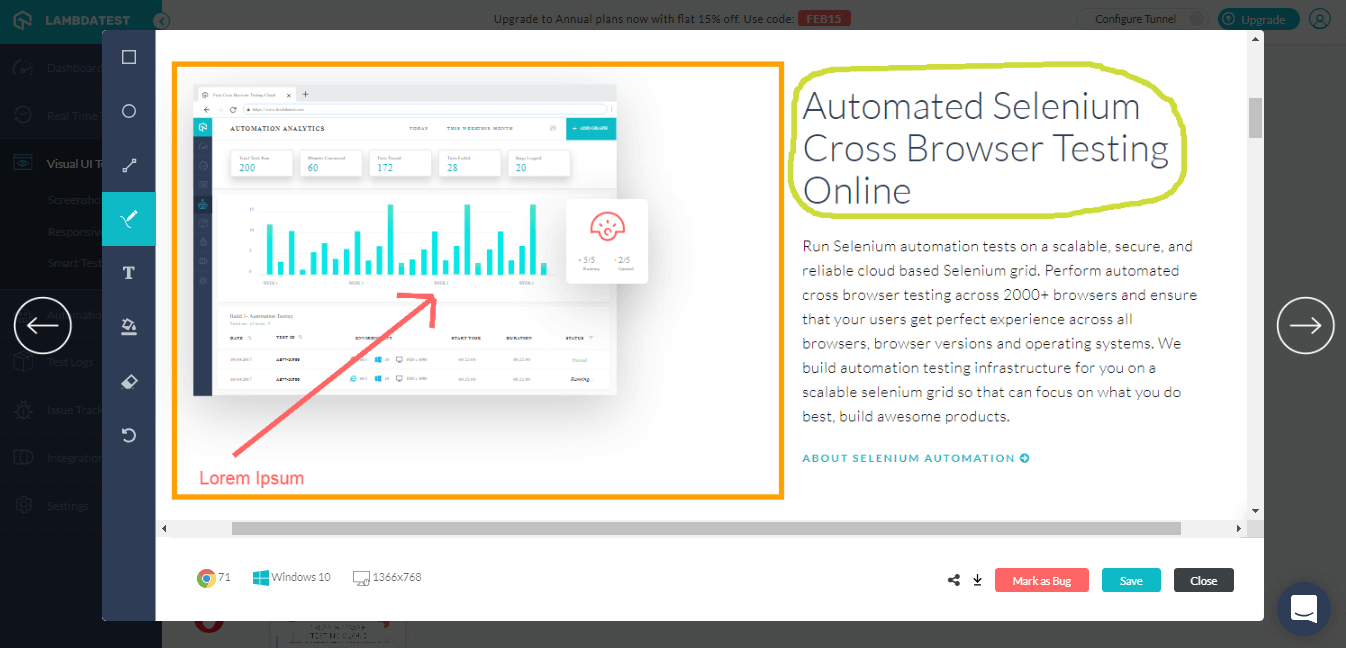
You can use various geometrical shapes, crayons, text in different colours from the left-hand menu. In case you go wrong, you can always use the eraser or the undo button.
3. One-Click Bug Logging
After you are done highlighting the cross browser compatibility issue with our in-built image editor. Comes the time to share that screenshot with your developer team or colleagues. It would be a hassle to download the image from LambdaTest to your machine and then upload it to your respective bug tracking tool while logging a case/task for a teammate.
However, LambdaTest offers a feature to help you mark a bug with only a single click effort. LambdaTest offers integrations with numerous third-party bug-tracking tools such as Jira, Asana, Trello, Paymo and many more. Now, you can log a bug or your UI observation to your respective bug tracking tool directly from LambdaTest.
Check out all our integrations and feel free to suggest us if we are missing out on your favourite bug tracking tool.
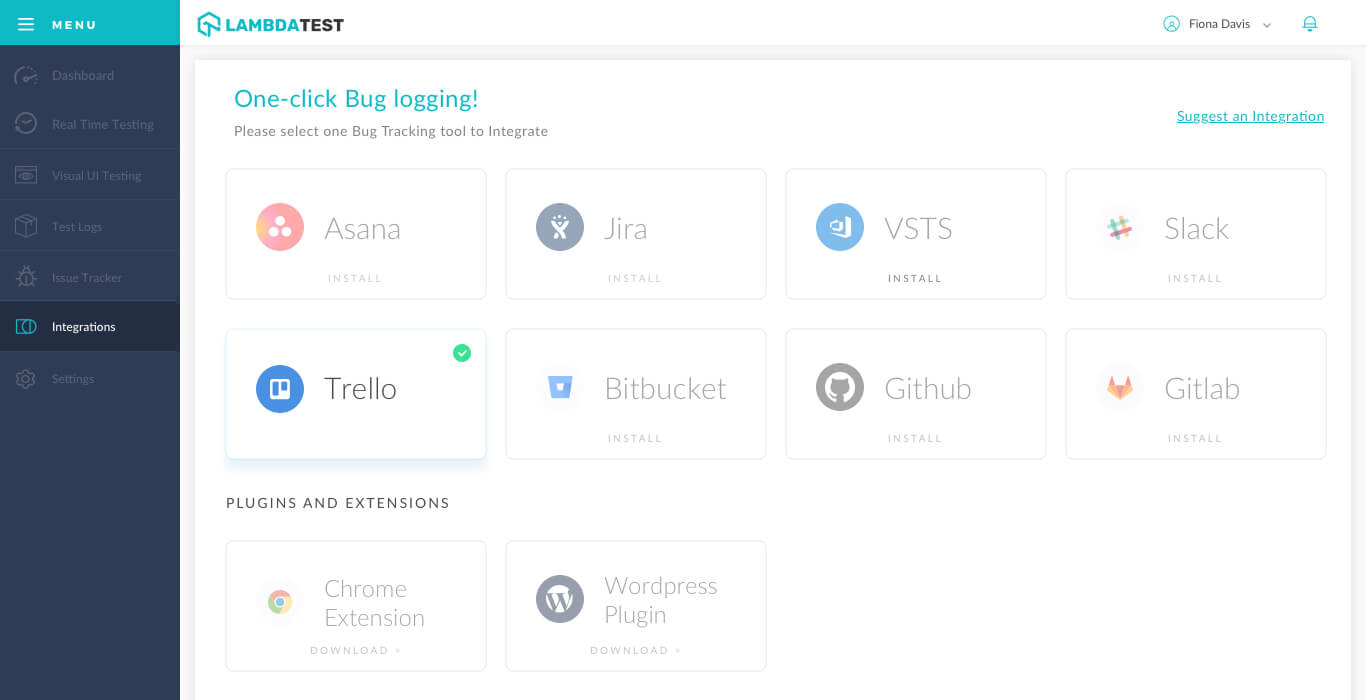
When you hit Mark as Bug button, a form related to your bug tracking instance would open up. Fill the needful details and hit the button to Create Bug. This would log the screenshot with your provided details in the respective bug tracking instance. In the above case I committed an integration with Trello, so the bug would log in the same.
4. Get Shareable Link
So mark as a bug would only help you save a single screenshot. What if you want to share all your automated screenshots? Well, we offer an option on the output screen which says Share Screenshots
As you click on it, a window would open as shown below.
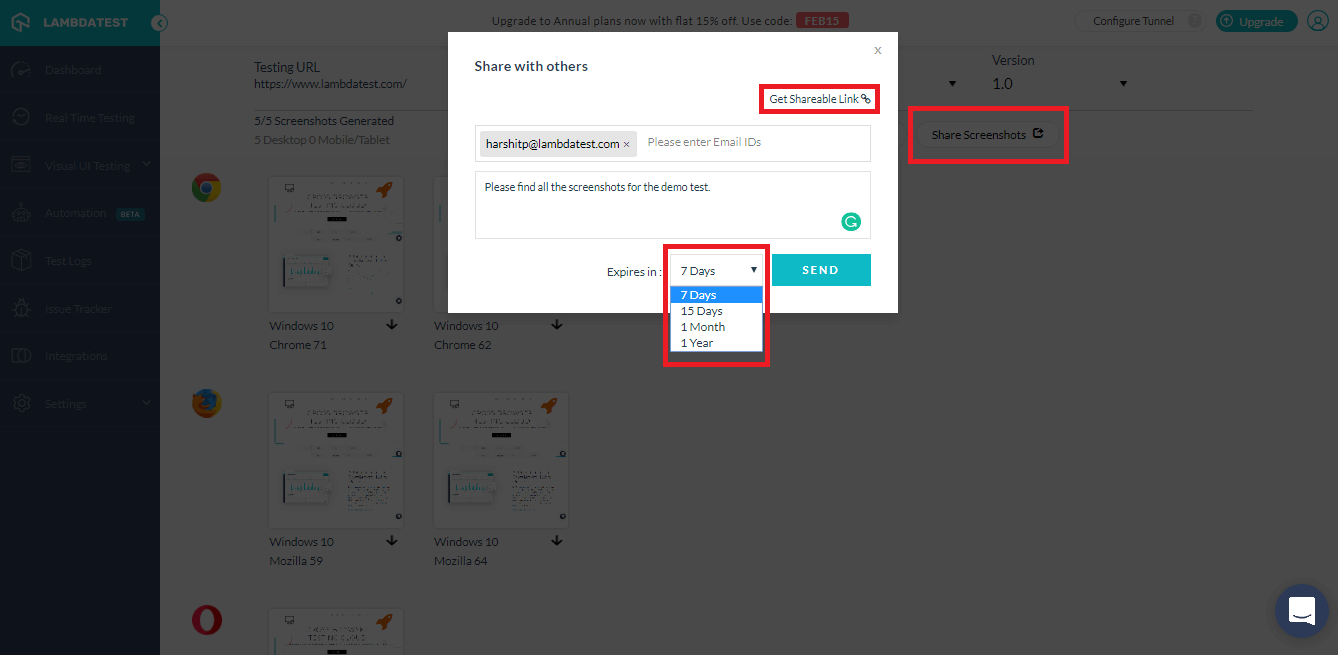
You can enter the particular email ID of your colleague along with a message you want to highlight. You can also set the validity of your results.
Wish to share the result using IM(Instant Messaging) and not Email?
Click on Get Shareable Link and find the URL which would guide you or your colleague straight to the output of your automated screenshot test.
5. Basic Authentication For Password Protected Websites Or Web App
You must be wondering how to capture automated screenshots for password-protected websites?
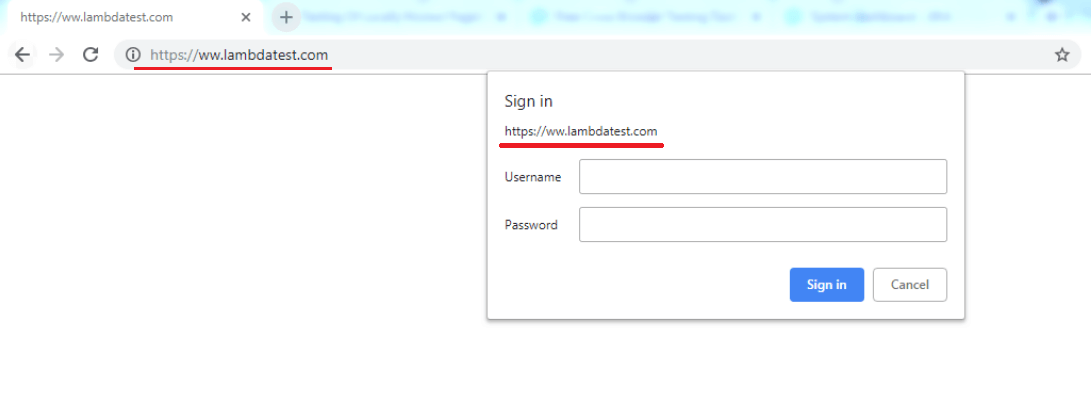
Well, LambdaTest automated screenshot testing offers a feature called basic authentication to help you with that. I have highlighted the option in the below image.
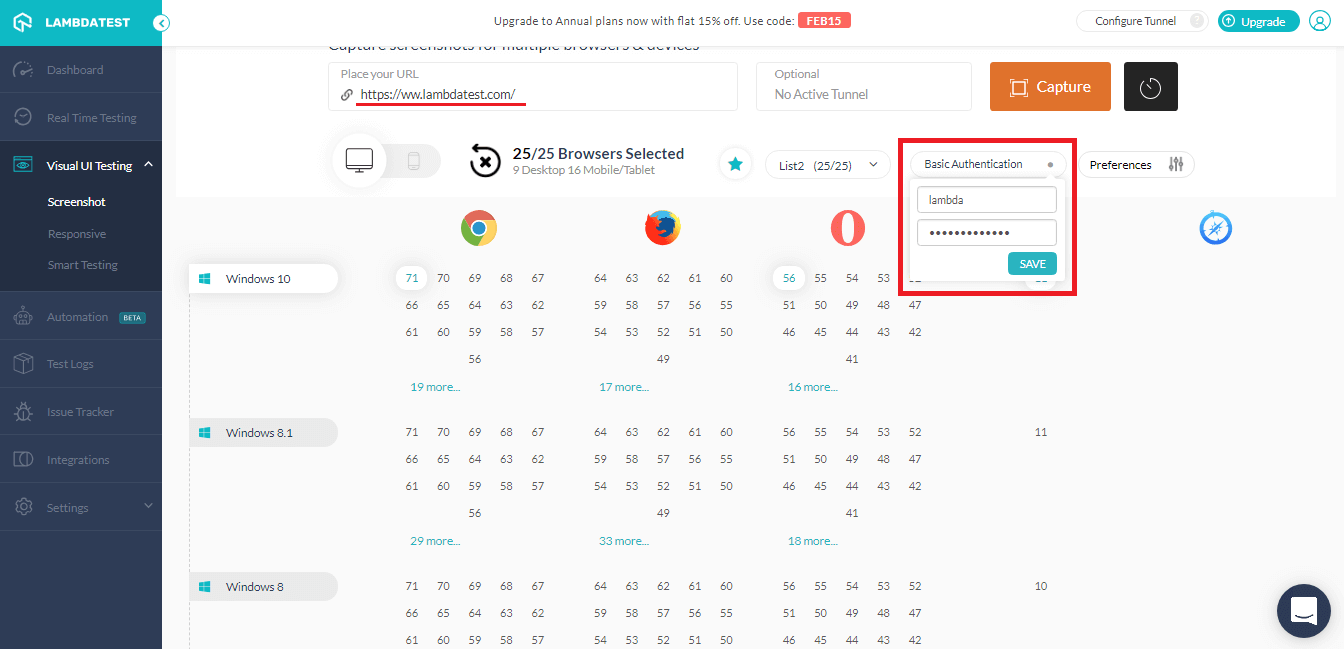
Once you provide the necessary details, hit ‘SAVE’. You will notice the basic authentication enabled(indicated with a blue color dot). If you run the test now, you will find results for your password-protected website(keep in mind the URL).
With this Screenshot Testing Tutorial, you will learn how to perform Automated Screenshot Testing on the LambdaTest platform.
6. Save Selected Browsers For Quick Screenshot Testing
If you have a specific test script which you use more frequently than others then selecting 25 combinations of browser, OS and device to test your responsive website then it could be exhausting and a bit annoying. Using our Quick Save feature, you can save those favourite configurations under a list. Also, you can save up to 3 lists, allowing you to save 75 combinations of browser, OS, and device.
To save a list, you need to select one from the drop-down menu. Select your favorite configurations and hit the Star button.
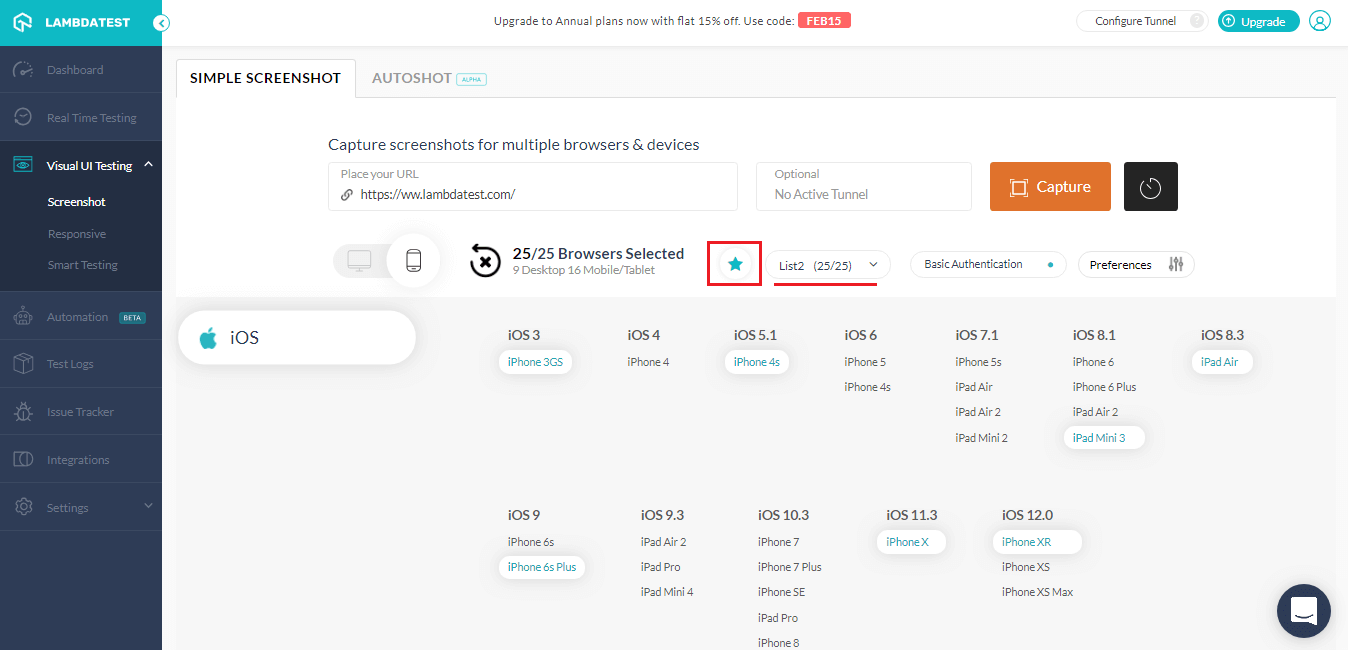
Once you save a list, you can quickly select all those configurations by selecting the respective list from the drop-down.

This is one of the most requested features by our users and has helped them significantly pace up their cross browser testing.
7. Email Me On Completion
Generating automated bulk screenshots can take up to around a minute or two. The time could vary depending on the size of your website. So, if you are performing cross browser testing on a website which consists of high-quality images, heavy I-frames, infinite scrolling and so on. The time consumption for completing an automated screenshot test on such websites can be more than usual.
Similarly, if you use a light weighted website then the time taken to complete a test session, could even be under a minute.
To wait for your output could be a bit inconvenient sometimes. However, you can fix that by going to your preferences and checking the box for “Email me on completion”
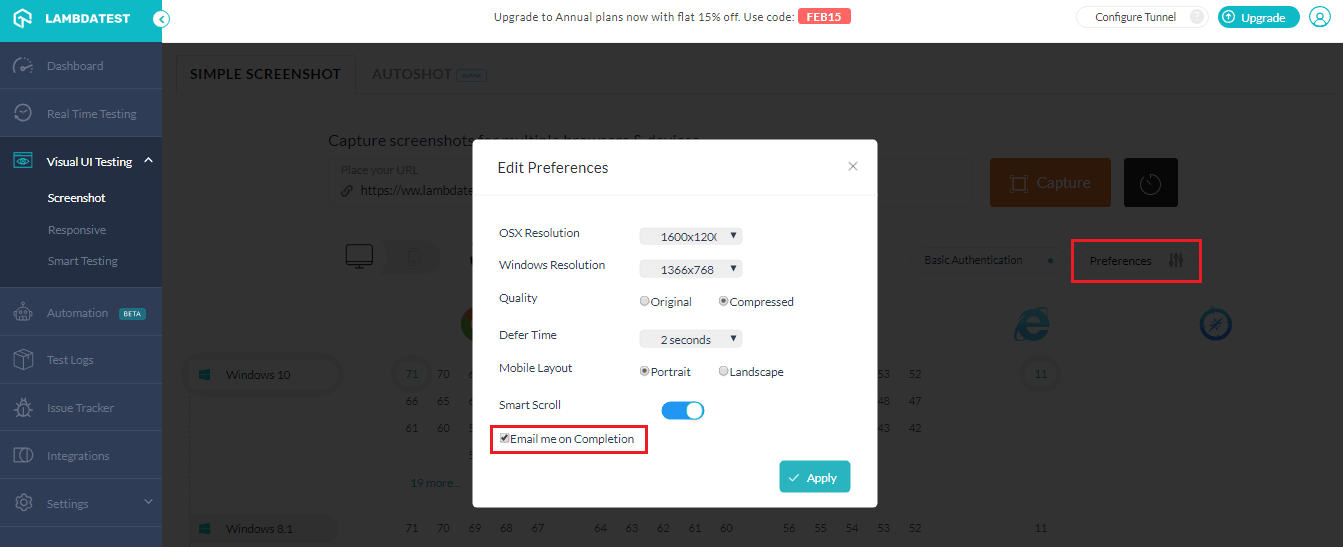
This way you can start a test and perform other activities simultaneously. Once your test would complete then you will receive an email on your email ID used for registration at LambdaTest.
8. History Or Recent Test Sessions
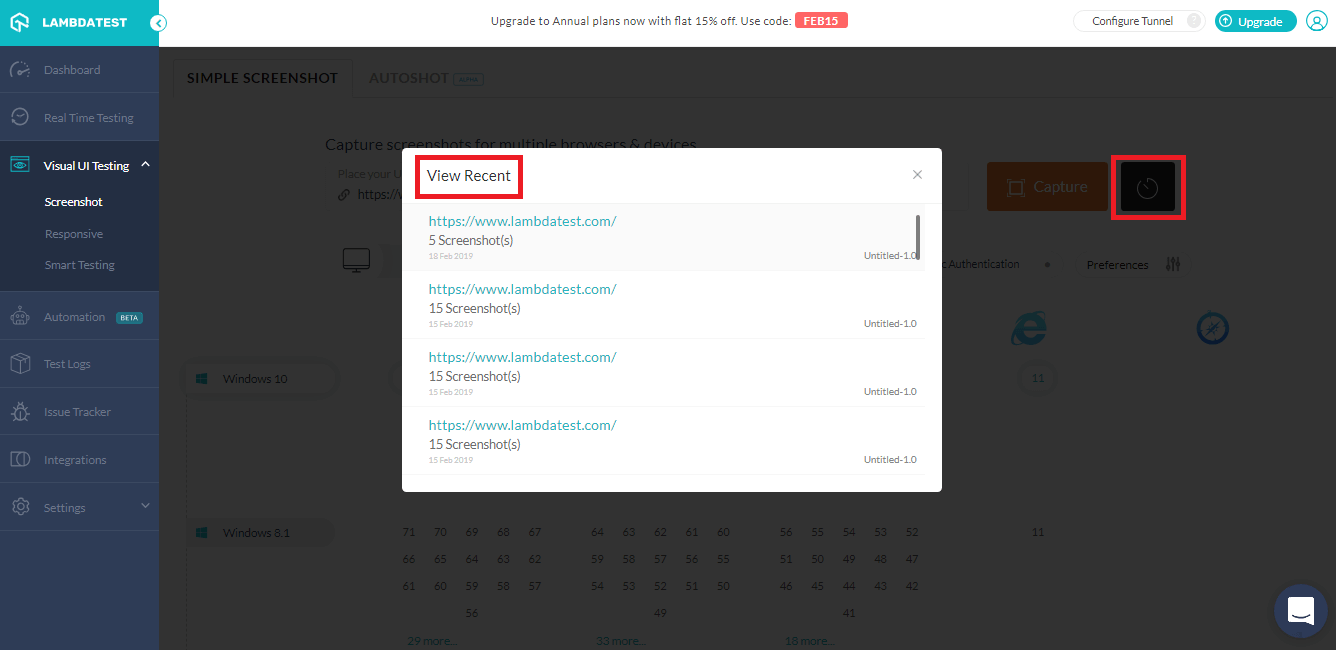
Easily review the output of last or recently performed test sessions by using automated screenshot testing on LambdaTest. LambdaTest records the configurations of your last performed test session so you could come back and analyze them through your convenience.
9. Responsive Testing On A Variety Of Screen Resolutions
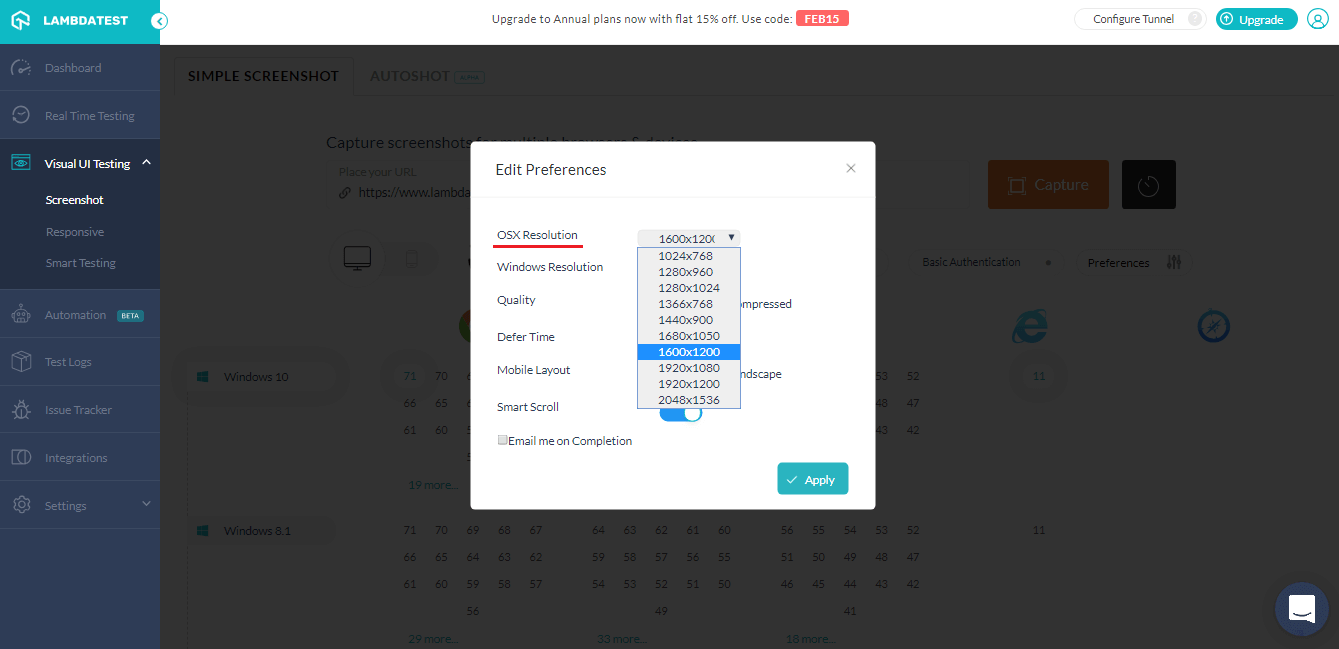
If you wish to perform a round of automated screenshot testing on a specific screen resolution then you can set that resolution under your preference for the test session. Go through this software testing question to understand how to check screen resolution.
You can select different resolutions from OSX:
Similarly, you can set resolutions from Windows:
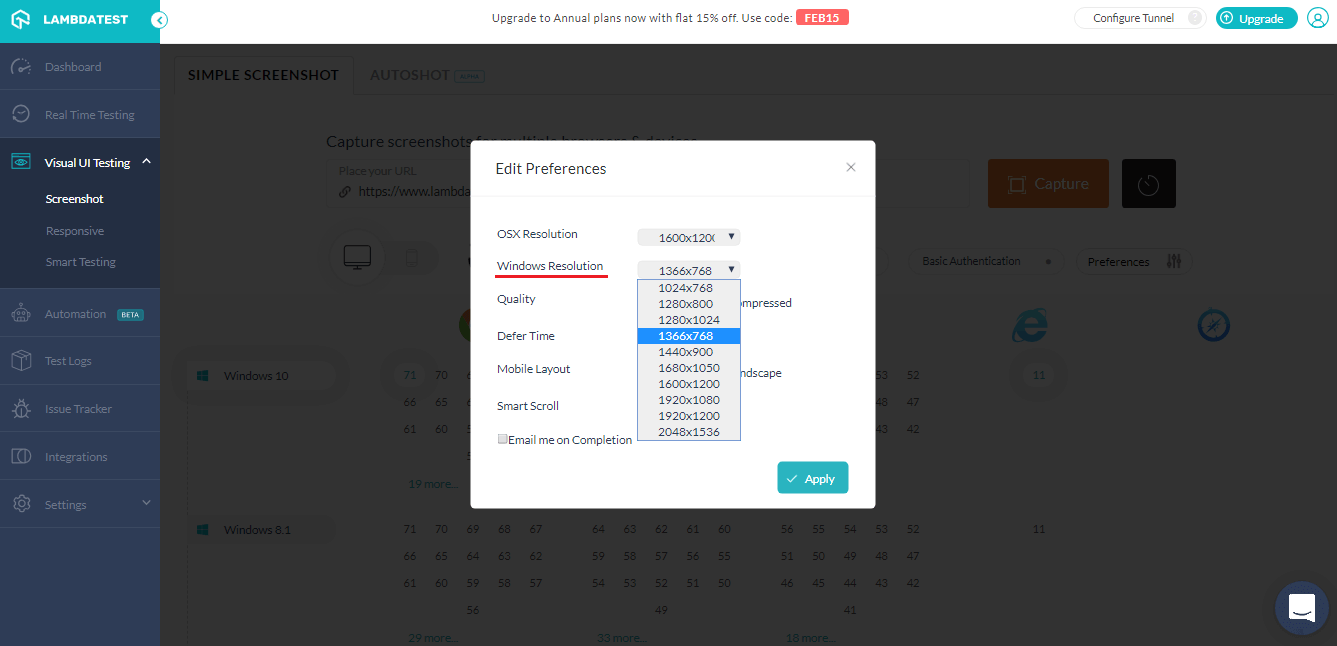
Note: These resolutions would only work for desktop devices. If you wish to test responsiveness on various mobile devices at one then make sure you use our feature for Responsive Testing.
10. Scheduling Your Automated Screenshots
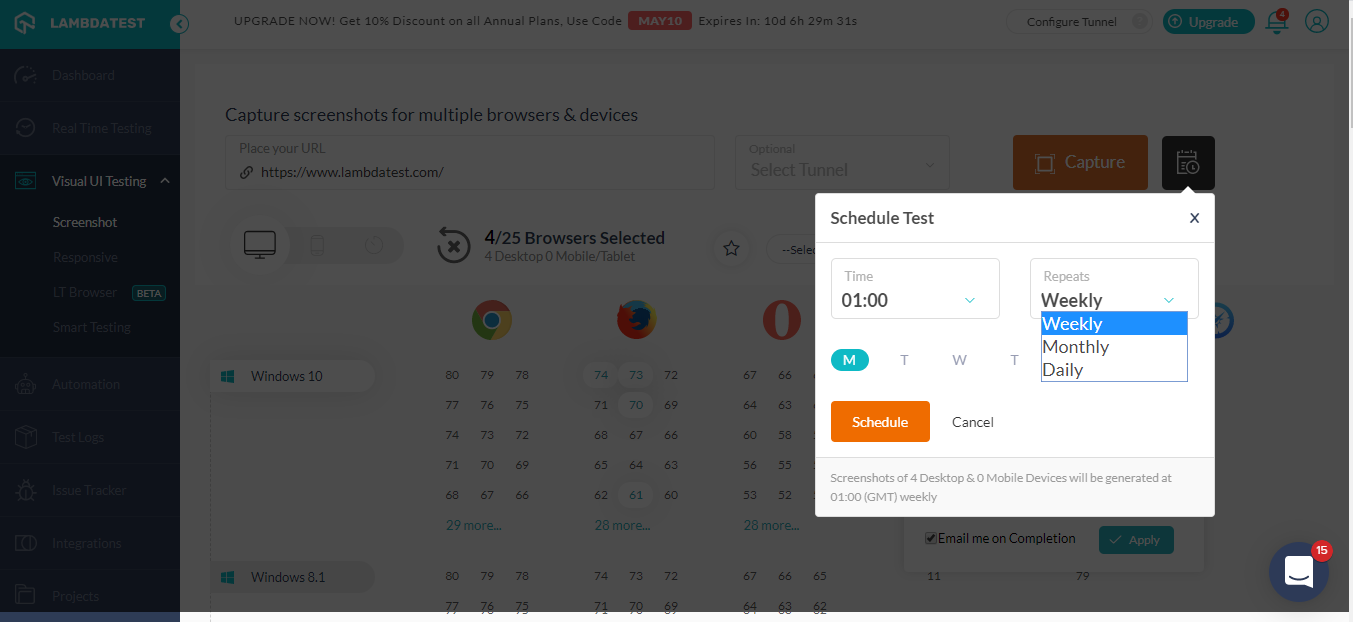
In case you want to schedule your screenshots on your browser matrix, you can do so easily with our scheduler. You just need to mention the frequency, it can be monthly, weekly or daily. You can also choose the timing and the day you want to schedule the screenshot tests and the screenshots will be shared with you on the mail
11. Taking Screenshots Behind Login
It’s easy to take screenshot behind login now, you can automatically capture bulk, full paged screenshots of any URL over different browsers after the login page, for different browsers to ensure the cross browser compatibility.
To get started you need to provide the login URL of the website, and then you need to identify the locators used for login and password in the login screen along with the locator for the login button. In the next screen, you need to enter your login credential for the website, and you’re good to go. Now you can easily take screenshots of any page behind the login.
In order to get a step by step approach for this you can refer to our documentation on screenshot behind log-in.
Bonus Point Number 12 – WordPress Plugin and Chrome Extension
LambdaTest has come up with a WordPress Plugin and a Chrome Extension which helps a user to perform automated screenshot testing with LambdaTest without logging into the platform.
Speed your cross browser testing process and boost your daily basis productivity by performing automated screenshot testing as your surf on WordPress or on the internet using the Chrome extension.
You can download WordPress Plugin by clicking here. Below is a quick tutorial video demonstrating how to perform automated screenshot testing using LambdaTest WordPress Plugin.
You can download Chrome Extension by clicking here. Below is a quick tutorial video demonstrating how to perform automated screenshot testing using LambdaTest Chrome Extension.
Wait! There is more!
You can do a lot more through Screenshot testing by LambdaTest. You can set defer time between the image capturing process, you can choose to ignore I-frames in your screenshots with by setting the preference of Smart Scroll. You can select the mobile layout, image quality and more. However, the above mentioned, are in my opinion the 10 feature you can’t miss in Screenshot testing on LambdaTest.
We are also coming with a functionality called Autoshot which would host your website on a live interactive test session through a VM using our cloud servers as we do in real time testing at LambdaTest. However, with Autoshot you can capture automated screenshots of every step that you perform under our live interactive test session. It is still in Alpha stage. So stay tuned to LambdaTest’s cross browser testing blog for further updates.
If you feel otherwise then let me know in the comment section below. We are always open to suggestions, so if there is anything that you would want to observe on our platform then be sure to let us know. You can drop an email on support@lambdatest.com or could simply give a shout to our 24×7 chat support by clicking here.
Got Questions? Drop them on LambdaTest Community. Visit now


