iPhone Gestures: A Guide to Seamless Mobile Navigation
Harish Rajora
Posted On: August 27, 2025
16 Min


Using an iPhone is more than just tapping icons. iPhone gestures like swiping, pinching, and dragging let you navigate apps, manage notifications, and control settings efficiently. Knowing these gestures can save time and make your device easier to use.
TABLE OF CONTENTS
Overview
iPhone gestures are actions like taps, swipes, pinches, and drags that allow users to interact directly with their device. Designed under Apple’s Human Interface Guidelines, gestures make navigation intuitive, actions efficient, and reduce reliance on physical buttons.
Types of iPhone Gestures
- Basic Touchscreen Interactions: Includes taps, double taps, pinches, tap and hold, swipes, and drag-and-drop gestures for everyday app use.
- Core System Gestures: Device-level gestures like swiping to open Control Center, Notification Panel, Spotlight Search, Home Screen, and App Switcher.
- Text Editing Gestures: Three-finger swipes and pinches to undo, redo, copy, paste, and cut text efficiently.
- Advanced and Accessibility Gestures: Gestures supporting VoiceOver, Assistive Touch, and other accessibility features for users with physical or visual impairments.
- iPhone FaceTime Hand Gestures: Non-touch gestures that trigger visual effects during FaceTime calls, such as thumbs up, peace sign, or double peace sign.
- Special iPhone Gestures: Combines buttons and motion for actions like screenshots, Siri activation, restarting devices, and Apple Pay.
Use Cases of iPhone Gestures
- Navigation: Gestures enable smooth movement through apps, content, and settings without extra taps.
- Text Management: Editing gestures streamline copying, pasting, undoing, and redoing text operations.
- Accessibility: Specialized gestures assist users with visual or physical disabilities.
- Communication: iPhone FaceTime gestures make calls interactive with visual feedback.
- Quick Actions: Special gestures allow rapid execution of key tasks like screenshots, activating Siri, or payments.
What Are iPhone Gestures?
iPhone gestures are actions like taps, swipes, pinches, and drags that let users interact directly with their device. They are designed under Apple Human Interface Guidelines to make navigation intuitive and actions efficient. By reducing reliance on physical buttons, gestures create a fluid experience that feels natural and responsive.
Gestures go beyond simple interaction. They let users move through apps, organize content, and perform tasks with minimal effort. Touch and stylus input are standard, while hand gestures are occasional, and peripherals like controllers are rarely relevant. Learning gestures improves speed, precision, and overall satisfaction when using the device.
To ensure your app handles these gestures correctly and delivers a seamless experience, it’s important to test apps on iPhones regularly.
Different Types of iPhone Gestures
An iPhone gesture is defined by two parts: the number of fingers touching the screen and their movement after touch (excluding FaceTime hand gestures).
Any change in these two factors creates a new gesture. To make sure your app handles every interaction correctly, it’s important to test on iPhone before release.
The following gestures are available on recent iPhone models, grouped into categories.
Basic Touchscreen Interactions
These gestures are used almost daily by most users.
- Tap: The most basic gesture, tapping an item selects it, similar to a mouse click. Tapping an app icon opens it. Images embedded in text often require a double-tap to select.
- Double Tap: Quickly tapping twice zooms in on images or zooms out if already zoomed in. Zoom scales vary by application. In Maps, combining double-tap with a hold allows dragging to zoom in or out.
- Pinch: Performed using two fingers, typically the thumb and index finger. Moving fingers apart (pinch open) zooms in, and moving them together (pinch close) zooms out. Pinch allows continuous magnification and is commonly used in Photos, Maps, Safari, Notes, Camera, and Files.
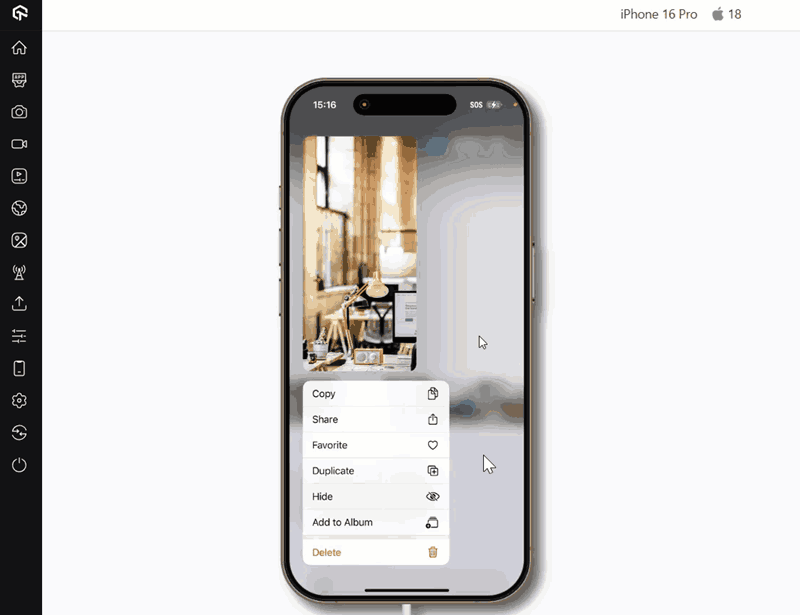
- Tap and Hold: Tapping and holding an item reveals a menu of actions. For images in Photos, this shows a quick preview and options. On text, it highlights the selection and shows actions like copy or paste. This gesture is equivalent to a mouse right-click.
- Swipe: Moving a finger across the screen triggers horizontal or vertical actions. Horizontal swipes are used for navigation in apps like Photos. Vertical swipes typically scroll content.
- Drag and Drop: Combines multiple gestures to move or copy elements between apps. Users select an element, navigate to the destination app, and release to drop it. Common uses include moving text, images, or files.
 Note
NoteTest your gestures on real iPhones & iPads. Try LambdaTest Today!
Core System Gestures
Core system gestures operate at the device level and remain consistent across all apps. They allow users to perform key actions with a single movement, eliminating the need to navigate multiple menus.
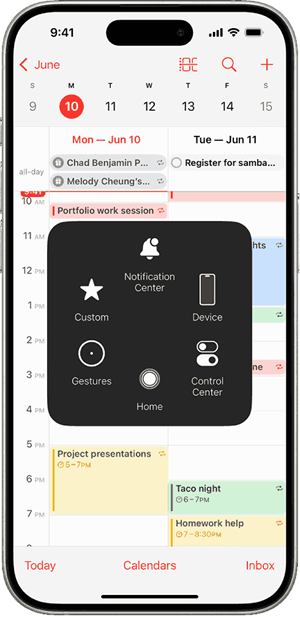
- Swipe Down (Top Right to Bottom): Performing a swipe from the top right to the bottom of the screen opens the Control Center, providing quick access to settings like Wi-Fi, Bluetooth, brightness, and media controls.
- Swipe Down (Top Left to Bottom): Swiping from the top left to the bottom opens the Notification Panel, showing recent notifications, alerts, and widgets without interrupting the current activity.
- Swipe Down (Middle to Bottom): Swiping down from the middle of the home screen opens Spotlight Search, allowing users to search for apps, contacts, emails, or web content directly.
- Swipe Up (Bottom to Top) to Open Home Screen: Performing a smooth swipe from the bottom to the top returns the user to the Home Screen, regardless of the app being used.
- Swipe Up (Bottom to Top) to Open App Switcher: Swiping up from the bottom and holding in the middle opens the App Switcher, displaying all open applications. Users can swipe left or right to switch between apps efficiently.
- Swipe Right on Home Screen: Swiping right on the Home Screen opens Today’s View, which contains widgets and quick information panels for weather, calendar events, news, and more.
- Swipe Left on Home Screen: Swiping left moves to the next recent application screen, allowing users to navigate between multiple pages of apps without returning to the Home Screen.
- Swipe Left on Lock Screen: Swiping left from the lock screen opens the Camera instantly, enabling quick access for photos or videos without unlocking the device.
Text Editing Gestures
Text editing gestures allow users to manage text quickly and efficiently on an iPhone. These gestures are particularly useful in messaging apps, emails, notes, and other text-heavy tasks, reducing the need for manual editing.
- Three-Finger Swipe Left (Undo): Swiping left with three fingers undoes the previous action. For example, it can restore text that was just deleted.
- Three-Finger Swipe Right (Redo): Swiping right with three fingers redoes an action that was undone, such as deleting text again after using undo.
- Three-Finger Swipe Down (Text Editing Menu): Swiping down with three fingers vertically opens the text editing toolbar. This gesture is rarely used but provides access to formatting and editing options.
- Three-Finger Pinch In (Copy Text): Pinching in with three fingers on a selected text copies it to the clipboard for easy pasting elsewhere.
- Three-Finger Pinch Out (Paste Text): Pinching out with three fingers pastes the text from the clipboard into the selected area.
- Three-Finger Pinch In Twice (Cut Text): Quickly pinching in twice with three fingers cuts the selected text and copies it to the clipboard.
Advanced and Accessibility Gestures
Standard iPhone gestures are not always fully accessible to people with disabilities. iPhone provides accessibility gestures to help users with physical or visual impairments perform tasks more easily. VoiceOver-based gestures require VoiceOver to be turned on via Settings > Accessibility > VoiceOver.
- Swipe Left to Previous Item: With VoiceOver enabled, swiping left selects the previous item on the screen.
- Swipe Right to Next Item: Swiping right selects the next item under the same settings.
- Four-Finger Tap (Top of Screen): Tapping with four fingers near the top selects the first item while VoiceOver is on.
- Four-Finger Tap (Bottom of Screen): Tapping with four fingers near the bottom selects the last item.
- Swipe Up With Two Fingers (Speak Entire Screen): Reads all content on the screen from top to bottom.
- Swipe Down With Two Fingers (Speak Selected Item): Reads content from the selected item only.
- Two-Finger Tap (Pause or Continue Speech): Pauses ongoing VoiceOver speech; if speech is paused, the same gesture resumes it.
- Three-Finger Tap (Get Additional Information): Provides extra details, such as whether selected text is highlighted, useful for visually impaired users.
- Three-Finger Swipe Down (Scroll Up One Page): Scrolls the screen up by one page.
- Three-Finger Swipe Up (Scroll Down One Page): Scrolls the screen down by one page.
- Touch and Hold / Triple-Tap: For users with physical disabilities who cannot hold an item, triple-tap can perform the same action.
- Three-Finger Double Tap (Zoom In/Out): Zooms in or out on an image. A slider appears to adjust magnification. Users can also move around the image by dragging with three fingers.
- Back Tap: Users can tap the back of the iPhone (two or three taps) to perform a custom action. These actions are configurable in Settings > Accessibility > Touch > Back Tap.
To ensure your iOS app supports all these features and delivers an inclusive experience, incorporating mobile accessibility testing into your QA process is essential.
FaceTime Hand Gestures
iPhone FaceTime hand gestures make video calls more interactive. These gestures do not require touching the screen and trigger visual effects on the call interface.
- One Thumb Up: Displaying a thumbs-up gesture during FaceTime shows a thumbs-up icon on the screen.
- Two Thumbs Up: Signaling two thumbs up simultaneously triggers fireworks on the call screen.
- Thumbs Down: A thumbs-down gesture displays a corresponding “thumbs down” icon.
- Two Thumbs Down: Using two thumbs down triggers a rainstorm effect on the screen.
- Peace Sign: Showing a peace sign (index and middle fingers together) displays balloons.
- Double Peace Sign: Making the peace sign with both hands simultaneously triggers confetti on the screen.
Special iPhone Gestures
Some iPhone gestures are considered special because they involve buttons or unique combinations to perform critical tasks. These gestures simplify actions like undoing text, taking screenshots, activating Siri, restarting the device, or making payments.
- Shake to Undo: If enabled under Settings > Accessibility > Touch, shaking the iPhone undoes recent actions. This works in apps like Notes and Messages.
- Screenshot With Face ID: Pressing the Side Button + Volume Up Button captures a screenshot on devices with Face ID.
- Screenshot With Touch ID: On devices with Touch ID, pressing the Home Button + Side Button captures a screenshot.
- Activate Siri With Face ID: Press and hold the Side Button to activate Siri on devices with Face ID.
- Activate Siri With Home Button: On devices with a Home Button, press and hold the Home Button to activate Siri.
- Restart Device With Face ID: Force restart a Face ID device by pressing and holding Volume Up > Volume Down > Side Button in sequence.
- Restart Device Without Face ID: Force restart by pressing and holding Volume Down + Side Button.
- Pay With Apple Pay (Face ID): Double-click the Side Button to open Apple Pay and pay with the default card.
- Pay With Apple Pay (Touch ID): Place your finger on the Touch ID sensor to pay with Apple Pay using the default card.
How to Create Custom iPhone Gestures With Assistive Touch?
iPhone users can create custom gestures and execute them with a single tap using Assistive Touch. This feature is especially useful for frequently used gestures or for users who prefer a simplified interaction.
- Enable Assistive Touch: Go to Settings > Accessibility > Touch > AssistiveTouch > Create New Gesture.
- Create the Gesture: Perform the gesture you want to save. For example, swipe down with three fingers, then tap Save.
- Activate Assistive Touch: Turn on Assistive Touch from the same menu. A small floating dot will appear on the screen, providing quick access to various options.
- Use the Custom Gesture: Tap the Custom option within the Assistive Touch menu to perform the saved gesture automatically.
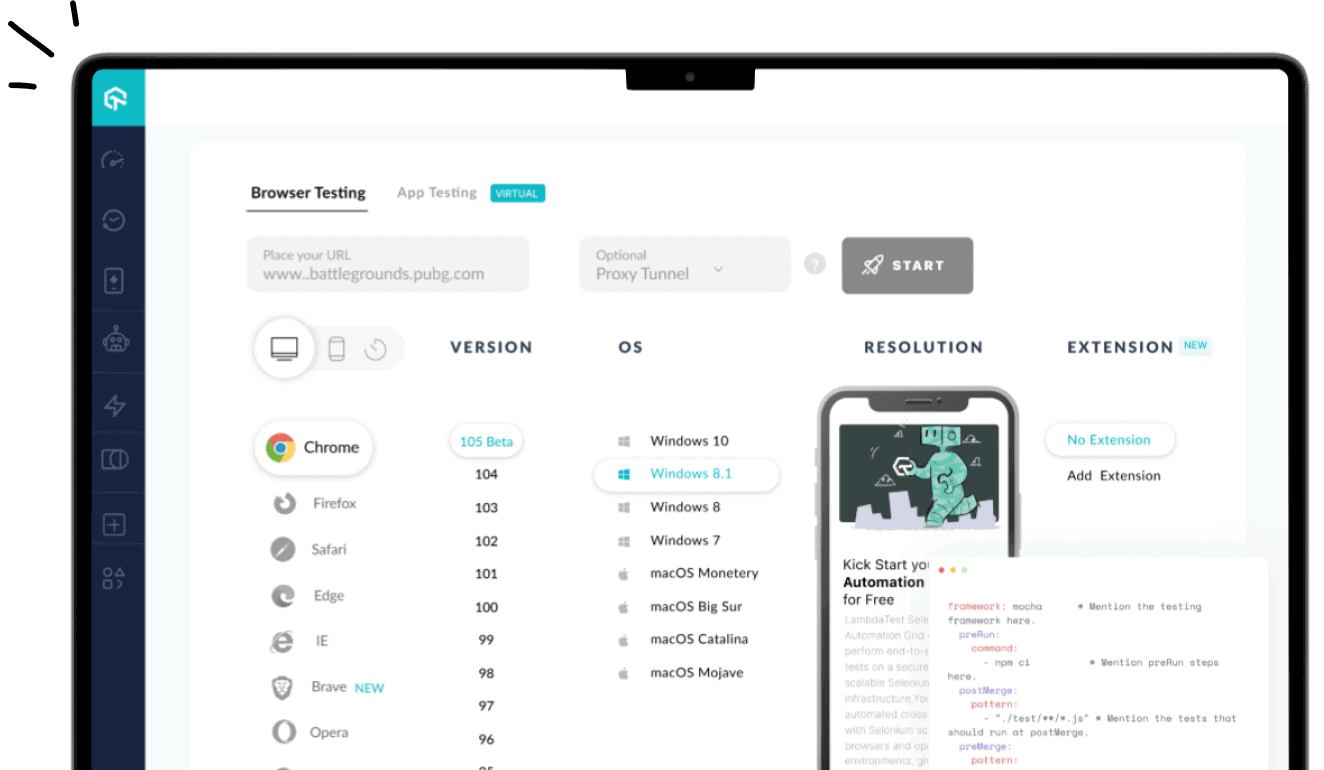
How to Test iPhone Gestures With LambdaTest Real Device Cloud?
iPhone gestures must be tested before releasing your app, but doing it manually is time-consuming and hectic. The smarter way is an online platform with all iPhone models accessible via a browser. LambdaTest makes gesture testing effortless with its real iOS device testing cloud.
LambdaTest lets you perform mobile app testing on real iOS devices in the cloud, ensuring your mobile apps perform flawlessly across iOS versions. With instant access to real iPhones and iPads on its , you can validate touch interactions, swipes, pinches, and more without managing a physical device lab.
Features:
- Real Device Cloud: Test on a wide range of iPhones and iPads with different iOS versions instantly.
- Gesture Testing: Validate taps, swipes, pinches, rotations, and multi-touch interactions.
- Cross-Browser and OS Coverage: Perform iOS app testing and ensure your iOS apps work on other browsers and OS versions.
- Automation Testing: Perform iOS automated testing with frameworks like Appium and XCUITest on real devices.
- Debugging & Reporting: Capture logs, screenshots, and video recordings for easy issue analysis.
To get started, check out this guide on real device app testing on LambdaTest.
Conclusion
iPhone gestures constitute a major percentage of what makes an iPhone experience worth buying the device. They are used by applications to implement their own functionalities on these gestures, and along with this, they need to make sure that none of these gestures (including iPhone FaceTime hand gestures) break their application flow.
These two reasons call for testing iPhone gestures on the application, for which the best solution is to opt for a cloud-based real device cloud like LambdaTest, which is economical, full of features, and takes care of all the mobile maintenance work.
Therefore, to catch gesture-specific issues early and deliver a reliable iOS app, it’s important to test iOS apps on multiple devices using real devices in the cloud, rather than relying solely on simulators or single-device testing.
Frequently Asked Questions (FAQs)
What are gestures on iPhone?
iPhone gestures are actions like taps, swipes, pinches, drags, and hand movements that allow users to interact with their device, navigate apps, manage content, and perform tasks efficiently without relying on physical buttons.
How to use gestures on iPhone?
Gestures are used by touching or moving fingers on the screen, combining taps, swipes, pinches, and holds. They let users navigate apps, edit text, access system controls, and interact with content intuitively and efficiently.
How to turn off VoiceOver gestures on iPhone?
To turn off VoiceOver gestures, go to Settings > Accessibility > VoiceOver and toggle it off. This disables VoiceOver-specific gestures while keeping standard touch gestures available for normal navigation and device interaction.
How to turn on hand gestures on iPhone?
iPhone hand gestures for FaceTime or accessibility are enabled via Settings > Accessibility or during FaceTime setup. Users can turn on features like back tap or VoiceOver gestures to allow hand-based or multi-touch interactions with the device.
How to turn off gestures on iPhone?
To disable certain gestures, go to Settings > Accessibility > Touch or specific gesture features like Back Tap, then toggle them off. This prevents accidental actions while keeping basic touch functionality for apps and navigation.
How to use iOS 18 gestures?
iOS 18 gestures follow standard iPhone interactions, including swipes, taps, pinches, and multitouch gestures. Users can navigate apps, edit text, access system controls, and use accessibility or FaceTime hand gestures according to the updated interface features.
How to enable gestures on iPhone?
Most gestures are enabled by default, but Assistive Touch or custom gestures can be added via Settings > Accessibility > Touch > AssistiveTouch. Users can create gestures for easier navigation, custom actions, or accessibility purposes.
What are the gestures on iPhone calls?
During iPhone calls, gestures like swipes, taps, or hand gestures can mute, answer, end, or switch calls. FaceTime supports interactive iPhone hand gestures that trigger visual effects, enhancing communication without relying solely on buttons or touch controls.
Citations
- Pages User Guide for iPhone: https://support.apple.com/en-in/guide/pages-iphone/tan72489b52/ios
Author
Harish Rajora is a Software Developer 2 at Oracle India with over 6 years of hands-on experience in Python and cross-platform application development across Windows, macOS, and Linux. He has authored 800 + technical articles published across reputed platforms. He has also worked on several large-scale projects, including GenAI applications, and contributed to core engineering teams responsible for designing and implementing features used by millions. Harish has worked extensively with Django, shell scripting, and has led DevOps initiatives, building CI/CD pipelines using Jenkins, AWS, GitLab, and GitHub. He has completed his post-graduation with an M.Tech in Software Engineering from the Indian Institute of Information Technology (IIIT) Allahabad. Over the years, he has emphasized the importance of planning, documentation, ER diagrams, and system design to write clean, scalable, and maintainable code beyond just implementation.
Blogs: 112