How To Run JUnit Tests In Jupiter? [JUnit Jupiter Tutorial]
Shalini Baskaran
Posted On: March 16, 2022
![]() 354953 Views
354953 Views
![]() 12 Min Read
12 Min Read
This article is a part of our Learning Hub. For more in-depth resources, check out our hub on JUnit Tutorial.
JUnit Jupiter is a perfect blend of the JUnit 5 programming model and extension model for writing tests and extensions. The Jupiter sub-project provides a TestEngine for running Jupiter-based tests on the platform. It also defines the TestEngine API for developing new testing frameworks that run on the platform.
The Jupiter programming model is derived from JUnit 4’s annotations and assumptions about how you structure your test code. So, if you are familiar with JUnit 4, then it will be pretty simple to grasp Jupiter concepts.
With this article on JUnit Jupiter, let’s explore the basic usage of Jupiter, its unit testing capabilities, and how you can run JUnit tests in Jupiter.
TABLE OF CONTENTS
- What is JUnit?
- JUnit 5 – The next generation testing framework
- Writing simple JUnit 5 test cases using Jupiter
- Running JUnit 5 tests with specific tags
- Writing JUnit 5 tests with composed annotation
- Writing test cases repeatedly in JUnit5
- Running JUnit 5 tests using Jupiter
- Running JUnit 5 tests in LambdaTest Grid
- Frequently Asked Questions (FAQs)
What is JUnit?
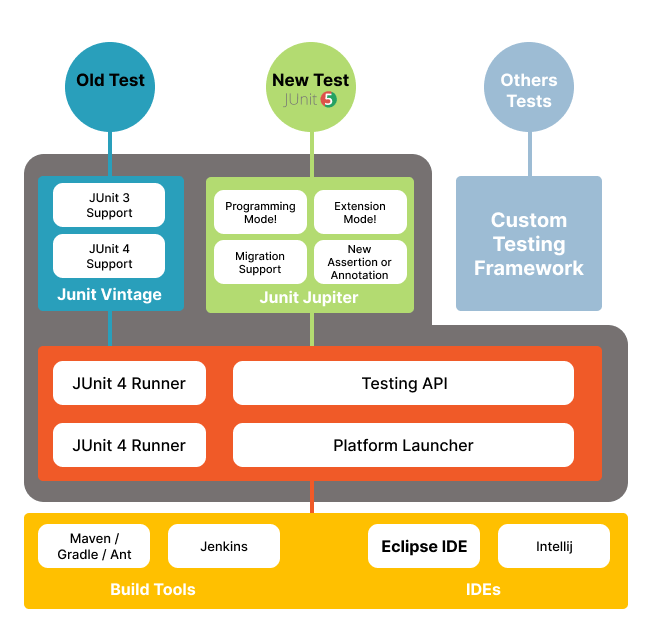
JUnit is one of the most powerful unit testing frameworks that has been widely used for carrying out unit tests. JUnit 5 is the latest version of JUnit consisting of three different sub-components, namely JUnit Platform, JUnit Jupiter, and JUnit Vintage. JUnit 5 requires Java version 8 or any other higher version, which makes it stand out from its previous versions. But surprisingly, the unit tests written in JUnit4 or previous versions can still be compiled and tested with JUnit 5. Now let us understand the three sub-components of JUnit 5.
Also Read – How to execute JUnit 4 tests with JUnit 5 [Tutorial]

JUnit 5 – The next generation testing framework
JUnit 5 is the latest, modular and highly extensible version of JUnit. The JUnit platform is the basic foundation of the testing framework, which helps in framework development. The JUnit framework is made up of three modules:
- JUnit Platform provides a clean and functional API for managing, executing, and reporting the results of tests. Tools built with the JUnit Platform can rely on the JUnit tooling ecosystem to discover, run, report, and diagnose test execution.
- JUnit Jupiter is used for writing the tests and the Jupiter sub-project provides a TestEngine for running Jupiter-based tests on the platform.
- JUnit Vintage is used for running earlier versions of JUnit tests such as JUnit 3 and JUnit 4 based tests.
Annotations used in JUnit 5
JUnit annotations are required while performing Selenium automation testing with JUnit. So, basically, annotations are the meta-tags that provide additional information about the methods and classes defined in our code structure. Below are some of the annotations that are used in JUnit 5.
- @Test – This annotation is used for declaring a test.
- @TestFactory – This annotation is used for defining a method which is a test factory for dynamic tests which are generated at the runtime
- @RepeatedTest – This annotation is used to specify that the method is a template for the tests that can be repeated a specific number of times.
- @ParameterizedTest – This annotation is used to indicate that the method is a parameterized test. These parameterized tests are similar to normal test methods, but we have to specify a source to provide parameters for each invocation used in the test.
- @TestMethodOrder – This annotation is used to define the order of the test execution.
- @DisplayName – This annotation is used to specify a customized display name for the method or class.
- @Tag – This annotation is used for filtering the tests at the method or class level by defining the tags.
- @Disabled – This annotation is used to disable a test method or class.
- @BeforeEach – This annotation is used to specify that the specific test method has to be executed before each @Test, @RepeatedTest, @ParameterizedTest, or @TestFactory method.
- @AfterEach – This annotation is used to specify that the specific test method has to be executed after each @Test, @RepeatedTest, @ParameterizedTest, or @TestFactory method.
- @BeforeAll – This annotation is used to specify that the specific test method has to be executed before all @Test, @RepeatedTest, @ParameterizedTest, or @TestFactory method.
- @AfterAll – This annotation is used to specify that the specific test method has to be executed after all @Test, @RepeatedTest, @ParameterizedTest, or @TestFactory method.
To understand the difference between JUnit 5 and JUnit 4, please refer to our article on executing JUnit 4 test with JUnit 5. Now let us see how to create simple test cases in JUnit 5 and run them using Jupiter.

LambdaTest offers free JUnit certification for Java developers that can be helpful to accelerate your career in Java development and testing.
Here’s a glimpse of the JUnit Certification offered by LambdaTest:
Writing simple JUnit 5 test cases using Jupiter
Prior to writing the test cases, let us quickly understand the scenarios and steps to automate the tests. We will be using the https://www.lambdatest.com website for writing our test cases.
Scenario 1: Launch LambdaTest website and verify the tabs on the main page:
- Navigate to https://www.lambdatest.com website.
- Verify the tabs like Automation, Pricing, Resources, etc., are displayed on the main page or not.
Scenario 2: Login into the LambdaTest website and verify whether the user could successfully navigate to the LT Browser page:
- Navigate to https://www.lambdatest.com website.
- Enter the valid credentials.
- Upon successful login, verify if the user is able to navigate to the LT Browser page.
Scenario 3: Verify if the user is able to navigate to his profile page
- Navigate to https://www.lambdatest.com website.
- Login to the website using valid credentials.
- Verify if the user is able to navigate to his profile.
Scenario 4: Verify the list of options available under the Resources tab:
- Navigate to https://www.lambdatest.com website.
- Under the Resources tab, verify if the list of options is displayed or not.
To write and run your JUnit 5 tests cases using Jupiter, make sure that you have added the below dependencies in the pom.xml file.
|
1 2 3 4 5 6 7 8 9 10 11 12 13 14 15 16 17 18 19 20 21 22 23 24 25 26 27 28 29 30 31 32 33 34 35 36 37 |
<?xml version="1.0" encoding="UTF-8"?> <project xmlns="http://maven.apache.org/POM/4.0.0" xmlns:xsi="http://www.w3.org/2001/XMLSchema-instance" xsi:schemaLocation="http://maven.apache.org/POM/4.0.0 http://maven.apache.org/xsd/maven-4.0.0.xsd"> <modelVersion>4.0.0</modelVersion> <groupId>org.example</groupId> <artifactId>Demo</artifactId> <version>1.0-SNAPSHOT</version> <properties> <maven.compiler.source>1.8</maven.compiler.source> <maven.compiler.target>${maven.compiler.source}</maven.compiler.target> <junit.jupiter.version>5.7.1</junit.jupiter.version> </properties> <dependencies> <dependency> <groupId>org.junit.jupiter</groupId> <artifactId>junit-jupiter-engine</artifactId> <version>${junit.jupiter.version}</version> <scope>test</scope> </dependency> <dependency> <groupId>org.junit.jupiter</groupId> <artifactId>junit-jupiter-api</artifactId> <version>${junit.jupiter.version}</version> <scope>test</scope> </dependency> <dependency> <groupId>org.seleniumhq.selenium</groupId> <artifactId>selenium-java</artifactId> <version>3.141.59</version> </dependency> </dependencies> </project> |
Below is the automation test script covering all the above-mentioned scenarios.
|
1 2 3 4 5 6 7 8 9 10 11 12 13 14 15 16 17 18 19 20 21 22 23 24 25 26 27 28 29 30 31 32 33 34 35 36 37 38 39 40 41 42 43 44 45 46 47 48 49 50 51 52 53 54 55 56 57 58 59 60 61 62 63 64 65 66 67 68 69 70 71 72 73 74 75 76 77 78 79 80 81 82 83 84 85 86 87 88 89 90 91 92 93 94 95 96 97 98 99 100 101 102 103 104 105 106 107 108 109 110 111 112 113 114 115 116 117 118 119 120 121 122 123 124 125 126 127 128 129 130 131 132 133 134 135 136 137 138 139 140 141 142 143 144 145 146 147 148 149 150 151 152 153 154 155 156 157 158 159 160 161 162 163 164 165 166 167 168 169 170 171 172 173 174 175 176 177 178 179 180 181 182 183 |
package demo; import org.junit.jupiter.api.*; import org.openqa.selenium.By; import org.openqa.selenium.WebDriver; import org.openqa.selenium.WebElement; import org.openqa.selenium.chrome.ChromeDriver; import org.openqa.selenium.interactions.Actions; import org.openqa.selenium.support.ui.ExpectedConditions; import org.openqa.selenium.support.ui.WebDriverWait; import java.util.ArrayList; import java.util.Arrays; import java.util.List; import java.util.concurrent.TimeUnit; @TestMethodOrder(MethodOrderer.OrderAnnotation.class) public class demoTests { WebDriver driver; String urlToTest ="https://www.lambdatest.com/"; @BeforeAll public static void start() { System.out.println("=======Starting junit 5 tests========"); } @BeforeEach public void setup() { System.out.println("Setting up the drivers"); System.setProperty("webdriver.chrome.driver", "C:\\Users\\Shalini\\Downloads\\chromedriver_latest94\\chromedriver.exe"); driver = new ChromeDriver(); } /*To test the tabs available in the main page like Resources,Documentation,login etc */ @Test @DisplayName("HeaderTabs_Test") @Tag("Smoke") @Order(1) public void headers_Test() { String methodName = Thread.currentThread() .getStackTrace()[1] .getMethodName(); System.out.println("********Execution of "+methodName+" has been started********"); System.out.println("Launching LambdaTest website started.."); driver.get(urlToTest); driver.manage().window().maximize(); driver.manage().timeouts().pageLoadTimeout(10, TimeUnit.SECONDS); List<WebElement> elements = driver.findElements(By.xpath("//*[contains(@class,'md:text-right')]/a")); List<String> actualList = new ArrayList<>(); for(WebElement ele :elements){ actualList.add(ele.getText()); } System.out.println("Actual elements : "+actualList); List<String> expectedList = Arrays.asList("Live","Automation","Pricing","Documentation","Login","Start Free Testing"); System.out.println("Expected elements : "+expectedList); boolean boolval = actualList.equals(expectedList); System.out.println(boolval); Assertions.assertTrue(boolval); System.out.println("********Execution of "+methodName+" has ended********"); } @Test @DisplayName("LTBrowser_Test") @Tag("Smoke") @Order(2) public void click_LTBrowser_Test() { String methodName = Thread.currentThread() .getStackTrace()[1] .getMethodName(); System.out.println("********Execution of "+methodName+" has been started********"); System.out.println("Launching LambdaTest website started.."); driver.get(urlToTest); driver.manage().window().maximize(); driver.manage().timeouts().pageLoadTimeout(10, TimeUnit.SECONDS); driver.findElement(By.xpath("//a[text()='Login']")).click(); driver.findElement(By.xpath("//input[@name=\"email\"]")).sendKeys("successismine514@gmail.com"); driver.findElement(By.xpath("//input[@name=\"password\"]")).sendKeys("Google@123"); driver.findElement(By.xpath("//button[text()='Login']")).click(); driver.manage().timeouts().pageLoadTimeout(20, TimeUnit.SECONDS); List <WebElement> options = driver.findElements(By.xpath("//div[contains(@class,'aside__menu__item')]//a")); for(WebElement ele : options){ if(ele.getText().equals("LT Browser")) { ele.click(); break; } } driver.manage().timeouts().implicitlyWait(20,TimeUnit.SECONDS); String actualText = driver.findElement(By.xpath("//*[@class='lt__demo__box__title']")).getText(); String expectedText = "LT Browser- Desktop App for Fast and Easy Mobile View Testing"; Assertions.assertEquals(expectedText, actualText); System.out.println("The user has been successfully navigated to LT browser page"); System.out.println("********Execution of "+methodName+" has ended********"); } @Test() @DisplayName("editProfile_Test") @Order(3) public void editProfile_Test() { String methodName = Thread.currentThread() .getStackTrace()[1] .getMethodName(); System.out.println("********Execution of "+methodName+" has been started********"); System.out.println("Launching LambdaTest website started.."); driver.get(urlToTest); driver.manage().window().maximize(); driver.manage().timeouts().pageLoadTimeout(10, TimeUnit.SECONDS); driver.findElement(By.xpath("//a[text()='Login']")).click(); driver.findElement(By.xpath("//input[@name=\"email\"]")).sendKeys("successismine514@gmail.com"); driver.findElement(By.xpath("//input[@name=\"password\"]")).sendKeys("Google@123"); driver.findElement(By.xpath("//button[text()='Login']")).click(); driver.manage().timeouts().pageLoadTimeout(20, TimeUnit.SECONDS); driver.findElement(By.id("profile__dropdown")).click(); driver.findElement(By.xpath("//*[@class='profile__dropdown__item']")).click(); String actualTitle = driver.getTitle(); Assertions.assertEquals(actualTitle,"Profile - LambdaTest"); System.out.println("********Execution of "+methodName+" has ended********"); } @Test @DisplayName("ResourcesOption_Test") @Order(4) public void getListOfOptionsUnderResourcesTab() { String methodName = Thread.currentThread() .getStackTrace()[1] .getMethodName(); System.out.println("********Execution of "+methodName+" has been started********"); System.out.println("Launching LambdaTest website started.."); driver.get(urlToTest); driver.manage().window().maximize(); driver.manage().timeouts().pageLoadTimeout(10, TimeUnit.SECONDS); WebElement resources = driver.findElement(By.xpath("//*[text()='Resources ']")); List<WebElement> options_under_resources = driver.findElements(By.xpath("//*[text()='Resources ']/../ul/a")); boolean flag = resources.isDisplayed(); if(flag) { System.out.println("Resources header is visible in the webpage"); Actions action = new Actions(driver); action.moveToElement(resources).build().perform(); WebDriverWait wait=new WebDriverWait(driver, 20); wait.until(ExpectedConditions.visibilityOfAllElements(options_under_resources)); List<String> options = new ArrayList<>(); for(WebElement element : options_under_resources) { options.add(element.getText()); } System.out.println(options); List<String> list = Arrays.asList("Blog", "Certifications", "Learning Hub", "Webinars", "Videos", "Newsletter", "Community", "Case Studies", "Product Updates"); boolean boolval = list.equals(options); System.out.println(boolval); Assertions.assertTrue(boolval); } else { Assertions.fail("Resources header is not visible"); } System.out.println("********Execution of "+methodName+" has ended********"); } @AfterEach public void tearDown() { System.out.println("Quitting the browsers has started"); driver.quit(); System.out.println("Quitting the browsers has ended"); } @AfterAll public static void end() { System.out.println("Tests ended"); } } |
In the above script, you could have noticed some JUnit 5 annotations. Let us understand them one by one.
- @DisplayName – This annotation is used to specify a customized display name for the method or class.
- @Tag – This annotation is used for filtering the tests at the method or class level by defining the tags.
- @Order – This annotation is used for providing the sequence or order in which the tests have to be executed.
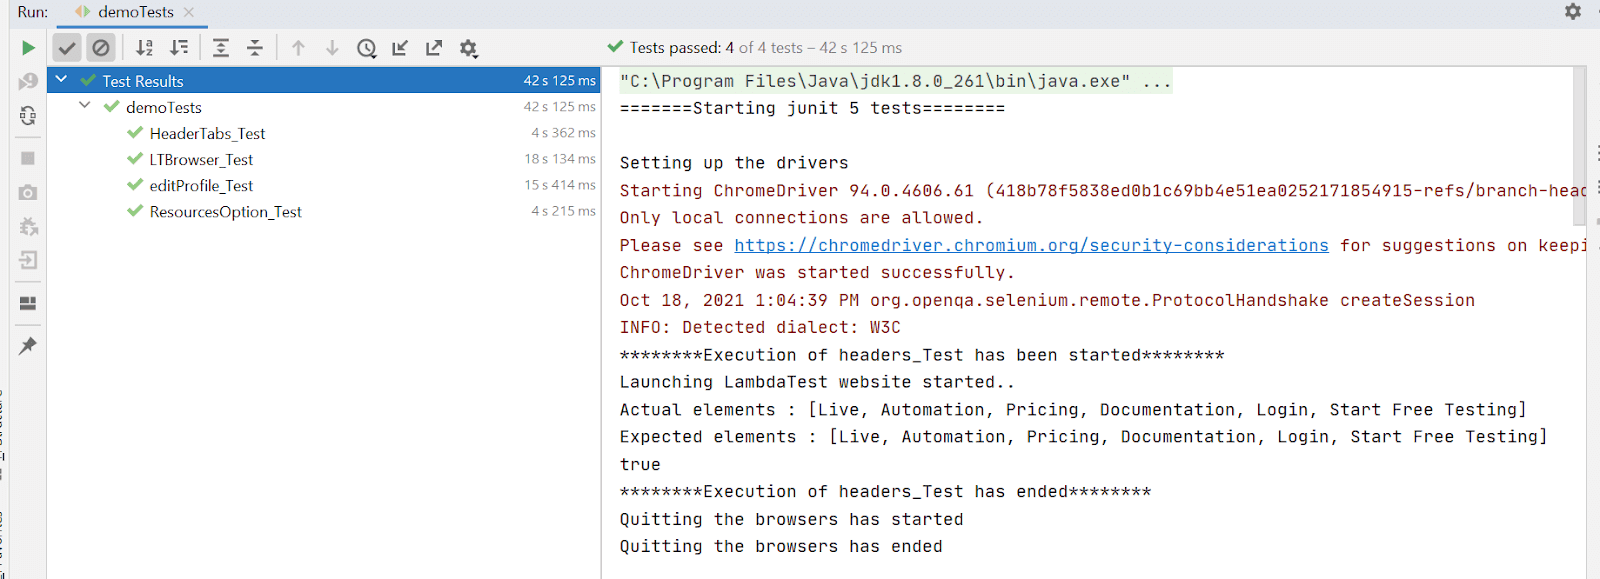
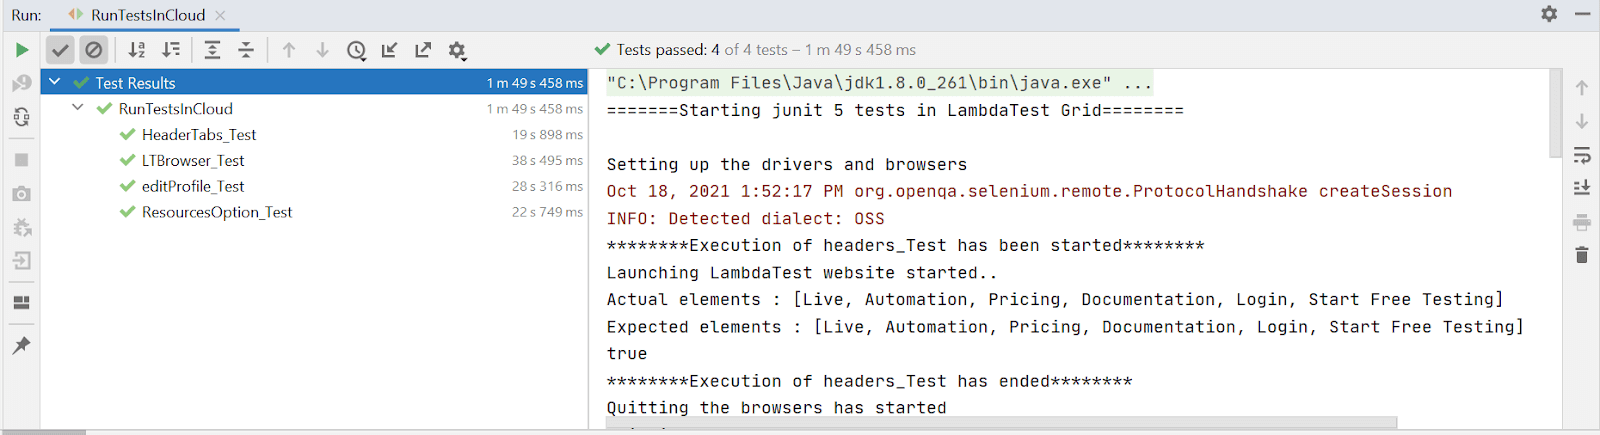
To execute the JUnit Tests, right-click on the class and click Run.
Console Output:
The test cases would be run in the respective order that has been provided.
You can check our blog on junit interview questions, this will come in handy if your are preparing for an interview.
Running JUnit 5 tests with specific tags
In our test script, we have used tags for grouping the test cases. For example, during the process of testing, there would be a need to run only smoke or sanity cases. In such cases, we can group the tests using tags and execute them. To run the test cases specific to a tag,
- Right-click on your test class.
- Click Edit ‘your test class name.’
- In the Edit Run Configuration dialog box, select Test Kind as Tags and enter the tag value in the Tag expression field.
- Now Run your tests.
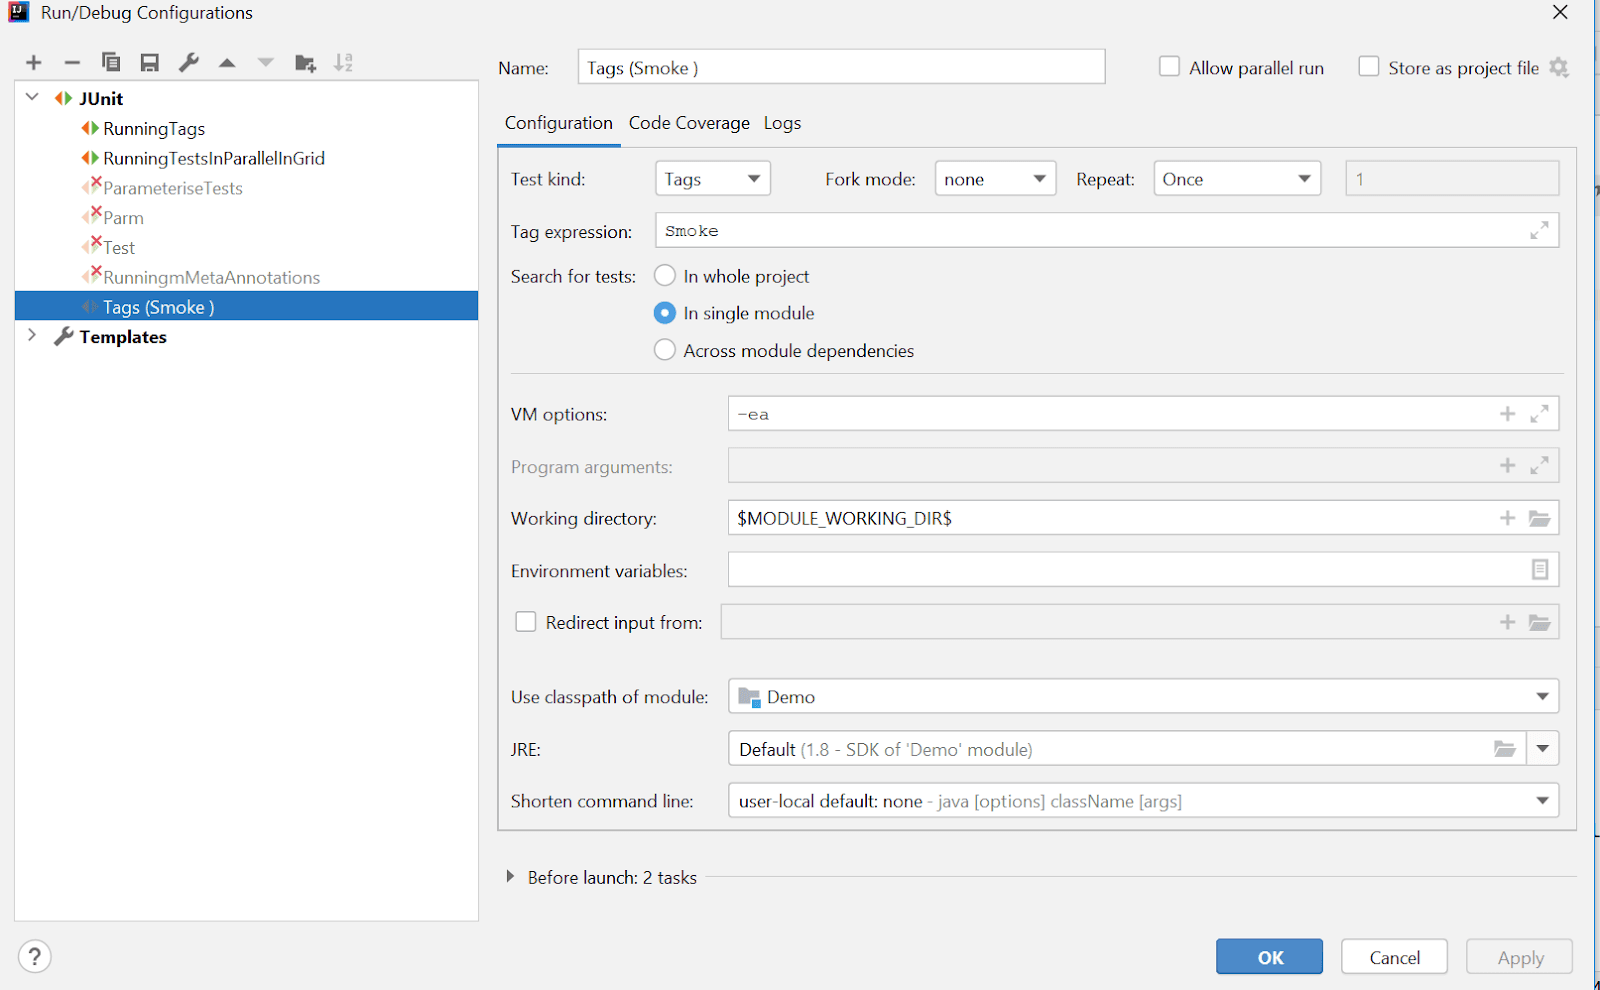
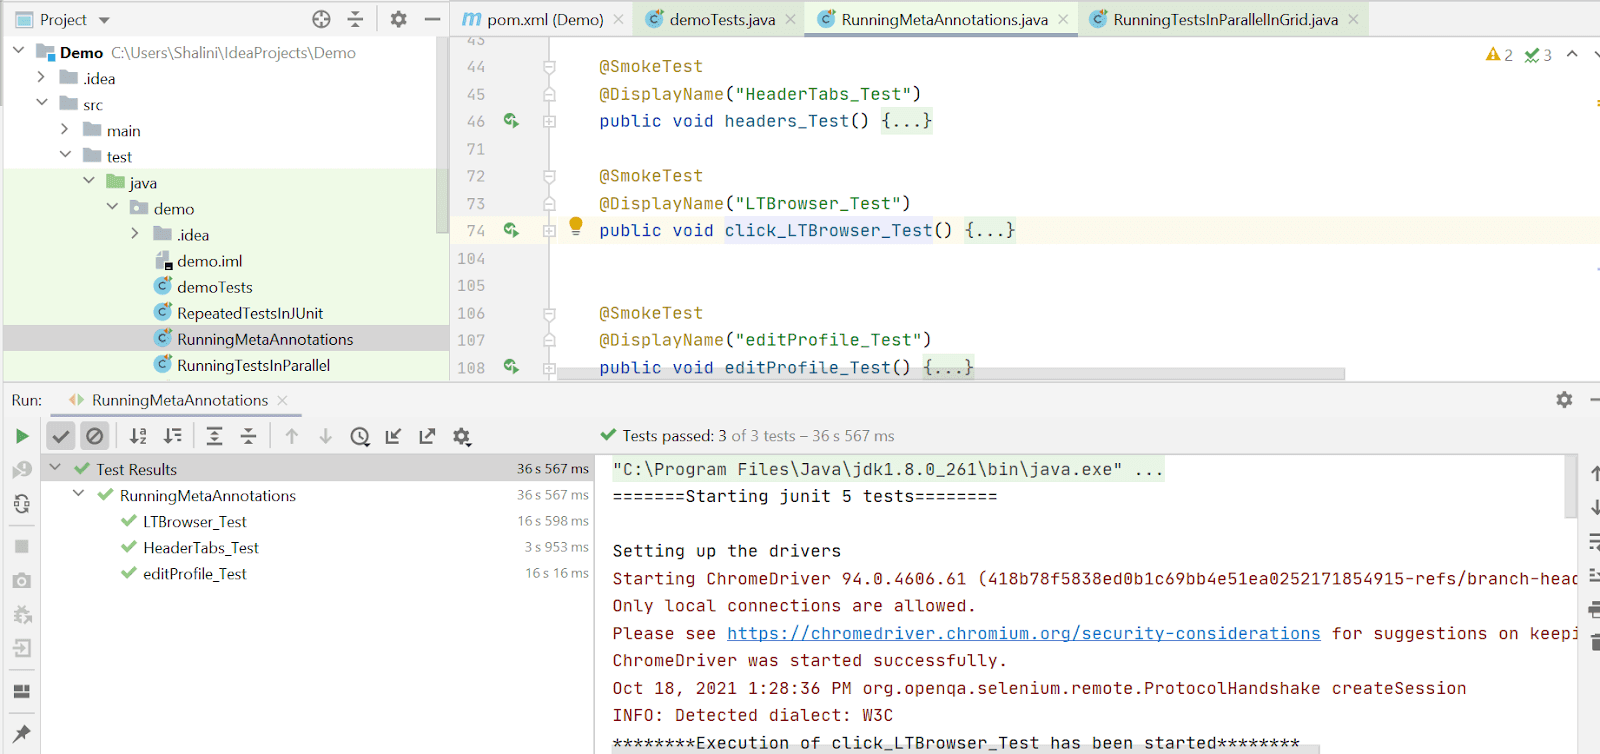
Console Output:
In the console, you could see the execution of the tests specific to the tags.

Also read – Mastering Selenium Testing: JUnit Asserts With Examples
Writing JUnit 5 tests with composed annotation
Annotations in JUnit Jupiter can be used as meta-annotations. This allows you to create a custom composed annotation that will automatically inherit the semantics of its meta-annotations. For example, you can use @Test and @Tag(“Smoke”) annotations as meta-annotations and create a composed annotation named @SmokeTest which can be used as a replacement for the other two annotations on tests.
|
1 2 3 4 5 6 7 8 9 10 11 12 13 14 15 16 17 18 19 20 21 22 23 24 25 26 27 28 29 30 31 32 33 34 35 36 37 38 39 40 41 42 43 44 45 46 47 48 49 50 51 52 53 54 55 56 57 58 59 60 61 62 63 64 65 66 67 68 69 70 71 72 73 74 75 76 77 78 79 80 81 82 83 84 85 86 87 88 89 90 91 92 93 94 95 96 97 98 99 100 101 102 103 104 105 106 107 108 109 110 111 112 113 114 115 116 117 118 119 120 121 122 123 124 125 126 127 128 129 130 131 132 133 134 135 136 137 138 139 140 141 142 143 144 |
package demo; import org.junit.jupiter.api.*; import org.openqa.selenium.By; import org.openqa.selenium.WebDriver; import org.openqa.selenium.WebElement; import org.openqa.selenium.chrome.ChromeDriver; import org.openqa.selenium.support.ui.ExpectedConditions; import org.openqa.selenium.support.ui.WebDriverWait; import java.lang.annotation.ElementType; import java.lang.annotation.Retention; import java.lang.annotation.RetentionPolicy; import java.lang.annotation.Target; import java.util.ArrayList; import java.util.Arrays; import java.util.List; import java.util.concurrent.TimeUnit; public class RunningMetaAnnotations { @Target({ ElementType.TYPE, ElementType.METHOD }) @Retention(RetentionPolicy.RUNTIME) @Tag("Smoke") @Test public @interface SmokeTest { } WebDriver driver; String urlToTest ="https://www.lambdatest.com/"; @BeforeAll public static void start() { System.out.println("=======Starting junit 5 tests========"); } @BeforeEach public void setup() { System.out.println("Setting up the drivers"); System.setProperty("webdriver.chrome.driver", "C:\\Users\\Shalini\\Downloads\\chromedriver_latest94\\chromedriver.exe"); driver = new ChromeDriver(); } @SmokeTest @DisplayName("HeaderTabs_Test") public void headers_Test() { String methodName = Thread.currentThread() .getStackTrace()[1] .getMethodName(); System.out.println("********Execution of "+methodName+" has been started********"); System.out.println("Launching LambdaTest website started.."); driver.get(urlToTest); driver.manage().window().maximize(); driver.manage().timeouts().pageLoadTimeout(10, TimeUnit.SECONDS); List<WebElement> elements = driver.findElements(By.xpath("//*[contains(@class,'md:text-right')]/a")); List<String> actualList = new ArrayList<>(); for(WebElement ele :elements){ actualList.add(ele.getText()); } System.out.println("Actual elements : "+actualList); List<String> expectedList = Arrays.asList("Live","Automation","Pricing","Documentation","Login","Start Free Testing"); System.out.println("Expected elements : "+expectedList); boolean boolval = actualList.equals(expectedList); System.out.println(boolval); Assertions.assertTrue(boolval); System.out.println("********Execution of "+methodName+" has ended********"); } @SmokeTest @DisplayName("LTBrowser_Test") public void click_LTBrowser_Test() { String methodName = Thread.currentThread() .getStackTrace()[1] .getMethodName(); System.out.println("********Execution of "+methodName+" has been started********"); System.out.println("Launching LambdaTest website started.."); driver.get(urlToTest); driver.manage().window().maximize(); driver.manage().timeouts().pageLoadTimeout(10, TimeUnit.SECONDS); driver.findElement(By.xpath("//a[text()='Login']")).click(); driver.findElement(By.xpath("//input[@name=\"email\"]")).sendKeys("successismine514@gmail.com"); driver.findElement(By.xpath("//input[@name=\"password\"]")).sendKeys("Google@123"); driver.findElement(By.xpath("//button[text()='Login']")).click(); driver.manage().timeouts().pageLoadTimeout(20, TimeUnit.SECONDS); List <WebElement> options = driver.findElements(By.xpath("//div[contains(@class,'aside__menu__item')]//a")); for(WebElement ele : options){ if(ele.getText().equals("LT Browser")) { ele.click(); break; } } driver.manage().timeouts().implicitlyWait(20,TimeUnit.SECONDS); String actualText = driver.findElement(By.xpath("//*[@class='lt__demo__box__title']")).getText(); String expectedText = "LT Browser- Desktop App for Fast and Easy Mobile View Testing"; Assertions.assertEquals(expectedText, actualText); System.out.println("The user has been successfully navigated to LT browser page"); System.out.println("********Execution of "+methodName+" has ended********"); } @SmokeTest @DisplayName("editProfile_Test") public void editProfile_Test() { String methodName = Thread.currentThread() .getStackTrace()[1] .getMethodName(); System.out.println("********Execution of "+methodName+" has been started********"); System.out.println("Launching LambdaTest website started.."); driver.get(urlToTest); driver.manage().window().maximize(); driver.manage().timeouts().pageLoadTimeout(10, TimeUnit.SECONDS); driver.findElement(By.xpath("//a[text()='Login']")).click(); driver.findElement(By.xpath("//input[@name=\"email\"]")).sendKeys("successismine514@gmail.com"); driver.findElement(By.xpath("//input[@name=\"password\"]")).sendKeys("Google@123"); driver.findElement(By.xpath("//button[text()='Login']")).click(); driver.manage().timeouts().pageLoadTimeout(20, TimeUnit.SECONDS); driver.findElement(By.id("profile__dropdown")).click(); driver.findElement(By.xpath("//*[@class='profile__dropdown__item']")).click(); String actualTitle = driver.getTitle(); Assertions.assertEquals(actualTitle,"Profile - LambdaTest"); System.out.println("********Execution of "+methodName+" has ended********"); } @AfterEach public void tearDown() { System.out.println("Quitting the browsers has started"); driver.quit(); System.out.println("Quitting the browsers has ended"); } @AfterAll public static void end() { System.out.println("Tests ended"); } } |
Console Output:
The tests marked with composed annotation have been executed.
Writing test cases repeatedly in JUnit5
To run our JUnit tests repeated a certain number of times, JUnit 5 provides an annotation @RepeatedTest. Using the RepeatedTest class, you can write a test method that will repeat execution with different input data over and over again. This class gets used when your tests need to be repeated multiple times with data, such as when running performance profiling or simulating everyday use of your app.
|
1 2 3 4 5 6 7 8 9 10 11 12 13 14 15 16 17 18 19 20 21 22 23 24 25 26 27 28 29 30 31 32 33 34 35 36 37 38 39 40 41 42 43 44 45 46 47 48 49 50 51 52 53 54 55 56 57 58 59 60 61 |
package demo; import org.junit.jupiter.api.*; import org.openqa.selenium.WebDriver; import org.openqa.selenium.chrome.ChromeDriver; import java.util.concurrent.TimeUnit; public class RepeatedTestsInJUnit { WebDriver driver; String urlToTest ="https://www.lambdatest.com/"; @BeforeAll public static void start() { System.out.println("=======Starting junit 5 tests========"); } @BeforeEach public void setup() { System.out.println("Setting up the drivers"); System.setProperty("webdriver.chrome.driver", "C:\\Users\\Shalini\\Downloads\\Mychromedriver\\chromedriver.exe"); driver = new ChromeDriver(); } @RepeatedTest(value=7,name="{displayName} {currentRepetition}/{totalRepetitions}") @DisplayName("Repeat_Test") public void launchAndVerifyTitle_Test(RepetitionInfo repetitionInfo) { String methodName = Thread.currentThread() .getStackTrace()[1] .getMethodName(); System.out.println("********Execution of "+methodName+" has been started********"); System.out.println("Launching LambdaTest website started.."); driver.get(urlToTest); driver.manage().window().maximize(); driver.manage().timeouts().pageLoadTimeout(10, TimeUnit.SECONDS); String actualTitle = driver.getTitle(); System.out.println("The page title is "+actualTitle); String expectedTitle ="Most Powerful Cross Browser Testing Tool Online | LambdaTest"; System.out.println("Verifying the title of the webpage started"); Assertions.assertEquals(expectedTitle, actualTitle); System.out.println("The webpage has been launched and the title of the webpage has been veriified successfully"); System.out.println("********Execution of "+methodName+" has ended********"); Assertions.assertEquals(7,repetitionInfo.getTotalRepetitions()); } @AfterEach public void tearDown() { System.out.println("Quitting the browsers has started"); driver.quit(); System.out.println("Quitting the browsers has ended"); } @AfterAll public static void end() { System.out.println("Tests ended"); } } |
Console Output:
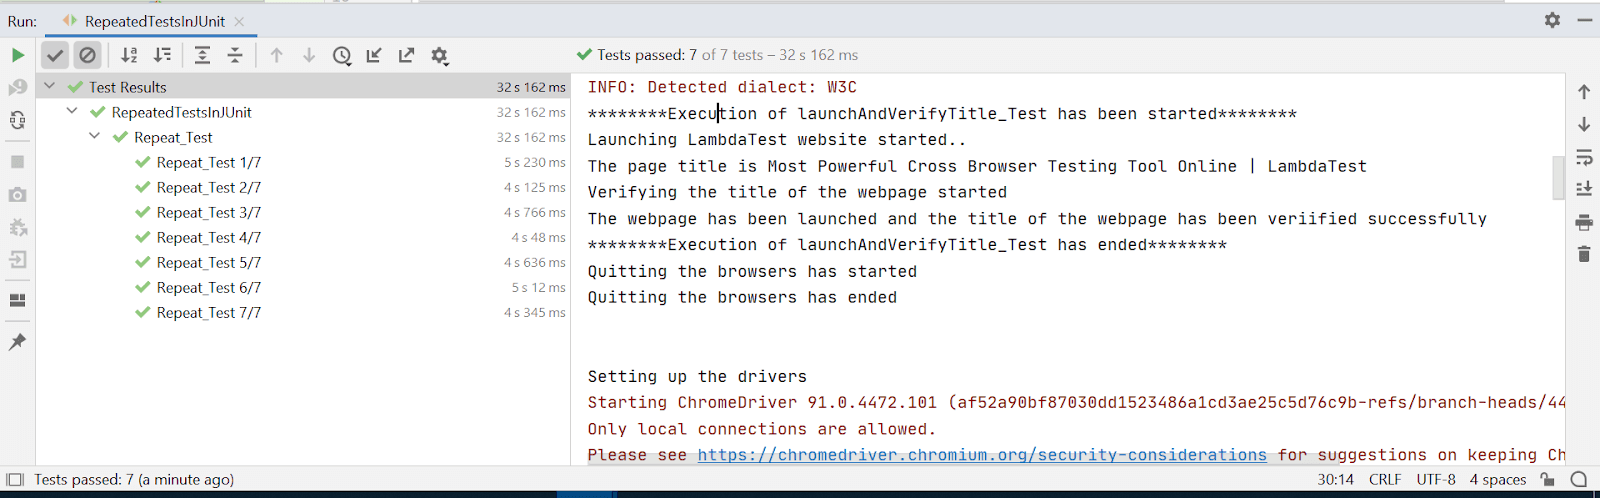
Also read – How To Use @RepeatedTest Annotation In JUnit 5
Running JUnit 5 tests using Jupiter
To run the same JUnit test with multiple inputs, we can use @ParameterizedTest annotation in JUnit 5. While parameterizing the values, the test has to be annotated with @ParameterizedTest instead of @Test.
Scenario: Verify the Login functionality of the website using different sets of credentials to cover valid and negative cases.
For parameterizing the tests, we have to add the below maven dependency in the pom.xml file.
|
1 2 3 4 5 6 |
<dependency> <groupId>org.junit.jupiter</groupId> <artifactId>junit-jupiter-params</artifactId> <version>5.7.1</version> <scope>test</scope> </dependency> |
Pom.xml
|
1 2 3 4 5 6 7 8 9 10 11 12 13 14 15 16 17 18 19 20 21 22 23 24 25 26 27 28 29 30 31 32 33 34 35 36 37 38 39 40 41 42 43 44 |
<?xml version="1.0" encoding="UTF-8"?> <project xmlns="http://maven.apache.org/POM/4.0.0" xmlns:xsi="http://www.w3.org/2001/XMLSchema-instance" xsi:schemaLocation="http://maven.apache.org/POM/4.0.0 http://maven.apache.org/xsd/maven-4.0.0.xsd"> <modelVersion>4.0.0</modelVersion> <groupId>org.example</groupId> <artifactId>SampleJunitTests</artifactId> <version>1.0-SNAPSHOT</version> <properties> <maven.compiler.source>1.8</maven.compiler.source> <maven.compiler.target>${maven.compiler.source}</maven.compiler.target> <junit.jupiter.version>5.7.1</junit.jupiter.version> </properties> <dependencies> <dependency> <groupId>org.junit.jupiter</groupId> <artifactId>junit-jupiter-engine</artifactId> <version>${junit.jupiter.version}</version> <scope>test</scope> </dependency> <dependency> <groupId>org.junit.jupiter</groupId> <artifactId>junit-jupiter-api</artifactId> <version>${junit.jupiter.version}</version> <scope>test</scope> </dependency> <dependency> <groupId>org.seleniumhq.selenium</groupId> <artifactId>selenium-java</artifactId> <version>3.141.59</version> </dependency> <dependency> <groupId>org.junit.jupiter</groupId> <artifactId>junit-jupiter-params</artifactId> <version>5.7.1</version> <scope>test</scope> </dependency> </dependencies> </project> |
Test script for parameterizing our tests.
|
1 2 3 4 5 6 7 8 9 10 11 12 13 14 15 16 17 18 19 20 21 22 23 24 25 26 27 28 29 30 31 32 33 34 35 36 37 38 39 40 41 42 43 44 45 46 47 48 49 50 51 52 53 54 55 56 57 58 59 60 61 62 63 64 65 66 67 68 69 70 71 72 73 74 75 76 77 78 79 80 81 82 83 84 85 86 87 88 |
package demo; import org.junit.jupiter.api.Assertions; import org.junit.jupiter.api.BeforeAll; import org.junit.jupiter.api.BeforeEach; import org.junit.jupiter.params.ParameterizedTest; import org.junit.jupiter.params.provider.Arguments; import org.junit.jupiter.params.provider.MethodSource; import org.openqa.selenium.By; import org.openqa.selenium.WebDriver; import org.openqa.selenium.WebElement; import org.openqa.selenium.chrome.ChromeDriver; import org.openqa.selenium.support.ui.ExpectedConditions; import org.openqa.selenium.support.ui.WebDriverWait; import java.util.concurrent.TimeUnit; import java.util.stream.Stream; import static org.junit.jupiter.params.provider.Arguments.arguments; public class test { WebDriver driver; String urlToTest ="https://www.lambdatest.com/"; @BeforeAll public static void start() { System.out.println("=======Starting junit 5 tests========"); } @BeforeEach public void setup() { System.out.println("Setting up the drivers"); System.setProperty("webdriver.chrome.driver", "C:\\Users\\Shalini\\Downloads\\Mychromedriver\\chromedriver.exe"); driver = new ChromeDriver(); } @ParameterizedTest @MethodSource("userList") public void login_Test(String user,String passwd) { String methodName = Thread.currentThread() .getStackTrace()[1] .getMethodName(); System.out.println("********Execution of "+methodName+" has been started********"); System.out.println("Launching LambdaTest website started.."); driver.get(urlToTest); driver.manage().window().maximize(); driver.manage().timeouts().pageLoadTimeout(10, TimeUnit.SECONDS); WebElement login = driver.findElement(By.xpath("//a[text()='Login']")); login.click(); WebElement username = driver.findElement(By.xpath("//input[@name='email']")); WebElement password = driver.findElement(By.xpath("//input[@name='password']")); WebDriverWait wait = new WebDriverWait(driver,20); wait.until(ExpectedConditions.visibilityOf(username)); username.clear(); username.sendKeys(user); password.clear(); password.sendKeys(passwd); WebElement loginButton = driver.findElement(By.xpath("//button[text()='Login']")); loginButton.click(); driver.manage().timeouts().pageLoadTimeout(10, TimeUnit.SECONDS); String actual = driver.getTitle(); String expected = "Welcome - LambdaTest"; Assertions.assertEquals(expected, actual); System.out.println("The user has been successfully logged in"); System.out.println("********Execution of "+methodName+" has ended********"); } static Stream<Arguments> userList() { return Stream.of( arguments("xxxxxx@gmail.com","abc@123" ), arguments("yyyyyyyy@gmail.com", "one@123") ); } @AfterEach public void tearDown() { System.out.println("Quitting the browsers has started"); driver.quit(); System.out.println("Quitting the browsers has ended"); } @AfterAll public static void end() { System.out.println("Tests ended"); } } |
Running JUnit 5 tests in LambdaTest Grid
Using Selenium along with JUnit is a good option due to its capabilities to run tests on multiple browsers and platforms, providing flexibility in choosing any third-party language.
LambdaTest provides an online cloud platform to perform Selenium automation testing with ease at scale. Automation testing tools like LambdaTest allows you to perform cross browser testing on an online device farm of over 3000+ real devices running real operating systems.
Once you are logged into the website you will be provided with a username and an access key which can be used to run your scripts in the cloud.
Below is the code snippet for executing the JUnit 5 tests using Jupiter in the LambdaTest platform.
|
1 2 3 4 5 6 7 8 9 10 11 12 13 14 15 16 17 18 19 20 21 22 23 24 25 26 27 28 29 30 31 32 33 34 35 36 37 38 39 40 41 42 43 44 45 46 47 48 49 50 51 52 53 54 55 56 57 58 59 60 61 62 63 64 65 66 67 68 69 70 71 72 73 74 75 76 77 78 79 80 81 82 83 84 85 86 87 88 89 90 91 92 93 94 95 96 97 98 99 100 101 102 103 104 105 106 107 108 109 110 111 112 113 114 115 116 117 118 119 120 121 122 123 124 125 126 127 128 129 130 131 132 133 134 135 136 137 138 139 140 141 142 143 144 145 146 147 148 149 150 151 152 153 154 155 156 157 158 159 160 161 162 163 164 165 166 167 168 169 170 171 172 173 174 175 176 177 178 179 180 181 182 183 184 185 186 187 188 189 190 191 192 193 194 195 196 197 198 199 200 201 202 203 |
package demo; import org.junit.jupiter.api.*; import org.openqa.selenium.By; import org.openqa.selenium.WebElement; import org.openqa.selenium.interactions.Actions; import org.openqa.selenium.remote.DesiredCapabilities; import org.openqa.selenium.remote.RemoteWebDriver; import org.openqa.selenium.support.ui.ExpectedConditions; import org.openqa.selenium.support.ui.WebDriverWait; import java.net.MalformedURLException; import java.net.URL; import java.util.ArrayList; import java.util.Arrays; import java.util.List; import java.util.concurrent.TimeUnit; @TestMethodOrder(MethodOrderer.OrderAnnotation.class) public class RunTestsInCloud { String username = "YOUR_USERNAME"; //Enter your username String accesskey = "YOUR_ACCESSKEY"; //Enter your accesskey static RemoteWebDriver driver = null; String gridURL = "@hub.lambdatest.com/wd/hub"; String urlToTest = "https://www.lambdatest.com/"; @BeforeAll public static void start() { System.out.println("=======Starting junit 5 tests in LambdaTest Grid========"); } @BeforeEach public void setup() { System.out.println("Setting up the drivers and browsers"); DesiredCapabilities capabilities = new DesiredCapabilities(); capabilities.setCapability("browserName", "chrome"); //To specify the browser capabilities.setCapability("version", "70.0"); //To specify the browser version capabilities.setCapability("platform", "win10"); // To specify the OS capabilities.setCapability("build", "Running_Junit5Tests_In_Grid"); //To identify the test capabilities.setCapability("name", "JUnit5Tests"); capabilities.setCapability("network", true); // To enable network logs capabilities.setCapability("visual", true); // To enable step by step screenshot capabilities.setCapability("video", true); // To enable video recording capabilities.setCapability("console", true); // To capture console logs try { driver = new RemoteWebDriver(new URL("https://" + username + ":" + accesskey + gridURL), capabilities); } catch (MalformedURLException e) { System.out.println("Invalid grid URL"); } catch (Exception e) { System.out.println(e.getMessage()); } } /*To test the tabs available in the main page like Resources,Documentation,login etc */ @Test @DisplayName("HeaderTabs_Test") @Tag("Smoke") @Order(1) public void headers_Test() { String methodName = Thread.currentThread() .getStackTrace()[1] .getMethodName(); System.out.println("********Execution of "+methodName+" has been started********"); System.out.println("Launching LambdaTest website started.."); driver.get(urlToTest); driver.manage().window().maximize(); driver.manage().timeouts().pageLoadTimeout(10, TimeUnit.SECONDS); List<WebElement> elements = driver.findElements(By.xpath("//*[contains(@class,'md:text-right')]/a")); List<String> actualList = new ArrayList<>(); for(WebElement ele :elements){ actualList.add(ele.getText()); } System.out.println("Actual elements : "+actualList); List<String> expectedList = Arrays.asList("Live","Automation","Pricing","Documentation","Login","Start Free Testing"); System.out.println("Expected elements : "+expectedList); boolean boolval = actualList.equals(expectedList); System.out.println(boolval); Assertions.assertTrue(boolval); System.out.println("********Execution of "+methodName+" has ended********"); } @Test @DisplayName("LTBrowser_Test") @Tag("Smoke") @Order(2) public void click_LTBrowser_Test() { String methodName = Thread.currentThread() .getStackTrace()[1] .getMethodName(); System.out.println("********Execution of "+methodName+" has been started********"); System.out.println("Launching LambdaTest website started.."); driver.get(urlToTest); driver.manage().window().maximize(); driver.manage().timeouts().pageLoadTimeout(10, TimeUnit.SECONDS); driver.findElement(By.xpath("//a[text()='Login']")).click(); driver.findElement(By.xpath("//input[@name=\"email\"]")).sendKeys("successismine514@gmail.com"); driver.findElement(By.xpath("//input[@name=\"password\"]")).sendKeys("Google@123"); driver.findElement(By.xpath("//button[text()='Login']")).click(); driver.manage().timeouts().pageLoadTimeout(20, TimeUnit.SECONDS); List <WebElement> options = driver.findElements(By.xpath("//div[contains(@class,'aside__menu__item')]//a")); for(WebElement ele : options){ if(ele.getText().equals("LT Browser")) { ele.click(); break; } } driver.manage().timeouts().implicitlyWait(20,TimeUnit.SECONDS); String actualText = driver.findElement(By.xpath("//*[@class='lt__demo__box__title']")).getText(); String expectedText = "LT Browser- Desktop App for Fast and Easy Mobile View Testing"; Assertions.assertEquals(expectedText, actualText); System.out.println("The user has been successfully navigated to LT browser page"); System.out.println("********Execution of "+methodName+" has ended********"); } @Test() @DisplayName("editProfile_Test") @Order(3) public void editProfile_Test() { String methodName = Thread.currentThread() .getStackTrace()[1] .getMethodName(); System.out.println("********Execution of "+methodName+" has been started********"); System.out.println("Launching LambdaTest website started.."); driver.get(urlToTest); driver.manage().window().maximize(); driver.manage().timeouts().pageLoadTimeout(10, TimeUnit.SECONDS); driver.findElement(By.xpath("//a[text()='Login']")).click(); driver.findElement(By.xpath("//input[@name=\"email\"]")).sendKeys("successismine514@gmail.com"); driver.findElement(By.xpath("//input[@name=\"password\"]")).sendKeys("Google@123"); driver.findElement(By.xpath("//button[text()='Login']")).click(); driver.manage().timeouts().pageLoadTimeout(20, TimeUnit.SECONDS); driver.findElement(By.id("profile__dropdown")).click(); driver.findElement(By.xpath("//*[@class='profile__dropdown__item']")).click(); String actualTitle = driver.getTitle(); Assertions.assertEquals(actualTitle,"Profile - LambdaTest"); System.out.println("********Execution of "+methodName+" has ended********"); } @Test @DisplayName("ResourcesOption_Test") @Order(4) public void getListOfOptionsUnderResourcesTab() { String methodName = Thread.currentThread() .getStackTrace()[1] .getMethodName(); System.out.println("********Execution of "+methodName+" has been started********"); System.out.println("Launching LambdaTest website started.."); driver.get(urlToTest); driver.manage().window().maximize(); driver.manage().timeouts().pageLoadTimeout(10, TimeUnit.SECONDS); WebElement resources = driver.findElement(By.xpath("//*[text()='Resources ']")); List<WebElement> options_under_resources = driver.findElements(By.xpath("//*[text()='Resources ']/../ul/a")); boolean flag = resources.isDisplayed(); if(flag) { System.out.println("Resources header is visible in the webpage"); Actions action = new Actions(driver); action.moveToElement(resources).build().perform(); WebDriverWait wait=new WebDriverWait(driver, 20); wait.until(ExpectedConditions.visibilityOfAllElements(options_under_resources)); List<String> options = new ArrayList<>(); for(WebElement element : options_under_resources) { options.add(element.getText()); } System.out.println(options); List<String> list = Arrays.asList("Blog", "Certifications", "Learning Hub", "Webinars", "Videos", "Newsletter", "Community", "Case Studies", "Product Updates"); boolean boolval = list.equals(options); System.out.println(boolval); Assertions.assertTrue(boolval); } else { Assertions.fail("Resources header is not visible"); } System.out.println("********Execution of "+methodName+" has ended********"); } @AfterEach public void tearDown() { System.out.println("Quitting the browsers has started"); driver.quit(); System.out.println("Quitting the browsers has ended"); } @AfterAll public static void end() { System.out.println("Tests ended"); } } |
To run this test in the LambdaTest platform:
- Right-click on the test class that you have created in the IDE.
- Click Run. Now the test will be started on the LambdaTest platform.
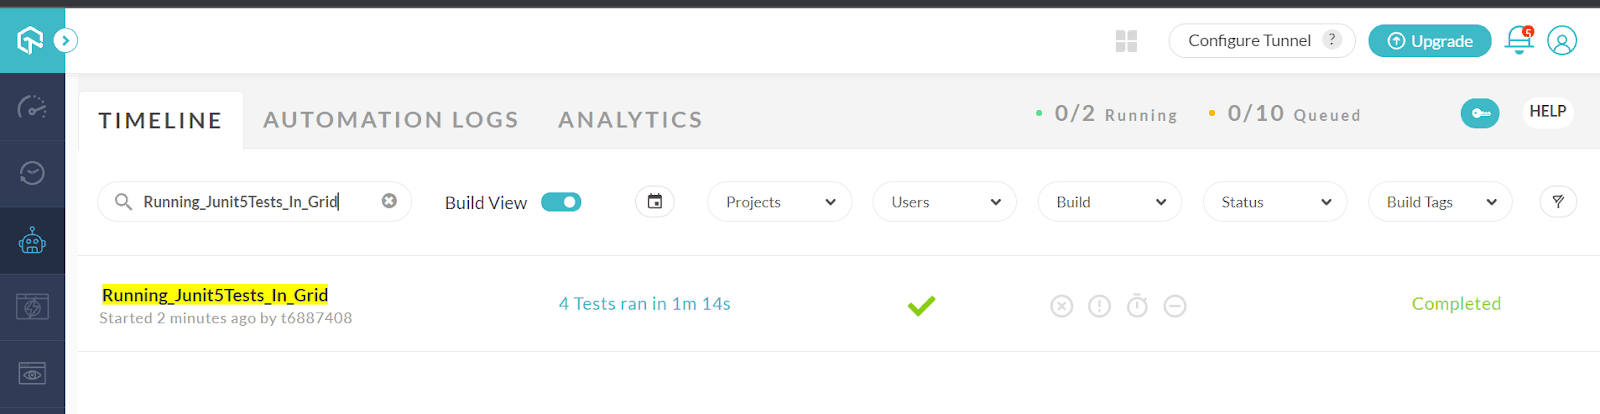
- Once your tests are executed, navigate to your LambdaTest Account in the browser and click Dashboard in the left-hand side panel. This page shows an overview of the tests that are run on the platform.
- Next, click the Automation label in the left-hand side panel. This is the place where you have to identify your executed tests. It contains multiple tests, and to identify the specific test, you have to search using the build name that you have provided in the script.
- In the code above, we have named the build as ” Running_Junit5Tests_In_Grid” and now search for that build. This page also shows the status of your build and the time taken for execution.
- Click the build to view the tests that were run. You can see the test “JUnit5Tests”, which was provided in the script, and this is how we identify our tests in LambdaTest. We will see four tests run in the grid as written in our script. Here you can verify all the test details that have been provided in the script, like the browser, browser version, operating system, and version in which the test was executed. This would be the same as provided in the test script.
As we have enabled video recording in the code, you will see a video attached to the test on this page, which has recorded all the test steps while executing the test.
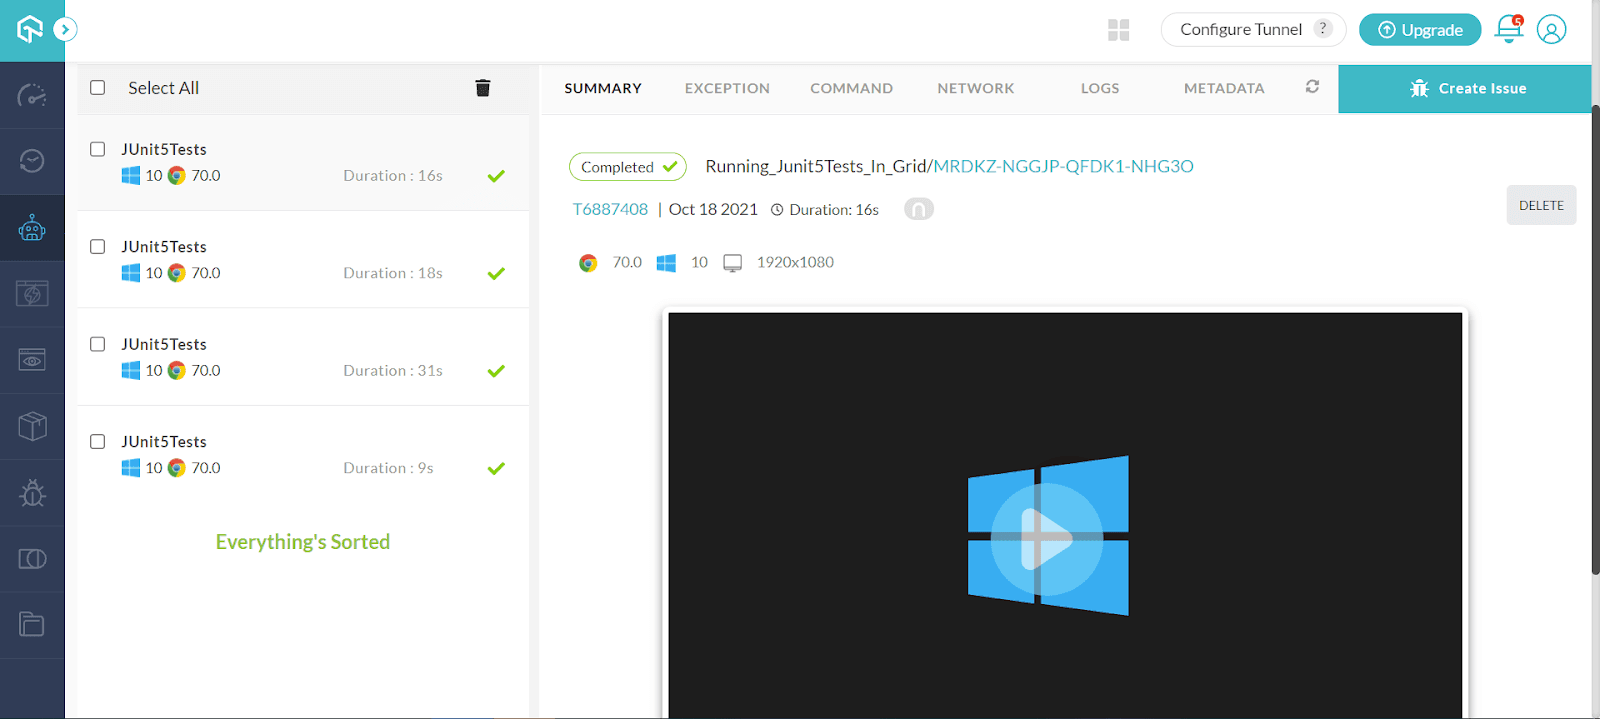
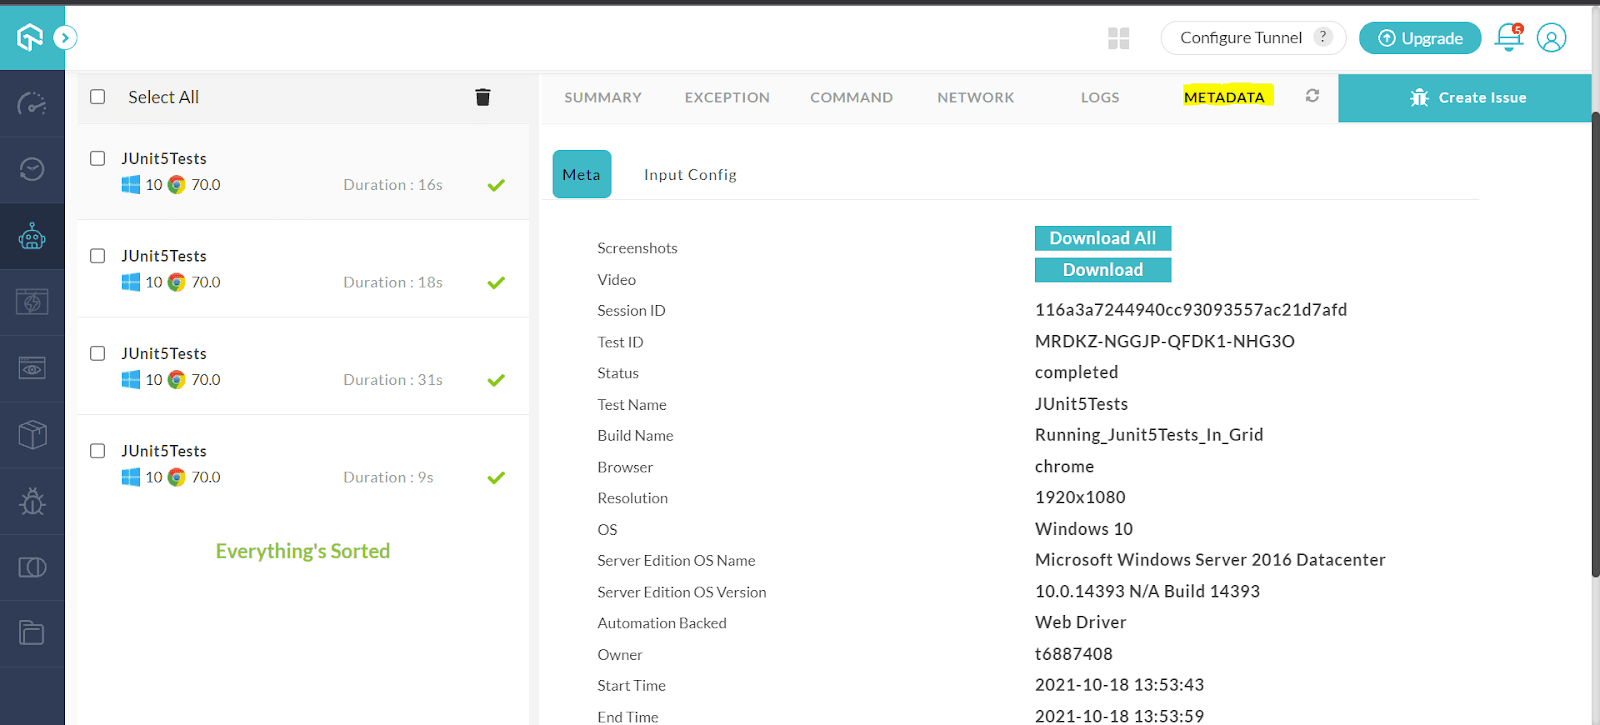
By playing the video, you can view how the tests were executed. In case of failure, this would help analyze the point where the failure has occurred. We can also have a quick view of the tests on the Meta tab.
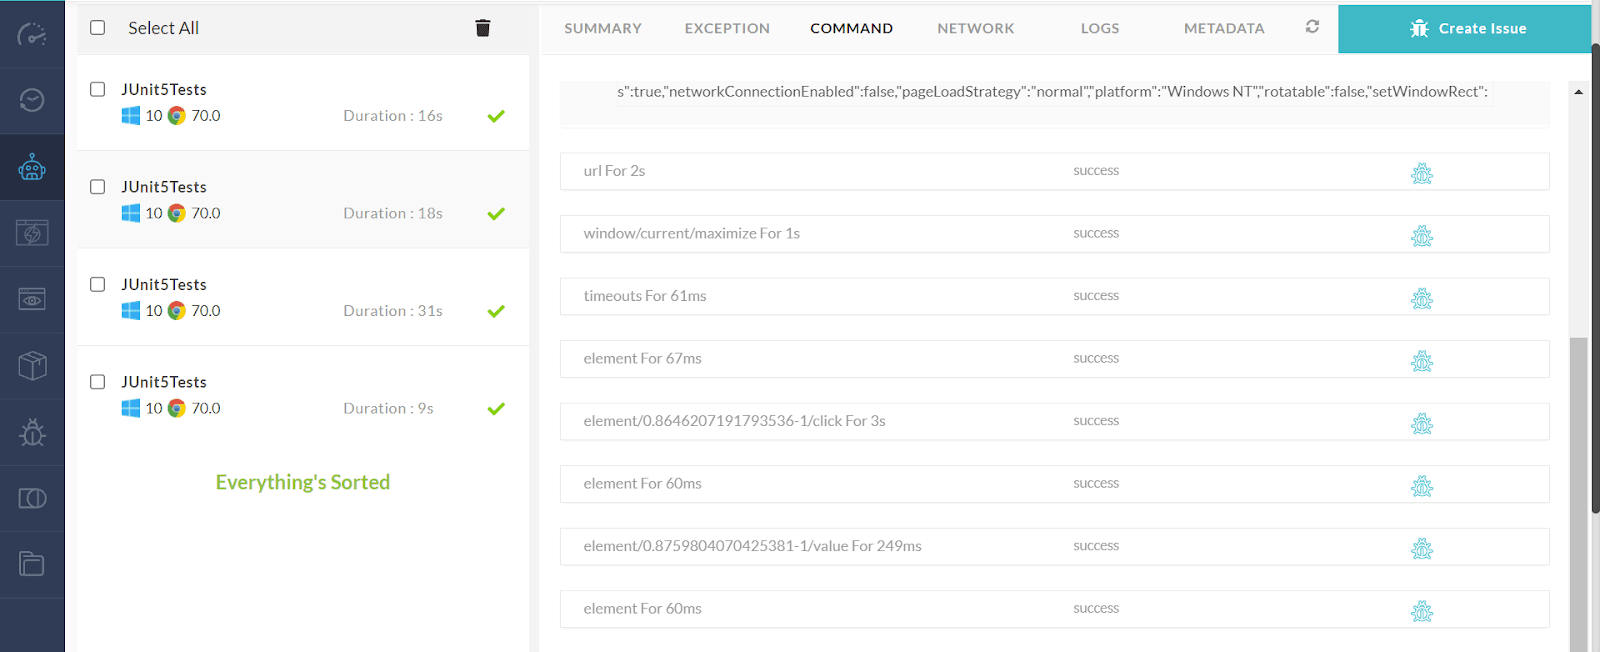
To see the steps executed in a test, click a Test and go to the COMMAND tab. This displays the list of steps that are executed as part of the test.
If the test doesn’t behave as per the expectation as a result of which failure occurs in any step, it can be directly marked as a bug by clicking the Mark Bug icon in the test step.
Console Output:
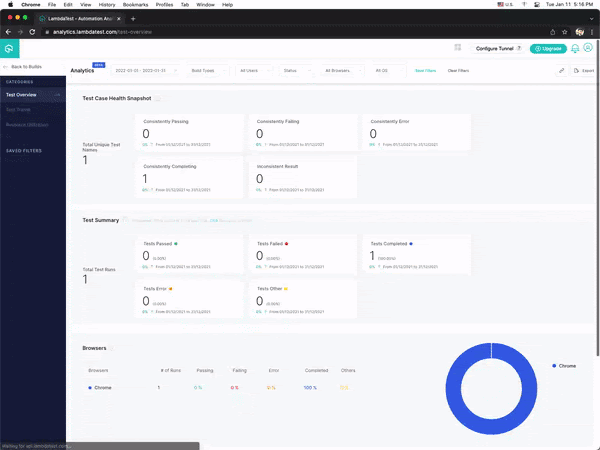
LambdaTest also allows users to get a clear view of the quality and performance of their applications by tracking the health of test cases through LambdaTest Analytics. Visit Analytics under the Automation page to see your failed tests, download a report, and track test progress.
You can go through the following video on JUnit Tutorial for beginners series, to run JUnit tests in parallel in the Selenium cloud using multiple browsers and platforms. The video demonstrates cross-browser testing with JUnit using the LambdaTest platform. By the end of this tutorial video, you will be in a position to run JUnit tests in parallel across different browsers and platforms.
You can also Subscribe to the LambdaTest YouTube Channel and stay updated with the latest tutorials around Selenium testing, Cypress testing, CI/CD, and more.
Finally!
We have reached the end of the article on JUnit Jupiter, and it is time to summarize our understanding here. So far, we have seen a quick introduction to the JUnit framework and the latest version of it, JUnit 5. We have seen how to frame our tests using JUnit 5, the various annotations used in JUnit 5, and the most important part, the execution of JUnit 5 tests using Jupiter for automated browser testing. Now it is time for you to try and explore. I hope you all find this article informative and helpful. I would love to hear your comments on this. Until then, Happy Testing…!
Frequently Asked Questions (FAQs)
What is JUnit Jupiter?
JUnit Jupiter is the next generation testing platform for writing tests in Java 8 and beyond. It provides extension features to unit test base classes, which was not possible in JUnit 3 and JUnit 4.
Is JUnit Jupiter the same as JUnit 5?
The JUnit 4 architecture embraced a monolithic design, where all components of the framework were contained internally within the bundle. The JUnit 5 iteration is based on a separation of concerns and provides APIs to tool developers (Platform) or to users (Jupiter).


Author’s Profile
Shalini Baskaran
Shalini works as a Technical Writer at LambdaTest. She loves to explore recent trends in test automation. Other than test automation, Shalini is always up for travel & adventure.
Blogs: 13
Got Questions? Drop them on LambdaTest Community. Visit now